1
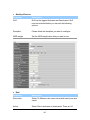
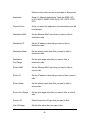
Copyright by Edimax Technology Co, LTD. all rights reserved. No part of this publication may be reproduced, transmitted, transcribed, stored in a retrieval system, or translated into any language or computer language, in any form or by any means, electronic, mechanical, magnetic, optical, chemical, manual or otherwise, without the prior written permission of this Company. This company makes no representations or warranties, either expressed or implied, with respect to the contents hereof and specifically disclaims any warranties, merchantability or fitness for any particular purpose. Any software described in this manual is sold or licensed "as is". Should the programs prove defective following their purchase, the buyer (and not this company, its distributor, or its dealer) assumes the entire cost of all necessary servicing, repair, and any incidental or consequential damages resulting from any defect in the software. Further, this company reserves the right to revise this publication and to make changes from time to time in the contents hereof without obligation to notify any person of such revision or change. The product you have purchased and the setup screen may appear slightly different from those shown in this QIG. For more detailed information about this product, please refer to the User Manual on the CD-ROM. The software and specifications are subject to change without notice. Please visit our web site www.edimax.com for the update. All rights reserved including all brand and product names mentioned in this manual are trademarks and/or registered trademarks of their r e s p e c t i v e h o l d e r s . Notice according to GNU/GPL-Version 2 This product includes software that is subject to the GNU/GPL-Version 2. You find the text of the license on the product cd/dvd. The program is free software and distributed without any warranty of the author. We offer, valid for at least three years, to give you, for a charge no more than the costs of physically performing source distribution, a complete machine-readable copy of the corresponding source code. Please contact Edimax at: Edimax Technology co., Ltd, NO. 3, Wu-Chuan 3rd RD Wu-KuIndustrial Park, Taipei Hsien, Taiwan. R.O.C., TEL : +886-2-77396888, FAX : +886-2-77396887, [email protected] Contents 1. INTRODUCTION .......................................................1 1.1. 1.2. 1.3. 1.4. FEATURES ............................................................................. 2 MINIMUM REQUIREMENTS ................................................... 3 PACKAGE CONTENT ............................................................. 3 HARDWARE PLACEMENT ..................................................... 4 1.4.1. 1.4.2. Rear Panel .................................................................................. 4 Front LEDs ................................................................................. 5 2. HARDWARE INSTALLATION ................................6 3. IP ADDRESS SETTING .............................................7 4. WEB MANAGEMENT CONFIGURATION .........13 4.1. QUICK START ..................................................................... 14 4.2. GENERAL SETUP ................................................................ 18 4.2.1. Internet Setup ............................................................................ 18 4.2.1.1. 4.2.1.2. 4.2.1.3. 4.2.2. Internet Setup .................................................................................................................... 18 LAN .................................................................................................................................. 28 Wireless ............................................................................................................................ 31 Advanced Setup ......................................................................... 38 4.2.2.1. 4.2.2.2. 4.2.2.3. Firewall ............................................................................................................................. 38 Routing ............................................................................................................................. 38 NAT .................................................................................................................................. 40 4.2.2.3.1. 4.2.2.3.2. 4.2.2.3.3. 4.2.2.4. 4.2.2.5. NAT .................................................................................................................................. 41 DMZ ................................................................................................................................. 41 Virtual Server.................................................................................................................... 42 ADSL ................................................................................................................................ 43 QoS ................................................................................................................................... 43 4.2.3. Access Management.................................................................. 47 4.2.3.1. 4.2.3.2. UPnP ................................................................................................................................. 47 DDNS ............................................................................................................................... 47 4.2.3.3. 4.2.3.4. 4.2.3.4.1. ACL .................................................................................................................................. 48 Filter .................................................................................................................................. 50 IP/MAC Filter ................................................................................................................... 51 4.2.3.4.2. Application Filter .............................................................................................................. 53 4.2.3.4.3. URL Filter ......................................................................................................................... 53 4.3. STATUS ............................................................................... 55 4.3.1. 4.3.2. 4.3.3. Device Info ................................................................................ 55 System Log ................................................................................ 56 Statistics .................................................................................... 57 4.4. TOOLS................................................................................. 58 4.4.1. 4.4.2. 4.4.3. 4.4.4. 4.4.5. Administrator ............................................................................ 58 Time Zone ................................................................................. 59 Firmware .................................................................................. 60 System Restart ........................................................................... 61 Diagnostics ............................................................................... 61 Note: The setup images used in this manual are for reference only. The contents of these images may vary according to firmware version. The official image contents are based on the newest firmware version. 1. Introduction The AR-7167WnA/B provides four 10/100 base-T Ethernet ports for user. The device provides high-speed ADSL2+ broadband connection to the Internet or Intranet for high-end users, such as net bars and office users. It provides high performance access to the Internet, downstream up to 24 Mbps and upstream up to 1 Mbps. The device supports WLAN access to the Internet, such as WLAN AP or WLAN device. It complies with IEEE 802.11b/g, IEEE 802.11n specifications, WEP, WPA, and WPA2 security specifications. You can configure the router by running the Setup Wizard in the CD-ROM provided in the package. The wizard provides quick setup for Internet connection, Ethernet WAN Internet connection, SSID, wireless security, firmware upgrade and changing router‟s password. When you start the Setup Wizard, you will get the following Welcome screen. Please choose the language to start with and follow the easy steps in the Wizard. No instruction for the Setup Wizard is given here. If you lost the CD-ROM or you prefer the traditional web setup, please follow the procedures in Manual to configure the router 1 1.1. Features ADSL2/2+ Compliance Support downstream rates of up to 24Mbps and upstream rates of up to 1Mbps. Compliant to ITU-T G.992.1 (G.dmt), G.992.2 (G.lite), G.992.3 (ADSL2), G.992.4 (splitterless ADSL2), G.992.5 (ADSL2+) for Annex A, B. (Annex A and B are supported in different H/W platform) Supports Multi-Mode standard (ANSI T1.413, Issue 2; G.dmt (G.992.1); G.994.1 and G.996.1 (for ISDN only); G.991.1;G.lite (G992.2)). Multiple Protocols over AAL5 (RFC 1483/2684). PPP over AAL5 (RFC 2364). PPP over Ethernet (RFC 2516). Support 802.11n Wireless Access Point Complies with IEEE 802.11b/g/n standards. High data rate – up to 150Mbps network speed. Supports 64-bit/128-bit WEP, WPA-PSK and WPA2-PSK wireless security functions. Supports WPS (WiFi Protected Setup) to easy connect wireless network without configuring the security. Supports MAC address filtering. Router NAT (Network Address Translation) IP Sharing Virtual Server DMZ VPN Pass Through (IPSec/PPTP/L2TP) SPI Anti-DOS Firewall DHCP Server and Client 2 Access Management ACL (Access Control) IP/MAC/Application/URL Filter UPnP (Universal Plug and Play) Dynamic DNS 1.2. Minimum Requirements The following devices are necessary to configure and use the ADSL2+ Router: A PC with Pre-installed Ethernet Adapter (Required) and a Web-Browser (Internet Explorer 4.0 or higher) RJ-45 Ethernet crossover cable (Included in the package) RJ-11 (ADSL Ready) phone Line 1.3. Package Content One ADSL2/2+ Router (Annex A or B) One Power Adapter (12VDC, 1A) One RJ-45 Ethernet Cable (100 cm) One RJ-11 Telephone Line (180 cm) One CD with full User Manual and Quick Installation Guide and Setup Wizard. 3 1.4. Hardware Placement 1.4.1. Rear Panel Item Name Description Antenna The 3dBi dipole antennas. Radio ON/OFF Switch the button to activate or deactivate the wireless functions. Reset / WPS Reset the router to factory default settings (clear all settings) or start WPS function. Press this button and hold for 10 seconds to restore all settings to factory defaults, and press this button for less than 5 seconds to start WPS function. 1-4 The router‟s 4 LAN ports are where you connect your LAN‟s PCs, printer servers, hubs and switches etc. ADSL Connect the supplied RJ-11 telephone line to this port and your ADSL/telephone network. 12V Please plug the power adapter attached with the ADSL Router to the power jack. The power adapter is 12VDC, 1A. 4 1.4.2. Front LEDs On the router‟s front panel there are LED lights that inform you of the router‟s current status. Below is an explanation of each LED and its description. LED Light Status Description PWR (Green) On Router is switched on and correctly powered. WLAN (Yellow) On Off Blinking Wireless LAN WPS is on. Wireless LAN is disabled Wireless traffic is transmitting or receiving ADSL (Green) On Connected to an ADSL DSLAN successfully No connection Blinking LAN LNK/ACT (Port 1-4) The LAN cable is connected to the router No network connection. Network traffic transferring or receiving through the LAN port On Off Blinking 5 2. Hardware Installation Step 1. Connect the ADSL Line Connect the router to your ADSL cable through the supplied RJ-11 telephone line. Step 2. Connect the router to your LAN network Connect the router to your PC, hub or switch by attached the Ethernet cable to the LAN port of the router. Step 3. Connect the Power Adapter to the Router Connect the power adapter to the power jack on the rear panel of router. Step4: Check the ADSL LED on the Router The ADSL LED will be ON if the router is connected to the ADSL cable and receives the ADSL signals successfully. If the LED is blinking, please contact with your ISP (Internet Service Provider) to check the problem. Note: You must use the power adapter shipped along with the router, do NOT use any other power adapter from other sources. 6 3. IP Address Setting Using the router to get into the Internet, the PCs in the network must have Ethernet adapter installed and be connected to the router either directly or through a hub or switch. The TCP/IP protocol of each PC has to been installed and the IP Address of each PC has to be set in the same subnet as the router. The router‟s default IP Address is 192.168.2.1 and the subnet mask is 255.255.255.0. PCs can be configured to obtain IP Address automatically through the DHCP Server of the router or a fixed IP Address in order to be in the same subnet as the router. By default, the DHCP Server of the router is enabled and will dispatch IP Address to PC from 192.168.2.100 to 192.168.2.200. It is strongly recommended to set obtaining IP address automatically. This section shows you how to configure your PC‟s so that it can obtain an IP address automatically for either Windows 95/98/Me, 2000 or NT operating systems. For other operating systems (Macintosh, Sun, etc.), please follow the manual of the operating systems. The following is a step-by-step illustration on how to configure your PC to obtain an IP address automatically for Windows 7, Windows Vista, Windows XP. Windows 7 1. Click the Start button and select Control Panel. Double click Network and Internet and click Network and Sharing Center, the Network and Sharing Center window will appear. 2. Click Change adapter settings and right click on the Local Area Connection icon and select Properties. The Local Area Connection window will appear. 3. Check your list of Network Components. You should see Internet Protocol Version 4 (TCP/IPv4) on your list. Select it and click the Properties button. 7 4. In the Internet Protocol Version 4 (TCP/IPv4) Properties window, select Obtain an IP address automatically and Obtain DNS server address automatically as shown on the following screen. 5. Click OK to confirm the setting. Your PC will now obtain an IP address automatically from your router‟s DHCP server. Note: Please make sure that the router’s DHCP server is the only DHCP server available on your LAN. 8 Windows Vista 1. Click the Start button and select Settings and then select Control Panel. Double click Network and Sharing Center, the Network and Sharing Center window will appear. 2. Click Manage network connections and right click on the Local Area Connection icon and select Properties. The Local Area Connection window will appear. 3. Check your list of Network Components. You should see Internet Protocol Version 4 (TCP/IPv4) on your list. Select it and click the Properties button. 4. In the Internet Protocol Version 4 (TCP/IPv4) Properties window, select Obtain an IP address automatically and Obtain DNS server address automatically as shown on the following screen. 9 5. Click OK to confirm the setting. Your PC will now obtain an IP address automatically from your router‟s DHCP server. Note: Please make sure that the router’s DHCP server is the only DHCP server available on your LAN. 10 Windows XP 1. Click the Start button and select Control Panel and then double click Network Connections. The Network Connections window will appear. 2. Right click on the Local Area Connection icon and select Properties. The Local Area Connection window will appear. 3. Check your list of Network Components. You should see Internet Protocol [TCP/IP] on your list. Select it and click the Properties button. 4. In the Internet Protocol (TCP/IP) Properties window, select Obtain an IP address automatically and Obtain DNS server address automatically as shown on the following screen. 11 5. Click OK to confirm the setting. Your PC will now obtain an IP address automatically from your router‟s DHCP server. Note: Please make sure that the router’s DHCP server is the only DHCP server available on your LAN. 12 4. Web Management Configuration Once you have configured your PCs to obtain an IP address automatically, the router‟s DHCP server will automatically give your LAN clients an IP address. By default the router‟s DHCP server is enabled so that you can obtain an IP address automatically. To see if you have obtained an IP address, see Appendix A. Once your PC has obtained an IP address from your router, enter the default IP address 192.168.2.1 (router‟s IP address) into your PC‟s web browser and press <enter> The login screen below will appear. Enter the “User Name” and “Password” and then click <OK> to login. By default the user name is “admin” and the password is “1234”. For security reasons it is recommended that you change the password as soon as possible. 13 4.1. Quick Start The Quick Start section is designed to get you using the router as quickly as possible. Before configuring the router, please check with your ISP (Internet Service Provider) what kind of the service is provided such as PPPoE, PPPoA or RFC1483/2684. Gather the information as illustrated in the following table and keep it for reference. PPPoE VPI/VCI, VC-based/LLC-based multiplexing, Username, Password (and Service Name). PPPoA VPI/VCI, VC-based/LLC-based multiplexing, Username, Password. RFC1483 Bridged VPI/VCI, VC-based/LLC-based multiplexing to use Bridged Mode. RFC1483 Routed VPI/VCI, VC-based/LLC-based multiplexing, IP Address, Subnet Mask, Gateway Address, and Domain Name System (DNS) IP Address (It is a fixed IP Address). In the Quick Start, click “Run Wizard” to start the configuration. 14 Please follow the steps in the setup wizard to complete the configuration of the Internet connection. Step 1: Set your new password Please enter the new password and confirm the password again. 15 Step 2: Choose your tome zone Please select the tome zone where you are located. Step 3: Set your Internet connection Please check with your ISP the connection type of the ADSL line. 16 Step 4: Input the data supplied by your ISP To know more about the explanation of each setting, please refer to Section 4.2. Step 5: Re-start your ADSL router Click “Next” to save the settings and restart the router. 17 4.2. General Setup Please start your web browser and log onto the web management interface of the router, then click „General Setup‟ button on the left menu, or click „General Setup‟ link at the upper-right corner of web management interface. 4.2.1. Internet Setup 4.2.1.1. Internet Setup 18 ATM VC Parameter Virtual Circuit Description VPI (Virtual Path Identifier) and VCI (Virtual Channel Identifier define a virtual circuit. Status Each PCV can be toggled Activated or Deactivated. VPI VPI is a virtual path determines the way an ATM cell should be routed. The VPI is an 8-bit (in UNI) or 12-bit (in NNI) number that is included in the header of an ATM cell. The valid range for the VPI is 0 to 255. Enter the VPI assigned by the ISP. VCI VCI is the label given to an ATM VC to identify it and determine its destination. The VCI is a 16-bit number that is included in the header of an ATM cell. The valid range for the VCI is 32 to 65535. Enter the VCI assigned by the ISP. QoS Parameter ATM QoS Description UBR (Unspecified Bit Rate) – Select UBR for applications that are non-time sensitive, such as e-mail. CBR (Constant Bit Rate) – This class is used for emulating circuit switching. The cell rate is constant with time. Select CBR to specify fixed (always on) bandwidth for voice or data traffic. rtVBR (real time Variable Bit Rate) – This class is similar to nrtVBR but is designed for applications that are sensitive to cell-delay variation. Examples for real-time VBR are voice with speech activity detection (SAD) and interactive compressed video. 19 nrtVBR (non-real time Variable Bit Rate) – This class allows users to send traffic at a rate that varies with time depending on the availability of user information. Statistical multiplexing is provided to make optimum use of network resources. Multimedia e-mail is an example of nrtVBR. PCR Divide the DSL line rate (bps) by 424 (the size of an ATM cell) to find the PCR (Peak Cell Rate). This is the maximum rate at which the sender can send cells. SCR SCR (Sustain Cell Rate) is the average rate, as measured over a long interval, in the order of the connection lifetime. MBS MBS (Maximum Burst Size) refers to the maximum number of cells that can be sent at the peak rate. Type the MBS, which is less than 65535. Encapsulation The router can be connected to your service provider in any of the following ways. Parameter Description Dynamic IP Address Obtain an IP address automatically from your service provider. Static IP Address Uses a static IP address. Your service provider gives a static IP address to access Internet services. PPPoE/PPPoA PPPoE (PPP over Ethernet) and PPPoA (PPP over ATM) are common connection methods used for xDSL. Bridge Mode Bridge Mode is a common connection method used for xDSL modem. 20 Dynamic IP Address Parameter Encapsulation Description Please check with your ISP the method of multiplexing. In Bridge Mode, please select “1483 Bridge IP LLC” or “1483 Bridge IP VC-Mux”. Bridge Interface This router has built-in ADSL modem and is able to connect to ISP directly. Alternatively, if you want to use the dial up software to manually connect to the ISP, you have to activate the ”Bridge Interface”. Default Route When “Default Router” is enabled, all the packets for destinations not known by the router's routing table are sent to the default route. By default, it is enabled. TCP MSS Option The “TCP MSS Option” enables the configuration of the maximum segment size (MSS) for transient packets that traverse a router, specifically TCP segments in the SYN bit set, when PPPoE is being used in the network. Please specify the MSS range from 100 to 1452 bytes or 0 byte as the default value. NAT NAT (Network Address Translation), an Internet standard that enables a local-area network (LAN) to use one set of 21 IP addresses for internal traffic and a second set of addresses for external traffic. When NAT is enabled, the router will help to make all necessary IP address translations for the PC connected to the router to access the Internet. Dynamic Route Dynamic routing allows routing tables in routers to change as the possible routes change. This router supports RIP1, RIP2-B and RIP2-M protocols for dynamic routing. After the RIP protocol is selected, please choose the RIP direction from “None”, “Both”, “IN Only” or “OUT Only”. IGMP Porxy Enable or disable IGMP proxy feature. When you are done making changes, click on SAVE to save your changes. 22 Static IP Address Parameter Description Encapsulation Please check with your ISP the method of multiplexing. In Static IP Mode, please select “1483 Bridge IP LLC” or “1483 Bridge IP VC-Mux” or “1483 Routed IP LLC(IPoA)” or “1483 Routed IP VC-Mux”. Bridge Interface This router has built-in ADSL modem and is able to connect to ISP directly. Alternatively, if you want to use the dial up software to manually connect to the ISP, you have to activate the ”Bridge Interface”. Default Route When “Default Router” is enabled, all the packets for destinations not known by the router's routing table are sent to the default route. By default, it is enabled. TCP MTU Option MTU (Maximum Transmission Unit) determine the maximum size of each packet in any transmission within the network. Please specify the MTU range from 100 to 1500 bytes or 0 byte as the default value. 23 Static IP Address Enter the IP Address assigned by your ISP. IP Subnet Mask Enter the Subnet Mask assigned by your ISP. Gateway Enter the Gateway assigned by your ISP. NAT NAT (Network Address Translation), an Internet standard that enables a local-area network (LAN) to use one set of IP addresses for internal traffic and a second set of addresses for external traffic. When NAT is enabled, the router will help to make all necessary IP address translations for the PC connected to the router to access the Internet. Dynamic Route Dynamic routing allows routing tables in routers to change as the possible routes change. This router supports RIP1, RIP2-B and RIP2-M protocols for dynamic routing. After the RIP protocol is selected, please choose the RIP direction from “None”, “Both”, “IN Only” or “OUT Only”. IGMP Porxy Enable or disable IGMP proxy feature. When you are done making changes, click on SAVE to save your changes. 24 PPPoE/PPPoA Parameter User Name Description Enter the username exactly as your ISP assigned. Password Enter the password that your ISP has assigned to you. Encapsulation Please check with your ISP the method of multiplexing. In PPPoE/PPPoA mode, please select “PPPoE LLC”, “PPPoE VC-Mux”, “PPPoA LLC”, or “PPPoA VC-Mux”. Bridge Interface This router has built-in ADSL modem and is able to connect to ISP directly. Alternatively, if you want to use the dial up software to manually connect to the ISP, you have to activate the ”Bridge Interface”. 25 Connection Always On – The connection will be kept always on. If the connection is interrupted, the router will re-connect automatically. Connect On-Demand – Only connect when you want to surf the Internet. “Close if idle for xx minutes” is set to stop the connection when the network traffic is not sending or receiving after an idle time. Connect Manually – After you have selected this option, please go to Status page. You will see the “Connect” button, click it and the router will connect to the ISP. If you want to stop the connection, please click “Disconnect” button. TCP MSS Option The “TCP MSS Option” enables the configuration of the maximum segment size (MSS) for transient packets that traverse a router, specifically TCP segments in the SYN bit set, when PPPoE is being used in the network. Please specify the MSS range from 100 to 1452 bytes or 0 byte as the default value. Default Route When “Default Router” is enabled, all the packets for destinations not known by the router's routing table are sent to the default route. By default, it is enabled. Get IP Address Choose Static or Dynamic IP Address. If Static IP is selected, please set the IP Address, Subnet Mask and Gateway obtained from your ISP. Static IP Address Enter the IP Address assigned by your ISP. Only if you chose Static above. IP Subnet Mask Enter the Subnet Mask assigned by your ISP. Only if you 26 chose Static above. Gateway Enter the Gateway assigned by your ISP. Only if you chose Static above. NAT NAT (Network Address Translation), an Internet standard that enables a local-area network (LAN) to use one set of IP addresses for internal traffic and a second set of addresses for external traffic. When NAT is enabled, the router will help to make all necessary IP address translations for the PC connected to the router to access the Internet. Dynamic Route Dynamic routing allows routing tables in routers to change as the possible routes change. This router supports RIP1, RIP2-B and RIP2-M protocols for dynamic routing. After the RIP protocol is selected, please choose the RIP direction from “None”, “Both”, “IN Only” or “OUT Only”. TCP MTU Option MTU (Maximum Transmission Unit) determine the maximum size of each packet in any transmission within the network. Please specify the MTU range from 100 to 1500 bytes or 0 byte as the default value. IGMP Porxy Enable or disable IGMP proxy feature. When you are done making changes, click on SAVE to save your changes. 27 Bridge Mode Parameter Encapsulation Description Please check with your ISP the method of multiplexing. In Bridge Mode, please select “1483 Bridge IP Only LLC” or “1483 Bridge IP Only VC-Mux”. When you are done making changes, click on SAVE to save your changes. 4.2.1.2. LAN This page is used to configure the LAN interface of your ADSL Router. You can set IP address, subnet mask, DHCP Server. 28 LAN Settings Parameter IP Address Description Enter the IP Address of the ADSL router for the local user to access the router‟s web page. By default, the IP Address is 192.168.2.1. IP Subnet Mask Enter the Subnet Mask of the ADSL router. By default, the Subnet Mask is 255.255.255.0. Alias IP Address Alias IP allows you to partition a physical network into logical networks over the same Ethernet interface. Enter the Alias IP Address of the ADSL router for the local user to access the router‟s web page. By default, the IP Address is 192.168.1.1. Alias IP Subnet Mask Enter the Alias IP Subnet Mask of the ADSL router. By default, the Subnet Mask is 255.255.255.0. IGMP Snoop When “IGMP Snoop” (Internet Group Management Protocol Snoop) is enabled, the router can make intelligent multicast forwarding decisions by examining the contents of each frame‟s IP header. Without the function, the router will broadcast the multicast packets to each port and may create excessive traffic on the network and degrade the performance of the network. Dynamic Route Dynamic routing allows routing tables in routers to change as the possible routes change. This router supports RIP1, RIP2-B and RIP2-M protocols for 29 dynamic routing. After the RIP protocol is selected, please choose the RIP direction from “None”, “Both”, “IN Only” or “OUT Only”. DHCP Select whether DHCP is Disabled, Enabled or Relay. Start IP If the DHCP Server is enabled, please set the “Starting IP Address” which will be the first IP Address assigned to the LAN client. By default, the “Starting IP Address” is 192.168.2.100. IP Pool Count You can select a particular IP address range for your DHCP server to issue IP addresses to your LAN Clients. By default, the “IP Pool Count” is 100. The IP range is starting from IP 192.168.2.100 to 192.168.2.199. Lease Time In the Lease Time setting you can specify the time period that the DHCP Server lends an IP address to your LAN clients. The DHCP will change your LAN client‟s IP address when this time threshold period is terminated. DNS Relay A Domain Name System (DNS) server is like an index of IP addresses and Web addresses. If you type a Web address into your browser, such as “www.router.com”, a DNS server will find that name in its index and the matching IP address. Please select “Use Auto Discovered DNS Server Only” to auto set the DNS Server. If there is a DNS server that you would rather to use, please select “Use Discovered DNS Server Only” and you need to specify the IP address of that DNS server. Primary DNS Enter the ISP‟s DNS Server IP Address; or you can specify your own preferred DNS Server IP Address. 30 Secondary DNS This is optional. You can enter another DNS Server‟s IP Address as a backup. The secondary DNS will be used should the Primary DNS fail. IP Address Enter the IP Address and MAC address for the DHCP reservation. 4.2.1.3. Wireless Wireless Settings Parameter Description Access Point Activated or deactivated the wireless function of the router. When it is activated, the router will be an access point for other wireless clients to connect wirelessly. Channel It is the radio channel used by the wireless LAN. All devices in the same wireless LAN should use the same channel. Please select the country you are located and designate a channel that the router will use. For product available in the USA/Canada market, only channel 1~11 can be operated. For product available in Europe market, only channel 1~13 can be operated. Selection of other channels is not permitted. If you want to let the router automatically to find an available channel with the highest signal strength, please select “Auto”. The autoselective channel will be shown in the “Current Channel” field. 31 Beacon Interval The interval of time that this wireless router broadcast a beacon. Beacon is used to synchronize the wireless network. The range for the beacon period is between 20 and 1000 with a typical value of 100 (milliseconds). RTS/CTS Threshold When the packet size is smaller than the RTS threshold, the wireless router will not use the RTS/CTS mechanism to send this packet. The range is from 1500 to 2347. Fragmentation Threshold Fragment Threshold specifies the maximum size of packet during the fragmentation of data to be transmitted. If you set this value too low, it will result in bad performance. Enter a value from 256 to 2346. DTIM Determines the interval the Access Point will send its broadcast traffic. The range is from 1 to 255 and the default value is 3 beacons. Wireless Mode 802.11b – It only allows 802.11b wireless network client to connect this router (maximum transfer rate 11Mbps). 802.11g – It only allows 802.11g wireless network client to connect this router (maximum transfer rate 54Mbps). 802.11b+g – It only allows 802.11b and 802.11g wireless network client to connect this router (maximum transfer rate 11Mbps for 802.11b clients, and maximum 54Mbps for 802.11g clients). 802.11n – It only allows 802.11n wireless network client to connect this router (maximum transfer rate 150Mbps). 802.11g+n – It allows 802.11g, and 802.11n wireless network client to connect this router (maximum transfer 32 rate 54Mbps for 802.11g clients, and maximum 150Mbps for 802.11n clients). 802.11b+g+n – It allows 802.11b, 802.11g, and 802.11n wireless network client to connect this router (maximum transfer rate 11Mbps for 802.11b clients, maximum 54Mbps for 802.11g clients, and maximum 150Mbps for 802.11n clients). NOTE: For 802.11b and 802.11g mode, the signals can be transmitted only by antenna 1 (The antenna in the right side of the rear panel). For 802.11n mode: The router is operating in a 2T3R Spatial Multiplexing MIMO configuration. 2 antennas are for signal transmitting and 3 antennas are for signal receiving. 11n Settings Parameter Channel Bandwidth Description Set channel width of wireless radio. Do not modify default value if you don’t know what it is, default setting is ‘20/40 MHz’. Extension Channel Select the extension channel to above or below the control channel while 40MHz channel bandwidth is selected. Do not modify the default value if you don’t know what it is. Guard Interval It is one of several draft-n features designed to improve 33 efficiency. Select 400nsec to provide a shorter delay between transmission frames in 11n network. The throughput in 400nec guard interval is better than 800nsec guard interval. MCS Select MCS 0-7 to configure the data rate of 11n network. When MCS 7 is selected, the data rate is up to 150Mbps. It is recommended to set “Auto” and the router will negotiate with wireless clients to operate in a proper data rate. SSID Settings Parameter SSID Index SSID Description This router can support multiple SSIDs. By default, this function is disabled. You can only set a set of SSID. The SSID (up to 32 printable ASCII characters) is the unique name identified in a WLAN. The ID prevents the unintentional merging of two co-located WLANs. The default SSID of the router is “default”. Broadcast SSID Select “Yes” to make the SSID to be visible so wireless clients can scan the router within the network. Select “No” if you want to hide the SSID of the router. Wireless clients have to set the same SSID of the router in order to access the network. Use WPS Select “Yes” to enable WPS function, Select “No” to disable WPS. 34 WPS Settings Wi-Fi Protected Setup (WPS) is the simplest way to build connection between wireless network clients and this router. You don‟t have to select encryption mode and input a long encryption passphrase every time when you need to setup a wireless client, you only have to press a button on wireless client and this wireless router, and the WPS will do the setup for you. This router supports two types of WPS: Push-Button Configuration (PBC), and PIN code. If you want to use PBC, you have to switch this wireless router to WPS mode and push a specific button on the wireless client to start WPS mode. You can push Reset/WPS button of this router, or select “PBC” and click “Start WPS” button in the WPS setup page to do this. If you want to use PIN code, you have to know the PIN code of wireless client and switch it to WPS mode, then set the PIN code of the wireless client you wish to connect to this router in the WPS setup page and click “Start WPS” button to start WPS mode. Parameter WPS state Description If the wireless security (encryption) function of this wireless router is enabled, you‟ll see ”Configured” message here. If wireless security function has not been set, you‟ll see „”Unconfigured”. WPS mode When PIN code is selected, you have to enter the 8-digit PIN code of the wireless client you wish to connect to this router. If PBC mode is selected, just click “Start WPS” button to start WPS mode. 35 Authentication Type It‟s very important to set wireless security settings properly. If you don‟t, hackers and malicious users can reach your network and valuable data without your consent and this will cause serious security problem. This router supports WEP, WPA-PSK and WPA2-PSK authentication type. If the router has enabled the authentication, all the wireless clients‟ settings have to be consistent with the router for building the connection. WEP/WPA-PSK/WPA2-PSK and WPA-PSK/WPA2-PSK Parameter Description WEP-64Bits WEP is less level of security than WPA. WEP supports 64-bit and 128-bit key lengths to encrypt the wireless data. The longer key length will provide higher security. When “WEP-64Bits” is selected, you have to enter exactly 5 ASCII characters (“a-z” and “0-9”) or 10 hexadecimal digits ("0-9", "a-f") for each Key (1-4). WEP-128Bits When “WEP-128Bits” is selected, you have to enter exactly 13 ASCII characters (“a-z” and “0-9”) or 26 hexadecimal digits ("0-9", "a-f") for each Key (1-4). WPA-PSK WPA-PSK is suitable for home and small business. It uses TKIP or AES for data encryption. When “WPA-PSK” is selected, please select the encryption method and enter 8-63 ASCII characters or 64 hexadecimal characters as the “Pre-Shared Key”. WPA2-PSK WPA2-PSK is also for home and small business. It uses TKIP or AES for data encryption. WPA2-PSK offers the highest level of security available. When “WPA2-PSK” is selected, please select the encryption method and enter 8-63 ASCII characters or 64 hexadecimal characters as the “Pre-Shared Key”. 36 WPA-PSK/ WPA2-PSK When “WPA-PSK/WPA2-PSK” is selected, please select the encryption method (TKIP or AES) and enter 8-63 ASCII characters or 64 hexadecimal characters as the “Pre-Shared Key”. Wireless MAC Address Filter Parameter Description Active This router can prevent the wireless clients from accessing the wireless network by checking the MAC Address of the clients. If you enable this function, please set the MAC Address of the wireless clients that you want to filter. Action Allow Association – Only allow the wireless clients with the MAC Address you have specified can access to the router. Deny Association – The wireless clients with the MAC Address you have specified will be denied accessing to the router. Mac Address #1-8 Please enter the MAC Address of the wireless clients for the filtering control. 37 4.2.2. Advanced Setup 4.2.2.1. Firewall Parameter Firewall Description When you enable the firewall function, it will protect you from following attacks of WAN side: SPI SYN flooding attack Ping of Death Teardrop Land attack If you enable SPI, all traffics initiated from WAN site will be blocked including DMZ, Virtual Server, etc. 4.2.2.2. Routing 38 Routing Table List You can see the current routing table of the router here. If you want to add another routing rule, please click “ADD ROUTE”. Parameter Dest IP Description Show the IP Address of the destination LAN. Mask Show the Subnet Mask of the destination LAN. If it shows “8” that means the Subnet Mask is “255.0.0.0”; “16” means the Subnet Mask is “255.255.0.0”; “24” means the Subnet Mask is “255.255.255.0”. Gateway IP The next stop gateway of the path toward the destination LAN. This is the IP of the neighbor router that this router should communicate with on the path to the destination LAN. Metric The number of hops (routers) to pass through to reach the destination LAN. It must be between 1 and 15. Device Show the interface that go to the next hop (router), such as LAN port. Use The counter for access time. Edit Edit the route, this icon is not shown for system default route. Drop Drop the route, this icon is not shown for system default route. Add Route If you have another router with a LAN-to-LAN connection, you may need to create a static routing on the router that is the gateway to Internet. 39 Parameter Description Destination IP Address Enter the IP Address of the destination LAN. IP Subnet Mask Enter the Subnet Mask address of the destination LAN. Gateway IP Address This is the gateway IP Address where packets are sent. Enter the gateway IP Address and select the channel (PVC) you want to configure. Metric The number of hops (routers) to pass through to reach the destination LAN. It must be between 1 and 15. 4.2.2.3. NAT 40 4.2.2.3.1. NAT Network Address Translation (NAT) allows multiple users at your local site to access the Internet through a single Public IP Address or multiple Public IP Addresses. NAT provides Firewall protection from hacker attacks and has the flexibility to allow you to map Private IP Addresses to Public IP Addresses for key services such as Websites and FTP. Parameter Description Virtual Circuit Please select the channel (PVC) you want to configure. NAT Status The activated or deactivated status for the NAT function will be shown here. Number of IPs Select “Single” if you only have a public IP Address. 4.2.2.3.2. DMZ The DMZ Host is a local computer exposed to the Internet. When setting a particular internal IP Address as the DMZ Host, all incoming packets will be checked by the firewall and NAT algorithms then passed to the DMZ Host. For example, if you have a local client PC that cannot run an Internet application (e.g. Games) properly from behind the NAT firewall, then you can open the client up to unrestricted two-way Internet access by defining a DMZ Host. Parameter DMZ setting for Description Show the DMZ setting is for single or multiple IP Addresses. DMZ Enable or disable the DMZ function. 41 DMZ Host IP Address Enter a static IP Address to the DMZ Host. This IP Address will be exposed to the Internet. 4.2.2.3.3. Virtual Server Use the Virtual Server function when you want different servers/clients in your LAN to handle different service/Internet application type (e.g. Email, FTP, Web server etc.) from the Internet. Computers use numbers called port numbers to recognize a particular service/Internet application type. The Virtual Server allows you to re-direct a particular service port number (from the Internet/WAN) to a particular LAN private IP Address and its service port number. Parameter Virtual Server for Description Show the Virtual Server setting is for single or multiple IP Addresses. Start Port Number Enter the start port number. End Port Number Enter the end port number. 42 Local IP Address It is recommended to enter a static IP Address for the server here. If the server‟s IP Address is obtained from DHCP Server, the IP Address may be changed dynamically and will cause problem on this feature. Please assign a static IP Address to the server and make sure that the IP Address is not in the range of IP Addresses that the DHCP Server will assign. 4.2.2.4. ADSL ADSL Parameter ADSL Mode ADSL Type Description The default setting is “Auto Sync-Up”. This mode will automatically detect the ADSL mode including ADSL2+, ADSL2, G.DMT, T1.413 and G.lite. If you are not sure how to select the ADSL mode, please contact with your ISP. Check with your ISP about the ADSL type of the DSLAM device they use. 4.2.2.5. QoS 43 Quality of Service Parameter Description QoS QoS can be toggled Activated and Deactivated. QoS must be activated before you can edit the following options. Discipline Please select the discipline you want to configure. WRR weight Set the WRR weight value that you want to use. Rule Parameter Rule Index Description Select 16 different rules, each rule‟s detail can be set and saved Active Select Rule is activated or deactivated. There are 16 44 different rules, each rule can be activated or deactivated. Application Select 11 different applications: There are IGMP, SIP, H.323, MGCP, SNMP, DNS, DHCP, RIP, RSTP, RTCP, RTP. Physical Ports Once you select the application, the associated ports will be displayed. Destination MAC Set the Ethernet MAC value that you want to filter in destination side. Destination IP Set the IP address value that you want to filter in destination side. Destination Mask Set the subnet mask value that you want to filter in destination side. Destination Port Range Set the port range value that you want to filter in destination side. Source MAC Set the Ethernet MAC value that you want to filter in source side. Source IP Set the IP address value that you want to filter in source side. Source Mask Set the subnet mask value that you want to filter in source side. Source Port Range Set the port range value that you want to filter in source side. Protocol ID Select the protocol ID type that you want to filter. Vlan ID Range Set the Vlan value that you want to filter. 45 IPP/DS Field Select IP QoS format. IP Precedence Range Select the IP precedence range. Type of Service Select 5 different type of service. DSCP Range Set the DSCP value that you want to filter 802.1p Set the remarked new 802.1p priority value on the packet that fulfill every detail setting condition of each rule Action Parameter IPP/DS Field Description Select IP QoS format. IP Precedence Remarking Select the remarking value of IP precedence. Type of Service Remarking Select the remarking value of type of service. DSCP Remarking Select the remarking value of DSCP. 802.1p Remarking Select the remarking value of 802.1p. Queue # Select four types of Queue: Low, Medium, High, Highest. 46 4.2.3. Access Management 4.2.3.1. UPnP When the UPnP function is enabled, the router can be detected by UPnP compliant system such as Windows XP. The router will be displayed in the Neighborhood of Windows XP, so you can directly double click the router or right click the router and select “Invoke” to configure the router through web browser. Universal Plug & Play Parameter Description UPnP Activated or deactivated the UPnP function. Auto-configured Select this check box to allow UPnP-enabled applications to automatically configure the router so that they can communicate through the router, for example by using NAT traversal, UPnP applications automatically reserve a NAT forwarding port in order to communicate with another UPnP enabled device; this eliminates the need to manually configure port forwarding for the UPnP enabled application. 4.2.3.2. DDNS DDNS allows you to map the static domain name to a dynamic IP address. You must get an account, password and your static domain name from the DDNS service providers. 47 Dynamic DNS Parameter Dynamic DNS Description Activated or deactivated the DDNS function. Service Provider This router supports DynDNS service provider. My Host Name Enter the domain name assigned to your router by the service provider. E-mail Address Enter the E-mail address assigned by DDNS service provider. Username Enter your username. Password Enter the password you set for the DDNS service. Wildcard Support Enable or disable the wildcard to stand for some characters. 4.2.3.3. ACL If you want to restrict users from accessing certain Internet applications/services such as Internet websites, email, FTP etc., then this is the place to set that configuration. Access Control allows users to define the traffic type permitted in 48 your LAN or WAN. You can control which computer can have access to these services by entering the IP Address of the computer. ACL Parameter ACL Description Activate or deactivate the Access Control function. When you have activated the function, please do make sure that you have designated the available applications/services or you will be denied to access all the services. Access Control Editing Parameter Description ACL Rule Index This is the item number to record the setting rule. Active Toggle the ACL rule on or off with Yes or No, respectively. Secure IP Address The default 0.0.0.0~0.0.0.0 allows any user to use this service to remotely manage the router. Type a range of IP Addresses to authorize access to a number of users with matching IP Addresses. 49 Application Choose the services that you permit to use in your LAN or WAN interface. These services include Web, FTP, Telnet, SNMP and Ping. Interface Select the interface that the user is allowed to use services through it. It includes LAN, WAN or Both. Access Control Listing Access Control Listing is a list of all the rules you have set for access control. When you are done making changes, click on SET to save your changes, DELETE to delete the rule with the parameters you set or CANCEL to exit without saving. 4.2.3.4. Filter You can forbid some users accessing to the router by filtering the users through IP Address or MAC Address. You can also restrict some applications or URLs be accessing by users through the router here. Please select the Filter Type to start configuring. 50 4.2.3.4.1. IP/MAC Filter Rule Type Parameter Rule Type Selection Description Select the rule type of type of filter. IP / MAC Filter Rule Editing Parameter Description IP/MAC Filter Rule This is the item number to record the setting rule. Index Active Select “Yes” to enable the current rule, select “No” to cancel the current rule. 51 Interface Select which channel (PVC) to configure. Direction Select the access to the Internet (Outgoing) or from the Internet (Incoming), or Both. Rule Type Select to filter through the IP Address or MAC Address. Source IP Address Enter the start IP Address which will be monitored. If “0.0.0.0” is set, it means for any IP Address. Subnet Mask Enter the Subnet Mask based on the Source IP Address. Port Number LAN users use port number to distinguish one network application over another such as 21 is for FTP service. The port number range is from 0 to 65535. It is recommended that this option be configured by an advanced user. Destination IP Address Enter the start IP Address which will be monitored. If “0.0.0.0” is set, it means for any IP Address. Subnet Mask Enter the Subnet Mask based on the Destination IP Address. Port Number This is the port or port ranges that define the application. Protocol It is the packet protocol type used by the application. Please select “TCP”, “UDP” or “ICMP”. For example, FTP service, you have to select “TCP”. IP / MAC Filter Listing The IP/MAC Filter Listing will list the IP/MAC Filter rules you have configured. You can review the settings here. When you are done making changes, click on SET to save your changes, DELETE to delete the rule with the parameters you set or CANCEL to exit without saving. 52 4.2.3.4.2. Application Filter Application Filter Editing Parameter Description Application Filter Activate or deactivate the application filter. ICQ/MSN/YMSG/Real If “Allow” is selected, the packets for these applications Audio/Video will be able to pass through the router. If you want to restrict these applications, please select “Deny”. When you are done making changes, click on SAVE to save your changes, DELETE to delete the rule with the parameters you set or CANCEL to exit without saving. 4.2.3.4.3. URL Filter 53 URL Filter Editing Parameter Description Active Activate or deactivate the URL filter. URL Index This is the item number to record the setting. Individual active Select “Yes” to enable the individual active, select “No” to cancel the individual active. URL(host) A URL can be thought of as the "address" of a web page and is sometimes referred to informally as a "web address." Please enter the web address here that you want to restrict to be connected. URL Filter Listing The URL Filter Listing will list the URL you have configured. You can review the settings here. When you are done making changes, click on SAVE to save your changes, DELETE to delete the rule with the parameters you set or CANCEL to exit without saving. 54 4.3. Status The status screens give you information about various aspects of your ADSL router’s settings. 4.3.1. Device Info In this page, you can know the device information including firmware, MAC Address, LAN and WAN settings and also the ADSL line status. 55 4.3.2. System Log Display system logs accumulated up to the present time. You can also save the logs for future reviewing. 56 4.3.3. Statistics Show the statistics of transmit and receive packets on the LAN port, ADSL line or WLAN port. 57 4.4. Tools 4.4.1. Administrator Parameter Username Description The username of the router is “admin” by default. New Password Enter up to 30-digit of the new password. Confirm Password Enter the new password again to confirm the setting. When you are done making changes, click on SAVE to save your changes, DELETE to delete the rule with the parameters you set or CANCEL to exit without saving. 58 4.4.2. Time Zone The Time Zone allows your router to set its time; this will affect function such as System Log. Parameter Description Current Date/Time Show the current date/time of the router. Synchronize time with NTP Server Automatically – Set the time by following with a NTP Server. PC‟s Clock – Set the time the same as your computer. Manually – Set the time manually. Time Zone Select the time zone of the country you are currently in. The router will set its time based on your selection. Daylight Saving Select this option if it is in daylight savings time. NTP Server Address Enter the IP Address of your time server. When you are done making changes, click on SAVE to save your changes, DELETE to delete the rule with the parameters you set or CANCEL to exit without saving. 59 4.4.3. Firmware If you have new firmware for some features update, please upgrade firmware of the router here. Parameter New Firmware Location Description Type in the location of the new firmware or click “Browse” to find it. Romfile Backup To save the current settings as a backup file, please click “ROMFILE SAVE”. Then please change the file name and select the location you want to save the file. Status The status of the firmware upgrades function. Upgrade Click “Upgrade” to begin the upgrade processes or backup file restoring processes. After the router is restarted, the processes are completed. It might take several minutes, don't power off the router during upgrading or restoring. 60 4.4.4. System Restart In this page, you can restart your router or restore to factory defaults. If you wish to restart the router using the factory default settings, select “Factory Default Settings” to reset to factory defaults. You can also click the “Reset” button in the rear panel of the router over 5 seconds to reset default settings. 4.4.5. Diagnostics This page allows you to diagnose the connectivity of the LAN and WAN network. 61 Federal Communication Commission Interference Statement This equipment has been tested and found to comply with the limits for a Class B digital device, pursuant to Part 15 of FCC Rules. These limits are designed to provide reasonable protection against harmful interference in a residential installation. This equipment generates, uses, and can radiate radio frequency energy and, if not installed and used in accordance with the instructions, may cause harmful interference to radio communications. However, there is no guarantee that interference will not occur in a particular installation. If this equipment does cause harmful interference to radio or television reception, which can be determined by turning the equipment off and on, the user is encouraged to try to correct the interference by one or more of the following measures: 1. Reorient or relocate the receiving antenna. 2. Increase the separation between the equipment and receiver. 3. Connect the equipment into an outlet on a circuit different from that to which the receiver is connected. 4. Consult the dealer or an experienced radio technician for help. FCC Caution This device and its antenna must not be co-located or operating in conjunction with any other antenna or transmitter. This device complies with Part 15 of the FCC Rules. Operation is subject to the following two conditions: (1) this device may not cause harmful interference, and (2) this device must accept any interference received, including interference that may cause undesired operation. Any changes or modifications not expressly approved by the party responsible for compliance could void the authority to operate equipment. Federal Communications Commission (FCC) Radiation Exposure Statement This equipment must be installed and operated in accordance with provided instructions and a minimum 20 cm spacing must be provided between computer mounted antenna and person‟s body (excluding extremities of hands, wrist and feet) during wireless modes of operation. The equipment version marketed in US is restricted to usage of the channels 111 only. R&TTE Compliance Statement This equipment complies with all the requirements of DIRECTIVE 1999/5/EC OF THE EUROPEAN PARLIAMENT AND THE COUNCIL of March 9, 1999 on radio equipment and telecommunication terminal Equipment and the mutual recognition of their conformity (R&TTE) The R&TTE Directive repeals and replaces in the directive 98/13/EEC (Telecommunications Terminal Equipment and Satellite Earth Station Equipment) As of April 8, 2000. Safety This equipment is designed with the utmost care for the safety of those who install and use it. However, special attention must be paid to the dangers of electric shock and static electricity when working with electrical equipment. All guidelines of this and of the computer manufacture must therefore be allowed at all times to ensure the safe use of the equipment. EU Countries Intended for Use 62 The ETSI version of this device is intended for home and office use in Austria, Belgium, Denmark, Finland, France, Germany, Greece, Ireland, Italy, Luxembourg, Bulgaria, Cyprus, Czech Republic, Estonia, Hungary, Latvia, Lithuania, Malta, Poland, Romania, Slovakia, Slovenia, the Netherlands, Portugal, Spain, Sweden, and the United Kingdom. The ETSI version of this device is also authorized for use in EFTA member states: Iceland, Liechtenstein, Norway, and Switzerland. EU Countries not intended for use None A declaration of conformity is available on www.edimax.com N2037 9 63 64