1
Quick start guide
CD180
Important safety instructions
•
•
•
•
Use only the power adapter listed in the technical data.
Do not allow the product to come into contact with liquids.
Risk of explosion if battery is replaced by an incorrect type.
Dispose of used batteries according to the instructions. (Refer to the user manual online)
Overview
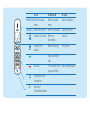
Earpiece
Microphone
• Find handsets.
• Register additional
handsets.
In call
In idle mode
Enter the option
menu
menu
REDIAL/C Enter the redial list Enter the redial list
Increase the volume Enter the
phonebook
Decrease the
Enter the call log
volume
Make and receive
calls
End calls
Turn handset on/off
(press and hold)
Mute/unmute the
microphone
R
Recall key*
*network dependent
MENU/OK Enter the option
In menu
Confirm selection
Cancel operation
Scroll up
Scroll down
Exit menu/operation
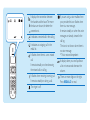
It displays the connection between
the handset and the base. The more
the bars are shown, the better the
connection is.
It indicates a received call in the call log.
It indicates an outgoing call in the
redial list.
It flashes when there is a new missed
call.
It remains steadily on when browsing
the missed calls in call log.
It flashes when receiving incoming call.
It remains steadily on during a call.
The ringer is off.
If you are using a voice mailbox from
your provider, this icon flashes when
there is a new message.
It remains steadily on when the voice
messages are already viewed in the
call log.
The icon is not shown when there is
no voice message.
* This is network dependent
It displays when you scroll up/down
a list or increase and decrease the
volume.
There are more digits on the right.
Press REDIAL/C to read.
1
Connect
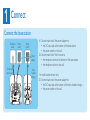
Connect the base station
Telephone
socket
Power
socket
1 Connect each end of the power adapter to:
Power
socket
Power
adapter
Telephone
base station
2
1
3
Extra
handset
charger
• the DC input jack at the bottom of the base station;
• the power socket on the wall.
2 Connect each end of the line cord to:
• the telephone socket at the bottom of the base station;
• the telephone socket on the wall.
For multi-handset version only:
3 Connect each end of the power adapter to:
• the DC input jack at the bottom of the extra handset charger.
• the power socket on the wall.
2
Get started
Configure your phone
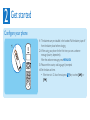
1 The batteries are pre-installed in the handset. Pull the battery tape off
from the battery door before charging.
2 When using your phone for the first time, you see a welcome
message (country dependent).
After the welcome message, press MENU/OK.
3 Please set the country and language if prompted.
4 Set the date and time.
• If the time is in 12-hour format, press / key to select [AM] or
[PM].
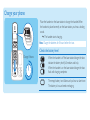
Charge your phone
Place the handset on the base station to charge the handset. When
the handset is placed correctly on the base station, you hear a docking
sound.
»» The handset starts charging.
Note Charge the batteries for 8 hours before first use.
Check the battery level
Charge 8 hours
When the handset is off the base station/charger, the bars
indicate the battery level (full, medium and low).
When the handset is on the base station/charger, the bars
flash until charging completes.
The empty battery icon flashes and you hear an alert tone.
The battery is low and needs recharging.
3
Enjoy
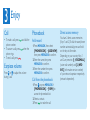
Call
• To make a call, press
and dial the
phone number.
• To answer a call, press
when the
phone rings.
• To end a call, press
.
Earpiece volume
Press or to adjust the volume
during a call.
Phonebook
Add record
1 Press MENU/OK, then select
[PHONEBOOK] > [ADD NEW],
then press MENU/OK to confirm.
2 Enter the name, then press
MENU/OK to confirm.
3 Enter the number, then press
MENU/OK to confirm.
Call from the phonebook
1 Press or, press MENU/OK >
[PHONEBOOK] > [VIEW] to
access the phonebook list.
2 Select a contact.
3 Press
to make the call.
Direct access memory
You have 2 direct access memories
(Keys 1 and 2). To dial the saved phone
number automatically, press and hold
on the keys in idle mode.
Depending on your country, Keys 1
and 2 are preset to [1_VOICEMAIL]
(voice mail number) and [2_INFO
SVC] (information service number)
of your network operator respectively
(network dependent).
Call log
Redial list
To make a call
To make a call
To view more details
To save a call record to the
phonebook
1 Press
2 Press
and select a record.
.
2 Press MENU/OK.
3 Select [VIEW].
To save a call record to the
phonebook
2 Press MENU/OK.
3 Select [Save number].
4 Press MENU/OK to confirm.
5 Enter the name.
6 Press MENU/OK to confirm.
7 Press MENU/OK to save.
To delete a call record
2 Press MENU/OK.
3 Select [Delete] or [Delete all].
4 Press MENU/OK to confirm.
1 Press REDIAL/C and select a record.
2 Press
.
2 Press MENU/OK.
3 Select [Save number].
4 Press MENU/OK to confirm.
5 Enter the name.
6 Press MENU/OK to confirm.
7 Press MENU/OK to save.
To delete a call record
2 Press MENU/OK.
3 Select [Delete] or [Delete all].
4 Press MENU/OK to confirm.
Register the handsets
You can register additional handsets to
the base station. The base station can
register up to 4 handsets.
1 Press MENU/OK on the handset.
2 Select [SERVICES] > [Register],
then press MENU/OK to confirm.
3 Press and hold
on the base
station for 5 seconds.
4 Enter the system PIN (0000).
5 Press MENU/OK to confirm the PIN.
»» Registration is completed in less
than 2 minutes.
Restore default settings
You can reset your phone settings to the original factory
settings.
1 Press MENU/OK.
2 Select [SERVICES] > [Reset], then press
MENU/OK to confirm.
»» The handset displays a confirmation request.
3 Press MENU/OK to confirm.
»» All settings are reset
»» The welcome screen displays.
Technical data
Battery
• CORUN: 2 x AAA NiMH 1.2V Rechargeable 500mAh
batteries
• SANIK: 2 x AAA NiMH 1.2V Rechargeable 500mAh
batteries
Power adapter
Base and charger:
• Philips:
SSW-1920EU-2/SSW-1920UK-2/S003PV0600050/
S003PB0600050:
Input: 100-240V 50/60Hz 0.2A;
Output: 6V 500mA
Frequently asked
questions
No signal bar displays on the
screen.
• The handset is out of range. Move it
closer to the base station.
• If the handset displays
[Unregistered], register your
handset (See the section on Register
the handsets).
If I fail to register the additional
handsets to the base station,
what do I do?
Your base memory is full. Unregister the
unused handsets and try again.
No dialing tone
• Check your phone connections.
• The handset is out of range. Move it
closer to the base station.
I cannot change the settings of
my voice mail, what do I do?
The voice mail service is managed by
your service provider but not the phone
itself. Contact your service provider to
change the settings.
The handset on the charger
does not charge.
• Ensure the batteries are inserted correctly.
• Ensure the handset is placed properly
on the charger. The battery icon
animates when charging.
• The charging contacts are dirty.
Disconnect the power supply first and
clean the contacts with a damp cloth.
• Batteries are defective. Purchase new
ones from your dealer.
No display
• Ensure the batteries are charged.
• Ensure there are power and phone
connections.
Bad audio (crackles, echo, etc.)
• The handset is nearly out of range.
Move it closer to the base station.
• The phone receives interference from
the nearby electrical appliances. Move
the base station away from them.
• The phone is at a location with thick
walls. Move the base away from them.
The handset does not ring.
Ensure the handset ringtone is turned on.
The caller ID does not display.
• The service is not activated. Check
with your service provider.
• The caller’s information is withheld or
unavailable.
Welcome to Philips
Register your product at www.philips.com/welcome
Need help?
User manual / Online help
www.philips.com/support
Reproduction in whole or in part is prohibited without the written
consent of the copyright owner.
Trademarks are the property of Koninklijke Philips Electronics N.V. or
their respective owners.
© 2011 Koninklijke Philips Electronics N.V.
All rights reserved.
0168
QSG_CD180_05_EN_V3.0
wk10464