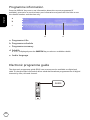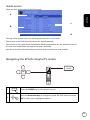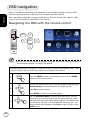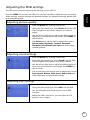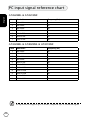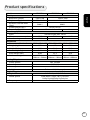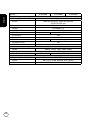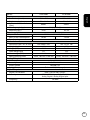
1
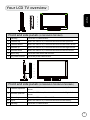
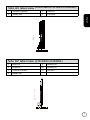
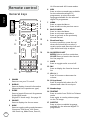
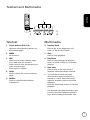
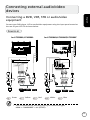
Acer LCD TV
Contents
AT2618MF
AT3218MF
AT2628ML
AT3228ML
AT4028ML
Important safety instructions-----------------------------------------------3
User Guide
General keys---------------------------------------------------------------------------------8
Teletext and Multimedia-----------------------------------------------------------------9
Disposal instructions-----------------------------------------------------------------------4
Your LCD TV overview---------------------------------------------------------5
Front and side panels---------------------------------------------------------------------5
Rear panel view-----------------------------------------------------------------------------6
Side AV label view-------------------------------------------------------------------------7
Remote control------------------------------------------------------------------8
Basic connections------------------------------------------------------------ 10
Connecting the power cord----------------------------------------------------------- 10
Setting up the remote control------------------------------------------------------- 10
Enjoying analog and digital TV------------------------------------------- 10
Connecting an antenna/cable-------------------------------------------------------- 10
Getting started watching your TV-------------------------------------------------- 11
Wall mount preparation / removing the base------------------------ 12
Connecting external audio/video devices----------------------------- 13
Connecting a DVD, VCR, STB or audio/video equipment-------------------- 13
Connecting a camera, camcorder or game console--------------------------- 14
Connecting a PC or notebook computer------------------------------------------ 15
Connecting a USB storage device--------------------------------------------------- 15
Selecting the input source------------------------------------------------------------- 16
Playing multimedia files from a USB storage device---------------- 17
Connecting a USB storage device--------------------------------------------------- 17
Navigating in the multimedia screen---------------------------------------------- 17
Channel controls-------------------------------------------------------------- 20
Channel list--------------------------------------------------------------------------------- 20
Favourite channel list------------------------------------------------------------------- 21
Programme information--------------------------------------------------------------- 22
Electronic programme guide--------------------------------------------------------- 22
OSD navigation--------------------------------------------------------------- 24
Navigating the OSD with the remote control----------------------------------- 24
Adjusting the OSD settings------------------------------------------------------------ 25
OSD menus--------------------------------------------------------------------- 27
Picture settings---------------------------------------------------------------------------- 27
Sound settings----------------------------------------------------------------------------- 28
PAP function------------------------------------------------------------------------------- 29
Options settings-------------------------------------------------------------------------- 29
Timer settings----------------------------------------------------------------------------- 31
Lock settings------------------------------------------------------------------------------- 31
Setup the TV------------------------------------------------------------------------------- 32
Special functions------------------------------------------------------------- 34
Troubleshooting-------------------------------------------------------------- 35
PC Input Signal Reference Chart----------------------------------------- 36
Product specifications------------------------------------------------------- 37
1
© 2011 All Rights Reserved.
English
Acer LCD TV User Guide
Original Issue: 06/2011
Model Number:
Serial Number:
Purchase Date:
Place of Purchase:
HDMI, the HDMI logo and High-Definition Multimedia Interface are trademarks or registered trademarks of HDMI Licensing LLC.
DVB is a registered trademark of the DVB Project.
2
Important safety instructions
Read these instructions carefully. Please put them somewhere safe for future reference.
1. Only use attachments/accessories specified by the manufacturer.
English
2. Use only with the cart, stand, tripod, bracket, or table specified
by the manufacturer, or sold with the apparatus. When a cart is
used, use caution when moving the cart/ apparatus combination
to avoid injury from tip-over.
3. Unplug this apparatus during lightning storms or when unused
for long periods of time.
4. Do not install this equipment in a confined space such a book
case or similar unit.
5.
WARNING
To prevent the spread of fire, keep candles or other open flames away from this
apparatus at all times.
6. If the remote control will not to be used for a long time, remove the batteries. Use
the remote control carefully. Do not drop the remote control on the floor. Keep it
away from moisture, direct sunlight, and high temperatures.
7. Batteries shall not be exposed to excessive heat from sunshine, fire or other heat
sources. Used or discharged batteries must be properly disposed of or recycled in
compliance with all applicable laws. For detailed information, contact your local solid
waste disposal authority.
8. Follow all warnings and instructions marked on the product.
9. Unplug this product from the wall outlet before cleaning. Do not use liquid cleaners
or aerosol cleaners. Use a damp cloth for cleaning.
10.The apparatus shall not be exposed to drips or splashes. No objects filled with liquids,
such as vases, shall be placed on the apparatus.
11.Do not place this product on an unstable cart, stand or table. The product may fall,
sustaining serious damage.
12.Slots and openings are provided for ventilation; to ensure reliable operation of the
product and to protect it from overheating, these openings must not be blocked or
covered. The openings should never be blocked by placing the product on a bed,
sofa, rug or other similar surface. This product should never be placed near or over
a radiator or heat register or in a built-in installation unless proper ventilation is
provided.
13.This product should be operated from the type of power indicated on the marking
label. If you are not sure of the type of power available, consult your dealer or local
power company.
14.Do not allow anything to rest on the power cord. Do not locate this product where
the cord will be stepped on.
15.If an extension cord is used with this product, make sure that the total ampere rating
of the equipment plugged into the extension cord does not exceed the extension
cord ampere rating. Also, make sure that the total rating of all products plugged into
the wall outlet does not exceed the fuse rating.
16.Never push objects of any kind into this product through cabinet slots as they may
touch dangerous voltage points or short-out parts, which could result in a fire or
electric shock. Never spill liquid of any kind on the product.
17.Do not attempt to service this product yourself, as opening or removing covers may
expose you to dangerous voltage points or other risks. Refer all servicing to qualified
service personnel.
18.Unplug this product from the wall outlet and refer servicing to qualified service
3
personnel under the following conditions:
a.When the power cord or plug is damaged or frayed.
b.If liquid has been spilled into the product.
c. If the product has been exposed to rain or water.
English
d.If the product does not operate normally when the operating instructions are
followed. Adjust only those controls that are covered by the operating instructions.
Improper adjustment of other controls could result in damage; extensive work by
a qualified technician might then be required to restore the product to normal
condition.
e.If the product has been dropped or the case has been damaged.
f. If the product exhibits a distinct change in performance, indicating a need for
service.
19.Use only the proper type of power supply cord set (provided in your accessories box)
for this unit. Always disconnect the power cord from the wall outlet before servicing
or disassembling this equipment.
20.Do not overload an electrical AC outlet, power strip, or convenience receptical. The
overall system load must not exceed 80% of the branch circuit rating. If power strips
are used, the load should not exceed 80% of the power strip input rating.
21.Some products are equipped with a three-wire electrical grounding-type plug that
has a third pin for grounding. This plug only fits into a grounded electrical outlet.
This is a safety feature. Make sure the AC outlet is properly grounded. Do not defeat
the safety purpose of the grounding-type plug by trying to insert it into a nongrounded outlet. If you cannot insert the plug into the outlet, contact your electrician
to replace the obsolete outlet.
22.Do not use this LCD TV in the workplace in accordance with BildscharbV, and
maintain ample distance from it when watching. Watching a big-screen TV too close
can cause eyestrain.
23.This TV is designed for home entertainment purposes only. Make sure there is
sufficient distance between you and the TV when you are viewing content to avoid
harming your eyes.
24. Where the mains plug or power cable is used to disconnect power, the cable or plugs
shall remain readily accessible.
The grounding pin is an important safety feature. It is possible to receive an electric shock
from a system that is not properly grounded.
The grounding pin is also providing good immunity ability against unexpected noise that
interferes performance of this product and is produced by other nearby electrical devices.
Disposal instructions
Do not throw this electronic device into the rubbish bin / container when
discarding. To minimize pollution and ensure utmost protection of the global
environment, please recycle.
For more information regarding WEEE, please refer to
http://global.acer.com/about/environmental.htm
Соответствует сертификатам, обязательным в РФ
(Compliant with Russian regulatory certification)
4
UA.TR.002
Your LCD TV overview
English
1
2
3
4
5
6
7
Front and side panels (AT2618MF/AT3218MF)
1
Standby
Turns the TV ON and OFF.
2
Channel up
When the OSD is on, functions the same as the Up arrow.
3
Channel down
When the OSD is on, functions the same as the Down arrow.
4
Volume up
When the OSD is on, functions the same as the Right arrow.
5
Volume down
When the OSD is on, functions the same as the Left arrow.
6
Menu key
Turns the OSD menu ON and OFF.
7
AC power button
Turns the power ON and OFF.
8
9
10
11
12
Front and side panels (AT2628ML/AT3228ML/AT4028ML)
8
Channel up/down
When the OSD is on, functions the same as the Up/Down
arrow.
9
Volume up/down
When the OSD is on, functions the same as the Right/Left
arrow.
10 Menu key
Turns the OSD menu ON and OFF.
11 Input
When the OSD is on, functions the same as the OK key.
12 Standby
Turns the TV ON and OFF.
5
English
Rear panel view (AT2618MF/AT3218MF/AT2628ML)
1
AV (SCART)
5
PC Audio L/R
2
COMPONENT-in + Audio-in L/R
6
HDMI 2 port
3
VGA-in
7
Antenna/Cable-in
4
SPDIF out
Y
PB
SPDIF
OUT
PR
HDMI2
L
ANT/RF
R
D-SUB
SCART
1
COMPONENT
2
AUDIO
PC IN
3 4 5
Rear panel view (AT3228ML/AT4028ML)
8
COMPONENT-in + Audio-in L/R
11
Antenna/Cable-in
9
PC Audio L/R
12
VGA-in
10
AV (SCART)
PR
6
PB
Y
R
L
COMPONENT
PC AUDIO
IN
SCART
ANT/RF
D-SUB
8
9
10
11
12
6
7
Side AV label view (AT2618MF/AT3218MF/AT2628ML)
1
Common interface
3
USB port
2
HDMI1 port
4
Earphone
English
1
2
3
4
Side AV label view (AT3228ML/AT4028ML)
SPDIF out
9
HDMI2 port
6
Earphone
10
HDMI3 port
7
Common interface
11
USB port
8
HDMI1 port
8
COMMON INTERFACE
10
HDMI3
11
USB
9
HDMI1
7
HDMI2
5
6
SPDIF
OUT
5
7
16:9 format and 4:3 format modes.
Remote control
English
General keys
2
1
4
SOURCE
DISPLAY
GUIDE
WIDE
MPX
3
5
6
CANCEL
7
BACK
MENU
10
OK
9
8
11
MUTE
FAV
12
13
VOL
CH
14
15
16
SUBTITLE
TELETEXT
INDEX
SIZE
HOLD
17
REVEAL
1 POWER
Press to turn your TV on/off.
2 DISPLAY
Press to display channel information
(dependent on input/source type).
3 GUIDE
Press to launch Electronic Programme
Guide (EPG) mode
(Digital TV mode only). See page 22.
4 SOURCE
Press to display the Source menu.
5 WIDE
Press to toggle scaling mode between
Cinerama, 14:9 Zoom, 16:9 Zoom,
16:9 Zoom up, Wide Zoom, Zoom 2,
8
6 MPX
Press to select a sound type available
for the selected analogue TV
programme; to select an audio
langugae available for the selected
digital TV programme.
7 MENU
Press to open the Menu.
Press to back to the previous menu.
8 BACK/CANCEL
Press to close the Menu.
Press to exit some operations.
Press to go back to the previously
viewed channel.
9 Directional keys
In menu operation, press the up/
down directional keys to select a
certain option and press the left and
right directional keys to adjust.
10 OK/ENTER/CH LIST
ENTER: Press to confirm a selection.
CH LIST: Press to launch the channel
list. See page 20.
11 MUTE
Press to toggle audio on and off.
12 FAV
Press to display the favorite channel
list.
13 VOL (+/-)
Press to increase or decrease the
volume.
14 CH (up/down)
Press to sequentially select the TV
channel and other source input.
15 Number keys
16 TELETEXT
Press to switch from TV/AV to Teletext
mode.
Press again to overlay teletext page
on the TV image.
17 SUBTITLE
Press to select a subtitle language
available for the selected digital TV
programme.
Teletext and Multimedia
English
1
2
3
INDEX
SIZE
HOLD
REVEAL
5
4
Teletext
Multimedia
1 Colour buttons (R/G/Y/B)
Operates corresponding button on
the teletext page.
2 Previous Track
Press to go to the beginning of a
track, or the previous track.
2 INDEX
No function.
3 Stop
Press to stop playback.
3 SIZE
Press once to zoom teletext page
to 2X and view the top part.
Press twice to view the bottom part
of 2X teletext page.
Press again to resume.
4 Play/Pause
Press to start playing the selected
track, or pause a track if it is already
playing.
4 HOLD
Press to pause the current teletext
page.
5 Next track
Press to skip to the next track if
multiple tracks have been selected.
*
You may use the left and right
directional buttons to advance or
rewind in a track. Press the button
again to increase how fast the track
advances.
Press the Play/Pause button to resume
playback.
The left and right directional keys also
function as rewind and fast-forward
keys when viewing multimedia files.
5 REVEAL
Press to reveal hidden teletext
information.
9
Basic connections
Connecting the power cord
English
1 Connect the AC cord into the AC input on the back of the set.
2 Connect the plug to the wall outlet as shown.
Setting up the remote control
1 Open the cover on the bottom of the remote unit.
2 Insert two AA batteries (supplied) to match the polarity indicated inside the battery
compartment.
Enjoying analog and digital TV
Connecting an antenna/cable
Connect the antenna cable to the appropriate antenna terminal on the back of the TV
set as shown below.
Tuner
10
Getting started watching your TV
1
English
2
4
3
1
1 Power
Press the power button on the remote control or TV set.
2 Installation Guide
The first time you switch on the TV, you will be asked to select the language and
scan for channels.
Press the OK key to begin the setup process.
Step 1. Select the setup language you prefer.
You can also adjust these settings using the side control panel. Please see "Front
and side panels" on page 5 for details.
Step 2.
Step 3.
Step 4.
Step 5.
Step 6.
Step 7.
Please select the correct country for signal reception.
Select the correct tuner mode.
Ensure that your co-axial cables are connected correctly before proceeding.
Scan for digital channels and analog channels.
Select Home mode.
Setup is now complete. You are ready to begin watching TV.
3 Changing channels
a. Press 0 - 9 on the remote control to select a channel. The channel changes after 2
seconds. Press OK to select the channel immediately.
b. Pressing the channel ( CH ) up / down button on the remote control will also
change the channel.
4 Adjusting the volume
Adjust the volume level using the ( VOL ) up/down button on the remote control.
Setup may vary due to local broadcast differences.
11
English
Wall mount preparation /
removing the base
Caution: Disassemble the base carefully otherwise the plastic parts and/or TV
body may be damaged.
1) Remove the base.
2) Remove the screws from inside the stand.
AT2618MF/AT3218MF
2
1
AT2628ML/AT3228ML/AT4028ML
3
2
1
3) Assemble the wall mount following the instructions included with the wall mount.
12
Connecting external audio/video
devices
English
Connecting a DVD, VCR, STB or audio/video
equipment
Connect your DVD player, VCR or audio/video equipment using the input ports located at
the rear of your LCD TV as shown below.
Source-in
for AT2628ML/AT2618MF/AT3218MF
USB
HDMI3
HDMI2
HDMI1
COMMON INTERFACE
SPDIF
OUT
for AT3228ML/AT4028ML
PR
PB
Y
R
L
COMPONENT
PC AUDIO
IN
SCART
ANT/RF
D-SUB
Y
PB
SPDIF
OUT
PR
HDMI2
L
ANT/RF
R
D-SUB
SCART
COMPONENT
R B G R W
AUDIO
PC IN
G B R R W
D-Sub
D-Sub
COMPONENT
VGA
AV
PC-Audio in
SCART
HDMI
AUDIO
COMPONENT
SCART
VGA
AV
PC-Audio in
G
D-Sub
B R R
W
G
D-Sub
or
DVD
PC
B R R
W
or
VCR
or
STB
DVD
PC
Green
HDMI
AUDIO
Yellow
Red
White
or
VCR
STB
Blue
* Acer recommends the following priority for connection types:
HDMI -> COMPONENT -> AV (SCART).
13
TV-out
for AT2628ML/AT2618MF/AT3218MF
HDMI2
HDMI1
COMMON INTERFACE
English
SPDIF
OUT
for AT3228ML/AT4028ML
PR
PB
R
Y
L
PC AUDIO
IN
SCART
ANT/RF
Y
D-SUB
HDMI3
COMPONENT
PB
SPDIF
OUT
USB
PR
HDMI2
L
ANT/RF
R
D-SUB
SCART
COMPONENT
AUDIO
PC IN
EARPHONE
EARPHONE
SCART
SCART
SPDIF
Recorder
SPDIF
AV
Recorder
AV
Connecting a camera, camcorder or game console
Connect your camera or camcorder to the video/audio ports on the TV set as shown
below.
for AT2628ML/AT2618MF/AT3218MF
USB
HDMI3
HDMI2
HDMI1
COMMON INTERFACE
SPDIF
OUT
for AT3228ML/AT4028ML
PR
PB
Y
R
L
COMPONENT
PC AUDIO
IN
SCART
ANT/RF
D-SUB
Y
PB
SPDIF
OUT
PR
HDMI2
L
ANT/RF
R
D-SUB
SCART
R B G R W
G
14
AUDIO
B R R
W
AUDIO
PC IN
G B R R W
COMPONENT
AV
COMPONENT
HDMI
COMPONENT
AV
G
AUDIO
B R R
W
HDMI
Connecting a PC or notebook computer
To display PC output on your TV, connect your PC or notebook computer to the TV as
shown below.
D-Sub
English
for AT3228ML/AT4028ML
for AT2628ML/AT2618MF/
AT3218MF
D-Sub
D-Sub
D-Sub
For VGA connections, Acer recommends setting your PC’s external monitor
resolution to 1920 x 1080 pixels @ 60 Hz refresh rate for AT3218MF/AT3228ML/
AT4028ML and 1366 x 768 pixels @ 60 Hz refresh rate for AT2618MF/AT2628ML.
Connecting a USB storage device
To display multimedia content on your TV, connect the USB device to the TV as shown
below.
15
Selecting the input source
Once you have connected your antenna or external equipment to the TV, you need to
select the correct input source.
English
Press the SOURCE button on the remote control to display the Source menu. Use the up/
down directional keys to navigate the list and press OK to confirm the input you wish to
watch: TV/CMP/AV/VGA/HDMI1/HDMI2/HDMI3 (HDMI3 only for AT3228ML/AT4028ML).
SOURCE
16
Playing multimedia files from a USB
storage device
English
Connecting a USB storage device
Connect the USB storage device to the USB port on your TV, the TV will enter the media
center menu directly.
Supported file formats:
Photo
JPG, JPEG
Music
MP3, AC 3, LPCM, ADPCM, AAC, MPEG
Video
AVI, MPEG1, MPEG2, H.264 BP/MP/HP, MPEG4 SP/ASP
Note: Some USB keys and USB products like digital cameras or mobile phones
are not fully compatible with USB 2.0 standard so it may not work with the TV
multimedia player. Not all USB devices are compatible with the multimedia player.
Navigating in the multimedia screen
There are three main areas of the multimedia screen:
a
b
c
a. Media type bar
The top of the screen shows the type of media being viewed: Photo, Music or Video.
b. Navigation menu
The middle of the screen shows the contents of the USB device. Use the directional keys
and press OK to open a file or folder. Some information of the selected file appears on
the left. Press the MENU button to display the options: Sort, Edit and Parser.
Sort: sorting files or folders.
Edit: including the Copy, Paste and Delete options.
Parser: Selecting Recursive to display all the files of the selected media type.
Note: Only files that match the selected media type are displayed.
17
Press the BACK button to return to the folder that contains the folder being viewed.
c. File option bar
English
The bottom of the screen shows addition options for the file being viewed, such as volume
level or functions for the buttons on the remote control.
Note: When playing a file, the top bar will disapper. When playing a movie or
viewing photos, the bottom bar will disappear after a short delay. Press MENU
to display it.
View Photo
Select a picture and press OK to open it. Picture files will be shown in a slideshow. Press OK
or Play/Pause to pause the display on a specific photo.
Press the MENU key to display the information bar at the bottom.
Press the MENU key again to display the options list and use up/down to select an option and
left/right to adjust.
To rotate a picture, press OK to pause on the picture and then press MENU to display the
options list. Select Rotate and press OK repeatedly to rotate clockwise.
Press BACK to return to the folder navigation list.
Listen to Music
Select a music file and press OK to open it. Press OK or Play/Pause to pause a track.
Press Previous (‘Index’) / Next (‘Reveal’) to skip to the previous track or advance to the next
track in the folder.
18
Press the MENU key to display the options list and use up/down to select an option and
left/right to adjust. The menu includes the Audio Only option. Select it and press OK, you
can listen to music with the screen turned off. Press any key to exit the audio only mode.
Press the left and right directional keys to advance or rewind in a track.
Press BACK to return to the folder navigation list and preview screen.
English
Watch video
Select a movie file and press OK to open it. Press OK or Play/Pause to pause a movie.
Press the MENU key to display the information bar at the bottom.
Press the MENU key again to diplay the options list and use up/down to select an option
and left/right to adjust.
You may use the left and right directional keys to advance or rewind in a movie. Press the
key again to increase how fast the track advances or rewinds.
Press BACK to return to the folder navigation list and preview screen.
Leaving multimedia storage display
Repeatedly press BACK to exit the USB storage.
Warning: Do not remove the USB storage device while a media file is playing.
Stop playback and switch to a different source before removing the device from
the USB port.
19
Channel controls
English
Channel list
Channel list allows you to quickly find the TV channel you are searching for.
OK
TELETEXT
SUBTITLE
To open the channel list feature:
1
2
OK
Press the OK key on the remote control. This will
bring up the channel list menu.
The current channel will be highlighted.
Use the up/down directional keys to navigate the
list and select the channel you wish to watch.
3
Use the red key to switch to the tuner mode
selection menu and press up/down to switch
between Antenna and Cable.
Use the yellow key to switch to the channel list
selection menu and press up/down to switch
between the All, TV, Radio and Free channel lists.
Use the blue key to exit the list.
20
Favourite channel list
The favourite channel list allows you to store your favourite TV channels and flick
between them at the touch of a button.
English
Viewing your favourite channels
On the remote control, if you press the FAV key, the TV
will display a list of favourite TV channels. Use the up or
down directional keys to select a channel, and then press
OK.
FAV
To set a favourite channel, follow the steps described on this page.
Storing favourite channels
FAV
1
Press the FAV key on the remote control. This will bring
up the favourite channel list.
The Favourite list will be shown. Press OK to select,
delete or add a favourite channel.
2
3
BACK
OR
FAV
Press either the BACK key or FAV key on the remote
control to exit.
21
Programme information
English
Press the DISPLAY key once to see information about the current programme (if
available), press twice to see the lower part information and press the third time to see
the channel number and the time only.
a
b
c
d
e
a. Programme title
b. Programme schedule
c. Programme summary
d. Subtitle
If ‘STTL’ is displayed press the SUBTITLE key to select an available subtitle.
e. Audio language
Electronic programme guide
The electronic programme guide (EPG) is an onscreen service available on digital and
cable TV that provides information about scheduled broadcast programmes on all digital
channels by time, title and channel.
GUIDE
22
Guide screen
There are four main areas of the EPG screen:
a
English
c
b
d
The top of the screen shows the viewing date and the current time.
The section on the left shows all names for digital channels.
The section on the right shows information about programmes for the selected channel:
the start and finish times, any age rating and a summary.
Use the up or down directional keys to switch to the previous or next channel.
Navigating the EPG (for Digital TV mode)
GUIDE
OK
1
2
GUIDE
Press the GUIDE key on the remote control.
Use the directional keys to navigate around the EPG menu and press
OK to select your highlighted option.
23
OSD navigation
Many of the advanced settings and adjustments are available through using the OSD
(onscreen display) menus, as shown in the example screenshot below.
English
Basic operations required to navigate these menus (Picture, Sound, PAP, Options, USB,
Timer, Lock and Setup) are described in this section.
Navigating the OSD with the remote control
MENU
OK
You can also interact with these menus using the right panel controls. Please see
"Front and side panels" on page 5 for details.
There are eight main OSD menus. These are: Picture, Sound, PAP, Options, USB, Timer,
Lock and Setup. Use the following method to navigate these menus.
1
MENU
Press the MENU button on the remote control or the MENU
button on the control panel.
Select your desired menu by using the up/down and left/right
directional keys to switch between the eight menus.
2
Press OK to enter a menu.
Press MENU to return to the main menus.
3
24
Use the directional keys to interact with the menu. The up /
down directions will scroll through the menu options, while
left/right will adjust the different settings (for example, in the
Picture menu, settings such as Brightness, Contrast, etc.). For
some options with submenu, press OK or right to enter. Press
BACK to exit.
Adjusting the OSD settings
The OSD can be used for adjusting the settings of your LCD TV.
English
Press the Menu key to open the OSD. You can use the OSD to adjust the picture quality,
audio settings, channel settings and general settings. For advanced settings, please refer
to the following page:
Adjusting picture quality
1 Press the Menu key to bring up the OSD.
Picture
Picture preset
Brightness
Contrast
Saturation
Sharpness
ECO dynamic back light
Color temperature
Screen mode
Auto format
Advanced video
ECO
Auto
Normal
16:9 format
On
50
90
55
4
2 Using the directional keys, select Picture from the OSD.
Then navigate to the picture element you wish to
adjust.
3 Use the left or right keys to adjust the sliding scales or
select one of the preset picture modes. Press MENU to
save and exit.
4 The Picture menu can be used to adjust the current
Picture preset, Brightness, Contrast, Saturation,
Sharpness, ECO dynamic back light and other imagerelated qualities.
Adjusting sound settings
1 Press the Menu key to bring up the OSD.
2 Using the directional keys, select Sound from the OSD.
Then navigate to the feature you wish to adjust.
3 Use the left or right keys to adjust the sliding scales or
select one of the preset sound modes. Press MENU to
save and exit.
4 The Sound menu can also be used to adjust the current
Sound preset, Balance, Wide stereo, Audio delay and
other important sound-related settings.
Adjusting PAP settings
1 Press the Menu key to bring up the OSD.
2 Using the directional keys, select PAP from the OSD.
3 Use the left/right directional keys to turn on PAP
function.
4 When the PAP is turned on, you can adjust the TV
position: Left or Right.
25
Adjusting options settings
1 Press the Menu key to bring up the OSD.
English
2 Using the directional keys, select Options from the
OSD. Then navigate to the feature you wish to adjust.
3 The Options menu can be used to adjust the screen
Subtitle, Decoding page language, Digital teletext
language and other important settings.
Adjusting timer settings
1 Press the Menu key to bring up the OSD.
2 Using the directional keys, select Timer from the OSD.
Then navigate to the feature you wish to adjust.
3 The Timer menu can be used to select the Time zone,
Clock and Sleep timer.
Adjusting lock settings
1 Press the Menu key to bring up the OSD.
2 Using the directional keys, select Lock from the OSD.
Then navigate to the feature you wish to adjust.
3 The Lock menu can be used to adjust the Channel lock,
Parental rating, Input block, Front panel lock and other
important settings.
Adjusting setup settings
1 Press the Menu key to bring up the OSD.
2 Using the directional keys, select Setup from the OSD.
Then navigate to the feature you wish to adjust.
3 The Setup menu can be used to adjust the Language,
Country, Tuner mode, Channel install and other
important settings.
26
The options available on the OSD may vary depending on the TV signal source
and model. Some digital options may not be available with an analog signal and
vice versa.
OSD menus
English
Picture settings
Open the Picture menu as described in the OSD navigation section. This menu provides
the following settings:
Picture preset
This TV provides preset viewing modes designed to give you the best picture quality when
watching a particular kind of programme. These provide preset values for brightness,
contrast, hue colour and sharpness. There are pre-defined audio and video settings for
optimal enjoyment of the following viewing modes: ECO, Vivid, Studio, Personal, Movie.
Mode
Information
ECO
ECO mode allows you to watch your favourite channels while reducing
power requirements.
Vivid
Vivid mode allows you to watch your favourite channels with brilliant
image via adaptive brightness and contrast adjustments for bright
surroundings.
Studio
Studio mode allows you to watch your favourite channels with dark
imagery via adaptive brightness and contrast adjustments.
Personal
Personal mode allows you to save your favourite video settings.
Movie
For comfortably enjoying movies at home, Movie mode displays dim
scenes in clear detail; compensates for colour; and smoothly presents
motion images. This is accomplished through optimal Gamma correction
plus saturation, brightness and contrast adjustments.
Brightness
Change the brightness of the image.
Contrast
Change the contrast of the image.
Saturation
Change the colour depth of the image.
Sharpness
Change the sharpness of the image.
ECO dynamic back light
This setting adjusts the power saving mode. You can set it to Auto, High, Middle and Low
depending on your preference.
27
Color temperature
This setting adjusts the color temperature of the image. You can set it to Normal, Warm,
Cool depending on your preference.
English
Screen mode
This setting adjusts the screen mode of the image. You can set it to Cinerama, 14:9
Zoom, 16:9 Zoom, 16:9 Zoom up, Wide Zoom, Zoom 2, 16:9 format and 4:3 format modes
depending on your preference.
Auto format
Turn on or off auto format function.
Advanced video
This setting adjusts the video quality.
Sound settings
Open the Sound menu as described in the OSD navigation section. This menu provides
the following settings:
Sound preset
This TV provides preset audio modes designed to give you the best sound quality when
listening to a particular kind of programme. These provide preset values for treble
and bass. There are pre-defined audio and video settings for optimal enjoyment of the
following scenarios: Rock, Pop, Live, Dance, Techno, Classic, Soft, Personal. For example,
Soft mode accentuates symphonic harmonies and the tenor audio range.
Balance
Change the balance between the left and right speakers.
Audio delay
Play it back after a period of time to create the sound of a repeating.
Wide stereo
Turn wide stereo on to add virtual surround sound.
Auto volume control
You can set it to control the volume of programme.
Sound type
Select a sound type available for the selected analog programme.
Audio language
Select an audio language available for the selected digtal programme.
Type
Select to active Visually Impaired options.
28
Visually impaired
Set overall volume and if Visually Impaired mode uses speakers, headphones or both.
English
PAP function
Open the PAP menu as described in the OSD navigation section. This menu provides the
following settings:
PAP
Turn the PAP function on or off. When PAP function is turned on, you can display the
pictures from different source inputs side by side. Note that one window is for analogue
or digital TV inputs, the other is for VGA, HDMI or CMP inputs.
Note: this PAP function is not available for AV inputs.
TV position
Select the position for TV input window, left or right.
You can toggle the focus window by pressing the left/right directional keys. When focus
in TV input window, the digit keys and CH+/- keys work in TV input window. When focus
in the other window, CH+/- keys can change available extension sources.
Options settings
Open the Options menu as described in the OSD navigation section. This menu provides
the following settings:
Subtitle
Use these settings to adjust subtitles.
Subtitle
Turn on or off subtitles.
Digital subtitle language
Select a language as your preferred subtitle language.
Digital subtitle language 2nd
Select a language as your secondary subtitle language.
Subtitle type
You can choose between normal subtitles and subtitles for the hearing impaired, when
these are available.
Decoding page language
Select the type of language used for teletext pages.
29
Digital Teletext language
Select the primary language used for digital teletext pages.
SPDIF type
English
Select a proper sound type for the current programme to output sound to the auido device
connected through the SPDIF output terminal. The options you may choose depend on the
programme you are watching. If the programme outputs sound in Dolby D format, you can
select Dolby D or PCM. If the programme does not output sound in Dolby D format, you can
select PCM only, otherwise no sound output. You can select Off to turn off the sound output.
SPDIF delay
If PCM is selected for SPDIF type, you can adjust the delay time to synchronize the sound with
the image at this option.
Clear.fi link
Search for CEC (Consumer Electronics Control) devices connected to the HDMI ports on your
TV. CEC allows you to control several devices with a single remote control.
Network update
Turn on or off network update function.
Common interface
Displays information about any card installed in the common interface slot. You have to
switch off the TV before inserting a card. Be sure to insert the card gently and push it in as
far as it will go. Wrong insertion may damage both the card and your TV.
Location
Select your location: Home or Shop.
Note: In Home mode, the TV will automatically enter Standby mode if there are no
operations performed for more than four hours.
Software update
Current version
Display the current version of the software.
Product name
Display the model number.
OAD (over air download)
Enable you to install the lastest version of the software if availalbe. Press OK to enter the
setup menu. Select Manual OAD download and press OK to start manual scanning the latest
software. Press OK/BACK to cancel or exit the process.
Select Auto download and press left/right to select Yes to execute the automatic download or
select No to decline the automatic download.
30
Timer settings
Open the Timer menu as described in the OSD navigation section. This menu provides the
following settings:
English
Time zone
Select a time zone.
Clock
Auto synchronization
Turn on auto synchronization and the TV will detect the time from digital channels.
Date
If auto synchronization is turned off, you can set the date manually.
Time
If auto synchronization is turned off, you can set the time manually.
Power on timer
If this is on, the TV will power on at the set time and on the set channel or last source.
Power off timer
If this is on, the TV will power off at the set time.
Sleep timer
Set a time for sleep timer or turn off sleep timer.
Lock settings
Open the Lock menu as described in the OSD navigation section. Lock menu allows you to
enter a password and effectively stop anyone without the password from watching TV. The
default password is 1234. If you forget your code, use the super password 0423 to overide
any existing codes.
This menu provides the following settings:
Channel lock
Press OK or right to see the list of channels. Use the up and down directional keys to select
the channel to block and then press OK to lock. Press the OK again to unblock a channel.
When viewing channels, if a blocked channel is selected the TV will ask for your password.
Enter your password to view the channel.
Parental rating
Most digital TV allows you to block content according to rating systems. The rating system
used is dependent on region, and is only available on digital channels. Analog channels will
not be blocked with this option.
31
Input lock
Press OK to see the list of input sources (AV, HDMI, etc.). Use the up and down directional
keys to select the input source to block and then press OK to lock. Press the OK again to
unblock an input source.
English
Front panel lock
Lock or unlock the keys on the side panel.
Installation lock
Lock or unlock the setup menu.
Max volume
Set a maximum volume.
Change password
You can change the default password to a 4-digit code of your choice. If you are using the
parental controls, then we recommend you change the password periodically.
Clean all
Return all parental settings to default values, removing any changes.
Set up the TV
Open the Setup menu as described in the OSD navigation section. This menu provides the
following settings:
Language
Use these settings to adjust language.
Country
Select the country you live in to scan for the correct signals.
Tuner mode
Select a tuner mode: Antenna or Cable.
Channel install
Automatic search
Automatic search allows you to scan for channels. If you completed the setup wizard the first
time you turned on your TV, all available channels are listed.
Wait until the scan has finished; this will take several minutes. During the scanning process,
press MENU or BACK to abort halfway with all searched channels saved.
Automatic update
If the tuner mode is Antenna, you can use Automatic update to scan for new or deleted
channels.
32
Analog manual scan
You can manually scan an analog channel by adjusting the settings here.
Digital manual scan
English
You can manually add a channel by adjusting the settings here.
Clean channel list
You can manually clean all channels you set here.
Organiser
You can use these settings to skip channels, change a channels’ number and name or sort
channels.
Input settings
Select a type of apparatus for each connector with equipment connected.
Decode
Use the up/down directional keys to select an analog channel and press OK to decode.
Diagnostics
Display signal information about the current digital channel.
Time shift
Turn the Time shift feature on or off.
Reset shop
Allow you to reset the TV to factory default settings. You have to enter a correct password to
reset all settings. After resetting the initial setup menu will appear.
33
Special functions
Before you use the Time shift or PVR functions, connect a USB storage device to the TV.
Time shift
English
This allows you to record TV programs so that you won’t miss your favorite moments, even if you go out
Before using the Time shift function, you must connect and set up a USB storage device.
Press the HOLD button on the remote control to display the time shift menu. Press the red button to enter
the time shift menu, and then use the remote control to perform the functions shown on screen.
The first time you use time shifting, follow the instructions to set up your USB storage device.
Notes:
1) It is recommended you use a USB device with more than 1 GB unused free space and a read/write speed
greater than 5.0 Mb/sec.
2) If you switch channel while using time shifting, a message will ask you to confirm that you want to stop
time shifting.
PVR(Personal Video Record)
This allows you to record your favorite programs.
Press the SIZE button on the remote control to display the PVR menu; then press the red
button to start recording. The recorded file can be accessed in the video section of the Media
center. The file is saved in the PVR folder, named after the channel number.
Use the remote control to perform the functions shown on screen; use the directional keys to
set the recording duration.
Notes:
1) This function is only available for digital channels.
2) This function requires a USB memory device that uses the FAT32 file format.
3) If you switch channels or input source, a message will ask you to confirm that you want to stop the PVR
function. Select Yes to exit PVR and save all data recorded so far.
4) Recording duration ranges from 2 minutes to 5 hours depending on the USB storage.
5) The PVR function cannot be used with a CI+ card.
6) Due to specific country requirements, the PVR function is not available in Finland.
34
Troubleshooting
Before you call the Acer service center, please check the following items:
English
Here is a list of possible situations that may arise during the use of your LCD TV. Easy
answers and solutions are provided for each.
There is no picture or sound
• Make sure the power cord is properly inserted in the power outlet.
• Make sure the input mode is correctly set by your selected input.
• Make sure the antenna at the rear of the TV is properly connected.
• Make sure the main power switch is turned on.
• Make sure the volume is not set to minimum or the sound is not set to mute.
• Make sure the headphones are not connected.
• Reception other than those of broadcasting stations can be considered.
Picture is not clear
• Make sure the antenna cable is properly connected.
• Consider whether your TV signal is being properly received.
• Poor picture quality can occur due to a VHS camera, camcorder, or other peripheral
being connected at the same time. Switch off one of the other peripherals.
• The 'ghost' or double image may be caused by obstruction to the antenna due to
high-rise buildings or hills. Using a highly directional antenna may improve the
picture quality.
• The horizontal dotted lines shown on the pictures may be caused by electrical
interference, e.g., hair dryer, nearby neon lights, etc. Turn off or remove these.
Picture is too dark, too light or tinted
• Check the colour adjustment.
• Check the brightness setting.
• Check the sharpness function.
• The fluorescent lamp may have reached the end of its service life.
Remote control does not work
• Check the batteries of the remote control.
• Make sure the remote sensor window is not under strong fluorescent lighting.
• Try to clean the remote control sensor lens on the TV with a soft cloth.
• Use the buttons (hotkeys) on the TV before the remote control works.
If the above suggestions do not solve your technical issue, please refer to the warranty
card for service information.
35
PC input signal reference chart
English
AT2628ML & AT2618MF
Item
Resolution
Frequency (Hz)
1
640 x 480
60
2
640 x 480
75
3
800 x 600
60
4
800 x 600
75
5
1024 x 768
60
6
1024 x 768
75
7
1366 x 768
60
AT3228ML & AT4028ML & AT3218MF
Item
Resolution
Frequency (Hz)
1
640 x 480
60
2
640 x 480
75
3
800 x 600
60
4
800 x 600
75
5
1024 x 768
60
6
1024 x 768
75
7
1280 x 1024
60
8
1280 x 1024
75
9
1600 x 1200
60
10
1366 x 768
60
11
1920 x 1080
60
PC input does not support Sync on Green, Composite Sync or interlaced signals.
36
Product specifications
Brightness (typ.)
Dynamic Contrast Ratio
(max.)
Viewing angle (typ.)
Response (typ.)
Power supply
Input
Max. power consumption
Power saving
Mechanical
AT2628ML
AT3228ML
AT4028ML
1366 x 768
1920 x 1080
350 cd/m2
400 cd/m2
3000:1
4000:1
89°(H), 89°(V)
6.5 ms
43 W
<0.5 W
220 Vac to 240 VAC, 50 Hz
70 W
<0.3 W
English
Model
Panel spec
Resolution (pixels)
8 ms
110 W
Dimensions (W x H x D mm) 645.2 x 462.6 x 155 764 x 538 x 183 951.3 x 655.4 x 231
Weight (kg)
6.55
9.7
15.1
Weight (lbs.)
14.5
21.3
33.3
Gross weight (kg)
8.18
11.5
18.1
Gross weight (lbs.)
18.03
25.3
39.9
Wall-mounting holes
VESA,
VESA,
VESA,
100mm x 100mm 200mm x 100mm 400mm x 400mm
Analog TV system
Colour system
Sound system
Stereo system
Subtitle
Digital TV system
Digital TV standard
Sound system
Frequency
PAL, SECAM
B/G/D/K/I/L
NICAM/A2
Teletext 1.5 (1000 pages)
DVB-T HD (H.264)/DVB-C
PCM/ MPEG ( Layer I & II ), HE-AAC
Dolby Digital/Dolby Digital plus
7/8 MHz
37
English
Model
Terminal
Analog/Digital Tuner In
SCART
Component in
HDMI 1
HDMI 2
HDMI 3
PC D-sub in
PC audio in
SPDIF out
Headphone out
USB Port
HDMI
Speakers
Photo
Audio
Video
38
AT2628ML
AT3228ML
AT4028ML
Hybrid
CVBS (In), RGB (In), Audio R/L (In/Out)
ATV/DTV CVBS out
YPbPr, Audio (R/L)
Yes (HDMI 1.3)
Yes (HDMI 1.3)
No
Yes (HDMI 1.3)
Yes
Yes
Yes (Coxial)
Yes (Optical)
Yes
Yes
480i/p, 576i/p, 720p, 1080i, 1080p
3W x 2
5W x 2
JPG, JPEG
MP3, AC3, LPCM, ADPCM, AAC, MPEG
MPEG1, MPEG2/H.264 BP/MP/HP, MPEG4 SP/ASP
Brightness (typ.)
Dynamic Contrast Ratio
(max.)
Viewing angle (typ.)
Response (typ.)
Power supply
Input
Max. power consumption
Power saving
Mechanical
Dimensions (W x H x D mm)
Weight (kg)
Weight (lbs.)
Gross weight (kg)
Gross weight (lbs.)
Wall-mounting holes
Analog TV system
Colour system
Sound system
Stereo system
Subtitle
Digital TV system
Digital TV standard
Sound system
Frequency
AT2618MF
AT3218MF
1366 x 768
1920 x 1080
450 cd/m2
400 cd/m2
4000:1
5000:1
English
Model
Panel spec
Resolution (pixels)
89° (H), 89° (V)
8 ms
6.5 ms
220 Vac to 240 VAC, 50 Hz
80 W
110 W
<0.5 W
656 x 483 x 165
6.9
15.18
8.7
19.14
VESA, 100 mm x 100 mm
785 x 575 x 196
9.74
21.43
12.2
26.8
VESA, 200 mm x 100 mm
PAL, SECAM
B/G/D/K/I/L
NICAM / A2
Teletext 1.5 (1000 pages)
DVB-T HD (H.264) / DVB-C
PCM/ MPEG (Layer I & II), HE-AAC
Dolby Digital / Dolby Digital plus
7/8 MHz
39
English
Model
Terminal
Analog/Digital Tuner In
SCART
Component in
AV-in
HDMI 1
HDMI 2
PC D-sub in
PC audio in
SPDIF out
Headphone out
USB Port
HDMI
Speakers
Photo
Audio
Video
40
AT2618MF
AT3218MF
Hybrid
CVBS (In), RGB (In), Audio R/L (In/Out),
ATV/DTV CVBS out
YPbPr, Audio (R/L)
CVBS, Audio (R/L)
Yes (HDMI 1.3)
Yes (HDMI 1.3)
Yes
Yes
Yes (Coxial)
Yes
Yes
480i/p, 576i/p, 720p, 1080i, 1080p
3W x 2
5W x 2
JPG, JPEG
MP3, AC3, LPCM, ADPCM, AAC, MPEG
MPEG1, MPEG2, H.264 BP/MP/HP, MPEG4 SP/ASP