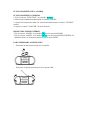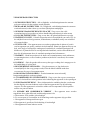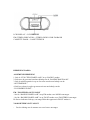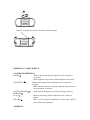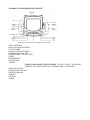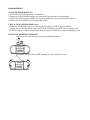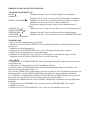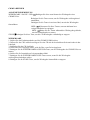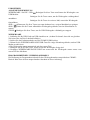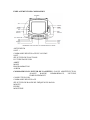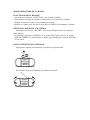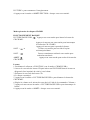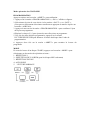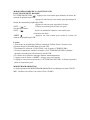
1
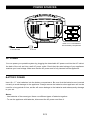
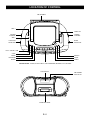
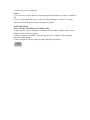
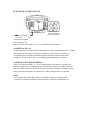
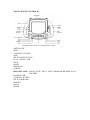
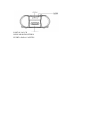
SCR-96
USB/MP3/CD/Cassette/Radio
Portable Player
User Manual
English
Lenco recommends attentive reading of the manual before operating the unit.
For information and support, www.lenco.eu
WARNING
TO PREVENT FIRE OR SHOCK HAZARD DO NOT EXPOSE THIS APPLIANCE TO RAIN OR MOISTURE.
CAUTION
RISK OF ELECTRIC SHOCK
DO NOT OPEN
WARNING : SHOCK HAZARD-DO NOT OPEN
LIGHTNING FLASH WITH ARROWHEAD SYMBOL -
EXCLAMATION POINT - within an equilateral triangle,
within an equilateral triangle, is intended to alert the
is used to indicate that a specific component shall be
user to the presence of uninsulated dangerous
replaced only by the component specified in that
voltage within the products enclosure that may be of
documentation for safety reason.
sufficient magnitude to constitude a risk of electric
shock to persons.
The following label has been affixed to the unit, listing the proper procedure for working with the laser beam:
CLASS 1 LASER PRODUCT LABEL CLASS 1 LASER PRODUCT
KLASS 1 LASER APPARAT
LUOKEN 1 LAISERLAITE
KLASSE 1 LASER PRODUKT
This label is attached to the place as illustrated to inform that the
apparatus contains a laser component.
WARNING LABEL INFORMING OF RADIATION This label is placed inside the unit. As shown in the illustration. To
warn against further measures on the unit. The equipment contains
a laser radiating laser rays according to the limit of laser product of
class 1.
E-1
SAFETY INSTRUCTIONS
1. READ INSTRUCTIONS - All the safety and operating instructions should be read before the appliance is operated.
2. RETAIN INSTRUCTIONS - The safety and operating instruction should be retained for future reference.
3. HEED WARNINGS - All warnings on the appliance and in the operating instructions should be adhered to.
4. FOLLOW INSTRUCTIONS - All operating instructions should be followed.
5. WATER AND MOISTURE - The appliance should not be used near water, for example, near a bathtub, washbowl,
kitchen sink, laundrytub, swimming pool or in a wet basement.
6. VENTILATION - The appliance should be situated so that its location or position does not interfere with its proper
ventilation. Do not place on bed, sofa, rug or similar surface that may block the ventilation openings, in a built-in
installation, such as a bookcase or cabinet that may impede the flow of air through the ventilation openings.
7. HEAT - The appliance should be situated away from heat sources such as radiators, stoves, or other appliances
(including amplifiers) that produce heat.
8. POWER SOURCE - The appliance should be connected to power supply only of the type described in the
operating instructions or as marked on the appliance.
9. POWER CORD PROTECTION - Power supply cords should be routed so that they are not likely to be walked
on or pinched by items placed upon or against them.
10. POWER LINES - An outdoor antenna should be located away from power lines.
11. OBJECT and LIQUID ENTRY - Care should be taken so that objects do not fall and liquids are not spilled into
the enclosure through openings.
12. ESD WARNING - The display does not function properly or no reaction to operation of any the control may due
to the electrostatic discharge. Switch off and unplug the set. Reconnect after a few seconds.
13. DAMAGE REQUIRING SERVICE - The appliance should be serviced by qualified service personnel when:
a. The power-supply cord or plug has been damaged.
b. Objects have fallen into, or liquid has been spilled into the appliance enclosure.
c. The appliance has been exposed to rain.
d. The appliance has been dropped, or the enclosure damaged.
e. The appliance does not appear to operate normally.
14. SERVICING - The user should not attempt to service the appliance beyond that described in the user operating
instructions. All other servicing should be referred to qualified service personnel.
Notes:
a. Dirty or scratched CD may cause a skipping problem. Clean or replace the CD.
b. If an error display or malfunction occurs, disconncet the AC cord and remove all the batteries. Then turn the power
back on.
BEFORE OPERATION
Notes: CONCERNING COMPACT DISCS.
Since dirty, damaged or warped discs may damage the appliance, care should be taken of the followings items:
a. Usable compact discs. Use only compact disc with the mark shown below.
b. CD compact disc only with digital audio signals.
E-2
POWER SOURCES
Insert 8 x “C” size batteries
into the battery compartment
to a wall outlet
to AC IN
AC POWER
You can power your portable system by plugging the detachable AC power cord into the AC inlet at
the back of the unit and into a wall AC power outlet. Check that the rated voltage of your appliance
matches your local voltage. Make sure that the AC power cord is fully inserted into the appliance.
BATTERY POWER
Insert 8 x “C” size batteries into the battery compartment. Be sure that the batteries are inserted
correctly to avoid damage to the appliance. Always remove the batteries when appliance will not be
used for a long period of time, as this will cause leakage to the batteries and subsequently damage
to your set.
Notes:
- Use batteries of the same type. Never use different types of batteries together.
- To use the appliance with batteries, disconnect the AC power cord from it.
E-3
LOCATION OF CONTROL
FM ANTENNA
SKIP +
USB SLOT
TUNING
CONTROL
VOLUME
CONTROL
SKIP -
BAND
SELECTOR
FUNCTION
SELECTOR
PLAY / PAUSE / USB
STOP
MODE
MINUTE
PROGRAM
HOUR
ALBUM
TIMER
TAPE BUTTONS - PAUSE, STOP / EJECT, FAST FORWARD, REWIND, PLAY, RECORD
LCD DISPLAY
FM STEREO
INDICATOR
CASSETTE DOOR
E-4
RADIO OPERATION
GENERAL OPERATION
1.
2.
3.
4.
Set the “FUNCTION” selector to “RADIO” mode.
Select desired band by using the “BAND” selector.
Adjust radio frequency to your desired station by using the “TUNING” control.
Adjust the “VOLUME” control to the desired level.
FM / FM-STEREO RECEPTION
- Set the “BAND” selector to FM mode for MONO reception.
- Set the “BAND” selector to FM ST. mode for FM STEREO reception. The Stereo indicator light up
to show FM ST. mode.
FOR BETTER RECEPTION
- Reorient the antenna for better reception.
- Reorient the appliance to get better AM reception.
E-5
TAPE OPERATION
GENERAL OPERATION
PAUSE
Press to stop playing tape operation temporarily.
Press again to resume tape operation.
STOP / EJECT
Press to stop tape operation.
Press again to open the cassette door after the tape spools stop turning.
FAST FORWARD
REWIND
PLAY
RECORD
&
Press to start rapid tape winding either forward or reverse direction.
Press to start playing tape.
Press it together with “PLAY” button to start recording.
PLAYBACK
1. Set the “FUNCTION” selector to “TAPE” mode.
2. Press the “STOP / EJECT” button to open the cassette door and insert your tape.
3. Close the cassette door.
4. Press the “PLAY” button to start playing tape.
5. Adjust the “VOLUME” control to the desired level.
6. Press the “PAUSE” button when you want to stop playing tape operation temporarily.
7. Press the “STOP / EJECT” button when finished.
RECORDING
1. Press the “STOP / EJECT” button to open the cassette door and insert a blank tape.
2. Select the source you want to record.
To record from radio - Set the “FUNCTION” selector to “RADIO” mode and adjust the desired station.
To record from CD / MP3 - Place a disc on the CD compartment. Set the “FUNCTION” selector to
“CD / MP3 / USB” mode and select the desired track.
To record from USB - Plug or slot in USB device to the port. (Make sure no disc on disc tray. )
Set the “FUNCTION” selector to “CD / MP3 / USB” mode and select the desired track.
3. Press the “RECORD” button together with the “PLAY” button to start recording.
4. Press the “STOP / EJECT” button when finished.
E-6
CD / MP3 OPERATION
GENERAL OPERATION
PLAY / PAUSE / USB
Press to start playing CD / MP3 disc.
Press again to stop playing CD / MP3 operation temporarily.
Press again to resume playback.
SKIP +
SKIP -
Press to go to the next track or back to the previous track.
Press and hold while playing until you find the point of the sound.
&
STOP
Press to stop all CD / MP3 operation.
PLAYBACK
1.
2.
3.
4.
Set the “FUNCTION” selector to “CD / MP3 / USB” mode.
Open the CD door and place a CD / MP3 disc with the label up on the CD compartment.
Close the CD door.
Focus search is performed if disc is inside.
5. Press the “PLAY / PAUSE / USB” button to start playing CD / MP3 disc.
6. Adjust the “VOLUME” control to the desired level.
7. Press the “PLAY / PAUSE / USB” button again when you want to stop playback temporarily.
8. Press the “STOP” button when finished.
E-7
CD / MP3 OPERATION
PROGRAM
Be sure to press the “STOP” button before use.
1. Press the “PROGRAM” button, the display will show “P01” and flash.
2. Select desired track by using the “SKIP +” or “SKIP -” button. ( You may select a desired album
by pressing “ALBUM” button. )
3. Press the “PROGRAM” button again to confirm desired track into the program memory.
4. Repeat step 2 and 3 to enter additional tracks into the program memory.
5. When all the desired tracks have been programmed, press the “PLAY / PAUSE / USB” button
to play the disc in the order you have programmed.
6. Press the “STOP” button twice to terminate programmed playback.
MODE
Press the “MODE” button before or during playing CD / MP3 disc,
each press switches the mode function as follows:
1 - REPEAT 1
2 - REPEAT ALBUM ( *MP3 ONLY )
3 - REPEAT ALL
4 - RANDOM
5 - NORMAL PLAYBACK
REP
REP
ALBUM
REP
ALL
REPEAT 1
REPEAT
ALBUM
REPEAT
ALL
RAND
NORMAL
PLAYBACK
E-8
RANDOM
USB OPERATION
GENERAL OPERATION
PLAY / PAUSE / USB
Press to start playing tracks from the USB device.
Press again to stop playing USB operation temporarily.
Press again to resume playback.
SKIP +
SKIP -
Press to go to the next track or back to the previous track.
Press and hold while playing until you find the point of the sound.
&
STOP
Press to stop all USB operation.
PLAYBACK
1.
2.
3.
4.
5.
Plug or slot in USB device to the port. (Make sure no disc on disc tray)
Set the “FUNCTION” selector to “CD / MP3 / USB” mode.
Press and hold the “PLAY / PAUSE / USB” button for a few seconds to entry USB mode.
Playback will start automatically from the first track.
Press the “STOP” button when finished.
6. Press the “PLAY / PAUSE / USB” button again, playback will start from the first track.
PROGRAM, MODE
The operation of PROGRAM, MODE are as the same as that of CD / MP3. Please refer to CD / MP3
OPERATION.
E-9
OTHER FEATURES
CLOCK SETTING
To adjust clock setting, make sure in CD mode.
1. Press the “TIMER” button. (Do not release “TIMER” button during time setting)
2. Press the “HOUR” button to set hour.
3. Press the “MIN” button to set minute.
4. Release all button to confirm setting. Confirmed setting will appear on the display.
Recycling
If at any time in the future you should need to dispose of this product please note that:
Waste electrical products should not be disposed of with household waste. Please
recycle where facilities exist. Check with your local authority or retailer for recycling
advice. (Waste Electrical and Electronic Equipment Directive)
If at any time in the future you should need to dispose of this product please note
that: All batteries and accumulators need to be removed from this product
(Removal of Waste Batteries and Accumulators).
E-10
SCR-96
Reproductor portátil
USB/MP3/CD/casete/radio
Manual del usuario
Español
LENCO recomienda una lectura atenta del manual antes de usar la unidad.
Para información y ayuda, www.lenco.eu
ADVERTENCIA
PARA PREVENIR RIESGOS DE INCENDIOS Y DESCARGAS
ELÉCTRICAS, NO EXPONGA ESTE APARATO A LLUVIA NI HUMEDAD.
PRECAUCIÓN
RIESGO DE DESCARGA ELÉCTRICA
NO ABRIR
ADVERTENCIA: RIESGO DE DESCARGA ELÉCTRICA – NO ABRIR
EL SÍMBOLO DE UN RAYO CON PUNTA DE FLECHA - dentro de un
triángulo equilátero pretende alertar al usuario sobre la presencia de voltaje peligroso
no aislado dentro de la carcasa del producto que puede ser de magnitud suficiente
como para constituir un riesgo de descarga eléctrica para las personas.
EL SIGNO DE EXCLAMACIÓN – dentro de un triángulo equilátero se usa para
indicar que un componente específico se cambiará únicamente por el componente
especificado en esa documentación por motivos de seguridad.
La siguiente etiqueta se pegó a la unidad, e indica el procedimiento correcto para
el funcionamiento de un rayo láser:
ETIQUETA DE PRODUCTO LÁSER DE CLASE 1 Esta etiqueta está pegada al producto como se ilustra para
informar que el aparato contiene un componente láser.
ETIQUETA DE ADVERTENCIA SOBRE RADIACIÓN Esta etiqueta está colocada dentro de la unidad. Como se muestra en la
ilustración. Para advertir acerca de mayores medidas con la unidad. El
equipo contiene un láser que irradia rayos láser conforme a los límites de
un producto láser de clase 1.
INSTRUCCIONES DE SEGURIDAD
1. LEA LAS INSTRUCCIONES – Todas las instrucciones de seguridad y
funcionamiento deben leerse antes de usar el aparato.
2. CONSERVE LAS INSTRUCCIONES – Las instrucciones de seguridad y
funcionamiento deben conservarse para futuras consultas.
3. RESPETE LAS ADVERTENCIA – Todas las advertencias en el aparato y en las
instrucciones de funcionamiento deben respetarse.
4. SIGA LAS INSTRUCCIONES – Deben seguirse todas las instrucciones de
funcionamiento.
5. AGUA Y HUMEDAD – El aparato no debe usarse cerca de agua, por ejemplo,
cerca de una bañera, lavamanos, fregadero, pila para lavar, piscina ni en un sótano
húmedo.
6. VENTILACIÓN – El aparato debe colocarse de modo que su ubicación o posición
no interfiera con una ventilación adecuada. No lo coloque en una cama, sofá,
alfombra u otra superficie similar que pueda bloquear las aberturas de ventilación,
como en una instalación empotrada, como un estante o armario que pueda impedir el
flujo de aire por las aberturas de ventilación.
7. CALOR – El aparato debe colocarse alejado de fuentes de calor como radiadores,
hornos y otros aparatos (incluyendo amplificadores) que generen calor.
8. SUMINISTRO ELÉCTRICO – El aparato debe conectarse únicamente a un
suministro eléctrico del tipo descrito en las instrucciones de funcionamiento o
marcado en el aparato.
9. PROTECCIÓN DEL CABLE DE SEGURIDAD – Los cables de suministro
eléctrico deben guiarse para que no sean susceptibles de ser pisados o pinchados por
objetos colocados encima o contra ellos.
10. LÍNEAS DE CORRIENTE – Una antena exterior debe colocarse alejada de
líneas de corriente.
11. ENTRADA DE OBJETOS Y LÍQUIDOS – Debe tenerse cuidado para que no
caigan objetos ni líquidos por las aberturas de la carcasa.
12. ADVERTENCIA ESD – Si la pantalla no funciona correctamente o no hay
reacción a cualquiera de las operaciones del mando podría ser por causa de una
descarga electrostática. Apague y desenchufe la unidad. Reconecte tras unos
segundos.
13. DAÑOS QUE REQUIEREN SERVICIO – El aparato debe recibir servicio por
personal de servicio calificado cuando:
a. El cable de alimentación o la clavija se hayan dañado.
b. Hayan caído objetos o líquido dentro de la carcasa del aparato.
c. El aparato se haya expuesto a lluvia.
d. El aparato se haya caído o se haya dañado la carcasa.
e. El aparato no parezca funcionar con normalidad.
14. SERVICIO – El usuario no debe intentar darle servicio al aparato más allá de lo
descrito en las instrucciones de uso. Todos los demás servicios deben delegarse a
personal de servicio calificado.
Notas:
a. Un CD sucio o rayado puede ocasionar un problema de brincos. Limpie o cambie el
CD.
b. Si se ve una pantalla de error u ocurre un fallo, desconecte el cable AC y saque
todas las baterías. Después vuelva a encender el aparato.
ANTES DE USAR
Notas: ACERCA DE DISCOS COMPACTOS.
Ya que los discos sucios, dañados o combados pueden dañar el aparato, debe tenerse
cuidado con los siguientes puntos:
a. Discos compactos utilizables. Use únicamente discos compactos que tengan la
marca mostrada debajo.
b. Disco compacto CD con señales de audio digitales únicamente.
FUENTES DE ALIMENTACIÓN
a una toma de pared
a la entrada AC IN
Inserte 8 x baterías tamaño “C” en el compartimiento de baterías
ALIMENTACIÓN AC
Podrá alimentar su sistema portátil enchufando el cable de alimentación AC extraíble
a la entrada AC de la parte trasera de la unidad y a una toma de corriente AC.
Compruebe que la tensión nominal del aparato coincida con la tensión local.
Asegúrese de que el cable AC esté completamente insertado en el aparato.
ALIMENTACIÓN POR BATERÍAS
Inserte 8 x baterías tamaño “C” en el compartimiento de baterías. Asegúrese de
insertar las baterías correctamente para evitar daños al aparato. Siempre saque las
baterías cuando el aparato dejará de usarse un periodo extendido de tiempo, ya que
esto ocasionará un derrame de las baterías y daños subsecuentes a su aparato.
Notas:
- Use baterías del mismo tipo. Nunca use distintos tipos de baterías juntas.
- Para usar el aparato con baterías, desconéctele el cable de alimentación AC.
UBICACIÓN DE CONTROLES
ANTENA FM
SKIP +
CONTROL VOLUME
SKIP SELECTOR FUNCTION
PLAY / PAUSE / USB
STOP
MODE
PROGRAM
ALBUM
BOTONES TAPE - PAUSE, STOP / EJECT, FAST FORWARD, REWIND, PLAY,
RECORD
RANURA USB
CONTROL TUNING
SELECTOR BAND
MINUTE
HOUR
TIMER
PANTALLA LCD
INDICADOR FM STEREO
PUERTA PARA CASETES
FUNCIONAMIENTO DE LA RADIO
FUNCIONAMIENTO GENERAL
1. Fije el selector “FUNCTION” en el modo “RADIO”.
2. Seleccione la banda deseada usando el selector “BAND”.
3. Ajuste la frecuencia de radio a la estación deseada usando el control “TUNING”
control.
4. Ajuste le control “VOLUME” al nivel deseado.
RECEPCIÓN FM/FM ESTÉREO
- Fije el selector “BAND” en el modo FM para la recepción MONO.
- Fije el selector “BAND” en el modo FM ST. para la recepción FM ESTÉREO. El
indicador Stereo se iluminará cuando se use el modo FM ST.
PARA MEJORAR LA RECEPCIÓN
-
Reoriente la antena para mejorar la recepción.
-
Reoriente el aparato para mejorar la recepción AM.
FUNCIONAMIENTO DEL CASETE
FUNCIONAMIENTO GENERAL
PAUSE
Pulse para detener la reproducción del casete
temporalmente.
Pulse de nuevo para retomar la reproducción del casete.
STOP/EJECT
Pulse para detener el funcionamiento del casete.
Pulse de nuevo para abrir la puerta de casetes tras
detenerse los carretes.
Pulse para iniciar el adelantado o retroceso rápidos.
FAST FORWARD &
REWIND
PLAY
Pulse para empezar a reproducir la cinta.
RECORD
Pulse junto con el botón “PLAY” para empezar a grabar.
REPRODUCCIÓN
1. Fije el selector “FUNCTION” en el modo “TAPE”.
2. Pulse el botón “STOP / EJECT” para abrir la puerta de casetes y meta su casete.
3. Cierre la puerta de casetes.
4. Pulse el botón “PLAY” para empezar a reproducir el casete.
5. Ajuste el control “VOLUME” hasta el nivel deseado.
6. Pulse el botón “PAUSE” cuando quiera detener la reproducción del casete
temporalmente.
7. Pulse el botón “STOP / EJECT” cuando termine.
GRABACIÓN
1. Pulse el botón “STOP / EJECT” para abrir la puerta de casetes e inserte un casete
en blanco.
2. Seleccione la fuente que quiera grabar.
Para grabar de la radio - Fije el selector “FUNCTION” en el modo “RADIO” y
sintonice la estación deseada.
Para grabar de un CD / MP3 – Coloque un disco en el compartimiento CD. Fije el
selector “FUNCTION” en el modo “CD / MP3 / USB” y seleccione la pista deseada.
Para grabar de un USB – Enchufe o conecte un dispositivo USB al puerto.
(Asegúrese de que no haya discos en la bandeja de discos).
Fije el selector “FUNCTION” en el modo “CD / MP3 / USB” y seleccione la pista
deseada.
3. Pulse el botón “RECORD” junto con el botón “PLAY” para empezar a grabar.
4. Pulse el botón “STOP / EJECT” cuando termine.
FUNCIONAMIENTO CD/MP3
FUNCIONAMIENTO GENERAL
Pulse para empezar a reproducir el disco CD / MP3.
PLAY / PAUSE / USB
Pulse de nuevo para detener la reproducción CD/MP3
temporalmente.
Pulse de nuevo para reanudar la reproducción.
SKIP + &
Pulse para ir a la pista siguiente o a la anterior.
Pulse y sostenga cuando reproduzca para encontrar un
SKIP punto específico de la música.
STOP
Pulse para detener todas las operaciones CD/MP3
REPRODUCCIÓN
1. Fije el selector “FUNCTION” en el modo “CD/MP3/USB”.
2. Abra la puerta CD y coloque un disco CD/MP3 con la etiqueta hacia arriba en el
compartimiento de CD.
3. Cierre la puerta CD.
4. Se realizará la lectura del disco si hay uno dentro.
5. Pulse el botón “PLAY / PAUSE / USB” para empezar a reproducir el disco
CD/MP3.
6. Ajuste el control “VOLUME” al nivel deseado.
7. Pulse el botón “PLAY / PAUSE / USB” de nuevo cuando quiera detener la
reproducción temporalmente.
8. Pulse el botón “STOP” cuando termine.
FUNCIONAMIENTO CD/MP3
PROGRAMAR
Asegúrese de pulsar el botón “STOP” antes de usar.
1. Pulse el botón “PROGRAM”, la pantalla mostrará “P01” y parpadeará.
2. Seleccione la pista deseada usando el botón “SKIP +” o “SKIP -”. (Podrá
seleccionar el álbum deseado pulsando el botón “ALBUM”).
3. Pulse el botón “PROGRAM” de nuevo para confirmar la pista deseada en la
memoria de la programación.
4. Repita los pasos 2 y 3 para introducir pistas adicionales a la memoria de
programación.
5. Cuando se hayan programado todas las pistas deseadas, pulse el botón “PLAY /
PAUSE / USB” para reproducir el disco en el orden programado.
6. Pulse el botón “STOP” dos veces para cancelar la reproducción programada.
MODO DE REPRODUCCIÓN
Pulse el botón “MODE” antes o durante la reproducción de un disco CD/MP3; con
cada pulsación el modo de reproducción cambia así:
1 – REPETIR 1
2 – REPETIR ÁLBUM (*MP3 SOLAMENTE)
3 – REPETIR TODO
4 - ALEATORIA
5 – REPRODUCCIÓN NORMAL
FUNCIONAMIENTO USB
FUNCIONAMIENTO GENERAL
Pulse para empezar a reproducir pistas de un dispositivo
PLAY / PAUSE / USB
USB.
Pulse de nuevo para detener la reproducción USB
temporalmente.
Pulse de nuevo para reanudar la reproducción.
&
Pulse para ir a la pista siguiente o anterior.
SKIP +
SKIP Pulse y sostenga durante la reproducción hasta encontrar el
punto deseado.
STOP
Pulse para detener todas las operaciones USB.
REPRODUCCIÓN
1. Enchufe o conecte un dispositivo USB al puerto (asegúrese de que no haya discos
en la bandeja).
2. Fije el selector “FUNCTION” en el modo “CD / MP3 / USB”.
3. Pulse y sostenga el botón “PLAY / PAUSE / USB” durante unos segundos para
entrar al modo USB.
4. La reproducción empezará automáticamente de la primera pista.
5. Pulse el botón “STOP” cuando termine.
6. Pulse el botón “PLAY / PAUSE / USB” de nuevo y la reproducción iniciará de la
primera pista.
MODO DE PROGRAMACIÓN
El funcionamiento de los modos de programación y de reproducción es igual al de los
CD/MP3. Véase FUNCIONAMIENTO CD/MP3.
OTRAS FUNCIONES
AJUSTE DEL RELOJ
Para ajustar el reloj, asegúrese de estar en el modo CD.
1. Pulse el botón “TIMER”. (No suelte el botón “TIMER” durante el ajuste de la
hora).
2. Pulse el botón “HOUR” para fijar las horas.
3. Pulse el botón “MIN” para fijar los minutos.
4. Suelte todos los botones para confirmar los cambios. El ajuste confirmado
aparecerá en pantalla.
Reciclaje
Si requiere desechar este producto en cualquier momento futuro, por favor note que:
Los residuos de productos eléctricos no deben tirarse en la basura doméstica. Por
favor recicle donde existan centros para ello. Consulte con su autoridad local o
minorista para obtener información sobre el reciclaje (Directiva de Residuos de
Aparatos Eléctricos y Electrónicos).
Si en algún momento futuro requiere desechar este producto por favor recuerde que:
Todas las baterías y acumuladores deben retirarse de este producto (Retiro de baterías
y acumuladores residuales).
SCR-96
USB/MP3/CD/Cassette/Radio
Draagbare speler
Handleiding
Nederlands
LENCO raadt aan deze handleiding aandachtig door te lezen voordat u het apparaat
gebruikt.
Voor informatie en ondersteuning, www.lenco.eu
WAARSCHUWING
STEL DIT APPARAAT NIET BLOOT AAN REGEN OF VOCHT OM BRAND- EN
SCHOKGEVAAR TE VOORKOMEN.
LET OP
GEVAAR VAN ELEKTRISCHE SCHOK
NIET OPENEN
WAARSCHUWING: SCHOKGEVAAR-NIET OPENEN
HET BLIKSEMSCHICHT MET PIJLPUNT SYMBOOL - – in een gelijkzijdige
driehoek is bedoeld om de gebruiker attent te maken op de aanwezigheid van
“gevaarlijke spanning” binnenin de behuizing van het product die sterk genoeg kan
zijn om te leiden tot een gevaar op elektrische schokken.
HET UITROEPTEKEN - in een gelijkzijdige driehoek wordt gebruikt om aan te
geven dat een bepaald onderdeel voor veiligheidsredenen alleen mag worden
vervangen door een onderdeel dat is gespecificeerd in de handleiding.
Met het volgende label dat is aangebracht op het apparaat wordt aangegeven dat
u de juiste procedure voor het werken met de laserstraal wordt dient te
gebruiken:
KLASSE 1 LASERPRODUCT LABEL Het hiernaast getoonde label is aangebracht om u te
informeren dat het apparaat een laseronderdeel bevat.
WAARSCHUWINGSLABEL TER INFORMATIE STRALING Dit label zit aan de binnenkant van het apparaat. Zoals getoond in de
afbeelding. Om u te waarschuwen tegen verdere maatregelen op het
apparaat. De apparatuur bevat een laser die laserstralen uitstraalt volgens
de limiet van een klasse 1 laserproduct..
VEILIGHEIDSINSTRUCTIES
1. LEES DE INSTRUCTIES – Alle veiligheids- en bedieningsinstructies moeten
gelezen worden vóór het product wordt gebruikt.
2. BEWAAR DE INSTRUCTIES - De veiligheids- en bedieningsinstructies moeten
worden bewaard, zodat u deze op een later tijdstip kunt raadplegen.
3. NEEM DE WAARSCHUWINGEN IN ACHT- Zorg ervoor dat u alle
waarschuwing op het product en in deze handleiding nauwkeurig in acht neemt.
4. VOLG DE INSTRUCTIES - Zorg ervoor dat u de gebruiksinstructies opvolgt.
5. WATER EN VOCHT - Gebruik dit product niet in de nabijheid van water, bijv. in
de nabijheid van een bad, gootsteen, keukenkraan, wasbakken, nabij een zwembad
of in natte kelders.
6. VENTILATIE – Het apparaat moet zo worden geplaatst dat de plaats of positie
van het apparaat een goede ventilatie niet belemmerd. Plaats het apparaat niet op een
bed, sofa, tapijt of soortgelijke ondergrond, omdat dit de ventilatieopeningen kan
blokkeren, of plaats het niet in een ingebouwde installatie, zoals een boekenkast of
kast die de luchtstroom door de ventilatieopeningen kan belemmeren..
7. WARMTE - Houd het product uit de buurt van warmtebronnen, zoals radiatoren,
verwarmingsbuizen, ovens of andere producten (inclusief versterkers) die warmte
produceren.
8. VOEDING – Sluit dit product alleen aan op het type voeding dat is aangegeven in
de handleiding of op het label.
9. BESCHERMING NETSNOER – : Zorg het netsnoer zo ligt dat het niet
waarschijnlijk is dat er op gestapt wordt, of dat de kabel bekneld raakt door
voorwerpen die erop of ertegenaan staan.
10. HOOGSPANNINGSKABELS - Een buitenantenne moet niet nabij
hoogspanningskabels worden geplaatst.
11. VOORWERPEN EN VLOEISTOFFEN -.Zorg ervoor dat er geen voorwerpen
vallen of vloeistoffen worden gemorst in de behuizing het apparaat via de openingen.
12. ESD WAARSCHUWING – Door elektrostatische ontlading kan het voorkomen
dat het display niet naar behoren werkt of dat het apparaat niet op de bediening
reageert. Zet het apparaat uit en haal de stekker uit het stopcontact. Sluit opnieuw
aan na een paar seconden.
13. SCHADE DIE ONDERHOUD VEREIST – Het apparaat moet worden
nagekeken door gekwalificeerd onderhoudspersoneel als:
a. Het netsnoer of de stekker is beschadigd.
b. Er voorwerpen of vloeistoffen in de behuizing van het apparaat zijn gevallen.
c. Het apparaat is blootgesteld aan regen.
d. Het apparaat is gevallen of de behuizing is beschadigd.
e. Het apparaat niet naar behoren werkt.
14. ONDERHOUD – De gebruiker mag geen ander onderhoud aan het product
uitvoeren dan het onderhoud dat in de gebruiksaanwijzing vermeldt staat. Al het
andere onderhoud moet worden uitgevoerd door een gekwalificeerd
onderhoudsmonteur.
.
Opmerkingen:
a. Vuile of bekraste CD’s kunnen soms overslaan. Maak de CD schoon of vervang de
CD.
b. Als het apparaat niet juist werkt of een fout vertoont, haal de stekker uit het
stopcontact en verwijder alle batterijen. Schakel het apparaat daarna opnieuw in.
VOOR GEBRUIK
Opmerkingen: OVER HET GEBRUIK VAN COMPACT DISCS.
Vuile, beschadigde of vervormde disks kunnen het apparaat beschadigen, gebruik
daarom alleen:
a. Ondersteunde CD’s. Gebruik alleen compact disks waarop het onderstaande logo is
aangebracht.
b. CD’s met digitale audiosignalen.
VOEDINGSBRONNEN
to a wall outlet = naar stopcontact
to AC IN = naar AC IN
Insert 8 x “C” size batteries into the battery compartment = Plaats 8 x maat “C”
batterijen in het batterijcompartiment
NETSTROOM
U kunt uw draagbare systeem van stroom voorzien door het afneembare netsnoer in
de voedingsingang op de achterkant van het apparaat te steken en de stekker in het
stopcontact te steken. Controleer of de spanning van uw apparaat overeenkomt met
uw plaatselijke netspanning. Zorg ervoor dat het netsnoer volledig in het apparaat is
gestoken.
BATTERIJSTROOM
Plaats 8 x maat “C” batterijen in het batterijcompartiment. Zorg ervoor dat de
batterijen juist zijn geplaatst om schade aan het apparaat te voorkomen. Haal de
batterijen altijd uit het apparaat als het apparaat voor een lange periode niet wordt
gebruikt, omdat dit batterijlekkage en de schade als gevolg hiervan kan voorkomen.
Opmerkingen:
- Gebruik batterijen van hetzelfde type. Gebruik nooit verschillende soorten batterijen
samen.
- Haal de stekker uit het stopcontact als u het apparaat gebruikt met batterijen.
PLAATSING VAN BEDIENINGSELEMENTEN
FM ANTENNA = FM-ANTENNE
SKIP + = SKIP +
VOLUME CONTROL = VOLUMEREGELING
SKIP - = SKIP FUNCTION SELECTOR = FUNCTIESCHAKELAAR
PLAY / PAUSE / USB = PLAY / PAUSE / USB
STOP = STOP
MODE = MODE
PROGRAM = PROGRAM
ALBUM = ALBUM
TAPE BUTTONS - PAUSE, STOP / EJECT, FAST FORWARD, REWIND, PLAY,
RECORD = KNOPPEN VOOR CASSETTEDECK - PAUSE,
STOP / EJECT, VOORUITSPOELEN, TERUGSPOELEN,
PLAY, RECORD
USB SLOT = USB-POORT
TUNING CONTROL = AFSTEMKNOP
BAND SELECTOR = BANDSCHAKELAAR
MINUTE = MINUUT
HOUR = UUR
TIMER = TIMER
LCD DISPLAY = LCD-DISPLAY
FM STEREO INDICATOR = STEREO-INDICATOR FM-BAND
CASSETTE DOOR = CASSETTEDEUR
BEDIENING RADIO
ALGEMENE BEDIENING
1. Stel de “FUNCTIESCHAKELAAR” in op “RADIO” modus.
2. Selecteer de gewenste band met behulp van de “BANDSCHAKELAAR”.
3. Stel de radiofrequentie in op uw favoriete zender met behulp van de
“AFSTEMKNOP”.
4. Stel het volume in op het gewenste niveau met behulp van de
“VOLUMEREGELING”.
FM / FM-STEREO ONTVANGST
- Stel de “BANDSCHAKELAAR” in op FM-modus voor MONO ontvangst.
- Stel de “BANDSCHAKELAAR” in op FM ST-modus voor FM STEREO ontvangst.
De Stereo-indicator licht op, wat aangeeft dat het apparaat in FM ST-modus is.
VOOR BETERE ONTVANGST
-
Pas de richting van de antenne aan voor betere ontvangst.
-
Draai of verplaats het toestel voor betere AM ontvangst.
BEDIENING CASSETTEDECK
ALGEMENE BEDIENING
PAUSE
Druk op deze knop om het afspelen van de cassette te
pauzeren.
Druk nogmaals op de knop om het afspelen te hervatten.
STOP/EJECT
Druk op deze knop om het afspelen van de cassette te
stoppen.
Druk nadat de cassette is gestopt nogmaals op de knop om
de cassettedeur te openen,
Druk op deze knoppen om vooruit of terug te spoelen.
FAST FORWARD &
REWIND
PLAY
Druk op deze knop om het afspelen van de cassette te
starten.
RECORD
Druk op deze knop in combinatie met de knop “PLAY”
om te starten met opnemen.
AFSPELEN
1. Stel de “FUNCTIESCHAKELAAR” in op “TAPE”.
2. Druk op de knop “STOP / EJECT” om de cassettedeur te openen en plaats uw
cassette.
3. Sluit de cassettedeur.
4. Druk op de knop “PLAY” om het afspelen van de cassette te starten.
5. Stel het volume naar wens in met behulp van de “VOLUMEREGELING”.
6. Druk op de knop “PAUSE” als u het afspelen wilt pauzeren.
7. Druk op de knop “STOP / EJECT” als u het afspelen wilt stoppen.
OPNEMEN
1. Druk op de knop “STOP / EJECT” om de cassettedeur te openen en plaats een lege
cassette.
2. Selecteer de bron die u wilt opnemen.
Om op te nemen van radio – Stel de “FUNCTIESCHAKELAAR” in op “RADIO”
en stem af op de gewenste zender.
Om op te nemen van CD / MP3 – Plaats de disc in het CD-compartiment. Stel de
“FUNCTIESCHAKELAAR” in op “CD / MP3 / USB” en selecteer de gewenste
track.
Om op te nemen van USB – Plaats een USB-apparaat in de USB-poort. (Zorg ervoor
dat er geen disc is geplaatst in de CD-speler. )
Stel de “FUNCTIESCHAKELAAR” in op “CD / MP3 / USB” en selecteer de
gewenste track.
3. Druk op zowel de knop “RECORD” als de knop “PLAY” om het opnemen te
starten.
4. Druk op de knop “STOP / EJECT” om het opnemen te stoppen.
BEDIENING CD / MP3
ALGEMENE BEDIENING
PLAY / PAUSE / USB
Druk op deze knop om het afspelen van een
CD/MP3-disc te starten.
Druk nogmaals om het afspelen tijdelijk te pauzeren.
Druk een derde keer om het afspelen te hervatten.
&
Druk op deze knoppen om naar de volgende of vorige
SKIP +
SKIP track te gaan. Houd de knoppen ingedrukt om vooruit of
terug te spoelen.
STOP
Druk op deze knop om het afspelen te stoppen.
AFSPELEN
1. Stel de “FUNCTIESCHAKELAAR” in op “CD/MP3/USB” modus.
2. Open de CD-deur en plaats een CD/MP3-disc met het label omhoog in het
CD-compartiment.
3. Sluit de CD-deur.
4. De CD zal worden ingeladen als deze in het apparaat is geplaatst.
5. Druk op de knop “PLAY / PAUSE / USB” om het afspelen van de CD/MP3-disc te
starten.
6. Stel het volume in naar wens met behulp van de “VOLUMEREGELING”.
7. Druk nogmaals op de knop “PLAY / PAUSE / USB” als u het afspelen wilt
pauzeren.
8. Druk op de knop “STOP” om het afspelen te stoppen
BEDIENING CD/MP3
PROGRAMMA
Zorg ervoor dat u op de knop “STOP” drukt vóór gebruik.
1. Druk op de knop “PROGRAM”, de melding “P01” knippert op het display.
2. Selecteer de gewenste track met behulp van de knoppen “SKIP +” of “SKIP -” (u
kunt het album selecteren door op de knop “ALBUM” te drukken).
3. Druk nogmaals op de knop “PROGRAM” om de geselecteerde track in het
geheugen op te slaan.
4. Herhaal stappen 2 en 3 om aanvullende tracks in het geheugen op te slaan.
5. Druk als alle tracks zijn geprogrammeerd op de knop “PLAY / PAUSE / USB” om
de disc in de geprogrammeerde volgorde af te spelen.
6. Druk twee keer op de knop “STOP” om het geprogrammeerd afspelen te
beëindigen.
MODUS
Druk vóór of tijdens het afspelen van een CD / MP3-disc op de knop “MODE”, bij
elke druk op de knop verandert de modusfunctie als volgt:
1 - HERHAAL 1
2 - HERHAAL ALBUM ( *ALLEEN VOOR MP3)
3 - HERHAAL ALLE
4 – WILLEKEURIG AFSPELEN
5 – NORMAAL AFSPELEN
BEDIENING USB
ALGEMENE BEDIENING
PLAY / PAUSE / USB
Druk op deze knop om het afspelen van tracks op het
USB-apparaat te starten.
Druk nogmaals om het afspelen tijdelijk te pauzeren.
Druk een derde keer om het afspelen te hervatten.
SKIP +
&
Druk op deze knoppen om naar de volgende of vorige
SKIP track te gaan. Houd de knoppen ingedrukt om vooruit of
terug te spoelen.
STOP
Druk op deze knop om het afspelen te stoppen.
AFSPELEN
1. Plaats het USB apparaat in de USB-poort. (Zorg ervoor dat er geen disc is geplaatst
in de CD-speler)
2. Stel de “FUNCTIESCHAKELAAR” in op “CD / MP3 / USB”.
3. Houd de knop “PLAY / PAUSE / USB” een paar seconden ingedrukt om de
USB-modus te starten.
4. Het afspelen begint automatisch bij de eerste track.
5. Druk op de knop “STOP” als u het afspelen wilt stoppen.
6. Druk nogmaals op de knop “PLAY / PAUSE / USB” het afspelen zal starten vanaf
de eerste track.
DE KNOPPEN PROGRAM, MODE
De werking van PROGRAM, MODE is hetzelfde als bij gebruik van CD / MP3. Kijk
in de paragraaf BEDIENING CD / MP3 voor meer informatie.
ANDERE FUNCTIES
INSTELLEN KLOK
Zorg ervoor dat het apparaat in CD-modus is om de klok in te stellen.
1. Druk op de knop “TIMER”. (Houd de knop “TIMER” ingedrukt tijdens het
instellen van de tijd)
2. Druk op de knop “HOUR” om de uren in te stellen.
3. Druk op de knop “MIN” om de minuten in te stellen.
4. Laat alle knoppen los om de instelling te bevestigen. De instelling verschijnt op het
display.
Recycling
Indien u zich in de toekomst van dit toestel wenst te ontdoen, let er dan op dat
elektrisch afvalmateriaal niet met het huishoudelijk afval mag worden verwijderd.
Breng het toestel naar een kringloopwinkel of andere voorziening voor recycling.
Neem contact op met uw plaatselijke autoriteit of winkelier indien u meer informatie
wenst over recycling. (Richtlijn voor Afval van Elektrische en Elektronische
Apparaten, AEEA).
Als u zich op enig moment in de toekomst wilt ontdoen van dit product, bedenk dan
dat: Alle batterijen en accu’s moeten worden verwijderd uit dit product (richtlijn
Afgedankte Elektrische en Elektronische Apparatuur).
SCR-186
USB/MP3/CD/Kassette/Radio
Tragbares Abspielgerät
Benutzerhandbuch
Englisch
LENCO empfiehlt ein aufmerksames Lesen der Bedienungsanleitung vor der Inbetriebnahme des
Geräts.
Für weitere Information und Support gehen Sie bitte auf die Webseite www.lenco.eu
WARNUNG
ZUR VERMEIDUNG VON FEUER- ODER STROMSCHLAGGEFAHR, SETZEN SIE
DIESES GERÄT BITTE NIEMALS REGEN ODER STARKER FEUCHTIGKEIT AUS.
ACHTUNG
STROMSCHLAGGEFAHR!
NICHT ÖFFNEN!
WARNUNG: STROMSCHLAGGEFAHR - NICHT ÖFFNEN
Das Dreieckszeichen mit BLITZSYMBOL verweist auf nicht isolierte „gefährliche
Spannungen“ im Gerätegehäuse, die so hoch sein können, dass sie eine Gefahr von Stromschlägen
bilden.
Das AUSRUFEZEICHEN in einem gleichseitigen Dreieck wird verwendet, um anzuzeigen, dass
bestimmte Bauteile nur durch Bauteil ersetzt werden darf, die den Angaben in der Dokumentation
entsprechen.
Das folgende Etikett wurde am Gerät angebracht, um auf einen sachgemäße Umgang mit
Geräten, die einen dem Laserstrahl verwenden, hinzuweisen:
KLASSE 1 LASERPRODUKT Dieses Etikett wird an der besagten Stelle angebracht, um darauf hinzuweise, dass das Gerät LaserKomponenten enthält.
STRAHLUNGSWARNHINWEIS Dieses Warnschild befindet sich im Inneren des Geräts. Siehe dargestellte Abbildung. Es dient dazu
auf Gefahren im Umgang mit dem Gerät hinzuweisen. Das Gerät enthält ein Laser, der
Laserstrahlen erzeugt, die den Spezifikationen von Laserprodukten der Klasse 1 entsprechen.
SICHERHEITSHINWEISE
1. LESEN SIE DIE ANWEISUNGEN – Alle Sicherheits- und Bedienungshinweise sollten vor
der Inbetriebnahme durchgelesen werden.
2. ANLEITUNG AUFBEWAHREN – Die Sicherheitshinweise und die Bedienungsanleitung
sollten Sie für den späteren Gebrauch aufbewahren.
3. WARNHINWEISE BEACHTEN – Alle in der Anleitung befindlichen Warnhinweise sollten
beachtet werden.
4. BEFOLGEN SIE DIE ANWEISUNGEN – Alle Bedienungsanweisungen sollten befolgt
werden.
5. WASSER UND FEUCHTIGKEIT – Benutzen Sie das Gerät nicht in der Nähe von Wasser, z.
B. in der Nähe von Badewannen, Waschbecken, Spülbecken, Wäschekammern, in nassen Kellern
oder in der Nähe von Schwimmbecken o. Ä.
6. BELÜFTUNG – Das Gerät sollte so aufgestellt werden, dass die Luftzirkulation nicht
beeinträchtigt wird. Aus diesen Grund sollte das Gerät z. B. nicht auf einem Bett, Sofa oder
weichem Teppich zur Benutzung aufgestellt werden, da dadurch die Ventilationsöffnungen des
Geräts blockiert werden. Aus dem selben Grund sollte das Gerät nicht an Orten aufgestellt werden,
an denen die Luftzirkulation eingeschränkt wird. Dies beinhaltet u. A. geschlossene Regale und
Schränke.
7. HITZE – Stellen Sie das Gerät nicht in der Nähe von Hitzequellen, wie z.B. Heizungen, Herden
oder anderen Geräten die Hitze produzieren (z.B. Verstärker), auf.
8. STROMVERSORGUNG – Das Gerät sollte nur mit der auf dem Gerät oder der
Bedienungsanleitung angegebenen Netzspannung betrieben werden.
9. NETZKABELSCHUTZ – Das Netzkabel muss so verlegt werden, dass es nicht durch
Gegenstände eingeklemmt werden kann bzw. darauf gestellt werden. Achten Sie außerdem darauf,
dass niemand auf das Netzkabel treten kann.
10. HOCHSPANNUNGSLEITUNGEN – Halten Sie eventuelle Außenantenne in ausreichender
Entfernung zu Hochspannungsleitungen.
11. GEGENSTÄNDE UND FLÜSSIGKEITEN IM GERÄT – Achten Sie darauf, dass keine
Gegenstände oder Flüssigkeiten durch die Öffnungen in das Gehäuse gelangen.
12. ELEKTROSTATISCHE LADUNGEN - Wenn die Anzeige nicht mehr richtig funktioniert
oder keine Reaktion auf Tastenbetätigungen besteht, kann dies an elektrostatischen Entladungen
liegen. Schalten Sie das Gerät aus und ziehen Sie den Netzstecker aus der Steckdose heraus.
Schließen Sie das Gerät nach ein paar Sekunden wieder an.
13. BEI REPARATURBEDARF – Lassen Sie das Gerät durch ausgebildetes Wartungspersonal
reparieren, wenn...:
a) Das Netzkabel oder der Netzstecker beschädigt sind.
b) Gegenstände oder Flüssigkeiten in das Gerät gelangt sind.
c) Wenn das Gerät Regen oder Wasser ausgesetzt wurde.
d) Das Gerät heruntergefallen oder das Gehäuse beschädigt ist.
e) Das Gerät nicht normal zu funktionieren scheint.
14. WARTUNG – Der Benutzer sollte keine Versuche anstellen das Gerät eigenhändig zu warten,
es sei denn es wurde entsprechend in der Bedienungsanleitung beschrieben. Wenden Sie sich bei
weiterem Wartungsbedarf immer an ausgebildetes Wartungspersonal.
Hinweise:
a) Verschmutzte oder zerkratzte CD können zu Aussetzern bei der Wiedergabe führen. Reinigen
oder ersetzen Sie die entsprechende CD.
b) Wenn eine Fehlermeldungen oder Fehlfunktion auftreten, ziehen Sie das Netzkabel aus der
Steckdose und entfernen Sie alle Batterien. Stellen Sie danach die Stromversorgung wieder her und
schalten Sie das Gerät an.
INBETRIEBNAHME
Hinweise: Bezüglich Compact Discs.
Da verschmutzte, beschädigte oder verbogene Discs das Gerät beschädigen können, sollten die
folgenden Punkte unbedingt beachtet werden:
a) Unterstützte Compact-Discs. Verwenden Sie nur CDs mit den unten gezeigten Markierungen.
b) Benutzen Sie nur Compact-Discs mit digitalen Audiosignalen.
STROMVERSORGUNG
zur Steckdose
zum Stromversorgungseingang
Legen Sie 8 x Batterien der Größe C in das Batteriefach ein.
NETZBETRIEB
Sie können Ihr tragbares System mithilfe des abnehmbaren Netzkabels an eine Steckdose
anschließen. Überprüfen Sie bitte, ob die Netzspannung mit der Gerätespannung übereinstimmt.
Achten Sie darauf, dass das Netzkabel vollständig am das Gerät angeschlossen wurde.
BATTERIEBETRIEB
Legen Sie 8 x Batterien der Größe C in das Batteriefach ein. Vergewissern Sie sich, dass die korrekt
Batterien eingelegt wurde, um Schaden am Gerät zu vermeiden. Entfernen Sie die Batterien, wenn
das Gerät für einen längeren Zeitraum nicht verwendet wird, da währenddessen die Batterien
anfangen können auszulaufen und dies zu Schäden am Gerät kommen kann.
Hinweise:
- Verwenden Sie nur Batterien des gleichen Typs. Verwenden Sie niemals verschiedene
Batterietypen zusammen.
- Um das Gerät mit Batterien zu benutzen, ziehen Sie das Netzkabel bitte heraus.
ANORDNUNG DER BEDIENELEMENTE
UKW-ANTENNE
KANÄLE DEAKTIVIEREN
LAUTSTÄRKE
KANÄLE DEAKTIVIEREN
FUNKTIONSSCHALTER
WIEDERGABE / PAUSE / USB
STOPP
BETRIEBSART
PROGRAMM
ALBUM
TASTEN DES KASSETTENSYSTEMS - PAUSE, STOPP / AUSWURF,
VORSPULEN, ZURÜCKSPULEN, WIEDERGABE, AUFNAHME
USB-ANSCHLUSS
FREQUENZAUSWAHL
FREQUENZBAND
MINUTE
STUNDE
TIMER
LCD-ANZEIGE
UKW-STEREO-ANZEIGE
KASSETTENFACH
RADIOBETRIEB
ALLGEMEINE BEDIENUNG
1. Stellen Sie den Funktionsschalter auf RADIO.
2. Benutzen Sie den BAND-Schalter zur Auswahl des gewünschten Frequenzbands.
3. Stellen die Radiofrequenz mithilfe des Frequenzdrehknopfs auf den gewünschten Sender.
4. Stellen Sie die Lautstärke auf ein angenehmes Maß.
UKW- & UKW-STEREO-EMPFANG
- Stellen Sie den BAND-Schalter auf FM für den Empfang von UKW-Mono-Signalen.
- Stellen Sie den BAND-Schalter auf FM ST für den Empfang von UKW-Stereo-Signalen. Die
STEREO-Anzeige leuchtet auf und zeigt damit an, dass ein UKW-Stereo-Signal empfangen wird.
FÜR EINEN BESSEREN EMPFANG
Richten Sie die Antenne für einen besseren Empfang neu aus.
-
Stellen Sie das Gerät besser MW-Empfang an einem anderen Ort auf.
BEDIENUNG DES KASSETTENSYSTEMS
ALLGEMEINE BEDIENUNG
PAUSE
Betätigen Sie diese Taste, um die Wiedergabe vorübergehend
anzuhalten.
Betätigen Sie die Taste erneut, um mit der Wiedergabe fortzufahren.
Betätigen Sie diese Taste, um die Kassettenwiedergabe zu stoppen.
STOPP / AUSWURF
Betätigen Sie die Taste ein zweites Mal, nachdem die
Kassettenwiedergabe gestoppt wurde, um das Kassettenfach zu
öffnen.
VORSPULEN &
Benutzen Sie diese Tasten, um die Kassette vor- oder zurückzuspulen.
ZURÜCKSPULEN
WIEDERGABE
Betätigen Sie diese Taste zum Starten der Kassettenwiedergabe.
Betätigen Sie diese Taste zusammen mit der WIEDERGABE-Taste
AUFNAHME
zum Starten der Aufnahme.
WIEDERGABE
1. Stellen Sie den Funktionsschalter auf TAPE.
2. Betätigen Sie die STOPP/AUSWURF-Taste, um das Kassettenfach zu öffnen und legen Sie Ihre
Kassette ein.
3. Schließen Sie das Kassettenfach.
4. Betätigen Sie die WIEDERGABE-Taste, um die Wiedergabe der Kassette zu starten.
5. Stellen Sie die Lautstärke auf ein angenehmes Maß.
6. Betätigen Sie die PAUSE-Taste, wenn Sie die Wiedergabe vorübergehend stoppen wollen.
7. Betätigen Sie die STOPP/AUSWURF-Taste, wenn Sie fertig sind.
AUFNAHME
1. Betätigen Sie die STOPP/AUSWURF-Taste, um das Kassettenfach zu öffnen und legen Sie eine
leere Kassette ein.
2. Wählen Sie ein Eingangssignal, dass Sie aufnehmen möchten.
Zum Aufzeichnen von Radioprogrammen stellen Sie den Funktionsschalter auf "RADIO" und
stellen Sie den gewünschten Sender ein.
Um von einer CD/MP3-Disc aufzunehmen, legen Sie eine Disc in das CD-Ladefach. Stellen Sie den
Funktionsschalter auf den CD/MP3/USB-Modus und wählen Sie den gewünschten Musiktitel.
Zur Aufnahme von USB-Medien schließen Sie Ihr USB-Gerät am USB-Anschluss an. (Achten Sie
darauf, dass sich zur gleichen Zeit keine Disc im Disc-Ladefach befindet.)
Stellen Sie den Funktionsschalter auf den CD/MP3/USB-Modus und wählen Sie den gewünschten
Musiktitel.
3. Betätigen Sie die AUFNAHME-Taste zusammen mit der WIEDERGABE-Taste, um die
Aufnahme zu starten.
4. Betätigen Sie die STOPP/AUSWURF-Taste, wenn Sie mit Aufnahme fertig sind.
CD/MP3-BETRIEB
ALLGEMEINE BEDIENUNG
WIEDERGABE / PAUSE / USB
Betätigen Sie diese zum Starten der Wiedergabe einer
CD/MP3-Disc.
Betätigen Sie die Taste erneut, um die Wiedergabe vorübergehend
anzuhalten.
Betätigen Sie die Taste ein weiteres Mal, um mit der Wiedergabe
fortzufahren.
SKIP+ & Benutzen Sie diese Tasten, um zum nächsten bzw.
vorigen Musiktitel zu springen.
SKIPHalten Sie die Tasten während der Wiedergabe gedrückt,
um eine Schnellsuche zu starten.
STOPP Betätigen Sie diese Taste, um die CD-Wiedergabe vollständig zu stoppen.
WIEDERGABE
1. Stellen Sie den Funktionsschalter auf die CD/MP3/USB-Position.
2. Öffnen Sie das CD-Ladefach und legen Sie eine CD mit der beschrifteten Seite nach oben in das
Ladefach.
3. Schließen Sie das CD-Ladefach.
4. Wenn eine Disc eingelegt wurde, wird die Disc vom Gerät eingelesen.
5. Betätigen Sie die WIEDERGABE/PAUSE/USB-Taste, um die Wiedergabe der CD/MP3-Disc zu
starten.
6. Stellen Sie die Lautstärke auf ein angenehmes Maß.
7. Betätigen Sie die WIEDERGABE/PAUSE-Taste erneut, wenn Sie die Wiedergabe
vorübergehend anhalten wollen.
8. Betätigen Sie die STOPP-Taste, um die Wiedergabe letztendlich zu stoppen.
CD/MP3-Betrieb
PROGRAMM
Achten Sie darauf, vor dem Programmieren der Titel zuerst die STOPP-Taste zu betätigen.
1. Betätigen Sie die PROGRAM-Taste. In der Anzeige erscheint dann blinkend P01.
2. Wählen Sie den gewünschten Titel mithilfe der Tasten SKIP+ und SKIP-. (Sie können das
gewünschte Album mithilfe der ALBUM-Taste wählen.)
3. Betätigen Sie die PROGRAM-Taste erneut, um den gewünschten Titel in die Programmliste
einzufügen.
4. Wiederholen Sie die Schritte 2 und 3, um bei Bedarf weitere Titel zu speichern.
5. Wenn alle gewünschten Titel programmiert sind, betätigen Sie bitte die
WIEDERGABE/PAUSE-Taste zum Starten der Programmwiedergabe.
6. Betätigen Sie die STOPP-Taste zweimal, um die Programmwiedergabe zu beenden.
WIEDERGABEMODUS
Betätigen Sie die MODE-Taste vor oder während der Wiedergabe der CD/MP3-Disc und das Gerät
aktiviert eine der folgenden Wiedergabearten:
1 - Einzelwiederholung (REPEAT 1)
2 - Verzeichniswiederholung (REPEAT ALBUM - *nur MP3)
3 - Alle wiederholen (REPEAT ALL)
4 - Zufallswiedergabe (RANDOM)
5 - Normale Wiedergabe
USB-BETRIEB
ALLGEMEINE BEDIENUNG
WIEDERGABE / PAUSE / USB
Betätigen Sie diese Taste zum Starten der Wiedergabe von
USB-Medien.
Betätigen Sie die Taste erneut, um die Wiedergabe vorübergehend
anzuhalten.
Betätigen Sie die Taste ein weiteres Mal, um mit der Wiedergabe
fortzufahren.
& Benutzen Sie diese Tasten, um zum nächsten bzw. vorigen Musiktitel zu springen.
SKIP+
SKIPHalten Sie die Tasten während der Wiedergabe gedrückt, um eine Schnellsuche zu
starten.
STOPP Betätigen Sie diese Taste, um die USB-Wiedergabe vollständig zu stoppen.
WIEDERGABE
1. Schließen Sie Ihr USB-Gerät am USB-Anschluss an. (Achten Sie darauf, dass sich zur gleichen
Zeit keine Disc im Disc-Ladefach befindet.)
2. Stellen Sie den Funktionsschalter auf die CD/MP3/USB-Position.
3. Halten Sie die WIEDERGABE/PAUSE/USB-Taste für einige Sekunden gedrückt, um den USBModus zu aktivieren.
4. Die Wiedergabe startet automatisch mit dem ersten Titel.
5. Betätigen Sie die STOPP-Taste, wenn Sie mit der Wiedergabe fertig sind.
6. Betätigen WIEDERGABE/PAUSE/USB-Taste erneut und die Wiedergabe startet erneut vom
ersten Titel des Mediums.
PROGRAMMBETRIEB / WIEDERGABEMODUS
Die Bedienung im Programmbetrieb und für den Wiedergabemodus entspricht dem CD/MP3Betrieb. Bitte lesen sie den entsprechenden Abschnitt in dieser Anleitung.
WEITERE FUNKTIONEN:
EINSTELLEN DER UHRZEIT
Zur Einstellung Uhrzeit, vergewissern Sie sich, dass das Gerät sich im CD-Modus befindet.
1. Betätigen Sie die TIMER-Taste. (Lassen Sie die TIMER-Taste während der Zeiteinstellung nicht
los.)
2. Benutzen Sie die HOUR-Taste, um die Stunden einzustellen.
3. Benutzen Sie die MIN-Taste, um die Minuten einzustellen.
4. Lassen Sie alle Tasten los, um die Einstellung zu bestätigen. Die bestätigte Einstellung wird dann
in der Anzeige angezeigt.
Entsorgung
Sollten Sie dieses Produkt zu einem späteren Zeitpunkt entsorgen müssen, beachten Sie bitte:
Elektro- und Elektronik-Altgeräte dürfen nicht mit dem Hausmüll entsorgt werden. Bitte
wiederverwerten, falls entsprechende Einrichtungen vorhanden sind. Für Hinweise zur
Wiederverwertung wenden Sie sich an die zuständigen örtlichen Stellen oder Ihren Händler.
(Richtlinie über Elektro- und Elektronik-Altgeräte)
Wenn Sie zu irgendeinem Zeitpunkt in der Zukunft dieses Produkt entsorgen müssen, beachten Sie
bitte, dass alle Batterien und Akkumulatoren aus dem Produkt entfernt werden müssen.
SCR-96
CHAÎNE HI-FI PORTABLE MP3 AVEC RADIO, CONNECTEUR
USB/LECTEUR DE CASSETTES ET LECTEUR CD
Manuel d’utilisation
Anglais
LENCO recommande d’attentivement lire ce manuel avant toute utilisation de l’unité.
Pour davantage d’informations et d’assistance, visitez www.lenco.eu
AVERTISSEMENT
AFIN
DE
PRÉVENIR
TOUT
RISQUE
D'INCENDIE
ET
D'ÉLECTROCUTION, N'EXPOSEZ PAS CET APPAREIL A LA PLUIE OU
L'HUMIDITÉ.
ATTENTION
RISQUE D‘ÉLECTROCUTION
N’OUVREZ PAS
AVERTISSEMENT : Danger de décharge électrique – Ne pas ouvrir.
LE SYMBOLE AVEC L'ÉCLAIR DANS LE TRIANGLE vous prévient de la
présence d’une tension dangereuse non isolée à l’intérieur du produit. Cette tension
peut suffire à provoquer un choc électrique sur les personnes.
LE POINT D’EXCLAMATION situé dans un triangle équilatéral indique qu’un
composant spécifique doit seulement être remplacé par le composant spécifié dans ce
manuel pour des raisons de sécurité.
Le logo suivant apposé sur le produit indique le mode opératoire du rayon laser :
LOGO DES PRODUITS LASER DE CLASSE 1 Cette étiquette est apposée à l’endroit indiqué et informe
l’utilisateur de la présence d’un émetteur laser dans l’unité.
ÉTIQUETTE D'AVERTISSEMENT, INFORMATIONS LIÉES
AUX RADIATIONS LASER Cette étiquette se trouve sur la paroi interne du boîtier de l’unité. Tel
qu’indiqué sur l’image. Celle-ci permet d’avertir l’utilisateur. L’unité
contient un émetteur laser, celui-ci est conforme aux limites de la
catégorie des produits laser de classe 1.
INSTRUCTIONS DE SÉCURITÉ
1. LISEZ LES INSTRUCTIONS - Lisez la totalité des instructions de sécurité et
d’utilisation avant la première utilisation de cette unité.
2. Conservez les instructions - Conservez les instructions de sécurité et d’utilisation
afin de pouvoir vous y référer ultérieurement.
3. OBSERVEZ LES AVERTISSEMENTS - Tous les avertissements apposés sur le
produit et figurant dans ce manuel d’utilisation doivent être observés.
4. SUIVEZ LES INSTRUCTIONS – Vous devez suivre toutes les instructions de
sécurité.
5. EAU ET HUMIDITÉ---N’utilisez pas cet appareil près de points d’eau (par
exemple, à proximité d’une baignoire, d’un évier de cuisine, d’une cuve de
buanderie, dans un sous-sol humide, près d’une piscine, etc.).
6. VENTILATION – Installez l’unité de manière à ce que son emplacement ou sa
position n’affecte pas la ventilation de celle-ci. Les ouvertures ne doivent pas être
bloquées en installant le produit sur un lit, canapé, tapis ou autres surfaces similaires,
dans un espace confiné tel qu’une bibliothèque ou étagère pouvant obstruer les
orifices de ventilation de l’unité.
7. CHALEUR - Le produit doit être installé loin des sources de chaleur telles que des
radiateurs, conduits d’air chaud, poêles, fours ou autres produits (amplificateurs
inclus) produisant de la chaleur.
8. SOURCE D’ALIMENTATION - L’unité doit être raccordée à une source
d’alimentation dont les caractéristiques correspondent à celles figurant sur la plaque
signalétique du produit.
9. PROTECTION DU CORDON D’ALIMENTATION - Les cordons électriques
doivent être disposés de manière à ce que personne ne marche dessus et qu’aucun
objet de repose dessus.
10. LIGNES ÉLECTRIQUES – Installez votre antenne extérieure à l’écart des lignes
électriques.
11. INSERTION D’OBJETS ET DE LIQUIDES – Veillez à ce qu’aucun objet ou
liquide ne pénètre à l’intérieur de l’unité.
12. AVERTISSEMENT LIÉ AUX DÉCHARGES ÉLECTROSTATIQUES – Tout
dysfonctionnement de l’écran ou des commandes peut être lié à une décharge
électrostatique. Éteignez puis débranchez l’unité. Reconnectez celle-ci après
quelques secondes.
13. DOMMAGES NÉCESSITANT UNE RÉPARATION – La réparation de l’unité
doit être confiée à un technicien spécialisé lorsque :
a. Le cordon d’alimentation ou sa fiche est endommagé.
b. Un objet ou un liquide a pénétré à l’intérieur de l’unité.
c. L’appareil a été exposé à la pluie.
d. L’appareil a subi une chute ou son boîtier est endommagé.
e. L’appareil ne fonctionne pas normalement.
14. RÉPARATION – L’utilisateur ne doit effectuer aucun travail d'entretien non
mentionné dans ce manuel. Tous les autres travaux d’entretien doivent être confiés à
du personnel d’entretien qualifié.
Remarques :
a. Les disques sales ou rayés peuvent entraîner des sauts de lecture. Nettoyez ou
remplacez le disque.
b. En cas de panne d’écran ou de dysfonctionnement, débranchez le cordon
d’alimentation CA puis retirez les piles de l’unité. Mettez ensuite en marche l’unité.
AVANT TOUTE UTILISATION
Remarques : REMARQUE LIÉE AUX DISQUES COMPACTS.
Les disques sales, endommagés ou déformés peuvent endommager l’unité, veuillez
donc prendre en considération les points suivants :
a. Disques compacts compatibles. Utilisez seulement les disques compacts munis du
logo suivant.
b. Les disques compacts contenant seulement des données audio numériques.
SOURCES D’ALIMENTATION
vers une prise de courant murale
vers le connecteur d'alimentation de l'unité
Insérez 8 piles « C » dans le compartiment à piles.
ALIMENTATION CA
Vous pouvez alimenter votre système portable en raccordant une extrémité du cordon
d’alimentation CA amovible à une prise de courant CA et l’autre extrémité au
connecteur Alimentation de l’unité. Vérifiez que la tension nominale de l’unité
correspond à celle de votre installation. Assurez-vous que le cordon d’alimentation
CA est correctement raccordé à l'unité.
ALIMENTATION PAR DES PILES
Insérez 8 piles « C » dans le compartiment à piles. Assurez-vous de correctement
insérer les piles afin prévenir tout dommage de l'unité. Retirez toujours les piles lors
de périodes de non-utilisation prolongées, ceci permet de prévenir toute fuite de
combustible et dommage subséquent.
Remarques :
- Utilisez seulement des piles de même type. Ne mélangez jamais plusieurs types de
piles.
- Pour alimenter l’unité par des piles, débranchez le cordon d’alimentation CA.
EMPLACEMENT DES COMMANDES
ANTENNE FM
SAUT +
COMMANDE DE RÉGLAGE DU VOLUME
SAUT SÉLECTEUR DE FONCTIONS
LECTURE/PAUSE/USB
ARRÊT
MODE
PROGRAMMATION
ALBUM
COMMANDES DU LECTEUR DE CASSETTES - PAUSE, ARRÊT/ÉJECTION,
AVANCE
RAPIDE,
REMBOBINAGE,
LECTURE,
ENREGISTREMENT.
CONNECTEUR USB
COMMANDE DE RÉGLAGE
SÉLECTEUR DE BANDE DE FRÉQUENCES RADIO
MINUTE
HEURE
MINUTERIE
ÉCRAN LCD
INDICATEUR STÉRÉO FM
COUVERCLE DU LECTEUR DE CASSETTES
MODE OPÉRATOIRE DE LA RADIO
FONCTIONNEMENT BASIQUE
1. Positionnez le sélecteur « FONCTION » sur le mode « Radio ».
2. Sélectionnez la bande de fréquences radio désirée via le sélecteur « Bande ».
3. Réglez la fréquence radio via la commande de réglage.
4. Réglez le volume sur le niveau de votre choix à l’aide de la commande « Volume ».
RÉCEPTION RADIO FM / FM STÉRÉO
- Positionnez le sélecteur « BANDE » sur le mode FM pour activer la réception
radio MONO.
- Positionnez le sélecteur « BANDE » sur le mode FM.ST pour activer la réception
radio FM STÉRÉO. Le témoin Stéréo s’allume pour indiquer que le mode radio FM
ST. est activé.
POUR UNE RÉCEPTION OPTIMALE
-
Réorientez l’antenne pour améliorer la qualité de réception radio.
-
Réorientez l’unité pour améliorer la réception radio AM.
MODE OPÉRATOIRE DU LECTEUR DE CASSETTES
FONCTIONNEMENT BASIQUE
PAUSE
Appuyez sur cette touche pour interrompre la lecture de la
cassette.
Appuyez à nouveau pour reprendre la lecture.
ARRÊT/ÉJECTION
Appuyez sur cette touche pour interrompre la lecture
de la cassette.
Lorsque les bobines de la cassette ont cessé de tourner,
appuyez de nouveau sur cette touche pour ouvrir le lecteur
de cassettes.
AVANCE RAPIDE ET Utilisez ces touches pour effectuer une avance
rapide/rembobinage sur la cassette.
REMBOBINAGE
LECTURE
Appuyez sur la touche Lecture pour lancer la lecture
de la cassette.
ENREGISTREMENT
Appuyez sur cette touche ainsi que sur la
touche Lecture pour commencer l’enregistrement.
Lecture
1. Positionnez le sélecteur « FONCTION » sur le mode « CASSETTE ».
2. Appuyez sur la touche « ARRÊT/ÉJECTION » pour ouvrir le couvercle du lecteur
de cassettes, insérez ensuite votre cassette.
3. Refermez le couvercle du lecteur de cassettes.
4. Appuyez sur la touche « LECTURE » pour démarrer la lecture de la cassette.
5. Réglez le volume sur le niveau de votre choix à l’aide de la commande « Volume ».
6. Appuyez sur la touche « PAUSE » pour interrompre la lecture de la cassette.
7. Appuyez sur la touche « ARRÊT/ÉJECTION » lorsque vous avez terminé.
Enregistrement EN COURS
1. Appuyez sur la touche « ARRÊT/ÉJECTION » pour ouvrir le couvercle du lecteur
de cassettes, insérez ensuite votre cassette vierge.
2. Sélectionnez la source à enregistrer.
Pour enregistrer une station radio - positionnez le sélecteur « FONCTION » sur le
mode « RADIO » puis sélectionnez la station radio de votre choix.
Pour enregistrer à partir d'un CD/CD MP3 - installez un disque dans le lecteur CD.
Positionnez le sélecteur « FONCTION » sur le mode « CD/MP3/USB » puis
sélectionnez la musique de votre choix.
Pour enregistrer à partir d'un périphérique USB - raccordez un périphérique USB au
connecteur USB de l'unité. (Assurez-vous qu'aucun disque n'est installé dans le
lecteur CD).
Positionnez le sélecteur « FONCTION » sur le mode « CD/MP3/USB » puis
sélectionnez la musique de votre choix.
3. Appuyez sur la touche « ENREGISTREMENT » ainsi que sur la touche «
LECTURE » pour commencer l’enregistrement.
4. Appuyez sur la touche « ARRÊT/ÉJECTION » lorsque vous avez terminé.
Mode opératoire des disques CD/MP3
FONCTIONNEMENT BASIQUE
Appuyez sur cette touche pour lancer la lecture du
LECTURE/PAUSE/USB
CD/CD MP3.
Appuyez à nouveau sur cette touche pour interrompre
la lecture du CD/ CD MP3.
Appuyez à nouveau pour reprendre la lecture.
SAUT +
et
Utilisez ces touches pour accéder à la piste
suivante/précédente.
SAUT Pressez et maintenez enfoncée cette touche pour
rechercher une durée.
ARRÊT
Appuyez sur cette touche pour arrêter la lecture du
CD/CD MP3.
Lecture
1. Positionnez le sélecteur « FONCTION » sur le mode « CD/MP3/USB ».
2. Ouvrez le couvercle du lecteur CD puis insérez un CD/CD MP3 dans le lecteur en
dirigeant la face imprimée de celui-ci vers le haut.
3. Refermez le couvercle du lecteur CD.
4. Le disque est analysé.
5. Appuyez sur la touche « LECTURE/PAUSE/USB » pour démarrer la lecture du
CD/CD MP3.
6. Réglez le volume sur le niveau de votre choix à l’aide de la commande « Volume ».
7. Appuyez à nouveau sur la touche « LECTURE/PAUSE/USB » pour interrompre la
lecture.
8. Appuyez sur la touche « ARRÊT » lorsque vous avez terminé.
Mode opératoire des CD/CD MP3
PROGRAMMATION
Appuyez toujours sur la touche « ARRÊT » avant utilisation.
1. Appuyez sur la touche « PROGRAMMATION », « P01 » s’affiche et clignote.
2. Sélectionnez la piste de votre choix via les touches « SAUT+ » et « SAUT- ».
(Vous pouvez directement sélectionner un album en appuyant de manière répétée sur
la touche « ALBUM »).
3. Appuyez à nouveau sur la touche « PROGRAMMATION » pour confirmer l’ajout
de la piste au programme.
4. Répétez les étapes 2 à 3 pour ajouter de nouvelles pistes au programme.
5. Une fois les pistes désirées programmées, appuyez sur la touche
LECTURE/PAUSE/USB pour démarrer la lecture du disque dans l’ordre de
programmation.
6. Appuyez deux fois sur la touche « ARRÊT » pour terminer la lecture du
programme.
MODE
En cours de lecture d’un disque CD/MP3, appuyez sur la touche « MODE » pour
sélectionner un des modes de répétition suivants :
1 - RÉPÉTITION 1
2 – RÉPÉTITION DE L'ALBUM (pour les disques MP3 seulement)
3 - RÉPÉTITION TOTALE
4 - ALÉATOIRE
5- LECTURE NORMALE
MODE OPÉRATOIRE DE LA FONCTION USB
FONCTIONNEMENT BASIQUE
LECTURE/PAUSE/USB
Appuyez sur cette touche pour démarrer la lecture du
contenu du périphérique USB.
Appuyez à nouveau sur cette touche pour interrompre la
lecture du contenu du périphérique USB.
Appuyez à nouveau pour reprendre la lecture.
SAUT +
et
Utilisez ces touches pour accéder à la piste
suivante/précédente.
SAUT Pressez et maintenez enfoncée cette touche pour
rechercher une durée.
ARRÊT
Appuyez sur cette touche pour arrêter le lecteur du
contenu du périphérique USB.
Lecture
1. Raccordez un périphérique USB au connecteur USB de l'unité. (Assurez-vous
qu'aucun disque n'est installé dans le lecteur CD).
2. Positionnez le sélecteur « FONCTION » sur le mode « CD/MP3/USB ».
3. Pressez et maintenez enfoncée la touche « LECTURE/PAUSE/USB » pendant
quelques secondes pour sélectionner le mode USB.
4. La lecture de la première musique démarre automatiquement.
5. Appuyez sur la touche « ARRÊT » lorsque vous avez terminé.
6. Appuyez à nouveau sur la touche « LECTURE/PAUSE/USB », la lecture reprend à
partir de la première piste.
MODE PROGRAMMATION
Le mode opératoire du MODE PROGRAMMATION est identique au mode CD/CD
MP3. Veuillez vous référer à la section CD et CD MP3.
AUTRES FONCTIONNALITÉS
RÉGLAGE DE L'HORLOGE
Pour régler l'horloge, vérifiez que le mode CD est activé.
1. Appuyez sur la touche « MINUTERIE ». (Ne relâchez pas la touche «
MINUTERIE » lors du réglage de l'horloge).
2. Utilisez la touche « HEURE » pour régler l'heure.
3. Utilisez la touche « MINUTE » pour régler les minutes.
4. Relâchez les touches pour confirmer le réglage. L'horloge s'affiche.
Recyclage
Si à l'avenir vous devez vous débarrasser de ce produit, veuillez noter que :
Les produits électriques ne peuvent pas être jetés avec le reste des déchets ménagers.
Si possible, amenez l'appareil à un centre de recyclage. Vérifiez auprès de votre
municipalité ou de votre détaillant pour en savoir plus sur le recyclage. (Directive
relative aux déchets d’équipements électriques et électroniques).
A noter lors de la mise au rebut de ce produit : les piles et batteries doivent être
retirées de l’unité (retrait des batteries et piles).