1
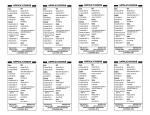
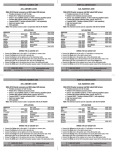
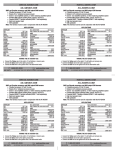
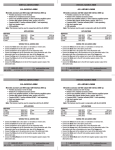
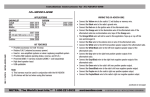
APPLICATIONS
APPLICATIONS
CHRYSLER
• 300 2005-07
• Aspen 2007
• PT Cruiser 2006-07
CHRYSLER
• 300 2005-07
• Aspen 2007
• PT Cruiser 2006-07
DODGE
• Caliber 2007
• Charger 2005-07
• Dakota 2005-07
• Durango 2005-07
• Magnum 2005-07
• Ram 2006-07
DODGE
• Caliber 2007
• Charger 2005-07
• Dakota 2005-07
• Durango 2005-07
• Magnum 2005-07
• Ram 2006-07
JEEP
• Grand Cherokee 2005-07
• Commander 2006-07
• Compass 2007
• Patriot 2007
JEEP
• Grand Cherokee 2005-07
• Commander 2006-07
• Compass 2007
• Patriot 2007
MITSUBISHI
• Raider 2005-07
MITSUBISHI
• Raider 2005-07
INSTXSVI-6502-NAV REV. 06/28/10
1-800-221-0932 www.metraonline.com
METRA ELECTRONICS CORPORATION © COPYRIGHT 2010
INSTXSVI-6502-NAV REV. 06/28/10
1-800-221-0932 www.metraonline.com
METRA ELECTRONICS CORPORATION © COPYRIGHT 2010
APPLICATIONS
APPLICATIONS
CHRYSLER
• 300 2005-07
• Aspen 2007
• PT Cruiser 2006-07
CHRYSLER
• 300 2005-07
• Aspen 2007
• PT Cruiser 2006-07
DODGE
• Caliber 2007
• Charger 2005-07
• Dakota 2005-07
• Durango 2005-07
• Magnum 2005-07
• Ram 2006-07
DODGE
• Caliber 2007
• Charger 2005-07
• Dakota 2005-07
• Durango 2005-07
• Magnum 2005-07
• Ram 2006-07
JEEP
• Grand Cherokee 2005-07
• Commander 2006-07
• Compass 2007
• Patriot 2007
JEEP
• Grand Cherokee 2005-07
• Commander 2006-07
• Compass 2007
• Patriot 2007
MITSUBISHI
• Raider 2005-07
MITSUBISHI
• Raider 2005-07
INSTXSVI-6502-NAV REV. 06/28/10
1-800-221-0932 www.metraonline.com
METRA ELECTRONICS CORPORATION © COPYRIGHT 2010
INSTXSVI-6502-NAV REV. 06/28/10
1-800-221-0932 www.metraonline.com
METRA ELECTRONICS CORPORATION © COPYRIGHT 2010
XSVI-6502-NAV INSTALLATION INSTRUCTIONS
XSVI-6502-NAV INSTALLATION INSTRUCTIONS
NOTE: ASWC SOLD SEPERATELY
NOTE: ASWC SOLD SEPERATELY
In the Chrysler/Dodge/Jeep vehicles listed on back there are no 12 volt accessory
wires in the factory radio harness making the installer run an accessory wire to the
fuse box or underneath the steering column when installing an aftermarket radio.
The XSVI-6502-NAV is designed to provide a 12 volt 10 amp switched accessory
output along with the rest of the wires needed to install an aftermarket radio. The
R.A.P. (Retained Accessory Power) function is retained by the XSVI-6502-NAV.
Along with OE equipped steering wheel controls using the steering wheel control
output of the aftermarket radio (if equipped).
The XSVI-6502-NAV also provides essential wires required for aftermarket radios
that have navigation. Provided is VSS (Vehicle Speed Sense), Reverse, and
Parking Brake. This cuts down the installation time since the installer does not
have to look for these wires in the vehicle.
The XSVI-6502-NAV also provides essential wires required for aftermarket radios
that have navigation. Provided is VSS (Vehicle Speed Sense), Reverse, and
Parking Brake. This cuts down the installation time since the installer does not
have to look for these wires in the vehicle.
Note: The XSVI-6502-NAV does not retain OEM amplifiers.
Note: The XSVI-6502-NAV does not retain OEM amplifiers.
Wiring the XSVI-6502-NAV
Wiring the XSVI-6502-NAV
Wiring up the XSVI-6502-NAV is like wiring up any other wire harness that would
attach to the aftermarket radios harness. The Metra/EIA wire code can be found
on the back of this package that will aid you in the wiring of your aftermarket radio.
Wiring up the XSVI-6502-NAV is like wiring up any other wire harness that would
attach to the aftermarket radios harness. The Metra/EIA wire code can be found
on the back of this package that will aid you in the wiring of your aftermarket radio.
Navigation wire colors:
Blue/Pink – VSS (Vehicle Speed Sense)
Green/Violet – Reverse
Lt. Green – Parking Brake
Navigation wire colors:
Blue/Pink – VSS (Vehicle Speed Sense)
Green/Violet – Reverse
Lt. Green – Parking Brake
Once all connections have been made, plug in the aftermarket radio if not done
already.
Once all connections have been made, plug in the aftermarket radio if not done
already.
Do not plug in the ASWC into the XSVI harness yet.
Do not plug in the ASWC into the XSVI harness yet.
Initialize the XSVI interface
Initialize the XSVI interface
With all connections made and harnesses connected to the vehicle, turn the ignition key to the ON position for thirty seconds, then turn the key off.
With all connections made and harnesses connected to the vehicle, turn the ignition key to the ON position for thirty seconds, then turn the key off.
After the XSVI is initialized, plug in the ASWC and refer to the ASWC instructions.
After the XSVI is initialized, plug in the ASWC and refer to the ASWC instructions.
XSVI-6502-NAV INSTALLATION INSTRUCTIONS
XSVI-6502-NAV INSTALLATION INSTRUCTIONS
NOTE: ASWC SOLD SEPERATELY
NOTE: ASWC SOLD SEPERATELY
In the Chrysler/Dodge/Jeep vehicles listed on back there are no 12 volt accessory
wires in the factory radio harness making the installer run an accessory wire to the
fuse box or underneath the steering column when installing an aftermarket radio.
The XSVI-6502-NAV is designed to provide a 12 volt 10 amp switched accessory
output along with the rest of the wires needed to install an aftermarket radio. The
R.A.P. (Retained Accessory Power) function is retained by the XSVI-6502-NAV.
Along with OE equipped steering wheel controls using the steering wheel control
output of the aftermarket radio (if equipped).
The XSVI-6502-NAV also provides essential wires required for aftermarket radios
that have navigation. Provided is VSS (Vehicle Speed Sense), Reverse, and
Parking Brake. This cuts down the installation time since the installer does not
have to look for these wires in the vehicle.
The XSVI-6502-NAV also provides essential wires required for aftermarket radios
that have navigation. Provided is VSS (Vehicle Speed Sense), Reverse, and
Parking Brake. This cuts down the installation time since the installer does not
have to look for these wires in the vehicle.
Note: The XSVI-6502-NAV does not retain OEM amplifiers.
Note: The XSVI-6502-NAV does not retain OEM amplifiers.
Wiring the XSVI-6502-NAV
Wiring the XSVI-6502-NAV
Wiring up the XSVI-6502-NAV is like wiring up any other wire harness that would
attach to the aftermarket radios harness. The Metra/EIA wire code can be found
on the back of this package that will aid you in the wiring of your aftermarket radio.
Wiring up the XSVI-6502-NAV is like wiring up any other wire harness that would
attach to the aftermarket radios harness. The Metra/EIA wire code can be found
on the back of this package that will aid you in the wiring of your aftermarket radio.
Navigation wire colors:
Blue/Pink – VSS (Vehicle Speed Sense)
Green/Violet – Reverse
Lt. Green – Parking Brake
Navigation wire colors:
Blue/Pink – VSS (Vehicle Speed Sense)
Green/Violet – Reverse
Lt. Green – Parking Brake
Once all connections have been made, plug in the aftermarket radio if not done
already.
Once all connections have been made, plug in the aftermarket radio if not done
already.
Do not plug in the ASWC into the XSVI harness yet.
Do not plug in the ASWC into the XSVI harness yet.
Initialize the XSVI interface
Initialize the XSVI interface
With all connections made and harnesses connected to the vehicle, turn the ignition key to the ON position for thirty seconds, then turn the key off.
With all connections made and harnesses connected to the vehicle, turn the ignition key to the ON position for thirty seconds, then turn the key off.
After the XSVI is initialized, plug in the ASWC and refer to the ASWC instructions.
After the XSVI is initialized, plug in the ASWC and refer to the ASWC instructions.