1
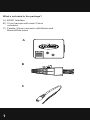
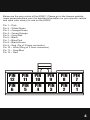
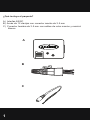
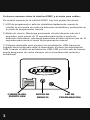
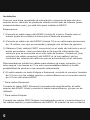
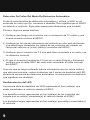
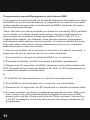
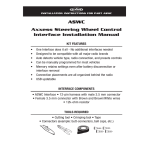
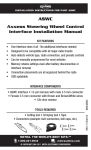
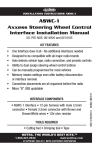
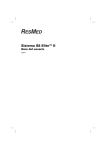
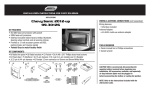
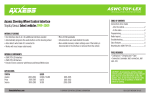
ASWC
Axxess Steering Wheel Control Interface
Installation Manual
The ASWC is a universal steering wheel control interface that can be used
on most any vehicle with steering wheel controls. Designed to be used
with today’s top aftermarket radio manufactures like Pioneer, Sony, Alpine,
Kenwood, Eclipse, JVC, and others, the ASWC is all you’ll need to retain
the OEM steering wheel controls. The ASWC has the ability to auto-detect
many vehicle makes and aftermarket radios and it will preset the steering
wheel controls to the aftermarket radio automatically so no programming is
required. If desired the ASWC can be manually programmed so the user
can make the steering wheel controls function they way they want them
to, only limited by the functions of the aftermarket radio. The ASWC also
has a non-volatile memory which means the ASWC will remember the
programming even if the ASWC is disconnected from the vehicle.
The ASWC is also updatable using the Axxess website (www.axxessinterface.com) and the USB-CAB update cable. If there is an update made to
the ASWC there is no need to send inventory back, or ask for the latest
version, you can update it yourself and save time and money.
axxessinterface.com
460 Walker Street • Holly Hill, FL 32117-2699
800.221.0932
What’s included in the package?
A) ASWC Interface
B) 12 pin harness with male 3.5mm
connector
C) Female 3.5mm connector with Brown and
Brown/White wires
A
B
C
1
What you need to know before you begin:
1) Make sure you know the correct year, make, and model of your vehicle.
2) Make sure the radio you are installing is compatible with a steering
wheel control interface (Check in owners manual).
3) Go to the Axxess website (www.axxessinterface.com) for a detailed
information sheet on what color(s) the steering wheel control wires will
be in your vehicle, the location, what wire(s) to use on the ASWC, and
what, if any, programming is required. Print or write the information
down so you have it in the vehicle during the install.
Note: Though we have done extensive research and testing verifying
the steering wheel control wire colors of the vehicle we list are correct, it
is still your responsibility to verify the steering wheel control wires with a
multimeter. If you find a discrepancy please notify our Tech Department at
1-800-253-TECH.
2
A brief overview of the ASWC interface and wire harness:
On the top of the ASWC interface there are three points of interest:
1) The Programming led – this will flash rapidly when in auto detect mode,
flashes slowly in manual programming mode.
2) The Reset button – Hold down button more then 2 seconds but less then
10 seconds to start auto detect mode; hold down longer then 10 seconds
to start manual programming mode.
3) The slide cover for the USB update port – open this up to reveal the USB
update port. Using the USB-CAB update cable and the Axxess website
you can make sure you always have the latest, updated inventory.
USB PORT COVER
3
RESET BUTTON
PROGRAMMING LED
Below are the wire colors of the ASWC. Please go to the Axxess website
(www.axxessinterface.com) for detailed information on your specific vehicle
and what color wire(s) to use on the ASWC.
Pin 1 – Pink
Pin 2 – White/Green
Pin 3 – Orange/Green
Pin 4 – Green/Orange
Pin 5 – Gray/Red
Pin 6 – Black
Pin 7 – Blue/Pink
Pin 8 – Black/Green
Pin 9 – Red (Tip of 3.5mm connector)
Pin 10 – Whie (Ring of 3.5mm connector)
Pin 11 – Gray/Blue
Pin 12 – Red
PIN
12
PIN
11
PIN
10
PIN
9
PIN
8
PIN
7
PIN
6
PIN
5
PIN
4
PIN
3
PIN
2
PIN
1
4
The Installation
Once you have collected the information or printed out the information
sheet on your particular vehicle from the Axxess website (www.axxessinterface.com) you’re ready to install the ASWC.
So here we go:
1) Connect the Black wire of the ASWC (pin 6) to ground. You may use the
same grounding point as the aftermarket radio.
2) Connect the Red wire of the ASWC (pin 12) to a 12 volt accessory wire,
one that turns on and off with the ignition key.
3) Locate the correct SWC wire(s) in the vehicles radio or secondary
harness as described in the vehicle information sheet found in the
Axxess website. Connect the correct wire color(s) from the ASWC to the
vehicles steering wheel control wire(s) in the vehicle.
We recommend that the wires are soldered for the best and most secure
connection. T-Taps are not recommended due to the higher chance of an
intermitted connection.
4) If you are using an Eclipse or Kenwood radio, plug the female 3.5mm
connector with the Brown and Brown/White wires into the male 3.5mm
connector of the ASWC harness.
* For Kenwood radios:
Connect the Kenwood SWC wire (normally Blue/Yellow) to the Brown wire
of the ASWC. Isolate and tape the Brown/White wire, it will not be used.
* For Eclipse radios:
Connect the Eclipse SWC wires (Normally Brown and Brown/Black) to the
Brown and Brown/White wires of the ASWC. Brown goes to Brown and
5
Brown/White goes to Brown/Black.
5) For all other radios, plug in the male 3.5mm connector of the ASWC into
the back of the aftermarket radio, designated for an external SWC
control interface. Please refer to the aftermarket radios manual if you
are in doubt where the 3.5mm connector of the ASWC goes.
Once all connections have been made, plug in the aftermarket radio if not
done already.
Programming the ASWC
The ASWC can be programmed in two ways; it can do it by itself in Auto
Detect Mode or it can be manually programmed. We will start with the Auto
Detect Mode first:
Auto Detect Mode:
The ASWC has the ability to auto detect certain vehicles and to know what
aftermarket radio it is connected to. The vehicle info sheet from the Axxess
website (www.axxessinterface.com) will show if your vehicle would be auto
detected and what action, if any, is required by you for this process to take
place.
For the Auto Detect feature to work there are 3 possible actions, however
only one action will be required by you depending on your vehicle:
1) Turn the ignition on and no other action is required.
2) Turn the ignition on, press and hold down the Volume Up button on the
steering wheel.
Or
3) Turn the ignition on, press and release the Volume Up button repeatedly
on the steering wheel.
6
Like we said before, only one of these actions will need to be done depending on your vehicle for the auto detect feature to work. Please refer to the
vehicle info sheet in the Axxess website.
These are the steps for the Auto Detect Mode:
1) Complete connections to the vehicle and the aftermarket radio.
* If this is the first time the ASWC is being installed in a vehicle:
2) Turn the ignition on; the led will start flashing rapidly which means the
ASWC is looking for the vehicle and the radio.
3) Perform action required for your particular vehicle as noted in the vehicle
info sheet.
4) After a couple of seconds the led should stop flashing and not light up for
2 seconds.
At this point do not push any buttons.
5) After the 2 seconds there will be a series of 7 flashes, some short and
some long. Make a note of which flashes were long for this may be
needed later.
6) The led will pause for another 2 seconds then flash up to 9 times. Again
make a note of how many flashes.
7) This is the end of the auto detection stage. If the ASWC detected the
vehicle and the radio successfully the led will light up solid red.
8) Make sure the steering wheel control buttons function correctly in the
vehicle and enjoy your radio.
So what if the led does not light up solid red? Check out troubleshooting
section below.
7
* If the ASWC was installed in a vehicle before:
2) Turn the ignition on, the led will flash slowly.
3) Hold down the reset button for more then 2 seconds but less then 10
seconds, the led will start flashing rapidly.
4) Perform action required for your particular vehicle as noted in the vehicle
info sheet.
5) After a couple of seconds the led should stop flashing and not light up for
2 seconds.
At this point do not push any buttons.
6) After the 2 seconds there will be a series of 7 flashes, some short and
some long.
7) The led will pause another 2 seconds then a series of 9 flashes.
8) This is the end of the auto detection stage. If the ASWC detected the
vehicle and the radio successfully the led will light up solid red.
9) Make sure the steering wheel control buttons function correctly in the
vehicle and enjoy your radio.
So what if the led does not light up solid red or the steering wheel controls
is not working correctly with the aftermarket radio?
Check out troubleshooting section right below.
8
Troubleshooting the Auto Detect Mode
So you tried the auto detect feature and at the end the led did not stay
on solid red, it started flashing. That means the ASWC did not detect the
vehicle. Follow these couple steps to determine what happened:
First some basic steps:
1) Verify that you have 12 volt accessory and a good ground to the ASWC.
2) Verify with the vehicle information sheet on the Axxess website that you
connected the correct steering wheel control wires in the vehicle to the
correct wire(s) on the ASWC.
3) Verify that the 3.5mm connector is connected to your radio securely and
in the correct location.
4) If using the female 3.5mm connector on an Eclipse or Kenwood radio,
verify that the radio’s SWC wire is connected to the correct wire on the
ASWC.
Once all the information above has been verified and correct, refer back to
the 2 sets of led flashes during the auto detect sequence. Here is what the
flashes stand for:
LED Feedback
The 1st series of led flashes represent the wire(s) that are connected to the
vehicle from the ASWC.
Short flashes represent the steering wheel control wire(s) that are not connected to the vehicle from the ASWC.
Long flashes represent the wire(s) that are connected to the vehicle.
9
1st led flash is pin #2 (White/Green) on the ASWC
2nd led flash is pin #3 (Orange/Green) on the ASWC
3rd led flash is pin #4 (Green/Orange) on the ASWC
4th led flash is pin #5 (Gray/Red) on the ASWC
5th led flash is pin #8 (Black/Green) on the ASWC
6th led flash is pin #11 (Gray/Blue) on the ASWC
7th led flash is pin #1 (Pink) on the ASWC
If during the auto detect sequence there was no long led flash, just short
ones, the ASWC was not connected to the correct wire in the vehicle or
the incorrect wire was used on the ASWC. Double check connections and
the vehicle information sheet to verify that you have the correct wires connected.
The 2nd set of led flashes represents what brand radio the ASWC believes
it is connected to. Each flash is for a different radio manufacturer.
1st led flash is for Eclipse
2nd led flash is for Kenwood
3rd led flash is for Clarion
4th led flash is for Sony and Dual
5th led flash is for JVC
6th led flash is for Pioneer and Jensen
7th led flash is for Alpine*
8th led flash is for Visteon
9th led flash is for Valor
10th led flash is for Clarion 5V
* Note: If the ASWC flashes 7 times and you do not have an Alpine radio
connected to it that means that the ASWC did not see any radio connected.
Verify the 3.5mm connector is connected to the SWC input on the radio.
10
Manual Programming/SWC Button Reassignment:
If your vehicle is not listed for auto detection by the ASWC on the Axxess
website most vehicles can still be manually programmed to the ASWC by
following these steps:
* Note: Not every radio will have all the possible swc commands on the
steering wheel. Aftermarket radios that do not have Bluetooth will not recognize the PTT (Push To Talk) or On Hook / Off Hook commands, however
those buttons can be manually programmed to do other commands. Please
refer to the radios owners’ manual or wireless remote for specific commands the radio will recognize.
1) Complete connections to the vehicle and the aftermarket radio, making
sure the 3.5mm connector is connected.
* If this is the first time the ASWC is being installed in a vehicle:
2) Turn the ignition on; the led will start flashing rapidly.
3) After 10 seconds the ASWC will go into the LED feedback mode. After
the series of led flashes the led will stay in a slow constant flash state.
Or
* If the ASWC has been in a vehicle before:
2) Press and hold the reset button down for more then 10 seconds.
3) After the 10 seconds the led will begin a slow constant flash.
4) At this point press and hold the Volume Up button on the steering wheel
for 7 seconds until the led goes solid red. Now release the Volume Up
button and the led goes off. Volume Up has now been programmed.
11
5) Now press and hold the Volume Down button until the led goes solid red.
Release the Volume Down button and the led goes off. Volume Down
has now been programmed.
6) At this point press and hold the next button on the steering wheel that
corresponds with the programming list (see below). The chart below
shows in what order the steering wheel control buttons need to be
programmed in.
If the next function on the list is not on the steering wheel press and hold
the Volume Up button for 1 second till the led comes on then release the
button. This tells the ASWC that the function is not available and moves on
to the next function.
1. Volume Up
2. Volume Down
3. Seek Up/Next
4. Seek Down/Prev
5. Source/Mode
6. Mute
7. Preset Up
8. Preset Down
9. Power
10. Band
11. Play/Enter
12. PTT (Push To Talk)
13. On Hook
14. Off Hook
15. Fan Up
16. Fan Down
17. Temp Up
18. Temp Down
* Note: Remember not all radios will have all these commands. Please
refer to the radios’ owners manual for specific commands recognized by
the radio.
12
7) You can end this half of the programming in 2 ways:
1) After the last button is programmed on your steering wheel (you do not
have to go through the whole list), hold down the Volume Up button for at
least 10 seconds. The led will go into the slow constant blink mode.
Or
2) After the 18th button is programmed or skipped the led will go back to
the slow constant blink mode.
* If at any time you get lost or mess up hold down the reset button on the
ASWC for more then 10 seconds. This will restart the manual programming. Go back to step #4 and start again.
At this point you will now be in the Radio Identification mode.
8) Press and hold the Volume Down button for 5 seconds till the led starts
to flash quickly.
9) Release the Volume Down button.
10) After 4 seconds of the led flashing quickly the led will go out for 2
seconds.
11) Then the led will flash, up to 9 times, depending on what radio the
ASWC thinks it’s connected to.
Here are the led blinks and which radio they represent:
1st led flash is for Eclipse
2nd led flash is for Kenwood
3rd led flash is for Clarion
4th led flash is for Sony and Dual
5th led flash is for JVC
6th led flash is for Pioneer and Jensen
13
7th led flash is for Alpine*
8th led flash is for Visteon
9th led flash is for Valor
* Note: If the ASWC flashes 7 times and you do not have an Alpine radio
connected to it that means that the ASWC did not see any radio connected.
Verify the 3.5mm connector is connected to the SWC input on the radio.
12) Make sure the number of flashes match what radio you have installed.
13) If the led flashes match the radio then hold down the Volume Down
button until the led goes solid red.
14) Programming for the vehicle and the radio is now complete. Test out
the steering wheel control functions to make sure it works correctly.
If the led flashes do not match the radio you have connected, you must
manually program the ASWC to tell it what radio it is connected to.
1) To manually program the aftermarket radio, press and hold the Volume
Up button on the steering wheel control until the led goes solid red, then
release Volume Up.
2) At this point Eclipse is programmed.
If you are using an Eclipse radio go to step 3.
If you are using a different radio go to step 4.
3) Press and hold Volume Down for 5 seconds. The led will flash once then
go solid red indicating the programming has finished. Go enjoy your
radio.
4) If you have a different radio then Eclipse, press the Volume Up button
again till the led goes solid red, then release Volume Up. You have now
programmed Kenwood.
14
5) Here is the chart to show how many presses of the Volume Up button is
needed for which radio you are trying to program:
1st led flash is for Eclipse
2nd led flash is for Kenwood**
3rd led flash is for Clarion
4th led flash is for Sony and Dual
5th led flash is for JVC
6th led flash is for Pioneer and Jensen
7th led flash is for Alpine*
8th led flash is for Visteon
9th led flash is for Valor
10th led flash is for Clarion 5V
* Note: If the ASWC flashes 7 times and you do not have an Alpine radio
connected to it that means that the ASWC did not see any radio connected.
Verify the 3.5mm connector is connected to the SWC input on the radio.
** Note: The following four models, DNX9960, DNX7160, DDX896 and
DDX418, need a 10k to 12k ohm resistor between the Blue/Yellow of the
Kenwood and the Brown wire of the female 3.5 during programming.
After programming remove the resistor and reconnect the Blue/Yellow
and brown wire.
6) Once the radio manufacturer has been selected hold Volume Down for
at least 5 seconds. The led will flash the number of times which radio
was selected then the led will remain on to indicate the ASCW has
finished programming.
7) Go enjoy your radio.
Remapping the SWC Buttons
Let’s say you have the ASWC programmed to your vehicle and your radio
and you want to change the button assignment for the steering wheel
controls. For instance you would like Seek Up to be Mute.
This process is the same as manually programming the ASWC (please
refer to the Manual Programming section) with a couple of notes:
•The ASWC must have detected the vehicle and radio it is attached to
before you can remap any buttons.
•You can only start the remapping of the steering wheel controls process
15
within the first 20 seconds of turning the ignition key on. If you wait longer
then the 20 seconds you will have to turn the ignition off then back on
again.
•Within the first 20 seconds if any button other then Volume Up or Volume
Down is pushed, the remapping process will stop.
•If during the remapping process no button is pushed for 30 seconds the
remapping process is aborted and the original settings are reset.
So let’s begin the remapping process:
1) Ideally having the ASWC visible is recommended since you can see the
led flashes to confirm button recognition.
2) Turning off the radio is recommended.
3) Within the first 20 seconds of turning the ignition on, press and hold
down the Volume Up button for at least 25 seconds.
4) The led will light up solid red. Release Volume Up and the led will go out.
Volume Up has now been programmed.
5) Follow the list below in order however pushing the steering wheel control
button you want for the function below. If you want to skip a command
press the Volume Up on the steering wheel, this will tell the ASWC to
skip the command and go to the next one.
1. Volume Up
2. Volume Down
3. Seek Up/Next
4. Seek Down/Prev
5. Source/Mode
6. Mute
7. Preset Up
8. Preset Down
9. Power
16
10. Band
11. Play/Enter
12. PTT (Push To Talk)
13. On Hook
14. Off Hook
15. Fan Up
16. Fan Down
17. Temp Up
18. Temp Down
* Note: Remember not all radios will have all these commands. Please
refer to the radios’ owners manual for specific commands recognized by
the radio.
For instance the next command to be mapped is the Volume Down command. Let’s say you want the Mode button on your steering wheel to be the
Volume Down command. Hold down the Mode button till the led lights up
solid red, and then release it. Now your Mode button on the steering wheel
is Volume Down.
6) After the last button is programmed on your steering wheel (you do not
have to go through the whole list), hold down the Volume Up button for
at least 10 seconds then the led will go out.
Or
After the 18th button is programmed or skipped the led will go out and the
remapping is completed.
If for any reason after remapping the steering wheel controls you want to
go back to the original steering wheel control settings, follow these steps:
1) Within the first 20 seconds of turning the ignition on. Press and hold
down the original Volume Down button (not the Volume Down button you
just remapped) for at least 25 seconds.
17
2) The led will turn on then release the Volume Down button and the led will
turn off.
3) The original steering wheel control settings will be restored.
18
KNOWLEDGE IS POWER
Enhance your installation and fabrication skills by
enrolling in the most recognized and respected
mobile electronics school in our industry.
Log onto www.installerinstitute.com or call
800-354-6782 for more information and take steps
toward a better tomorrow.
Metra recommends MECP certified
technicians.
ASWC-INST10
ASWC - Patent Pending
axxessinterface.com
460 Walker Street • Holly Hill, FL 32117-2699
800.221.0932
ASWC
Interfaz de control de volante Axxess
Manual de instalación
El ASWC es una interfaz de control universal de volante que puede usarse
en la mayoría de los vehículos con controles de volante. Diseñado para
usarse con los principales fabricantes de radios de posventa actuales
como Pioneer, Sony, Alpine, Kenwood, Eclipse, JVC y otros, el ASWC es
todo lo que necesitará para retener los controles de volante de fabricantes
de equipos originales (Original Equipment Manufacter, OEM). El ASWC
tiene la capacidad de detectar automáticamente muchas marcas de
vehículos y radios de posventa y preconfigurará los controles del volante
al radio de posventa en forma automática, de modo que no se necesitará
programarlos. Si se desea, el ASWC puede programarse manualmente
para que el usuario pueda adaptar los controles del volante de modo
que funcionen a su gusto; las únicas limitaciones serán las funciones del
radio de posventa. El ASWC también tiene una memoria no volátil, lo que
significa que el ASWC recordará la programación aun en caso de que se
desconecte del vehículo.
El ASWC también puede actualizarse mediante el sitio web de Axxess
(www.axxessinterface.com) y mediante el cable de actualización USBCAB. Si se actualizó el ASWC, no es necesario devolver el inventario ni
pedir la última versión; puede actualizarlo usted solo y ahorrar tiempo y
dinero.
axxessinterface.com
460 Walker Street • Holly Hill, FL 32117-2699
800.221.0932
¿Qué incluye el paquete?
A) Interfaz ASWC
B) Arnés de 12 clavijas con conector macho de 3.5 mm
C) Conector hembra de 3.5 mm con cables de color marrón y marrón/
blanco
A
B
C
1
Qué debe saber antes de comenzar:
1) Asegúrese de conocer el año, la marca y el modelo correctos de su
vehículo.
2) Asegúrese de que el radio que está instalando sea compatible con una
interfaz de control de volante (Revise el manual del propietario).
3) Visite el sitio web de Axxess (www.axxessinterface.com) para obtener
una hoja de información detallada acerca del color (de los colores) de
los cables de los controles del volante que encontrará en su vehículo, la
ubicación, qué cable(s) deberá usar en el ASWC y qué programación, si
la hay, se requiere. Imprima o tome nota de la información, de manera
que la tenga disponible en el vehículo durante la instalación.
Nota: Si bien hemos realizado investigaciones y pruebas extensivas que
verifican que los colores de los cables de los controles del volante del
vehículo que enumeramos son los correctos, sigue siendo su responsabilidad verificar los cables de los controles del volante con un multímetro.
Si encuentra una discrepancia, notifique a nuestro Departamento Técnico
llamando al 1-800-253-TECH.
2
Un breve resumen sobre la interfaz ASWC y el arnés para cables:
En la parte superior de la interfaz ASWC, hay tres puntos de interés:
1) LED de programación: esta luz destellará rápidamente cuando la
interfaz se encuentra en modo de detección automática y lentamente en
el modo de programación manual.
2) Botón de reinicio: Mantenga presionado el botón durante más de 2
segundos, pero menos de 10 segundos para iniciar el modo de
detección automática; mantenga presionado el botón durante más de 10
segundos para iniciar el modo de programación manual.
3) Cubierta deslizable para el puerto de actualización USB: Abra esta
cubierta hacia arriba para dejar al descubierto el puerto de actualización
USB. Usando el cable de actualización USB-CAB y el sitio web de Axxess,
puede asegurarse de contar siempre con el inventario más reciente y
actualizado.
CUBIERTA
DEL
USB
PORT COVER
PUERTO USB
3
BOTÓN
DE
RESET
BUTTON
REINICIO
LED DE
PROGRAMMING
LED
PROGRAMACIÓN
Debajo se detallan los colores de los cables del ASWC. Visite el sitio web
de Axxess (www.axxessinterface.com) para obtener información detallada
acerca de su vehículo específico y qué color de cable(s) debe usar en el
ASWC.
Clavija 1: rosa
Clavija 2: blanco/verde
Clavija 3: naranja/verde
Clavija 4: verde/naranja
Clavija 5: gris/rojo
Clavija 6: negro
Clavija 7: azul/rosa
Clavija 8: negro/verde
Clavija 9: rojo (punta del conector de 3.5 mm)
Clavija 10: blanco (anillo del conector de 3.5 mm)
Clavija 11: gris/azul
Clavija 12: rojo
PIN
12
CLAVIJA
PIN
6
CLAVIJA
PIN
11
CLAVIJA
PIN
5
CLAVIJA
PIN
10
CLAVIJA
PIN
4
CLAVIJA
PIN
9
CLAVIJA
PIN
3
CLAVIJA
PIN
8
CLAVIJA
PIN
2
CLAVIJA
PIN
7
CLAVIJA
PIN
1
CLAVIJA
4
Instalación
Una vez que haya recopilado la información o impreso la hoja de información de su vehículo en particular desde el sitio web de Axxess (www.
axxessinterface.com), ya está listo para instalar el ASWC.
Empecemos:
1) Conecte el cable negro del ASWC (clavija 6) a tierra. Puede usar el
mismo punto de conexión a tierra que el radio de posventa.
2) Conecte el cable rojo del ASWC (clavija 12) a un cable para accesorios
de 12 voltios, uno que se encienda y apague con la llave de ignición.
3) Ubique el (los) cable(s) SWC correcto(s) en el radio del vehículo o en el
arnés secundario, como se describe en la hoja de información del
vehículo que se encuentra en el sitio web de Axxess. Conecte el (los)
color(es) de cable correcto(s) del ASWC al (a los) cable(s) de los
controles del volante del vehículo que se encuentra(n) en el vehículo.
Recomendamos soldar los cables para obtener la mejor conexión y la
más segura. Las tomas en T no son recomendables debido a la alta
probabilidad de producir una conexión intermitente..
4) Si está usando un radio Eclipse o Kenwood, enchufe el conector hembra
de 3.5 mm con los cables marrón y marrón/blanco en el conector macho
de 3.5 mm del arnés ASWC
* Para radios Kenwood:
Conecte el cable SWC Kenwood (normalmente azul/amarillo) al cable
marrón del ASWC. Aísle y encinte el cable marrón/blanco, ya que no se
utilizará.
* Para radios Eclipse:
Conecte los cables SWC Eclipse (normalmente marrón y marrón/negro) a
los cables marrón y marrón/blanco del ASWC. El marrón va con el marrón
5
y el marrón/blanco va con el marrón/negro.
5) Para todos los demás radios, enchufe el conector macho de 3.5 mm del
ASWC en la parte posterior del radio de posventa, designado para una
interfaz de control externa SWC. Consulte el manual del radio de
posventa si tiene dudas respecto de dónde va el conector de 3.5 mm del
ASWC.
Una vez que se hayan realizado todas las conexiones, enchufe el radio de
posventa si aún no lo ha hecho.
Cómo programar el ASWC
El ASWC puede programarse de dos maneras; puede programarse en
el modo de detección automática, o puede programarse manualmente.
Comenzaremos con el modo de detección automática:
Modo de detección automática:
El ASWC tiene la capacidad de detectar automáticamente determinados
vehículos y de reconocer el radio de posventa al que está conectado. La
hoja de información del vehículo del sitio web de Axxess (www.axxessinterface.com) le mostrará si su vehículo podría ser detectado automáticamente y qué acción, si la hay, debe realizar para que se lleve a cabo este
proceso.
Para que la característica de detección automática pueda funcionar, hay
3 acciones posibles; sin embargo, únicamente debe realizar una acción
según su vehículo:
1) Encienda la ignición. No se requiere ninguna otra acción.
2) TEncienda la ignición, presione y mantenga presionado el botón Subir
volumen (Volume Up) del volante.
O
3) Encienda la ignición, presione y suelte el botón Subir volumen (Volume
Up) del volante varias veces.
6
Como dijimos anteriormente, únicamente una de estas acciones será
necesaria según su vehículo para que la característica de detección automática funcione. Consulte la hoja de información del vehículo en el sitio
web de Axxess.
Estos son los pasos que debe seguir para activar el modo de detección
automática:
1) Termine de realizar las conexiones al vehículo y al radio de posventa.
* Si es la primera vez que se instala el ASWC en un vehículo:
2) Encienda la ignición; el LED comenzará a destellar rápidamente, lo que
significa que el ASWC está buscando el vehículo y el radio.
3) Realice la acción necesaria para su vehículo en particular, según se
indica en la hoja de información del vehículo.
4) Después de un par de segundos, el LED debe dejar de destellar y no
encenderse durante 2 segundos.
En este momento, no pulse ningún botón.
5) Después de 2 segundos, se producirá una serie de 7 destellos, algunos
cortos y algunos largos. Tome nota de los destellos que fueron largos,
ya que necesitará esta información más adelante.
6) El LED hará una pausa durante otros 2 segundos y, luego, destellará
hasta 9 veces. Nuevamente, tome nota de cuántos destellos se producen.
7) Este es el fin de la etapa de detección automática. Si el ASWC detectó
el vehículo y el radio con éxito, el LED se encenderá en color rojo fijo.
8) Asegúrese de que los botones de los controles del volante funcionen
correctamente en el vehículo y disfrute su radio.
¿Qué ocurre si el LED no se enciende en color rojo fijo? Revise la sección
detección de fallas que aparece debajo.
7
* Si el ASWC fue instalado en un vehículo con anterioridad:
2) Encienda la ignición, el LED destellará lentamente.
3) Mantenga presionado el botón de reinicio durante más de 2 segundos,
pero menos de 10 segundos, el LED comenzará a destellar rápidamente.
4) Realice la acción necesaria para su vehículo en particular, según se
observa en la hoja de información del vehículo.
5) Después de un par de segundos, el LED debe dejar de destellar y no
encenderse durante 2 segundos.
En este momento, no pulse ningún botón.
6) Después de 2 segundos, se producirá una serie de 7 destellos, algunos
cortos y algunos largos.
7) El LED hará una pausa durante otros 2 segundos y, luego, producirá
una serie de 9 destellos.
8) Este es el fin de la etapa de detección automática. Si el ASWC detectó
el vehículo y el radio con éxito, el LED se encenderá en color rojo fijo.
9) Asegúrese de que los botones de los controles del volante funcionen
correctamente en el vehículo y disfrute su radio.
¿Qué sucede si el LED no se enciende en color rojo fijo o si los controles
del volante no funcionan correctamente con el radio de posventa? Revise
la sección detección de fallas que aparece debajo.
8
Detección De Fallas Del Modo De Detección Automática
Probó la característica de detección automática y, al final, el LED no se
encendió en color rojo fijo, comenzó a destellar. Eso significa que el ASWC
no detectó el vehículo. Siga estos pasos para determinar qué sucedió:
Primero, algunos pasos básicos:
1) Verifique que tenga una conexión con un accesorio de 12 voltios y una
buena conexión a tierra al ASWC.
2) Verifique en la hoja de información del vehículo en sitio web de Axxess
que usted haya conectado los cables de los controles del volante cor
rectos del vehículo al (a los) cable(s) correctos del ASWC.
3) Verifique que el conector de 3.5 mm esté bien conectado a su radio y en
la ubicación correcta.
4) Si usa un conector hembra de 3.5 mm en un radio Eclipse o Kenwood,
verifique que el cable SWC del radio esté conectado al cable correcto
del ASWC.
Una vez que se haya verificado toda la información que se indica arriba y
que esta sea correcta, vuelva a observar las 2 series de destellos del LED
durante la secuencia de detección automática. A continuación se explica lo
que significan los destellos:
Realimentación del LED
La primera serie de destellos del LED representa el (los) cable(s) que
están conectados al vehículo desde el ASWC.
Los destellos cortos representan el (los) cable(s) de los controles del
volante que no está(n) conectado(s) al vehículo desde el ASWC.
Los destellos largos representan el (los) cable(s) que está(n) conectado(s)
al vehículo.
9
El 1.° destello del LED es la clavija n.° 2 (blanco/verde) en el ASWC
El 2.° destello del LED es la clavija n.° 3 (naranja/verde) en el ASWC
El 3.° destello del LED es la clavija n.° 4 (verde/naranja) en el ASWC
El 4.° destello del LED es la clavija n.° 5 (gris/rojo) en el ASWC
El 5.° destello del LED es la clavija n.° 8 (negro/verde) en el ASWC
El 6.° destello del LED es la clavija n.° 11 (gris/azul) en el ASWC
El 7.° destello del LED es la clavija n.° 1 (rosa) en el ASWC
Si durante la secuencia de detección automática no se produjo ningún
destello del LED largo, solo cortos, el ASWC no se conectó al cable correcto en el vehículo o se usó el cable incorrecto en el ASWC. Vuelva a
revisar las conexiones y la hoja de información del vehículo para verificar
que haya conectado los cables correctos.
La segunda serie de destellos del LED representa la marca de radio a la
que el ASWC cree estar conectado. Cada destello es para un fabricante de
radio distinto.
El 1.° destello del LED es para Eclipse
El 2.° destello del LED es para Kenwood
El 3.° destello del LED es para Clarion
El 4.° destello del LED es para Sony y Dual
El 5.° destello del LED es para JVC
El 6.° destello del LED es para Pioneer y Jensen
El 7.° destello del LED es para Alpine*
El 8.° destello del LED es para Visteon
El 9.° destello del LED es para Valor
El 10.° destello del LED es para Clarion 5V
*Nota: Si el ASWC destella 7 veces y usted no tiene un radio Alpine
conectado, significa que el ASWC no vio ningún radio conectado. Verifique
que el conector de 3.5 mm esté conectado a la entrada SWC del radio.
10
Programación manual/Reasignación de botones SWC:
Si su vehículo no está incluido en la lista de detección automática por parte
del ASWC en el sitio web de Axxess, la mayoría de los vehículos de todos
modos pueden programarse manualmente al ASWC siguiendo los pasos
que se mencionan debajo:
*Nota: No todos los radios contarán con todos los comandos SWC posibles
en el volante. Los radios de posventa que no cuentan con Bluetooth no
reconocerán los comandos Pulsar para hablar (Push To Talk, PTT) ni
Colgado/Descolgado; sin embargo, esos botones pueden programarse
manualmente para realizar otros comandos. Consulte el manual del propietario del radio o del control remoto inalámbrico para ver los comandos
específicos que el radio reconocerá.
1) Termine de realizar las conexiones al vehículo y el radio de posventa, y
asegúrese de que el conector de 3.5 mm esté conectado.
* Si es la primera vez que se instala el ASWC en un vehículo:
2) Encienda la ignición; el LED comenzará a destellar rápidamente.
3) Después de 10 segundos, el ASWC pasará al modo realimentación del
LED. Después de las series de destellos del LED, el LED permanecerá en
un estado de destello constante lento.
O
* Si el ASWC ha sido instalado en un vehículo con anterioridad:
2) Si el ASWC ha sido instalado en un vehículo con anterioridad.
3) Después de 10 segundos, el LED empezará un destello constante lento.
4) En este momento, presione y mantenga presionado el botón Subir volumen (Volume Up) del volante durante 7 segundos hasta que el LED
pase a color rojo fijo. Ahora suelte el botón Subir volumen (Volume Up)
y el LED se apagará. La función de aumento de volumen acaba de ser
programada.
11
5) Ahora presione y mantenga presionado el botón Bajar volumen (Volume
Down) hasta que el LED pase a color rojo fijo. Suelte el botón Bajar volumen (Volume Down) y el LED se apagará. La función de reducción de
volumen acaba de ser programada.
6) En este momento, presione y mantenga presionado el siguiente botón
del volante que corresponde a la lista de programación (vea la información
que se presenta debajo). El siguiente cuadro muestra en qué orden deben
programarse los botones de los controles del volante.
Si la siguiente función de la lista no está en el volante, presione y mantenga presionado el botón Subir volumen (Volume Up) durante 1 segundo
hasta que el LED se encienda y, luego, suelte el botón. Esto indica al
ASWC que la función no está disponible y se pasa a la siguiente función.
1.
2.
3.
4.
5.
6.
7.
8.
9.
10.
11.
12.
13.
14.
15.
16.
17.
18.
Volume Up (Subir volumen)
Volume Down (Bajar volumen)
Seek Up/Next (Buscar arriba/Siguiente)
Seek Down/Prev (Buscar abajo/Anterior)
Source/Mode (Fuente/Modo)
Mute (Función silenciosa)
Preset Up (Preconfiguración hacia arriba)
Preset Down (Preconfiguración hacia abajo)
Power (Encendido)
Banda
Reproducir/Intro
PTT (Pulsar para hablar)
Colgado
Descolgado
Subir ventilador
Bajar ventilador
Subir Temp.
Bajar Temp.
*Nota: Recuerde que no todos los radios contarán con todos estos comandos. Consulte el manual del propietario del radio para obtener información
sobre los comandos específicos reconocidos por el radio.
12
7) Puede terminar esta mitad de la programación de 2 maneras:
1) Después de programar el último botón de su volante (no tiene que pasar
por toda la lista), mantenga presionado el botón Subir volumen (Volume
Up) durante, al menos, 10 segundos. El LED pasará a modo de parpadeo
constante lento.
O
2) Después de programar o pasar el 18.° botón, el LED volverá al modo de
parpadeo constante lento.
* Si, en algún momento, usted se siente desorientado o confundido,
mantenga presionado el botón de reinicio del ASWC durante más de 10
segundos. Esto reiniciará la programación manual. Regrese al paso n.° 4 y
comience nuevamente.
En este momento, se encontrará en el modo de Identificación de radio.
8) Presione y mantenga presionado el botón Bajar volumen (Volume Down)
durante 5 segundos hasta que el LED comience a parpadear rápidamente.
9) Suelte el botón Bajar volumen (Volume Down).
10) Después de 4 segundos de destellos rápidos del LED, el LED se
apagará durante 2 segundos.
11) Luego, el LED destellará hasta 9 veces, según el radio al que el ASWC
crea estar conectado.
A continuación, se mencionan los parpadeos del LED y el radio en que se
encuentran presentes:
El 1.° destello del LED es para Eclipse.
El 2.° destello del LED es para Kenwood.
El 3.° destello del LED es para Clarion.
El 4.° destello del LED es para Sony y Dual.
El 5.° destello del LED es para JVC.
El 6.° destello del LED es para Pioneer y Jensen.
13
El 7.° destello del LED es para Alpine*.
El 8.° destello del LED es para Visteon.
El 9.° destello del LED es para Valor.
*Nota: Si el ASWC destella 7 veces y usted no tiene un radio Alpine conectado, significa que el ASWC no vio ningún radio conectado.
Verifique que el conector de 3.5 mm esté conectado a la entrada SWC en
el radio.
12) Asegúrese de que la cantidad de destellos coincida con el radio que
acaba de instalar.
13) Si los destellos del LED coinciden con el radio; presione el botón Bajar
volumen (Volume Down) hasta que el LED pase a color rojo fijo.
14) La programación del vehículo y del radio ya está completa. Pruebe
las funciones de los controles del volante para asegurarse de que este
funcione correctamente.
Si los destellos del LED no coinciden con el radio que tiene conectado,
debe programar el ASWC manualmente para indicarle a qué radio ha sido
conectado.
1) Para programar manualmente el radio de posventa, presione y mantenga presionado el botón Subir volumen (Volume Up) de los controles del
volante hasta que el LED cambie a color rojo fijo. Luego, suelte el botón
Subir volumen (Volume Up) .
2) En este momento, el radio Eclipse está programado.
Si está usando un radio Eclipse, siga con el paso 3.
Si está usando un radio diferente, siga con el paso 4.
3) Presione y mantenga presionado el botón Bajar volumen (Volume Down)
durante 5 segundos. El LED destellará una vez y, luego, pasará a color rojo
fijo, lo que indica que la programación ha terminado. Es hora de disfrutar
de su radio.
4) Si cuenta con un radio que no sea Eclipse, presione el botón Subir
volumen (Volume Up) nuevamente hasta que el LED pase a color rojo fijo;
luego, suelte el botón Subir volumen (Volume Up). Acaba de programar el
radio Kenwood.
14
5) El cuadro que figura a continuación muestra cuántas veces es necesario
presionar el botón Subir volumen (Volume Up) según el radio que esté
intentando programar:
El 1.° destello del LED es para Eclipse.
El 2.° destello del LED es para Kenwood.
El 3.° destello del LED es para Clarion.
El 4.° destello del LED es para Sony y Dual.
El 5.° destello del LED es para JVC.
El 6.° destello del LED es para Pioneer y Jensen.
El 7.° destello del LED es para Alpine*.
El 8.° destello del LED es para Visteon.
El 9.° destello del LED es para Valor.
El 10.° destello del LED es para Clarion 5V
*Nota: Si el ASWC destella 7 veces y usted no tiene un radio Alpine
conectado, significa que el ASWC no vio ningún radio conectado. Verifique
que el conector de 3.5 mm esté conectado a la entrada SWC en el radio.
**Nota: El siguientes quatro modelos, DNX9960, DNX7160, DDX896 y
DDX418, necesitan un resistor ohmios 10k a 12k entre el Blue / Amarillo
del Kenwood y el alambre Brown de la hembra 3,5 durante programación.
Después programación retire la resistencia y reconecte el Azul / cable
Amarillo y marrón.
6) Una vez que el fabricante del radio haya sido seleccionado, mantenga
presionado el botón Bajar volumen (Volume Down) durante, al menos, 5
segundos. El LED destellará la cantidad de veces según el radio que se
haya seleccionado y, luego, el LED permanecerá encendido para indicar
que el ASCW ha finalizado la programación.
7) Es hora de disfrutar de su radio.
Cómo remapear los botones SWC
Supongamos que tiene el ASWC programado para su vehículo y su radio,
y desea cambiar la asignación de botones para los controles del volante.
Por ejemplo, usted prefiere que el botón Buscar arriba (Seek Up) pase a
ser la función Silenciosa (Mute).
Este proceso es igual que el de la programación manual del ASWC (consulte la sección Programación Manual) con algunas observaciones:
•El ASWC debe haber detectado el vehículo y el radio al que está conectado antes de que usted pueda remapear cualquier botón.
•Únicamente puede comenzar el remapeo del proceso de los controles del
15
volante dentro de los primeros 20 segundos después de encender la llave
de ignición. Si espera más de 20 segundos, tendrá que apagar la ignición
y, luego, volver a encenderla.
•Si dentro de los primeros 20 segundos presiona cualquier botón que no
sea el botón de Subir volumen (Volume Up) o Bajar volumen (Volume
Down), el remapeo se detendrá.
•Si durante el proceso de remapeo no se presiona ningún botón durante
30 segundos se interrumpe el proceso de remapeo y se restablecen las
configuraciones originales.
Empecemos, entonces, el proceso de remapeo:
1) De ser posible, se recomienda tener el ASWC visible, ya que usted
puede ver los destellos del LED para confirmar el reconocimiento de los
botones.
2) Se recomienda apagar el radio.
3) Dentro de los primeros 20 segundos después de encender la ignición,
presione y mantenga presionado el botón Subir volumen (Volume Up)
durante, al menos, 25 segundos.
4) El LED se encenderá en color rojo fijo. Suelte el botón Subir volumen
(Volume Up) y el LED se apagará. La función de aumento de volumen
acaba de ser programada.
5) Siga la lista que figura debajo en el orden indicado; sin embargo,
presione el botón de los controles del volante que prefiera para la función
que aparece debajo. Si desea pasar un comando, presione el botón Subir
volumen (Volume Up) del volante, esto indicará al ASWC que debe pasar
el comando e ir al siguiente.
1.
2.
3.
4.
5.
6.
7.
8.
9.
Subir volumen (Volume Up)
Bajar volumen (Volume Down)
Seek Up/Next (Buscar arriba/Siguiente)
Seek Down/Prev (Buscar abajo/Anterior)
Source/Mode (Fuente/Modo)
Mute (Función silenciosa)
Preconfiguración hacia arriba (Preset Up)
Preconfiguración hacia abajo (Preset Down)
Power (Encendido)
16
10.
11.
12.
13.
14.
15.
16.
17.
18.
Band (Banda)
Play/Enter (Reproducir/Intro)
PTT (Push To Talk) (PTT [Pulsar para hablar])
On Hook (Colgado)
Off Hook (Descolgado)
Fan Up (Subir ventilador)
Fan Down (Bajar ventilador)
Temp Up (Subir temp.)
Temp Down (Bajar temp.)
*Nota: Recuerde que no todos los radios contarán con todos estos comandos. Consulte el manual del propietario del radio para obtener información
sobre los comandos específicos reconocidos por el radio.
Por ejemplo, el siguiente comando que se va a mapear es el comando de
reducción de volumen. Supongamos que quiere que el botón Modo (Mode)
de su volante sea el comando de reducción de volumen. Mantenga presionado el botón Modo (Mode) hasta que el LED se encienda en color rojo fijo
y, luego, suéltelo. Ahora, su botón Modo (Mode) del volante es el comando
de reducción de volumen.
6) Después de programar el último botón de su volante (no tiene que pasar
por toda la lista), mantenga presionado el botón Subir volumen (Volume
Up) durante, al menos, 10 segundos y, luego, el LED se apagará.
O
Después de haber programado o pasado el 18.° botón, el LED se apagará
y se habrá completado el remapeo.
Si por cualquier motivo, después de haber remapeado los controles del
volante, usted desea regresar a las configuraciones originales de los controles del volante, siga estos pasos:
1) Dentro de los primeros 20 segundos después de encender la llave de
ignición, presione y mantenga presionado el botón Bajar volumen (Volume
Down) original (no el botón Bajar volumen [Volume Down] que acaba de
remapear) durante, al menos, 25 segundos.
17
2) El LED se encenderá; luego, suelte el botón Bajar volumen (Volume
Down) y el LED se apagará.
3) Se restablecerán las configuraciones originales de los controles del
volante.
18
Conocimiento es Poder
Convierta su hobby en una carrera en Installer Institute,
el líder educativo de la industria de dispositivos
electrónicos portátiles.
Regístrese en www.installerinstitute.com o llame al
800-354-6782 para obtener más información y empiece
su nueva carrera hoy mismo.
Metra recomienda técnicos con certificación del Programa de Certificación
en Electrónica Móvil (Mobile Electronics Certification Program, MECP).
ASWC-INST10
ASWC - Patent Pending
axxessinterface.com
460 Walker Street • Holly Hill, FL 32117-2699
800.221.0932