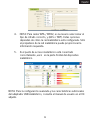
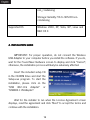
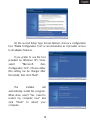
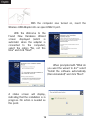
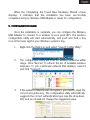
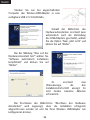
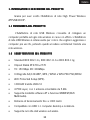
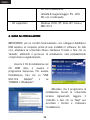
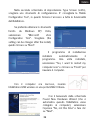
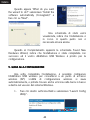
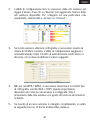
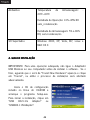
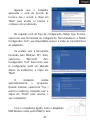
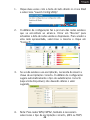
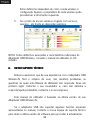
1
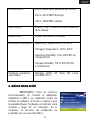
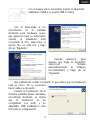
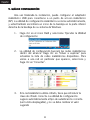
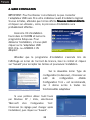
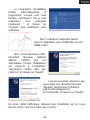
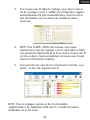
appUSB300HP High-Power Wireless-N USB Adapter High Gain detachable antenna 1000mW Español .............................. English ............................... Français ............................. Deutsch .............................. Italiano................................ Português............................ 03 11 19 27 35 43 1. INTRODUCCIŁN Y DESCRIPCIŁN DEL PRODUCTO Gracias por elegir el adaptador USB inalámbrico de alta potencia APPUSB300HP. 1.1 INFORMACIŁN GENERAL DEL PRODUCTO Adaptador USB inalámbrico que le permite conectar su ordenador portátil o de escritorio a cualquier red inalámbrica en su hogar u oficina. El adaptador USB inalámbrico es ideal para aquellos que deseen actualizar los equipos más antiguos para poder acceder a Internet a través de una red inalámbrica 1.2 CARACTERISTICAS DEL PRODUCTO • Los estándares IEEE 802.11n, 802.11.B IEEE 802.11g de IEEE. • Chipset Ralink RT2720 2770 • TX: RX 150 Mbps: 300Mbps. • 64/128 WEP, WPA/WPA2 y WPA-PSK/WPA2-PSK cifrados. • Wi-Fi Protected Setup (WPS). • 1000mW través de USB 2.0 • 4 PCB capa, con 1 x antena de 5dbi desmontable. • Soporte de Software AP modo y WMMTM (Wi-Fi Multimedia) función. • Distancia de funcionamiento de hasta 1000 metros • Compatible con USB 1.1 de escritorio y computadoras portátiles. • Soporte de recogida y análisis de datos inalámbricos. • Windows 98SE, 2000, Millenium, XP, Vista, W7, Linux y MAC OS X. • Gran potencia en un tamaño compacto • Constante y estable rendimiento • Fácil de usar y fácil instalación 1.3 REQUISITOS DEL SISTEMA DEL PC • Notebook o PC de escritorio con procesador de 1 GHz Pentiumcompatible o superior 3 • Windows 2000 / XP / Vista / W7, Mac OS, Linux • Puerto USB disponible 2.0 de alta velocidad del puerto 2. CONTENIDO DEL EMBALAJE • Alta Potencia 11n • Antena de alta ganancia. • Cable USB 2.0 • Conductor / CD con el manual 3. ESPECIFICACIONES Item Especificaciones Estándares IEEE 802.1n, IEEE 802.11g and IEEE 802.11b Tipo Interfaz USB 2.0/1.1 Date Rate 802.11b: 11Mbps 802.11g: 54 Mbps 802.11n: TX:150Mbps RX:300Mbps Seguridad 64/128 bit WEP encryption WPA/WPA2 and WPA-PSK/WPA2-PSK encryptions Wi-Fi Protected Setup (WPS) Frecuencia de funcionamiento FCC:2412-2462Mhz (Ch1-Ch11) ETSI:2412-2472MHz (Ch1-Ch13) 4 Frecuencia RF 2412~2462 MHz (América Del Norte) 2412~2472 MHz (Europa) 2412~2482 MHz (Japón) Tipo Antena Interior PCB + Antena de Alta Ganancia de la antena Estado LED Estado del enlace, Actividad Ambientes Operables Operating Temperature: 0ÀC~40ÀC Storage Temperature: -20ÀC~60ÀC Operating Humidity: 10%~85% RH sin condensación Storage Humidity: 5% to 90% RH sin condensación Sistemas operativos soportados Windows 2000, XP, Vista, W7, Linux and MAC OS X 4. GU¸A DE INSTALACIŁN IMPORTANTE: Para un correcto funcionamiento, no conecte el adaptador inalámbrico USB a su ordenador antes de instalar el software. Si lo hace, esperar a que la pantalla Nuevo hardware encontrado para mostrar y haga clic en "Cancelar", de lo contrario, el proceso de instalación es probable que se vean afectados. 5 Inserte el CD de instalación en el CD-ROM e inicie el programa Setup.exe. Para iniciar la instalación, por favor haga clic en el "Adaptador USB 802.11g" o "USB802.11N Adapter‰. Espere a que el instalador se ejecute cuando aparezca la pantalla Contrato de licencia, lea el contrato y haga clic en "Siguiente" para aceptar los términos y continuar con la instalación. En el segundo tipo de instalación de la pantalla (abajo), seleccione una herramienta de configuración. "Ralink Herramienta de configuración" se recomienda, ya que proporciona acceso a todas las funciones del adaptador Si usted prefiere utilizar la herramienta proporcionada por Windows XP / Vista, seleccione "Microsoft Zero Configuration Tool". Elija (el ajuste puede ser cambiado después de la instalación), a continuación, haga clic en "Siguiente‰ El programa de instalación instalará utomáticamente el programa. Cuando haya terminado, seleccione "Sí, deseo reiniciar mi equipo ahora" y haga clic en "Finalizar " para reiniciar el equipo. 6 Con el equipo ahora encendido, inserte el adaptador inalámbrico USB a un puerto USB 2.0 libre. Con la bienvenida a los encontrados en la pantalla Asistente para hardware nuevo que aparecen (que es automática cuando el adaptador está conectado al PC), seleccione la opción "No, no esta vez" y haga clic en "Siguiente". Cuando aparezca "œQué quieres que haga el asistente?" seleccione "Instalar automáticamente el software (recomendado)" y haga clic en "Siguiente". Una pantalla de estado mostrará, lo que indica que la instalación está en curso. No es necesario hacer nada a este punto. Cuando la Finalización de la muestra pantalla Nuevo hardware encontrado Asistente, se indica que la instalación se ha completado con éxito y su adaptador USB inalámbrico está listo para la configuración 7 5. GU¸A DE CONFIGURACIŁN Una vez finalizada la instalación, puede configurar el adaptador inalámbrico USB para conectarse a un punto de acceso inalámbrico (AP). La utilidad de configuración inalámbrica se inicia automáticamente, y usted también encontrará un icono de la bandeja en la parte inferior derecha de la bandeja de su sistema de Windows 1. Haga clic en el icono RaUI y seleccione "Ejecutar la Utilidad de configuración 2. La utilidad de configuración buscará las redes inalámbricas dentro del alcance. Haga clic en "Volver a explorar" para actualizar la lista de redes inalámbricas disponibles. Para unirse a una red en particular que aparece, seleccione y haga clic en "Conectar". 3. Si la red inalámbrica utiliza cifrado, tiene que introducir la clave de cifrado correcta. La utilidad de configuración sugiere automáticamente el tipo de autenticación correcta (ver la lista desplegable), y no se debe cambiar el valor sugerido 8 4. NOTA: Para redes WPA / WPA2, es necesario seleccionar el tipo de cifrado correcto, y (AES o TKIP). Estas opciones dependen de cómo la red inalámbrica está configurada. Sólo el propietario de la red inalámbrica puede proporcionar la información requerida. 5. Si el punto de acceso inalámbrico está conectado correctamente, verá ► en la parte frontal del dispositivo inalámbrico. NOTA: Para la configuración avanzada y las características adicionales del adaptador USB inalámbrico, consulte el manual de usuario en el CD adjunto. 9 6. OBTENER SOPORTE TECNICO Mientras esperamos que su experiencia con el adaptador inalámbrico USB N sea agradable y fácil de usar, si experimenta algunos problemas o algunas de las preguntas que esta Guía del usuario no ha respondido. Póngase en contacto con su distribuidor y pedir ayuda en primer lugar, si no puede resolver su problema, póngase en contacto con nuestra empresa. Este manual se basa en la versión más reciente de nuestro adaptador inalámbrico USB N. Si su adaptador USB no es compatible con algunas funciones especiales mostradas en el manual, por favor contacte con nuestro equipo de soporte técnico para obtener la última versión del software para hacer la actualización. 10 1. INTRODUCTION INTRODUCTION AND PRODUCT DESCRIPTION Thank you for choosing the APPUSB300HP Wireless USB Adapter High Power. 1.1 PRODUCT OVERVIEW Wireless USB Adapter allows you to connect your laptop or desktop to any wireless networks in your home or office. The Wireless USB Adapter is great for those who want to upgrade older computers to be able to access the Internet over a Wireless network. 1.2. PRODUCT FEATURES • Standards IEEE 802.11n, IEEE 802.11.b and IEEE 802.11g. • Chipset Ralink RT2720+2770 • TX: 150 Mbps RX: 300Mbps. • 64/128 WEP, WPA/WPA2 and WPA-PSK/WPA2-PSK encryptions. • Wi-Fi Protected Setup (WPS). • 1000mW via USB 2.0 • 4 PCB Layer, with 1 x detachable 5dbi antenna. • Support Software AP mode and WMMTM (Wi-Fi Multimedia) function. • Operating distance of up to 1000 meters • Compatible with USB 1.1 desktop and notebook computers. • Support Wireless Data gathering and analyzing. • Windows 98SE, 2000, Millennium, XP, Vista, W7, Linux and MAC OS X. 11 • High power in compact size • Constant and stable performance • User-friendly and easy installation 1.3 PC SYSTEM REQUERIMENTS • Notebook or desktop PC with Pentium 1 GHz-compatible or higher processor • Windows 2000/ XP/ Vista/ W7, Mac OS, Linux • Available Hi-Speed USB 2.0 Port 2. PACKAGE CONTENTS • 11n High Power • High gain Antenna. • USB 2.0 Cable • Driver/Manual CD 3. SPECIFICATIONS Item Specifications Standards IEEE 802.1n, IEEE 802.11g and IEEE 802.11b Interface Type USB 2.0/1.1 12 Date Rate 802.11b: 11Mbps 802.11g: 54 Mbps 802.11n: TX:150Mbps RX:300Mbps Security 64/128 bit WEP encryption WPA/WPA2 and WPA-PSK/WPA2-PSK encryptions Wi-Fi Protected Setup (WPS) OPERATING FRECUENCY FCC:2412-2462Mhz (Ch1-Ch11) ETSI:2412-2472MHz (Ch1-Ch13) RF Frequency 2412~2462 MHz (North America) 2412~2472 MHz (Europe) 2412~2482 MHz (Japan) Antenna Type Internal PCB Antenna + High gain Antenna LED Status Link Status, Activity Operable Operating Temperature: 0ÀC~40ÀC Environments Storage Temperature: -20ÀC~60ÀC Operating Humidity: 10%~85% RH 13 non_condensing Storage Humidity: 5% to 90% RH noncondensing Supported OS Windows 2000, XP, Vista, W7, Linux and MAC OS X 4. INSTALATION GUIDE IMPORTANT: For proper operation, do not connect the Wireless USB Adapter to your computer before you install the software. If you do, wait for the Found New Hardware screen to display and click „Cancel‰; otherwise, the installation process will likely be adversely affected. Insert the included setup in the CD-ROM Drive and start Setup.exe program. To start installation, please click on „USB 802.11G Adapter‰ „USB802.11N Adapter‰. CD the the the or Wait for the installer to run when the License Agreement screen displays, read the agreement and click „Next‰ to accept the terms and continue with the installation. 14 On the second Setup Type Screen (below), choose a configuration tool. „Ralink Configuration Tool‰ is recommended, as it provides access to all adapter features. If you prefer to use the tool provided by Windows XP/ Vista, select „Microsoft Zero Configuration Tool‰. Choose either (the setting can be changer after the install), then click „Next‰. The installer will automatically install the program. When done, select „Yes, I want to restart my computer now‰ and click „Finish‰ to reboot your computer. 15 With the computer now turned on, insert the Wireless USB Adapter into an open USB2.0 port. With the Welcome to the Found New Hardware Wizard screen displayed (which is automatic when the adapter is connected to the computer), select the option „No, not this time‰ and click „Next‰. When prompted with „What do you want the wizard to do?‰ select „Install the software automatically (Recommended)‰ and click „Next‰. A status screen will display, indicating that the installation is in progress. No action is needed as this point. 16 When the Completing the Found New Hardware Wizard screen displays, it indicates that the installation has been successfully completed and your Wireless USB Adapter is ready for configuration. 5. CONFIGURATION GUIDE Once the installation is complete, you can configure the Wireless USB Adapter to connect to a wireless access point (AP). The wireless configuration utility will start automatically, and youÊll also find a tray icon at the lower right in your Windows systemÊs tray. 1. Right-click the RaUI icon and select „Launch Config Utility‰. 2. The configuration utility will scan for wireless networks within range. Click „Rescan‰ to refresh the list of available wireless networks. To join a particular network that displays, select it and click „Connect‰. 3. If the wireless network uses encryption, you need to input the correct encryption key. The configuration utility automatically suggests the correct authentication type (see the drop-down list), and you should not change the suggested value. 17 4. 5. NOTE: For WPA/ WPA2 networks, you need to select the correct encryption type, as well (AES or TKIP). These settings depend on how the wireless network is set up. Only the owner of the wireless network can provide the required information. If the wireless access point is successfully connected, you will see ► in front of the wireless device. NOTE: For advanced settings and additional features of the Wireless USB Adapter, refer to the user manual on the enclosed CD. 6. OBTAINING TECHNICAL SUPPORT While we hope your experience with the Wireless-N USB Adapter is enjoyable and easy to use, you may experience some difficulties or have some questions that this User Guide has not answered. Please contact your reseller and ask them for help first. If they cannot resolve your issue, please contact our company. This user manual is based on the latest version of our Wireless-N USB Adapter. If your USB adapter does support some special functions showed in the manual, please contact our technical support team to obtain the latest software for doing upgrade. 18 1. INTRODUCTION ET DESCRIPTION DU PRODUIT Merci d'avoir choisi l´adaptateur USB sans fil de haute puissance APPUSB300HP. 1.1 APERÇU APERÇU DU PRODUIT Adaptateur USB sans fil qui vous permet de connecter votre ordinateur portable ou de bureau pour tous les réseaux sans fil dans votre maison ou au bureau. L'adaptateur USB sans fil est idéal pour ceux qui veulent mettre à niveau les ordinateurs plus anciens pour pouvoir accéder à Internet via un réseau sans fil. 1.2 CARACTÉRISTIQUES • Normes IEEE 802.11n, IEEE 802.11.b et IEEE 802.11g.Ralink RT2720 Chipset 2770 • TX: 150 Mbps RX: 300Mbps. • 64/128 WEP, WPA/WPA2 et cryptages WPA-PSK/WPA2-PSK. • Wi-Fi Protected Setup (WPS). • 1000mW via USB 2.0 • PCB 4 couches, avec 1 x Antenne détachable 5 dBi. • Supporte le mode logiciel AP WMMTM (fonction Wi-Fi Multimedia) • Distance de fonctionnement jusqu'à 1000 mètres • Compatible USB 1.1 de bureau et ordinateurs portables. • Support de données sans fil collecte et d'analyse. • Windows 98SE,2000,Millenium,XP, Vista, W7, Linux et MACOS X. • Grande puissance de taille compacte • La performance constante et stable • Installation conviviale et facile 19 1.3 EXIGENCES EXIGENCES DU SYST˚ME PC • Ordinateur portable ou PC de bureau avec processeur Pentium 1 GHz ou plus compatible • Windows 2000 / XP / Vista / W7, Mac OS, Linux • USB Disponible haute vitesse USB 2.0 Port 2. CONTENU DE L´EMBALLAGE - 11n haute puissance - Antenne à gain élevé. - Câble USB 2.0 - Driver / Manuel CD 3. SPÉCIFICATIONS Item Spécifications Standards IEEE 802.1n, IEEE 802.11g and IEEE 802.11b Type d´interface USB 2.0/1.1 Taux de données 802.11b: 11Mbps 802.11g: 54 Mbps 802.11n: TX:150Mbps RX:300Mbps Sécurité 64/128 bit WEP encryption WPA/WPA2 and WPA-PSK/WPA2-PSK 20 encryptions Wi-Fi Protected Setup (WPS) Fréquence d´opération FCC:2412-2462Mhz (Ch1-Ch11) ETSI:2412-2472MHz (Ch1-Ch13) Fréquence RF 2412~2462 MHz (Amérique du Nord) 2412~2472 MHz (Europe) 2412~2482 MHz (Japan) Type d´antenne Interne PCB antenne + antenne à gain élevé Statut du LED Etat de la liaison, l'activité Environnements de funcionnment Température d´opération: 0ÀC~40ÀC Température de stockage: -20ÀC~60ÀC Humidité d´opération: 10%~85% RH sans condensation Humidité de stockage: 5% to 90% RH noncondensing Systèmes d´exploitations supportés Windows 2000, XP, Vista, W7, Linux and MAC OS X 21 4. GUIDE D´INSTALATION IMPORTANT: Pour fonctionner correctement, ne pas connecter l´adaptateur USB sans fil à votre ordinateur avant d'installer le logiciel. Si vous le faites, attendez que l'écran affiche Nouveau matériel détecté et cliquez sur ÿAnnulerŸ, sinon, le processus d'installation sera probablement affectée. Insérez le CD d'installation fourni dans le CD-ROM et lancez le programme Setup.exe. Pour démarrer l'installation, s'il vous plaît cliquer sur le "adaptateur USB 802.11GŸ ou ÿUSB802.11N Adapter". Attendez que le programme d'installation s'exécute lors de l'affichage en écran de l´accord de licence, lisez le contrat et cliquez sur "Suivant" pour accepter les termes et poursuivre l'installation. Sur le deuxième écran Type de configuration (ci-dessous), choisissez un outil de configuration. ÿRalink Configuration Tool Ÿ est recommandé, car il donne accès à toutes les fonctionnalités adaptateur Si vous préférez utiliser l'outil fourni par Windows XP / Vista, sélectionnez "Microsoft Zero Configuration Tool". Choisissez (le réglage peut changer après l'installation), puis cliquez sur "Suivant". 22 Le programme d'installation installe automatiquement le programme. Lorsque vous avez terminé, sélectionnez "Oui, je veux redémarrer mon ordinateur maintenant " et cliquez sur "Terminer" pour redémarrer votre ordinateur. Avec l'ordinateur maintenant allumé, insérez l'adaptateur sans fil USB dans un port USB2.0 libre. Avec l'écran Bienvenue dans l'Assistant Nouveau matériel détecté s'affiche (qui est automatique lorsque l'adaptateur est connecté à l'ordinateur), sélectionnez l'option ÿNon, pas cette fois" et cliquez sur "Suivant" Lorsque le prompt ÿQu'est-ce que vous voulez que l'Assistant de faire? „apparaît, sélectionnez "Installer le logiciel automatiquement (recommandé)" et cliquez sur "Suivant". Un écran d'état d'affichage, indiquant que l'installation est en cours. Aucune action n'est nécessaire que ce point. 23 Lorsque l´écran affiche que l´assistant à terminer de détecté le nouveau matériel il indique que l'installation a été achevée avec succès et votre adaptateur USB sans fil est prêt pour la configuration. 5. GUIDE DE CONFIGURATION Une fois l'installation terminée, vous pouvez configurer l'adaptateur USB sans fil pour se connecter à un point d'accès sans fil (AP). L'utilitaire de configuration sans fil démarre automatiquement, et vous trouverez également une icône en bas à droite dans le tiroir de votre système Windows. 1. Droit-cliquez sur l'icône RaUI et sélectionnez "Launch Config Utility". 2. La fonction d´utilité de configuration recherchera pour la numérisation de réseaux sans fil à portée. Cliquez sur "Rescan" pour actualiser la liste des réseaux sans fil disponibles. Pour vous joindre à un réseau particulier qui s'affiche, sélectionnez-le et cliquez sur "Connect". 24 3. Si le réseau sans fil utilise le cryptage, vous devez saisir la clé de cryptage correct. L'utilitaire de configuration suggère automatiquement le type d'authentification correcte (voir la liste déroulante), vous ne devez pas modifier la valeur proposée. 4. NOTE: Pour le WPA / WPA2 des réseaux, vous devez sélectionner le type de cryptage correct, ainsi (AES ou TKIP). Ces paramètres dépendent de la façon dont le réseau sans fil est mis en place. Seul le propriétaire du réseau sans fil peut fournir les informations requises. 5. Si le point d'accès sans fil est correctement connecté, vous verrez ► en face de l'appareil sans fil. NOTE: Pour les réglages avancés et des fonctionnalités supplémentaires de l'adaptateur USB sans fil, consulter le manuel d'utilisation sur le CD inclus. 25 6. OBTENIR SUPPORT TECHNIQUE TECHNIQUE Bien que nous espérons que votre expérience avec lÊadaptateur USB sans fil est agréable et facile à utiliser, il se peut que vous puissiez avoir certains problèmes ou avoir des questions que ce guide n'a pas répondues. S'il vous plaît contactez votre revendeur et demander de l'aide tout d'abord, dans le cas qu´il ne pourrait pas résoudre votre problème, s'il vous plaît contacté nous. Ce manuel est basé sur la dernière version de notre adaptateur USB sans fil N. Si votre adaptateur ne supporte pas certaines fonctions spéciales montrées dans le manuel, s'il vous plaît contacter notre équipe de support technique pour obtenir le logiciel le plus récent pour faire les mises à jour. 26 1.1 PRODUKTÜBERBLICK Der Wireless USB-Adapter ermöglicht Ihnen kabellose Netzwerkverbindungen Ihres Laptops oder Tischcomputers mit Netzwerken im Büro oder zuhause. Der Wireless USB-Adapter ist besonders für die Erweiterung älterer Computer geeignet, um einen drahtlosen Internetzugang zu ermöglichen. 1.2 PRODUKTEIGENSCHAFTEN • Standards IEEE 802.11n, IEEE 802.11.b und IEEE 802.11g. • Chipset Ralink RT2720+2770 • TX: 150 Mbps RX: 300Mbps. • 64/128 WEP, WPA/WPA2 und WPA-PSK/WPA2-PSK Verschlüsselung. • Wi-Fi Sicherheitseinstellung (WPS). • 1000mW via USB 2.0 • 4 PCB Layer, mit 1 x abnehmbaren 5dbi Antenne. • Unterstützung des AP-Softwaremodus und der WMMTM (Wi-Fi Multimedia) Funktion. • Reichweite von bis zu 1000 Meter • Kompatibel mit Tischcomputern und Notebooks mit USB 1.1. • Unterstützt kabellose Datensammlung und Analyse. • Windows 98SE,2000,Millennium, XP, Vista, W7, Linux und MAC OS X. • Hochleistung im Kleinformat 27 • Konstant und stabil im Betrieb • Benutzerfreundlich und leicht zu installieren 1.3 SYSTEMANFORDERUNGEN • Notebook oder Tischcomputer mit Pentium 1 GHz Prozessor kompatibel oder höher • Windows 2000/ XP/ Vista/ W7, Mac OS, Linux • Eine verfügbare USB 2.0 Hochgeschwindigkeits-Schnittstelle 2. LIEFERUMFANG • 11n Hochleistung • Hochgewinnantenne. • USB 2.0 Kabel • CD mit Treibern/Betriebsanleitung 3. DATENBLATT Posten Datenblatt Standards IEEE 802.1n, IEEE 802.11g und IEEE 802.11b 28 Schnittstellentyp USB 2.0/1.1 Datenrate 802.11b: 11Mbps 802.11g: 54 Mbps 802.11n: TX:150Mbps RX:300Mbps Sicherheit 64/128 bit WEP Verschlüsselung WPA/WPA2 und WPA-PSK/WPA2-PSK Verschlüsselung Wi-Fi Sicherheitseinstellung (WPS) BETRIEBSFREQUENZ FCC:2412-2462Mhz (Kanäle Ch1-Ch11) ETSI:2412-2472MHz (Kanäle Ch1-Ch13) RF Frequenz 2412~2462 MHz (Nordamerika) 2412~2472 MHz (Europa) 2412~2482 MHz (Japan) Antennentyp Interne PCB-Antenne Hochgewinnantenne LED Statusanzeige Verbindungsstatus, Aktivität Betriebsumgebung Betriebstemperatur: 0ÀC~40ÀC 29 + Lagertemperatur: -20ÀC~60ÀC Relative Luftfeuchtigkeit bei Betrieb: 10%~85% RH (ohne Kondensierung) Relative Luftfeuchtigkeit bei Lagerung: 5% bis 90% RH (ohne Kondensierung) Unterstützte Betriebssysteme Windows 2000, XP, Vista, W7, Linux und MAC OS X 4. INSTALLATIONSANLEITUNG WICHTIG: Damit ein ordnungsgemäßer Installationsablauf gewährleistet ist, verbinden Sie den Wireless USB-Adapter nicht mit Ihrem Computer, bevor Sie die Software installiert haben. Falls Sie das trotzdem getan haben, warten Sie auf die Meldung „Neue Hardware gefunden‰ und klicken Sie auf „Abbrechen‰, da ansonsten der Installationsvorgang voraussichtlich nicht erfolgreich abgeschlossen werden kann. Legen Sie die beigefügte Setup-CD in das CD-ROM-Laufwerk und rufen Sie das Setup.exe Programm auf. Zum Start der Installation klicken Sie bitte auf „USB 802.11G Adapter‰ oder „USB802.11N Adapter‰. 30 Lassen Sie die Installation ablaufen und wenn der Bildschirm mit der Lizenzvereinbarung erscheint, lesen Sie diese durch und klicken Sie bei Annahme der Lizenzvereinbarungen auf „Weiter‰ und fahren Sie mit der Installation fort. Auf dem zweiten Installationsbildschirm (unten), wählen Sie ein Konfigurierungstool. Das „Ralink Configuration Tool‰ wird empfohlen, da es den Zugang zu allen Produkteigenschaften des Adapters ermöglicht. Falls Sie lieber das Standardtool von Windows XP/ Vista verwenden wollen, wählen Sie das „Microsoft Zero Configuration Tool‰. Wählen Sie eines der beiden aus und klicken Sie auf ıWeiter„ (die Einstellung kann nach der Installation geändert werden). Das Installationsprogramm installiert das Programm automatisch. Nach Abschluss der Installation wählen Sie „Ja, Computer jetzt neu starten‰ und klicken Sie auf ıBeenden‰, um Ihren Computer neu zu starten. 31 Stecken Sie nun bei angeschaltetem Computer den Wireless-USB-Adapter in eine verfügbare USB 2.0 Schnittstelle. Sobald der Bildschirm des Hardware-Assistenten erscheint (was automatisch nach der Verbindung des USB-Adapters geschieht), wählen Sie die Option "Nein, jetzt nicht" und klicken Sie auf "Weiter". Bei der Meldung „Was soll der Hardware-Assistent tun?‰ wählen Sie „Software automatisch installieren (empfohlen)‰ und klicken Sie auf „Weiter‰. Es erscheint eine Statusanzeige, die den Installationsfortschritt anzeigt. Es sind hierbei keinerlei Aktionen erforderlich. Bei Erscheinen des Bildschirms „Abschluss des HardwareAssistenten‰ wird angezeigt, dass die Installation erfolgreich abgeschlossen worden ist und Sie Ihren Wireless USB-Adapter nun konfigurieren können. 32 5. KONFIGURATIONSANLEITUNG Nach Abschluss der Installation können Sie Ihren Wireless USBAdapter konfigurieren, um sich mit einem kabellosen Zugangspunkt (AP) zu verbinden. Das Konfigurierungstool startet automatisch und es erscheint ein Symbol am unteren rechten Rand der WindowsFunktionsleiste. 1. Klicken Sie mit der rechten Maustaste auf das RaUI-Symbol und wählen Sie „Konfigurierungstool starten‰. 2. Das Konfigurierungstool scannt nach kabellosen Netzwerken in Reichweite. Klicken Sie auf „Erneut scannen‰, um die Liste der verfügbaren kabellosen Netzwerke zu aktualisieren. Zur Verbindung mit einem bestimmten angezeigten Netzwerk wählen Sie es aus und klicken Sie auf „verbinden„. 3. Falls das drahtlose Netzwerk Verschlüsselung verwendet, müssen Sie den richtigen Netzwerkschlüssel eingeben. Das Konfigurierungstool schlägt automatisch den korrekten Authentifizierungstyp vor (siehe Auswahlliste) und Sie sollten den vorgeschlagenen Wert nicht ändern. 4. ZU BEACHTEN: Bei WPA/ WPA2 Netzwerken müssen Sie auch den richtigen Verschlüsselungstyp angeben (AES oder TKIP). Diese 33 Einstellungen hängen von den Einstellungen des kabellosen Netzwerkes ab. Nur der Netzwerkeigner kann Ihnen die erforderlichen Informationen mitteilen. 6. Sobald der Zugang erfolgreich hergestellt worden ist, erscheint ein vor dem kabellosen Netzwerkgerät. ZU BEACHTEN: Für weitere Einstellungen und zusätzliche Produkteigenschaften des kabellosen USB-Adapters lesen Sie bitte die Anleitungen auf der beigefügten CD. 7. TECHNISCHER KUNDENDIENST Obwohl wir hoffen, dass Sie mit dem Wireless-N USB-Adapter nur gute Erfahrungen machen, er Ihren Erwartungen entspricht und Ihnen die Bedienung leicht fällt, können Situationen und Fragen auftreten, die anhand dieser Bedienungsanleitung nicht gelöst werden können. Wenden Sie sich in diesem Fall bitte an Ihren Händler und fragen Sie dort zuerst nach Rat. Sollte dieser Ihr Problem nicht lösen können, wenden Sie sich an unsere Firma. Diese Betriebsanleitung basiert auf der letzten Version des Wireless-N USB-Adapters. Sollte Ihr USB-Adapter bestimmte Funktionen nicht unterstützen, die in dieser Anleitung aufgeführt sind, wenden Sie sich bitte an unseren technischen Kundendienst, damit Ihnen die neueste Aktualisierungssoftware zur Verfügung gestellt wird. 34 1. INTRODUZIONE E DESCRIZIONE DEL PRODOTTO Grazie per aver scelto lÊAdattatore di rete High Power Wireless APPUSB300HP. 1.1 PANORAMICA DEL PRODOTTO LÊAdattatore di rete USB Wireless consente di collegare un computer portatile ad ogni rete wireless in casa o in ufficio. LÊAdattatore di rete USB Wireless è interessante per coloro che vogliono aggiornare i computer più vecchi, potendo quindi accedere ad Internet tramite una rete wireless. 1.2 CARATTERISTICHE DEL PRODOTTO • Standard IEEE 802.11n, IEEE 802.11.b e IEEE 802.11g. • Chipset Ralink RT2720+2770 • TX: 150 Mbps RX: 300Mbps. • Crittografie 64/128 WEP, WPA / WPA2 e WPA PSK PSK/WPA2. • Wi-Fi Protected Setup (WPS). • 1000mW tramite USB 2.0 • 4 PCB Layer, con 1 antenna smontabile da 5 dBi. • Supporta modalità software AP e funzione WMMTM (Wi-Fi Multimedia). • Distanza di funzionamento fino a 1000 metri • Compatibile con USB 1.1 computer desktop e notebook. • Supporta raccolta dati wireless ed analisi. 35 • Windows 98SE, 2000,Millennium, XP, Vista, W7, Linux e MAC OSX. • Alta potenza in dimensione compatta • Rendimento costante e stabile • Istruzioni per l'installazione facili e veloci 1.3 REQUISITI DI SISTEMA • Notebook o PC desktop con processore Pentium 1 GHz o superiore compatibile • Windows 2000/ XP/ Vista/ W7, Mac OS, Linux • Porta USB 2.0 ad alta velocità 2. CONTENUTO DELLA CONFEZIONE • 11n High Power • Antenna high gain. • Cavo USB 2.0 • Driver / manuale CD 3. SPECIFICHE TECNICHE Articolo Specifiche tecniche Standards IEEE 802.1n, IEEE 802.11g e IEEE 802.11b 36 Tipo di interfaccia USB 2.0/1.1 Velocità dati 802.11b: 11Mbps 802,11g: 54 Mbps 802.11b: TX:150Mbps RX:300Mbps Protezione Crittografia WEP 64/128 bit Crittografie WPA/WPA2 e WPAPSK/WPA2-PSK Wi-Fi Protected Setup (WPS) FREQUENZA DI FUNZIONAMENTO FCC: 2412 2462Mhz (Ch1-CH11) Frequenza RF 2412 ~ 2462 MHz (Stati Uniti) ETSI: 2412 -2472MHz (Ch1-CH13) 2412 ~ 2472 MHz (Europa) 2412 ~ 2482 MHz (Giappone) Tipo di antenna Antenna PCB interna + antenna high gain Stato LED Stato Link, attività Operabile Temperatura di funzionamento: 0ÀC~40ÀC Ambiente Temperatura magazzinaggio: 20ÀC~60ÀC Umidità di funzionamento: 10%~85% 37 RH non condensante Umidità di magazzinaggio: 5% - 90% RH, non condensante SO supportato Windows 2000, XP, Vista, W7, Linux e MAC OS X 4. GUIDA ALLÊINSTALLAZIONE IMPORTANTE: per un corretto funzionamento, non collegare l'Adattatore USB wireless al computer prima di aver installato il software. Se fate così, attendere la schermata Nuovo Hardware Trovato e fare clic su "Annulla", altrimenti il processo di installazione sarà probabilmente compromesso negativamente. Inserire il CD di installazione nel CD ROM drive e avviare il programma Setup.exe. Per avviare lÊinstallazione, fare clic su „USB 802.11G Adapter‰ o su „USB802.11N Adapter‰. Attendere che il programma di installazione mostri la schermata License Agreement, leggere il contratto e fare clic su "Next" per accettare i termini e continuare l'installazione. 38 Nella seconda schermata di impostazione Type Screen (sotto), scegliere uno strumento di configurazione. EÊ consigliata la "Ralink Configuration Tool", in quanto fornisce l'accesso a tutte le funzionalità dell'Adattatore. Se preferite utilizzare lo strumento fornito da Windows XP/ Vista, selezionare „Microsoft Zero Configuration Tool‰. Scegliere (the setting can be changer after the install), quindi cliccare su „Next‰. Il programma di installazione installerà automaticamente il programma. Una volta installato, selezionare „Yes, I want to restart my computer now‰ e cliccare su „Finish‰ per riavviare il computer. Con il computer ora riacceso, inserire l'Adattatore USB wireless in una porta USB2.0 libera. Con il benvenuto della schermata Found New Hardware Wizard (che è automatica quando lÊAdattatore viene collegato al computer), selezionare lÊopzione „No, not this time‰ e fare clic su „Next‰. 39 Quando appare „What do you want the wizard to do?‰ selezionare „Install the software automatically (Consigliato)‰ e fare clic su „Next‰. Una schermata di stato verrà visualizzata, indica che l'installazione è in corso. A questo punto non è necessaria alcuna azione. Quando al Completamento apparirà la schermata Found New Hardware Wizard, indica che l'installazione è stata completata con successo ed il vostro Adattatore USB Wireless è pronto per la configurazione. 5. GUIDA ALLA CONFIGURAZIONE Una volta completata l'installazione, è possibile configurare l'Adattatore USB wireless per connettersi a un punto di accesso wireless (AP). L'utilità di configurazione wireless si avvia automaticamente, e potrete trovare anche unÊicona nella barra in basso a destra nel vassoio del sistema Windows. 1. Fare clic destro sullÊicona RaUI e selezionare „Launch Config Utility‰. 40 2. L'utilità di configurazione farà la scansione delle reti wireless nel raggio d'azione. Fare clic su "Rescan" per aggiornare l'elenco delle reti wireless disponibili. Per collegarsi ad una particolare rete visualizzata, selezionarla e cliccare su "Connect". 3. Se la rete wireless utilizza la crittografia, è necessario inserire la chiave di cifratura corretta. L'utility di configurazione suggerisce automaticamente il tipo corretto di autenticazione (vedi l'elenco a discesa), non si deve modificare il valore suggerito. 4. NB: per reti WPA / WPA2, è necessario selezionare il corretto tipo di crittografia, nonché (AES o TKIP). Queste impostazioni dipendono da come la rete wireless è configurata. Solo il proprietario della rete wireless è in grado di fornire le informazioni richieste. 5. Se il punto di accesso wireless è collegato correttamente, si vedrà la seguente freccia ►di fronte al dispositivo wireless. 41 NB: Per le impostazioni avanzate e funzionalità aggiuntive dellÊAdattatore USB Wireless, consultare il manuale utente sul CD allegato. 6. USUFRUIRE DELLÊASSISTENZA TECNICA Ci auguriamo che la vostra esperienza con lÊAdattatore USB wireless-N sia piacevole e facile, tuttavia potreste sperimentare qualche problema non esaminato in questa Guida Utente. In primo luogo si prega di contattare il proprio rivenditore e chiedere aiuto, se non riuscite in questo modo a risolvere il problema, potete contattare la nostra azienda. Questo manuale è basato sulla più recente versione dellÊAdattatore USB Wireless-N. Se il vostro Adattatore USB non supporta alcune funzioni particolari di cui al manuale, si prega di contattare il nostro team di supporto tecnico per ottenere l'ultimo software per provvedere all'aggiornamento. 42 1. INTRODUÇ‹O E DESCRIÇ‹O DO PRODUTO Obrigada por escolher a solução APPUSB300HP Adaptador USB Wireless de Alta Potência. 1.1. RESUMO DO PRODUTO PRODUTO O Adaptador USB Wireless permite ligar o seu portátil ou desktop a qualquer rede sem fios, em casa ou no escritório. O Adaptador USB Wireless é adequado para aqueles que pretendem actualizar computadores antigos para poderem aceder à Internet a partir de uma rede sem-fios. 1.2 CARACTER¸TICAS DO Produto • Normas IEEE 802.11n, IEEE 802.11.b e IEEE 802.11g. • Chipset Ralink RT2720+2770 • TX: 150 Mbps RX: 300Mbps. • 64/128 WEP, encriptações WPA/WPA2 e WPA-PSK/WPA2-PSK. • Configuração Wi-Fi Protegida (WPS). • 1000mW via USB 2.0 • 4 PCB Layer, com 1 x antena 5dbi amovível. • Modo de Suporte Software AP e função WMMTM (Wi-Fi Multimédia). • Distância de operação de até 1000 metros • Compatível com USB 1.1 computadores desktop e notebooks. 43 • Suporte na recolha e análise Wireless de Dados. • Windows 98SE,2000, Millennium, XP, Vista, W7, Linux e MAC OSX. • Potência elevada em tamanho compacto • Desempenho constante e estável • Instalação simples e fácil 1.3. REQUISITOS DO SISTEMA SISTEMA • Notebook ou PC Desktop com Pentium 1 GHz - compatível o processador superior • Windows 2000/ XP/ Vista/ W7, Mac OS, Linux • Porta USB 2.0 DE Alta Velocidade Disponível 2. CONTEÐDO DA EMBALAGEM EMBALAGEM • 11n Alta Potência • Cabo USB 2.0 • Antena de ganho elevado • Driver/CD Manual 3. ESPECIFICAÇ›ES ESPECIFICAÇ›ES Termo Prescrições Material padronizado IEEE 802.1n, IEEE 802.11g e IEEE 802.11b 44 Tipo de Interface USB 2.0/1.1 Velocidade de Dados 802.11b: 11Mbps 802.11g: 54 Mbps 802.11n: TX:150Mbps RX:300Mbps Segurança 64/128 bit encriptação WEP Encriptações WPA/WPA2 e WPAPSK/WPA2-PSK. Configuração Wi-Fi Protegida (WPS) FREQU¯NCIA OPERAÇ‹O FCC:2412-2462Mhz (Ch1-Ch11) ETSI:2412-2472MHz (Ch1-Ch13) Frequência RF 2412~2462 MHz (América do Norte) 2412~2472 MHz (Europa) 2412~2482 MHz (Japão) Tipo de Antena Antena Interna PCB + Antena de ganho elevado LED Estado Estado Link, Actividade Operável Temperatura de Operação: 0ÀC~40ÀC 45 Ambientes Temperatura 20ÀC~60ÀC de Armazenagem: - Humidade de Operação: 10%~85% RH sem_condensação Humidade de Armazenagem: 5% a 90% RH, sem-condensação SO Suportados Windows 2000, XP, Vista, W7, Linux e MAC OS X 4. GUIA DE INSTALAÇ‹O IMPORTANTE: Para uma operação adequada, não ligue o Adaptador USB Wireless ao seu computador antes de instalar o software. Se o fizer, aguarde que o ecrã de „Found New Hardware‰ apareça e clique em „Cancel‰, ou então o processo de instalação será afectado adversamente. Insira o CD de configuração incluído no Drive do CD-ROM e arranque o programa Setup.exe. Para iniciar a instalação, clique em „USB 802.11G Adapter‰ ou „USB802.11N Adapter‰. 46 Aguarde que o instalador apresente o ecrã do Acordo de Licença, leia o acordo e clique em „Next‰ para aceitar os termos e continue com a instalação. No segundo ecrã do Tipo de Configuração (Setup Type Screen), seleccione uma ferramenta de configuração. Recomendamos a „Ralink Configuration Tool‰, que disponibiliza acesso a todas as características do adaptador. Se preferir usar a ferramenta fornecida pelo Windows XP/ Vista, seleccione „Microsoft Zero Configuration Tool‰ Seleccione uma (a configuração pode ser alterada depois da instalação), e clique em „Next‰. O instalador instala automaticamente o programa. Quando terminar, seleccione „Yes, I want to restart my computer now‰ e clique em „Finish‰ para reiniciar o seu computador. Com o computador ligado, insira o Adaptador USB Wireless numa porta USB2.0. livre. 47 No ecrã do wizzard „Welcome to the Found New Hardware‰ (que é automaticamente apresentado quando o adaptador é ligado ao computador), seleccione a opção „No, not this time‰ e clique em „Next‰. Quando aparecer a pergunta „What do you want the wizard to do?‰ seleccione „Install the software automatically (Recomendado)‰ e clique em „Next‰. Um ecrã de estado aparece, indicando que a instalação está em progresso. Não é necessária uma acção neste ponto. Quando aparece o ecrã do wizzard „Completing the Found New Hardware‰, significa que a instalação foi efectuada com sucesso e que o Adaptador USB Wireless está pronto para ser configurado. 5. GUIA DE CONFIGURAÇ‹O Depois de completa a instalação, é possível configurar o Adaptador USB Wireless para se ligar a um ponto de acesso sem fios (AP). O utilitário de configuração wireless arranca automaticamente, apresentando um ícone na parte inferior direita do sistema Windows. 48 1. Clique duas vezes com a tecla do lado direito no ícone RaUI e seleccione „Launch Config Utility‰. 2. O utilitário de configuração faz a procura das redes wireless que se encontram ao alcance. Clicar em „Rescan‰ para actualizar a lista de redes wireless disponíveis. Para aceder a uma rede apresentada, seleccione a mesma e clique em „Connect‰. 3. Se a rede wireless usa encriptação, necessita de inserir a chave de encriptação correcta. O utilitário de configuração sugere automaticamente o tipo de autenticação correcto (veja a lista drop-down), não devendo alterar o valor sugerido. 4. Nota: Para redes WPA/ WPA2, também é necessário seleccionar o tipo de encriptação correcto, (AES ou TKIP). 49 Estas definições dependem de como a rede wireless é configurada. Apenas o proprietário da rede wireless pode providenciar a informação requerida. 5. Se o ponto de acesso wireless é ligado com sucesso, aparece ► em frente ao dispositivo wireless. NOTA: Sobre definições avançadas e características adicionais do Adaptador USB Wireless, consulte o manual do utilizador no CD incluído. 6. OBTER SUPORTE TÉCNICO Embora esperemos que da sua experiência com o Adaptador USB Wireless-N, fácil e simples de usar, não resultem problemas ou questões às quais este Manual de Utilizador não responda. Deve em primeiro lugar contactar o seu revendedor e, caso não obtenha a resposta/ajuda pretendida, contactar a nossa empresa. Este manual do utilizador é baseado na última versão do seu Adaptador USB Wireless-N. Se o adaptador USB não suportar algumas funções especiais apresentadas no manual, contacte a nossa equipa de suporte técnico para obter a última versão de software para proceder à actualização. 50 Importado por / Imported by: APPROX IBERIA S. L. CIF: B-91202499 Soporte técnico / Technical support: [email protected] MADE IN CHINA www.printyourideas.com