1
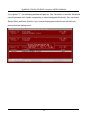
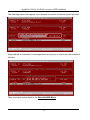
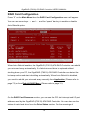
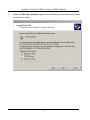
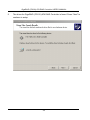
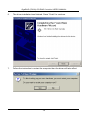
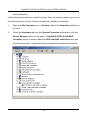
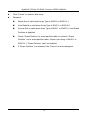
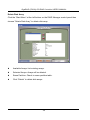
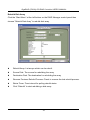
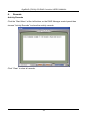
GigaRAID (IT8212) ATA RAID Controller
USER’S MANUAL
12ME-IT8212-006R
Copyright
Copyright by GIGA-BYTE TECHNOLOGY CO., LTD. (“GBT”) No part of this manual
may be reproduced or transmitted in any from without the expressed, written
permission of GBT.
Trademarks
Third-party brands and names are the property of their respective owners.
Notice
Due to rapid change in technology, some of the specifications might be out of date
before publication of this booklet.
The author assumes no responsibility for any errors or omissions which may appear
in this document nor does it make a commitment to update the information contained
herein.
Contents
Introduction ................................................................................................................4
Features ...........................................................................................................5
What is the GigaRAID (IT8212) ATA RAID Controller .......................................6
Quick Start .................................................................................................................7
Create Your Disk Array .....................................................................................9
Setup Utility..............................................................................................................15
Using the GigaRAID (IT8212) ATA RAID Controller Setup Utility....................15
Auto Configuration..........................................................................................17
Define RAID....................................................................................................22
Delete RAID....................................................................................................28
Rebuild RAID..................................................................................................31
RAID Card Configuration................................................................................36
Driver Installation .....................................................................................................38
Windows XP ...................................................................................................39
Windows 2000 ................................................................................................45
Windows SE/ME.............................................................................................53
Windows NT ...................................................................................................61
Linux...............................................................................................................69
Install the GigaRAID (IT8212) ATA RAID Controller on Red Hat 7.3 ........................69
Application ...............................................................................................................72
Installation ......................................................................................................72
Functions Description .....................................................................................75
How to….........................................................................................................86
Q&A .........................................................................................................................88
GigaRAID (IT8212) ATA RAID Controller USER’S MANUAL
Introduction
This manual is mainly to help users setup the GigaRAID (IT8212) ATA RAID
Controller and solve problems when they use it.
If it is your first time to use the GigaRAID (IT8212) ATA RAID Controller and you are
about to install it, please refer to the “Quick Start” section on page 7. After finishing
installing it, you can get the advantages of enhancing the performance and raising
the system’s reliability.
When you face any difficulties and find anything you don’t understand while using the
GigaRAID (IT8212) ATA RAID Controller, please refer to the “Q&A” section on page
88. In this section, you can refer to the problems users may face and find the correct
solutions. You can follow its instructions to solve your problems and then you will get
satisfactory results.
4
GigaRAID (IT8212) ATA RAID Controller USER’S MANUAL
Features
Compatible with the ATA133 specification and supports two IDE channels with
4 drives.
Supports ANSI ATA proposal PIO modes 0,1,2,3,4 with flow control, DMA
Modes 0,1,2,3,4,5,6.
512 bytes FIFO for auto transfer per IDE channel to get a high performance
Supports the RAID 0/1/0+1 function
Supports the JBOD function
Supports the Scatter/Gather function for the DMA/UDMA function
Includes one embedded CPU and firmware on system to handle the RAID
function. It can reduce the driver’s loading of system CPU and improve the
system’s ability.
Low CPU utilization based on a local processor architecture
Compatible with PCI Local bus specification v2.2. Users can easily install our
systems to your PCs.
Supports PCI power Management v1.0 to reduce power consumption.
Supports the drivers for windows 98SE/Me/XP, Windows NT 4.0, Windows
2000 and Linux v2,4,1,0
5
GigaRAID (IT8212) ATA RAID Controller USER’S MANUAL
What is the GigaRAID (IT8212) ATA RAID Controller
This GigaRAID (IT8212) ATA RAID Controller is an excellent product resulting from
Soc concept. It includes one RAID Chip combining CPU, firmware, advanced PCI
controller and IDE controller. Its architecture can provide users a RAID system with
low CPU utilization. When a PC is in high CPU operation or PCI traffic, users won’t
have any penalties for installing RAID system. This is because this system embeds a
local CPU to deal with the RAID function and it’s unnecessary to share CPU’s
performance. It is entirely different from the traditional software RAID system.
Similarly, it also provides users more system stability. It provides users high speed
and integration and low price PC RAID system. Additionally, it also provides PCI
33MHz interface and is compatible with PCI spec. v2.2. It can be easily installed into
the PC system nowadays. Besides, we provide each OS a corresponding driver so
that users don’t have to worry that your systems and the IDE RAID system have any
compatibility issue.
This GigaRAID (IT8212) ATA RAID Controller can support IDE drivers ranging from
the lowest speed of PIO mode drive to the highest speed of ATA/133 drive. Thus,
users can use this characteristic to combine RAID system without any limitations.
Users can use ATA/133 drive and RAID function to achieve the best performance and
get the merit of system’s stability.
The GigaRAID (IT8212) ATA RAID Controller can support the RAID0 (striping),
RAID1 (mirroring), RAID0+1 (striping and mirroring) or JBOD (spanning) mode.
When a system is programmed to the RAID0 mode, it can read or write two drivers at
the same time to enhance the performance. When a system is programmed to the
RAID1 mode, two drivers have the same data and it will prevent data from being
damaged. Once data is damaged, the system will start the rebuild function
automatically and save data back to another new drive. Similarly, this system can use
6
GigaRAID (IT8212) ATA RAID Controller USER’S MANUAL
this data-copying characteristic to let two drivers transmit at the same time and
balance the performance to raise throughput. The RAID0+1 mode uses four drivers
to get the merits of RAID0 and RAID1. As for the JBOD mode, it combines more than
two drives into a drive with a large capacity. This mode does not have the RAID
function and its merit.
Quick Start
This section leads you to quickly establish your RAID system with default settings.
The default settings can meet most people’s requirements. If you need more
advanced optimal, please refer to Setup Utility on page 15 to achieve your goal.
Warning: In order to prevent any data loss resulting from
!
inappropriate operation, please backup data before you start to
install your system.
7
GigaRAID (IT8212) ATA RAID Controller USER’S MANUAL
The hard drives which are required for the installation
The hard drives, which are connected on the GigaRAID (IT8212) ATA RAID Controller,
can support Ultra ATA/ 133, Ultra ATA/ 100, Ultra ATA/ 66, Ultra ATA/33, EIDE or Fast
ATA-2 drives. Nevertheless, for the best performance, it is suggested that you had
better use the hard drives of the same type and capacity to establish your own RAID
system. After getting ready for the hard drives, you can follow the procedures below
to install the system.
1.
Exactly set up every hard drive’s master and slave setting to assure that the
hard drives can surely action and unnecessarily incorrect action of data access
won’t occur.
2.
Exactly insert the hard drive’s cables into the connectors on the hard drive and
check if it’s really firmly inserted.
3.
Insert every power cable connector into the corresponding hard drive and
check if it’s firmly inserted in a correct direction.
Warning: Because this system can support the hard drives of
!
Ultra ATA/133, it is suggested that you can use the 80-wire,
40-pin cable to connect the GigaRAID (IT8212) ATA RAID
Controller and hard drives in order to assure the system’s ability
and efficiency. If the cable is damaged after a period of time, it is also
suggested to buy the cable of the same specification.
8
GigaRAID (IT8212) ATA RAID Controller USER’S MANUAL
Create Your Disk Array
You can create your own array using the onboard BIOS utility of the
GigaRAID (IT8212) ATA RAID Controller with the attached hard drives. Please follow
the steps below to setup your disk array.
Warning: Please backup data in your hard drives to prevent data
!
1.
damage resulting from the unfamiliarity with the operation.
Boot your system
Please attach your hard drives to the GigaRAID (IT8212) ATA RAID Controller,
boot your system and then you will see the following message shown by the
GigaRAID (IT8212) ATA RAID Controller onboard BIOS on the screen.
9
GigaRAID (IT8212) ATA RAID Controller USER’S MANUAL
Please press “Ctrl-G” keys to enter the BIOS utility Main Menu. The screen below will
be shown.
10
GigaRAID (IT8212) ATA RAID Controller USER’S MANUAL
Please click ”1” to enter the Auto Configuration window. It will guide you to set an
array and this is the simplest and fastest way to create your first array. Under the
Setup Array Type as option, you can use arrow keys → and ← and the “space”
bar key to change your option to setup your array type.
11
GigaRAID (IT8212) ATA RAID Controller USER’S MANUAL
Totally, there are five configurations supported:
RAID level/Type
Configurations
Number of disks needed
RAID 0
Disk Striping
2 or 3 or 4
RAID 1
Disk Mirroring
2
RAID 0+1
Disk Striping + Mirroring
4
JBOD
Disk Concatenation
2 or 3 or 4
Normal
None
1 or 2 or 3 or 4
Setup Array for RAID 0:
The GigaRAID (IT8212) ATA RAID Controller allows you to use two, three or four
hard drives to set a RAID 0 (stripe) array. All the hard drives attached on the
controller will be set as array 0. When you create a striped array, files are broken into
64k (stripe size) and stripes are sent to each disk in the array. Selecting RAID 0 can
increase data transfer rate and allow the best overall performance characteristics
because of giving up redundancy.
12
GigaRAID (IT8212) ATA RAID Controller USER’S MANUAL
Setup Array for RAID 1:
The GigaRAID (IT8212) ATA RAID Controller allows two drives to be setup as a RAID
1 (mirror) array or four drives as two arrays. The first mirrored array will be set as
array 0 and the second as array 1. RAID 1 is implemented as mirroring; a drive has
its data duplicated on the other different drive. Selecting RAID 1 can enhance read
performance and allow fault tolerance. A RAID 1 array can thoroughly backup your
files to prevent data loss.
Warning: Two hard drives that form a RAID 1 array have to be
!
attached as the same master or slave hard disks.
Setup Array for RAID 0+1:
A RAID 0+1 (mirror and stripe) array has to be formed by four hard drives. RAID 0+1
is implemented as a mirrored array whose segments are RAID 0 arrays so RAID 0+1
also has fault-tolerance capacity as RAID 1. It not only enhances hard disk access
performance but also backups data to prevent data loss. The formed array is
automatically set as array 0.
Setup Array for JBOD:
The GigaRAID (IT8212) ATA RAID Controller allows you to use two, three or four
hard drives to form a JBOD (Just a Bunch Of Disks) array as array 0. Although JBOD
doesn’t offer other RAID functionality, it makes the hard disks appear to be a single
one by combining the drives into one larger logical one without any capacity loss.
13
GigaRAID (IT8212) ATA RAID Controller USER’S MANUAL
Setup Array for Normal:
You can use the GigaRAID (IT8212) ATA RAID Controller as a normal IDE controller.
The GigaRAID (IT8212) ATA RAID Controller allows you to use one, two, three or four
hard drives. All the hard drives attached on the GigaRAID (IT8212) ATA RAID
Controller are left to act as independent drive volumes.
Please follow the procedures below to set an array:
Use the “space” bar key to select a RAID type.
Press “Ctrl-Y” keys to save and create an array. If you select RAID 0, 1, 0+1 or
JBOD, the boot sector of the new created array will be erased. If you select
Normal, the boot sector will be remained.
Warning: If you prefer to keep data in your hard drives, please
!
follow the procedures in Define RAID section on page 22 to
setup your arrays manually.
Click the “Esc” key to go back to the Main Menu on page 10.
Click the “Esc” key to quit BIOS and boot.
You need to FDISK and format your new array. The new array will be regarded
as a new hard drive by the system.
14
GigaRAID (IT8212) ATA RAID Controller USER’S MANUAL
Setup Utility
Using the GigaRAID (IT8212) ATA RAID Controller Setup
Utility
The GigaRAID (IT8212) ATA RAID Controller Setup Utility provides functions to
create, delete and rebuild an array. It also provides the information of each hard drive
and the configuration of the GigaRAID (IT8212) ATA RAID Controller. Please attach
your hard drives to the GigaRAID (IT8212) ATA RAID Controller and boot your
system. If your array’s configuration is correct, you will see the following message
shown by the GigaRAID (IT8212) ATA RAID Controller onboard BIOS on the screen.
You can press “Ctrl-G” keys to enter Setup Utility or press the “Esc” key to skip and
boot directly.
If your array’s configuration is incorrect, you will see an error message on your
screen. You have to enter Setup Utility to reconfigure the arrays then quit utility to
boot.
15
GigaRAID (IT8212) ATA RAID Controller USER’S MANUAL
GigaRAID (IT8212) ATA RAID Controller Setup Utility Main Menu
There are five options in the Setup Utility Main Menu, please press 1 ~ 5 to enter
the submenu or the “Esc” key to quit the Setup Utility.
If you are not familiar with the array setting, please follow the procedures in Auto
Configuration on page 17 to create new arrays automatically. You can use Define
RAID on page 22 and Delete RAID on page 28 to manually create or delete arrays.
You can also use Rebuild RAID selection on page 31 to help you rebuild a mirrored
(RAID 1 or RAID 0+1) array. Besides, you can use RAID Card Configuration on
page 36 to see the controller’s resources, each hard drive’s status and the setting of
the GigaRAID (IT8212) ATA RAID Controller.
16
GigaRAID (IT8212) ATA RAID Controller USER’S MANUAL
Auto Configuration
Click “1” on the Main Menu to enter Auto Configuration. You can use arrow keys →
and ← and the “space” bar key to change your option. After selecting your option,
you can press “Ctrl-Y” keys to save the setting and click the “Esc” key to leave Auto
Configuration menu and go back to the Main Menu on page 10.
17
GigaRAID (IT8212) ATA RAID Controller USER’S MANUAL
Setup Array for RAID 0:
The GigaRAID (IT8212) ATA RAID Controller allows you to use two, three or four
hard drives to set a RAID 0 (stripe) array. All the hard drives attached on the
controller will be set as array 0. When you create a striped array, files are broken into
64k (stripe size) and stripes are sent to each disk in the array. Selecting RAID 0 can
increase data transfer rate and allow the best overall performance characteristics
because of giving up redundancy.
RAID 0
Primary/Master
Secondary/Master
Primary/Slave
18
Secondary/Slave
GigaRAID (IT8212) ATA RAID Controller USER’S MANUAL
Setup Array for RAID 1:
The GigaRAID (IT8212) ATA RAID Controller allows two drives to be setup as a RAID
1 (mirror) array or four drives as two arrays. The first mirrored array will be set as
array 0 and the second as array 1. RAID 1 is implemented as mirroring; a drive has
its data duplicated on the other different drive. Selecting RAID 1 can enhance read
performance and allow fault tolerance. RAID 1 array can thoroughly backup your files
to prevent data loss.
Note: Two hard drives that form a RAID 1 array have to be attached as the same
master or slave hard disks.
RAID 1
Primary/Master
Primary/Slave
Secondary/Master
Secondary/Slave
19
GigaRAID (IT8212) ATA RAID Controller USER’S MANUAL
Setup Array for RAID 0+1:
A RAID 0+1 (mirror and stripe) array has to be formed by four hard drives. RAID 0+1
is implemented as a mirrored array whose segments are RAID 0 arrays so RAID 0+1
also has fault-tolerance capacity as RAID 1. It not only enhances hard disk access
performance but also backups data to prevent data loss. The formed array is
automatically set as array 0.
RAID 0+1
Primary/Slave
Primary/Master
20
Secondary/Slave
Secondary/Master
GigaRAID (IT8212) ATA RAID Controller USER’S MANUAL
Setup Array for JBOD:
The GigaRAID (IT8212) ATA RAID Controller allows you to use two, three or four
hard drives to form a JBOD (Just a Bunch Of Disks) array as array 0. Although JBOD
doesn’t offer other RAID functionality, it makes the hard disks appear to be a single
one by combining the drives into one larger logical one without any capacity loss.
Setup Array for Normal:
You can use the GigaRAID (IT8212) ATA RAID Controller as a normal IDE controller.
The GigaRAID (IT8212) ATA RAID Controller allows you to use one, two, three or four
hard drives. All the hard drives attached on the GigaRAID (IT8212) ATA RAID
Controller are left to act as independent drive volumes.
21
GigaRAID (IT8212) ATA RAID Controller USER’S MANUAL
Define RAID
Click “2” on the Main Menu then you can enter the Define RAID Menu. Please use
arrow keys ↑ and ↓ to highlight the array number you want to define; use “space”
key to specify the bootable array if you like to boot your system from array attached
on GigaRAID (IT8212) ATA RAID Controller; and click the “Enter” key to select it and
enter the Define RAID Sub-Menu to create your array. If you want to quit and go
back to the Main Menu, please click the “Esc” key.
When an array is not assigned a RAID level, you will see “
” on the raw.
Column “Array Mode” shows the RAID level (Stripe, Mirror, Stripe + Mirror or JBOD)
assigned to the array. Column “Drive No” shows the number of hard drive included in
the array. Column “Size” shows the array’s total capacity. If there is a symbol
shown in front of “Size”, the capacity unit is gigabyte. Column “Status” shows array
status. You will see “Functional” if the array is operational and “Non-Functional” if the
array has lost its functionality.
Please highlight the array number you want to define, click the “Enter” key, then the
Define RAID Sub-Menu will appear and allow drive assignments to the array.
22
GigaRAID (IT8212) ATA RAID Controller USER’S MANUAL
Define RAID Sub-Menu
When you highlight the array you want to define on the Define RAID Menu, click the
“Enter” key then you will enter this Define RAID Sub-Menu. You can use arrow keys
↑ and ↓ to highlight different positions. The “space” bar key can help you cycle
through the different options. “Ctrl-Y” keys can save the change and the “Esc” key
can help you quit then go back to the Define RAID Menu on page 22.
Block Size Option:
You can select Stripe Block size ranging from 1k to 64k for Stripe (RAID 0) or Stripe +
Mirror (RAID 0+1) array. The selection of block size is related to how your data is sent
and regained from hard drives. You can do some tests to decide which block size is
suitable for your system. Generally, a large block size is suitable to manage large file
transfer such as MPEG files. On the contrary, the small block size is suitable to
manage small files such as e-mail files.
Drive Assignments Option:
23
GigaRAID (IT8212) ATA RAID Controller USER’S MANUAL
You can use arrow keys ↑ and ↓ to highlight the drive you want to assign to the
disk array and change the status of Assignments to “Y” by pressing the “space” bar
key.
For the meanings of “Array Mode”, “Drive No” and “Status”, please refer to Define
RAID Menu on page 22. The location of the hard drive is shown at the column
“Channel ID”. “Pri” represents the primary channel and “Sec” represents the
secondary channel. D0 represents a master hard drive while D1 represents a slave
hard drive. Column “Drive Name” shows the model name of the hard drive. Column
“Size” shows the capacity of each hard drive. When a symbol
is shown before the
size, the capacity unit is gigabyte.
When you press “Ctrl-Y” keys to save your change, Setup Utility will check if the
setting is legal. If not, an error message will pop up to show you what the error is and
you have to correct the setting. Limitations are shown as below.
Stripe (RAID 0): There isn’t any specific limitation.
Mirror (RAID 1): Two hard drives that form a RAID 1 array have to be attached as the
same master or slave hard disks. For example, primary channel (Pri) master drive
(D0) and secondary channel (Sec) master drive (D0) can form a mirror array; primary
channel (Pri) slave drive (D1) and secondary channel (Sec) slave drive (D1) can form
a mirror array; but primary channel master drive and primary channel slave drive
cannot form a mirror array.
Stripe + Mirror (RAID 0+1): A RAID 0+1 array has to be formed by four hard drives.
24
GigaRAID (IT8212) ATA RAID Controller USER’S MANUAL
RAID 0+1 is implemented as a mirrored array whose segments are RAID 0 arrays.
SPAN (JBOD): There isn’t any specific limitation.
Normal: If a hard drive is not included in an array (Column “Assignment” in the View
Drive Assignment is shown “Free”), this hard drive is regarded as a normal drive.
The existence of the normal hard drive sometimes will influence the array number
user specified. If the Pri/D0, Pri/D1, Sec/D0 or Sec/D1 hard drive is a normal drive,
array 0, 1, 2 or 3 cannot have the array setting respectively. However, you do not
have to concern about this limitation. If Setup Utility finds any conflicts, Array No will
be adjusted automatically. After finishing setting the array, go back to the Define
RAID Menu on page 22 then you will find the Array No is changed. This is because
the existence of the normal hard drive(s) causes the Array No to be adjusted
automatically.
When you press “Ctrl-Y” keys to save your change and your settings checked by
Setup Utility are correct, the following window will appear. You can choose to clear
the boot sector for the newly created array or not. If your RAID Mode is neither Mirror
nor Stripe + Mirror, this array setting is finished then you can click the “Esc” key to go
back to the Define RAID Menu on page 22.
25
GigaRAID (IT8212) ATA RAID Controller USER’S MANUAL
If your RAID Mode selection is Mirror or Stripe + Mirror and you choose not to delete
the boot sector of the array, the following window will appear to ask whether you want
to rebuild an array. If you choose “Y”, the Rebuild RAID Menu will appear. (Please
refer to page 31.)
If you choose not to rebuild this array for the time being, the GigaRAID (IT8212) ATA
RAID Controller cannot read data correctly because the data is inconsistent in the
26
GigaRAID (IT8212) ATA RAID Controller USER’S MANUAL
mirrored hard drives. Thus, the following window will appear.
Please press arrow keys ↑ and ↓ to highlight your selection and press the “Enter”
key to select the source disk(s) then you have finished the setting and the screen will
go back to the Define RAID Sub-Menu automatically. This array’s setup is completed.
You can press the “Esc” key to go back to the Define RAID Menu on page 22.
27
GigaRAID (IT8212) ATA RAID Controller USER’S MANUAL
Delete RAID
Press “3” on the Main Menu then the Delete RAID Menu will appear. Please use
arrow keys ↑ and ↓ to highlight the array you want to delete, press “Del” to select
it and then enter the Delete RAID Sub-Menu to delete your array. The “Del” key has
no effect if the highlight raw is an empty array. If you want to leave and go to the Main
Menu, press the “Esc” key.
As for the detailed descriptions of
“Array Mode”, “Drive No”, “Size” and “Status”,
please refer to Define RAID on page 22.
28
GigaRAID (IT8212) ATA RAID Controller USER’S MANUAL
Delete RAID Sub-Menu
When you highlight the array you select to delete at the Delete RAID Menu and
press the “Del” key, the Delete RAID Sub-Menu will appear. Please press “Ctrl-Y”
keys to confirm to delete an array or press any other keys to abort array delete.
29
GigaRAID (IT8212) ATA RAID Controller USER’S MANUAL
If you press “Ctrl-Y” keys to make sure to delete an array, the following window will
appear. You can choose to clear the array’s boot sector or keep it. After you finish the
selection, Delete RAID Menu will pop up automatically.
30
GigaRAID (IT8212) ATA RAID Controller USER’S MANUAL
Rebuild RAID
Press ”4” when you are at the Main Menu then the Rebuild RAID Menu will appear.
You can use ↑ and ↓ keys to highlight different arrays, press the “Enter” key to
select an array and enter the next rebuild drive select screen. If the RAID Mode of the
array you want to select is neither mirror nor stripe + mirror, the “Enter” key will have
no effect. If you want to leave and go back to the Main Menu, press the “Esc” key.
31
GigaRAID (IT8212) ATA RAID Controller USER’S MANUAL
Rebuild RAID Drive Select
When you highlight the array you want to rebuild on the Rebuild RAID Menu, press
the “Enter” key then the following screen will appear.
32
GigaRAID (IT8212) ATA RAID Controller USER’S MANUAL
You can use arrow keys ↑ and ↓ to highlight the source disk(s) then press the
“Enter” key to select the source disk(s). The following window will appear to make
sure if you would like to continue.
33
GigaRAID (IT8212) ATA RAID Controller USER’S MANUAL
If you press “Y”, the following window will pop up. You can select to monitor the whole
rebuild process until it ends completely or select background rebuild. You can leave
Setup Utility and boot directly if you choose background rebuild and rebuild can
proceed at the background.
34
GigaRAID (IT8212) ATA RAID Controller USER’S MANUAL
The following screen will appear if you choose to monitor the whole rebuild process.
When rebuild is completed, a message below will pop up to inform you that rebuild is
finished.
Then you leave and go back to the Rebuild RAID Menu.
35
GigaRAID (IT8212) ATA RAID Controller USER’S MANUAL
RAID Card Configuration
Press “5” on the Main Menu then the RAID Card Configuration menu will appear.
You can use arrow keys → and ← and the “space” bar key to enable or disable
Auto-Rebuild option.
When Auto-Rebuild enables, the GigaRAID (IT8212) ATA RAID Controller can rebuild
your mirrored array automatically. If a failed mirrored drive is replaced without
shutting down your PC, the GigaRAID (IT8212) ATA RAID Controller can detect the
hot-swap action and start rebuilding automatically. When Auto-Rebuild is disabled,
you need to rebuild your mirrored array manually from Application (Please refer to
page 72) or from Rebuild RAID Menu (Please refer to page 31).
On the RAID Card Resource section, you can see the PCI slot interrupt and I/O port
address used by the GigaRAID (IT8212) ATA RAID Controller. You can also see the
status of each hard drive from the Drive Status section. For the meanings of
36
GigaRAID (IT8212) ATA RAID Controller USER’S MANUAL
“Channel ID”, “Drive Name” and “Size”, please refer to Define RAID sub-Menu on
page 23. Column “Array No” shows hard drive’s array number. If a hard drive is not
assigned to an array, it’s shown as free. A free hard drive is taken as a normal one.
Column “Mode” shows hard drive’s data transfer mode. “U” represents Ultra DMA
(UDMA) mode, “D” represents Multiword DMA (DMA) mode and “P” represents PIO
mode. PIO modes 0, 1, 2, 3, and 4 correspond to maximum transfer rates of 3.3, 5.2,
8.3, 11.1 and 16.7 megabytes per second (MB/s) respectively. Multiword DMA
modes 0, 1, and 2 have maximum transfer rates of 4.2, 13.3, and 16.7 MB/s
respectively. Ultra DMA modes 0, 1, 2, 3, 4, and 5 have maximum transfer rates of
16.7, 25, 33.3, 44.4, 66.7, and 100 MB/s respectively.
37
GigaRAID (IT8212) ATA RAID Controller USER’S MANUAL
Driver Installation
This section details the procedures to install the GigaRAID (IT8212) ATA RAID
Controller driver under the following various operating systems. Before starting to
install this driver, please make sure that GigaRAID (IT8212) ATA RAID Controller has
already been properly setup in the system.
Windows XP
Windows 2000
Windows 98/ME
Windows NT 4.0
For the Windows operating system (Win NT, WinXP, Win2000 ), for IDE
RAID/SCSI/Serial ATA functioning, the driver must first be transferred to a floppy disk.
Please follow the steps below to complete driver transfer to a floppy disk:
1)
Please insert the provided driver CD into the hard disk drive eg. Drive D:
2)
Insert a blank formatted floppy disk into the floppy disk drive.
3)
Either from "Command Prompt" or DOS, please type in
"D:\BootDrv\menu.exe"
4)
Information on all chipsets should be listed on the screen, please select the
proper chipset model.
Your system will then automatically zip and transfer this driver file to the floppy disk.
After you complete the steps, boot from the Windows CD to install the RAID drivers.
When install Windows 2000 or Windows XP from HDDs in serial ATA controller, press
F6 as Win2000 or XP boots up, then supply serial ATA controller driver by this floppy
disk. Follow on-screen instructions to complete installation.
(Each time you add a new hard drive to a RAID array, the RAID driver will have to be
installed under Windows once for that hard drive. After that, the driver will not have to
be installed.)
38
GigaRAID (IT8212) ATA RAID Controller USER’S MANUAL
Windows XP
Install the driver during Windows XP installation
1.
Start Windows XP installation.
Warning: Because of the different selections of the
!
following installation methods, the time when step2 starts
will be different.
Boot from floppy with Windows installation diskette.
Boot from floppy with un-installable diskette.
Boot from CD-ROM with Windows installation CD.
2.
When the message “Press F6 if you need to install third party SCSI or
RAID driver” appears on the bottom of the screen, please press the <F6> key.
3.
The installation will continue. When a message appears to ask you to
designate the device you want to install, press the <S> key.
4.
Follow the instruction of the installation program to insert the GigaRAID
(IT8212) ATA RAID Controller Driver diskette into the floppy disk drive then
press the <Enter> key to continue.
5.
Select GigaRAID (IT8212) ATA RAID Controller (Windows 2000/XP) from
the device list shown on the window then press the <Enter> key to continue.
6.
The devices that are going to be installed will be listed on the next window.
GigaRAID (IT8212) ATA RAID Controller (Windows 2000/XP) should be
contained on
the list. If you need to install any other devices, please designate them now.
After designating all the devices, please proceed to the next step.
7.
Press the <Enter> key to continue the installation of Windows XP.
39
GigaRAID (IT8212) ATA RAID Controller USER’S MANUAL
Install the driver under existing Windows XP
1.
Start Windows.
2.
When Windows detects GigaRAID (IT8212) ATA RAID Controller in the system,
a dialog box named Found New Hardware Wizard will show on the screen.
Select the Install from a list or specific location (Advanced) option then
click “Next” to continue to setup.
40
GigaRAID (IT8212) ATA RAID Controller USER’S MANUAL
3.
Insert the GigaRAID (IT8212) ATA RAID Controller Driver diskette into the
floppy disk drive then check the Search for the best driver in these locations
option and type A:\WIN2K_XP on the field designating the file’s location. Press
“Next” to continue to setup.
41
GigaRAID (IT8212) ATA RAID Controller USER’S MANUAL
4.
The driver installation has finished. Press “Finish” to continue.
5.
Follow the instruction to restart the computer then the driver will take effect.
42
GigaRAID (IT8212) ATA RAID Controller USER’S MANUAL
Verify Installation
Follow the previous section to install the driver. After the system restarts, you can do
the following steps to check if the driver has been installed successfully.
1.
Right-click My Computer icon on Desktop. Select the Properties option from
the form.
2.
Select the Hardware tab from the System Properties window then click the
Device Manager button on the panel. If GigaRAID (IT8212) ATA RAID
Controller device is shown below the SCSI and RAID controllers item (see
the following figure), it means that the driver has been installed successfully.
43
GigaRAID (IT8212) ATA RAID Controller USER’S MANUAL
3.
If there is a marking ! or ? under SCSI and RAID Controller device as shown
below, it indicates that the driver has not been correctly installed. User should
remove the device and reinstall.
44
GigaRAID (IT8212) ATA RAID Controller USER’S MANUAL
Windows 2000
Install the driver during Windows 2000 installation
1.
Start Windows 2000 installation.
Warning: Because of the different selections of the
!
following installation methods, the time when step2 starts
will be different.
Boot from floppy with Windows installation diskette.
Boot from floppy with un-installable diskette.
Boot from CD-ROM with Windows installation CD.
2.
When the message “Press F6 if you need to install third party SCSI or
RAID driver” appears on the bottom of the screen, please press the <F6> key.
3.
The installation will continue. When a message appears to ask you to
designate the device you want to install, press the <S> key.
4.
Follow the instruction of the installation program to insert the GigaRAID
(IT8212) ATA RAID Controller Driver diskette into the floppy disk drive then
press the <Enter> key to continue.
5.
Select GigaRAID (IT8212) ATA RAID Controller (Windows 2000/XP) from the
device list shown on the window then press the <Enter> key to continue.
6.
The devices that are going to be installed will be listed on the next window.
GigaRAID (IT8212) ATA RAID Controller (Windows 2000/XP) should be
contained on
the list. If you need to install any other devices, please designate them now.
After designating all the devices, please proceed to the next step.
7.
Press the <Enter> key to continue the installation of Windows 2000.
45
GigaRAID (IT8212) ATA RAID Controller USER’S MANUAL
Install the driver under existing Windows 2000
1.
Start Windows.
2.
When Windows detects GigaRAID (IT8212) ATA RAID Controller in the system,
a dialog box named Found New Hardware Wizard will show on the screen.
Select the Search for a suitable driver for my device (recommended) option
then click “Next” to continue to setup.
46
GigaRAID (IT8212) ATA RAID Controller USER’S MANUAL
3.
Check the Specify a location option on the following window then press “Next”
to continue to setup.
47
GigaRAID (IT8212) ATA RAID Controller USER’S MANUAL
4.
Insert the GigaRAID (IT8212) ATA RAID Controller Driver diskette into the
floppy disk drive then type A:\WIN2K_XP on the field designating the file’s
location. Press “Next” to continue to setup.
48
GigaRAID (IT8212) ATA RAID Controller USER’S MANUAL
5.
The driver for GigaRAID (IT8212) ATA RAID Controller is found. Press “Next” to
continue to setup.
49
GigaRAID (IT8212) ATA RAID Controller USER’S MANUAL
6.
The driver installation has finished. Press “Finish” to continue.
7.
Follow the instruction to restart the computer then the driver will take effect.
50
GigaRAID (IT8212) ATA RAID Controller USER’S MANUAL
Verify Installation
Follow the previous section to install the driver. After the system restarts, you can do
the following steps to check if the driver has been installed successfully.
1.
Right-click My Computer icon on Desktop. Select the Properties option from
the form.
2.
Select the Hardware tab from the System Properties window then click the
Device Manager button on the panel. If GigaRAID (IT8212) ATA RAID
Controller device is shown under the SCSI and RAID controllers item (see
the following figure), it means that the driver has been installed successfully.
51
GigaRAID (IT8212) ATA RAID Controller USER’S MANUAL
3.
If there is a marking ! or ? under SCSI and ATA RAID Controller device, it
indicates that the driver has not been correctly installed. User should remove
the device and reinstall.
52
GigaRAID (IT8212) ATA RAID Controller USER’S MANUAL
Windows SE/ME
Install the driver
1.
Start Windows.
2.
When Windows detects GigaRAID (IT8212) ATA RAID Controller in the system,
a dialog box named Add New Hardware Wizard will show on the screen.
Select the Specify the location of the driver (Advanced) option then click
“Next” to continue to setup.
53
GigaRAID (IT8212) ATA RAID Controller USER’S MANUAL
3.
Insert the GigaRAID (IT8212) ATA RAID Controller Driver diskette into the
floppy disk drive then select Search for the best driver for your device
(Recommended) from the following dialog box and type A:\WIN98_ME on the
field designating the file’s location. Press “Next” to continue to setup.
54
GigaRAID (IT8212) ATA RAID Controller USER’S MANUAL
4.
The driver for GigaRAID (IT8212) ATA RAID Controller is found. Press “Next”
to continue to setup.
55
GigaRAID (IT8212) ATA RAID Controller USER’S MANUAL
5.
The driver installation has finished. Press “Finish” to continue.
56
GigaRAID (IT8212) ATA RAID Controller USER’S MANUAL
6.
Follow the instruction to restart the computer then the driver will take effect.
57
GigaRAID (IT8212) ATA RAID Controller USER’S MANUAL
Verify Installation
Follow the previous section to install the driver. After the system restarts, you can do
the following steps to check if the driver has been installed successfully.
1.
Right-click My Computer icon on Desktop. Select the Properties option from
the form.
58
GigaRAID (IT8212) ATA RAID Controller USER’S MANUAL
2.
Select the Device Manager panel from the System Properties window. If
GigaRAID (IT8212) ATA RAID Controller device is shown under the SCSI
controllers item (see the following figure), it means that the driver has been
installed successfully.
59
GigaRAID (IT8212) ATA RAID Controller USER’S MANUAL
3.
If there is a marking ! or ? in front of the GigaRAID (IT8212) ATA RAID
Controller device as shown below, it indicates that the driver has not been
correctly installed. User should remove the device and reinstall.
60
GigaRAID (IT8212) ATA RAID Controller USER’S MANUAL
Windows NT
Install the driver during Windows NT installation
1.
Start Windows NT installation.
Warning: Because of the different selections of the
!
following installation methods, the time when step2 starts
will be different.
Boot from floppy with Windows installation diskette.
Boot from floppy with un-installable diskette.
Boot from CD-ROM with Windows installation CD.
2.
When the message “Setup is inspecting your computer’s hardware
configuration” appears on the bottom of the screen, please press the <F6>
key.
3.
The installation will continue. When a message appears to ask you to
designate the device you want to install, press the <S> key.
4.
The device list of SCSI Adapter will show on the following window. Select
“Other” and press the <Enter> key to continue.
5.
Insert GigaRAID (IT8212) ATA RAID Controller Driver diskette into the floppy
disk drive then press the <Enter> key to continue.
6.
Select GigaRAID (IT8212) ATA RAID Controller (Windows NT) from the
device list shown on the window then press the <Enter> key to continue.
7.
The devices that are going to be installed will be listed on the next window.
GigaRAID (IT8212) ATA RAID Controller (Windows 2000/XP) should be
contained on
the list. If you need to install any other devices, please designate them now.
After designating all the devices, please proceed to the next step.
8.
Press the <Enter> key to continue the installation of Windows NT.
61
GigaRAID (IT8212) ATA RAID Controller USER’S MANUAL
Install the driver under existing Windows NT
1.
Start Windows.
2.
Select Settings from the Start menu then choose the Control Panel option
from the Settings form.
62
GigaRAID (IT8212) ATA RAID Controller USER’S MANUAL
3.
In the Control Panel window, double-click on the SCSI Adapters icon.
63
GigaRAID (IT8212) ATA RAID Controller USER’S MANUAL
4.
Choose the Drivers tab from the SCSI Adapters window then press “Add” to
continue.
64
GigaRAID (IT8212) ATA RAID Controller USER’S MANUAL
5.
Click Have Disk from the Install Driver window.
65
GigaRAID (IT8212) ATA RAID Controller USER’S MANUAL
6.
Insert the GigaRAID (IT8212) ATA RAID Controller Driver diskette into the
floppy disk drive then type A:\WINNT on the field designating the file’s location.
Press “OK” to continue to setup.
66
GigaRAID (IT8212) ATA RAID Controller USER’S MANUAL
7.
Select GigaRAID (IT8212) ATA RAID Controller from the window then click
“OK” to continue.
8.
Follow the instruction to restart the computer then the driver will take effect.
67
GigaRAID (IT8212) ATA RAID Controller USER’S MANUAL
Verify Installation
Follow the previous section to install the driver. After the system restarts, you can do
the following steps to check if the driver has been installed successfully.
1.
Follow step1 to step3 described in the previous section to activate the SCSI
Adapters option.
2.
If the GigaRAID (IT8212) ATA RAID Controller device is shown on the
Devices panel as shown below, it means that the driver has been installed
successfully.
68
GigaRAID (IT8212) ATA RAID Controller USER’S MANUAL
Linux
Install the GigaRAID (IT8212) ATA RAID Controller on Red Hat 7.3
1.
Mount the driver CD-ROM.
[/]mkdir cdrom
For mount point
[/]mount –t iso9660 /dev/cdrom /cdrom
Mount CD-ROM under /cdrom
directory
2.
Copy and unzip the new kernel
[/]cp /cdrom/linux/linux-2.4.18.tar.gz /usr/src/
Copy new kernel to the
/usr/src/
[/]cd /usr/src/
[/]tar zxvf linux-2.4.18.tar.gz
1.
Untar the kernel
Compile the new kernel
[/]cd linux-2.4.18
Go to the new kernel directory
[/]make menuconfig
Configure your hardware (Our RAID controller is
already selected , you don’t have to select again)
The following are the procedures to compile the new kernel:
[/]make dep
[/]make clean
[/]make bzImage
[/]make modules
[/]make modules_install
or you can use this way
[/] make dep clean bzImage modules modules_install
then
[/]make install
2.
This will copy the necessary stuffs to the /boot directory
Update the new kernel into LILO
69
GigaRAID (IT8212) ATA RAID Controller USER’S MANUAL
[/] cd /etc/
[/]vim lilo.conf
Edit the lilo.conf , the contents may be different with
yours
prompt
timeout=50
default=Linux
boot=/dev/had
map=/boot/map
install=/boot/boot.b
message=/boot/message
linear
#
# Original kernel
#
image=/boot/vmlinuz-2.4.18-3
label=Linux
initrd=/boot/initrd-2.4.18-3.img
read-only
root=/dev/hda1
#
# Add the new kernel here
#
image=/boot/vmlinuz-2.4.18
label=Linux-RAID
The kernel is in /boot directory
The new kernel label (you can change it)
read-only
root=/dev/hda1
70
GigaRAID (IT8212) ATA RAID Controller USER’S MANUAL
3.
Run LILO to update the book record on disk by typing the following:
[/] /sbin/lilo
The output should be similar to:
Added Linux *
Added Linux-RAID
4.
Reboot the system then choose the Linux-RAID.
[/]reboot
71
GigaRAID (IT8212) ATA RAID Controller USER’S MANUAL
Application
Installation
Pictures below are shown in Windows XP (CD ver. 2.2)
Insert the driver CD-title that came with your motherboard into your CD-ROM drive,
the driver CD-title will auto start and show the installation guide. If not, please double
click the CD-ROM device icon in "My computer", and execute the setup.exe.
1.
Click "GigaRAID Utility.
72
GigaRAID (IT8212) ATA RAID Controller USER’S MANUAL
2.
Click “Next”.
3.
Click “Next”.
73
GigaRAID (IT8212) ATA RAID Controller USER’S MANUAL
4.
Click “Next”.
5.
Click “Finish”.
74
GigaRAID (IT8212) ATA RAID Controller USER’S MANUAL
Functions Description
1.
Starting
RAID Manager will be executed automatically when Microsoft Windows is booted. A
small icon, “
”, will show in the system tray at the right bottom corner to indicate
RAID Manager is active.
Open RAID Manager
Double click on the small icon in the system tray to open the RAID Manager control
panel.
Click the right button on the small icon to open the menu then choose “Open”.
The system information will be presented in the beginning when the RAID Manager
control panel is opened. Please read the next section System Information for more
detail about system information.
Close RAID Manager
Click “Close” to close RAID Manager. The RAID Manager will be minimized to the
system tray at the right bottom corner but will not exit.
Terminate RAID Manager
Right click the small icon, and choose “Exit” to terminate RAID Manager.
Note: Click the “Start Menu” at the left bottom on the RAID Manager control
panel to choose RAID functions.
If more than one adapter exists, click the “RAID Adapter” at the right bottom to
choose RAID Adapter.
75
GigaRAID (IT8212) ATA RAID Controller USER’S MANUAL
Alert LED, at the right bottom, is used to indicate the whole system situation.
GREEN: Normal.
RED: If the configuration error of any array occurs.
BLINKING: If there is any array in rebuilding process.
76
GigaRAID (IT8212) ATA RAID Controller USER’S MANUAL
2.
System Information
Device Status
Click the “Start Menu” at the left bottom on the RAID Manager control panel then
choose “Device Status” to show the system information.
If the disk arrays exist, they will be listed at the first row.
If the physical disks exist, they will be listed at the second row.
Click the disk array or physical disk icons to list the device properties.
Reset Adapter: Check to reset adapter.
Click “Refresh” to refresh system information.
77
GigaRAID (IT8212) ATA RAID Controller USER’S MANUAL
3.
Configuration
Create Disk Array
Click the “Start Menu” at the left bottom on the RAID Manager control panel then
choose “Create Disk Array” to create a disk array.
Array Type: RAID 0, RAID 1, RAID 0+1, JBOD
Array Name: Assigned by RAID Manager
Block Size: Virtual block size for RAID 0 or RAID 0+1
Auto Rebuild: Check to rebuild by hardware automatically.
Boot Disk: Check to boot from this array.
Erase Partition: Check to erase partition table.
Source: Source disk
Existing Arrays: Existing arrays list
Available Disks: Disks can be used to create an array.
Selected Disks: Disks will be put in an array.
78
GigaRAID (IT8212) ATA RAID Controller USER’S MANUAL
Click “Create” to create a disk array.
Remarks:
Stripe Size is valid when Array Type is RAID 0 or RAID 0+1.
Auto Rebuild is valid when Array Type is RAID 1 or RAID 0+1.
Source Disk is valid when Array Type is RAID 1 or RAID 0+1 and Erase
Partition is disabled.
Check “Erase Partition” to erase partition table or uncheck “Erase
Partition” not to erase partition table. If there is an Array of RAID 1 or
RAID 0+1, “Erase Partition” can’t be modified.
If “Erase Partition” is unchecked, the “Source” must be assigned.
79
GigaRAID (IT8212) ATA RAID Controller USER’S MANUAL
Delete Disk Array
Click the “Start Menu” at the left bottom on the RAID Manager control panel then
choose “Delete Disk Array” to delete disk array.
Available Arrays: List existing arrays.
Selected Arrays: Arrays will be deleted.
Erase Partition: Check to erase partition table.
Click “Delete” to delete disk arrays.
80
GigaRAID (IT8212) ATA RAID Controller USER’S MANUAL
Rebuild Disk Array
Click the “Start Menu” at the left bottom on the RAID Manager control panel then
choose “Rebuild Disk Array” to rebuild disk array.
Rebuild Array: List arrays which can be rebuilt.
Source Disk: The source for rebuilding the array
Destination Disk: The destination for rebuilding the array
Resume Previous Rebuild Process: Check to resume the last rebuild process.
Status Timer: Time interval for polling rebuild status
Click “Rebuild” to start rebuilding a disk array.
81
GigaRAID (IT8212) ATA RAID Controller USER’S MANUAL
4.
Records
Activity Records
Click the “Start Menu” at the left bottom on the RAID Manager control panel then
choose “Activity Records” to show the activity records.
Click “Clear” to clear all records.
82
GigaRAID (IT8212) ATA RAID Controller USER’S MANUAL
5.
Options
Email Notification
Click the “Start Menu” at the left bottom on the RAID Manager control panel then
choose “Email Notification” to modify the settings.
Event Timer: Self error detection time interval
Enable Email Notification: Check to enable email notification.
Email Address: If email notification is enabled, a warning message will be sent
to this email box.
Click “Test” to send a test email to the above email address.
Click “Set” to save the settings.
83
GigaRAID (IT8212) ATA RAID Controller USER’S MANUAL
Remote Access
Click the “Start Menu” at the left bottom on the RAID Manager control panel then
choose “Remote Access” to modify the settings.
Machine Type: Single Machine, Client or Server
Server Name: If this machine is client, a server is required.
Server Name can be a computer name or an IP address.
Click “Set” to save the settings.
Restart RAID Manager if settings are modified.
84
GigaRAID (IT8212) ATA RAID Controller USER’S MANUAL
6.
Miscellaneous
Icon list
represents disk array is inactive.
represents disk array is active.
represents physical disk is inactive.
represents physical disk is active.
85
GigaRAID (IT8212) ATA RAID Controller USER’S MANUAL
How to…
1.
Create RAID 0
Open RAID Manager.
Change the control panel to “Create Disk Array”.
Select “Array Type” as “RAID 0”.
Check “Erase Partition” to erase partition table or uncheck “Erase
Partition” not to erase partition table.
Select “Stripe Size”. Default is 64 KB.
Select at least two disks.
Click “Create”.
2.
Create RAID 1
Open RAID Manager.
Change the control panel to “Create Disks Array”.
Select “Array Type” as “RAID 1”.
Check “Erase Partition” to erase partition table or uncheck “Erase
Partition” not to erase partition table. If there is an Array of RAID 1 or RAID
0+1, “Erase Partition” can’t be modified.
If “Erase Partition” is unchecked, the “Source” must be assigned.
Select exactly two disks (These two disks must be “primary master and
secondary master” or “primary slave and secondary slave”).
Click “Create”.
86
GigaRAID (IT8212) ATA RAID Controller USER’S MANUAL
3.
Create RAID 0+1
Open RAID Manager.
Change the control panel to “Create Disks Array”.
Select “Array Type” as “RAID 0+1”.
Check “Erase Partition” to erase partition table or uncheck “Erase
Partition” not to erase partition table. If there is an Array of RAID 1 or RAID
0+1, “Erase Partition” can’t be modified.
If “Erase Partition” is unchecked, the “Source” must be assigned.
Select exactly four disks.
Click “Create”.
4.
Create JBOD
Open RAID Manager.
Change the control panel to “Create Disk Array”.
Select “Array Type” as “JBOD”.
Select at least two disks.
Click “Create”.
87
GigaRAID (IT8212) ATA RAID Controller USER’S MANUAL
Q&A
1.
Q: How to set RAID as startup disk?
A: Please set booting device to Array0 and set as SCSI boot in the BIOS.
2.
Q: Is CD ROM able to be used?
A: This product does not support any ATAPI devices.
3.
Q: How can two RAID0 perform well?
A: For two RAID0, it is suggested that HD should be put in different
channels to get a better performance.
4.
Q: Is a special mobile rack necessary for HOT Swap?
A: It’s not necessary. The regular one is just enough.
5.
Q: What if R1 and R0+1 just create RAID but don’t Rebuild right away?
A: It is suggested that they should Rebuild as soon as possible because the
HD data of two mirrors are different and if the HD with the correct data is
damaged, the data will lose.
6.
Q: For R0+1, when two HDs in the same channel are hot swapping at the same
time, sometimes AP can’t find that Slave is back again.
A: This situation may happen to some HDs. To avoid this situation, please set
Slave HD first then set Master HD.
88