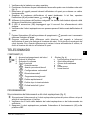
Download Solac AA3400
Transcript
MOD. ECOGENIC Robot Aspirador Robot Vacuum Robot Aspirateur Staubsaugerroboters Robô Aspirador Robot Aspirapolvere Stofzuigerrobot Robotického Vysava Robota Odkurzacz Robotického Vysávaa Robot Porszívó Robot Robot Usisava Aspiratorului Robot Solac is a registered Trade Mark INSTRUCCIONES DE USO INSTRUCTIONS FOR USE MODE D’EMPLOI GEBRAUCHSANLEITUNG INSTRUÇÕES DE USO ISTRUZIONI PER L’USO GEBRUIKSAANWIJZING NÁVOD K POUZITÍ INSTRUKCJA OBSUGI NÁVOD NA POUŽITIE HASZNÁLATI UTASÍTÁS UPUTE ZA UPOTREBU INSTRUCIUNI DE UTILIZARE 11/10 5-16 17-25 26-35 36-46 47-57 58-67 68-77 78-86 87-96 97-105 106-115 116-126 127-135 136-145 • • • • • • • • • • • • • • ESPAÑOL ENGLISH FRANÇAIS DEUTSCH PORTUGUÊS ITALIANO NEDERLANDS ESKY POLSKI SLOVENINA MAGYAR !" HRVATSKA ROMÂN# es en fr de pt it nl cs pl sk hu bg hr ro . ESPAÑOL INDICACIONES DE SEGURIDAD • Lea completamente estas instrucciones antes de utilizar su aparato. • Este manual es parte integrante del producto. Consérvelo en un lugar seguro para futuras consultas. • Este aparato es sólo para uso doméstico, no industrial. Cualquier uso diferente al indicado podría ser peligroso (por ejemplo, aspiración de líquidos, polvo de obra, cemento, etc). • Los niños deberían ser supervisados para asegurar que no juegan con el aparato. • Este aparato no está destinado para ser utilizado por personas (incluidos niños) cuyas capacidades físicas, sensoriales o mentales estén reducidas, o carezcan de experiencia o conocimiento, salvo si han tenido supervisión o instrucciones relativas al uso del aparato por una persona responsable de su seguridad. • No realice ninguna modificación ni reparación en el aparato. Ante cualquier anomalía en el cable u otra parte del aparato, no lo use y acuda a un servicio de asistencia autorizado. • No utilice piezas o accesorios no suministrados o recomendados por SOLAC. • Antes de enchufar el aparato a la red eléctrica, compruebe que el voltaje indicado coincide con el de su hogar. • Desenchufe y apague el aparato antes de desmontar o montar piezas y realizar cualquier tarea de mantenimiento o limpieza. Desenchúfelo también en caso de apagón. • No cuelgue el aparato por el cable. Desenchufe el aparato tirando siempre de la clavija, nunca del cable. • Evite que el cable de alimentación entre en contacto con aristas cortantes o superficies calientes. No deje el cable colgando por el borde de la mesa o encimera, para evitar que los niños tiren de él y hagan caer el aparato. d No sumerja nunca el aparato en agua u otro líquido, ni lo introduzca en el lavavajillas. • No toque el aparato con las manos húmedas cuando esté en funcionamiento. • Mantenga su robot aspirador alejado de focos de calor. • No utilice nunca el robot aspirador sin el depósito de suciedad o el filtro de protección correctamente colocado. • Mantenga siempre despejado el módulo de aspiración. • Mantenga el pelo, ropa, dedos o cualquier otra parte del cuerpo alejada del módulo de aspiración, de los rodillos y de las ruedas. • No utilice el aspirador para limpiar animales. • No utilice el aparato en espacios cerrados donde se acumulen vapores explosivos o tóxicos. • No use el aparato nunca sobre superficies mojadas ni en el exterior. • Cada cierto tiempo compruebe el estado del adaptador, cable y conexión. • Evite posibles salpicaduras en la base de carga, en el adaptador o el cable de conexión. • No utilice la base de carga ni el adaptador cerca de bañeras, lavabos, duchas u otros recipientes que contengan agua, mientras están siendo utilizados. • Utilice únicamente el adaptador suministrado. INDICACIONES DE SEGURIDAD 7 es • No toque el adaptador ni la base de carga con las manos húmedas cuando esté enchufado. • Nunca deje el adaptador o base de carga funcionando sobre una superficie o trapo húmedo. • No se siente sobre el aparato ni se ponga delante de él, podría causar daños materiales en el aparato. • Compruebe que en el suelo no hay hilos, cables u otros objetos de longitud mayor de 150mm, ya que podrían engancharse los rodillos. ¡¡ATENCION!!: Cuando desee desprenderse del aparato, NUNCA lo deposite en la basura, sino que acuda al PUNTO LIMPIO o de recogida de residuos más cercano a su domicilio, para su posterior tratamiento. De esta manera, esta contribuyendo al cuidado del medio ambiente. q COMPONENTES PRINCIPALES 1 2 3 4 5 6 7 8 9 10 11 12 13 14 15 Cuerpo principal Control remoto Base de carga automática Aislador de espacios Adaptador Cepillo de limpieza Filtro (dos unidades) Cepillo lateral (dos unidades) Mopa Accesorio mopa Deposito suciedad Pulsador desbloqueo depósito suciedad Pulsador desbloqueo módulo aspiración Pestaña filtro Módulo aspiración 16 17 18 19 20 21 22 23 24 25 26 Sensor infrarrojos Asa Parachoques frontal Conector adaptador batería Interruptor de funcionamiento Panel pulsadores de control Rodillo de goma Rodillo central Ruedas laterales Sensores antichoque Conectores de contacto a base de carga 27 Sensores detector escalera 28 Rueda delantera 29 Lámpara UV PREPARACIÓN DEL APARATO. RECARGA DEL ROBOT DE ASPIRACIÓN n Utilice sólo el adaptador y la base de carga suministrado, no emplee ningún otro. , El tiempo de carga es de aproximadamente 5 horas para 60/90 min de autonomía. Para la primera carga, cargue la batería durante toda la noche. COMPONENTES PRINCIPALES DE LA BASE DE CARGA (A) 1A 2A 3A 4A 5A 6A 7A LED decorativo Interruptor LED decorativo Señal de transmisión LED de encendido Indicador de carga Conectores de contacto Conector adaptador CARGA MEDIANTE BASE DE CARGA (Fig. 1) ) No sitúe ningún objeto y evite que haya obstáculos o muebles alrededor de la base de carga (Vea distancias recomendadas en la figura). ) El robot no encontrará la base de carga en caso de que haya obstáculos. Coloque la base de carga en un área despejada. 8 COMPONENTES PRINCIPALES ) El robot no encontrará la base de carga si el transmisor de la señal 1 2 3 , ) 4 5 ) , (3A) de infrarrojos está tapado. Coloque la base de carga sobre un suelo limpio y contra una pared vertical. Conecte el adaptador al conector (7A) de la base de carga. Enchufe el adaptador en la red eléctrica. El LED de encendido (4A) se iluminará en rojo. Coloque correctamente el cable del cargador a lo largo de la pared o de lo contrario el robot podría enredarse con él. Presione el pulsador de control del control remoto o el pulsador del panel de control del robot. El robot aspirador buscará la base de carga si está a una distancia adecuada y se conectará a ella. Si durante la búsqueda desea cancelar la orden de carga, presione nuevamente el pulsador de control o del control remoto. El robot aspirador se detendrá. Asegúrese de que los conectores del robot (26) se ha conectado correctamente a los conectores (6A) de la base de carga. Durante la carga, los Indicadores de carga de la base de carga (5A) y del panel de control parpadearán. Una vez finalizada la carga, el indicador de carga (5A) de la base de carga se apagará y el del panel de control se iluminará de forma permanente. El aparato queda listo para su uso. , No desconecte la base de carga durante la limpieza, el robot aspirador volverá a ella para cargarse si el nivel de carga de la batería desciende demasiado. Si lo desea puede poner una pequeña cantidad de la esencia que desee en el centro del LED decorativo (1A). 6 Pulse el interruptor (2A). El LED (1A) se iluminará. Cuando se caliente se extenderá la fragancia de la esencia colocada en su interior. Algunas esencias pueden dañar la superficie de plástico. Asegúrese de que no dañará la superficie antes de utilizar la esencia. , ) CARGA SIN BASE DE CARGA (Fig. 2) 1 Conecte el cable del adaptador directamente al conector (19) del cuerpo del robot aspirador. 2 Enchufe el adaptador en la red eléctrica. Durante la carga el LED indicador de carga del panel de control del robot parpadeará y se fijará una vez finalizada la carga. Durante la carga directa mediante el cable, el robot no podrá ser puesto en funcionamiento. 3 Tras la carga, desenchufe el adaptador de la red y desenchufe el cable del conector (19). El aparato queda listo para su uso. Durante la carga, el adaptador se calienta ligeramente. Esto es normal, a no ser que el calentamiento sea muy elevado. , , ) CARGA AUTOMÁTICA , Durante la limpieza el robot buscará siempre la base de carga automáticamente ) si la carga de la batería es baja. Cuando finaliza la limpieza, la temperatura de la batería puede ser muy alta por lo que el tiempo de carga puede ser mayor. PREPARACIÓN DEL APARATO. RECARGA DEL ROBOT DE ASPIRACIÓN 9 es Recomendaciones para alargar la vida de las baterías • No deje el adaptador conectado durante largos períodos de tiempo. Desconéctelo cuando finalice la recarga. • No almacene ni recargue el aparato cerca de radiadores u otras fuentes de calor, o expuesto a la luz solar directa. • No recargue el aparato en lugares sucios o húmedos, y procure que la temperatura ambiente esté comprendida entre 15ºC y 35ºC. • Cada pocos meses, descargue las baterías por completo y a continuación recárguelas. Para descargarlas, haga funcionar el aparato sin cable hasta que se detenga y con la base de carga desconectada. A continuación recargue las baterías como se explica más atrás. • Para almacenar el aparato durante un largo periodo de tiempo, se recomienda cargar la batería completamente y posteriormente retirarla para almacenarla en un lugar fresco y seco. UTILIZACIÓN DEL APARATO , Este aparato ha sido diseñado exclusivamente para limpiar suelos y moquetas ) ) ) ) , , por aspiración. Este aparato está pensado para el mantenimiento diario del suelo, evitando la aparición de pelusones y la acumulación de suciedad. No aspire nunca ceniza encendida, astillas u objetos puntiagudos ni líquidos. No aspire cerillas encendidas ni colillas. Tampoco aspire materiales tóxicos (amoniaco...). Retire completamente todos los elementos que sirvieron para su transporte y embalaje. No utilice el robot aspirador entre mesas pequeñas, sillas o espacios muy pequeños, podría dañar el aparato. El robot aspirador utiliza unos parámetros de limpieza para limpiar eficazmente la totalidad del suelo: Movimiento en espiral para una limpieza más intensa donde ha detectado suciedad, contorneo de paredes para limpiar el perímetro de la habitación, cruce de habitación para asegurar una limpieza completa. El robot aspirador tarda aproximadamente 45 minutos en limpiar una habitación de tamaño medio, pasando sobre la misma zona múltiples veces para asegurar la limpieza de toda la superficie. PANEL DE CONTROL DEL ROBOT ASPIRADOR Puesta en marcha/Parada del robot aspirador Pulsador carga: Se ilumina al pulsarlo, se apaga cuando el robot se conecta con la base de carga. Indicador de carga: Durante la carga parpadea, una vez finalizada la carga se ilumina de forma permanente Lámpara Ultravioleta: Se ilumina al pulsarlo, la lámpara de desinfección actuará mientras el robot esté en funcionamiento. 10 UTILIZACIÓN DEL APARATO 1 Retire del suelo todos los objetos que podrían romperse o dañar el robot aspirador (lámparas, botellas..). 2 Compruebe que el depósito de suciedad (11) está correctamente colocado. Vea el apartado (“LIMPIEZA Y CONSERVACIÓN”). 3 Coloque el aislador de espacios (4) donde desee para evitar el paso del robot por una zona concreta. Vea el apartado (“AISLADOR DE ESPACIOS”). 4 Ponga en funcionamiento el robot aspirador. Para ello coloque el interruptor de funcionamiento (20) en la posición ON. 5 Asegúrese de que el robot de limpieza está cargado. Si el LED indicador de carga del panel de control del robot parpadea ponga a cargar el robot aspirador. Vea el apartado (“PREPARACIÓN DEL APARATO. RECARGA DEL ROBOT DE ASPIRACIÓN”). 6 Si desea utilizar el robot aspirador en modo automático programe su funcionamiento mediante el control remoto. Vea el apartado (“CONTROL REMOTO”). 7 Pulse el pulsador del panel del robot. El robot aspirador comenzará a trabajar según sus patrones de limpieza. Si lo desea, controle sus movimientos o funciones mediante los botones del control remoto, vea el apartado (“CONTROL REMOTO”) o mediante los pulsadores de control en el panel del cuerpo del robot aspirador. Si desea una esterilización del área frente, presione la tecla UV. Esta función está especialmente indicada para personas alérgicas o para los hogares donde viven mascotas, puesto que esteriliza el suelo de virus y bacterias. 8 Pulse nuevamente el pulsador para hacer una parada temporal en el proceso de limpieza. 9 Si no desea una limpieza semanal programada apague el aparato tras la limpieza. Para ello, coloque el interruptor de funcionamiento (20) en la posición OFF o pulse el botón encendido/apagado del control remoto. 10 Desconecte la base de carga de la red. , , , AISLADOR DE ESPACIOS COMPONENTES PRINCIPALES (B) 1B Interruptor Encendido & Longitud de aislador de espacios Apagado Alcance bajo = 4 m Alcance medio = 6 m Alcance alto = 8 m 2B LED de encendido 3B Cabezal de transmisión de proximidad 4B Cabezal de transmisión del aislador de espacios 5B Tapa de compartimiento de baterías 6B Desbloqueo tapa de baterías FUNCIONAMIENTO , Utilice el aislador de espacios para limitar el área de limpieza del robot a la zona que ) ) ) usted desee, evitando que el robot entre en zonas innecesarias o no deseadas. Utilícela para evitar su entrada a una zona con cables, o una habitación concreta. Coloque el aislador de espacios al mismo nivel en la superficie donde vaya a utilizar el robot aspirador. Coloque el aislador de espacios y la base de carga a una distancia mayor a 3m, de lo contrario podría haber interferencia. No coloque la base de carga dentro del alcance de la señal del aislador de espacios. AISLADOR DE ESPACIOS 11 es , El 1 2 3 4 , , 5 6 , cabezal de transmisión de proximidad (3B) evita el impacto entre el robot de aspiración y el aislador de espacios, impidiendo que se acerque a una distancia inferior a 0,5-1m de distancia. Asegúrese de que las baterías no están descargadas. Coloque el aislador de espacios delimitando la zona en la que no desee que entre. (fig. 3). Retire los objetos que se encuentren frente al aislador de espacios para evitar un mal funcionamiento. Elija la longitud del aislador de espacios deseada. Para ello, desplace el interruptor (B) escogiendo alcance bajo , medio o alto . Utilice la longitud de aislador adecuada, la duración de la batería depende de la distancia de transmisión seleccionada. El LED de encendido (2B) parpadeará cada 8 segundos hasta que se agote la batería. Compruebe que el robot aspirador no puede atravesar la frontera creada por el aislador de espacios. Coloque el interruptor (B) en la posición de apagado cuando no sea necesaria el aislador de espacios. Se pueden producir algunas diferencias en la dirección de la señal de infrarrojos del aislador de espacios y la distancia de recepción del robot, debido al movimiento del robot durante su uso. Este diferencia puede variar dependiendo del entorno de trabajo y del nivel de carga del robot y del aislador de espacios. CONTROL REMOTO COMPONENTES (C) 1 2 3 4 Encendido/apagado robot aspirador Botones dirección Botón de confirmación Teclas control Puesta en marcha /domingo Parada provisional /lunes 5 Display (fig. 4) a Icono “transmitiendo señal” b Días de la semana c Día actual de la semana d Hora e Icono error f Icono funciones Configuración hora /martes Carga /miércoles Programación /jueves Limpieza rápida /viernes Limpieza tras carga /sábado Limpieza lenta /todos los días PROGRAMACIÓN Sincronización del control remoto y el robot aspirador (fig. 5) , Sincronice el control remoto y el robot aspirador antes del primer uso y después de tareas de mantenimiento. Para ello: 1 Compruebe que el robot aspirador y el control remoto tienen suficiente batería. 2 Apague el robot aspirador. Para ello coloque el interruptor de funcionamiento (20) en la posición OFF. 12 CONTROL REMOTO 3 Presione el botón durante más de 4 segundos. Vuelva a colocar el interruptor de funcionamiento (20) en la posición ON sin soltar el botón . Cuando la sincronización se haya llevado a cabo correctamente el robot emitirá dos pitidos. , Configuración fecha y hora (fig. 6) , Es necesario memorizar la hora y el día de la semana actual para que el robot comience a trabajar en el momento esperado. 1 Pulse el botón . Se accede al ajuste del día de la semana. 2 Pulse el botón del día correspondiente al día de la semana actual (SU= domingo, MO= lunes, TU= martes, WE= miércoles, TH= jueves, FR= viernes, SA= sábado). 3 Pulse las flechas para moverse por los campos “hora” y “minutos”. Pulse la flechas 4 Pulse Pulse ) para seleccionar la hora y los minutos actuales. para confirmar la selección. si desea cancelar la configuración. es Programación limpieza semanal automática (fig. 7) Con el robot aspirador apagado. 1 Pulse el botón del control remoto. 2 Pulse el botón del día correspondiente al día de la semana que desea programar. Seleccione uno, varios o todos los días de la semana. Los días seleccionados parpadean. 3 Pulse las flechas para programar la hora exacta de limpieza. Pulse la flechas “arriba” y “abajo” para seleccionar la hora y minutos. 4 Pulse para confirmar la selección. Pulse el botón encendido/apagado si desea cancelar la configuración. Para que el robot aspirador se ponga en funcionamiento en el momento esperado este debe estar encendido. El interruptor de funcionamiento (20) en la posición ON y iluminado. ) ) FUNCIONES ADICIONALES Función FULL GO ) Seleccionando esta función el robot aspirador quedará programado para continuar limpiando una vez se haya cargado completamente. 1 Presione el botón . El robot aspirador debe estar encendido. Se iluminará FULL GO en el display del control remoto. El robot aspirador buscará la base de carga antes de que se termine la batería y comenzará a limpiar automáticamente cuando se haya cargado completamente. , Función VELOCIDAD 1 Presione el botón para elegir limpieza rápida. Se iluminará FAST en el display del control remoto. 2 Presione el botón para elegir limpieza lenta. Se iluminará SLOW en el display del control remoto. , , CÓDIGOS DE ERROR Si el robot no funciona correctamente debido a una de las siguientes circunstancias, todos los pulsadores del panel de control del robot parpadearan simultáneamente. CONTROL REMOTO 13 1 Pulse el botón del control remoto. Asegúrese de que la señal del control remoto está en el campo de acción del aparato. En la pantalla del control remoto aparecerá el icono de error junto a uno de los código de error descritos a continuación. 2 Lleve a cabo las acciones descritas a continuación según el error mostrado. , CÓDIGO CAUSA DEL FALLO ERROR RESOLUCIÓN E01 Sensores detector escalera Limpie los sensores (27) E02 Rodillo central Retire la suciedad y el pelo atrapado en el rodillo (23) E03 Batería baja Cargue la batería E04 Ruedas laterales Retire la suciedad y el pelo atrapado en las ruedas E05 Depósito de suciedad Coloque correctamente el depósito de suciedad (11) , Si el fallo persiste después de hacer estas comprobaciones, no lo use y acuda a un servicio de asistencia autorizado. No realice ninguna modificación ni reparación en el aparato. LIMPIEZA Y CONSERVACIÓN n Antes de cualquier operación de mantenimiento o limpieza del aparato asegúrese de que el interruptor de funcionamiento (20) se encuentra en la posición OFF y de que no se encuentra conectado a la red. Asegúrese de que los elementos lavados están completamente secos antes de montarlos. No sumerja nunca el módulo de aspiración (15) en agua u otro líquido, ni lo introduzca en el lavavajillas. No utilice productos abrasivos ni disolventes. Para una mayor eficacia del robot aspirador se aconseja vaciar el depósito de suciedad y limpiar el filtro cada 3 usos. ) ) VACIADO DEL DEPÓSITO DE SUCIEDAD (11) 1 Mantenga pulsado el pulsador de desbloqueo (12). Extraiga el depósito de suciedad (11). (fig. 8) 2 Coloque el depósito sobre el cubo de la basura, abra el soporte del filtro tirando de la pestaña (14) y vacíe su contenido sobre el cubo de la basura. (fig. 9) LIMPIEZA Y SUSTITUCIÓN DEL FILTRO (7) ) Se recomienda revisar el filtro periódicamente para comprobar su correcto funcionamiento. Lleve a cabo una limpieza del filtro si detecta una disminución en la capacidad de succión del aparato. Una o dos veces al año, dependiendo de la intensidad de uso del aparato, es recomendable sustituir el filtro. 1 Extraiga el depósito de suciedad tal y como se muestra en “VACIADO DEL DEPÓSITO DE SUCIEDAD (11)” ) 2 Separe el filtro (7). Presione el soporte semicircular con una mano para sacar el filtro usado del soporte. (fig. 10) 3 Sacuda suavemente el filtro de salida contra la pared del cubo de basura para desprender el exceso de suciedad y polvo. 14 LIMPIEZA Y CONSERVACIÓN ) No utilice nunca el robot aspirador sin el filtro (7). 4 Limpie el filtro con el cepillo de limpieza (6) (fig. 11). 5 Vuelva a colocar en su alojamiento el filtro limpio o si fuera necesario un nuevo filtro. LIMPIEZA DEL DEPÓSITO DE SUCIEDAD (11) 1 2 3 4 Presione el pulsador (13). El módulo de aspiración (15) queda liberado (fig. 12). Dé la vuelta al módulo de aspiración, libere las dos pestañas y extraiga la tapa. Limpie el interior del depósito con el cepillo de limpieza (6) (fig. 13). Limpie el módulo de aspiración (15) y el dispositivo de admisión y expulsión de aire con el cepillo de limpieza (fig. 13). No limpie el módulo de aspiración con agua. 5 Coloque el depósito de suciedad en el cuerpo del aparato. Empuje el depósito hacia el cuerpo hasta que escuche un clic indicador de que el depósito ha quedado correctamente fijado al cuerpo. ) LIMPIEZA Y SUSTITUCIÓN DE LA MOPA (9) ) No utilice la mopa sobre alfombras, moquetas o suelos que no estén completamente lisos. 1 En estos casos retire el soporte mopa (10). Gire el soporte mopa y desacople las pestañas derecha e izquierda (fig. 14). 2 Para sustituir la mopa (9) tire de ella y coloque una nueva en su lugar (fig.14). DESMONTAJE Y LIMPIEZA DE LOS CEPILLOS Para una mayor eficacia del robot aspirador se aconseja limpiar los rodillos y cepillos cada 3 usos. Rodillos (22) y (23) 1 Desplace la pestaña hacia atrás y levante la palanca de sujeción (fig.15). Los rodillos quedan liberados. 2 Extraiga los rodillos (22) y (23). 3 Limpie los rodillos con el cepillo de limpieza (6) (fig.16). 4 Coloque de nuevo los rodillos y coloque la palanca de sujeción, presionando hasta que oiga un clic indicador de que se ha fijado correctamente. , Cepillo lateral (8) , Limpie el cepillo lateral con regularidad para evitar el mal funcionamiento del robot aspirador. 1 Retire con las manos el pelo y polvo que haya quedado atrapado en el cepillo lateral. 2 Si la suciedad se hubiera quedado muy enredada en el cepillo córtela con una tijera. Si fuera necesario desenrosque el tornillo y extraiga el cepillo lateral (8) del cuerpo para una limpieza más eficaz (fig.17). 3 Vuelva a colocar el cepillo lateral en su alojamiento. , DESMONTAJE Y LIMPIEZA DE LAS RUEDAS Ruedas Laterales 1 Desenrosque los dos tornillos de la ruedas (fig.18). 2 Extraiga las ruedas de su alojamiento y límpielas. No limpie las ruedas con agua, aceite o grasa. ) LIMPIEZA Y CONSERVACIÓN 15 es ) Coloque de nuevo las ruedas en su alojamiento y enrosque los tornillos con ayuda de un destornillador. Rueda frontal En caso de que la rueda frontal se haya quedado atascada o no gire libremente, extraígala para su limpieza (fig.18). 1 Tire de la rueda con ayuda de alguna herramienta que haga palanca. 2 Para volver a colocarla tras su limpieza, presione la rueda en su alojamiento. LIMPIEZA DE LOS SENSORES ANTICHOQUE (25) Y SENSORES DE ESCALERA (27) , Mantenga los infrarrojos limpios para que el robot aspirador pueda funcionar correctamente. 1 Limpie los sensores con un algodón o un paño suave (fig.19). LIMPIEZA DEL APARATO n Asegúrese de que no entra agua en el interior del aparato. ) Limpie el aparato antes del primer uso, inmediatamente después de cada uso y tras un largo periodo de tiempo sin usar. Así asegurará un correcto funcionamiento del mismo y prolongará su vida útil. 1 Limpie el exterior del aparato con un paño húmedo. No utilice productos abrasivos ni disolventes. SUSTITUCIÓN DE LAS BATERÍAS SUSTITUCIÓN DE LAS BATERÍAS DEL AISLADOR DE ESPACIOS (Fig. 20) 1 Gire el desbloqueo de la tapa de baterías (6B) hasta que se libere la tapa (5B). 2 Coloque las baterías en el compartimiento destinado a tal fin. Compruebe que los electrodos positivos y negativos se encuentran en correcto estado. Extraiga las baterías sino se va a utilizar el aspirador durante un largo periodo de tiempo. , SUSTITUCIÓN DE LAS BATERÍAS DEL CONTROL REMOTO (Fig. 21) 1 Abra la tapa del compartimento de baterías. 2 Coloque las baterías en el compartimiento destinado a tal fin. Compruebe que los electrodos positivos y negativos se encuentran en correcto estado. Extraiga las baterías sino se va a utilizar el aspirador durante un largo periodo de tiempo. , 16 SUSTITUCIÓN DE LAS BATERÍAS . ENGLISH SAFETY INDICATIONS • Read these instructions carefully before using the appliance. • This manual is an integral part of the product. Keep it in a safe place for future reference. • This appliance is exclusively for household use and not for industrial use. It is dangerous to use it for any purpose other than the one indicated (e.g. vacuuming liquids, dust from construction work, cement, etc.) • Children must be supervised to ensure they do not play with the appliance. • This appliance is not to be used by persons (or children) whose physical, sensorial or mental capacities are impaired, or who have no experience or knowledge, unless supervised or instructed in the use of the appliance by a person responsible for their safety. • Do not make any modifications or repairs to the appliance. In the event of any anomaly in the cord or any other part of the appliance, do not use it and take it to an authorised service centre. • Do not use any parts or accessories not supplied or recommended by SOLAC. • Before plugging the appliance into the mains, check that the indicated voltage is the same as in your home. • Turn off and unplug the appliance before dismantling or assembling parts and prior to any maintenance or cleaning operation. Also unplug it in the case of a power cut. • Do not use the cord to hang up the appliance. Always unplug the appliance by pulling on the plug, and not the cord. • Make sure the cord does not come into contact with sharp edges or hot surfaces. Do not leave the cord hanging over the edge of a table or worktop, to prevent children from pulling it and causing the appliance to fall. d • • • • • • • • • • • • • • Never immerse the appliance in water or any other liquid, and do not put it in the dishwasher. Never handle the vacuum cleaner or the plug with wet hands. Keep your robot vacuum cleaner away from heat. Never use the robot vacuum cleaner without the dustbin or the protective filter adequately fitted. Always keep the vacuum module clear. Keep hair, clothes, fingers and any other body areas away from the vacuum module, rollers and wheels. Do not use the vacuum cleaner to clean animals. Do not use the appliance in confined spaces where explosive or toxic vapours can build up. Do not use the appliance on wet surfaces or outdoors. Check the condition of the power cord, mains adaptor and connection at regular intervals. Avoid splashing the charging station, adaptor or power cord. Do not use the charging station or adaptor near a bathtub, wash basin, shower or anything else containing water while in use. Only use the adaptor supplied. Do not touch the adaptor or charging station with wet hands when it is plugged into the mains. Never leave the appliance or charging station on a wet surface or cloth when switched on. SAFETY INDICATIONS 17 en • Do not sit on the appliance or stand in front of it, as this could cause material damage to the appliance. • Make sure that there are no wires, cables or other objects longer than 150 mm on the floor, as they could entangle the rollers. CAUTION! When you want to dispose of the appliance, NEVER throw it in the rubbish bin. Take it to the CLEAN POINT or waste collection centre closest to your home for processing. You will thus be helping to take care of the environment. q MAIN COMPONENTS 1 2 3 4 5 6 7 8 9 10 11 12 13 14 15 Main body Remote control Automatic charging station Virtual barrier Adaptor Cleaning brush Filter (two units) Side brush (two units) Mop Mop accessory Dustbin Dustbin release button Vacuum module release button Filter tab Vacuum module 16 17 18 19 20 21 22 23 24 25 26 27 28 29 Infrared sensor Handle Front bumper Battery adaptor connector Operating switch Control button panel Rubber roller Central roller Side wheels Collision sensors Charging station contact connectors Stair detector sensors Front wheel UV lamp PREPARING THE APPLIANCE CHARGING THE ROBOT VACUUM n Only use the adaptor and charging station supplied. Do not use any others. , The charging time is approximately 5 hours for 60-90 min of operation. The first time you charge the battery, leave it to charge overnight. MAIN COMPONENTS OF CHARGING STATION (A) 1A 2A 3A 4A Decorative LED Decorative LED switch Transmission signal LED ON light 5A Charge indicator 6A Contact connectors 7A Adaptor connector CHARGING USING THE CHARGING STATION (Fig. 1) ) Do not place any objects near the charging station and ensure that the surrounding area is free from items of furniture or obstacles (see recommended distances in the diagram). The robot will not find the charging station if there are obstacles. Place the charging station in a clear, unobstructed area. The robot will not find the charging station if the infrared signal transmitter (3A) is covered. 1 Place the charging station on a clean floor and against a vertical wall. 2 Connect the adaptor (7A) to the charging station connector. 3 Plug the adaptor into the mains. The LED ON light (4A) will light up red. ) ) , 18 MAIN COMPONENTS ) Run the charging station's power cord alongside the wall, otherwise the robot could get entangled in it. 4 Press the control button of the remote control or the button on the robot’s control panel. The robot vacuum will search for the charging station, if it is within a suitable distance, and connect to it. 5 If you want to cancel the charging command during the search, press the control button or remote control button again. The robot vacuum will stop. Check that the robot connectors (26) connect properly with the charging station’s connectors (6A). Whilst charging, the charging indicator lights of the charging station (5A) and control panel will flash. Once charging is complete, the charging indicator lights of the charging station (5A) and the control panel will stop flashing and remain lit. The appliance is ready for use. ) , , Do not turn off the charging station while vacuuming, as the robot vacuum will return to it for charging, if its battery charge level drops too low. If you like, you may put a small amount of the scent of your choice in the centre of the decorative LED (1A). 6 Press the switch (2A). The LED (1A) will light up. When it heats up, the fragrance of the scent inside the LED will spread. Some scents can damage the plastic surface. Check that the scent will not damage the surface before use. , ) CHARGING WITHOUT THE CHARGING STATION (Fig. 2) 1 Connect the adaptor cable directly to the connector (19) of the robot vacuum’s body (11). 2 Plug the adaptor into the mains. The LED indicator light on the robot’s control panel will flash while charging and will stop flashing when charging is complete. The robot cannot be started up while it is being directly charged using the power cord. 3 After charging, unplug the adaptor from the mains and then disconnect the cable from the connector (19). The appliance is ready for use. The adaptor heats up slightly while charging. This is normal, unless it becomes very hot. , , ) AUTOMATIC CHARGING , During cleaning, the robot will always automatically seek the charging station when its battery charge is low. ) After cleaning, the battery temperature may be high and therefore the charge time may be longer. Tips to Extend Battery Life • Do not leave the adaptor connected for long periods of time. Disconnect it when it has finished charging. • Do not store or charge the appliance near radiators or other heat sources, or exposed to direct sunlight. • Do not charge the appliance in dirty or damp places. The room temperature should be between 15ºC and 35ºC. • Every few months, allow the batteries to drain completely and then recharge them. To discharge them, use the appliance in cordless mode until it stops, with the charging station switched off. Then, recharge the batteries as explained above. PREPARING THE APPLIANCE CHARGING THE ROBOT VACUUM 19 en • When storing the appliance for a long period of time, we recommend you fully charge the battery and then remove it for storage in a cool, dry place. USING THE APPLIANCE , This ) ) ) ) , , appliance has been specially designed to vacuum floors and carpeted floors. This appliance is intended for daily floor maintenance, avoiding the accumulation of dirt and appearance of fluff. Never vacuum live ash, splinters or other sharp objects, or liquids. Never vacuum lit matches or cigarette butts. Do not vacuum toxic material (e.g. ammonia). Completely remove all the elements used for transportation and packaging. Do not use the robot vacuum cleaner between small tables, chairs or very small spaces, as this could damage the appliance. The robot vacuum cleaner uses cleaning settings to effectively clean the whole floor: Spiral movement for more intense cleaning where dirt has been detected, wall following for cleaning the perimeter of the room and room-crossing to ensure a full clean. The robot vacuum cleaner will take approximately 45 minutes to clean an average-sized room, passing over the same area several times to ensure the whole surface is cleaned. ROBOT VACUUM CONTROL PANEL Start/Stop robot vacuum Charge button: Lights up when pressed, turns off when the robot connects to the charging station. Charge indicator: Flashes during charging. It remains lit when charging is complete. Ultra-violet lamp: Lights up when pressed, the disinfection lamp will operate while the robot is cleaning. 1 Remove all objects that could break or damage the robot vacuum from the floor (e.g. lamps, bottles). 2 Check that the dustbin (11) is adequately fitted. See the section (“CLEANING AND STORAGE”). 3 Place the virtual barrier (4) where you like to prevent the robot entering a specific area. See the section (“VIRTUAL BARRIER”). 4 Start up the robot vacuum cleaner. To do so, set the operating switch (20) to the ON position. 5 Ensure that cleaning robot is charged. If the LED indicator light on the robot’s control panel flashes, set up the robot vacuum to charge. See the section (“PREPARING THE APPLIANCE. CHARGING THE ROBOT VACUUM”) 6 If you want to use the robot vacuum in automatic mode, programme its operation using the remote control. See the section (“REMOTE CONTROL”). 7 Press the button on the robot’s panel. The robot vacuum will then start to operate, following its cleaning patterns. , 20 USING THE APPLIANCE , If you wish, you can control its movements or functions using the remote control buttons (please refer to the “REMOTE CONTROL” section), or using the buttons of the control panel on the robot vacuum's body. Press the UV key, if you want to sterilise the front area. This function is particularly recommended for people suffering from allergies and for homes with pets, as it sterilises the floor against viruses and bacteria. 8 Press the button again to pause the cleaning process. 9 If you do not want a programmed weekly clean, turn off the appliance after cleaning. To do so, set the operating switch (20) to the OFF position or press the ON/OFF button on the remote control. 10 Unplug the charging station from the mains. , VIRTUAL BARRIER MAIN COMPONENTS (B) 1B ON switch & Length of virtual barrier Off Short range = 4 m Medium range = 6 m Long range = 8 m 2B 3B 4B 5B 6B LED ON light Proximity sensor head Virtual barrier sensor head Battery compartment cover Battery cover clip en OPERATION , Use the virtual barrier to define the desired cleaning area, preventing the robot from ) ) ) , 1 2 3 4 , , 5 6 , entering unnecessary or unwanted areas. Use this to prevent the robot entering areas with cables or a particular room. Place the virtual barrier at the same level on the surface where you are going to use the robot vacuum. Place the virtual barrier and the charging station at a distance of more than 3 m apart, to prevent interferences. Do not place the charging station within range of the virtual barrier’s signal. The proximity sensor head (3B) prevents impact between the robot vacuum and the virtual barrier, preventing it from coming within a distance of less than 0.5-1 m from it. Make sure that the batteries are not discharged. Position the virtual barrier so that it blocks the area you do not want the robot vacuum to enter. (fig. 3). Remove any objects that may be in front of the virtual barrier, to prevent its inadequate operation. Choose the desired length of the virtual barrier. To do so, set the switch (B) to choose short , medium or long range. Use the appropriate barrier length. The battery’s duration depends on the selected sensor distance. The LED ON light (2B) will flash every 8 seconds until the battery runs out. Check that the robot vacuum cannot cross the boundary created by the virtual barrier. Set switch (B) to the OFF position , when the virtual barrier is not required. Some differences may occur in the direction of the virtual barrier’s infrared signal and the robot's reception range, due to the movement of the robot during while in use. This difference may vary depending on the work environment and the charging level of the robot and the virtual barrier. VIRTUAL BARRIER 21 REMOTE CONTROL COMPONENTS (C) 1 2 3 4 Robot vacuum ON/OFF Direction buttons Confirmation button Control keys Start/Sunday Provisional stop/Monday 5 Display (fig. 4) a Transmitting signal” icon b Programmed days of the week c Programmed days of the week d Time e Error icon f Function icon Time setting/Tuesday Charge/Wednesday Timer/Thursday Fast clean/Friday Clean after charging/Saturday Slow clean/every day TIMER Synchronisation of the Remote Control and the Robot Vacuum (fig. 5) , Synchronise the remote control and the robot vacuum before first use and following maintenance operations. To do so: 1 Check that the batteries of the robot vacuum and the remote control are sufficiently charged. 2 Turn the robot off. To do so, set the operating switch (20) to the OFF position. 3 Press the button for more than 4 seconds. Return the operating switch (20) to the ON position, without releasing the button. When the synchronisation has been properly performed, the robot will emit two beeps. , Setting Day and Time (fig. 6) , To ensure that the robot starts operating at the expected time, the current day of the week and time must be saved. 1 Press the button. This opens the day setting function. 2 Press the button of the day corresponding to the current day of the week (SU= Sunday, MO= Monday, TU= Tuesday, WE= Wednesday, TH= Thursday, FR= Friday, SA= Saturday). 3 Press the arrows to move through the “hour” and “minutes” fields. Press the arrows to select the current “hour” and “minutes”. 4 Press to confirm the selection. Press if you want to cancel the setting. ) Scheduling Automatic Weekly Cleaning (fig. 7) With the robot turned off. 1 Press the button of the remote control. 2 Press the button of the day corresponding to the day of the week you want to programme. Select one, several or all the days of the week. The selected days will flash. 3 Press the arrows to set the exact cleaning time. Press the “up” and “down” arrows to select the hour and minutes. 22 REMOTE CONTROL 4 Press to confirm the selection. Press the ON/OFF button if you want to cancel the setting. For the robot vacuum to start up at the planned time, it must be switched on. The operating switch (20) in the ON position and lit. ) ) ADDITIONAL FUNCTIONS FULL GO Function ) If this function is selected, the robot vacuum is programmed to continue cleaning once it is fully charged. 1 Press the button. The robot vacuum must be switched on. FULL GO will light up in the remote control display. The robot vacuum will search for the charging station before the battery runs out and will automatically start cleaning when it is fully charged. , SPEED Function 1 Press the button to choose fast clean. FAST will light up in the remote control display. 2 Press the button to choose slow clean. SLOW will light up in the remote control display. en , , ERROR CODES If the robot is not functioning properly due to one of the following circumstances, all of the robot’s control panel buttons will flash simultaneously. 1 Press the button of the remote control. Ensure that the remote control signal is within the active range of the appliance. The error icon will appear in the remote control display beside one of the error codes described below. 2 Perform the actions described below depending on the error displayed. , ERROR CODE CAUSE OF THE FAILURE SOLUTION E01 Stair detector sensors Clean the sensors (27). E02 Central roller Remove any dirt and hair trapped in the roller (23). E03 Low battery Charge the battery. E04 Side wheels Remove any dirt and hair trapped in the wheels. E05 Dustbin Fit adequately the dustbin (11). , If the failure persists after fulfilling these actions, do not use it and take it to an authorised assistance service. Do not modify or repair the appliance. STORAGE AND STORAGE n Prior to any cleaning or maintenance operation, ensure that the operating switch ) ) (20) is in the OFF position and that the appliance is not connected to the mains. Make sure that all washed elements are completely dry prior to assembly. Never immerse the vacuum module (15) in water or any other liquid, or place it in the dishwasher. Do not use abrasive products or solvents. STORAGE AND STORAGE 23 For best performance of the robot vacuum, we recommend that you clean the dustbin and clean the filter after every 3 uses. EMPTYING THE DUSTBIN (11) 1 Keep the release button (12) pressed down. Remove the dustbin (11). (fig. 8) 2 Place the dustbin over a rubbish bin, pull the tab (14) to open the filter holder and empty the contents into the rubbish bin. (fig. 9) FILTER CLEANING AND REPLACEMENT (7) ) It is advisable to inspect the filter regularly, to check that it is working properly. ) 1 2 3 ) 4 5 Clean the filter thoroughly if you detect a reduction in the appliance’s vacuuming capacity. It is advisable to replace the filter once or twice a year, depending on how often the appliance is used. Empty the dustbin as shown in the “EMPTYING THE DUSTBIN (11)” section. Remove the filter (7). Press the semi-circular holder with one hand to remove the used filter from the holder (fig. 10) Gently shake the removed filter against the side of the rubbish bin to dislodge excess dust and dirt. Never use the robot vacuum without the filter (7). Clean the filter using the cleaning brush (6) (fig. 11). Return the clean filter, or new filter if necessary, to its holder. CLEANING THE DUSTBIN (11) 1 2 3 4 Press the button (13). This releases the vacuum module (15) (fig. 12). Turn the vacuum module round, release the two tabs and remove the lid. Clean the interior of the bin using the cleaning brush (6) (fig. 13). Use the cleaning brush to clean the vacuum module (15) and the air intake and outlet unit (fig. 13). Do not clean the vacuum module with water. 5 Fit the dustbin into the body of the appliance. Press on the bin until you hear a click, which indicates that it is properly fitted to the body. ) MOP CLEANING AND REPLACEMENT (9) ) Do not use the mop on rugs, carpets or floors that are not completely smooth. 1 In such cases, remove the mop attachment (10). Turn the mop attachment and undo the left and right tabs (fig. 14). 2 To replace the mop (9), pull it out and put a new one in its place (fig.14). REMOVAL AND CLEANING OF BRUSHES For best performance of the robot vacuum, we recommend that you clean the rollers and brushes after every 3 uses. Rollers (22) and (23) 1 Push the tab back and lift and fastening bar (fig.15). The rollers will be released. 2 Remove the rollers (22) and (23). 3 Clean the rollers using the cleaning brush (6) (fig.16). 4 Re-insert the rollers and replace the fastening bar, pressing it until you hear a click, which indicates that it is fitted properly , 24 STORAGE AND STORAGE Side Brush (8) , Clean the side brush regularly to prevent malfunctioning of the robot vacuum. 1 Use your hands to remove any hair and dust trapped in the side brush. 2 If the dirt is very tangled around the brush, cut it using scissors. If necessary, unscrew the screw and remove the side brush (8) from the body for more effective cleaning (fig.17). 3 Return the side brush to its housing. , REMOVAL AND CLEANING OF WHEELS Side Wheels 1 Unscrew the screws of the wheels (fig.18). 2 Remove the wheels from their housing and clean them. Do not clean the wheels with water, oil or grease. Return the wheels to their housing and screw down the screws using a screwdriver. ) ) en Front Wheel If the front wheel is jammed or does not rotate freely, remove it for cleaning (fig.18). 1 Remove the wheel with the help of a tool that serves as a lever. 2 To replace it after cleaning, press the wheel into its housing. CLEAN THE COLLISION SENSORS (25) AND STAIR SENSORS (27) , Keep the infrareds clean so that the robot vacuum can operate correctly. 1 Clean the sensors with a piece of cotton or a soft cloth (fig.19). CLEANING THE APPLIANCE n Check that no water enters the appliance. ) Clean the appliance after using it for the first time, immediately after each use and after a long period without use. You will thus ensure the correct operation of the appliance and prolong its useful life. 1 Clean the outside of the appliance with a damp cloth. Do not use abrasive products or solvents. REPLACING THE BATTERIES REPLACING THE BATTERIES OF THE VIRTUAL BARRIER (Fig. 20) 1 Turn battery cover lock (6B) until the cover is released (5B). 2 Place the batteries in the compartment intended for this purpose. Check that the positive and negative electrodes are in the proper positions. Remove the batteries if you are not going to use the robot vacuum for a long period of time. , REPLACING THE BATTERIES OF THE REMOTE CONTROL (Fig. 21) 1 Open the battery compartment cover. 2 Place the batteries in the compartment intended for this purpose. Check that the positive and negative electrodes are in the proper positions. Remove the batteries if you are not going to use the robot vacuum for a long period of time. , REPLACING THE BATTERIES 25 . FRANÇAIS INSTRUCTIONS DE SÉCURITÉ • Lisez attentivement ce mode d'emploi avant d'utiliser l'appareil. • Ce manuel fait partie du produit. Conservez-le dans un lieu sûr afin de pouvoir le consulter ultérieurement. • Cet appareil est destiné uniquement à un usage domestique, non industriel. Tout usage autre que celui indiqué pourrait s’avérer dangereux (par exemple, aspiration de liquides, poussière suite à des travaux, ciment, etc.). • Les enfants doivent être surveillés afin de s’assurer qu’ils ne jouent pas avec l’appareil. • À moins d’avoir été supervisées ou d’avoir reçu les instructions d’usage de la personne responsable de leur sécurité, les personnes (y compris des enfants) aux capacités physiques, sensorielles ou mentales réduites, ou manquant d’expérience ou de connaissance, ne doivent pas utiliser cet appareil. • Ne modifiez ni ne réparez jamais l’appareil. Si vous constatez une anomalie sur le cordon ou une autre partie de l’appareil, ne l’utilisez pas et amenez-le à un centre de service technique agréé. • N’utilisez pas de pièces ni d'accessoires non fournis ou recommandés par SOLAC. • Avant de brancher l’appareil au secteur, vérifiez que la tension indiquée correspond bien à celle de votre logement. • Éteignez et débranchez l’appareil avant de démonter ou de monter des pièces, et d’effectuer toute opération d’entretien ou de nettoyage. Débranchez-le également en cas de coupure de courant. • N’accrochez pas l'appareil par le cordon. Débranchez l’appareil en tirant toujours sur la prise, jamais sur le cordon. • Prenez garde à ce que le cordon d'alimentation n'entre pas en contact avec des éléments tranchants ou des surfaces chaudes. Ne laissez pas le cordon pendre au bord de la table ou du plan de travail afin d’éviter que les enfants ne tirent dessus et ne le fassent tomber. d • Ne trempez pas l'appareil dans l'eau ou dans tout autre liquide et ne le mettez pas au lave-vaisselle. Ne saisissez pas l’aspirateur ou la prise avec les mains mouillées. Tenez votre robot aspirateur éloigné de toute source de chaleur. N’utilisez jamais le robot aspirateur si le bac à poussière ou le filtre de protection n’est pas correctement placé. Le module d’aspiration doit toujours être dégagé. N’approchez pas le module d’aspiration, les rouleaux et les roues à proximité de cheveux, vêtements, doigts ou toute autre partie du corps. N'utilisez pas l’aspirateur pour laver des animaux. N’utilisez pas l’appareil dans des espaces fermés où des vapeurs explosives ou toxiques sont accumulées. Ne l'utilisez jamais sur des surfaces mouillées ni à l'extérieur. Vérifiez régulièrement l’état de l’adaptateur, du câble et du branchement. Évitez d’éclabousser le support de charge, l’adaptateur ou le câble de connexion. N’utilisez pas le support de charge ni l’adaptateur près d'une baignoire, d'un lavabo, d'une douche ou d'autres récipients contenant de l'eau en cours d'utilisation. Utilisez uniquement l’adaptateur fourni. 26 INSTRUCTIONS DE SÉCURITÉ • • • • • • • • • • • • Ne touchez pas l’adaptateur ni le support de charge avec les mains humides lorsqu’ils sont branchés. • Ne laissez jamais l’adaptateur ou le support de charge fonctionner sur une surface ou un chiffon humide. • Ne vous asseyez pas devant l’appareil et ne vous placez pas devant lui, afin d’éviter tout incident. • Vérifiez l’absence de fils, câbles ou autres objets d’une longueur supérieure à 15 cm sur le sol, afin d’éviter le blocage des rouleaux. ATTENTION ! : Pour mettre l’appareil au rebut, NE LE JETEZ JAMAIS à la poubelle ; déposez-le dans un POINT DE RECYCLAGE ou à la déchetterie la plus proche afin qu’il y soit recyclé. Vous contribuerez ainsi à la préservation de l’environnement. q PRINCIPAUX ÉLÉMENTS 1 2 3 4 5 6 7 8 9 10 11 12 13 14 15 Corps principal Télécommande Support de charge automatique Isolateur d’espaces Adaptateur Brosse de nettoyage Filtre (deux unités) Brosse latérale (deux unités) Serpillère Accessoire serpillère Bac à poussière Bouton déblocage bac à poussière Bouton déblocage module aspiration Languette filtre Module d’aspiration 16 17 18 19 20 21 22 23 24 25 26 27 28 29 Capteur à infrarouges Poignée Pare-chocs frontal Connecteur adaptateur batterie Interrupteur marche/arrêt Panneau des touches de contrôle Rouleau en caoutchouc Rouleau central Roues latérales Capteurs antichocs Connecteurs de contact au support de charge Capteurs détecteur escalier Roue avant Lampe UV PRÉPARATION DE L'APPAREIL. RECHARGE DU ROBOT ASPIRATEUR n Utilisez uniquement l’adaptateur et le support de charge fournis. , Le temps de charge est d’environ 5 heures pour une autonomie de 60/90 minutes. Avant d’utiliser l’appareil pour la première fois, chargez la batterie toute une nuit. COMPOSANTS PRINCIPAUX DU SUPPORT DE CHARGE (A) 1A Témoin lumineux à DEL décoratif 2A Interrupteur témoin lumineux à DEL décoratif 3A Signal de transmission 4A Témoin à DEL de fonctionnement 5A Témoin de charge 6A Connecteurs de contact 7A Connecteur de l’adaptateur CHARGE PAR SUPPORT DE CHARGE (Fig. 1) ) Ne placez aucun objet et évitez la présence d’obstacles ou de meubles autour du support de charge (voir distances recommandées sur le schéma). ) Le robot ne trouvera pas le support de charge en présence d’obstacles. Placez le support de charge sur une surface dégagée. PRINCIPAUX ÉLÉMENTS 27 fr ) Le robot ne trouvera pas le support de charge si le transmetteur de signal (3A) à infrarouges est obstrué. 1 Placez le support de charge sur un sol propre et contre un mur vertical. 2 Branchez l’adaptateur au connecteur (7A) du support de charge. 3 Branchez l’adaptateur au réseau électrique. Le témoin lumineux à DEL de fonctionnement (4A) s’allumera en rouge. Placez correctement le câble du chargeur le long du mur, afin d’éviter que le robot ne trébuche. 4 Appuyez sur le bouton de contrôle de la télécommande ou sur le bouton du tableau de contrôle du robot. Le robot aspirateur cherchera le support de charge si celui-ci se trouve à une distance adéquate, et s’y connectera. 5 Lors de la recherche, si vous souhaitez interrompre l’ordre de charge, appuyez à nouveau sur le bouton de contrôle ou de la télécommande. Le robot aspirateur s’arrêtera. Vérifiez que les connecteurs du robot (26) ont été branchés correctement aux connecteurs (6A) du support de charge. Lors du chargement, les indicateurs de chargement du support de charge (5A) et du tableau de commande clignoteront. À l’issue de la charge, l’indicateur de charge (5A) du support de charge s’éteindra et celui du tableau de contrôle restera allumé en permanence. L’appareil est prêt à être utilisé. , ) ) , , Ne débranchez pas le support de charge au cours du processus de nettoyage ; le robot aspirateur y retournera pour se recharger si le niveau de charge de la batterie est trop faible. Si vous le souhaitez, vous pouvez verser quelques gouttes de parfum d’ambiance au centre du témoin lumineux à DEL décoratif (1A). 6 Appuyez sur l’interrupteur (2A). Le témoin lumineux à DEL (1A) s’allumera. Lorsqu’il aura atteint une certaine température, le parfum se répandra dans la pièce. Certains parfums peuvent endommager le support plastique. Assurez-vous que la surface du plastique ne risque pas d’être endommagée avant d’utiliser le parfum. , ) CHARGE SANS SUPPORT DE CHARGE (Fig. 2) 1 Branchez le câble de l’adaptateur directement au connecteur (19) du corps du robot aspirateur. Branchez l’adaptateur au réseau électrique. Pendant la charge, le témoin lumineux à DEL indicateur de charge du tableau de contrôle du robot clignotera. Il restera allumé à l’issue de la charge. , , Lors de la charge directe par câble, le robot doit être à l’arrêt. 2 À l’issue du chargement, débranchez l’adaptateur du réseau puis détachez le câble du connecteur (19). L’appareil est prêt à être utilisé. Pendant le chargement, l’adaptateur chauffe légèrement. Ceci est normal, à moins que cette chauffe ne soit excessive. ) CHARGE AUTOMATIQUE , Au cours du nettoyage, le robot cherchera toujours le support de charge automatiquement si la batterie est faible. ) À l’issue du nettoyage, la température de la batterie peut être très élevée ; le temps de charge est donc susceptible d’être supérieur. 28 PRÉPARATION DE L'APPAREIL. Recommandations pour augmenter la durée des batteries • Ne laissez pas l’adaptateur branché pendant de longues périodes. Débranchez-le à l’issue du chargement. • Ne stockez ni ne rechargez l’appareil près de radiateurs ou d’autres sources de chaleur, et ne le laissez pas exposé à la lumière directe du soleil. • Ne rechargez pas l’appareil dans des endroits sales ou humides, et faites en sorte que la température ambiante soit comprise entre 15ºC et 35ºC. • Tous les trois ou quatre mois, déchargez complètement la batterie puis rechargez-la. Pour la décharger, faites fonctionner l’appareil sans câble jusqu’à ce qu’il s’arrête (le support de charge doit être débranché). Ensuite, rechargez la batterie comme expliqué plus haut. • Pour stocker l’appareil pendant une longue période, chargez la batterie complètement puis retirez-la de l’appareil et conservez-la dans un endroit frais et sec. FONCTIONNEMENT DE L’APPAREIL , Cet appareil a été conçu exclusivement pour nettoyer les sols et les moquettes ) ) ) ) , , par aspiration. Cet appareil est destiné à l’entretien quotidien du sol, afin d’éviter l’apparition de moutons et l’accumulation de poussière. N'aspirez jamais de cendres incandescentes, de braises, d’objets pointus ou de liquides. N’aspirez jamais d’allumettes allumées ni de mégots. N’aspirez pas non plus de substances toxiques (ammoniaque, etc.). Retirez complètement tous les éléments ayant servi à transporter et à emballer l’appareil. N’utilisez pas le robot aspirateur entre des petites tables, des petites chaises ou des espaces très réduits, afin d’éviter d’endommager l’appareil. Le robot aspirateur utilise des paramètres de nettoyage destinés à nettoyer la totalité du sol de façon efficace : Mouvement en spirale pour un nettoyage plus intense à des endroits particulièrement sales, contournement de murs pour nettoyer le périmètre de la pièce, nettoyage de la pièce en diagonale pour assurer un nettoyage complet. Le robot aspirateur nettoie une pièce de taille moyenne en 45 minutes environ ; il passe plusieurs fois sur la même zone pour assurer le nettoyage de toute la surface. TABLEAU DE CONTRÔLE DU ROBOT ASPIRATEUR Mise en marche/arrêt du robot aspirateur Bouton de charge : Il s’allume lorsqu’on appuie sur le bouton, et s’éteint lorsque le robot se connecte au support de charge. Témoin de charge : Il clignote pendant la charge et reste allumé de façon permanente à l’issue de la charge. Lampe ultraviolette : Elle s’allume lorsque le bouton est activé ; la lampe de désinfection fonctionnera pendant les opérations de nettoyage du robot. 1 Retirez du sol tous les objets susceptibles de se briser ou d’endommager le robot aspirateur (lampes, bouteilles, etc.). FONCTIONNEMENT DE L’APPAREIL 29 fr 2 Vérifiez que le bac à poussière (11) est placé correctement. Reportez-vous au paragraphe (« Nettoyage et stockage »). 3 Placez l’isolateur d’espaces (4) de votre choix pour éviter le passage du robot dans une zone spécifique. Reportez-vous au paragraphe (« ISOLATEUR D’ESPACES »). 4 Allumez le robot aspirateur. Pour ceci, placez l’interrupteur marche/arrêt (20) en position ON. 5 Assurez-vous que le robot de nettoyage est chargé. Si le témoin lumineux à DEL de charge du tableau de contrôle du robot clignote, placez le robot aspirateur en charge. Reportez-vous au paragraphe (« PRÉPARATION DE L’APPAREIL. RECHARGE DU ROBOT ASPIRATEUR »). 6 Si vous souhaitez utiliser le robot aspirateur en mode automatique, programmez son fonctionnement au moyen de la télécommande. Reportez-vous au paragraphe (« TÉLÉCOMMANDE »). 7 Appuyez sur le bouton du tableau de commandes du robot. Le robot aspirateur commencera à travailler selon ses schémas de nettoyage. Si vous le souhaitez, contrôlez ses mouvements ou ses fonctions par les touches de la télécommande ; reportez-vous au paragraphe (« TÉLÉCOMMANDE ») ou utilisez les boutons de contrôle du panneau de commandes du corps du robot aspirateur. Vous souhaitez stériliser une zone frontale, appuyez sur la touche UV. Cette fonction est spécialement utile pour les personnes allergiques, ou dans les logements où vivent des animaux domestiques : elle permet de stériliser la pièce en éliminant les virus et les bactéries du sol. 8 Appuyez à nouveau sur le bouton pour interrompre momentanément le processus de nettoyage. 9 Si vous ne souhaitez pas effectuer un nettoyage hebdomadaire programmé, éteignez l’appareil après le nettoyage. Pour ceci, placez l’interrupteur de marche/arrêt (20) en position OFF ou appuyez sur la touche marche/arrêt de la télécommande. 10 Débranchez le support de charge du secteur. , , , ISOLATEUR D’ESPACES PRINCIPAUX COMPOSANTS (B) 1B Interrupteur marche et longueur d’isolateur d’espaces Éteint Portée inférieure = 4 m Portée moyenne = 6 m Portée élevée = 8 m 2B Témoin de fonctionnement à DEL 3B Tête de transmission de proximité 4B Tête de transmission de l’isolateur d’espaces 5B Couvercle du compartiment des piles 6B Déblocage couvercle des piles FONCTIONNEMENT , Utilisez l’isolateur d’espaces pour limiter la zone de nettoyage du robot à la zone de ) ) ) 30 votre choix, afin d’éviter que le robot ne pénètre dans des espaces que vous ne souhaitez pas nettoyer. Utilisez cette fonction pour éviter l’accès à une pièce pourvue de câbles ou à une pièce en particulier. Placez l’isolateur d’espaces sur le même niveau que celui où vous souhaitez utiliser le robot aspirateur. Placez l’isolateur d’espaces et le support de charge à une distance supérieure à 3 mètres, afin d’éviter les interférences. Ne placez pas le support de charge dans le rayon de portée de l’isolateur d’espaces. ISOLATEUR D’ESPACES , La 1 2 3 4 , , 5 6 , tête de transmission de proximité (3B) permet d’éviter l’impact entre le robot d’aspiration et l’isolateur d’espaces, en empêchant que celui-ci s’approche à une distance inférieure à 50 cm – 1 mètre. Assurez-vous que la batterie est bien chargée. Placez l’isolateur d’espaces délimitant la zone où vous ne souhaitez pas que le robot pénètre. (fig. 3). Retirez les objets qui se trouvent face à l’isolateur d’espaces afin d’éviter un mauvais fonctionnement. Choisissez la longueur de l’isolateur d’espaces que vous souhaitez. Pour ceci, déplacez l’interrupteur (B) en choisissant une portée faible , moyenne ou élevée . Utilisez la longueur d’isolateur souhaitée ; la durée de la batterie dépend de la distance de transmission choisie. Le témoin de fonctionnement à DEL (2B) clignotera pendant 8 secondes jusqu’à ce que la batterie s’épuise. Vérifiez que le robot aspirateur ne peut pas traverser la frontière créée par l’isolateur d’espaces. Placez l’interrupteur (B) en position d’arrêt lorsque vous n’utilisez pas l’isolateur d’espaces. Quelques différences sont susceptibles de se produire dans la direction du signal à infrarouges de l’isolateur d’espaces et la distance de réception du robot, en raison des mouvements du robot lorsqu’il est en fonctionnement. Cette différence est variable selon les conditions de travail et le degré de charge du robot et de l’isolateur d’espaces. TÉLÉCOMMANDE COMPOSANTS (C) 1 2 3 4 Marche/arrêt du robot aspirateur Touches de direction Bouton de confirmation Touches de contrôle Mise en marche /dimanche Arrêt temporaire /lundi 5 Écran de visualisation (fig. 4) a Symbole de transmission b Jours de la semaine c Jour actuel de la semaine d Heure e Symbole d’erreur f Symbole des fonctions Configuration heure /mardi Charge /mercredi Programmation /jeudi Nettoyage rapide /vendredi Nettoyage après charge /samedi Nettoyage lent /tous les jours PROGRAMMATION Synchronisation de la télécommande et du robot aspirateur (fig. 5) , Synchronisez la télécommande et le robot aspirateur avant la première utilisation et après les opérations d’entretien. Pour cela : 1 Vérifiez que le robot aspirateur et la télécommande sont suffisamment chargés. TÉLÉCOMMANDE 31 fr 2 Éteignez le robot aspirateur. Pour ceci, placez l’interrupteur marche/arrêt (20) en position OFF. 3 Appuyez sur pendant plus de 4 secondes. Placez à nouveau l’interrupteur marche/ arrêt (20) en position ON sans relâcher le bouton . Lorsque la synchronisation aura été réalisée, le robot émettra deux signaux sonores. , Configuration date et heure (fig. 6) , Il est nécessaire de mémoriser l’heure et le jour de la semaine en cours pour que le 1 2 3 4 ) robot commence à travailler au moment souhaité. Appuyez sur la touche . Réalisez l’ajustement du jour de la semaine. Appuyez sur la touche correspondant au jour de la semaine actuelle (SU= dimanche, MO= lundi, TU= mardi, WE= mercredi, TH= jeudi, FR= vendredi, SA= samedi). Utilisez les flèches pour vous déplacer dans les champs « heure » et « minutes ». Utilisez les flèches pour sélectionner l’heure et les minutes actuelles. Appuyez sur pour confirmer la sélection. Appuyez sur si vous souhaitez annuler la configuration. Programmation nettoyage hebdomadaire automatique (fig. 7) Le robot doit être éteint. 1 Appuyez sur la touche de la télécommande. 2 Appuyez sur le bouton du jour correspondant au jour de la semaine que vous souhaitez programmer. Choisissez un, plusieurs ou tous les jours de la semaine. Les jours sélectionnés clignotent. 3 Utilisez les flèch es pour programmer l’heure exacte de nettoyage. Utilisez les flèches « haut » et « bas » pour sélectionner l’heure et les minutes. 4 Appuyez sur pour confirmer la sélection. Appuyez sur la touche marche/arrêt si vous souhaitez annuler la configuration. Pour que le robot aspirateur se mette en marche au moment souhaité, il doit être allumé. L’interrupteur marche/arrêt (20) doit être en position ON et éclairé. ) ) FONCTIONS COMPLÉMENTAIRES Fonction FULL GO ) Sélectionnez cette fonction pour que le robot aspirateur soit programmé pour poursuivre le nettoyage dès qu’il aura été complètement chargé. 1 Appuyez sur la touche . Le robot aspirateur doit être allumé. Les mots FULL GO s’éclaireront sur l’écran de la télécommande. Le robot aspirateur cherchera le support de charge avant que la batterie ne s’épuise et commencera à nettoyer le sol automatiquement lorsqu’il aura été chargé complètement. , Fonction VITESSE 1 Appuyez sur la touche pour choisir un nettoyage rapide. Le mot FAST s’éclairera sur l’écran de la télécommande. 2 Appuyez sur la touche pour choisir un nettoyage lent. Le mot SLOW s’éclairera sur l’écran de la télécommande. , , CODES D’ERREUR Si le robot ne fonctionne pas correctement en raison de l’une des circonstances suivantes, tous les boutons du tableau de contrôle du robot clignoteront simultanément. 32 TÉLÉCOMMANDE 1 Appuyez sur la touche de la télécommande. Assurez-vous que le signal de la télécommande se trouve dans le champ d’action de l’appareil. Le symbole d’erreur apparaîtra sur l’écran de la télécommande, ainsi que l’un des codes d’erreur décrits ci-dessous. 2 Effectuez les actions décrites ci-après selon l’erreur indiquée. , CODE CAUSE DU PROBLÈME ERREUR SOLUTION E01 Capteurs détecteur escalier Nettoyez les capteurs (27) E02 Rouleau central Retirez la poussière et les cheveux coincés dans le rouleau (23) E03 Batterie faible Chargez la batterie E04 Roues latérales Retirez la poussière et les cheveux coincés dans les roues E05 Bac à poussière Placez correctement le bac à poussière (11) , Si le problème persiste après ces vérifications, cessez d’utiliser l’appareil et adressez- fr vous à un service technique agréé. Ne modifiez ni ne réparez jamais l’appareil. NETTOYAGE ET STOCKAGE n Avant toute opération d’entretien ou de nettoyage de l’appareil, assurez-vous que l’interrupteur marche/arrêt (20) est en position OFF et qu’il est débranché. ) Assurez-vous que les éléments nettoyés sont complètement secs avant de les monter. ) Ne trempez jamais le module d’aspiration (15) dans l'eau ou dans tout autre liquide et ne le mettez jamais au lave-vaisselle. N’utilisez pas de produits abrasifs ni de dissolvants. Pour une meilleure efficacité du robot aspirateur, videz le bac à poussière et nettoyez le filtre toutes les trois utilisations. VIDER LE BAC À POUSSIÈRE (11) 1 Appuyez de façon continue sur le bouton de déblocage (12). Extrayez le bac à poussière (11). (fig. 8) 2 Placez le bac au-dessus de la poubelle ouverte, ouvrez le support du filtre en tirant sur la languette (14) et videz le contenu dans la poubelle. (fig. 9) NETTOYAGE ET REMPLACEMENT DU FILTRE (7) ) Il est recommandé de vérifier régulièrement le bon fonctionnement du filtre. ) 1 2 3 ) 4 5 Effectuez un nettoyage du filtre si vous détectez une diminution de la capacité d’aspiration de l’appareil. Remplacez le filtre une ou deux fois par an, selon l’intensité d’utilisation de l’appareil. Extrayez le bac à poussière selon les indications du paragraphe « VIDER LE BAC À POUSSIÈRE (11) ». Séparez le filtre (7). Appuyez sur le support semi-circulaire avec une main pour extraire le filtre usagé du support. (fig. 10) Secouez doucement le filtre de sortie contre la paroi interne de la poubelle pour éliminer l’excès de saleté et de poussière. N'utilisez jamais le robot aspirateur sans le filtre (7). Nettoyez le filtre à l’aide de la brosse de nettoyage (6) (fig. 11). Replacez le filtre propre à sa place (ou bien placez un nouveau filtre). NETTOYAGE ET STOCKAGE 33 NETTOYER LE BAC À POUSSIÈRE (11) 1 2 3 4 Appuyez sur le bouton (13). Le module d’aspiration (15) est libéré (fig. 12). Retournez le module d’aspiration, libérez les deux languettes et retirez le couvercle. Nettoyez l’intérieur du bac à l’aide de la brosse de nettoyage (6) (fig. 13). Nettoyez le module d’aspiration (15) et le dispositif d’admission et d’expulsion d’air à l’aide de la brosse de nettoyage (fig. 13). Ne nettoyez pas le module d’aspiration à l’eau. 5 Placez le bac à poussière dans le corps de l’appareil. Poussez le bac vers le corps jusqu’à entendre un clic, qui vous indique que le bac est correctement fixé au corps. ) NETTOYAGE ET REMPLACEMENT DE LA SERPILLÈRE (9) ) N’utilisez pas la serpillère sur des tapis, des moquettes ou des sols qui ne soient pas complètement lisses. 1 Dans ces cas, retirez le support de la serpillère (10). Tournez le support de la serpillère et débloquez les languettes droite et gauche (fig. 14). 2 Pour remplacer la serpillère (9), tirez légèrement pour la retirer et placez-en une nouvelle (fig.14). DÉMONTAGE ET NETTOYAGE DES BROSSES Pour améliorer l’efficacité du robot aspirateur, nettoyez les rouleaux et les brosses toutes les trois utilisations. Rouleaux (22) et (23) 1 Tirez la languette vers l’arrière et actionnez le levier de fixation (fig.15). Les rouleaux sont libérés. 2 Retirez les rouleaux (22) et (23). 3 Nettoyez les rouleaux à l’aide de la brosse de nettoyage (6) (fig.16). 4 Placez à nouveau les rouleaux et le levier de fixation en appuyant légèrement jusqu’à entendre un clic indiquant qu’ils sont correctement fixés. , Brosse latérale (8) , Nettoyez régulièrement la brosse latérale pour éviter un mauvais fonctionnement du robot aspirateur. 1 Retirez à la main les cheveux et la poussière coincés dans la brosse latérale. 2 Si la poussière et les cheveux bouchent la brosse, coupez-les à l’aide d’une paire de ciseaux. Si nécessaire, dévissez la vis et extrayez la brosse latérale (8) du corps pour effectuer un nettoyage plus profond (fig.17). 3 Replacez la brosse latérale à sa place. , DÉMONTAGE ET NETTOYAGE DES ROUES Roues latérales 1 Dévissez les deux vis des roues (fig.18). 2 Retirez les roues et nettoyez-les. Ne nettoyez pas les roues à l’eau, à l’huile ni avec de la graisse. Replacez à nouveau les roues et vissez les vis à l’aide d’un tournevis. ) ) Roue frontale Si la roue frontale est bloquée ou ne tourne pas librement, retirez-la afin de la nettoyer (fig.18). 34 NETTOYAGE ET STOCKAGE 1 Retirez la roue en utilisant un outil comme levier. 2 Pour replacer la roue après l’avoir nettoyée, placez-la dans son logement et appuyez légèrement. NETTOYAGE DES CAPTEURS ANTICHOCS (25) ET CAPTEURS D’ESCALIER (27) , Maintenez les infrarouges dégagés et propres pour que le robot aspirateur puisse fonctionner correctement. 1 Nettoyez les capteurs à l’aide d’un coton ou d’un chiffon doux (fig.19). NETTOYAGE DE L’APPAREIL n Assurez-vous de ne pas verser d’eau à l’intérieur de l’appareil. ) Nettoyez l’appareil avant la première utilisation, immédiatement après chaque utilisation et après une longue période d’inutilisation. Ceci assurera un fonctionnement correct de l’appareil et prolongera sa vie utile. 1 Nettoyez l'extérieur de l'appareil avec un chiffon sec. N’utilisez pas de produits abrasifs ni de dissolvants. REMPLACEMENT DES PILES fr REMPLACEMENT DES PILES DE L’ISOLATEUR D’ESPACES (fig. 20) 1 Tournez le mécanisme de déblocage du couvercle des piles (6B) jusqu’à ce que le couvercle se débloque (5B). 2 Placez les piles dans le compartiment prévu à cet effet. Vérifiez que les bornes positives et négatives sont correctement placées. Retirez les piles si vous prévoyez de ne pas utiliser l’aspirateur pendant longtemps. , REMPLACEMENT DES PILES DE LA TÉLÉCOMMANDE (fig. 21) 1 Ouvrez le compartiment des piles. 2 Placez les piles dans le compartiment prévu à cet effet. Vérifiez que les bornes positives et négatives sont correctement placées. Retirez les piles si vous prévoyez de ne pas utiliser l’aspirateur pendant longtemps. , REMPLACEMENT DES PILES 35 . DEUTSCH ACHTUNG • Lesen Sie diese Anweisungen vor Inbetriebnahme des Gerätes aufmerksam durch. • Diese Bedienungsanleitung ist Bestandteil des Produkts. Bewahren Sie sie an einem sicheren Ort zum späteren Nachlesen auf. • Dieses Gerät ist ausschließlich für den Hausgebrauch und nicht für gewerbliche Zwecke bestimmt. Jede andere Verwendung als die vorgesehene kann gefährlich sein (z.B. Aufsaugen von Flüssigkeiten, Baustaub, Zementstaub etc.) • Kinder nicht unbeaufsichtigt lassen um sicherzustellen, dass sie das Gerät nicht als Spielzeug verwenden. • Dieses Gerät darf nicht von Personen (einschließlich Kindern) mit eingeschränkten körperlichen, sensorischen oder geistigen Fähigkeiten bzw. ohne ausreichende Erfahrung und Kenntnisse benutzt werden, es sei denn unter der Aufsicht oder entsprechenden Anleitung einer für ihre Sicherheit verantwortlichen Person. • Nehmen Sie keine Änderungen oder Reparaturen am Gerät vor. Benutzen Sie das Gerät nicht im Falle eines Defekts am Netzkabel oder einem anderen Geräteteil und bringen Sie es zu einem autorisierten Kundendienst. • Verwenden Sie ausschließlich von SOLAC gelieferte oder empfohlene Teile bzw. Zubehör. • Vergewissern Sie sich vor dem Netzanschluss des Geräts, dass die angegebene Netzspannung mit derjenigen Ihres Haushalts übereinstimmt. • Schalten Sie das Gerät vor dem Abnehmen bzw. Aufsetzen eines Teils sowie vor jeder Instandhaltung oder Reinigung stets aus und trennen es vom Netz. Bei Stromausfall ebenfalls vom Netz trennen. • Das Gerät nicht am Kabel aufhängen. Ziehen Sie stets am Netzstecker, nicht am Kabel, wenn Sie das Gerät vom Netz trennen. • Achten Sie darauf, dass das Netzkabel nicht mit scharfen Kanten oder heißen Flächen in Berührung kommt. Lassen Sie das Kabel nicht über die Tischkante bzw. Abstellfläche hängen, um zu verhindern, dass Kinder daran ziehen und das Gerät zu Boden fällt. d • • • Das Gerät nicht in Wasser oder andere Flüssigkeiten tauchen und nicht in der Spülmaschine reinigen. Den Staubsauger oder Stecker nicht mit nassen Händen anfassen. Halten Sie den Staubsaugerroboter von Wärmequellen fern. Benutzen Sie den Staubsaugerroboter nie ohne den Schmutzbehälter bzw. ohne den richtig eingesetzten Schutzfilter. Halten Sie das Saugmodul stets frei von Behinderungen. Achten Sie darauf, genügend Abstand zwischen dem Saugmodul, den Rollen und Rädern und Haar, Bekleidung, Fingern oder sonstigen Körperteilen zu halten. Den Staubsauger nicht zur Reinigung von Tieren verwenden. Das Gerät nicht in geschlossenen Räumen verwenden, in denen sich explosive oder giftige Dämpfe ansammeln können. Stellen Sie das Gerät niemals auf nassen Oberflächen oder im Freien auf. Überprüfen Sie regelmäßig den Zustand des Adapters, Stromkabels und Steckers. Achten Sie darauf, dass das Gerät oder Stromkabel nicht mit Wasser bespritzt werden. 36 ACHTUNG • • • • • • • • Ladestation und Adapter während des Betriebs nicht in der Nähe von Badewannen, Waschbecken, Duschen oder sonstigen Behältern mit Wasser verwenden. • Verwenden Sie ausschließlich den mitgelieferten Netzadapter. • Berühren Sie den Adapter und die Ladestation, wenn sie an das Stromnetz angeschlossen sind, niemals mit feuchten Händen. • Stellen Sie den Adapter bzw. die Ladestation niemals auf eine feuchte Oberfläche oder ein feuchtes Tuch. • Setzen Sie sich nicht auf das Gerät und stellen Sie sich auch nicht davor, dadurch könnte das Gerät beschädigt werden. • Vergewissern Sie sich, dass auf dem Boden keine Fäden, Kabel oder sonstigen Gegenstände mit einer Länge von mehr als 150 mm befinden, da sie sich mit den Rollen verwickeln könnten. ACHTUNG! Das Gerät KEINESFALLS über den Hausmüll entsorgen, sondern zum nächstgelegenen WERTSTOFFHOF oder zu einer Abfallannahmestelle zur Weiterverwertung bringen. So leisten Sie einen Beitrag zum Umweltschutz. q HAUPTBESTANDTEILE 1 2 3 4 5 6 7 8 9 10 11 12 13 14 15 Gehäuse Fernbedienung Automatische Ladestation Raumabteiler Adapter Reinigungsbürste Filter (zwei Stck.) Seitenbürste (zwei Stck.) Mopp Mopp-Zubehör Schmutzbehälter Entriegelungstaste Schmutzbehälter Entriegelungstaste Saugmodul Filterhebel Saugmodul 16 17 18 19 20 21 22 23 24 25 26 27 28 29 Infrarot-Sensor Griff Vorderer Stoßfänger Akkuadapter-Anschluss Betriebsschalter Bedienungspaneel Gummirolle Trägerrolle Seitenräder Anti-Kollisions-Sensoren Kontaktanschlüsse an Ladestation Sensoren Treppenerkennung Vorderrad UV-Lampe VORBEREITUNG DES GERÄTS. AUFLADEN DES STAUBSAUGERROBOTERS n Verwenden , Sie ausschließlich den mitgelieferten Adapter und die mitgelieferte Ladestation. Die Ladezeit beträgt ca. 5 Stunden für 60/90 Minuten Selbstbetrieb. Beim ersten Aufladen sollten Sie den Akku eine ganze Nacht lang aufladen. HAUPTBESTANDTEILE DER LADESTATION (A) 1A 2A 3A 4A Dekorative LED Schalter der dekorativen LED Sendesignal LED-Betriebsanzeige HAUPTBESTANDTEILE 5A Ladestandsanzeige 6A Kontaktanschlüsse 7A Adapteranschluss 37 de AUFLADEN MIT DER LADESTATION (Abb. 1) ) Stellen Sie keinen Gegenstand in die Nähe der Ladestation und vermeiden Sie, dass ) ) 1 2 3 , ) 4 5 ) , sich dort Behinderungen oder Möbel befinden (siehe die auf der Abbildung empfohlenen Abstände). Falls Behinderungen vorhanden sind, kann der Roboter die Ladestation nicht finden. Stellen Sie die Ladestation in einem freien Bereich auf. Der Roboter kann die Ladestation nicht finden, wenn der Infrarot-Signalsender (3A) verdeckt ist. Stellen Sie die Ladestation auf einen sauberen Fußboden und an eine senkrechte Wand. Den Adapter (7A) an den Ladestationanschluss anschließen. Schließen Sie den Adapter an das Stromnetz an. Die Betriebs-LED (4A) leuchtet rot auf. Verlegen Sie das Ladegerätkabel ordnungsgemäß entlang der Wand, anderenfalls kann sich der Roboter darin verfangen. Betätigen Sie den Betriebstaster der Fernbedienung oder die Taste des Bedienungspaneels des Roboters. Der Staubsaugerroboter sucht die Ladestation, sobald er den richtigen Abstand erreicht hat, schließt er sich daran an. Wenn Sie während der Suche den Ladebefehl abbrechen möchten, betätigen Sie erneut den Betriebstaster oder auf der Fernbedienung. Der Staubsaugerroboter bleibt stehen. Vergewissern Sie sich, dass die Roboteranschlüsse (26) korrekt mit den Anschlüssen (6A) der Ladestation verbunden sind. Während des Ladevorgangs blinken die Ladestandsanzeigen der Ladestation (5A) und des Bedienungspaneels auf. Sobald der Ladevorgang beendet ist, erlischt die Ladestandsanzeige (5A) der Ladestation und die des Bedienungspaneels leuchtet durchgehend. Das Gerät ist nun betriebsbereit. , Trennen Sie die Ladestation während der Reinigung nicht vom Netz, der Staubsaugerroboter kehrt nämlich zu ihr zurück, wenn das Ladeniveau des Akkus zu gering wird. Auf Wunsch können Sie eine kleine Menge ätherisches Öl in die Mitte der dekorativen LED (1A) geben. 6 Betätigen Sie den EIN-Schalter (2A). Die LED (1A) leuchtet auf. Wenn sie sich erhitzt, wird der Duft des in ihrem Inneren vorhandenen ätherischen Öls verbreitet. Einige ätherische Öle können die Kunststoffoberfläche angreifen. Vergewissern Sie sich daher vor der Benutzung, dass das ätherische Öl die Oberfläche nicht angreift. , ) AUFLADEN OHNE LADESTATION (Abb. 2) 1 Schließen Sie das Adapterkabel direkt an den Anschluss (19) des Gehäuses des Staubsaugerroboters an. 2 Schließen Sie den Adapter an das Stromnetz an. Während des Ladevorgangs leuchtet die Ladestandsanzeige-LED des RoboterBedienungspaneels auf; nach Abschluss des Ladens leuchtet sie durchgehend. , , Während des direkten Aufladens über ein Kabel darf der Roboter nicht betrieben werden. 3 Nach dem Ladevorgang den Adpapter vom Netz trennen und das Kabel aus dem Anschluss (19) entfernen. Das Gerät ist nun betriebsbereit. 38 VORBEREITUNG DES GERÄTS. AUF- ) Während des Ladevorgangs erwärmt sich der Adapter leicht. Dies ist normal, solange die Erwärmung nicht zu stark ist. AUTOMATISCHES AUFLADEN , Während ) des Reinigens wird der Roboter immer automatisch die Ladestation aufsuchen, wenn die Akkuladung niedrig ist. Bei Abschluss der Reinigung ist die Temperatur des Akkus gegebenenfalls sehr hoch, wodurch sich die Aufladezeit verlängert. Tipps für eine längere Lebensdauer des Akkus • Lassen Sie den Adapter nicht für einen längeren Zeitraum angeschlossen. Trennen Sie ihn nach dem Ladevorgang vom Netz. • Gerät nicht in der Nähe von Heizkörpern oder anderen Wärmequellen aufbewahren oder aufladen und von direktem Sonnenlicht fernhalten. • Nicht an verschmutzten oder feuchten Orten aufladen und darauf achten, dass die Raumtemperatur zwischen 15 ºC und 35 ºC liegt. • Akku alle paar Monate vollständig entladen und danach wieder aufladen. Das Gerät zum Entladen des Akkus bei vom Netz getrennter Ladestation ohne Kabel bis zum Stillstand verwenden. Anschließend Akku nach den o.g. Anweisungen aufladen. • Um das Gerät über einen langen Zeitraum zu lagern, wird empfohlen, den Akku vollständig zu laden und ihn dann aus dem Gerät zu nehmen, um ihn an einem kühlen und trockenen Ort zu lagern. VERWENDUNG DES GERÄTS , Dieses Gerät ist ausschließlich zum Reinigen von Böden und Teppichböden ) ) ) ) , , durch Saugen ausgelegt. Dieses Gerät ist für die tägliche Bodenpflege gedacht, sodass es das Auftreten von Flusen und die Schmutzansammlung verhindert. Glühende Asche, Splitter, spitze Gegenstände und Flüssigkeiten dürfen nicht aufgesaugt werden. Saugen Sie auch keine brennenden Streichhölzer oder Zigarettenkippen auf. Saugen Sie auch keine Giftstoffe (Ammoniak...) auf. Entfernen Sie alle Transport- und Verpackungselemente des Gerätes. Verwenden Sie den Staubsaugerroboter nicht zwischen Beistelltischen, Stühlen oder in engen Bereichen, da das Gerät beschädigt werden könnte. Der Staubsaugerroboter benutzt Reinigungsparameter, um wirksam den gesamten Boden zu reinigen: Spiralbewegung für eine gründlichere Reinigung, wenn Schmutz erkannt wurde, Abfahren der Wände zur Reinigung des gesamten Raumumfangs, Zimmerdurchquerungzur Gewährleistung einer vollständigen Reinigung. Der Staubsaugerroboter benötigt ca. 45 Minuten zur Reinigung eines mittelgroßen Raums, wobei er denselben Bereich mehrfach durchläuft, um die Säuberung der gesamten Fläche zu gewährleisten. VERWENDUNG DES GERÄTS 39 de BEDIENUNGSPANEEL DES STAUBSAUGERROBOTERS Ein-/Ausschalten des Staubsaugerroboters Ladetaste: Leuchtet beim Betätigen auf, erlischt, wenn der Roboter an die Ladestation angeschlossen wird. Ladestandsanzeige: Während des Aufladens blinkt sie, nach Beendigung des Aufladens leuchtet sie durchgehend Ultraviolett-Lampe: Leuchtet beim Betätigen auf, die Desinfektionslampe arbeitet, solange der Roboter in Betrieb ist. 1 Entfernen Sie alle Gegenstände vom Boden, die zerbrechen oder den Staubsaugerroboter beschädigen könnten (Lampen, Flaschen...). 2 Sicherstellen, dass der Schmutzbehälter (11) korrekt eingesetzt ist. Siehe auch („REINIGUNG UND INSTANDHALTUNG“). 3 Positionieren Sie den Raumabteiler (4) dort, wenn Sie in einem konkreten Bereich den Durchlauf des Roboters verhindern möchten. Siehe hierzu auch („RAUMABTEILER“). 4 Schalten Sie den Staubsaugerroboter ein. Bringen Sie hierzu den Betriebsschalter (20) in ON-Position. 5 Vergewissern Sie sich, dass der Reinigungsroboter aufgeladen ist. Wenn die Ladestandsanzeige-LED des Bedienungspaneels des Roboters blinkt, laden Sie den Staubsaugerroboter auf. Siehe hierzu („VORBEREITUNG DES GERÄTS. AUFLADEN DES STAUBSAUGERROBOTERS”). 6 Wenn der Staubsaugerroboter im Automatikbetrieb eingesetzt werden soll, programmieren Sie ihn entsprechend über die Fernbedienung. Siehe hierzu („FERNBEDIENUNG“). 7 Drücken Sie auf den Schalter des Roboterpaneels. Der Staubsaugerroboter wird gemäß seinen Reinigungsmustern mit der Arbeit beginnen. Sie können die Bewegungen oder Funktionen über die Schaltflächen der Fernbedienung steuern, siehe hierzu („FERNBEDIENUNG“) oder über die Steuertasten auf dem Gehäusepaneel des Staubsaugerroboters. Zur Sterilisation des vorderen Bereichs die Taste UV drücken. Diese Funktion eignet sich vor allem für Allergiker oder für Haushalte mit Haustieren, da der Boden von Viren und Bakterien befreit wird. 8 Drücken Sie erneut die Taste , um den Reinigungsvorgang kurz zu unterbrechen. 9 Wenn Sie keine programmierte wöchentliche Reinigung wünschen, schalten Sie das Gerät nach der Reinigung aus. Bringen Sie hierzu den Betriebsschalter (20) in die Position OFF oder drücken Sie die Taste Ein/Ausschalten auf der Fernbedienung. 10 Trennen Sie die Ladestation vom Netz. , , , 40 VERWENDUNG DES GERÄTS RAUMABTEILER HAUPTBESTANDTEILE (B) 1B Hauptschalter & Länge der Raumabteiler Aus Geringe Reichweite = 4 m Mittlere Reichweite = 6 m Hohe Reichweite = 8 m 2B 3B 4B 5B 6B LED-Betriebsanzeige Sendekopf zur Annäherungskontrolle Sendekopf des Raumabteilers Batteriefachabdeckung Entriegelung Batterieabdeckung BETRIEB , Benutzen Sie den Raumabteiler, um den Reinigungsbereich des Roboters auf den von ) ) ) , 1 2 3 4 , , 5 6 , Ihnen gewünschten Raum einzuschränken, indem Sie vermeiden, dass der Roboter in nicht notwendige oder unerwünschte Bereiche eindringt. Benutzen Sie ihn dazu, den Zugang zu einem Bereich mit Kabeln oder in ein bestimmtes Zimmer zu verwehren. Positionieren Sie den Raumabteiler auf gleicher Höhe mit der Fläche, auf der Sie den Staubsaugerroboter einsetzen. Positionieren Sie den Raumabteiler und die Ladestation in einem Abstand von mehr als 3 m, anderenfalls kann es zu Störungen kommen. Positionieren Sie die Ladestation nicht innerhalb der Reichweite des Raumabteilersignals. Der Sendekopf für die Annäherungskontrolle (3B) verhindert den Zusammenstoß zwischen Staubsaugerroboter und Raumabteiler, indem er die Annäherung auf einen Abstand von weniger als 0,5-1 m unterbindet. Vergewissern Sie sich, dass der Akku nicht leer ist. Positionieren Sie den Raumabteiler so, dass er den Bereich abgrenzt, in den der Roboter nicht eindringen soll. (Abb. 3). Entfernen Sie Gegenstände, die sich dem Raumabteiler gegenüber befinden, um einen fehlerhaften Betrieb zu vermeiden. Wählen Sie die gewünschte Länge des Raumabteilers aus. Schieben Sie den Schalter (B) und wählen Sie geringe , mittlere oder hohe Reichweite . Verwenden Sie die angemessene Länge zur Abteilung, die Akku-Standzeit hängt von der gewählten Reichweite des Senders ab. Die LED-Betriebsanzeige (2B) blinkt alle 8 Sekunden auf, bis der Akku erschöpft ist. Versichern Sie sich, dass der Staubsaugerroboter die von dem Raumabteiler geschaffene Grenze nicht durchbrechen kann. Bringen Sie den Schalter (B) in die Stellung Ausgeschaltet wenn der Raumabteiler nicht benötigt wird. Aufgund der Bewegung des Roboters während des Betriebs können Richtungsabweichungen des Infrarot-Signals des Raumabteilers und der Empfangsdistanz des Roboters auftreten. Diese Abweichung kann je nach Arbeitsumfeld und dem Belastungsgrad des Roboters und Raumabteilers unterschiedlich sein. RAUMABTEILER 41 de FERNBEDIENUNG BESTANDTEILE (C) 1 2 3 4 Ein/Aus Staubsaugerrobotes Richtungstasten Bestätigungsknopf Steuertasten Inbetriebnahme /Sonntag Vorübergehender Stopp/Montag 5 Display (Abb. 4) a Symbol „Signal senden“ b Programmierte Wochentage c Aktueller Wochentag d Uhrzeit e Fehler-Symbol f Funktionssymbol Konfiguration Uhrzeit/Dienstag Aufladen/Mittwoch Programmierung / Donnerstag Schnelle Reinigung /Freitag Reinigung nach Aufladen/Samstag Langsame Reinigung / täglich PROGRAMMIERUNG Synchronisierung der Fernbedienung mit dem Staubsaugerroboter (Abb. 5) , Synchronisieren Sie die Fernbedienung und den Staubsaugerroboter vor der ersten Benutzung und nach Instandhaltungsarbeiten. Gehen Sie dazu folgendermaßen vor: 1 Vergewissern Sie sich, dass Staubsaugerroboter und Fernbedienung ausreichende Akkuladung aufweisen. 2 Schalten Sie den Staubsaugerroboter aus. Bringen Sie hierzu den Betriebsschalter (20) in die OFF-Position. 3 Halten Sie den Knopf länger als 4 Sekunden gedrückt. Bringen Sie den Betriebsschalter (20) in die ON-Position, ohne dabei die Taste loszulassen. Wenn die Synchronisierung ordnungsgemäß durchgeführt wurde, ertönen am Roboter zwei Pfeiftöne. , Konfiguration Datum und Uhrzeit (Abb. 6) , Um den Betrieb des Roboters zu einem gewünschten Zeitpunkt zu aktivieren, müssen die aktuelle Uhrzeit und der Wochentag eingestellt werden. 1 Drücken Sie die Taste . Gehen Sie zur Einstellung des Wochentages. 2 Drücken Sie die Taste für den aktuellen Wochentag (SU= Sonntag, MO= Montag, TU= Dienstag, WE= Mittwoch, TH= Donnerstag, FR= Freitag, SA= Samstag). 3 Betätigen Sie die Pfeile um sich durch die Felder “Stundenzahl” und “Minuten” zu bewegen. Betätigen Sie die Pfeile , um die derzeitige Stundenzahl und Minuten auszuwählen. 4 Drücken Sie Drücken Sie ) , um die Auswahl zu bestätigen. zum Abbruch der Konfiguration. Programmierung automatische wöchentliche Reinigung (Abb. 7) Bei ausgeschaltetem Staubsaugerroboter. 1 Drücken Sie die Taste der Fernbedienung. 42 FERNBEDIENUNG 2 Drücken Sie die Taste des Wochentags, den Sie programmieren möchten. Wählen Sie einen, mehrere oder alle Wochentage aus. Die ausgewählten Wochentage blinken. 3 Betätigen Sie die Pfeile , um die genaue Uhrzeit der Reinigung zu programmieren. Betätigen Sie die Pfeile „aufwärts” und „abwärts”, um Stundenzahl und Minuten auszuwählen. 4 Drücken Sie , um die Auswahl zu bestätigen. Drücken Sie die Taste Ein/Aus zum Abbruch der Konfiguration. Damit sich der Staubsaugerroboter zum gewünschten Zeitpunkt in Betrieb setzt, muss er eingeschaltet sein. Bringen Sie hierzu den Betriebsschalter (20) in die ON-Position; leuchtet auf. ) ) ZUSÄTZLICHE FUNKTIONEN Funktion FULL GO ) Durch die Auswahl dieser Funktion wird der Staubsaugerroboter programmiert, um nach vollständiger Aufladung die Reinigung fortzusetzen. 1 Drücken Sie die Taste . Der Staubsaugerroboter muss hierbei eingeschaltet sein. Auf dem Display der Fernbedienung leuchtet FULL GO auf. Der Staubsaugerroboter sucht die Ladestation, bevor der Akku erschöpft ist und beginnt die Reinigung automatisch, nachdem er vollständig aufgeladen wurde. , Funktion GESCHWINDIGKEIT 1 Drücken Sie die Taste , um Schnellreinigung zu wählen. Auf dem Display der Fernbedienung leuchtet FAST auf. 2 Drücken Sie die Taste , um Langsamreinigung zu wählen. Auf dem Display der Fernbedienung leuchtet SLOW auf. , , FEHLERCODES Wenn der Roboter aufgrund einer der folgenden Umstände nicht ordnungsgemäß arbeitet, blinken alle Tasten auf dem Bedienungspaneel des Roboters gleichzeitig. 1 Drücken Sie die Taste der Fernbedienung. Vergewissern Sie sich, dass das Signal der Fernbedienung den Arbeitsbereich des Geräts abdeckt. Auf der Anzeige der Fernbedienung erscheint das Fehlersymbol zusammen mit einem der im Anschluss erläuterten Fehlercodes. 2 Führen Sie je nach gezeigtem Fehler die anschließend beschriebenen Maßnahmen durch. , FEHLER CODE STÖRUNGSURSACHE LÖSUNG E01 Sensoren Treppenerkennung Sensoren (27) reinigen E02 Trägerrolle An der Rolle (23) festgesetzten Schmutz und Haare entfernen E03 Akku fast leer Akku laden E04 Seitenräder An den Rädern festgesetzten Schmutz und Haare entfernen E05 Schmutzbehälter Schmutzbehälter (11) richtig einsetzen , Wenn die Störung nach Durchführung dieser Maßnahmen auch weiterhin auftrit, benutzen Sie das Gerät nicht und bringen Sie es zu einem autorisierten Kundendienst. Nehmen Sie keine Änderungen oder Reparaturen am Gerät vor. FERNBEDIENUNG 43 de REINIGUNG UND INSTANDHALTUNG n Bevor Sie irgendeinen Eingriff zur Instandhaltung oder Reinigung des Geräts vornehmen, vergewissern Sie sich, dass sich der Betriebsschalter (20) in der Position OFF befindet und das Gerät nicht an das Netz angeschlossen ist. Vergewissern Sie sich, dass die abgewaschenen Elemente vor dem Einbau vollständig trocken sind. Das Saugmodul (15) nicht in Wasser oder andere Flüssigkeiten tauchen und nicht in der Spülmaschine reinigen. Keine Scheuer- oder Lösungsmittel verwenden. Für eine maximale Leistung des Staubsaugerroboters wird empfohlen, nach dreimaligem Gebrauch den Schmutzbehälter zu entleeren und den Filter zu reinigen. ) ) LEEREN DES SCHMUTZBEHÄLTERS (11) 1 Halten Sie die Entriegelungs-Taste (12) gedrückt. Nehmen Sie den Schmutzbehälter (11) heraus. (Abb. 8) 2 Halten Sie den Behälter über den Mülleimer, öffnen Sie den Filterträger durch Ziehen an der Lasche (14) und entleeren Sie seinen Inhalt in den Mülleimer. (Abb. 9) REINIGUNG UND AUSWECHSELN DES FILTERS (7) ) Es wird empfohlen, den Filter regelmäßig auf einwandfreie Funktion zu überprüfen. Reinigen Sie den Filter, wenn Sie eine Verringerung der Saugleistung feststellen. ) Es empfiehlt sich, den Filter ein- bis zweimal jährlich (je nachdem, wie oft Sie das Gerät 1 2 3 ) 4 5 verwenden) auszuwechseln. Entnehmen Sie den Schmutzbehälter gemäß der Abbildung in „ENTLEEREN DES SCHMUTZBEHÄLTERS (11)“. Trennen Sie den Filter (7). Üben Sie mit einer Hand Druck auf den halbkreisförmigen Träger aus, um den gebrauchten Filter aus dem Träger zu entfernen. (Abb. 10) Schütteln Sie den Ausgangsfilter leicht gegen die Mülleimerwand, damit überschüssiger Schmutz und Staub herausfallen. Benutzen Sie den Staubsaugerroboter nie ohne den Filter (7). Reinigen Sie den Filter mit der Reinigungsbürste (6) (Abb. 11). Bauen Sie den gereinigten Filter oder bei Bedarf einen neuen Filter an den dafür vorgesehenen Ort wieder ein. REINIGUNG DES SCHMUTZBEHÄLTERS (11) 1 Drücken Sie auf die Taste (13). Das Saugmodul (15) wird freigegeben (Abb. 12). 2 Drehen Sie das Saugmodul um, öffnen Sie die zwei Laschen und nehmen Sie die Abdeckung ab. 3 Reinigen Sie das Innere des Behälters mit der Reinigungsbürste (6) (Abb. 13). 4 Reinigen Sie das Saugmodul (15) und die Vorrichtung zum Luftein- und -auslass mit der Reinigungsbürste (Abb. 13). Reinigen Sie das Saugmodul nicht mit Wasser. 5 Setzen Sie den Schmutzbehälter in das Gerätegehäuse ein. Drücken Sie den Behälter gegen das Gehäuse, bis er einrastet. So stellen Sie sicher, dass der Behälter korrekt im Gehäuse befestigt wurde. ) REINIGUNG UND AUSWECHSELN DES MOPPS (9) ) Benutzen Sie den Mopp nicht auf Teppichen, Teppichböden oder Böden, die nicht vollständig glatt sind. 1 In diesen Fällen entfernen Sie den Mopp-Träger (10). Drehen Sie den Mopp-Träger und lösen Sie die Laschen rechts und links (Abb. 14). 44 REINIGUNG UND INSTANDHALTUNG 2 Um den Mopp (9) auszuwechseln, ziehen Sie daran und setzen Sie an einen neuen ein (Abb. 14). AUSBAU UND REINIGUNG DER BÜRSTEN Für eine maximale Leistung des Staubsaugerroboters wird empfohlen, nach dreimaligem Gebrauch die Rollen und Bürsten zu reinigen. Rollen (22) und (23) 1 Ziehen Sie die Lasche nach hinten und heben Sie den Befestigungshebel an (Abb. 15). Die Rollen sind jetzt nicht mehr fixiert. 2 Nehmen Sie die Rollen (22) und (23) heraus. 3 Reinigen Sie die Rollen mit der Reinigungsbürste (6) (Abb. 16). 4 Setzen Sie die Rollen wieder ein und senken Sie den Befestigungshebel, üben Sie Druck aus, bis dieser einrastet und damit die korrekte Befestigung signalisiert. , Seitenbürste (8) , Reinigen Sie regelmäßig die Seitenbürste, um mangelhaften Betrieb des Staubsaugerroboters zu vermeiden. 1 Entfernen Sie mit der Hand Haare und Staub, die sich in der Seitenbürste festgesetzt haben. 2 Wenn der Schmutz sich zu stark in die Bürste verwickelt hat, schneiden Sie ihn mit einer Schere ab. Lösen Sie bei Bedarf die Schraube und nehmen Sie die Seitenbürste (8) aus dem Gehäuse, um sie gründlich zu reinigen (Abb. 17). 3 Setzen Sie die Seitenbürste danach wieder an der gleichen Stelle ein. , ABBAU UND REINIGUNG DER RÄDER Seitenräder 1 Lösen Sie die zwei Schrauben der Räder (Abb. 18). 2 Nehmen Sie die Räder aus ihren Führungen und reinigen Sie sie. Reinigen Sie die Räder nicht mit Wasser, Öl oder Fett. Setzen Sie die Räder wieder in ihre Führung und ziehen Sie die Schrauben mit einem Schraubenzieher an. ) ) Vorderes Rad Falls das vordere Rad blockiert ist oder nicht frei rollt, entfernen Sie es zu seiner Reinigung (Abb. 18). 1 Ziehen Sie mit einem als Hebel eingesetzten Werkzeug an dem Rad. 2 Drücken Sie das Rad zu seinem Wiedereinbau nach der Reinigung in die entsprechende Führung. REINIGUNG UND INSTANDHALTUNG 45 de REINIGUNG DER ANTIKOLLISIONS-SENSOREN (25) UND TREPPENSENSOREN (27) , Sorgen Sie für saubere Infrarot-Strahler, damit der Staubsaugerroboter einwandfrei betrieben werden kann. 1 Reinigen Sie die Sensoren mit einem Baumwoll- oder weichen Tuch (Fig. 19). REINIGUNG DES GERÄTES n Stellen Sie sicher, dass kein Wasser in das Innere des Geräts gelangt. ) Reinigen Sie das Gerät vor der ersten Verwendung, unmittelbar nach jeder Verwendung, und wenn Sie es für längere Zeit nicht benutzt haben. So gewährleisten Sie seinen reibungslosen Betrieb und verlängern seine Lebensdauer. 1 Reinigen Sie die Außenseite des Geräts mit einem feuchten Tuch. Keine Scheueroder Lösungsmittel verwenden. AUSTAUSCH DES AKKUS AUSTAUSCH DER BATTERIEN DES RAUMABTEILERS (Abb. 20) 1 Drehen Sie die Batteriefach-Entriegelung (6B) bis man die Abdeckung (5B) abnehmen kann. 2 Legen Sie die Batterien in das hierfür vorgesehene Fach ein. Überprüfen Sie, das Positiv- und Negativelektroden korrekt ausgerichtet sind. Entnehmen Sie die Batterien, wenn der Staubsauger über einen längeren Zeitraum nicht benutzt wird. , AUSTAUSCH DER BATTERIEN DER FERNBEDIENUNG (Abb. 21) 1 Öffnen Sie den Deckel des Batteriefachs. 2 Legen Sie die Batterien in das hierfür vorgesehene Fach ein. Überprüfen Sie, dass Positiv- und Negativelektroden korrekt ausgerichtet sind. Entnehmen Sie die Batterien, wenn der Staubsauger über einen längeren Zeitraum nicht benutzt wird. , 46 AUSTAUSCH DES AKKUS . PORTUGUÊS ATENÇÃO • Leia completamente estas instruções antes de utilizar o aparelho. • Este manual é parte integrante do produto. Guarde-o em lugar seguro para eventual consulta posterior. • Este aparelho destina-se apenas à utilização doméstica, não industrial. Qualquer utilização diferente da indicada poderia ser perigosa (por exemplo, aspiração de líquidos, pó de obras, cimento, etc.). • As crianças devem ser supervisionadas para assegurar que não brincam com o aparelho. • Este aparelho não está destinado para as pessoas (incluindo crianças) que apresentem capacidades físicas, sensoriais ou mentais reduzidas, ou falta de experiência e conhecimento, excepto se forem supervisionadas ou receberam instruções sobre a utilização do aparelho por uma pessoa responsável pela sua segurança. • Não realize qualquer modificação nem reparação ao aparelho. Perante qualquer anomalia no cabo ou noutra parte do aparelho, não o utilize e contacte um serviço de assistência autorizado. • Não utilize peças ou acessórios que não tenham sido fornecidos ou recomendados pela SOLAC. • Antes de ligar o aparelho à rede eléctrica, verifique se a tensão indicada é igual à da sua residência. • Desligue o aparelho da corrente antes de desmontar ou montar peças e de realizar qualquer tarefa de manutenção ou limpeza. Desligue-o também em caso de corte de energia. • Não puxe o aparelho pelo cabo. Desligue o aparelho da tomada puxando sempre pela ficha, nunca pelo cabo. • Evite que o cabo de ligação entre em contacto com arestas cortantes ou superfícies quentes. Não permita que o cabo fique pendurado na borda da mesa, ou no tampo, de forma a evitar que as crianças puxem pelo mesmo e façam cair o aparelho. d • • • • • • • • • • Não submirja nunca o aparelho em água ou em outro líquido, nem o introduza na máquina de lavar loiça. Não agarre no aspirador nem na ficha com as mãos molhadas. Mantenha o seu robô aspirador afastado de focos de calor. Nunca utilize o robô aspirador sem o depósito de sujidade ou o filtro de protecção correctamente colocado. Mantenha sempre o módulo de aspiração desobstruído. Mantenha o cabelo, a roupa, os dedos ou qualquer outra parte do corpo longe do módulo de aspiração, dos rolos e das rodas. Não utilize o aspirador para limpar animais. Não utilize o aparelho em espaços fechados onde se acumulem vapores explosivos ou tóxicos. Não utilize o aparelho sobre superfícies molhadas nem no exterior. Verifique de vez em quando o estado do adaptador, do cabo e da ligação. Evite possíveis salpicos na base de carregamento, no adaptador ou no cabo de ligação. ATENÇÃO 47 pt • Não utilize a base de carregamento nem o adaptador perto de banheiras, lavatórios, duches e outros recipientes que contenham água, enquanto estiverem a ser utilizados. • Utilize unicamente o adaptador fornecido. • Não toque no adaptador nem na base de carregamento com as mãos húmidas quando estiverem ligados à corrente. • Nunca deixe o adaptador ou a base de carregamento a funcionar sobre uma superfície ou um pano húmido. • Não se sente sobre o aparelho nem se coloque à frente dele, pois poderá causar danos materiais no aparelho. • Verifique se não existem no chão fios, cabos ou outros objectos de comprimento superior a 150 mm, uma vez que podem entrelaçar-se nos rolos. ATENÇÃO!!: Quando pretender desfazer-se do aparelho, NUNCA o deite no caixote do lixo, faça-o no seu ECOPONTO ou no ponto de recolha de resíduos mais perto de sua casa, para o seu posterior tratamento. Desta forma, está a contribuir para a protecção do meio ambiente. q COMPONENTES PRINCIPAIS 1 2 3 4 5 6 7 8 9 10 11 12 13 14 15 Corpo principal Comando à distância Base de carregamento automático Isolador de espaços Adaptador Escova de limpeza Filtro (duas unidades) Escova lateral (duas unidades) Mopa Acessório mopa Depósito sujidade Botão desbloqueio depósito de sujidade Botão desbloqueio módulo de aspiração Patilha filtro Módulo aspiração 16 17 18 19 20 21 22 23 24 25 26 27 28 29 Sensor infravermelhos Asa Pára-choques frontal Conector adaptador bateria Interruptor de funcionamento Painel botões de controlo Rolo de borracha Rolo central Rodas laterais Sensores anti-choque Conectores de contacto com a base de carregamento Sensores detector escada Roda dianteira Luz UV PREPARAÇÃO DO APARELHO. RECARREGAMENTO DO ROBÔ DE ASPIRAÇÃO n Utilize apenas o adaptador e a base de carregamento fornecidos, não utilize qualquer , 48 outro. O tempo de carregamento é de aproximadamente 5 horas para 60/90 min. de autonomia. Para o primeiro carregamento, carregue a bateria durante toda a noite. COMPONENTES PRINCIPAIS COMPONENTES PRINCIPAIS DA BASE DE CARREGAMENTO (A) 1A 2A 3A 4A LED decorativo Interruptor LED decorativo Sinal de transmissão LED de ligação 5A Indicador de carga 6A Conectores de contacto 7A Conector adaptador CARREGAMENTO ATRAVÉS DA BASE DE CARREGAMENTO (Fig. 1) ) Não coloque nenhum objecto e evite a existência de obstáculos ou móveis à volta da base de carregamento (Veja as distâncias recomendadas na figura). ) O robô não encontrará a base de carregamento caso existam obstáculos. Coloque a base de carregamento numa área desobstruída. ) O robô não encontrará a base de carregamento se o transmissor do sinal (3A) de 1 2 3 , ) 4 5 ) , infravermelhos estiver tapado. Coloque a base de carregamento sobre um piso limpo e contra uma parede vertical. Ligue o adaptador ao conector (7A) da base de carregamento. Ligue o adaptador à rede eléctrica. O LED de ligação (4A) acende-se em vermelho. Coloque correctamente o cabo do carregador ao longo da parede, caso contrário o robô pode enrolar-se nele. Pressione o botão de controlo do comando à distância ou o botão do painel de controlo do robô. O robô aspirador procurará a base de carregamento se estiver a uma distância adequada, e ligar-se-á à mesma. Se, durante a procura, pretender cancelar a ordem de carregamento, pressione novamente o botão de controlo ou do comando à distância. O robô aspirador parará. Assegure-se de que ligou correctamente os conectores do robô (26) aos conectores (6A) da base de carregamento. Durante o carregamento, os Indicadores de carga da base de carregamento (5A) e do painel de controlo piscam. Uma vez finalizado o carregamento, o indicador de carga (5A) da base de carregamento apaga-se e o do painel de controlo fica aceso permanentemente. O aparelho fica pronto a ser utilizado. , Não desligue a base de carregamento durante a limpeza, o robô aspirador voltará a ela para carregar-se se o nível de carga da bateria baixar demasiado. Se desejar, pode colocar uma pequena quantidade da essência que pretender no centro do LED decorativo (1A). 6 Pressione o interruptor (2A). O LED (1A) acende-se. Quando aquecer, sairá a fragrância da essência colocada no seu interior. Algumas essências podem danificar a superfície de plástico. Antes de utilizar a essência, assegure-se de que esta não vai danificar a superfície. , ) CARREGAMENTO SEM BASE DE CARREGAMENTO (Fig. 2) 1 Ligue o cabo do adaptador directamente ao conector (19) do corpo do robô aspirador. 2 Ligue o adaptador à rede eléctrica. Durante o carregamento, o LED indicador de carga do painel de controlo do robô piscará e ficará fixo depois de terminado o carregamento. Durante o carregamento directo através do cabo, o robô não poderá ser utilizado. 3 Após o carregamento, desligue o adaptador da rede e desligue o cabo do conector (19). O aparelho fica pronto a ser utilizado. , , RECARREGAMENTO DO ROBÔ DE ASPIRAÇÃO 49 pt 
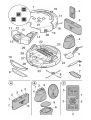
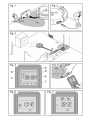
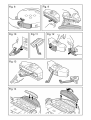
) Durante o carregamento, o adaptador aquece ligeiramente. Isto é normal, a não ser que o aquecimento seja muito elevado. CARREGAMENTO AUTOMÁTICO , Durante a limpeza, o robô procurará a base de carregamento automaticamente se a ) carga da bateria estiver baixa. Quando terminar a limpeza, a temperatura da bateria pode ser muito alta e o tempo de carregamento pode ser maior. Recomendações para prolongar a vida das baterias • Não deixe o adaptador ligado durante longos períodos de tempo. Desligue-o quando o carregamento acabar. • Não guarde nem carregue o aparelho próximo de radiadores ou outras fontes de calor, ou exposto à luz solar directa. • Não carregue o aparelho em locais sujos ou húmidos, e tente que a temperatura ambiente esteja compreendida entre 15ºC e 35ºC. • De tempos a tempos (poucos meses), descarregue completamente as baterias e em seguida volte a carregá-las. Para descarregá-las, faça funcionar o aparelho sem o cabo até parar e com a base de carregamento desligada. Carregue depois as baterias como se explica anteriormente. • Para guardar o aparelho durante um longo período de tempo, recomenda-se que carregue a bateria completamente e posteriormente retire-a para guardar num local fresco e seco. UTILIZAÇÃO DO APARELHO , Este aparelho foi concebido exclusivamente para limpar pisos e tapetes por ) ) ) ) , , 50 aspiração. Este aparelho está pensado para a manutenção diário do piso, evitando o aparecimento de cotão e a acumulação de sujidade. Não aspire nunca cinzas acesas, lascas ou objectos com pontas agudas, nem líquidos. Não aspire fósforos nem cigarros acesos. Também não aspire materiais tóxicos (amoníaco, etc.). Retire completamente todos os elementos que serviram para o transporte e embalagem. Não utilize o robô aspirador entre mesas pequenas, cadeiras ou espaços muito pequenos, pois pode danificar o aparelho. O robô aspirador utiliza uns parâmetros de limpeza para limpar eficazmente a totalidade do piso: Movimento em espiral para uma limpeza mais intensa onde detectou sujidade, contorno de paredes para limpar o perímetro da divisão, cruzamento de habitação para assegurar uma limpeza completa. O robô aspirador demora aproximadamente 45 minutos a limpar uma divisão de tamanho médio, passando sobre a mesma zona várias vezes para assegurar a limpeza de toda a superfície. UTILIZAÇÃO DO APARELHO PAINEL DE CONTROLO DO ROBÔ ASPIRADOR Colocação em funcionamento/Paragem do robô aspirador Botão de carregamento: Acende-se ao pressionar, apaga-se quando o robô se liga à base de carregamento. Indicador de carga: Durante o carregamento pisca, depois de terminado o carregamento fica aceso permanentemente Luz Ultravioleta: Acende-se ao pressionar, a luz de desinfecção actuará enquanto o robô estiver a funcionar. 1 Retire do chão todos os objectos que possam partir ou danificar o robô aspirador (luzes, garrafas, etc.). 2 Verifique se o depósito de sujidade (11) está correctamente colocado. Veja a secção (“LIMPEZA E CONSERVAÇÃO”). 3 Coloque o isolador de espaços (4) onde desejar para evitar que o robô passe por uma determinada zona. Veja a secção (“ISOLADOR DE ESPAÇOS”). 4 Coloque o robô aspirador em funcionamento. Para isso, coloque o interruptor de funcionamento (20) na posição ON. 5 Assegure-se de que o robô de limpeza está carregado. Se o LED indicador de carga do painel de controlo do robô piscar, coloque o robô aspirador a carregar. Veja a secção (“PREPARAÇÃO DO APARELHO. RECARREGAMENTO DO ROBÔ DE ASPIRAÇÃO”). 6 Se pretender utilizar o robô aspirador no modo automático, programe o seu funcionamento através do comando à distância. Veja a secção (“COMANDO À DISTÂNCIA”). 7 Pressione o botão do painel do robô. O robô aspirador começará a trabalhar de acordo com os seus padrões de limpeza. Se desejar, controle os seus movimentos ou funções através dos botões do comando à distância. Veja a secção (“COMANDO À DISTÂNCIA”) ou através dos botões de controlo no painel do corpo do robô aspirador. Se desejar uma esterilização da área frontal, pressione a tecla UV. Esta função está especialmente indicada para pessoas com alergias ou para os locais onde vivam animais domésticos, uma vez que esteriliza o chão de vírus e bactérias. 8 Pressione novamente o botão para parar temporariamente o processo de limpeza. 9 Se não desejar uma limpeza semanal programada, desligue o aparelho após a limpeza. Para isso, coloque o interruptor de funcionamento (20) na posição OFF ou pressione o botão ligado/desligado do comando à distância. 10 Desligue a base de carregamento da rede. , , , UTILIZAÇÃO DO APARELHO 51 pt ISOLADOR DE ESPAÇOS COMPONENTES PRINCIPAIS (B) 1B Interruptor Ligado & Comprimento do isolador de espaços Desligado Alcance baixo = 4 m Alcance médio = 6 m Alcance alto = 8 m 2B LED de ligação 3B Cabeça de transmissão de proximidade 4B Cabeça de transmissão do isolador de espaços 5B Tampa do compartimento das baterias 6B Desbloqueio da tampa das baterias FUNCIONAMENTO , Utilize o isolador de espaços para limitar a área de limpeza do robô à zona que deseja, ) ) ) , 1 2 3 4 , , 5 6 , 52 evitando que o robô entre em zonas desnecessárias ou não desejadas. Utilize-o para evitar a sua entrada numa zona com cabos, ou numa divisão concreta. Coloque o isolador de espaços ao mesmo nível na superfície onde vai utilizar o robô aspirador. Coloque o isolador de espaços e a base de carregamento a uma distância superior a 3 m, caso contrário poderá haver interferência. Não coloque a base de carregamento dentro do alcance do sinal do isolador de espaços. A cabeça de transmissão de proximidade (3B) evita o impacto entre o robô de aspiração e o isolador de espaços, impedindo que se aproxime a uma distância inferior a 0,5-1 m. Assegure-se de que as baterias não estão descarregadas. Coloque o isolador de espaços delimitando a zona na qual não deseja que entre. (Fig. 3). Retire os objectos que se encontrem à frente do isolador de espaços para evitar um mau funcionamento. Escolha o comprimento desejado do isolador de espaços. Para isso, desloque o interruptor (B) escolhendo alcance baixo , médio ou alto . Utilize o comprimento adequado do isolador, a duração da bateria depende da distância de transmissão seleccionada. O LED de ligação (2B) piscará a cada 8 segundos até que a bateria acabe. Verifique se o robô aspirador não consegue atravessar a fronteira criada pelo isolador de espaços. Coloque o interruptor (B) na posição de desligado quando o isolador de espaços não for necessário. Podem criar-se algumas diferenças na direcção do sinal de infravermelhos do isolador de espaços e na distância de recepção do robô, devido ao movimento do robô durante a sua utilização. Esta diferença pode variar dependendo do ambiente de trabalho, do nível de carga do robô e do isolador de espaços. ISOLADOR DE ESPAÇOS COMANDO À DISTÂNCIA COMPONENTES (C) 1 2 3 4 Ligar/desligar robô aspirador 5 Botões direcção Botão de confirmação Teclas de controlo Colocação em funcionamento/domingo Paragem provisória/segunda-feira Visor (fig. 4) a Ícone “transmitindo sinal” b Dias da semana programados c Día actual de la semana d Hora e Ícone erro f Ícone funções Configuração hora/terça-feira Carregamento/quarta-feira Programação/quinta-feira Limpeza rápida/sexta-feira Limpeza após o carregamento/ Limpeza lenta/todos os dias PROGRAMAÇÃO pt Sincronização do comando à distância e do robô aspirador (fig. 5) , Sincronize o comando à distância e o robô aspirador antes da primeira utilização e após as tarefas de manutenção. Para isso: 1 Verifique se o robô aspirador e o comando à distância têm bateria suficiente. 2 Desligue o robô aspirador. Para isso, coloque o interruptor de funcionamento (20) na posição OFF. 3 Pressione o botão durante mais de 4 segundos. Volte a colocar o interruptor de funcionamento (20) na posição ON sem libertar o botão . Quando a sincronização estiver correctamente efectuada, o robô emitirá dois sinais sonoros. , Configuração da data e hora (fig. 6) , É necessário memorizar a hora e o dia da semana actual para que o robô comece a 1 2 3 4 ) trabalhar na altura esperada. Pressione o botão . Acede-se ao ajuste do dia da semana. Pressione o botão do dia correspondente ao dia da semana actual (SU= domingo, MO= segunda-feira, TU= terça-feira, WE= quarta-feira, TH= quinta-feira, FR= sexta-feira, SA= sábado). Pressione as setas para deslocar-se pelos campos “hora” e “minutos”. Pressione as setas para seleccionar a hora e os minutos actuais. Pressione para confirmar a selecção. Pressione se desejar cancelar a configuração. Programação da limpeza semanal automática (fig. 7) Com o robô aspirador desligado. 1 Pressione o botão do comando à distância. 2 Pressione o botão do dia correspondente ao dia da semana que deseja programar. Seleccione um, vários ou todos os dias da semana. Os dias seleccionados piscam. 3 Pressione as setas para programar a hora exacta de limpeza. Pressione as setas “para cima” e “para baixo” para seleccionar a hora e minutos. COMANDO À DISTÂNCIA 53 4 Pressione para confirmar a selecção. Pressione o botão ligar/desligar se desejar cancelar a configuração. Para que o robô aspirador funcione na altura esperada, este deve estar ligado. O interruptor de funcionamento (20) na posição ON e aceso. ) ) FUNÇÕES ADICIONAIS Função FULL GO ) Seleccionando esta função o robô aspirador ficará programado para continuar a limpar depois de estar completamente carregado. 1 Pressione o botão . O robô aspirador deve estar ligado. Acender-se-á FULL GO no visor do comando à distância. O robô aspirador procurará a base de carregamento antes de acabar a bateria e começará a limpar automaticamente quando estiver completamente carregado. , Função VELOCIDADE 1 Pressione o botão para escolher limpeza rápida. Acender-se-á FAST no visor do comando à distância. 2 Pressione o botão para escolher limpeza lenta. Acender-se-á SLOW no visor do comando à distância. , , CÓDIGOS DE ERRO Se o robô não funcionar correctamente devido a uma das seguintes circunstâncias, todos os botões do painel de controlo do robô piscarão simultaneamente. 1 Pressione o botão do comando à distância. Assegure-se de que o sinal do comando à distância está no campo de acção do aparelho. No ecrã do comando à distância aparecerá o ícone de erro junto a um dos códigos de erro descritos a seguir. 2 Realize as acções descritas a seguir de acordo com o erro mostrado. , CÓDIGO CAUSA DA AVARIA ERRO RESOLUÇÃO E01 Sensores detector escada Limpe os sensores (27) E02 Rolo central Retire a sujidade e os cabelos presos no rolo (23) E03 Bateria fraca Carregue a bateria E04 Rodas laterais Retire a sujidade e os cabelos presos nas rodas E05 Depósito de sujidade Coloque correctamente o depósito de sujidade (11) , Se a avaria persistir depois de fazer estas verificações, não utilize o aparelho e recorra a um serviço de assistência autorizado. Não realize qualquer modificação nem reparação ao aparelho. 54 COMANDO À DISTÂNCIA LIMPEZA E CONSERVAÇÃO n Antes de qualquer operação de manutenção ou limpeza do aparelho, assegure-se de que o interruptor de funcionamento (20) se encontra na posição OFF e de que não se encontra ligado à rede. Assegure-se de que os elementos lavados estão completamente secos antes de montá-los. Não mergulhe nunca o módulo de aspiração (15) em água ou em outro líquido, nem o introduza na máquina de lavar loiça. Não utilize produtos abrasivos nem dissolventes. Para uma maior eficácia do robô aspirador, aconselha-se esvaziar o depósito de sujidade e limpar o filtro a cada 3 utilizações. ) ) ESVAZIAMENTO DO DEPÓSITO DE SUJIDADE (11) 1 Mantenha pressionado o botão de desbloqueio (12). Retire o depósito de sujidade (11). (Fig. 8) 2 Coloque o depósito sobre o balde do lixo, abra o suporte do filtro puxando pela patilha (14) e esvazie o seu conteúdo sobre o balde do lixo. (Fig. 9) LIMPEZA E SUBSTITUIÇÃO DO FILTRO (7) ) Recomenda-se ) 1 2 3 ) 4 5 verificar o filtro periodicamente para comprovar o correcto funcionamento. Realize uma limpeza do filtro se detectar uma diminuição na capacidade de sucção do aparelho. Recomenda-se a substituição do filtro uma ou duas vezes por ano, dependendo da intensidade de utilização do aparelho. Retire o depósito de sujidade tal como mostrado na secção “ESVAZIAMENTO DO DEPÓSITO DE SUJIDADE (11)” Separe o filtro (7). Pressione o suporte semicircular com uma mão para retirar o filtro usado do suporte. (Fig. 10) Sacuda suavemente o filtro de saída contra a parede do balde do lixo para desprender o excesso de sujidade e pó. Nunca utilize o robô aspirador sem o filtro (7). Limpe o filtro com a escova de limpeza (6) (fig. 11). Volte a colocar no seu alojamento o filtro limpo ou, se necessário, um filtro novo. LIMPEZA DO DEPÓSITO DE SUJIDADE (11) 1 2 3 4 Pressione o botão (13). O módulo de aspiração (15) é libertado (fig. 12). Vire o módulo de aspiração, liberte as duas patilhas e retira a tampa. Limpe o interior do depósito com a escova de limpeza (6) (fig. 13). Limpe o módulo de aspiração (15) e o dispositivo de entrada e saída de ar com a escova de limpeza (fig. 13). Não limpe o módulo de aspiração com água. 5 Coloque o depósito de sujidade no corpo do aparelho. Empurre o depósito contra o corpo até ouvir um estalido indicador de que o depósito ficou correctamente fixado ao corpo. ) LIMPEZA E SUBSTITUIÇÃO DA MOPA (9) ) Não utilize a mopa sobre carpetes, tapetes ou pavimentos que não sejam completamente lisos. 1 Nestes casos, retire o suporte mopa (10). Rode o suporte mopa e desengate as patilhas direita e esquerda (fig. 14). LIMPEZA E CONSERVAÇÃO 55 pt 2 Para substituir a mopa (9) puxe-a e coloque uma nova no seu lugar (fig. 14). DESMONTAGEM E LIMPEZA DAS ESCOVAS Para uma maior eficácia do robô aspirador, aconselha-se limpar os rolos e as escovas a cada 3 utilizações. Rolos (22) e (23) 1 Deslize a patilha até atrás e levante a alavanca de fixação (fig. 15). Os rolos são libertados. 2 Retire os rolos (22) e (23). 3 Limpe os rolos com a escova de limpeza (6) (fig. 16). 4 Coloque novamente os rolos e coloque a alavanca de fixação, pressionando até ouvir um estalido indicador de que estão correctamente fixados. , Escova lateral (8) , Limpe a escova lateral com regularidade para evitar o mau funcionamento do robô aspirador. 1 Retire com as mãos os cabelos e o pó que tenham ficado presos na escova lateral. 2 Se a sujidade tiver ficado muito entranhada na escova, corte-a com uma tesoura. Se necessário, desaperte o parafuso e retire a escova lateral (8) do corpo para uma limpeza mais eficaz (fig. 17). 3 Volte a colocar a escova lateral no seu alojamento. , DESMONTAGEM E LIMPEZA DAS RODAS Rodas Laterais 1 Desaperte os dois parafusos das rodas (fig. 18). 2 Retire as rodas do seu alojamento e limpe-as. Não limpe as rodas com água, óleo ou gordura. Coloque novamente as rodas no seu alojamento e aperte os parafusos com a ajuda de uma chave de fendas. ) ) Roda frontal Se a roda frontal tiver ficado presa ou não rodar livremente, extraia-a para limpar (fig. 18). 1 Puxe a roda com a ajuda de alguma ferramenta que sirva de alavanca. 2 Para voltar a colocá-la após a sua limpeza, pressione a roda no seu alojamento. LIMPEZA DOS SENSORES ANTI-CHOQUE (25) E SENSORES DE ESCADA (27) , Mantenha os infravermelhos limpos para que o robô aspirador possa funcionar correctamente. 1 Limpe os sensores com um algodão ou um pano suave (fig. 19). LIMPEZA DO APARELHO n Assegure-se de que não entra água no interior do aparelho. ) Limpe o aparelho antes da primeira utilização, imediatamente após cada utilização e após um longo período de tempo sem usar. Assim assegurará um funcionamento correcto do mesmo e prolongará a sua vida útil. 1 Limpe o exterior do aparelho com um pano húmido. Não utilize produtos abrasivos nem dissolventes. 56 LIMPEZA E CONSERVAÇÃO SUBSTITUIÇÃO DAS BATERIAS SUBSTITUIÇÃO DAS BATERIAS DO ISOLADOR DE ESPAÇOS (Fig. 20) 1 Rode o desbloqueio da tampa das baterias (6B) até que a tampa se liberte (5B). 2 Coloque as baterias no compartimento destinado a esse fim. Verifique se os eléctrodos positivos e negativos se encontram na posição correcta. Retire as baterias se não for utilizar o aspirador durante um longo período de tempo. , SUBSTITUIÇÃO DAS BATERIAS DO COMANDO À DISTÂNCIA (Fig. 21) 1 Abra a tampa do compartimento das baterias. 2 Coloque as baterias no compartimento destinado a esse fim. Verifique se os eléctrodos positivos e negativos se encontram na posição correcta. Retire as baterias se não for utilizar o aspirador durante um longo período de tempo. , pt SUBSTITUIÇÃO DAS BATERIAS 57 . ITALIANO ATTENZIONE • Leggere le presenti istruzioni in ogni loro parte prima di utilizzare l'apparecchio. • Il presente manuale è parte integrante del prodotto. Conservarlo in un luogo sicuro per poterlo consultare in futuro. • Il presente apparecchio è destinato unicamente all'uso domestico e non industriale. Per evitare pericoli, non utilizzare l'apparecchio per scopi diversi da quelli a cui è destinato (ad esempio aspirazione di liquidi, calcinacci, cemento ecc.) • Assicurarsi che i bambini non giochino con l'apparecchio. • L’apparecchio non è indicato per essere utilizzato da persone (bambini compresi) con capacità fisiche, sensoriali o mentali ridotte e prive dell'esperienza e delle conoscenze necessarie, a meno che non abbiano ricevuto una supervisione o istruzioni relative all’uso dell’apparecchio stesso da una persona responsabile della loro sicurezza. • Non apportare modifiche né riparazioni di sorta all’apparecchio. In presenza di qualunque anomalia del cavo o di qualsiasi altra parte dell’apparecchio, non utilizzarlo e consultare un servizio di assistenza autorizzato. • Non usare pezzi o accessori non forniti o non raccomandati da SOLAC. • Prima di collegare l’apparecchio alla rete elettrica, verificare che il voltaggio indicato coincida con quello della sua abitazione. • Spegnere e scollegare l'apparecchio dalla rete elettrica prima di smontarne o montarne dei pezzi o svolgere qualsiasi attività di manutenzione o pulizia. Scollegare l'apparecchio dalla rete elettrica anche in caso di black-out. • Non utilizzare il cavo per appendere l'apparecchio. Scollegare l’apparecchio dalla rete elettrica impugnando sempre la spina e non il cavo di alimentazione. • Evitare che il cavo entri in contatto con schegge taglienti o superfici calde. Non lasciare il cavo sospeso dal bordo di tavoli o ripiani; i bambini potrebbero tirarlo e far cadere l'apparecchio. d Non immergere mai l'apparecchio in acqua, in altri liquidi o in lavastoviglie. • Non toccare l'aspirapolvere o la spina con le mani bagnate. • Tenere il robot aspirapolvere lontano da fonti di calore. • Non utilizzare mai il robot aspirapolvere senza il contenitore per la polvere o il filtro di protezione correttamente posizionati. • Fare in modo che il modulo di aspirazione sia sempre libero. • Non avvicinare capelli, abiti, dita o altre parti del corpo al modulo di aspirazione, ai rulli e alle ruote. • Non utilizzare l'aspirapolvere per la pulizia degli animali. • Non utilizzare l'apparecchio in spazi chiusi in cui possano accumularsi vapori esplosivi o tossici. • Non utilizzare mai l'apparecchio su superfici umide e all'aperto. • Verificare periodicamente lo stato dell'adattatore, del cavo e del collegamento. • Evitare possibili schizzi sulla base di ricarica, sull'adattatore o sul cavo di alimentazione. • Non utilizzare la base di ricarica e l'adattatore in prossimità di vasche da bagno, lavabi, docce o altri recipienti contenenti acqua durante l'uso. • Utilizzare solo l'adattatore fornito in dotazione. 58 ATTENZIONE • Non toccare l'adattatore e la base di ricarica con le mani umide quando sono collegati alla rete elettrica. • Non lasciare mai l'adattatore e la base di ricarica in funzione su una superficie umida o su un panno umido. • Non sedersi sopra l'apparecchio né posizionarsi davanti a esso per non danneggiarlo. • Verificare che sul pavimento non vi siano fili, cavi o altri oggetti di lunghezza superiore a 150 mm, poiché potrebbero bloccare i rulli. ATTENZIONE: Non smaltire MAI l'apparecchio insieme ai rifiuti domestici. Portarlo presso il CENTRO DI SMALTIMENTO o di raccolta più vicino perché possa essere smaltito adeguatamente. In questo modo si contribuirà alla tutela dell'ambiente. q COMPONENTI PRINCIPALI 1 2 3 4 5 6 7 8 9 10 11 12 13 14 15 Corpo principale Telecomando Base di ricarica automatica Isolatore di spazi Adattatore Spazzola per la pulizia Filtro (due unità) Spazzola laterale (due unità) Straccio Accessorio straccio Contenitore per la polvere Pulsante di sblocco del contenitore per la polvere Pulsante di sblocco del modulo di aspirazione Linguetta filtro Modulo di aspirazione 16 17 18 19 20 21 22 23 24 25 26 27 28 29 Sensore infrarossi Manico Paraurti anteriore Connettore adattatore batteria Interruttore di funzionamento Pannello di controllo Rullo di gomma Rullo centrale Ruote laterali Sensori antiurto Connettori di contatto sulla base di ricarica Sensori rilevamento scala Ruota anteriore Lampada UV PREPARAZIONE DELL'APPARECCHIO. RICARICA DEL ROBOT ASPIRAPOLVERE n Utilizzare esclusivamente l'adattatore e la base di ricarica forniti in dotazione. , Il tempo di ricarica è di circa 5 ore per 60/90 minuti di autonomia.. Per la prima ricarica, caricare la batteria per tutta la notte. COMPONENTI PRINCIPALI DELLA BASE DI RICARICA (A) 1A 2A 3A 4A LED decorativo Interruttore LED decorativo Segnale di trasmissione LED di accensione 5A Spia di ricarica 6A Connettori di contatto 7A Connettore adattatore CARICA MEDIANTE LA BASE DI RICARICA (Fig. 1) ) Non posizionare oggetti ed evitare che vi siano ostacoli o mobili intorno alla base di ricarica (vedere le distanze consigliate nella figura). ) Il robot non rileverà la base di ricarica se vi sono degli ostacoli. Collocare la base di ricarica in un'area libera. ) Il robot non rileverà la base di ricarica se il trasmettitore del segnale (3A) a infrarossi è chiuso. COMPONENTI PRINCIPALI 59 it 1 Collocare la base di ricarica su un'area pulita e addossata a una parete. 2 Collegare l'adattatore al connettore (7A) sulla base di ricarica. 3 Collegare l'adattatore alla rete elettrica. Il LED di accensione (4A) diventerà rosso. Posizionare correttamente il cavo del caricatore lungo la parete, altrimenti il robot potrebbe attorcigliarvisi. 4 Premere il pulsante di controllo sul telecomando o il pulsante sul pannello di controllo del robot. Il robot aspirapolvere cercherà la base di ricarica se si trova a una distanza adeguata e si collegherà a essa. 5 Se durante la ricerca si desidera annullare la ricarica, premere di nuovo il pulsante di controllo oppure il pulsante sul telecomando. Il robot aspirapolvere si arresterà. Verificare che i connettori del robot (26) siano collegati correttamente ai connettori (6A) sulla base di ricarica. Durante la ricarica, le spie di ricarica sulla base di ricarica (5A) e sul pannello di controllo lampeggiano. Al termine della ricarica, la spia di ricarica (5A) sulla base di ricarica si spegne e quella sul pannello di controllo si illumina in modo fisso. L'apparecchio è ora pronto per l'uso. , ) ) , , Non scollegare la base di ricarica durante la pulizia. Il robot aspirapolvere tornerà alla base per ricaricarsi se il livello di carica della batteria si riduce notevolmente. Se lo si desidera, è possibile versare una piccola quantità di essenza al centro del LED decorativo (1A). 6 Premere l'interruttore (2A). Il LED (1A) si illumina. Quando si sarà riscaldato, la fragranza dell'essenza posta al suo interno si diffonderà nell'aria. Alcune essenze possono danneggiare la superficie di plastica. Assicurarsi che l'essenza non danneggerà la superficie prima di utilizzarla. , ) CARICAMENTO SENZA LA BASE DI RICARICA (Fig. 2) 1 Collegare il cavo dell'adattatore direttamente al connettore (19) sul corpo del robot aspirapolvere. 2 Collegare l'adattatore alla rete elettrica. Durante la ricarica, la spia di carica LED sul pannello di controllo del robot lampeggia e diventa fissa al termine della ricarica. Durante la ricarica diretta tramite il cavo, non sarà possibile utilizzare il robot. 3 A ricarica terminata, scollegare l'adattatore dalla rete elettrica, quindi il cavo dal connettore (19). L'apparecchio è ora pronto per l'uso. In fase di ricarica, l’adattatore si riscalda leggermente. Si tratta di una condizione normale, a meno che il riscaldamento non risulti particolarmente elevato. , , ) RICARICA AUTOMATICA , Durante la pulizia, il robot cercherà sempre la base di ricarica automaticamente se il livello della batteria è basso. ) Al termine della pulizia, la temperatura della batteria può risultare particolarmente elevata, per questo la durata della ricarica può essere maggiore. Consigli per prolungare la durata delle batterie • Non lasciare l’adattatore collegato per lunghi periodi di tempo. Scollegarlo a caricamento ultimato. 60 RICARICA DEL ROBOT ASPIRAPOLVERE • Non riporre né ricaricare l’apparecchio nei pressi di caloriferi o altre fonti di calore o esposto a luce solare diretta. • Non ricaricare l'apparecchio in luoghi sporchi o umidi e assicurarsi, per quanto possibile, che la temperatura circostante sia compresa tra 15 e 35 °C. • A intervalli regolari di alcuni mesi, lasciare scaricare completamente le batterie e ricaricarle. Per scaricarle, lasciar funzionare l'apparecchio senza il cavo fino a quando non si arresta e con la base di ricarica scollegata. Ricaricare quindi le batterie come indicato in precedenza. • Per conservare l'apparecchio per un lungo periodo, si consiglia di caricare completamente la batteria e poi di rimuoverla per conservarla in un luogo fresco e asciutto. UTILIZZO DELL'APPARECCHIO , L'apparecchio è stato progettato esclusivamente per pulire pavimenti, moquette ) ) ) ) , , e tappeti mediante aspirazione. È stato creato per la pulizia quotidiana dei pavimenti al fine di evitare la formazione di lanugine e l'accumulo di sporco. Non aspirare mai cenere accesa, schegge, oggetti appuntiti o liquidi. Non aspirare fiammiferi accesi o mozziconi. Non aspirare materiali tossici, (es. ammoniaca, ecc.). Liberare completamente l'apparecchio da tutti gli elementi utilizzati per il trasporto e l'imballaggio. Non utilizzare il robot aspirapolvere tra tavolini, sedie o spazi molto ristretti per non danneggiarlo. Il robot aspirapolvere utilizza alcuni parametri di pulizia per pulire in modo efficace tutto il pavimento: movimento a spirale per una pulizia più intensa laddove viene rilevato lo sporco; contorno delle pareti per pulire il perimetro della stanza; e attraverso la stanza per garantire una pulizia completa. Il robot aspirapolvere necessita di circa 45 minuti per pulire una stanza di medie dimensioni e passa sulla stessa area più volte per garantirne una pulizia completa. PANNELLO DI CONTROLLO DEL ROBOT ASPIRAPOLVERE Avvio/arresto del robot aspirapolvere Pulsante di ricarica: Si illumina quando viene premuto, si spegne quando il robot viene collegato con la base di ricarica. Spia di ricarica: Lampeggia durante la ricarica e, al termine, si illumina in modo fisso Lampada ai raggi UV: Si illumina se viene premuto. La lampada disinfettante agisce mentre il robot è in funzione. 1 Rimuovere da terra tutti gli oggetti che potrebbero rompersi o danneggiare il robot aspirapolvere (lampade, bottiglie e così via). 2 Verificare che il contenitore per la polvere (11) sia posizionato correttamente. Vedere la sezione "Pulizia e conservazione". UTILIZZO DELL'APPARECCHIO 61 it 3 Posizionare l'isolatore di spazi (4) dove si desidera per evitare il passaggio del robot in una determinata zona. Vedere la sezione "Isolatore di spazi". 4 Accendere il robot aspirapolvere portando l'interruttore di funzionamento (20) sulla posizione ON. 5 Verificare che il robot di pulizia sia in ricarica. Se il LED indicatore di ricarica sul pannello di controllo del robot lampeggia, ricaricare il robot aspirapolvere. Vedere la sezione "Preparazione dell'apparecchio. Ricarica del robot aspirapolvere". 6 Per utilizzare il robot aspirapolvere in modalità automatica, programmarne il funzionamento con il telecomando. Vedere la sezione "Telecomando". 7 Premere il pulsante sul pannello del robot. Il robot aspirapolvere inizierà a lavorare in base alle proprie impostazioni di pulizia. Se lo si desidera, controllarne i movimenti o le funzioni tramite i pulsanti del telecomando (vedere la sezione "Telecomando") oppure tramite i pulsanti sul pannello di controllo del robot. Per sterilizzare l'area da pulire, premere il tasto UV. Questa funzione è particolarmente indicata per le persone che soffrono di allergie o per le abitazioni in cui vivono animali domestici, poiché il pavimento viene sterilizzato da virus e batteri. 8 Premere nuovamente il pulsante per interrompere temporaneamente il processo di pulizia. 9 Se non si desidera utilizzare la pulizia settimanale programmata, spegnere l'apparecchio dopo la pulizia. Per farlo, portare l'interruttore di funzionamento (20) sulla posizione OFF oppure premere il pulsante di accensione/spegnimento sul telecomando. 10 Scollegare la base di ricarica dalla rete elettrica. , , , ISOLATORE DI SPAZI COMPONENTI PRINCIPALI (B) 1B Interruttore di accensione e lunghezza dell'isolatore di spazi Apagado Alcance bajo = 4 m Alcance medio = 6 m Alcance alto = 8 m 2B LED di accensione 3B Testina di trasmissione di prossimità 4B Testina di trasmissione dell'isolatore di spazi 5B Coperchio del vano batterie 6B Sblocco del coperchio delle batterie FUNZIONAMENTO , Utilizzare l'isolatore di spazi per limitare l'area di pulizia del robot alla zona desiderata, ) ) ) , 62 per evitare che acceda a zone non necessarie o indesiderate. Utilizzarlo per evitare che acceda a un'area con molti cavi o a una stanza in particolare. Collocare l'isolatore di spazi sullo stesso livello sulla superficie in cui si utilizzerà il robot aspirapolvere. Posizionare l'isolatore di spazi e la base di ricarica a una distanza superiore a 3 m per non avere problemi di interferenza. Non posizionare la base di ricarica nel raggio di azione del segnale dell'isolatore di spazi. La testina di trasmissione di prossimità (3B) evita l'impatto tra il robot aspirapolvere e l'isolatore di spazi. Impedisce, infatti, che il robot si avvicini a meno di 0,5-1 m dall'isolatore. ISOLATORE DI SPAZI 1 Verificare che le batterie non siano scariche. 2 Posizionare l'isolatore di spazi delimitando l'area nella quale non si desidera che entri (fig. 3). 3 Rimuovere gli oggetti presenti davanti all'isolatore di spazi per evitarne un cattivo funzionamento. 4 Scegliere la lunghezza dell'isolatore di spazi desiderata. A tal fine, spostare l'interruttore (B) su portata bassa , media o alta . Utilizzare la lunghezza dell'isolatore adeguata. La durata della batteria dipende dalla distanza di trasmissione selezionata. Il LED di accensione (2B) lampeggerà ogni 8 secondi fino all'esaurimento della batteria. 5 Verificare che il robot aspirapolvere non possa superare il limite creato dall'isolatore di spazi. 6 7 Portare l'interruttore (B) sulla posizione di spegnimento quando non è necessario utilizzare l'isolatore di spazi. Possono verificarsi delle differenze nella direzione del segnale a infrarossi dell'isolatore di spazi e la distanza di ricezione del robot. Ciò è dovuto al movimento del robot durante l'uso. Questa differenza può variare in base all'ambiente di utilizzo, al livello di ricarica del robot e all'isolatore di spazi. , , , TELECOMANDO it COMPONENTI (C) 1 2 3 4 Accensione/spegnimento del robot Pulsanti di direzione Pulsante di conferma Tasti di controllo Avvio/domenica Arresto provvisorio/lunedì 5 Display (fig. 4) a Icona "trasmissione del segnale in corso" b Giorni della settimana c Giorno della settimana d Ora e Icona errore f Icona funzioni Configurazione ora/martedì Ricarica/mercoledì Programmazione/giovedì Pulizia rapida/venerdì Pulizia dopo la ricarica/sabato Pulizia lenta/tutti i giorni PROGRAMMAZIONE Sincronizzazione del telecomando e del robot aspirapolvere (fig. 5) , Sincronizzare il telecomando e il robot aspirapolvere prima del primo utilizzo e dopo le attività di manutenzione. A tal fine: 1 Verificare che il livello delle batterie del robot aspirapolvere e del telecomando sia sufficiente. 2 Spegnere il robot aspirapolvere portando l'interruttore di funzionamento (20) sulla posizione OFF. TELECOMANDO 63 3 Premere il pulsante per più di 4 secondi. Riportare l'interruttore di funzionamento (20) sulla posizione ON senza rilasciare il pulsante . Al termine della sincronizzazione, il robot emetterà due segnali acustici. , Impostazione della data e dell'ora (fig. 6) , È necessario memorizzare l'ora e il giorno della settimana correnti affinché il robot 1 2 3 4 ) possa iniziare a funzionare nel momento desiderato. Premere il pulsante . Adesso è possibile impostare il giorno della settimana. Premere il pulsante per il giorno corrente (SU = domenica, MO = lunedì, TU = martedì, WE = mercoledì, TH = giovedì, FR = venerdì, SA = sabato). Premere le frecce per spostarsi tra i campi "ora" e "minuti". Premere le frecce per selezionare l'ora e i minuti correnti. Premere per confermare la selezione. Premere se si desidera annullare la configurazione. Programmazione della pulizia settimanale automatica (fig. 7) Con il robot aspirapolvere spento: 1 Premere il pulsante sul telecomando. 2 Premere il pulsante corrispondente al giorno della settimana che si desidera programmare. Selezionare uno, alcuni o tutti i giorni della settimana. I giorni selezionati lampeggiano. 3 Premere le frecce per programmare l'ora esatta di avvio della pulizia. Premere le frecce "su" e "giù" per selezionare l'ora e i minuti. 4 Premere per confermare la selezione. Premere il pulsante di accensione/spegnimento se si desidera annullare la configurazione. Affinché il robot aspirapolvere entri in funzione nel momento desiderato, è necessario che sia acceso, ovvero l'interruttore di funzionamento (20) si trovi sulla posizione ON e sia illuminato. ) ) FUNZIONI AGGIUNTIVE Funzione FULL GO ) Selezionando questa funzione, il robot aspirapolvere rimarrà programmato per continuare a pulire al termine della ricarica. 1 Premere il pulsante . Il robot aspirapolvere deve essere acceso. FULL GO si illuminerà sul display del telecomando. Il robot aspirapolvere cercherà la base di ricarica prima che la batteria si esaurisca e inizierà automaticamente a pulire quando sarà completamente carico. , Funzione VELOCITÀ 1 Premere il pulsante per scegliere la pulizia rapida. FAST si illuminerà sul display del telecomando. 2 Premere il pulsante per scegliere la pulizia lenta. SLOT si illuminerà sul display del telecomando. , , 64 TELECOMANDO CODICI DI ERRORE Se il robot non funziona correttamente a causa di una delle seguenti circostanze, tutti i pulsanti sul pannello di controllo del robot lampeggeranno simultaneamente. 1 Premere il pulsante sul telecomando. Verificare che il segnale del telecomando si trovi nel campo di azione dell'apparecchio. Sullo schermo del telecomando vengono visualizzati l'icona di errore e un codice tra quelli descritti nella tabella. 2 A seconda dell'errore visualizzato, eseguire le azioni descritte. , CODICE DI ERRORE CAUSA DEL PROBLEMA RISOLUZIONE E01 Sensori rilevamento scala Pulire i sensori (27) E02 Rullo centrale Rimuovere lo sporco e i peli intrappolati sul rullo (23) E03 Batteria bassa Ricaricare la batteria E04 Ruote laterali Rimuovere lo sporco e i peli intrappolati sulle ruote E05 Contenitore per la polvere Posizionare correttamente il contenitore per la polvere (11) , Se il problema non viene risolto dopo l'esecuzione di queste verifiche, non usare l'apparecchio e portarlo presso un centro di assistenza autorizzato. Non apportare modifiche né riparazioni di alcun tipo all'apparecchio. PULIZIA E CONSERVAZIONE n Prima di eseguire un'operazione di manutenzione o pulizia dell'apparecchio, verificare che l'interruttore di funzionamento (20) si trovi sulla posizione OFF e che non sia collegato alla rete elettrica. Verificare che gli elementi che sono stati lavati siano completamente asciutti prima di montarli. Non immergere mai il modulo di aspirazione (15) in acqua o altri liquidi o in lavastoviglie. Non utilizzare prodotti abrasivi o solventi. Per una maggiore efficacia di pulizia del robot aspirapolvere, si consiglia di svuotare il contenitore per la polvere e pulire il filtro ogni 3 utilizzi. ) ) SVUOTAMENTO DEL CONTENITORE PER LA POLVERE (11) 1 Tenere premuto il pulsante di sblocco (12) ed estrarre il contenitore per la polvere (11) (fig. 8). 2 Posizionare il contenitore sul cestino della spazzatura, aprire il supporto del filtro tirando la linguetta (14) e svuotarne il contenuto nella spazzatura (fig. 9). PULIZIA E SOSTITUZIONE DEL FILTRO (7) ) Si consiglia di controllare periodicamente il filtro per verificarne il corretto funzionamento. Pulire il filtro se si rileva una diminuzione della capacità di aspirazione dell'apparecchio. Si consiglia di sostituire il filtro una o due volte all'anno, a seconda della frequenza di utilizzo dell'apparecchio. 1 Rimuovere il contenitore per la polvere come mostrato nella sezione "Svuotamento del contenitore per la polvere (11)". ) PULIZIA E CONSERVAZIONE 65 it 2 Rimuovere il filtro (7). Premere il supporto semicircolare con una mano per estrarre il filtro usato dal supporto (fig. 10). 3 Sbattere delicatamente il filtro di uscita contro la parete del cestino della spazzatura per eliminare lo sporco e la polvere in eccesso. Non utilizzare mai il robot aspirapolvere senza il filtro (7). 4 Pulire il filtro con la spazzola di pulizia (6) (fig. 11). 5 Riposizionare il filtro pulito nel suo alloggiamento oppure posizionare un nuovo filtro. ) PULIZIA DEL CONTENITORE PER LA POLVERE (11) 1 2 3 4 Premere il pulsante (13). Il modulo di aspirazione (15) si sgancia (fig. 12). Girare il modulo di aspirazione, liberare le due linguette ed estrarre il coperchio. Pulire l'interno del contenitore con la spazzola di pulizia (6) (fig. 13). Pulire il modulo di aspirazione (15) e il dispositivo di ingresso e uscita dell'aria con la spazzola di pulizia (fig. 13). Non pulire il modulo di aspirazione con acqua. 5 Posizionare il contenitore per la polvere nell'apparecchio. Spingere il contenitore verso l'apparecchio fino a sentire un clic, che ne indica l'alloggiamento corretto. ) PULIZIA E SOSTITUZIONE DELLO STRACCIO (9) ) Non utilizzare lo straccio su tappeti, moquette o pavimenti non completamente lisci. 1 In questi casi, rimuovere il supporto per lo straccio (10). Ruotare il supporto per lo straccio e sganciare le linguette destra e sinistra (fig. 14). 2 Per sostituire lo straccio (9) tirarlo e collocarne un altro nuovo al suo posto (fig. 14). SMONTAGGIO E PULIZIA DELLE SPAZZOLE Per una maggiore efficacia del robot aspirapolvere si consiglia di pulire i rulli e le spazzole ogni 3 utilizzi. Rulli (22) e (23) 1 Tirare la linguetta all'indietro e sollevare la leva di aggancio (fig. 15). I rulli risultano liberi. 2 Estrarre i rulli (22) e (23). 3 Pulire i rulli con la spazzola di pulizia (6) (fig. 16). 4 Posizionare di nuovo i rulli e la leva di aggancio premendo fino a sentire un clic, che indica il fissaggio corretto. , Spazzola laterale (8) , Pulire periodicamente la spazzola laterale per evitare un malfunzionamento del robot aspirapolvere. 1 Rimuovere con le mani i peli e la polvere intrappolati sulla spazzola laterale. 2 Se lo sporco è particolarmente intrappolato, tagliarlo con le forbici. Se necessario, svitare la vite ed estrarre la spazzola laterale (8) dal corpo per una pulizia più efficace (fig. 17). 3 Riposizionare la spazzola laterale nel suo alloggiamento. , 66 PULIZIA E CONSERVAZIONE SMONTAGGIO E PULIZIA DELLE RUOTE Ruote laterali 1 Svitare le due viti delle ruote (fig. 18). 2 Estrarre le ruote dal loro alloggiamento e pulirle. Non pulire le ruote con acqua, olio o grasso. Riposizionare le ruote nel loro alloggiamento e avvitare le viti con un giravite. ) ) Ruota anteriore Se la ruota anteriore risulta bloccata e non gira liberamente, estrarla per pulirla (fig. 18). 1 Tirare la ruota con l'aiuto di uno strumento che serva da leva. 2 Per riposizionarla dopo la pulizia, spingere la ruota nel suo alloggiamento. PULIZIA DEI SENSORI ANTIURTO (25) E I SENSORI SCALA (27) , Mantenere i sensori infrarossi puliti affinché il robot aspirapolvere possa funzionare correttamente. 1 Pulire i sensori con del cotone o un panno morbido (fig. 19). PULIZIA DELL'APPARECCHIO n Assicurarsi che nell'apparecchio non entri acqua. ) Pulire l'apparecchio prima del primo utilizzo, immediatamente dopo ogni utilizzo e dopo lunghi periodi di inutilizzo. In questo modo se ne garantirà il funzionamento corretto e una lunga durata. 1 Pulire l'esterno dell'apparecchio con un panno umido. Non utilizzare prodotti abrasivi o solventi. SOSTITUZIONE DELLE BATTERIE SOSTITUZIONE DELLE BATTERIE DELL'ISOLATORE DI SPAZI (Fig. 20) 1 Ruotare lo sblocco del coperchio delle batterie (6B) fino a liberarlo (5B). 2 Collocare le batterie nell'apposito vano. Verificare che gli elettrodi positivi e negativi siano posizionati correttamente. Rimuovere le batterie se l'aspirapolvere non verrà utilizzato per un lungo periodo. , SOSTITUZIONE DELLE BATTERIE DEL TELECOMANDO (Fig. 21) 1 Aprire il coperchio del vano batterie. 2 Collocare le batterie nell'apposito vano. Verificare che gli elettrodi positivi e negativi siano posizionati correttamente. Rimuovere le batterie se l'aspirapolvere non verrà utilizzato per un lungo periodo. , SOSTITUZIONE DELLE BATTERIE 67 it . NEDERLANDS VEILIGHEIDSINSTRUCTIES • Lees deze gebruiksaanwijzingen helemaal door alvorens het apparaat in gebruik te nemen. • Deze gebruiksaanwijzing is onderdeel van het product. Bewaar de gebruiksaanwijzing op een veilige plek om deze in de toekomst na te kunnen slaan. • Het apparaat is uitsluitend bedoeld voor huishoudelijk gebruik; niet voor bedrijfsmatig gebruik. Elk ander gebruik dan hier vermeld kan gevaarlijk zijn (bijv. opzuigen van vloeistoffen, stof van bouwwerkzaamheden, cement, enz.). • Laat kinderen niet zonder toezicht in de buurt van het apparaat om er zeker van te zijn dat ze er niet mee spelen. • Dit apparaat mag niet door mensen (met inbegrip van kinderen) met lichamelijke, zintuiglijke of geestelijke beperkingen, of met een gebrek aan ervaring en kennis gebruikt worden, met uitzondering van hen die door een met hun veiligheid belaste persoon opgeleid of gesuperviseerd werden voor het gebruik van dit apparaat. • Voer geen enkele wijziging of reparatie aan het apparaat uit. Bij defecten aan het netsnoer of een ander deel van het apparaat, het apparaat niet gebruiken maar naar een erkende technische dienst brengen. • Gebruik geen onderdelen of hulpstukken die niet door SOLAC geleverd of aanbevolen zijn. • Kijk, alvorens het apparaat op het lichtnet aan te sluiten, of het aangegeven voltage overeenkomt met de netspanning bij u thuis. • Zet het apparaat uit en trek de stekker uit het stopcontact vóórdat u onderdelen verwijdert of aanbrengt of onderhouds- of reinigingswerkzaamheden aan het apparaat verricht. Trek de stekker ook uit het stopcontact bij stroomuitval. • Laat het apparaat niet aan de kabel hangen. Neem de stekker uit het stopcontact door aan de stekker, nooit aan het snoer, te trekken. • Zorg ervoor dat het netsnoer niet in contact komt met scherpe kanten of hete oppervlakken. Laat het snoer niet over de rand van de tafel of het aanrecht hangen om te voorkomen dat kinderen eraan trekken en het apparaat op de grond valt. d • • • Dompel dit apparaat niet in water of in andere vloeistoffen onder en stop het evenmin in de vaatwasser. Raak de stofzuiger of de stekker niet met natte handen aan. Houd de stofzuigerrobot uit de buurt van warmtebronnen. Gebruik de stofzuigerrobot nooit zonder dat het stofreservoir en de beschermingsfilter correct geplaatst zijn. Zorg ervoor dat de zuigmodule altijd vrij van verstoppingen is. Houd haren, kleding, vingers en andere delen van het lichaam uit de buurt van de zuigmodule, rollers en wielen. Gebruik de stofzuiger niet om dieren schoon te maken. Gebruik dit apparaat niet in gesloten ruimten waar zich explosieve of giftige dampen kunnen ophopen. Gebruik dit apparaat nooit op een natte ondergrond of buitenshuis. Controleer regelmatig de staat van de adapter, het netsnoer en de aansluiting. Vermijd spatten op het laadstation, de adapter of het aansluitsnoer. 68 VEILIGHEIDSINSTRUCTIES • • • • • • • • Gebruik het laadstation of de adapter niet in de buurt van een bad, wastafel, douche of andere met water gevulde objecten als deze in gebruik zijn. • Gebruik uitsluitend de meegeleverde adapter. • Raak de adapter of het laadstation niet met natte handen aan als deze aangesloten zijn. • Laat de adapter of het laadstation nooit aan staan als ze op een vochtige ondergrond of doek staan of liggen. • Ga nooit op het apparaat zitten en ga er ook niet voor staan, omdat het apparaat dan beschadigd kan raken. • Controleer of er geen draden, kabels of andere voorwerpen langer dan 150 mm op de grond liggen, omdat deze in de rollers verward kunnen raken. LET OP: Wanneer u het apparaat wilt afdanken, deponeer het dan IN GEEN GEVAL bij het huisvuil, maar breng het voor verdere verwerking naar het dichtstbijzijnde recyclingcentrum of vuilophaalpunt. Op deze wijze draagt u bij aan het behoud van het milieu. q BELANGRIJKSTE ONDERDELEN 1 2 3 4 5 6 7 8 9 10 11 12 13 14 15 Romp Afstandsbediening Automatisch laadstation Ruimtebegrenzer Adapter Reinigingsborsteltje Filter (2 stuks) Zijborstel (2 stuks) Dweil Hulpstuk dweil Stofreservoir Ontgrendelingsknop stofreservoir Ontgrendelingsknop zuigmodule Lipje filter Zuigmodule 16 17 18 19 20 21 22 23 24 25 26 27 28 29 Infraroodsensor Handgreep Voorbumper Aansluiting voor de batterij van de adapter Aan/Uit-knop Paneel met bedieningsknoppen Rubberen rol Middelste rol Zijwielen Anti-botssensoren Contactpunten voor laadstation Trapsensoren Voorwiel UV-lamp HET APPARAAT GEREEDMAKEN. OPLADEN VAN DE STOFZUIGERROBOT n Gebruik uitsluitend de meegeleverde adapter en laadstation en geen andere adapters , of laders. De laadtijd bedraagt ongeveer 5 uur voor 60 tot 90 minuten zelfstandige werking. Bij de eerste oplaadbeurt de batterij gedurende de hele nacht laten opladen. BELANGRIJKSTE ONDERDELEN VAN HET LAADSTATION (A) 1A 2A 3A 4A Decoratief LED-lampje Schakelaar van decoratief LED-lampje Transmissiesignaal Aan-/uit controlelampje BELANGRIJKSTE ONDERDELEN 5A Laadcontrolelampje 6A Contactpunten 7A Aansluiting adapter 69 nl OPLADEN MET HET LAADSTATION (Afb. 1) ) Plaats geen voorwerpen in de buurt van het laadstation en zorg ervoor dat er geen ) ) 1 2 3 , ) 4 5 ) , obstakels of meubels staan rond het laadstation (zie de aanbevolen afstanden in de afbeelding). De robot kan het laadstation niet vinden als er obstakels in de weg staan. Plaats het laadstation in een ruimte die vrij is van obstakels. De robot kan het laadstation niet vinden als de zender van het infraroodsignaal (3A) bedekt is. Plaats het laadstation op een schone vloer en tegen een verticale wand. Sluit de adapter aan op het contact (7A) van het laadstation. Steek de stekker van de adapter in het stopcontact. Tijdens het laden gaat het controlelampje (4A) rood branden. Leg het snoer van het laadstation tegen de wand aan, anders kan de robot erin verward raken. Druk op de bedieningsknop van de afstandsbediening of op de knop van het bedieningspaneel van de robot. De stofzuigerrobot zal het laadstation opzoeken als het laadstation zich op de juiste afstand bevindt en zal zich daarop aansluiten. Als u de laadopdracht tijdens het zoeken wilt staken, druk dan opnieuw op de bedieningsknop of op de knop van de afstandsbediening. De stofzuigerrobot zal dan stoppen. Zorg ervoor dat de aansluitingen van de robot (26) correct zijn aangesloten op de contactpunten (6A) van het laadstation. Tijdens het opladen knipperen de controlelampjes van het laadstation (5A) en het bedieningspaneel . Als het apparaat volledig is opgeladen, gaat het controlelampje (5A) van het laadstation uit en blijft het controlelampje van het bedieningspaneel permanent branden. Het apparaat is nu klaar voor gebruik. , Haal tijdens de schoonmaak de stekker van het laadstation niet uit het stopcontact. De robot zal teruggaan naar het laadstation als de batterij leeg raakt. Indien gewenst kunt u een kleine hoeveelheid geurextract in het midden van het decoratieve LED-lampje (1A) aanbrengen. 6 Druk op de schakelaar (2A). Het LED-lampje (1A) gaat nu branden. Wanneer het lampje opwarmt, wordt het in het lampje aangebrachte geurextract verspreid. Sommige geurextracten kunnen het plastic oppervlak beschadigen. Verzekert u zich er voor gebruik van dat het geurextract het oppervlak niet zal beschadigen. , ) OPLADEN ZONDER HET LAADSTATION (Afb. 2) 1 Sluit het snoer van de adapter direct aan op het aansluitpunt (19) op de romp van de robot. 2 Steek de stekker van de adapter in het stopcontact. Het controlelampje van het bedieningspaneel knippert tijdens het opladen en blijft permanent branden als het opladen klaar is. Tijdens direct opladen met het snoer kan de robot niet in werking worden gesteld. 3 Haal na het opladen de stekker van de adapter uit het stopcontact en haal het snoer uit de aansluiting (19). Het apparaat is nu klaar voor gebruik. Tijdens het opladen wordt de adapter enigszins warm. Dit is normaal, behalve als de lader echt heel warm wordt. , , ) 70 OPLADEN VAN DE STOFZUIGERROBOT AUTOMATISCH OPLADEN , Tijdens de schoonmaak zal de robot steeds het laadstation automatisch opzoeken als de batterij leeg raakt. ) Als de robot klaar is met schoonmaken, kan de batterij erg warm zijn, waardoor de laadtijd langer kan zijn. Tips om de levensduur van de batterijen te verlengen • Laat de adapter niet langdurig aangesloten op het lichtnet. Haal de stekker uit het stopcontact zodra u klaar bent met opladen. • Bewaar of laad het apparaat niet op vlakbij radiatoren of andere warmtebronnen, of op een plek die aan rechtstreeks zonlicht is blootgesteld. • Laad het apparaat niet op in een vuile of vochtige omgeving. De omgevingstemperatuur bij het laden dient tussen 15ºC en 35ºC te liggen. • Ontlaad om de paar maanden de batterijen helemaal om ze vervolgens weer volledig op te laden. Om ze te ontladen zet u het apparaat zonder netsnoer en zonder het laadstation aan te sluiten op het lichtnet net zolang aan tot het stopt. Volg de bovenstaande aanwijzingen om de batterijen opnieuw op te laden. • Als u het apparaat voor langere tijd opbergt, wordt aanbevolen om de batterij volledig op te laden, deze vervolgens uit het apparaat te halen en op een koele en droge plek op te bergen. GEBRUIK VAN HET APPARAAT , Dit apparaat is uitsluitend bedoeld om vloeren en tapijten schoon te zuigen. ) ) ) ) , , Dit apparaat is bedoeld voor het dagelijkse onderhoud van vloeren, om stofvorming en vuilopeenhoping te voorkomen. Zuig nooit gloeiende as, splinters, scherpe voorwerpen of vloeistoffen op. Zuig geen brandende lucifers of sigarettenpeuken op. Zuig ook geen giftige materialen op (ammoniak e.d.). Verwijder alle transport- en verpakkingselementen in hun geheel. Gebruik de stofzuigerrobot niet tussen kleine tafeltjes, stoelen of in zeer kleine ruimten, omdat het apparaat dan beschadigd kan raken. De stofzuigerrobot gebruikt de volgende reinigingstechnieken om de vloer volledig en doeltreffend te reinigen: Spiraalbeweging voor een intensievere schoonmaak waar de robot vuil heeft gedetecteerd, beweging langs de wanden om de omtrek van de kamer te reinigen, doorkruising van de kamer voor een complete reiniging. De stofzuigerrobot heeft ongeveer 45 minuten nodig om een kamer van gemiddelde afmetingen schoon te maken. Daarbij gaat de robot meerdere malen over dezelfde vloergedeelten heen, zodat het hele oppervlak gereinigd wordt. GEBRUIK VAN HET APPARAAT 71 nl BEDIENINGSPANEEL VAN DE STOFZUIGERROBOT Aan-/uitschakeling van de stofzuigerrobot Laadknop: Gaat branden als erop gedrukt wordt, gaat uit wanneer de robot zich op het laadstation aansluit. Laadcontrolelampje: Knippert tijdens het opladen, blijft onafgebroken branden wanneer het opladen klaar is. UV-lamp: Gaat branden als erop gedrukt wordt, de desinfectielamp werkt als de robot in werking is. 1 Verwijder alle voorwerpen van de vloer die de robot kapot kunnen maken of beschadigen (lampen, flessen e.d.). 2 Controleer of het stofreservoir (11) op de juiste manier in de robot is geplaatst. Raadpleeg het hoofdstuk “REINIGING EN ONDERHOUD”. 3 Plaats de ruimtebegrenzer (4) waar u wilt om te voorkomen dat de robot in een bepaalde ruimte komt. Raadpleeg het hoofdstuk “RUIMTEBEGRENZER”. 4 Zet de stofzuigerrobot aan. Zet hiervoor de aan-/uitknop (20) op de stand ON. 5 Controleer of de robot is opgeladen. Als het laadcontrolelampje van het bedieningspaneel van de robot knippert, laad de robot dan op. Raadpleeg het hoofdstuk “HET APPARAAT GEREEDMAKEN. OPLADEN VAN DE STOFZUIGERROBOT”. 6 Als u de stofzuigerrobot automatisch wilt laten werken, programmeer de werking dan met de afstandsbediening. Raadpleeg het hoofdstuk “AFSTANDSBEDIENING”. 7 Druk op de knop van het bedieningspaneel van de robot. De stofzuigerrobot begint nu te werken volgens de reinigingspatronen. Indien gewenst, kunt u de bewegingen of functies van de robot bedienen met de knoppen van de afstandsbediening (zie het hoofdstuk “AFSTANDSBEDIENING”) of met de knoppen van het bedieningspaneel van de robot. Als u de ruimte voor de robot wilt steriliseren, druk dan op de toets UV. Deze functie is speciaal bedoeld voor allergische personen of voor huishoudens met huisdieren, omdat de vloer door sterilisatie vrij wordt gemaakt van virussen en bacteriën. 8 Druk opnieuw op de knop om het schoonmaakproces tijdelijk te stoppen. 9 Als u geen wekelijkse schoonmaak wilt programmeren, zet het apparaat dan uit als het klaar is met reinigen. Doe dit door de aan-/uitschakelaar (20) op de stand OFF te zetten of op de aan-/uitknop van de afstandsbediening te drukken. 10 Neem de stekker van het laadstation uit het stopcontact. , , , 72 GEBRUIK VAN HET APPARAAT RUIMTEBEGRENZER BELANGRIJKSTE ONDERDELEN (B) 1B Aan-/uitschakelaar & Lengtebereik van de begrenzer Uit Minimaal bereik = 4 m Gemiddeld bereik = 6 m Maximaal bereik = 8 m 2B 3B 4B 5B 6B Aan-/uitcontrolelampje Waarschuwingszender Zender van de begrenzer Batterijklep Ontgrendeling van de batterijklep. WERKING , Gebruik de begrenzer om de schoonmaak door de robot te beperken tot de door u ) ) ) , 1 2 3 4 , , 5 6 , gewenste plaats. Zo voorkomt u dat de robot bepaalde plekken onnodig of ongewenst schoonmaakt. Gebruik de begrenzer om te voorkomen dat de robot op plekken komt waar snoeren liggen of een bepaalde kamer binnengaat. Plaats de begrenzer op hetzelfde niveau op de oppervlakte als waar u de robot gaat gebruiken. Plaats de begrenzer en het laadstation op meer dan 3 m afstand van elkaar, om storingen te voorkomen. Zet het laadstation niet binnen het bereik van het signaal van de begrenzer. De waarschuwingszender (3B) voorkomt botsing tussen de robot en de begrenzer en zorgt ervoor dat de robot niet dichterbij komt dan op 0,5-1m afstand. Zorg ervoor dat de batterijen opgeladen zijn. Plaats de begrenzer om de ruimte af te bakenen waar u de robot niet wilt laten komen. (Afb. 3). Haal voorwerpen die zich voor de begrenzer bevinden weg, om te voorkomen dat het systeem niet goed werkt. Kies de gewenste lengte van de begrenzer. Zet daarvoor de schakelaar (B) op minimaal bereik , gemiddeld bereik of maximaal bereik . Stel de juiste lengte in. De duur van de batterij hangt af van de gekozen afstand. Het aan-/uitcontrolelampje (2B) knippert elke 8 seconden tot de batterij leeg is. Let erop dat de robot niet over de grens kan komen die wordt afgebakend door de ruimtebegrenzer. Zet de schakelaar (B) op de stand ‘uit’ wanneer de ruimtebegrenzer niet nodig is. Er kunnen verschillen ontstaan in de richting van het infraroodsignaal van de ruimtebegrenzer en de afstand voor ontvangst door de robot, al naar gelang de bewegingen van de robot tijdens het gebruik. Deze verschillen kunnen variëren, al naar gelang de werkomgeving en het laadniveau van de robot en de ruimtebegrenzer. RUIMTEBEGRENZER 73 nl AFSTANDSBEDIENING ONDERDELEN (C) 1 2 3 4 Aan-/uitzetten van de stofzuigerrobot 5 Richtingsknoppen Bevestigingstoets Bedieningstoetsen Starten/zondag Voorlopige stop/maandag Afleesscherm (Afb. 4) a Pictogram “doorgifte signaal”” b Geprogrammeerde dagen van de week c Huidige dag van de week d Uur e Pictogram ‘fout’ f Pictogrammen diverse functies Instelling uur/dinsdag Opladen/woensdag Programmeren/donderdag Snelle reiniging/vrijdag Reiniging na opladen/zaterdag Langzame reiniging/elke dag PROGRAMMEREN Synchronisatie van de afstandsbediening en de stofzuigerrobot (Afb. 5) , Synchroniseer de afstandsbediening en de stofzuigerrobot vóór het eerste gebruik en na onderhoudswerkzaamheden. Volg hiervoor onderstaande aanwijzingen: 1 Controleer of de stofzuigerrobot en de afstandsbediening voldoende batterijsterkte hebben. 2 Zet de stofzuigerrobot uit. Zet hiervoor de aan-/uitknop (20) op de stand OFF. 3 Druk langer dan 4 seconden op de knop . Zet de aan-/uitknop (20) weer op de stand ON zonder de knop los te laten. Als de synchronisatie juist is uitgevoerd laat de robot twee piepjes horen. , Datum en uur instellen (Afb. 6) , Het huidige uur en de huidige dag van de week moeten worden opgeslagen om ervoor te zorgen dat de robot op het juiste moment gaat werken. 1 Druk op de knop . Hiermee komt u bij de instelling voor de dag van de week. 2 Druk op de knop van de dag die overeenkomt met de dag van vandaag (SU= Zondag, MO= Maandag, TU= Dinsdag, WE= Woensdag, TH= Donderdag, FR= Vrijdag, SA= Zaterdag). 3 Druk op de pijltjestoetsen om het uur en de minuten in te stellen. Druk op de pijltjestoetsen om het huidige uur en de minuten in te stellen. 4 Druk op om de instelling te bevestigen. Druk op als u de instelling wilt annuleren. ) Programmering van automatische wekelijkse schoonmaak (Afb. 7) Zet de stofzuigerrobot uit. 1 Druk op de knop van de afstandsbediening. 2 Druk op de knop van de dag van de week waarvoor u de schoonmaak wilt programmeren. Selecteer één, meerdere of alle dagen van de week. De geselecteerde dagen gaan knipperen. 3 Druk op de pijltjestoetsen om het exacte tijdstip van de schoonmaak in te stellen. Druk op de pijltjestoetsen “omhoog” en “omlaag” om het uur en de minuten in te stellen. 74 AFSTANDSBEDIENING 4 Druk op om de instelling te bevestigen. Druk op de aan-/uitknop als u de instelling wilt annuleren. De robot moet aan staan om op het juiste moment te kunnen werken. De aan-/uitknop (20) moet op de stand ON staan en moet verlicht zijn. ) ) EXTRA FUNCTIES FULL GO functie ) Als u deze functie selecteert, wordt de robot geprogrammeerd om verder te gaan met schoonmaken zodra de robot volledig is opgeladen. 1 Druk op de knop . De stofzuigerrobot moet aan staan. U ziet FULL GO oplichten op het afleesscherm van de afstandsbediening. De stofzuigerrobot zal het laadstation opzoeken voordat de batterij leeg is en gaat automatisch verder met schoonmaken als de batterij weer volledig is opgeladen. , Functie SCHOONMAAKSNELHEID 1 Druk op de knop om snelle reiniging te selecteren. U ziet FAST oplichten op het afleesscherm van de afstandsbediening. 2 Druk op de knop om langzame reiniging te selecteren. U ziet SLOW oplichten op het afleesscherm van de afstandsbediening. , , FOUTCODES Als de robot niet goed werkt om een van de volgende redenen, gaan alle knoppen van het bedieningspaneel van de robot gelijktijdig knipperen. 1 Druk op de knop van de afstandsbediening. Zorg ervoor dat het signaal van de afstandsbediening binnen het werkingsbereik van het apparaat is. Op het afleesscherm van de afstandsbediening verschijnt het pictogram voor foutmeldingen samen met één van de onderstaande foutcodes. 2 Voer onderstaande stappen uit, al naar gelang de getoonde fout. , FOUTCODE OORZAAK OPLOSSING E01 Trapsensoren Maak de sensoren schoon (27) E02 Middelste rol Verwijder vuil en in de roller verwarde haren (23) E03 Batterij bijna leeg Laad de batterij op E04 Zijwielen Verwijder vuil en in de roller verwarde haren Stofreservoir Plaats het stofreservoir (11) op de juiste manier in het apparaat. E05 , Als de fout hierna blijft bestaan, het apparaat niet meer gebruiken maar naar een erkende technische dienst brengen. Voer geen enkele wijziging of reparatie aan het apparaat uit. REINIGING EN ONDERHOUD n Let ) er, vóórdat u onderhouds- of schoonmaakwerkzaamheden verricht aan het apparaat, op dat de aan-/uitschakelaar (20) op de stand OFF staat en dat de stekker uit het stopcontact is gehaald. Verzekert u zich ervan dat de gewassen onderdelen helemaal droog zijn voordat u ze in elkaar zet. REINIGING EN ONDERHOUD 75 nl ) Dompel het zuigonderdeel (15) nooit onder in water of in andere vloeistoffen en stop het nooit in de vaatwasser. Gebruik geen schuur- of oplosmiddelen. Voor een optimale werking van de stofzuigerrobot wordt aangeraden om na elke 3 zuigbeurten het stofreservoir te legen en de filter schoon te maken. HET STOFRESERVOIR (11) LEGEN 1 Houd de ontgrendelingsknop (12) ingedrukt. Haal het stofreservoir (11) uit het apparaat. (Afb. 8) 2 Houd het reservoir boven een vuilnisbak, open de bevestiging van de filter door aan het lipje (14) te trekken en leeg de inhoud in de vuilnisbak. (Afb. 9) DE FILTER (7) REINIGEN EN VERVANGEN ) Aanbevolen wordt om de filter regelmatig op zijn juiste werking te controleren. Maak de filter schoon als u merkt dat het apparaat minder krachtig zuigt. ) Het wordt aanbevolen om de filter één of twee maal per jaar te vervangen, afhankelijk van hoe intensief het apparaat gebruikt wordt. 1 Leeg het stofreservoir zoals wordt getoond in het hoofdstuk “HET STOFRESERVOIR LEGEN (11)”. 2 Verwijder de filter (7). Druk met één hand op de halfronde bevestiging om de gebruikte filter uit de behuizing te halen. (Afb. 10) 3 Schud de filter zachtjes tegen de rand van de vuilnisbak uit, om vuil en stof te verwijderen. Gebruik de stofzuigerrobot nooit zonder de filter (7). 4 Maak de filter schoon met het reinigingsborsteltje (6) (Afb. 11). 5 Plaats de schone filter (of indien nodig een nieuwe filter) terug in de behuizing. ) HET STOFRESERVOIR (11) REINIGEN 1 2 3 4 Druk op de knop (13). De zuigmodule (15) komt vrij (Afb. 12). Keer de zuigmodule om, ontgrendel de twee lipjes en haal het deksel eraf. Maak het stofreservoir van binnen schoon met het reinigingsborsteltje (6) (Afb. 13). Maak de zuigmodule (15) en de luchtinlaat en luchtuitlaat schoon met het reinigingsborsteltje (Afb. 13). Maak de zuigmodule nooit schoon met water. 5 Plaats het stofreservoir weer in de romp van het apparaat. Druk het reservoir naar de romp toe totdat u een klik hoort, ten teken dat het reservoir goed vastzit. ) REINIGING EN VERVANGING VAN DE DWEIL (9) ) Gebruik de dweil nooit op vloerkleden, tapijt of vloeren die niet volkomen glad zijn. 1 Verwijder de dweil in deze gevallen (10). Draai de bevestiging van de dweil en ontgrendel de lipjes aan de linker- en rechterkant (Afb. 14). 2 Om de dweil (9) te vervangen, aan de dweil trekken en een nieuwe aanbrengen (Afb. 14) DEMONTAGE EN REINIGING VAN DE BORSTELS Voor een optimale werking van de stofzuigerrobot wordt aangeraden om na elke 3 zuigbeurten de rollers en borstels schoon te maken. Rollen (22 en 23). 1 Beweeg het vergrendelingslipje naar achteren en trek het bevestigingslipje omhoog (Afb. 15). De rollers zijn nu vrijgemaakt. 2 Haal de rollers uit het apparaat (22 en 23). 3 Maak de rollers schoon met het reinigingsborsteltje (6) (Afb. 16). 4 Plaats de rollers terug in het apparaat en druk het bevestigingslipje op zijn plaats totdat u een klik hoort ten teken dat het goed vastzit. , 76 REINIGING EN ONDERHOUD Zijborstel (8) , Maak de zijborstel regelmatig schoon om te voorkomen dat de stofzuigerrobot niet meer goed werkt. 1 Verwijder in de zijborstel verward geraakt haar en stof met uw handen. 2 Als het vuil erg vast zit in de borstel, verwijder het dan met een schaar. Draai, indien nodig, de schroef los en haal de zijborstel (8) uit de romp van het apparaat voor een betere reiniging (Afb. 17). 3 Plaats de zijborstel terug in zijn behuizing. , DEMONTAGE EN REINIGING VAN DE WIELEN Zijwielen 1 Draai de twee schroeven van de wielen los (Afb. 18). 2 Haal de wielen uit hun behuizing en maak ze schoon. Maak de wielen nooit schoon met water, olie of vet. Plaats de wielen weer terug in hun behuizing en draai de schroeven vast met een schroevendraaier. ) ) Voorwiel Als het voorwiel geblokkeerd is geraakt of niet vrij kan draaien, haal het dan van het apparaat af om het schoon te maken (Afb. 18). 1 Trek daarvoor aan het wiel met behulp van gereedschap dat als ‘hefboom’ kan dienen. 2 Om het wiel na reiniging terug te plaatsen, drukt u het wiel weer in zijn behuizing. REINIGING VAN DE ANTI-BOTSSENSOREN (25) EN DE TRAPSENSOREN (27) nl , Houd de infraroodsensoren schoon, zodat de stofzuigerrobot goed kan werken. 1 Maak de sensoren schoon met een plukje watten of een zachte doek (Afb. 19). REINIGING VAN HET APPARAAT n Zorg ervoor dat er geen water in het apparaat terecht kan komen. ) Reinig het apparaat voordat u het voor het eerst in gebruik neemt, onmiddellijk na elk gebruik en na een lange periode ongebruikt te zijn geweest. Zo verzekert u een juiste werking van het apparaat en verlengt u de gebruiksduur. 1 Reinig de buitenkant van het apparaat met een vochtige doek. Gebruik geen schuurof oplosmiddelen. VERVANGING VAN DE BATTERIJEN VERVANGING VAN DE BATTERIJEN VAN DE RUIMTEBEGRENZER (Afb. 20) 1 Draai de ontgrendeling van de batterijklep (6B) totdat de klep vrij komt (5B). 2 Plaats de batterijen in het daarvoor bestemde vak. Controleer of de batterijen met de positieve en negatieve polen in de juiste richting zijn geplaatst. Haal de batterijen uit het apparaat als u het gedurende langere tijd niet gebruikt. , VERVANGING VAN DE BATTERIJEN VAN DE AFSTANDSBEDIENING(Afb. 21) 1 Open de klep van het batterijvak. 2 Plaats de batterijen in het daarvoor bestemde vak. Controleer of de batterijen met de positieve en negatieve polen in de juiste richting zijn geplaatst. Haal de batterijen uit het apparaat als u het gedurende langere tijd niet gebruikt. , VERVANGING VAN DE BATTERIJEN 77 . ESKY BEZPENOSTNÍ POKYNY • Než zanete spotebi používat, pette si pozorn tyto pokyny. • Tento návod na použití je nedílnou souástí výrobku.Uschovejte jej pro pozdjší potebu. • Zaízení je ureno pouze k domácímu, nikoli k prmyslovému použití. Jiné než uvedené použití mže být nebezpené (nap. vysávání kapalin, prachu ze stavebních prací, cementu apod.). • Dohlédnte na to, aby si se spotebiem nehrály dti. • Toto zaízení nesmjí používat osoby (vetn dtí) se sníženými tlesnými, smyslovými nebo mentálními schopnostmi, nebo s nedostatkem zkušeností a znalostí bez dozoru nebo bez pedchozího pouení o použití osobou, která je odpovdná za jejich bezpenost. • Spotebi neupravujte ani neopravujte. Pokud si na napájecím kabelu nebo na kterékoli jiné ásti zaízení povšimnete ehokoli neobvyklého, nepoužívejte je a pedejte je pracovníkm autorizovaného servisního stediska. • Nepoužívejte žádné souásti nebo píslušenství, které nebyly dodány i doporueny spoleností SOLAC. • Ped pipojením zaízení k elektrické síti zkontrolujte, zda vyznaené naptí odpovídá naptí sít ve vaší domácnosti. • Zaízení ped rozmontováním nebo složením ástí a ped jakoukoli údržbou a ištním vypnte a odpojte od zdroje elektrické energie. Zaízení rovnž odpojte v pípad výpadku elektrického proudu. • Nepoužívejte napájecí kabel k zavšení spotebie. Pi odpojování zaízení ze zásuvky vždy tahejte za zástrku, nikoli za kabel. • Kabel se nesmí dotýkat ostrých hran ani horkých povrch. Nenechávejte kabel zavšený pes okraj stolu nebo pracovní desky, aby za nj nemohly tahat dti a pístroj neshodily. d • • • • • • • Vysava nikdy neponoujte do vody nebo jiných kapalin, ani jej nevkládejte do myky nádobí. Nikdy nemanipulujte se zástrkou nebo s vysavaem mokrýma rukama. Chrate robotický vysava ped vysokými teplotami. Nikdy nepoužívejte robotický vysava bez náležit upevnné nádoby na prach nebo ochranného filtru. Vysávací modul udržujte vždy istý. Nepibližujte vlasy, odvy, prsty ani žádné jiné ásti tla k vysávacímu modulu, válcm a kolekm. Nepoužívejte vysava k ištní zvíat. Nepoužívejte pístroj v uzavených prostorách, kde se mohou hromadit výbušné nebo jedovaté výpary. Pístroj nepoužívejte na mokrých površích nebo ve venkovních prostorách. • • Pravideln kontrolujte stav napájecího kabelu, síového adaptéru a pipojení. • Dbejte na to, aby se nabíjecí stanice, adaptér nebo napájecí kabel nedostaly do styku s vodou. • Nabíjecí stanici ani adaptér nepoužívejte v blízkosti vany, umyvadla, sprchy nebo jiného zdroje vody. 78 BEZPENOSTNÍ POKYNY • Používejte pouze adaptér, který je souástí dodávky. • Nedotýkejte se adaptéru ani nabíjecí stanice mokrýma rukama, když jsou pipojeny k elektrické síti. • Nikdy nenechávejte zapnuté zaízení ani nabíjecí stanici na mokrém povrchu nebo textilii. • Na zaízení nesedejte ani ped ním nestjte, protože by mohlo dojít k jeho poškození. • Ujistte se, že se na podlaze nenachází žádné dráty, kabely ani jiné pedmty delší než 150 mm, protože by se mohly zaplést do válc. UPOZORNNÍ! Budete-li chtít spotebi zlikvidovat, NIKDY jej nevyhazujte do domovního odpadu. Zaneste jej na nejbližší SBRNÉ MÍSTO, kde bude zlikvidován. Tím pispjete k ochran životního prostedí. q HLAVNÍ SOUÁSTI 1 2 3 4 5 6 7 8 9 10 11 12 13 14 15 Hlavní tleso Dálkový ovlada Automatická nabíjecí stanice Virtuální bariéra Adaptér isticí kartá Filtr (dv jednotky) Postranní kartá (dv jednotky) Mop Píslušenství k mopu Nádoba na prach Uvolovací tlaítko nádoby na prach Uvolovací tlaítko vysávacího modulu Úchyt filtru Vysávací modul 16 17 18 19 20 21 22 23 24 25 26 27 28 29 Infraervený sníma Rukoje Pední nárazník Konektor bateriového adaptéru Vypína Panel s ovládacími tlaítky Gumový válec Stedový válec Postranní koleka Snímae náraz Kontaktní konektory nabíjecí stanice Snímae detektoru schod Pední koleko UV lampa P$ÍPRAVA ZA$ÍZENÍ. NABÍJENÍ ROBOTICKÉHO VYSAVAE n Používejte pouze adaptér a nabíjecí stanici, které jsou souástí dodávky. Nepoužívejte , žádná jiná zaízení. Nabíjení trvá pibližn 5 hodin a zajistí provoz zaízení po dobu 60 až 90 minut. Pokud nabíjíte baterii poprvé, nechejte ji nabít pes noc. HLAVNÍ SOUÁSTI NABÍJECÍ STANICE (A) 1A 2A 3A 4A Ozdobná kontrolka Ozdobný kontrolkový pepína Penosový signál Kontrolka zapnutí 5A Kontrolka nabití 6A Kontaktní konektory 7A Konektor adaptéru NABÍJENÍ POMOCÍ NABÍJECÍ STANICE (obr. 1) ) Neumisujte žádné pedmty v blízkosti nabíjecí stanice a ujistte se, že okolní prostor neobsahuje ásti nábytku ani jiné pekážky (viz doporuená vzdálenost na obrázku). ) Pokud jsou v prostoru pekážky, robot nabíjecí stanici nenalezne. Umístte nabíjecí stanici do volného prostoru bez pekážek. ) Pokud je penaše infraerveného signálu (3A) zakrytý, robot nabíjecí stanici nenalezne. HLAVNÍ SOUÁSTI 79 cs 1 Umístte nabíjecí stanici na istou podlahu a ke kolmé stn. 2 Pipojte adaptér (7A) ke konektoru nabíjecí stanice. 3 Adaptér pipojte k elektrické síti. Kontrolka zapnutí (4A) se rozsvítí erven. Natáhnte napájecí kabel nabíjecí stanice podél stny, aby se do nj robot nezapletl. 4 Stisknte ovládací tlaítko dálkového ovladae nebo tlaítko na ovládacím panelu robota. Robotický vysava vyhledá nabíjecí stanici, pokud se nachází ve vhodné vzdálenosti, a pipojí se k ní. 5 Pokud chcete bhem vyhledávání zrušit píkaz k nabíjení, stisknte opakovan ovládací tlaítko nebo tlaítko dálkového ovladae . Robotický vysava se zastaví. Zkontrolujte, zda jsou konektory robota (26) správn pipojeny ke konektorm nabíjecí stanice (6A). Bhem nabíjení svítí kontrolky nabití nabíjecí stanice (5A) a ovládací panel bliká. Po dokonení nabíjení pestanou kontrolky nabití nabíjecí stanice (5A) a ovládacího panelu blikat a zstanou svítit. Zaízení je pipraveno k použití. Bhem vysávání nabíjecí stanici nevypínejte, protože pokud je úrove nabití baterie robotického vysavae píliš nízká, vysava se ke stanici vrací, aby se nabil. Pokud chcete, mžete do stedu ozdobné kontrolky vložit malé množství parfému podle vlastního výbru (1A). 6 Stisknte vypína (2A). Rozsvítí se kontrolka (1A). Když se kontrolka zaheje, zane se šíit vn parfému uvnit kontrolky. Nkteré parfémy mohou poškodit plastový povrch. Ped použitím parfému se ujistte, že nepoškodí povrch. , ) ) , , , ) NABÍJENÍ BEZ POMOCI NABÍJECÍ STANICE (obr. 2) 1 Pipojte kabel adaptéru pímo ke konektoru (19) tlesa robotického vysavae (11). 2 Adaptér pipojte k elektrické síti. Kontrolka na ovládacím panelu robota bhem nabíjení bliká a po dokonení nabíjení pestane blikat. Pokud je robot pímo nabíjen pomocí napájecího kabelu, nelze jej spustit. 3 Po nabití odpojte adaptér od elektrické sít a poté odpojte kabel od konektoru (19). Zaízení je pipraveno k použití. Bhem nabíjení se adaptér mírn zahívá. Pokud není velmi horký, je vše v poádku. , , ) AUTOMATICKÉ NABÍJENÍ , Pokud je bhem ištní baterie robota slabá, robot vždy automaticky vyhledá nabíjecí stanici. ) Po ištní mže být teplota baterie vysoká a nabíjení tedy mže trvat déle. Rady, jak prodloužit životnost baterie • Nenechávejte adaptér pipojený píliš dlouho. Po ukonení nabíjení jej odpojte. • Neukládejte a nenabíjejte zaízení v blízkosti radiátor nebo jiných zdroj tepla a nevystavujte jej pímému slunenímu svtlu. • Nenabíjejte zaízení na zneištných nebo mokrých místech. Teplota v místnosti by mla být v rozmezí 15 ºC až 35 ºC. • Vždy po nkolika msících nechejte baterie zcela vybít a poté je znovu nabijte. Vybít je mžete tak, že necháte zaízení v provozu bez pipojeného kabelu, dokud se 80 NABÍJENÍ ROBOTICKÉHO VYSAVAE nezastaví. Nabíjecí stanice musí být vypnuta. Poté baterie znovu nabijte podle výše uvedených pokyn. • Pi delším skladování zaízení doporuujeme baterii úpln nabít a poté ji vyjmout a uskladnit na chladném a suchém míst. POUŽÍVÁNÍ ZA$ÍZENÍ , Toto zaízení bylo speciáln navrženo za úelem vysávání podlah a koberc. ) ) ) ) , , Toto zaízení je ureno ke každodenní údržb podlahy, aby nedocházelo k nahromadní neistot a prachu. Nikdy nevysávejte žhavý popel, tísky ani jiné ostré pedmty nebo tekutiny. Nikdy nevysávejte zapálené zápalky ani nedopalky cigaret. Nevysávejte toxický materiál (napíklad pavek). Prvky použité pro pepravu a balení beze zbytku odstrate. Nepoužívejte robotický vysava mezi menšími stolky, židlemi nebo malými prostory, protože by mohlo dojít k poškození zaízení. Robotický vysava používá nastavení ištní za úelem efektivního vyištní celé podlahy: Toivý pohyb k intenzivnjšímu ištní v místech s neistotami, sledování stn k ištní obvodu místnosti a pohyb po místnosti zajišující úplné ištní. Robotický vysava vyistí místnost prmrné velikosti pibližn za 45 minut, piemž nkolikrát projede tentýž prostor, aby zajistil vyištní celého povrchu. OVLÁDACÍ PANEL ROBOTICKÉHO VYSAVAE Spuštní/zastavení robotického vysavae Tlaítko nabití: Pi stisknutí se rozsvítí a vypne se po pipojení robota k nabíjecí stanici. Kontrolka nabití: Bhem nabíjení bliká. Po dokonení nabíjení zstane svítit. Ultrafialová lampa: Pi stisknutí se rozsvítí; dezinfekní lampa pracuje, když robot provádí ištní. 1 Odstrate z podlahy všechny pedmty, které by mohly zniit nebo poškodit robotický vysava (napíklad lampy, láhve). 2 Zkontrolujte, zda je nádoba na prach (11) náležit upevnna. Viz ást „IŠTNÍ A USKLADNNÍ“. 3 Umístte virtuální bariéru (4) tam, kde chcete robotu zamezit ve vstupu do uritého prostoru. Viz ást „VIRTUÁLNÍ BARIÉRA“. 4 Spuste robotický vysava. Udláte to tak, že nastavíte vypína (20) do polohy ZAPNUTO. 5 Ujistte se, že je isticí robot nabitý. Pokud kontrolka na ovládacím panelu robota bliká, nastavte nabíjení robotického vysavae. Viz ást „P ÍPRAVA ZA ÍZENÍ, NABÍJENÍ ROBOTICKÉHO VYSAVAE“ 6 Chcete-li používat robotický vysava v automatickém režimu, naprogramujte jeho provoz pomocí dálkového ovladae. Viz ást „DÁLKOVÝ OVLADA“. 7 Stisknte tlaítko na ovládacím panelu robota. Robotický vysava poté zane pracovat podle konfigurace ištní. , POUŽÍVÁNÍ ZA ÍZENÍ 81 cs , Pokud chcete, mžete ovládat pohyby nebo funkce vysavae pomocí tlaítek dálkového ovladae (pejdte do ásti „DÁLKOVÝ OVLADA“) nebo pomocí tlaítek na ovládacím panelu tlesa robotického vysavae. Stisknte klávesu UV, pokud chcete sterilizovat pední oblast. Tuto funkci doporuujeme obzvlášt osobám trpícím alergiemi a domácnostem se zvíaty, protože sterilizuje podlahu proti virm a bakteriím. 8 Opakovaným stisknutím tlaítka pozastavíte postup ištní. 9 Pokud nechcete naprogramované týdenní ištní, po ištní zaízení vypnte. Udláte to tak, že nastavíte vypína (20) do polohy VYPNUTO, nebo stisknete tlaítko ZAPNUTÍ/ VYPNUTÍ na dálkovém ovladai. 10 Odpojte nabíjecí stanici od elektrické sít. , VIRTUÁLNÍ BARIÉRA HLAVNÍ SOUÁSTI (B) 1B Spína a délka virtuální bariéry Vypnuto Krátký dosah = 4 m Stední dosah = 6 m Dlouhý dosah = 8 m 2B 3B 4B 5B 6B Kontrolka zapnutí Hlava snímae blízkosti Hlava snímae virtuální bariéry Kryt komory baterií Svorka krytu baterií PROVOZ , Virtuální bariéra slouží k urení požadovaných prostor ištní, ímž zabrauje robotu ) ) ) , 1 2 3 4 , , 5 6 , 82 ve vstupu do nežádoucích prostor nebo prostor, které není nutné istit. Pomocí této funkce zabráníte robotu ve vstupu do prostor obsahujících kabely nebo do konkrétní místnosti. Umístte virtuální bariéru do stejné úrovn na povrchu, kde budete používat robotický vysava. Umístte virtuální bariéru a nabíjecí stanici ve vzdálenosti více než 3 metry od sebe, ímž zabráníte rušení. Neumisujte nabíjecí stanici v oblasti dosahu signálu virtuální bariéry. Hlava snímae blízkosti (3B) zamezuje kontaktu robotického vysavae a virtuální bariéry, protože vysava se k bariée piblíží maximáln na vzdálenost 0,5 až 1 metr. Ujistte se, že baterie nejsou vybité. Umístte virtuální bariéru tak, aby blokovala prostor, do kterého nemá robotický vysava vstupovat (obr. 3). Odstrate jakékoli pedmty, které by se mohly nacházet ped virtuální bariérou, ímž zabráníte nedostatenému fungování bariéry. Vyberte požadovanou délku virtuální bariéry. Udláte to tak, že pomocí pepínae (B) vyberete krátký , stední nebo dlouhý dosah. Použijte vhodnou délku bariéry. Trvanlivost baterie závisí na vybrané vzdálenosti snímae. Kontrolka zapnutí (2B) zabliká každých 8 sekund, dokud se baterie nevybije. Zkontrolujte, zda robotický vysava nedokáže pekroit hranici vytvoenou virtuální bariérou. Pokud není virtuální bariéra vyžadována, nastavte pepína (B) do polohy Vypnuto . Ve smru infraerveného signálu virtuální bariéry a rozsahu píjmu robota se mohou vyskytnout urité rozdíly, a to z dvodu pohybu robota bhem jeho používání. Tyto rozdíly se mohou lišit v závislosti na pracovním prostedí a úrovni nabití robota a virtuální bariéry. VIRTUÁLNÍ BARIÉRA DÁLKOVÝ OVLADA SOUÁSTI (C) 1 2 3 4 ZAPNUTÍ/VYPNUTÍ robotického vysavae Smrová tlaítka Potvrzovací tlaítko Ovládací klávesy Spuštní/nedle Pedbžné zastavení/pondlí 5 Displej (obr. 4) a Ikona „penosu signálu“ b Naprogramované dny v týdnu c Aktuální den v týdnu d as e Ikona chyby f Ikona funkce Nastavení asu/úterý Nabití/steda asova/tvrtek Rychlé ištní/pátek ištní po nabití/sobota Pomalé ištní/každý den ASOVA Synchronizace dálkového ovladae a robotického vysavae (obr. 5) , Ped prvním použitím a po údržb provete synchronizaci dálkového ovladae a robotického vysavae. Postup: 1 Zkontrolujte, zda jsou baterie robotického vysavae a dálkového ovladae dostaten nabité. 2 Vypnte robota. Udláte to tak, že nastavíte vypína (20) do polohy VYPNUTO. 3 Stisknte tlaítko déle než 4 sekundy. Vrate vypína (20) do polohy ZAPNUTO a stále pidržujte tlaítko . Po správném provedení synchronizace robot dvakrát pípne. , Nastavení dne a asu (obr. 6) , Chcete-li zajistit, že robot zane pracovat v požadovanou dobu, je nutné uložit aktuální den v týdnu a as. 1 Stisknte tlaítko . Tím otevete funkci nastavení dne. 2 Stisknte tlaítko dne, který odpovídá aktuálnímu dni v týdnu (SU = nedle, MO = pondlí, TU = úterý, WE = steda, TH = tvrtek, FR = pátek, SA = sobota). 3 Stisknutím šipek mžete procházet poli „hodina“ a „minuty“. Stisknutím šipek mžete vybrat aktuální „hodinu“ a „minuty“. 4 Stisknutím tlaítka potvrdíte výbr. Chcete-li zrušit nastavení, stisknte tlaítko . ) Nastavení automatického týdenního ištní (obr. 7) Robot by ml být vypnutý. 1 Stisknte tlaítko na dálkovém ovladai. 2 Stisknte tlaítko dne, který odpovídá dni v týdnu, který chcete naprogramovat. Vyberte jeden, nkolik nebo všechny dny v týdnu. Vybrané dny budou blikat. 3 Stisknutím šipek nastavíte pesný as ištní. Stisknutím šipek „nahoru“ a „dol“ vyberete hodinu a minuty. 4 Stisknutím tlaítka potvrdíte výbr. DÁLKOVÝ OVLADA 83 cs ) Chcete-li zrušit nastavení, stisknte tlaítko ZAPNUTÍ/VYPNUTÍ . ) Pokud se má robotický vysava spustit v plánovaný as, musí být zapnut. Vypína (20) musí být v poloze ZAPNUTO a musí svítit. DALŠÍ FUNKCE Funkce FULL GO ) Pokud je vybrána tato funkce, robotický vysava je naprogramován tak, aby pokraoval v ištní po úplném nabití. 1 Stisknte tlaítko . Robotický vysava musí být zapnut. Na displeji dálkového ovladae se rozsvítí možnost FULL GO. Robotický vysava vyhledá ped vybitím baterie nabíjecí stanici a po úplném nabití automaticky zahájí ištní. , Funkce SPEED 1 Stisknutím tlaítka vyberete rychlé ištní. Na displeji dálkového ovladae se rozsvítí možnost RYCHLÉ. 2 Stisknutím tlaítka vyberete pomalé ištní. Na displeji dálkového ovladae se rozsvítí možnost POMALÉ. , , CHYBOVÉ KÓDY Pokud robot nefunguje správn z dvodu nkteré z následujících okolností, všechna tlaítka na ovládacím panelu robota zanou souasn blikat. 1 Stisknte tlaítko na dálkovém ovladai. Ujistte se, že signál dálkového ovladae je v aktivním dosahu zaízení. Ikona chyby se na dálkovém ovladai zobrazí vedle nkterého z níže popsaných chybových kód. 2 V závislosti na zobrazené chyb provete níže popsané akce. , CHYBOV Ý KÓD P$ÍINA PORUCHY $EŠENÍ E01 Snímae detektoru schod Oistte snímae (27). E02 Stedový válec Odstrate neistoty a vlasy zachycené ve válci (23). E03 Slabá baterie Nabijte baterii. E04 Postranní koleka Odstrate neistoty a vlasy zachycené v kolekách. E05 Nádoba na prach Náležit upevnte nádobu na prach (11). , Pokud po provedení tchto akcí porucha petrvává, zaízení dále nepoužívejte a dopravte jej do autorizovaného servisu. Toto zaízení nijak neupravujte ani neopravujte. 84 DÁLKOVÝ OVLADA IŠT%NÍ A USKLADN%NÍ n Ped zahájením ištní nebo údržby se ujistte, že vypína (20) se nachází v poloze Vypnuto a zaízení není pipojeno k elektrické síti. ) Ujistte se, že všechny umývané souásti jsou ped složením zcela suché. ) Vysávací modul (15) nikdy neponoujte do vody ani do žádné jiné kapaliny, ani jej nikdy nedávejte do myky na nádobí. Nepoužívejte abrazivní výrobky ani rozpouštdla. Chcete-li dosáhnout nejvyššího výkonu robotického vysavae, doporuujeme vyistit nádobu na prach a filtr vždy po tech použitích. VYSYPÁNÍ NÁDOBY NA PRACH (11) 1 Stisknte a pidržte uvolovací tlaítko (12). Vyjmte nádobu na prach (11) (obr. 8). 2 Podržte nádobu na prach nad odpadkovým košem, zatažením za úchyt (14) otevete držák filtru a vysypte obsah nádoby do odpadkového koše (obr. 9). IŠTNÍ A VÝMNA FILTRU (7) ) Doporuujeme filtr pravideln prohlédnout, ímž zkontrolujete, zda pracuje správn. Pokud zjistíte snížení vysávacího výkonu zaízení, dkladn filtr vyistte. ) V závislosti na etnosti používání zaízení doporuujeme vymnit filtr jednou nebo 1 2 3 ) 4 5 dvakrát za rok. Vysypte nádobu na prach podle popisu v ásti „VYSYPÁNÍ NÁDOBY NA PRACH“ (11). Vyjmte filtr (7). Jednou rukou stisknte plkruhový držák a vyjmte použitý filtr z držáku (obr. 10). Jemn klepejte vyjmutým filtrem na stranu odpadkového koše, aby se uvolnil nadbytený prach a neistoty. Nikdy nepoužívejte robotický vysava bez filtru (7). Vyistte filtr pomocí isticího kartáe (6) (obr. 11). Vrate istý filtr nebo nový filtr (v pípad poteby) do držáku. IŠTNÍ NÁDOBY NA PRACH (11) 1 2 3 4 Stisknte tlaítko (13). Tím uvolníte vysávací modul (15) (obr. 12). Obrate vysávací modul, uvolnte dva úchyty a odeberte víko. Vyistte vnitek nádoby pomocí isticího kartáe (6) (obr. 13). Pomocí isticího kartáe vyistte vysávací modul (15) a jednotku pívodu a odvodu vzduchu (obr. 13). Neistte vysávací modul vodou. 5 Upevnte nádobu na prach k tlesu zaízení. Zatlate na nádobu, dokud neuslyšíte cvaknutí, které znaí správné upevnní nádoby k tlesu. ) IŠTNÍ A VÝMNA MOPU (9) ) Nepoužívejte mop na pedložky, koberce a podlahy, které nejsou zcela hladké. 1 V takových pípadech mop odstrate (10). Obrate mop a uvolnte levý a pravý úchyt (obr. 14). 2 Chcete-li mop vymnit (9), vytáhnte jej a nahrate jej novým mopem (obr.14). ODSTRANNÍ A IŠTNÍ KARTÁ Chcete-li dosáhnout nejvyššího výkonu robotického vysavae, doporuujeme vyistit válce a kartáe vždy po tech použitích. Válec (22) a (23) 1 Zatlate na úchyt a zvednte upínací lištu (obr. 15). Válce se uvolní. , IŠTNÍ A USKLADNNÍ 85 cs 2 Vyjmte válec (22) a (23). 3 Vyistte válce pomocí isticího kartáe (6) (obr. 16). 4 Vložte válce zpt a pemístte upínací lištu. Zatlate na ni, dokud neuslyšíte cvaknutí, což znaí, že je správn upevnna. Postranní kartá (8) , Pravidelným ištním postranního kartáe zabráníte nesprávnému fungování robotického vysavae. 1 Rukama odstrate vlasy a prach zachycený v postranním kartái. 2 Pokud jsou neistoty zapletené do kartáe, odstihnte je nžkami. V pípad poteby odšroubujte šroub a vyjmte postranní kartá (8) z tlesa, abyste jej mohli efektivnji vyistit (obr. 17). 3 Vrate postranní kartá do pouzdra. , ODSTRANNÍ A IŠTNÍ KOLEEK Postranní koleka 1 Odšroubujte šrouby koleek (obr. 18). 2 Vyjmte koleka z pouzder a vyistte je. Neistte koleka vodou, olejem ani tukem. Vrate koleka do pouzder a pišroubujte šrouby šroubovákem. ) ) Pední koleko Pokud je pední koleko zaseknuté nebo se voln neotáí, odeberte jej a vyistte (obr. 18). 1 Odeberte koleko pomocí nástroje, který slouží jako páka. 2 Chcete-li koleko po oištní vymnit, zatlate jej do pouzdra. IŠTNÍ SNÍMA NÁRAZ (25) A SNÍMA SCHOD (27) , Udržujte infraervené snímae isté, aby robotický vysava fungoval správn. 1 Oistte snímae kouskem vaty nebo jemným hadíkem (obr. 19). IŠTNÍ ZAÍZENÍ n Dbejte na to, aby do zaízení nevnikla voda. ) Pi prvním použití, okamžit po každém použití a po delším skladování zaízení oistte. Tím zajistíte správný provoz zaízení a prodloužíte jeho životnost. 1 Vnjší povrch zaízení oistte vlhkým hadíkem. Nepoužívejte abrazivní výrobky ani rozpouštdla. VÝM%NA BATERIÍ VÝMNA BATERIÍ VIRTUÁLNÍ BARIÉRY (obr. 20) 1 Otote zámek krytu baterií (6B), dokud se kryt neuvolní (5B). 2 Umístte baterie do komory urené k tomuto úelu. Zkontrolujte, zda jsou kladné a záporné elektrody ve správné poloze. Pokud nebudete robotický vysava delší dobu používat, baterie vyjmte. , VÝMNA BATERIÍ DÁLKOVÉHO OVLADAE (obr. 21) 1 Otevete kryt komory baterií. 2 Umístte baterie do komory urené k tomuto úelu. Zkontrolujte, zda jsou kladné a záporné elektrody ve správné poloze. Pokud nebudete robotický vysava delší dobu používat, baterie vyjmte. , 86 VÝMNA BATERIÍ . POLSKI WSKAZÓWKI BEZPIECZE&STWA • Przed uyciem urzdzenia naley dokadnie zapozna si z niniejsz instrukcj. • Niniejsza instrukcja stanowi nierozczn cz produktu. Naley j przechowywa w bezpiecznym miejscu, w celu ponownego uytku. • Produkt ten przeznaczony jest do uytku domowego; nie nadaje si do uytku przemysowego. Uycie go w jakimkolwiek innym celu ni wskazany jest niebezpieczne (m.in. odkurzania cieczy, pyu budowlanego, cementu, itp.) • Naley uniemoliwi dzieciom wykorzystanie urzdzenia do zabawy. • Urzdzenie nie powinno by obsugiwane przez osoby (w tym dzieci) o obnionej sprawnoci fizycznej, czuciowej, psychicznej, niedowiadczone lub nieposiadajce odpowiedniej wiedzy i dowiadczenia, chyba, e bd one nadzorowane lub zostan odpowiednio przeszkolone przez osoby odpowiedzialne za ich bezpieczestwo. • Nie dokonywa adnych przeróbek ani nie naprawia urzdzenia na wasn rk. W przypadku stwierdzenia jakichkolwiek uszkodze przewodu zasilajcego bd elementów urzdzenia naley zaprzesta uywania urzdzenia i skontaktowa si z autoryzowanym serwisem technicznym. • Nie stosuj czci lub akcesoriów niedostarczonych lub niezalecanych przez SOLAC. • Przed podczeniem urzdzenia do róda zasilania naley upewni si, e napicie znamionowe odpowiada napiciu w domowej instalacji elektrycznej. • Przed wymontowaniem lub zamontowaniem czci oraz przed rozpoczciem wykonywania czynnoci konserwacyjnych i czyszczcych naley wyczy urzdzenie i odczy je od zasilania. Urzdzenie naley równie wyczy z sieci w przypadku braku dostaw energii elektrycznej. • Nie wolno cign za przewód zasilajcy w celu odczenia od róda zasilania. Zawsze wyjmowa wtyk przewodu z gniazda, nigdy nie cign w tym celu za przewód. • Upewni si, e przewód zasilajcy nie dotyka ostrych krawdzi lub gorcych powierzchni. Przewód zasilajcy nie powinien zwisa ze stou lub blatu roboczego. Dzieci mog pocign za przewód, zrzucajc w ten sposób urzdzenie. d Nie zanurza urzdzenia w wodzie ani innych pynach i nie wkada do zmywarki. • Nigdy nie dotyka odkurzacza ani wtyczki mokrymi domi. • Chroni robot odkurzajcy przed wysok temperatur. • Robot odkurzajcy mona uywa tylko wtedy, gdy worek i filtry ochronne znajduj si na swoich miejscach. • Naley zawsze utrzymywa modu odkurzajcy w czystoci. • Wosy, odzie, palce i inne czci ciaa naley trzyma z dala od moduu odkurzajcego, rolek i kóek. • Nie naley uywa odkurzacza do czyszczenia zwierzt. • Nie wolno uywa urzdzenia w ograniczonej przestrzenie gdzie moe tworzy si eksplozyjna lub toksyczna para. • Nie uywa urzdzenia na wilgotnych powierzchniach ani na zewntrz. • W regularnych odstpach czasu sprawdza stan przewodu zasilajcego, zasilacza i pocze. • Unika pryskania wod na stacj adujc, zasilacz lub przewód zasilajcy. • Nie uywa stacji adujcej ani zasilacza w pobliu wanny, zlewu, prysznica lub naczy z wod. WSKAZÓWKI BEZPIECZESTWA 87 pl • Uywa wycznie zasilacza znajdujcego si w zestawie. • Po podczeniu do zasilania, nie dotyka zasilacza ani stacji adujcej mokrymi rkami. • Nigdy naley pozostawia wczonego urzdzenia ani stacji adujcej na wilgotnej powierzchni lub wilgotnym rczniku. • Nie naley siada i stawa na urzdzenie, poniewa moe to doprowadzi do uszkodzenia materiau urzdzenia. • Upewni si, e na pododze nie znajduj si przewody, kable i inne przedmioty dusze ni 150 mm. Nieprzestrzeganie zalecenia moe doprowadzi do zapltania rolek. UWAGA! Chcc pozby si urzdzenia, NIGDY nie naley wyrzuca go do kosza. Naley odda je do najbliszego PUNKTU SKADOWANIA I UTYLIZACJI odpadów. Takie dziaanie pomaga chroni rodowisko. q GÓWNE ELEMENTY 1 2 3 4 5 6 7 8 9 10 11 12 13 14 15 Korpus Pilot Automatyczna stacja adujca Wirtualna barierka Zasilacz Szczotka do czyszczenia Filtr (dwie sztuki) Boczna szczotka (dwie jednostki) Mop Przystawka do mopa Worek Przycisk zwalniajcy worek Przycisk zwalniajcy modu odkurzajcy Klapka filtra Modu odkurzajcy 16 17 18 19 20 21 22 23 24 25 26 27 28 29 Czujnik na podczerwie Uchwyt Przedni zderzak Zcze akumulatora Przecznik operacyjny Przycisk panelu sterowania Rolka gumowa Rolka rodkowa Boczne kóka Czujniki zderzeniowe Zcza kontaktowe stacji adujcej Czujniki wykrywania stopni Przednie kóko Lampa UV PRZYGOTOWANIE ROBOTA ODKURZAJ'CEGO DO ADOWANIA n Naley , uywa wycznie doczonego zasilacza i stacji adujcej. Nie uywa adnych innych urzdze. Przybliony czas adowania to 5 godzin na 60-90 min. pracy. Jeli akumulator jest adowany po raz pierwszy, naley go adowa przez ca noc. GÓWNE PODZESPOY STACJI ADUJ'CEJ (A) 1A 2A 3A 4A Ozdobna kontrolka LED Ozdobny przecznik LED Sygna nadawania Kontrolka wczenia LED 5A Wskanik naadowania 6A Zcza kontaktowe 7A Zcze zasilacza ADOWANIE Z WYKORZYSTANIEM STACJI ADUJ'CEJ (Rys. 1) ) Nie naley stawia adnych przedmiotów w pobliu stacji adujcej i naley sprawdzi, ) ) 88 czy obszar otaczajcy stacj jest wolny od mebli i przeszkód (patrz na schemacie zalecane odlegoci). W przypadku obecnoci przeszkód, robot nie znajdzie stacji adujcej. Ustawi stacj adujc w czystym, nie osonitym miejscu. W przypadku przykrycia nadajnika sygnaów na podczerwie (3A), robot nie znajdzie stacji adujcej. GÓWNE ELEMENTY 1 Ustawi stacj adujc na czystej pododze i na przeciw pionowej ciany. 2 Podczy zasilacz (7A) do zcza stacji adujcej. 3 Podczy zasilacz do sieci. Kontrolka wczenia LED (4A) wczy si na czerwono. Przecign przewód zasilajcy stacji adujcej wzdu ciany. Nieprzestrzeganie zalecenia moe doprowadzi do zapltania robota w przewodzie. , ) 4 Nacisn przycisk sterowania na pilocie lub przycisk na panelu sterowania robota. Robot odkurzajcy wyszuka stacj adujc i jeli stacja znajduje si w odpowiedniej odlegoci podczy si do niej. 5 Jeli uytkownik chce anulowa polecenie adowania w trakcie wyszukiwania, naley ponownie nacisn przycisk sterowania lub przycisk na pilocie . Robot odkurzajcy zatrzyma si. Sprawdzi, czy zcza robota (26) s podczone prawidowo do zczy stacji adujcej (6A). Podczas adowania, wskanik adowania na stacji adujcej (5A) wcza si a na panelu sterowania zaczyna miga. Po zakoczeniu adowania, wskanik adowania na stacji adujcej (5A) wcza si a na panelu sterowania przestaje miga i pozostaje wczony. Urzdzenie jest gotowe do uycia. ) , , Nie naley wycza stacji adujcej podczas odkurzania, poniewa robot odkurzajcy, jeli jego poziom naadowania akumulatora bdzie za niski powróci do stacji w celu naadowania. Mona umieci niewielk ilo aromatu na rodku ozdobnej kontrolki LED (1A). 6 Nacisn przecznik (2A). Kontrolka LED (1A) wczy si. Po rozgrzaniu, aromat z wntrza kontrolki LED rozprzestrzeni si. Niektóre aromaty mog uszkodzi powierzchni z tworzywa sztucznego. Naley sprawdzi, czy aromat nie uszkodzi powierzchni przed jego uyciem. , ) pl ADOWANIE BEZ STACJI ADUJ'CEJ (Rys. 2) 1 Podczy kabel zasilacza bezporednio do zcza (19) korpusu robota odkurzajcego (11). 2 Podczy zasilacz do sieci. Kontrolka wskanika LED, która wcza si na panelu sterowania robota zacznie miga podczas adowania i przestanie miga po zakoczeniu adowania. Podczas adowania bezporednio za pomoc przewodu zasilajcego nie mona wczy robota. 3 Po naadowaniu naley odczy zasilacz od zasilania, a nastpnie odczy przewód od zcza (19). Urzdzenie jest gotowe do uycia. Podczas adowania zasilacz nagrzewa si. Jest to normalne zjawisko, o ile temperatura ta nie jest nadmiernie wysoka. , , ) AUTOMATYCZNE ADOWANIE , Podczas ) czyszczenia robot zawsze rozpocznie automatyczne wyszukiwanie stacji adujcej, jeli poziom naadowania akumulatora bdzie za niski. Po zakoczeniu czyszczenia, temperatura akumulatora moe by wysoka i z tego wzgldu czas adowania moe by duszy. Porady dotycz*ce wyd+u,enia pracy baterii • Nie naley pozostawia podczonego zasilacza przez duszy okres. Po zakoczeniu adowania odczy zasilacz. ODKURZAJCEGO DO ADOWANIA 89 • Nie naley przechowywa ani adowa urzdzenia w pobliu grzejników, czy innych róde ciepa, ani wystawia na dziaanie promieni sonecznych. • Nie naley adowa urzdzenia w zanieczyszczonych lub wilgotnych miejscach. Temperatura pokojowa powinna wynosi od 5ºC do 35ºC. • Co kilka miesicy rozadowa cakowicie akumulatory i naadowa je ponownie. W tym celu skorzysta z urzdzenia w trybie bezprzewodowym do momentu zatrzymania i wyczy stacj adujc. Nastpnie, zgodnie z powyszymi zaleceniami naadowa akumulatory. • Jeli urzdzenie bdzie przechowywane przez duszy okres czasu, zalecamy cakowite naadowanie akumulatora, nastpnie wyjcie go i umieszczenie w chodnym, suchym miejscu. KORZYSTANIE Z URZ'DZENIA , To ) ) ) ) , , urzdzenie jest specjalnie przeznaczone do odkurzania podóg i podóg dywanowych. Nadaje si do codziennego uytku, pozwala na uniknicie gromadzenia si zanieczyszcze. Nigdy nie odkurza tlcego si popiou, szkie i innych ostrych przedmiotów lub cieczy. Nie odkurza tlcych si zapaek lub niedopaków papierosów. Nie odkurza materiaów toksycznych (amoniaku itp.). Cakowicie usun wszystkie elementy opakowania i zabezpieczenia stosowane podczas transportu. Nie naley uywa robota odkurzajcego midzy maymi stolikami, krzesami lub w ograniczonych przestrzeniach. Nieprzestrzeganie zalecenia moe doprowadzi do uszkodzenia odkurzacza. Do skutecznego czyszczenia caej podogi, robot odkurzajcy wykorzystuje róne ustawienia: spiralny ruch do bardziej intensywnego czyszczenia zanieczyszczonych miejsc, jazda przy cianie do czyszczenia obwodu pomieszczenia i tryb przejazdu przez pomieszczenie zapewniajcy pene czyszczenie Robot odkurzajcy do odkurzenia redniej wielkoci pomieszczenia potrzebuje okoo 45 minut. Robot odkurza ten sam obszar kilkakrotnie, co pozwala na odkurzenie caej powierzchni. PANEL STEROWANIA ROBOTA ODKURZAJ CEGO Wczenie/wyczenie robota odkurzajcego Przycisk adowania: wcza si po naciniciu, wycza po podczeniu robota do stacji adujcej. Wskanik adowania: miga podczas adowania. wieci si po zakoczeniu adowania. Lampa UV: wcza si po naciniciu, lampa dezynfekujca pracuje w trakcie odkurzania. 1 Usun z podogi wszystkie przedmioty, które mog uszkodzi robot odkurzajcy (np. lampy, butelki). 2 Sprawdzi, czy worek (11) jest prawidowo zaoony. Patrz rozdzia („CZYSZCZENIE I PRZECHOWYWANIE”). 90 KORZYSTANIE Z URZDZENIA 3 Ustawi wirtualn barierk (4) w wybranym miejscu, aby unikn przedostania si robota w wybrany obszar. Patrz rozdzia („WIRTUALNA BARIERKA”). 4 Uruchamianie robota odkurzajcego. Aby uruchomi robot odkurzajcy, ustawi przecznik operacyjny (20) w pozycji ON. 5 Sprawdzi, czy robot odkurzajcy jest naadowany. Jeli kontrolka wskanika LED na panelu sterujcym robota zacznie miga, naley naadowa robot. Patrz rozdzia („PRZYGOTOWANIE URZDZENIA. ADOWANIE ROBOTA ODKURZAJCEGO”). 6 Jeli robot odkurzajcy ma by uywany w trybie automatycznym, naley zaprogramowa jego prac korzystajc z pilota. Patrz rozdzia („PILOT”). 7 Nacisn przycisk na panelu robota. Robot odkurzajcy rozpocznie prac korzystajc ze wzorców odkurzania. Uytkownik moe kontrolowa ruchy i funkcje robota za pomoc przycisków na pilocie (patrz rozdzia „PILOT”) lub za pomoc przycisków na panelu sterowania na korpusie robota odkurzajcego. Nacisn przycisk UV, jeli obszar z przodu ma zosta odkaony. Ta funkcja jest szczególnie zalecana w przypadku osób cierpicych na alergie i w domostwach, w których mieszkaj zwierzta, poniewa pozwala na usunicie wirusów i bakterii. 8 Ponownie nacisn przycisk , aby zatrzyma proces odkurzania. 9 Jeli uytkownik nie chce skorzysta z zaprogramowanego tygodniowego odkurzania powinien wyczy urzdzenie po zakoczeniu odkurzania. W tym celu, naley ustawi przecznik operacyjny (20) w pozycji OFF lub nacisn przycisk ON/OFF na pilocie. 10 Odczy stacj adujc od zasilania. , , , WIRTUALNA BARIERKA GÓWNE PODZESPOY (B) 1B Wcznik i dugo wirtualnej barierki Wyczony Krótki zakres = 4 m redni zakres = 6 m Dugi zakres = 8 m 2B 3B 4B 5B 6B pl Kontrolka wczenia LED Gowica czujnika zblieniowego Gowica czujnika wirtualnej barierki Pokrywa przedziau akumulatora Zacisk pokrywy akumulatora OBSUGA , Wirtualna barierka suy do okrelenia obszaru przeznaczonego do odkurzenia. Zapobiega przedostawaniu si robotaw niechciane miejsca. Naley uy barierki, aby zapobiec wjedaniu robota w miejsca, w których znajduj si kable lub do poszczególnego pomieszczenia. Ustawi wirtualn barierk na tym samym poziomie, na powierzchni na której ma zosta uyty robot odkurzajcy. Aby unikn zakóce, ustawi wirtualn barierk i stacj adujc w odlegoci ponad 3 m od siebie. Nie naley stawia stacji adujcej w zasigu sygnau wirtualnej barierki. Gowica czujnika zblieniowego (3B) zapobiega zderzeniom robota odkurzajcego z wirtualn barierk. Robot odkurzajcy moe znale si w odlegoci nie mniejszej ni 0,5-1 m od barierki. 1 Naley sprawdzi poziom naadowania akumulatorów. 2 Ustawi wirtualn barierk tak, aby blokowaa obszar do którego nie ma przedosta si robot odkurzajcy. (rys. 3). ) ) ) , WIRTUALNA BARIERKA 91 3 Usun wszystkie przedmioty, które znajduj si z przodu barierki, aby zapobiec jej nieprawidowemu dziaaniu. 4 Wybra dan dugo wirtualnej barierki. W tym celu naley ustawi przecznik (B) na krótki, redni lub dugi zakres. Korzysta z odpowiedniej dugoci barierki. Czas pracy akumulatora zaley od wybranej odlegoci czujnika. Kontrolka wczenia LED (2B) bdzie miga co 8 sekund do momentu wyczerpania akumulatora. 5 Sprawdzi, czy robot odkurzajcy nie przedostanie si przez granic utworzon przez wirtualn barierk. 6 Ustawi przecznik (B) w pozycji OFF , jeli wirtualna barierka nie jest potrzebna. Mog pojawi si niewielkie rónice w kierunku sygnau na podczerwie wirtualnej barierki oraz w zasigu odbioru robota z powodu ruchów jakie wykonuje robot podczas odkurzania. Te rónice mog zmienia si w zalenoci od otoczenia roboczego oraz poziomu naadowania robota i wirtualnej barierki. , , , PILOT PODZESPOY (C) 1 2 3 4 Wcznik/wycznik robota odkurzajcego Przyciski kierunkowe Przycisk potwierdzenia Przyciski sterujce Wcz/Niedziela Zatrzymanie tymczasowe/Poniedziaek 5 Wywietlacz (rys. 4) a Ikona sygnau nadawania b Zaprogramowane dni tygodnia c Biecy dzie tygodnia d Czas e Ikona bdu f Ikona funkcji Ustawienie czasu/Wtorek adowanie/roda Timer/Czwartek Szybkie czyszczenie/Pitek Wyczy po naadowaniu/Sobota Wolne czyszczenie/codziennie TIMER Synchronizacja pilota i robota odkurzaj*cego (rys. 5) , Zsynchronizowa pilot i robot odkurzajcy przed pierwszym uyciem i po zakoczeniu wykonywania czynnoci konserwacyjnych. W tym celu: 1 Sprawdzi, czy akumulatory robota odkurzajcego oraz pilota s wystarczajco naadowane. 2 Wyczy robot. Aby wyczy robot odkurzajcy, ustawi przecznik operacyjny (20) w pozycji OFF. 3 Nacisn przycisk przez okres duszy ni 4 sekundy. Ustawi ponownie przecznik operacyjny (20) w pozycji ON, bez zwalniania przycisku . Po prawidowym przeprowadzeniu synchronizacji, robot wyemituje dwa sygnay dwikowe. , 92 PILOT Ustawianie daty i godziny (rys. 6) , Aby upewni si, e robot rozpocznie prac w okrelonym czasie, naley zapisa 1 2 3 4 ) aktualn dat i godzin. Nacisn przycisk . Spowoduje to otwarcie funkcji ustawiania dnia. Nacisn przycisk dnia odpowiadajcy biecemu dniu tygodnia (SU= Niedziela, MO= Poniedziaek, TU= Wtorek, WE= roda, TH= Czwartek, FR= Pitek, SA= Sobota). Nacisn strzaki , aby przechodzi midzy polami „godzina” i „minuty”. Nacisn strzaki , aby wybra biec „godzin” i „minuty”. Nacisn , aby zatwierdzi wybór. Nacisn , jeli ustawienie ma zosta anulowane. Planowanie automatycznego odkurzania tygodniowego (rys. 7) Przy wyczonym robocie. 1 Nacisn przycisk na pilocie. 2 Nacisn przycisk dnia odpowiadajcy dniu tygodnia, który ma zosta zaprogramowany. Wybra jeden, kilka lub wszystkie dni tygodnia. Wybrane dni zaczn miga. 3 Nacisn strzaki , aby ustawi dokadn godzin odkurzania. Nacisn strzaki „w gór” i „w dó”, aby wybra godzin i minuty. 4 Nacisn , aby zatwierdzi wybór. Nacisn przycisk ON/OFF jeli ustawienie ma zosta anulowane. Aby robot odkurzajcy rozpocz odkurzanie o zaplanowanej godzinie musi by wczony. Przecznik operacyjny (20) w pozycji ON i wczony . ) ) FUNKCJE DODATKOWE Funkcja FULL GO ) Po wybraniu tej funkcji, robot odkurzajcy bdzie kontynuowa odkurzanie po naadowaniu akumulatora. 1 Nacisn przycisk . Robot odkurzajcy musi by wczony. FULL GO wczy si na wywietlaczu pilota. Przed cakowitym wyczerpaniem akumulatora robot rozpocznie wyszukiwanie stacji adujcej i rozpocznie odkurzanie w sposób automatyczny po cakowitym naadowaniu akumulatora. , Funkcja SPEED 1 Nacisn przycisk , aby wybra szybkie odkurzanie. FAST wczy si na wywietlaczu pilota. 2 Nacisn przycisk , aby wybra wolne odkurzanie. SLOW wczy si na wywietlaczu pilota. , , KODY B/DÓW Jeli robot nie dziaa w prawidowy sposób z powodu wystpienia jednego z powyszych warunków, wówczas wszystkie przyciski na panelu sterowania robota zaczn miga jednoczenie. 1 Nacisn przycisk na pilocie. Sprawdzi, czy sygna z pilota mieci si w aktywnym zasigu urzdzenia. Ikona bdu pojawi si na wywietlaczu pilota obok jednego z przedstawionych poniej kodów bdu. , PILOT 93 pl 2 Wykona dziaania opisane poniej w zalenoci od typu wywietlanego bdu. KOD PRZYCZYNA USTERKI ROZWI'ZANIE E01 Czujniki wykrywacza stopni Wyczyci czujniki (27). E02 Rolka rodkowa Usun zanieczyszczenia i wosy uwizione w rolce (23). E03 Niski stan naadowania akumulatora Naadowa akumulator. E04 Boczne kóka Usun zanieczyszczenia i wosy uwizione w kókach. E05 Worek Woy prawidowo worek (11). B/DU , Jeli usterka nie zostanie usunita po przeprowadzeniu tych czynnoci, nie naley uywa robota i zleci jego napraw w autoryzowanym centrum serwisowym. Nie dokonywa adnych przeróbek ani nie naprawia urzdzenia. PRZECHOWYWANIE n Przed rozpoczciem prac czyszczcych i konserwacyjnych, naley sprawdzi, czy przecznik operacyjny (20) znajduje si w pozycji OFF i, czy urzdzenie jest podczone do zasilania. Naley sprawdzi przed montaem, czy wszystkie umyte elementy s cakowicie suche. Nie zanurza moduu odkurzajcego (15) w wodzie ani innych pynach i nie wkada go do zmywarki. Nie uywa ciernych rodków czyszczcych lub rozpuszczalników. W celu uzyskania najlepszej wydajnoci robota odkurzajcego, zalecamy czyszczenie worka i filtra po 3-krotnym odkurzaniu. ) ) OPRÓ:NIANIE WORKA (11) 1 Przytrzyma nacinity przycisk zwalniajcy (12). Wyj worek (11). (rys. 8) 2 Umieci worek nad pojemnikiem na mieci, pocign klapk (14), aby otworzy uchwyt filtra i wysypa zawarto do pojemnika. (rys. 9) CZYSZCZENIE I WYMIANA FILTRA (7) ) Naley regularnie sprawdza filtr pod ktem prawidowego dziaania. W przypadku zmniejszenia wydajnoci odkurzania, naley dokadnie wyczyci filtr. ) Wymian filtrów zaleca si przeprowadzi raz lub dwa razy w roku, w zalenoci od tego jak czsto korzysta si z robota. 1 Opróni worek w sposób wskazany w rozdziale „OPRÓNIANIE WORKA (11)”. 2 Wyj filtr (7). Nacisn jedn rk pókolisty uchwyt w celu wyjcia zuytego filtra z uchwytu (rys. 10) 3 Delikatnie wstrzsn wyjtym filtrem nad pojemnikiem na mieci w celu usunicia zanieczyszcze. Nigdy nie naley uywa robota odkurzajcego bez woonego filtra (7). 4 Wyczyci filtr za pomoc szczotki do czyszczenia (6) (rys. 11). 5 Woy wyczyszczony lub nowy filtr (jeli jego wymiana jest konieczna) w uchwyt. ) CZYSZCZENIE WORKA (11) 1 Nacisn przycisk (13). Spowoduje to zwolnienie moduu odkurzajcego (15) (rys. 12). 2 Obróci modu odkurzajcy, zwolni dwie klapki i zdj pokryw. 3 Wyczyci wntrze za pomoc szczotki do czyszczenia (6) (rys. 13). 94 PRZECHOWYWANIE 4 Do czyszczenia moduu odkurzajcego (15) oraz wlotu i wylotu powietrza uy szczotki do czyszczenia (rys. 13). Nie naley czyci moduu odkurzajcego za pomoc wody. 5 Zaoy worek w korpusie urzdzenia. Nacisn na worek do momentu kliknicia, które wskazuje, e worek zosta woony w prawidowy sposób. ) CZYSZCZENIE I WYMIANA MOPA (9) ) Nie naley uywa mopa na dywanach i podogach, które nie s cakowicie równe. 1 W takich przypadkach, wymontowa przystawk mopa (10). Obróci przystawk mopa i odczepi dwie klapki z prawej i lewej strony (rys. 14). 2 Aby wymieni mop (9), naley go wycign i zaoy na jego miejsce nowy mop (rys. 14). DEMONTA: I CZYSZCZENIE SZCZOTEK W celu uzyskania najlepszej wydajnoci robota odkurzajcego, zalecamy czyszczenie rolek i szczotek po 3-krotnym odkurzaniu. Rolki (22) oraz (23) 1 Popchn w ty klapk i unie prt mocujcy (rys. 15). Rolki zostan zwolnione. 2 Wyj rolki (22) oraz (23). 3 Wyczyci rolki za pomoc szczotki do czyszczenia (6) (rys. 16). 4 Ponownie woy rolki i prt mocujcy dociskajc do momentu kliknicia, które oznacza prawidowe zamocowanie elementów , Boczna szczotka (8) , Aby unikn awarii robota, naley regularnie czyci boczn szczotk. 1 Za pomoc rk usun wszystkie wosy i zanieczyszczenia znajdujce si na bocznej szczotce. 2 Jeli usunicie zanieczyszcze przysparza trudnoci, uy noyczek. Jeli jest to konieczne, odkrci rub i wyj boczn szczotk (8) z korpusu w celu bardziej skutecznego wyczyszczenia (rys. 17). 3 Woy boczn szczotk w obudow. , DEMONTA: I CZYSZCZENIE KÓEK Boczne kó+ka 1 Odkrci ruby kóek (rys. 18). 2 Wymontowa kóka z ich obudowy i wyczyci je. Nie naley czyci kóek za pomoc wody, oleju i smaru. Zamontowa kóka w obudowie i dokrci za pomoc wkrtaka. ) ) Przednie kó+ko W przypadku zablokowanie przedniego kóka (lub jeli kóko nie obraca si swobodnie), naley wymontowa je w celu wyczyszczenia (rys. 18). 1 Wymontowa kóko za pomoc odpowiedniego narzdzia (które dziaa na zasadzie dwigni). 2 Zamontowa kóko po zakoczeniu czyszczenia wciskajc je w obudow. PRZECHOWYWANIE 95 pl CZYSZCZENIE CZUJNIKÓW ZDERZENIOWYCH (25) I CZUJNIKÓW WYKRYWANIA STOPNI (27) , Aby robot odkurzajcy dziaa w prawidowy sposób, jego czujniki na podczerwie powinny by utrzymywane w czystoci. 1 Wyczyci czujniki za pomoc bawenianej lub mikkiej cierki (rys. 19). CZYSZCZENIE URZ'DZENIA n Naley upewni si, e do wntrza urzdzenia nie przedostaje si woda. ) Urzdzenie powinno zosta wyczyszczone przed pierwszym uyciem, a take bezporednio po kadym uyciu oraz duszym okresie przechowywania. Dziki temu urzdzenie bdzie dziaa w prawidowy sposób i jego okres uytkowania bdzie duszy. 1 Elementy zewntrzne urzdzenia naley czyci wilgotn cierk. Nie uywa ciernych rodków czyszczcych lub rozpuszczalników. WYMIANA AKUMULATORÓW WYMIANA AKUMULATORÓW WIRTUALNEJ BARIERKI (rys. 20) 1 Obróci blokad pokrywy akumulatora (6B) do momentu zwolnienia pokrywy (5B). 2 Umieci akumulatory w przedziale przeznaczonym do tego celu. Woy akumulatory zgodnie z ich polaryzacj. Jeli robot nie bdzie uywany przez duszy okres czasu naley wyj z niego akumulatory. , WYMIANA AKUMULATORÓW W PILOCIE (rys. 21) 1 Otworzy pokryw przedziau akumulatora. 2 Umieci akumulatory w przedziale przeznaczonym do tego celu. Woy akumulatory zgodnie z ich polaryzacj. Jeli robot nie bdzie uywany przez duszy okres czasu naley wyj z niego akumulatory. , 96 WYMIANA AKUMULATORÓW . SLOVENINA BEZPENOSTNÉ POKYNY • Pred použitím zariadenia si pozorne preítajte tieto pokyny. • Táto príruka je neoddelitenou súasou výrobku. Odložte si ju na bezpené miesto pre prípad potreby v budúcnosti. • Toto zariadenie je urené výhradne na použitie v domácnosti, nie na priemyselné použitie. Je nebezpené používa spotrebi na iné úely, na aké je urený, (napr. vysávanie kvapalín, prachu zo stavebných prác, cementu, at.) • Deti by mali by pod dozorom, aby ste sa uistili, že sa so zariadením nehrajú. • Toto zariadenie nie je urené na používanie osobami (vrátane detí) so zníženými telesnými, zmyslovými alebo mentálnymi schopnosami alebo s nedostatkom skúseností a znalostí bez dozoru alebo bez predchádzajúceho vysvetlenia použitia zariadenia osobou, ktorá je zodpovedná za ich bezpenos. • Na zariadení nevykonávajte žiadne modifikácie ani opravy. Ak na napájacom kábli alebo na inej asti zariadenie zistíte akékovek poškodenie, obráte sa prosím, na špecializované servisné stredisko. • Nepoužívajte asti alebo náhradné príslušenstvo, ktoré nebolo dodané alebo odporuené výrobcom SOLAC. • Pred pripojením zariadenia ku zdroju elektrickej energie skontrolujte, i menovité napätie zodpovedá napätiu u vás doma. • Zariadenie pred demontážou alebo montážou astí a pred vykonaním akejkovek údržby alebo istenia vypnite a odpojte od zdroja elektrickej energie. Zariadenie odpojte aj v prípade výpadku elektrického prúdu. • Nepoužívajte šnúru na zavesenie zariadenia. Pri odpájaní spotrebia zo zásuvky nikdy neahajte za šnúru, ale za zástrku. • Uistite sa, že napájací kábel nie je v kontakte s ostrými hranami alebo s horúcimi povrchmi. Šnúru nenechávajte visie cez okraj stola alebo pultu, aby za u nepotiahli deti a spotrebi nezhodili. d • • • • • • • • • • • Zariadenie nenamáajte ani neponárajte do vody ani inej tekutiny a nedávajte ho do umývaky na riad. Nikdy nemanipulujte so zástrkou alebo s vysávaom s mokrými rukami. Robotický vysáva chráte pred teplom. Robotický vysáva nikdy nepoužívajte bez správne vloženej prachovej nádoby alebo ochranného filtra. Vysávací modul vždy udržujte v istote. Udržujte vlasy, šatstvo, prsty a všetky ostatné asti tela mimo vysávacieho modulu, valcov a kolies. Nepoužívajte vysáva na istenie zvierat. Nepoužívajte vysáva v stiesnených priestoroch, kde je riziko prítomnosti výbušných alebo toxických výparov. Zariadenie nepoužívajte na mokrých povrchoch alebo v exteriéroch. V pravidelných intervaloch kontrolujte stav napájacieho kábla, napájacieho adaptéra a pripojenia. Zabráte ošpliechaniu nabíjacej stanice, adaptéra alebo sieového kábla. Poas prevádzky nepoužívajte nabíjaciu stanicu ani adaptér v blízkosti vane, umývadla, sprchy alebo akýchkovek iných predmetov obsahujúcich vodu. BEZPENOSTNÉ POKYNY 97 sk • Používajte len priložený adaptér. • Ke sú adaptér alebo nabíjacia stanica zapojené do elektrickej siete, nedotýkajte sa ich mokrými rukami. • Nikdy nenechávajte prístroj ani nabíjaciu stanicu na mokrých povrchoch alebo textile, ke sú zapnuté. • Nesadajte si na zariadenie ani nestojte pred ním, pretože by mohlo dôjs k poškodeniu materiálu zariadenia. • Ubezpete sa, že na podlahe nie sú žiadne drôty, káble ani iné predmety dlhšie ako 150 mm, pretože by sa mohli zamota do kolies. UPOZORNENIE! Ak chcete prístroj odstráni, NIKDY ho nevyhadzujte do odpadu. Odneste ho na najbližšie MIESTO ZBERU alebo do najbližšieho centra zberu odpadkov na alšie spracovanie. Pomôžete tým životnému prostrediu. q HLAVNÉ PRVKY 1 2 3 4 5 6 7 8 9 10 11 12 13 14 15 Hlavné teleso Diakový ovláda Automatická nabíjacia stanica Virtuálna bariéra Adaptér istiaca kefka Filter (dve jednotky) Boná kefa (dve jednotky) Mop Príslušenstvo k mopu Nádoba na prach Tlaidlo uvonenia nádoby na prach Tlaidlo uvonenia vysávacieho modulu Jazýek filtra Vysávací modul 16 17 18 19 20 21 22 23 24 25 26 27 28 29 Infraervený sníma Rukovä Predný nárazník Konektor adaptéra batérie Vypína Panel s ovládacími tlaidlami Gumený valec Centrálny valec Boné kolieska Snímae kolízie Konektory kontaktu nabíjacej stanice Snímae detektora schodov Predné koleso UV svetlo PRÍPRAVA ZARIADENIA NABÍJANIE ROBOTICKÉHO VYSÁVAA n Používajte len priložený adaptér a nabíjaciu stanicu. Nikdy nepoužívajte iné adaptéry , alebo stanice. as nabíjania je približne 5 hodín na 60-90 minút prevádzky. Pri prvom nabíjaní batérie ju nechajte nabíja celú noc. HLAVNÉ KOMPONENTY NABÍJACEJ STANICE (A) 1A 2A 3A 4A Dekoratívna LED dióda Spína s dekoratívnou LED diódou Signál vysielania Indikátor LED ON (LED dióda zapnutá) 5A Indikátor nabíjania 6A Konektory kontaktu 7A Konektor adaptéra NABÍJANIE POMOCOU NABÍJACEJ STANICE (Obr. 1) ) Do blízkosti nabíjacej stanice neumiestujte žiadne predmety a ubezpete sa, že v jej ) 98 okolí sa nenachádza žiadny nábytok ani prekážky (pozrite si odporúané vzdialenosti v nákrese). Robotický vysáva nenájde nabíjaciu stanicu, ak mu budú v ceste stá prekážky. Nabíjaciu stanicu umiestnite na voné miesto bez prekážok. HLAVNÉ PRVKY ) Robotický vysáva nenájde nabíjaciu stanicu, ak je vysiela infraerveného signálu 1 2 3 , ) 4 5 ) , (3A) zakrytý. Umiestnite nabíjaciu stanicu na istú podlahu a oproti zvislej stene. Pripojte adaptér (7A) ku konektoru nabíjacej stanice. Pripojte adaptér do elektrickej siete. Indikátor LED ON (LED dióda zapnutá) (4A) sa rozsvieti naerveno. Sieový kábel nabíjacej stanice položte pozdž steny, inak sa do robotický vysáva môže zamota. Stlate tlaidlo ovládania na diakovom ovládai alebo tlaidlo na ovládacom paneli robotického vysávaa. Robotický vysáva vyhadá nabíjaciu stanicu, ak je vo vhodnej vzdialenosti a pripojí sa k nej. Ak chcete zruši príkaz nabíjania poas vyhadávania, znovu stlate tlaidlo ovládania alebo tlaidlo na diakovom ovládai. Robotický vysáva sa zastaví. Skontrolujte, i sa konektory robotického vysávaa (26) správne pripájajú ku konektorom nabíjacej stanice (6A). Poas nabíjania budú signalizané svetlá nabíjania na nabíjacej stanici (5A) a na ovládacom paneli blika. Po ukonení nabíjania signalizané svetlá nabíjania na nabíjacej stanici (5A) a na ovládacom paneli prestanú blika a zostanú rozsvietené. Prístroj je pripravený na použitie. , Nevypínajte nabíjaciu stanicu poas vysávania, pretože robotický vysáva sa k nej vráti, aby sa nabil, ak sa jeho batérie takmer vybijú. Ak chcete, do stredu dekoratívnej LED diódy (1A) môžete da malé množstvo aromatickej látky poda vášho výberu. 6 Stlate vypína (2A). LED dióda (1A) sa rozsvieti. Ke sa aromatická látka zohreje, zvnútra LED diódy sa bude šíri jej vôa. Niektoré aromatické látky môžu poškodi plastový povrch. Pred použitím skontrolujte, i aromatická látka nepoškodí povrch. , ) NABÍJANIE BEZ NABÍJACEJ STANICE (Obr. 2) 1 Pripojte kábel adaptéra priamo ku konektoru (19) na tele robotického vysávaa (11). 2 Pripojte adaptér do elektrickej siete. Signalizaná LED dióda na ovládacom paneli robotického vysávaa bude poas nabíjania blika a po ukonení nabíjania prestane blika. Robotický vysáva sa nedá zapnú, ke sa priamo nabíja pomocou sieového kábla. 3 Po nabití odpojte adaptér od siete a potom odpojte kábel od konektora (19). Prístroj je pripravený na použitie. Adaptér sa poas nabíjania mierne zohrieva. Tento jav je bežný, nesmie však nasta nadmerné zahriatie. , , ) AUTOMATICKÉ NABÍJANIE , Poas istenia robotický vysáva vždy automaticky vyhadá nabíjaciu stanicu, ke sa ) jeho batéria takmer vybije. Po istení môže by teplota batérie vysoká, preto môže nabíjanie trva dlhšie. Rady na pred;ženie životnosti batérie • Nenechávajte adaptér dlho zapojený do elektrickej siete. Po ukonení nabíjania ho odpojte. • Prístroj neuchovávajte alebo nenabíjajte v blízkosti radiátorov alebo iných zdrojov tepla, ani ho nevystavujte priamemu slnenému žiareniu. ROBOTICKÉHO VYSÁVAA 99 sk • Prístroj nenabíjajte na špinavých alebo vlhkých miestach. Optimálna teplota prostredia pre nabíjanie je 15 ºC až 35 ºC. • Pravidelne po niekokých mesiacoch nechajte batérie úplne vybi a potom ich opä nabite. Aby ste ich vybili, používajte zariadenie v bezdrôtovom režime, až kým sa nezastaví. Nabíjaciu stanicu nechajte vypnutú. Potom nabite batérie poda postupu uvedeného vyššie. • Pri skladovaní prístroja na dlhé obdobie odporúame, aby ste úplne nabili batériu, vytiahli ju a skladovali na chladnom, suchom mieste. POUŽÍVANIE ZARIADENIA , Tento prístroj je špeciálne urený na vysávanie podláh a podláh s kobercom. ) ) ) ) , , Tento prístroj je urený na každodennú údržbu podlahy, ím zabrauje hromadeniu neistôt a vzniku chumáov. Nikdy nevysávajte žeravý popol, triesky alebo iné ostré predmety alebo tekutiny. Nikdy nevysávajte zapálené zápalky ani cigaretové ohorky. Nevysávajte toxický materiál (napr. pavok). Úplne odstráte všetky prvky používané na prepravu a balenie. Nepoužívajte robotický vysáva medzi malými stolíkmi, stolikami alebo na vemi malých miestach. Mohlo by dôjs k jeho poškodeniu. Robotický vysáva používa nastavenia istenia na efektívne vyistenie celej podlahy: Špirálovitý pohyb na intenzívnejšie istenie na miestach, kde boli zistené neistoty, postup pozdž steny na istenie obvodu miestnosti a prechod krížom cez miestnos pre zabezpeenie úplného vyistenia. Vyistenie priemerne vekej miestnosti trvá robotickému vysávau približne 45 minút, priom niekokokrát prejde cez to isté miesto, aby bolo zabezpeené vyistenie celej plochy. OVLÁDACÍ PANEL ROBOTICKÉHO VYSÁVAA Spustenie/zastavenie robotického vysávaa Tlaidlo Charge (Nabíjanie): Rozsvieti sa po stlaení, zhasne, ke sa robotický vysáva pripojí k nabíjacej stanici. Indikátor nabíjania: Poas nabíjania bliká. Po ukonení nabíjania zostane rozsvietený. Ultrafialové svetlo: Rozsvieti sa po stlaení. Dezinfekné svetlo bude v prevádzke, ke robotický vysáva vykonáva istenie. 1 Odstráte z podlahy všetky predmety, ktoré by sa mohli rozbi alebo poškodi robotický vysáva (napr. lampy, faše). 2 Skontrolujte, i je prachová nádoba (11) správne nasadená. Pozrite si as („ISTENIE A SKLADOVANIE“). 3 Umiestnite virtuálnu bariéru (4) na mieste, kde chcete robotickému vysávau zabráni vo vstupe na špecifické miesto. Pozrite si as („VIRTUÁLNA BARIÉRA“). 4 Zapnite robotický vysáva. Ak to chcete urobi, prepnite ovládací vypína (20) do polohy ON (Zapnú). 5 Ubezpete sa, že istiaci robot je nabitý. 100 POUŽÍVANIE ZARIADENIA , Ak signalizané svetlo LED na ovládacom paneli robotického vysávaa 6 7 , , 8 9 10 bliká, nastavte robotický vysáva na nabíjanie. Pozrite si as („PRÍPRAVA PRÍSTROJA. NABÍJANIE ROBOTICKÉHO VYSÁVAA“) Ak chcete používa robotický vysáva v automatickom režime, naprogramujte jeho prevádzku pomocou diakového ovládaa. Pozrite si as („DIAKOVÝ OVLÁDA“). Stlate tlaidlo na paneli robotického vysávaa. Robotický vysáva potom zane fungova, priom bude nasledova dráhy istenia. Ak chcete, môžete ovláda jeho pohyby alebo funkcie pomocou tlaidiel diakového ovládaa (pozrite si as „DIAKOVÝ OVLÁDA“) alebo pomocou tlaidiel ovládacieho panela na tele robotického vysávaa. Ak chcete sterilizova prednú as, stlate tlaidlo UV. Táto funkcia sa obzvláš odporúa pre udí trpiacich alergiami a pre domácnosti so zvieratami, keže sterilizuje podlahu od vírusov a baktérií. Opätovným stlaením tlaidla pozastavíte proces istenia. Ak si neželáte naprogramované týždenné istenie, po istení prístroj vypnite. Ak to chcete urobi, prepnite vypína (20) do polohy OFF (Vypnú) alebo stlate tlaidlo ON/ OFF (Zapnú/vypnú) na diakovom ovládai. Nabíjaciu stanicu odpojte od napájania. VIRTUÁLNA BARIÉRA HLAVNÉ ASTI (B) 1B Spína ON (Zapnú) a džka virtuálnej bariéry Off (Vypnuté) Krátky rozsah = 4 m Stredný rozsah = 6 m Dlhý rozsah = 8 m 2B 3B 4B 5B 6B Indikátor LED ON (LED dióda zapnutá) Hlava snímaa blízkosti Hlava snímaa virtuálnej bariéry Kryt akumulátora Spona krytu batérie POUŽITIE , Virtuálnu bariéru použite na definovanie požadovanej oblasti istenia a zabránenie sk ) ) ) , 1 2 3 4 , robotickému vysávau vstupova na nepotrebné alebo neželané miesta. Použite túto funkciu na zabránenie robotickému vysávau vstupova do oblastí s káblami alebo do konkrétnej miestnosti. Umiestnite virtuálnu bariéru na rovnakú úrove na povrch, kde budete používa robotický vysáva. Umiestnite virtuálnu bariéru a nabíjaciu stanicu do vzdialenosti viac ako 3 m od seba, aby nedochádzalo k rušeniu. Neumiestujte nabíjaciu stanicu do dosahu signálu virtuálnej bariéry. Hlava snímaa blízkosti (3B) zabrauje nárazu medzi robotickým vysávaom a virtuálnou bariérou tak, že mu bráni priblíži sa na kratšiu vzdialenos ako 0,5 - 1 m od nej. Ubezpete sa, že batérie nie sú vybité. Umiestnite virtuálnu bariéru tak, aby blokovala oblas, do ktorej nechcete, aby robotický vysáva vstupoval. (obr. 3). Odstráte akékovek predmety, ktoré sa môžu nachádza pred virtuálnou bariérou, aby nedochádzalo k jej nesprávnemu fungovaniu. Zvote požadovanú džku virtuálnej bariéry. Ak to chcete urobi, nastavením spínaa (B) zvote krátky , stredný alebo dlhý rozsah. Použite vhodnú džku bariéry. Výdrž batérie závisí od zvolenej vzdialenosti snímaa. VIRTUÁLNA BARIÉRA 101 , Indikátor LED ON (LED dióda zapnutá) (2B) zabliká každých 8 sekúnd, pokým sa batéria nevybije. 5 Skontrolujte, i robotický vysáva nemôže prekroi hranicu vytvorenú virtuálnou bariérou. 6 Nastavte spína (B) do polohy OFF (Vypnú) , ke virtuálna bariéra nie je potrebná. Môžu sa vyskytnú urité rozdiely v smere infraerveného signálu virtuálnej bariéry a rozsahu príjmu robotického vysávaa, ktoré sú spôsobené pohybom robotického vysávaa poas používania. Tieto rozdiely sa môžu odlišova v závislosti od pracovného prostredia a úrovne nabitia robotického vysávaa a virtuálnej bariéry. , DIA<KOVÝ OVLÁDA KOMPONENTY (C) 1 2 3 4 Robotický vysáva ON/OFF (Zapnú/Vypnú) 5 Smerové tlaidlá Tlaidlo potvrdenia Ovládacie tlaidlá Štart/Nedea Doasné zastavenie/Pondelok Displej (obr. 4) a Ikona „vysielania signálu“ b Naprogramované dni týžda c Aktuálny de týžda d as e Ikona chyby f Ikona funkcie Nastavenie asu/Utorok Nabíjanie/Streda asova/Štvrtok Rýchle istenie/Piatok istenie po nabíjaní/Sobota Pomalé istenie/každý de ASOVA Synchronizácia dia=kového ovládaa a robotického vysávaa (obr. 5) , Zosynchronizujte diakový ovláda a robotický vysáva pred prvým použitím a po údržbe. Postup: 1 Skontrolujte, i sú batérie robotického vysávaa a diakového ovládaa dostatone nabité. 2 Vypnite robotický vysáva. Ak to chcete urobi, prepnite vypína (20) do polohy OFF (Vypnú). 3 Stlate tlaidlo na viac ako 4 sekundy. Vráte vypína (20) do polohy ON (Zapnú) bez toho, aby ste pustili tlaidlo . Po správnom vykonaní synchronizácie robotický vysáva dvakrát zapípa. , Nastavenie d>a a asu (obr. 6) , Aby sa zaistilo, že robotický vysáva sa spustí v nastavenom ase, musí by nastavený 1 2 3 4 102 aktuálny de týžda a as. Stlate tlaidlo . Otvorí sa funkcia nastavenia da. Stlate tlaidlo da zodpovedajúce aktuálnemu du týžda (SU= nedea, MO= pondelok, TU= utorok, WE= streda, TH= štvrtok, FR= piatok, SA= sobota). Pomocou šípok sa presúvajte medzi poami „hodiny“ a „minúty“. Stlaením šípok zvote aktuálne „hodiny“ a „minúty“. Stlaením tlaidla potvrte výber. DIAKOVÝ OVLÁDA ) Stlate tlaidlo , ak chcete zruši nastavenie. Plánovanie automatického týždenného istenia (obr. 7) S vypnutým robotickým vysávaom. 1 Stlate tlaidlo na diakovom ovládai. 2 Stlate tlaidlo da zodpovedajúce du týžda, ktorý chcete naprogramova. Zvote jeden, niekoko alebo všetky dni týžda. Zvolené dni budú blika. 3 Stlaením šípok nastavte presný as istenia. Stláaním šípok „nahor“ a „nadol“ zvote hodiny a minúty. 4 Stlaením tlaidla potvrte výber. Stlate tlaidlo ON/OFF (Zapnú/Vypnú) , ak chcete zruši nastavenie. Aby sa robotický vysáva spustil v plánovanom ase, musí by zapnutý. Prevádzkový vypína (20) v polohe ON (Zapnú) a svieti. ) ) ?ALŠIE FUNKCIE Funkcia FULL GO ) Ak je zvolená táto funkcia, robotický vysáva je naprogramovaný na pokraovanie v istení, ke sa úplne nabije. 1 Stlate tlaidlo . Robotický vysáva musí by zapnutý. FULL GO sa rozsvieti na displeji diakového ovládaa. Robotický vysáva vyhadá pred vybitím batérie nabíjaciu stanicu a po úplnom nabití zane automaticky s istením. , Funkcia SPEED (RÝCHLOS@) 1 Stlaením tlaidla zvote rýchle istenie. Na displeji diakového ovládaa sa rozsvieti FAST . 2 Stlaením tlaidla zvote pomalé istenie. Na displeji diakového ovládaa sa rozsvieti SLOW . , , KÓDY CHÝB Ak robotický vysáva správne nefunguje kvôli jednej z nasledovných okolností, všetky tlaidlá ovládacieho panelu robotického vysávaa budú blika súasne. 1 Stlate tlaidlo na diakovom ovládai. Skontrolujte, i je signál diakového ovládaa v aktívnom dosahu prístroja. Na displeji diakového ovládaa veda jedného z nižšie uvedených kódov chýb sa zobrazí ikona chyby . 2 V závislosti od zobrazenej chyby vykonajte nižšie uvedené innosti. , KÓD PRÍINA PORUCHY RIEŠENIE E01 Snímae detektora schodov Vyistite snímae (27). E02 Centrálny valec Odstráte akékovek neistoty a vlasy zachytené vo valci (23). E03 Nízke napätie batérie Nabite batériu. E04 Boné kolieska Odstráte akékovek neistoty a vlasy zachytené v kolesách. E05 Nádoba na prach Nádobu na prach nasate správne (11). CHYBY , Ke po vykonaní týchto inností chyba stále pretrváva, nepoužívajte prístroj a vezmite ho do autorizovaného servisu. Zariadenie neupravujte ani neopravujte. DIAKOVÝ OVLÁDA 103 sk USKLADNENIE A ISTENIE n Vždy pred istením alebo údržbou sa ubezpete, že prevádzkový vypína (20) je v polohe OFF (vypnuté) a že prístroj nie je pripojený k elektrickej sieti. ) Pred montážou sa ubezpete, že všetky umyté prvky sú úplne suché. ) Vysávací modul (15) nikdy neponárajte do vody alebo inej kvapaliny. Tiež ho nevkladajte do umývaky riadu. Nepoužívajte abrazívne prostriedky ani rozpúšadlá. Pre o najlepšiu výkonnos robotického vysávaa odporúame, aby ste vyistili nádobu na prach a filter vždy po 3 použitiach. VYPRÁZDNENIE NÁDOBY NA PRACH (11) 1 Podržte tlaidlo uvonenia (12) stlaené. Vytiahnite nádobu na prach (11). (obr. 8) 2 Umiestnite nádobu na prach nad smetný kôš, potiahnutím jazýka (14) otvorte držiak filtra a vyprázdnite obsah do smetného koša. (obr. 9) ISTENIE A VÝMENA FILTRA (7) ) Odporúa sa pravidelne kontrolova filter a presvedi sa, i správne funguje. Ak spozorujete zníženie sacieho výkonu prístroja, dôkladne vyistite filter. ) Odporúame vymeni filter jedenkrát alebo dvakrát rone, v závislosti od toho, ako asto spotrebi používate. 1 Vyprázdnite nádobu na prach poda popisu v asti „VYPRÁZDNENIE NÁDOBY NA PRACH (11)“. 2 Vyberte filter (7). Stlate polkruhový držiak jednou rukou, aby ste mohli vytiahnu použitý filter z držiaka (obr. 10) 3 Vytiahnutý filter jemne vytraste o bonú stranu smetného koša, aby ste odstránili prebytoný prach a neistoty. Robotický vysáva nikdy nepoužívajte bez filtra (7). 4 Filter vyistite pomocou kefky na istenie (6) (obr. 11). 5 Vráte istý filter (alebo nový filter, ak je to potrebné) do držiaka. ) ISTENIE NÁDOBY NA PRACH (11) 1 2 3 4 Stlate tlaidlo (13). Tým sa uvoní vysávací modul (15) (obr. 12). Otote vysávací modul, uvonite dva jazýky a odložte veko. Vnútro nádoby vyistite pomocou kefky na istenie (6) (obr. 13). Kefku na istenie použite na vyistenie vysávacieho modulu (15) a jednotky nasávania a vyfukovania vzduchu (obr. 13). Vysávací modul neistite vodou. 5 Nádobu na prach vložte do telesa zariadenia. Zatlate nádobu, až kým nezaujete, že zapadla, o znamená, že je správne vložená v telese. ) ISTENIE A VÝMENA MOPU (9) ) Nepoužívajte mop na koberekoch, kobercoch alebo podlahách, ktoré nie sú úplne hladké. 1 V takých prípadoch odstráte nadstavec mopu (10). Otote nadstavec mopu a odistite avý a pravý jazýek (obr. 14). 2 Ak chcete vymeni mop (9), vytiahnite ho a na jeho miesto vložte nový (obr. 14). DEMONTÁŽ A ISTENIE KIEF Pre o najlepšiu výkonnos robotického vysávaa odporúame, aby ste vyistili valce a kefy vždy po 3 použitiach. Valce (22) a (23) 1 Potlate jazýek dozadu a zdvihnite upevovaciu lištu (obr. 15). 104 USKLADNENIE A ISTENIE , Valce sa uvonia. 2 Vyberte valce (22) a (23). 3 Valce vyistite pomocou kefky na istenie (6) (obr. 16). 4 Vložte naspä valce aj upevovaciu lištu; zatlate ju, kým nezaujete, že zapadla, o znamená, že je správne nasadená. Boná kefa (8) , Bonú kefu pravidelne istite, aby ste predišli poruche robotického vysávaa. 1 Rukami odstráte akékovek vlasy a neistoty zachytené v bonej kefe. 2 Ak sú neistoty vemi omotané okolo kefy, rozstrihnite ich nožnicami. V prípade potreby odskrutkujte skrutku a vyberte bonú kefu (8) z telesa pre efektívnejšie vyistenie (obr. 17). 3 Vráte bonú kefu spä do krytu. , DEMONTÁŽ A ISTENIE KOLIES Boné kolieska 1 Odskrutkujte skrutky kolies (obr. 18). 2 Vyberte kolesá z krytu a vyistite ich. Kolesá neistite vodou, olejom ani mazivom. Vráte kolesá spä do krytu a zaskrutkujte skrutky pomocou skrutkovaa. ) ) Predné koleso Ak je predné koleso zaseknuté alebo sa vone neotáa, demontujte ho za úelom vyistenia (obr. 18). 1 Demontujte koleso pomocou nástroja, ktorý slúži ako páka. 2 Ak chcete koleso po vyistení nasadi spä, zatlate ho do krytu. ISTENIE SNÍMAOV KOLÍZIE (25) A SNÍMAOV SCHODOV (27) , Infraervené snímae udržiavajte v istote, aby robotický vysáva mohol správne fungova. 1 Snímae istite kúskom bavlny alebo mäkkou handrikou (obr. 19). ISTENIE ZARIADENIA n Skontrolujte, i do spotrebia nevnikla voda. ) Zariadenie umyte po prvom použití, ihne po každom alšom použití a po dlhšom období neinnosti. To vám zaistí správne fungovanie spotrebia a predži jeho prevádzkovú životnos. 1 Vonkajšiu as zariadenia vyistite vlhkou látkou. Nepoužívajte abrazívne prostriedky ani rozpúšadlá. VÝMENA BATÉRIÍ VÝMENA BATÉRIÍ VIRTUÁLNEJ BARIÉRY (Obr. 20) 1 Otáajte poistku krytu batérií (6B), kým sa kryt neuvoní (5B). 2 Vložte batérie do priestoru na to ureného. Ubezpete sa, že kladné a záporné elektródy sú v správnej polohe. Ak robotický vysáva nebudete dlhší as používa, batérie vyberte. , VÝMENA BATÉRIÍ DIA<KOVÉHO OVLÁDAA (Obr. 21) 1 Otvorte kryt priestoru pre batérie. 2 Vložte batérie do priestoru na to ureného. Ubezpete sa, že kladné a záporné elektródy sú v správnej polohe. Ak robotický vysáva nebudete dlhší as používa, batérie vyberte. , VÝMENA BATÉRIÍ 105 sk . MAGYAR BIZTONSÁGI ELQÍRÁSOK • A készülék használatba vétele eltt figyelmesen olvassa el az alábbi utasításokat. • A kézikönyv elválaszthatatlan részét képezi a terméknek. rizze meg biztos helyen, mert késbb még szüksége lehet rá. • Ez a termék nem ipari, hanem kizárólag otthoni használatra lett tervezve. A meghatározott céloktól eltér bármely más célra történ használata veszélyes (pl. folyadékok, ipari por, cement, stb. felszívása) • Vigyázni kell, hogy a gyermekek ne használják játékszerként a készüléket. • A fizikai, érzékszervi vagy értelmi fogyatékkal él személyek (vagy gyerekek), illetve a készülék használatát nem ismerk kizárólag a biztonságukért felels személy felügyelete mellett használhatják a készüléket. • Ne módosítsa, és ne javítsa saját kezleg a készüléket. Ha bármilyen rendellenességet észlel a készülék tápkábelén vagy egyéb alkatrészén, hagyja abba a készülék használatát, és forduljon szakszervizhez. • Ne használjon olyan elemeket vagy kiegészítket, melyeket nem a SOLAC gyárt, vagy ajánl. • Az elektromos hálózathoz való csatlakoztatás eltt ellenrizze, hogy a hálózati feszültség megfelel a készülék specifikációjának. • Kapcsolja ki, és húzza ki a készüléket, mieltt szétszerelné vagy összeszerelné az alkatrészeket, és mieltt karbantartási vagy tisztítási mveleteket hajtana végre. Áramszünet esetén húzza ki a készülék dugaszát a csatlakozóaljzatból. • A tápkábelnél fogva ne akassza fel a készüléket. Soha ne a kábelnél, hanem mindig a csatlakozónál fogva húzza ki a készüléket a hálózati aljzatból. • Vigyázzon, hogy a tápkábel ne érintkezzen éles szélekkel vagy forró felületekkel. Ne hagyja a tápkábelt asztal vagy pult szélérl lelógni, mivel a gyermekek megránthatják a kábelt, és így a készülék leeshet. d • • • • • • • • • • • • 106 Soha ne merítse a készüléket vízbe vagy más folyadékba, illetve ne helyezze mosogatógépbe. Soha ne érintse meg a porszívót vagy a dugaszt nedves kézzel. A robotporszívót tartsa hforrástól távol. Soha ne használja a robotporszívót a megfelelen behelyezett porzsák és a védszrk nélkül. A porszívó modult mindig tartsa tisztán. A hajat, ruhát, ujjakat és egyéb testrészeket távol kell tartani a porszívó modultól, a görgktl és a kerekektl. A porszívót ne használja állatok tisztítására. Ne használja a készüléket olyan helyiségben, ahol robbanó vagy mérgez gázok lehetnek. Ne használja a készüléket vizes felületeken vagy kültéren. Rendszeres idközönként ellenrizze a tápkábel, hálózati adapter és a csatlakozó állapotát. Kerülni kell a töltállomás, adapter és a tápkábel lefröccsenését. Ne használja a töltállomást vagy az adaptert kád, mosdó, zuhany mellett, illetve egyéb olyan tárgy mellett, amelyben használat közben víz van. Csak a tartozékként rendelkezésre bocsátott adaptert használja! BIZTONSÁGI ELÍRÁSOK • Ne érintse meg nedves kézzel az adaptert vagy a töltállomást, miközben az csatlakoztatva van az elektromos hálózathoz. • Soha ne hagyja a bekapcsolt készüléket vagy töltállomást nedves felületen vagy rongyon. • Ne üljön rá a készülékre, vagy ne álljon elé, mivel ez a készülék anyagának károsodását okozhatja. • Gyzdjön meg róla, hogy nincsenek vezetékek, kábelek vagy egyéb 150 mm-nél hosszabb tárgy a földön, mivel ezek összekuszálódhatnak a görgkkel. VIGYÁZAT! Amennyiben már nincs szüksége a készülékre, SOHA ne dobja azt a háztartási hulladékba. A készülék szakszer ártalmatlanítása érdekében keresse fel a legközelebbi HULLADÉKHASZNOSÍTÁSSAL FOGLALKOZÓ SZOLGÁLTATÓT. Ilyen módón is hozzájárulhat környezete megóvásához. q F ALKOTÓELEMEK 1 2 3 4 5 6 7 8 9 10 11 12 13 14 15 Készülékház Távvezérl Automatikus töltállomás Virtuális akadály Adapter Tisztítókefe Szr (két darab) Oldalsó kefe (két darab) Rongykorong Rongykorong tartozék Porzsák Porzsák kioldó gomb Porszívó modul kioldó gombja Szr-fül Porszívó modul 16 17 18 19 20 21 22 23 24 25 26 27 28 29 Infravörös érzékel Fogantyú Elüls ütköz Akkumulátor adapter csatlakozója Vezérl kapcsoló Szabályozógomb vezérlpanel Gumigörg Központi görg Oldalsó kerekek Ütközésérzékelk Töltállomás érintkez csatlakozói Lépcsérzékel szenzorok Elüls kerék UV-lámpa A ROBOTPORSZÍVÓT TÖLTQ KÉSZÜLÉK ELQKÉSZÍTÉSE hu n Csak a tartozákként rendelkezésre bocsátott adaptert és töltállomást használja. Ne , használjon mást! A töltési id körülbelül 5 óra, ez 60-90 perces mködést tesz lehetvé. Amikor els alkalommal tölti az akkumulátort, egy egész éjszakán keresztül hagyni kell töltdni. A TÖLTQÁLLOMÁS FQ ALKATRÉSZEI (A) 1A 2A 3A 4A Díszít LED Díszít LED kapcsolója Átviteli jel LED BEKAPCSOLVA fény 5A Töltésjelz 6A Érintkez csatlakozók 7A Adapter csatlakozója TÖLTÉS A TÖLTQÁLLOMÁS SEGÍTSÉGÉVEL (1. ábra) ) Ne tegyen más tárgyakat a töltállomás közelébe, és gyzdjön meg róla, hogy a ) környez területen nincsenek bútorok vagy akadályok (az ajánlott távolságokat ld. az ábrán). A robot nem találja meg a töltállomást, ha azt más tárgyak akadályozzák. A töltállomást szabad, akadályoktól mentes helyre kell rakni. F ALKOTÓELEMEK 107 ) A robot nem találja meg a töltállomást, ha az infravörös jelátvivt (3A) eltakarják. 1 A töltállomást tiszta padlóra, egy függleges fal mellé tegye. 2 Csatlakoztassa az adaptert (7A) a töltállomás csatlakozójához. 3 Dugja be az adaptert a konnektorba. A LED BEKAPCSOLVA fény (4A) pirosan kigyullad. A töltállomás tápkábelét a fal mellett vezesse, ellenkez esetben a robot belegabalyodhat. 4 Nyomja le a távirányító vezérlgombját, vagy a gombot a robot vezérlpanelén. A robotporszívó megkeresi a töltállomást, ha az megfelel távolságon belül van, majd csatlakozik hozzá. 5 Ha a keresés alatt szeretné törölni a töltési parancsot, nyomja le újra a vezérlgombot, vagy a távirányító gombját. Ekkor a robotporszívó megáll. Ellenrizze, hogy a robot csatlakozói (26) megfelelen csatlakoznak-e a töltállomás csatlakozóihoz (6A). Töltés közben a töltállomás és a vezérlpanel töltést jelz lámpái (5A) villognak. Miután a feltöltés befejezdött, a töltállomás és a vezérlpanel töltést jelz lámpái (5A) abbahagyják a villogást, és égve maradnak. A készülék használatra kész. , ) ) , , Porszívózás közben nem kapcsolja ki a töltállomást, mivel a robotporszívó visszatérhet töltdni, amennyiben az akkumulátor-szintje túl alacsonyra csökken. Ha szeretné, tehet egy kis mennyiséget az Önnek tetsz illatból a díszít LED (1A) közepére. 6 Nyomja meg a gombot (2A). A LED (1A) kigyullad. Amikor felmelegszik, a LED belsejében lév illat szétterjed. Egyes illatok károsíthatják a manyag felületet. Használat eltt ellenrizze, hogy az illat nem károsítja a felületet. , ) TÖLTÉS A TÖLTQÁLLOMÁS NÉLKÜL (2. ábra) 1 Csatlakoztassa az adapter vezetékét közvetlenül a robotporszívó készülékházának (11) csatlakozójához (19). 2 Dugja be az adaptert a konnektorba. A robot vezérlpaneljének LED jelzlámpája a töltés alatt villogni fog, a töltés befejezésekor pedig abbahagyja a villogást. A robot addig nem indítható el, amíg a vezeték segítségével közvetlenül töltdik. 3 Töltés után húzza ki az adaptert a konnektorból, majd húzza ki a kábelt a csatlakozóból (19). A készülék használatra kész. Az adapter töltés közben kissé felmelegszik. Ez normális, hacsak nem válik nagyon forróvá. , , ) AUTOMATIKUS TÖLTÉS , A tisztítás során a robot automatikusan megkeresi a töltállomást, amikor az akkumulátor feltöltöttsége alacsonnyá válik. ) A tisztítás után az akkumulátor hmérséklete magas lesz, ezért a töltés ideje hosszabbá válhat. Tippek az akkumulátor élettartamának meghosszabbítására • Ne hagyja az adaptert hosszú ideig bedugva. Húzza ki, amint befejezdött a töltés. • Ne tárolja vagy töltse a készüléket radiátor vagy hforrás közelében, ne tegye ki közvetlen napfénynek. • Ne töltse a készüléket piszkos vagy nedves helyen. A helyiség hmérséklete legyen 15ºC és 35ºC között. 108 A ROBOTPORSZÍVÓT TÖLT KÉSZÜLÉK • Néhány havonta hagyja az akkumulátort teljesen lemerülni, majd töltse újra. A lemerítéshez használja a készüléket vezeték nélküli módban, amíg az meg nem áll, és a töltállomás kikapcsolódik. Ezután az alább leírtak szerint töltse újra az akkumulátort. • Amikor hosszú ideig tárolják a készüléket, azt ajánljuk, hogy teljesen töltsék fel az akkumulátort, majd távolítsák el a készülékrl, és tárolják hvös, száraz helyen. A KÉSZÜLÉK HASZNÁLATA , A készüléket kifejezetten padló és sznyegpadló porszívózására tervezték. ) ) ) ) , , A készülék rendeltetésszer használata a napi padlótisztítás, hogy elkerüljék a piszok felhalmozódását és a porcicák megjelenését. Soha ne szívjon fel parazsat, üvegszilánkot vagy más éles tárgyat, vagy folyadékot. Soha ne szívjon fel ég gyufát vagy cigarettacsikket. Ne szívjon fel mérgez anyagot (pl. ammóniát). A szállításhoz és csomagoláshoz használt anyagokat teljes mértékben távolítsa el. Ne használja a robotporszívót kis asztalok, székek között vagy nagyon kis terekben, mivel ez károsíthatja a készüléket. A robotporszívó olyan tisztítási beállításokat használ, amelyekkel hatékonyan feltisztítható a teljes padló: Spirális mozgás az intenzívebb tisztítás érdekében, ahol koszt érzékel, a fal követése a szoba peremének megtisztítása érdekében, és szobán keresztül haladó mozgás a teljes tisztítás biztosítása érdekében. Egy átlagos méret szoba feltisztításához a robotporszívónak körülbelül 45 percre van szüksége, ami alatt többször végighalad ugyanazon a területen, így biztosan megtisztítja a teljes felületet. ROBOTPORSZÍVÓ VEZÉRLQPANELJE Robotporszívó indítása/leállítása Töltés gombja: Lenyomásra kigyullad, majd kialszik, amikor a robot csatlakozik a töltállomáshoz. Töltésjelz: Töltés közben villog. Égve marad, amikor a töltés kész. 1 2 3 4 5 , hu Ultraibolya lámpa: Lenyomásra kigyullad, a ferttlenít lámpa mködésben van, amíg a robot tisztít. A padlóról távolítson el minden tárgyat, amelyek eltörhetik vagy károsíthatják a robotporszívót (pl. lámpák, üvegek). Ellenrizze, hogy a porzsák (11) megfelelen rögzítve van-e. Ld. a "TISZTÍTÁS ÉS TÁROLÁS" fejezetet. Helyezze a virtuális akadályt (4) oda, ahol szeretné megakadályozni, hogy a robot az adott helyre bemenjen. Ld. a "VIRTUÁLIS AKADÁLY" fejezetet. Indítsa el a robotporszívót. Ehhez állítsa a mködtet gombot (20) BE állásba. Gyzdjön meg róla, hogy a robot fel van töltve. Ha a robot vezérlpaneljén lév LED jelzfény villog, állítsa a robotporszívót töltésre. Ld. a "A KÉSZÜLÉK ELKÉSZÍTÉSE. A ROBOTPORSZÍVÓ TÖLTÉSE" fejezetet. A KÉSZÜLÉK HASZNÁLATA 109 6 Ha automatikus üzemmódban szeretné használni a robotporszívót, a távirányító segítségével programozza be a mködését. Ld. a "TÁVIRÁNYÍTÓ" fejezetet. 7 Nyomja le a gombot a robot vezérlpaneljén. Ekkor a robotporszívó beindul, és követi a tisztítási beállításait. Ha szeretné, a távirányító gombjaival vezérelheti a készülék mozgását vagy a funkcióit (ld. "TÁVIRÁNYÍTÓ" fejezet), vagy használhatja a robot készülékházán lév vezérlpanel gombjait is. Az UV gombot akkor nyomja le, ha szeretné sterilizálni az elüls területet. Ez a funkció különösen azoknak ajánlott, akik allergiában szenvednek, valamint olyan otthonokba, ahol háziállatok is élnek, mivel ez a funkció sterilizálja a padlót a vírusokkal és baktériumokkal szemben. 8 A gomb újbóli lenyomásával szüneteltetheti a tisztító folyamatot. 9 Ha nem szeretne beprogramozott heti porszívózást, használat után kapcsolja ki a készüléket. Ehhez állítsa a mködtet kapcsolót (20) KI helyzetbe, vagy nyomja le a távirányító BE/KI gombját . 10 Húzza ki a töltállomást a hálózati csatlakozóaljzatból. , , VIRTUÁLIS AKADÁLY FQ ALKOTÓELEMEK (B) 1B BE kapcsoló és a virtuális akadály hossza Ki Rövid távolság = 4 m Közepes távolság = 6 m Hosszú távolság = 8 m 2B LED BEKAPCSOLVA fény 3B Közelséget érzékel szenzor fejrésze 4B Virtuális akadály szenzorjának fejrésze 5B Akkumulátortartó rekesz fedele 6B Akkumulátorfed rögzítje MXKÖDTETÉS ,A ) ) ) , 1 2 3 4 , 110 virtuális akadály segítségével határozza meg a tisztítani kívánt területet, így elkerülhet, hogy a robot szükségtelen vagy nem kívánatos helyekre menjen. Segítségével az is elkerülhet, hogy a robot vezetékekkel ellátott területekre vagy egy adott helyiségbe menjen. A virtuális akadályt a felület ugyanarra a szintjére helyezze, ahol a robotporszívót fogja használni. A virtuális akadályt és a töltállomást legalább 3 méterre helyezze egymástól az interferencia elkerülése érdekében. Ne helyezze a töltállomást a virtuális akadály jelzésének tartományán belül. A közelséget érzékel szenzor fejrésze (3B) megakadályozza az ütközést a robotporszívó és a virtuális akadály között, mert nem engedi, hogy 0,5-1 méternél közelebb menjen hozzá. Gyzdjön meg róla, hogy az akkumulátor nem merült le. Úgy helyezze a virtuális akadályt, hogy zárja le azokat a területeket, ahová a robotporszívót nem szeretné beengedni. (3. ábra). Távolítson el minden olyan tárgyat, amelyek a virtuális akadály eltt lehetnek, mert ezek akadályozzák megfelel mködését. Válassza ki a virtuális akadály kívánt hosszát. Ehhez állítsa be a kapcsolót (B) rövid , közepes vagy hosszú távolságra. Az akadály megfelel hosszát használja! Az akkumulátor idtartama függ a kiválasztott szenzortávolságtól. VIRTUÁLIS AKADÁLY , A LEB BEKAPCSOLVA lámpa (2B) 8 másodpercenként villan, amíg az akkumulátor lemerül. 5 Ellenrizze, hogy a robotporszívó nem tud áthaladni a virtuális akadály által kialakított határvonalon. 6 Állítsa a kapcsolót (B) KI helyzetbe , amikor a virtuális akadályra nincs szükség. A virtuális akadály infravörös jelzésének és a robot vételi tartományának irányában elfordulhatnak különbségek annak következtében, hogy a robot használat közben mozog. Ez a különbség a mködési környezettl, valamint a robot és a virtuális akadály feltöltöttségi szintjétl függen változhat. , TÁVIRÁNYÍTÓ ALKOTÓELEMEK (C) 1 2 3 4 Robotporszívó BE/KI Irányítógombok Megersítés gomb Vezérlgombok Indítás/Vasárnap Ideiglenes leállítás/Hétf 5 Kijelz (4. ábra) a "Átviteli jelzés" ikon b A hét beprogramozott napjai c A hét jelenlegi napjai d Id e Hiba ikon f Funkcióikon Idbeállítás/Kedd Töltés/Szerda Idzít/Csütörtök Gyorstisztítás/Péntek Tisztítás töltés után/Szombat Lassú tisztítás/mindennap IDQZÍTQ A távirányító és a robotporszívó szinkronizálása (5. ábra) ,A távirányítót és a robotporszívót az els használat eltt szinkronizálja össze, és kövesse a karbantartási mveleteket! Ehhez a következképpen járjon el: 1 Ellenrizze, hogy a robotporszívó és a távirányító akkumulátora megfelelen fel van töltve. 2 Kapcsolja ki a robotot. Ehhez állítsa a mködtet gombot (20) KI állásba. 3 A gombot több mint 4 másodpercig tartsa lenyomva. Állítsa vissza a mködtet gombot (20) BE helyzetbe, anélkül, hogy kioldaná a gombot. Amikor a szinkronizációt megfelelen végrehajtják, a robot két sípolással jelez. , Dátum és id[ beállítása (6. ábra) , Ahhoz, hogy a robot az elvárt idben elkezdjen mködni, a hét aktuális napját és az 1 2 3 4 ) idt el kell menteni. Nyomja meg a gombot. Ez megnyitja a nap beállítása funkciót. Nyomja le a hét aktuális napjának megfelel gombot (SU= Vasárnap, MO= Hétf, TU= Kedd, WE= Szerda, TH= Csütörtök, FR= Péntek, SA= Szombat). A nyilak lenyomásával lehet az “óra” és a “perc” mezk között ugrani. A nyilak lenyomásával lehet kiválasztani az aktuális “órát” és “percet”. A lenyomásával lehet megersíteni a kiválasztást. A lenyomásával törölheti a beállítást. TÁVIRÁNYÍTÓ 111 hu Automatikus heti tisztítás beütemezése (7. ábra) A robot kikapcsolva. 1 Nyomja le a távirányító gombját. 2 Nyomja le azt a gombot, amely megfelel a hét beprogramozni kívánt napjának. Kiválaszthatja a hét egy, több vagy összes napját. A kiválasztott napok villogni kezdenek. 3 A nyilak lenyomásával állíthatja be a pontos tisztítási idt. A "fel" és "le" nyilak lenyomásával kiválaszthatja az órát és a percet. 4 A lenyomásával lehet megersíteni a kiválasztást. A BE/KI gomb lenyomásával törölheti a beállítást. A robotporszívót be kell kapcsolni annak érdekében, hogy a tervezett idben elinduljon. A mködtet kapcsoló (20) BE helyzetben van, és a ég. ) ) TOVÁBBI FUNKCIÓK FULL GO funkció ) Ha ezt a funkciót választják, a robotporszívót arra programozzák be, hogy folytassa a tisztítást, amint teljesen feltöltdik. 1 Nyomja meg a gombot. A robotporszívót be kell kapcsolni. FULL GO jelenik meg a távirányító kijelzjén. A robotporszívó megkeresi a töltállomást, mieltt az akkumulátor lemerül, és automatikusan elkezd tisztítani, amikor teljesen feltöltdött. , GYORS funkció 1 A gyors tisztítás kiválasztása érdekében nyomja le a FAST jelenik meg a távirányító kijelzjén. 2 A lassú tisztítás kiválasztása érdekében nyomja le a SLOW jelenik meg a távirányító kijelzjén. , , gombot. gombot. HIBAKÓDOK Ha a robot az alábbi körülmények egyike miatt nem mködik megfelelen, a robot vezérlpanelének összes gombja egyszerre villogni kezd. 1 Nyomja le a távirányító gombját. Gyzdjön meg róla, hogy a távirányító jele a készülék aktív tartományán belül van. A távirányító kijelzjén megjelenik a hibaikon az egyik alábbiakban leírt hibakód mellett. 2 A megjelen hibaüzenetnek megfelelen hajtsa végre az alábbiakban leírt lépéseket. , HIBAKÓD MEGHIBÁSODÁS OKA MEGOLDÁS E01 Lépcsérzékel szenzorok Tisztítsa meg a szenzorokat (27). E02 Központi görg Távolítsa el a görgkbe akadt piszkot és hajat (23). E03 Akkumulátor töltöttségi szintje alacsony Töltse fel az akkumulátort! E04 Oldalsó kerekek Távolítsa el a kerekekbe akadt piszkot és hajat. E05 Porzsák Megfelelen rögzítse a porzsákot (11). , Ha a hiba ezen lépések végrehajtása után is fennáll, ne használja tovább a készüléket, és vigye el egy hivatalos szervizbe. Ne módosítsa, és ne javítsa saját kezleg a készüléket. 112 TÁVIRÁNYÍTÓ TÁROLÁS ÉS TÁROLÁS n Tisztítási vagy karbantartási mveletek eltt mindig gyzdjön meg róla, hogy a mködtet kapcsoló (20) KI helyzetben van, és a készülék nem csatlakozik az elektromos hálózathoz. Gyzdjön meg róla, hogy a kimosott elemek teljesen megszáradtak, mieltt összeszerelné azokat. Soha ne merítse a porszívó modult (15) vízbe vagy más folyadékba, illetve ne helyezze mosogatógépbe. Ne használjon súroló- vagy oldószert. A robotporszívó legjobb teljesítménye érdekében azt ajánljuk, hogy minden 3. használat után tisztítsa ki a porszákot és a szrt. ) ) A PORZSÁK KIÜRÍTÉSE (11) 1 Tartsa lenyomva a kioldó gombot (12). Távolítsa el a porzsákot (11). (8. ábra) 2 Helyezze a porzsákot egy szemetes fölé, húzza meg a fület (14) a szrtartó kinyitása érdekében, majd ürítse a tartalmát a szemetesbe. (9. ábra) SZXRQTISZTÍTÁS ÉS -CSERE (7) ) Ajánlott ) 1 2 3 ) 4 5 a szrt rendszeresen megvizsgálni, és ellenrizni, hogy megfelelen mködik-e. Ha azt érzékeli, hogy a készülék porszívási kapacitása csökken, alaposan tisztítsa meg a szrt. Érdemes a légszrt évente legalább egyszer-kétszer kicserélni, attól függen, hogy milyen gyakran használja a készüléket. A porzsákot a "PORZSÁK KIÜRÍTÉSE (11)" fejezetben leírtak szerint ürítse ki. Távolítsa el a szrt (7). Egyik kezével nyomja le a félkör-alakú fogantyút, és távolítsa el a használt szrt a tartóból (10. ábra) Gyengéden ütögesse hozzá az eltávolított szrt a szemetes oldalához, így kiverheti belle a por és a piszok nagyját. Soha ne használja a robotporszívót szr (7) nélkül! A szrt a tisztítókefe (6) segítségével tisztítsa meg (11. ábra). Tegye vissza a tiszta - vagy szükség esetén az új - szrt a tartóba. hu A PORZSÁK KITISZTÍTÁSA (11) 1 2 3 4 Nyomja meg a gombot (13). Ez kioldja a porszívó modult (15) (12. ábra). Fordítsa körbe a porszívó modult, oldja ki a két fület, majd távolítsa el a fedelet. A szrt a tisztítókefe (6) segítségével tisztítsa meg (13. ábra). A tisztítókefe segítségével tisztítsa meg a porszívó modult (15), valamint a légbeszívó és -kivezet egységet (13. ábra). Ne használjon vizet a porszívómodul tisztításához! 5 Rögzítse a porzsákot a készülékházba. Addig nyomja a porzsákot, amíg kattanást nem hall, ami azt jelzi, hogy megfelelen rögzült a készülékházhoz. ) RONGYKORONG TISZTÍTÁSA ÉS CSERÉJE (9) ) Ne használja a rongykorongot futósznyegen, sznyegen, vagy olyan padlón, amely nem teljesen sima. 1 Ilyen esetekben távolítsa el a rongykorong tartozékot (10). Fordítsa meg a rongykorong tartozékot, és oldja ki a jobb- és baloldali fület (14. ábra). 2 A rongykorong (9) cseréjéhez húzza le a régi rongykorongot, és húzzon fel egy újat (14. ábra). TÁROLÁS ÉS TÁROLÁS 113 KEFÉK ELTÁVOLÍTÁSA ÉS CSERÉJE A robotporszívó legjobb teljesítménye érdekében azt ajánljuk, hogy minden 3. használat után tisztítsa ki a görgket és a keféket. Görg[k (22) és (23) 1 Nyomja hátra a fület, valamint az emel és rögzít sávot (15. ábra). A görgk leoldásra kerülnek. 2 Távolítsa el a (22) és (23) görgket. 3 A görgket a tisztítókefe (6) segítségével tisztítsa meg (16. ábra). 4 Tegye vissza a görgket, és cserélje ki a rögzít sávot, nyomja le, amíg kattanást nem hall, ami azt jelzi, hogy megfelelen rögzült. , Oldalsó kefe (8): , A robotporszívó meghibásodásának elkerülése érdekében rendszeresen tisztítsa az oldalsó kefét. 1 Az oldalsó kefébe ragadt hajat és koszt a kezével távolítsa el. 2 Ha a kosz ersen belegabalyodott a kefébe, vágja le ollóval. Ha szükséges, a hatékonyabb tisztítás érdekében csavarja ki a csavart, és vegye le az oldalsó kefét (8) a készülékházról (17. ábra). 3 Tegye vissza az oldalsó kefét a foglalatába. , KEREKEK ELTÁVOLÍTÁSA ÉS CSERÉJE Oldalsó kerekek 1 Csavarja ki a kerekek csavarjait (18. ábra). 2 Vegye le a kerekeket a készülékházról, és tisztítsa meg azokat. Ne használjon vizet, olajat vagy zsírt a kerekek tisztításához! Tegye vissza a kerekeket a készülékházra, majd csavarhúzóval csavarja vissza a csavarokat. ) ) Elüls[ kerék Ha az elüls kerék eltömdött vagy nem forog szabadon, vegye le és tisztítsa meg (18. ábra). 1 Egy olyan eszköz segítségével távolítsa el a kereket, amely emelként szolgál. 2 A tisztítás után úgy helyezze vissza, hogy belenyomja a kereket a foglalatába. TISZTÍTSA MEG AZ ÜTKÖZÉSÉRZÉKELQKET (25) ÉS A LÉPCSQÉRZÉKELQKET (27) , Tartsa tisztán az infravörös lámpákat, hogy a robotporszívó helyesen tudjon mködni. 1 A szenzorokat egy darab pamuttal vagy puha ruhával tisztítsa meg (19. ábra). A KÉSZÜLÉK TISZTÍTÁSA n Ügyeljen rá, hogy víz ne kerüljön a készülékbe! ) Tisztítsa meg a készüléket az els használat eltt, minden esetben közvetlenül a használat után, illetve ha hosszabb ideig nem használta azt. Ily módon hosszú távon biztosíthatja a készülék helyes mködését és megnövelheti annak élettartamát. 1 A készülék külsejét nedves törlkendvel tisztítsa. Ne használjon súroló- vagy oldószert. 114 TÁROLÁS ÉS TÁROLÁS AKKUMULÁTOROK CSERÉJE A VIRTUÁLIS AKADÁLY AKKUMULÁTORÁNAK CSERÉJE (20. ábra) 1 Fordítsa el az akkumulátorfedél zárját (6B), amíg a fedél kinyílik (5B). 2 Helyezze az akkumulátort a rendeltetésszer rekeszbe. Ellenrizze, hogy a pozitív és negatív elektródák megfelel helyzetben vannak-e. Távolítsa el az elemeket, ha hosszabb ideig nem fogja használni a robotporszívót. , A TÁVIRÁNYÍTÓ AKKUMULÁTORÁNAK CSERÉJE (21. ábra) 1 Nyissa ki az akkumulátortartó fedelét. 2 Helyezze az akkumulátort a rendeltetésszer rekeszbe. Ellenrizze, hogy a pozitív és negatív elektródák megfelel helyzetben vannak-e. Távolítsa el az elemeket, ha hosszabb ideig nem fogja használni a robotporszívót. , MEGFELELQSÉGI NYILATKOZAT • • • • Névleges feszültség: 220-240V Névleges teljesítmény: <24W Érintésvédelmi osztály: Class II Zajszint: 60 dBA FORGALMAZZA HTM Nemzetközi Kereskedelmi Kft. 1046 Budapest, Kiss Ern u. 3. Fax: (1) 369-0403 Tel.: (1) 370-4074 (1) 370-1041 GARANCIAFELTÉTELEK • A garancia minden gyártási vagy anyaghibából ered mködési rendellenességgel kapcsolatban egy év. • A jótállás nem terjed ki a helytelen használatból ered hibákra. • A garancia nem érvényes, ha az üzletben nem teljesen vagy helytelenül töltötték ki ill. pecsételték le a garanciajegyet. • Nem vonatkozik a garancia az olyan károsodásokra, amelyek a helytelen használatból vagy szállításból erednek. Ez olyan esetekre is érvényes, amikor a készüléket nem megfelel földelés dugaljhoz csatlakoztatták. • Ugyancsak érvénytelen a garancia, ha a készüléket illetéktelen (hozzá nem ért személy) próbálja javítani, aki nem tartozik a vevszolgálathoz vagy hivatalos szervizhez. • A meghibásodott készüléket - beleértve a hálózati csatlakozó vezetéket is - csak szakember, szerviz javíthatja. AKKUMULÁTOROK CSERÉJE 115 hu . !" • ]^_`{ `| {}~}|_ ^_`|, ~^___ {|_ _}{ {^{{. • !" #$ % ! !#. &*+/13 4 "!! 5/! "*#6 1. • $}{ ^_` _ ~^_`|}|_ | }| ~^_| `|{ { { _ _ ~`` }| ~^{_| ~^_|. \~| _ `| {}~}|_ || { `| _ `^| _, ^|}{| ~_||| (._. }||_ | _{, ~^| ^{_{ `_{, {_ { `^.) • _|| ^| `| _ |`|| { `| _ { _ ~}| `| { {^| ^_`|. • $}{ ^_` _ _ ~^_`|}|_ }| ~^_| {| ||_{ {}{_{, _{{ { _{ } { ({_ `_|,) _~{{ { _^|{ {|, _ | _ | |`||{ {{ {^{^|{ }| {}~}|_ | ^_`| {_, |^ }| || _}~|. • _ ~^|__ {|{ ~^_{ { ^_{ | ^_`|. ¢ | | ~^_`| ~ |_| {{ `^| | | ^_`|, _ {}~}|_ { ___ ^{}{^| _^{}. • _ {}~}|_ |{ {{ ~^{|`_ {, { _ _ `| {{ ~^_~^| SOLAC. • ]^_`{ |_ | ^_`| __^{_|| {||{, ~^_^__ `|{ ~_ |~^_ _{_ | ^_`| ~|`| | `| {. • }__ ^_`| { {}|`__ _~_| ^_ || ~^_`{ `| ~^{~{_ `_| { | | |{ { ~^_`{ | ~_^|{ ~ ~{|_ . ]^{ ~^_|_ | __^}|^||_ {}__ ^_`| ^_ ||. • _ {}~}|_ }|^||{ |_, }| `| `^~|_ ^_`|. ¢{|{ {}|_ ^_`| | {}`^~|_ _~_| – {| _ `^~|_ |_|. • *_^__ _, _ }|^||{ |_ _ _ `~{^| ` ^{ ^_ {{ ^_{ ~^{. _ |_ |_| `| {{ ^| | ||| {{ ^||, }| `| _ `~__ `^~|_ `_|, _ _ `| `_`_ ` ~|`|_ | ^_`|. d • • • • • • • {| _ ~|~_ ^_`| `| {{ `^| _, _ ~|_ {|| |{|. {| _ ||_ ~^|||| {{ _~_| ^{ ^_. ]|}__ ||| ~^||| ^ `|__ ~{|. {| _ {}~}|_ ~^|||| ^ _} `| _ ~|{{ ~^|{ __^| }| ~^| {{ ~^_`~|}{ {^. ]{|{ ` ^| `| _ ~``^ | {|{ {. ]|}__ ||, `^_{_, ~^{_ { `^{ |{ { `|_ ~{|{ `, ^{_ { _||. _ {}~}|_ ~^|||| }| ~{|_ | {{. _ {}~}|_ ^_`| }|^_{ ~__{, `_ _~}{{ {{ {{ ~|^{ | `| {}|. _ {}~}|_ ^_`| ^ ^{ ~^{ {{ |. • • %_` ~^_^|_ {_ | }|^||{ |_, ^_ { |`|~_^ { ^}{_. 116 #$%*+< >? @[>\]?#\#$ • }|_ |~^|_ | }|^_ `||| |{, |`|~_^| {{ }|^||{ |_. • _ {}~}|_ }|^_ `||| |{ {{ |`|~_^| {} ` ||, {|, ` {{ `^ `, `^ | `|, `| { {}~}|_. • }~}|_ | ~^_`|_{ |`|~_^. • _ `|_ |`|~_^| {{ }|^_ `||| |{ | { ^_, | | _{ ^_ ||. • {| _ |_ ^_`| {{ }|^_ `||| |{ ^ ^| ~^ {{ ^~|, | | _{. • _ `|_ ^ ^_`| {{ ~||| ~^_` _, | | _ `| `_`_ ` ~^_`| | |_^{|| | ^_`|. • *_^__ _, _ | ~`| | {{, |_{ {{ `^{ ~^_`_{ ~-`{ 150 , | ^{_ _ `| _ ~_| . ¢£?[! ]^{ ^||_ | ^_`|, +\¤? _ {}^_ || }| . >|___ |-{}{ ]*+$ {{ <[$¥% >? $?+¢? \$]?¥<, }| `| `_ ^|_. $|| _ ~__ ^{ || }| || ^_`|. q ] ^ 1 2 3 4 5 6 7 8 9 10 11 12 13 14 15 16 +^~ {|{ ~^|_{_ ?|{| }|^_ `|| |{ ¢{^|| |^{_^| ?`|~_^ ]{|| _| ¦{^ (`| `|) #^|{| _| (`| `|) §_| || ?_|^ | _|| || +__^ }| ~^| @ }| `||_ | __^| }| ~^| @ }| `||_ | ~{|{ ` ]|{| | {^| ]{| ` |{ {^|_^_{ { 17 18 19 20 21 22 23 24 25 26 27 28 29 ^ | ]^_`_ _^ +_^ }| |`|~_^| | |_^{| ]^_|_ | ^|_ ^_ { ]|_ { }| ~^|_{_ ¤_| ^| <_^|| ^| #^|{{ _| |{{ }| +|{ _^{ | }|^_ `||| |{ |{{ }| |{{_ | { ]^_` _ *^|{_| |~| _`] q] x_ {^ n }~}|_ , | ~^_`|_{_ |`|~_^ { }|^_ `|| |{. _ {}~}|_ `^{. ¢^__ }| }|^_ `|_ _ ~^{{}{_ 5 || }| 60-90 {. ^||. +| }|^_ `|_ |_^{| }| ~^{ ~, |__ `| _ }|^_ `| _` `_{_. \#\¢ +\£]\[$ 117 bg ] ^ x_| () 1A _^|{_ _`{` 2A ]^_|_ | `_^|{{ _`{` 3A #{| }| ~^_`||_ 4A #_`{`_ {`{|^ ¢+ª. 5A `{|^ }| }|^_ `|_ 6A +_^{ | || 7A +_^ | |`|~_^| x_ x_| (}~!.1) ) _ ) ) 1 2 3 , ) 4 5 ) , ~|_ {|{ ~^_`_{ {} ` }|^_ `||| |{ { {^__ `| | ~|_{ __{ {{ ~^_~{ {} ` _ ( . ~^_~^{_{_ ^|}{ | `{|^|||). % | `| _ `| |_^{ }|^_ `||| |{, | | ~ {| ~^_~{. ]|__ }|^_ `||| |{ | { _} |{{_ | ~^_~{. % | `| _ `| |_^{ }|^_ `||| |{, | ~^_`||_ | {^|_^_ {| (3?) _ }|^{. #$%&#& *$+&=>$?$#$ #$@QX[ %\+]^ _X# `> > %&+#X{$|@$ #&@$. }%\+=&#& $>$`#&+$ (7~) {\ {@&{#+$ @$ *$+&=>$?$#$ #$@QX[. {|_&#& $>$`#&+$ % &|&{#+X_&{$#$ +&=$. #_`{`{ {`{|^ ¢+ª. (4) _ __ _^_. ]^_|^|_ }|^||{ |_ | }|^_ `||| |{ ~^| _||, ~^{_ | ^ _ `| _ }|~__ _. $#X@&#& {@#+|@X[ ^#@ @$ >X#$@QX@@# ^`+$%|&@X& X|X ^#@$ @$ `$@&|$ *$ ^`+$%|&@X& @$ +#$. +$]^{$_{$#$ +# ?& *$`_@& >$ #\+X *$+&=>$?$#$ #$@QX[, ${ #[ & @$X+$ @$ `>]>[? +$*#[@X&, X ?& & %\+=& @&[. ~{ X{$#& >$ $@^|X+$#& {$@>$#$ *$ #\+&@& ` %+&& @$ $# #\+&@&, @$#X@&#& #@% {@#+|@X[ ^#@ X|X ^#@$ *$ >X#$@QX@@ ^`+$%|&@X& . +$]^{$_{$#$ +# ?& `+&. ]^_^__ `|{ _^{_ | ^| (26) | ^}|{ ~^|{ _^{_ | }|^_ `||| |{ (6?). ] ^__ | }|^_ `|_ _{{ {`{|^ }| }|^_ `|_ | }|^_ `||| |{ (5A) { ^{ ~|_ _ ~^_{|. #_` ~^{|_ | }|^_ `|_, _{{_ {`{|^{ }| }|^_ `|_ | }|^_ `||| |{ (5A) { ^{ ~|_ _ ~^| `| ~^_{| { _ }|~| `| _ ~. *^_` _ }| ~^_|. , _ {}|_ }|^_ `||| |{ ~ ^__ | {__, | ~^|||| ^ _ _ ^| ~^{ _ }| }|^_ `|_, | { | }|^` | |_^{| |_ ^`_ {. =&|$@X& =&#& >$ `#$%X#& $|{ {|X_&#% $+$#X*$#+ ` %$ X*+ % Q&@#\+$ @$ >&{+$#X%@X[ %&#>X> (1~). 6 $#X@&#& {|_$ (2~). #_`{` (1A) _ __. +| _ |^__, |^| | |^|{}|^|, ~|_ _`{`|, _ _ ^|}__. { |^|{}|^{ _ `| ~^_` ~|||| ~^. ]^_^__ `|{ |^|{}|^ _ ~^_ `| ~^| ~^_`{ `| {}~}|_. , ) x_ x_| (}~!.2) 1 }%\+=&#& {$&|$ @$ $>$`#&+$ >X+&{#@ {\ {@&{#+$ (19) @$ {+`^$ @$ `+$]^{$_{$#$ +# (11). 2 {|_&#& $>$`#&+$ % &|&{#+X_&{$#$ +&=$. 118 ]\¤\$\¢+? ? *#$%\¨#$¢\$\ >? >?%[©?[ , `{|^|| |~{| | _`{`| | ^{ ~|_ | ^| _ }|~_ `| ~^_{| ~ ^__ | }|^_ `|_ { _ ~^_, | }|^_ `|_ _ ~^{{. % _ _ `| }|~_ ^||, `| _ }|^_ `| `{^_ ~^_` }|^|| |_. 3 *{|_&#& *$+[>@# # &|. +&=$ |&> {$# *$+&>X#& X |&> #%$ X*{|_&#& {$&|$ # {@&{#+$ (19). +&>\# & #% *$ ^`#+&$. ] ^__ | }|^_ `|_ |`|~_^ _ |^| _. $| _ ^|, _ | _ |_ ^_. , ) ]^ x_ , ] ^__ | ~{|_ ^ ||{ _ ~^{ }|^_ `||| |{, | }|^` | |_^{| ~|`_. ) #_` ~{|_, _~_^|^|| | |_^{| _ `| _ {| { }|| ^__ }| }|^_ `|_ _ `| _ ~-`. ~ ~ "~ • & #$%[#& $>$`#&+$ %{|_&@ *$ >\|\ `&+X> # %+&&. $*{$_&#& , {$# `+X{|_X *$+&=>$@&#. • & \]+$@[%$#& X @& *$+&=>$#& ^+&>$ % |X*# > +$>X$#+X X|X >+^X X*#_@XQX @$ #`|X@$ X|X X*|=&@ @$ |\@_&%$ %&#|X@$. • & *$+&=>$#& ^+&>$ @$ +\@X X|X %|$=@X &#$. &`&+$#^+$#$ @$ `&?&@X&# X #+[%$| >$ \>& &=>^ 15ºC X 35ºC. • $ %&{X @[{|{ &&Q$ #$%&#& $#&+XX#& >$ & X*#?[# @$`\|@ X |&> #%$ X *$+&>&#& #@%. $ >$ X +$*+&>X#&, X*`|*%$#& ^+&>$ &* {$&|, >{$# # `+&, {$# *$+&=>$?$#$ #$@QX[ #+[%$ >$ & X*{|_&@$. }|&> #%$ *$+&>&#& #@% $#&+XX#&, {${# & [@&@ `-+&. • $# ^+&>\# @[$ >$ & X*`|*%$ >\| %+&&, `+&`+\_%$& %X >$ *$+&>X#& @$`\|@ $#&+X[#$ X |&> #%$ >$ [ X*%$>X#& X \]+$@[%$#& @$ ]|$>@, ^] [#. _ , ! # $! ! !%1 !#!1 $5. ) ) ) ) , , ! # #% 7#1! !##*7 !#, ! !1!$/1 1 5*+ 5*/1. {| _ {}~}|_ ~^|||| }| ~{|_ | ^_| ~_~_, ^_{, ^{ ~^_`_{ {{ _{. {| _ ~{|_ }|~|_{ {^{_{ _{ {{ {|^_{ |^{. _ }||_ {{ |_^{|{ (| { `^.). \^|__ {} {{ ___{, { | {{ {}~}|{ }| ^|~^ { ~|_{^|_. _ {}~}|_ ~^|||| ^ _ ` |{ |{, _ {{ ^|{_{ ~^^||, | | _ ~^_`{ ^_`|. ]^|||| ^ {}~}| |^{_ }| ~{|_, }| `| ~{{ __{ _{ ~`: #~{^| `{ _{_ }| ~-{_}{ ~{|_ | }|^_{_ _|, _`|_ | {{| | _|| }| ~{|_ | ~_^{_^| | || { ~^_{|_ | || }| |^|{^|_ | ~ ~{|_. \ 45 {{ | _`{{ | ~^|||| ^ `| ~{{ | ^_`_ ^|}_^, ~^_{||{ ~{ ^ _` { , }| `| |^|{^|, _ || | _ |~ ~{_|. %?@\$? # *%[? 119 bg ]|_/~{^|_ | ~^|||| ^ @ }| }|^_ `|_: #_|, | _ |{|; {}||, | ^ _ { }|^_ `||| |{. `{|^ }| }|^_ `|_: ]^_{| ~ ^__ | }|^_ `|_. #_{ _~^_|, | }|^_ `|_ _ }|^_. *^|{_| |~|: #_|, | _ |{_; |~|| }| `_}{_{ ^|{, `| ^ ~{|. 1 ##+$@&#& # `>$ %X_{X `+&>&#X, {X# =& >$ _^`[# X|X `%+&>[# `+$]^{$_{$#$ +# (@$`+X&+ |$`X, ^#X|{X). 2 +%&+&#& >$|X {@#&@&+\# *$ `+$] (11) & @#X+$@ `+$%X|@. =. +$*>&|$ (“}~ }~”). 3 #$%&#& %X+#^$|@$#$ $+X&+$ (4) @$ [#, ${ @& X{$#& +#\# >$ %|X*$ % {@{+&#@$ |$#. =. +$*>&|$ (“~~ ~~"). 4 {|_&#& `+$]^{$_{$#$ +#. $ #$*X Q&| `+&&#&#& `+&%{|_%$#&|[ @$ +$#&@ +&=X (20) % `|=&@X& . 5 +%&+&#& >$|X `_X#%$?X[# +# & *$+&>&@. ? _`{`|| {`{|^| |~| | ^{ ~|_ | ^| ~^_{|, |^_ ~^|||| ^ }| }|^_ `|_. =. +$*>&|$ (“~ ~ ~. ~~ ~ ~} ~~~ ”) 6 ~{ =&|$&#& >$ X*`|*%$#& `+$]^{$_{$#$ +# % $%#$#X_&@ +&=X, `++$X+$#& >&#%X&# @$ ^+&>$ `?#$ @$ >X#$@QX@@# ^`+$%|&@X&. =. +$*>&|$ (“}~¡ ~"). 7 $#X@&#& ^#@$ @$ `$@&|$ @$ +#$. ${$ `+$]^{$_{$#$ +# *$`_%$ +$#$, |&>%${X ^#$@%&@X#& >&|X @$ `_X#%$@&. ? _|__, _ `| ~^||_ `{ _{| {{ ^||| | ^_`| ~| | {_ | `{|{ ~^|_{_ (|~^|__ ~^|| ^|}`_| "#$?<\\ *]%?¢ª[[") {{ | {}~}|_ {_ | ^{ ~|_ ^ ^~| | ~^|||| ^. |{__ |{| UV, | _|__ `| _^{{}{^|_ || ~^_` ^_`|. $|}{ { _ _ ~``| }| ^|, ^|`|{ |_^{{, | { }| `_, `_ _ _ `| `|{ {{, | ~ }{ |{ ~` _ _^{{}{^| ^_ {^{ { |_^{{. 8 $#X@&#& ^#@$ #@%, *$ >$ `+&#& @$ `$^*$ `+Q&$ ` `_X#%$@&. 9 ~{ @& =&|$&#& `++$X+$@ &>X_@ `_X#%$@&, X*{|_&#& ^+&>$ |&> `_X#%$@&. $ #$*X Q&|, @$#+#& `+&%{|_%$#&|[ @$ +$#&@ +&=X (20) % `|=&@X& X|X @$#X@&#& ^#@$ / @$ >X#$@QX@@# ^`+$%|&@X&. 10 *{|_&#& *$+&=>$?$#$ #$@QX[ # *$]+$@%$@&#. , , , 120 %?@\$? # *%[? ] ] ^ (]) 1B ]^_|_ ¢+ª { {| | {^||| |^{_^| }. £| | = 4 #^_`_ | = 6 ¤ | = 8 2B #_`{`_ {`{|^ ¢+ª. 3B }_^{__ |^|{ | `|{| }| ~^{{ ||_ 4B }_^{__ |^|{ | `|{| }| {^|| |^{_^| 5B +|~| | `__{_ }| |_^{| 6B #| | |~|| | |_^{| , }~}|_ {^||| |^{_^|, }| `| ~^_`_{_ _||| | }| ) ) ) , 1 2 3 4 , , 5 6 , ~{|_, | _ ~}{_ | ^| `| |_}_ _ { {{ _ _|{ |{. }~}|_ |}{ {, }| `| ~^_`~|}{_ ^| |{}|_ |, `_ {| |_{, {{ ^_{ |{. ]|__ {^||| |^{_^| | { | ~^|, `_ _ {}~}|_ ~^|||| ^. ]|__ {^||| |^{_^| { }|^_ `||| |{ | ^|}{_ ~__ 3 , }| `| {}___ }{|_ | _{. _ ~|_ }|^_ `||| |{ || | {|| | {^||| |^{_^|. }_^{_{ |^|{ | `|{| }| ~^{{ ||_ (3B) ~^_`^|| _ ` ~^|||| ^ { {^||| |^{_^|, | _ ~}| | ^_`| `| ~^{{ { | ^|}{_ ~-| 0,5-1 _. %&+&#& &, _& $#&+XX#& @& $ +$*+&>&@X. *XQX@X+$#& %X+#^$|@$#$ $+X&+$ #${$, _& >$ |{X+$ &#$#$, {\>&# @& =&|$&#& `+$]^{$_{$#$ +# >$ @$%|X*$. (¢X. 3). ##+$@&#& %X_{X `+&>&#X `+&> %X+#^$|@$#$ $+X&+$, *$ >$ `+&>#%+$#X#& @&`+$%X|@# £^@{QX@X+$@&. *&+&#& =&|$@$#$ >\|=X@$ @$ %X+#^$|@$#$ $+X&+$. $ >$ @$`+$%X#& #%$, @$#+#& `+&%{|_%$#&|[ (B) {$# X*&+&#& $|\{ , +&>&@ X|X |[ ]%$#. }~}|_ ~``| ` {| | |^{_^||. ]^` {_| | `_{_ | |_^{| }|{{ {}^| ^|}{_ | `|{|. #_`{`{ {`{|^ ¢+ª. (2B) }|~| `| ~^_{| | _{ 8 _`{, `| |_^{| _ {}|{. +%&+&#& >$|X `+$]^{$_{$#$ +# @& =& >$ `+&X@& +$@XQ$#$, \*>$>&@$ %X+#^$|@$#$ $+X&+$. $#+#& `+&%{|_%$#&|[ (B) % `|=&@X& , {$# @& & @^=@ X*`|*%$@&# @$ %X+#^$|@$#$ $+X&+$. ¢} _ }{|_ | { ^|}{{ ~ _{_ | ~|| | {^|_^_{ {| | {^||| |^{_^| { || | ~^{_|_ | ^|, ` |{ _ | `{ _{_ | ^| ~ ^__ | ^||. $|}{ ^|}{| _ `| |^{^| }|{{ ^||| ^_`| { { | }|^` | ^| { {^||| |^{_^|. ¢%$*?ª? @?%[%? 121 bg _ ] ^ ()) 1 2 3 4 ¢+ª/>+ª | ~^|||| ^ @{ }| ~| @ }| ~^ `_{_ +^{ |{{ ||/_`_ ¢^__ ~{^|_/]_`_{ 5 [^| (¦{. 4) a | "]^_`||_ | {||" b ]^^|{^|{ `{ _`{|| c $_ `_ _`{|| d §| e | “¤^_|” f | | { |^| | |/¢^{ >|^_ `|_/#^`| $|_^/§_^ @^} ~{|_/]_ ]{|_ _` }|^_ `|_/#| @| ~{|_/¢_{ `_ q^ ~"~~" ~~ "~ ~ " " (}~!.5) , #{^{}{^|_ `{|{ ~^|_{_ { ~^|||| ^ ~^_`{ ~^ {}~}|_ { _` _{_ |_ | ^_`|. >| |}{ _: 1 +%&+&#& >$|X $#&+XX#& @$ `+$]^{$_{$#$ +# X >X#$@QX@@# ^`+$%|&@X& $ >#$#\_@ *$+&>&@X. 2 *{|_&#& +#$. $ #$*X Q&| `+&&#&#& `+&%{|_%$#&|[ @$ +$#&@ +&=X (20) % `|=&@X& . 3 $#X@&#& ^#@$ *$ `%&_& # 4 &{^@>X. \+@&#& `+&%{|_%$#&|[ @$ +$#&@ +&=X (20) % `|=&@X& &* >$ %=>$%$#& ^#@$ . +| {^{}{^|_ _ ~_, ^ {|{}{^| }| | `| }{ {||. , " ~ (}~!.6) , >| `| _ {^{, _ ^ _ _ { _|{ _, ^| `| ) }|~|}{_ |^|| | _{ | { `_ _`{||. $#X@&#& ^#@$ . %$ ${#X%X+$ £^@{QX[#$ *$ @$#+{$ @$ >&@. $#X@&#& ^#@$ @$ >&@[, {# \#%&##%$ @$ #&{^?X[ >&@ # &>XQ$#$ (SU= , MO= , TU= , WE= , TH= , FR= , SA= ). $#X@&#& #+&|{X#& , *$ >$ & `+X>%X=%$#& % `|&#$#$ "_$" X "X@^#X". $#X@&#& #+&|{X#& , *$ >$ X*&+&#& #&{^?X[ "_$" X "X@^#X". $#X@&#& , *$ >$ `#%\+>X#& X*+$ X. |{__ , | _|__ `| |{^|_ |^||. 122 #$?<\\ *]%?¢ª[[ 1 2 3 4 ~ ~ ~ (}~!. 7) #\# #+[%$ >$ & X*{|_&@. 1 $#X@&#& ^#@$ @$ >X#$@QX@@# ^`+$%|&@X&. 2 $#X@&#& ^#@$ @$ >&@[, \#%&##%$? @$ >&@[ # &>XQ$#$, {# =&|$&#& >$ `++$X+$#&. *&+&#& &>X@, @[{|{ X|X %X_{X >@X # &>XQ$#$. *+$@X#& >@X *$`_%$# >$ `+&X%$#. 3 $#X@&#& #+&|{X#& , *$ >$ *$>$>&#& #_&@ _$ *$ `_X#%$@&. $#X@&#& #+&|{X#& "@$+&" X "@$>|^", *$ >$ X*&+&#& _$ X X@^#X. 4 $#X@&#& , *$ >$ `#%\+>X#& X*+$ X. |{__ | ¢+ª/>+ª , | _|__ `| |{^|_ |^||. >| `| _ ^ `| }|~_ ^|| ~|{^|{ _, ^| `| _ _. ]^_|_ | ^|_ ^_ { (20) _ ~ _{_ { __ . ) ) _ } }~ FULL GO ( ) ) ? _ {}^|| |}{ {, ~^|||| ^ _ ~^^|{^|| `| ~^` { ~{|_ _`| _` | _ |~ }|^_`_|. 1 $#X@&#& ^#@$ . +$]^{$_{$#$ +# #+[%$ >$ & %{|_&@$. FULL GO _| | _^|| | `{|{ ~^|_{_. ]^|||| ^ }|~| `| ^{ }|^_ `||| |{ ~^_`{ ~ {}||_ | |_^{| { ||{ }|~| `| ~{|, _` | _ }|^_`{ |~. , }~ SPEED (") 1 $#X@&#& ^#@$ , *$ >$ X*&+&#& \+* `_X#%$@&. FAST _| | _^|| | `{|{ ~^|_{_. 2 $#X@&#& ^#@$ , *$ >$ X*&+&#& $%@ `_X#%$@&. SLOW _| | _^|| | `{|{ ~^|_{_. , , _] ` ~{ +#\# @& £^@{QX@X+$ `+$%X|@ `+$>X @[{& # |&>@X#& #[#&|#%$, %X_{X ^#@X @$ {@#+|@X[ `$@&| @$ +#$ *$`_%$# >$ X$# &>@%+&&@@. 1 $#X@&#& ^#@$ @$ >X#$@QX@@# ^`+$%|&@X&. }X@$|\# @$ >X#$@QX@@# ^`+$%|&@X& #+[%$ >$ & % ${#X%@X[ ]%$# @$ ^+&>$. || }| ^_| _ _ ~{ | _^|| | `{|{ ~^|_{_ ` `__ | ^_{, ~{|{ ~-`. 2 *`\|@&#& `X$@X#& `->|^ >&#%X[ % *$%XX# # `{$*$@$#$ +& {$. , _ ` ] E01 $#_XQX *$ @$|X_X& @$ #\|X _X#&#& &@*+X#& (27). E02 ¡&@#+$|@$ +|{$ ##+$@&#& {|^{$ X {X#&, *$`|&#&@X % +|{$#$ (23). E03 *#?&@$ $#&+X[ $+&>&#& $#&+X[#$. E04 }#+$@X_@X {|&|$ ##+$@&#& {|^{$ X {X#&, *$`|&#&@X % {|&|$#$. E05 @#&@&+ *$ `+$] #$%&#& `+$%X|@ {@#&@&+$ *$ {|^{ (11). #$?<\\ *]%?¢ª[[ 123 bg , ? ~^_`|| _ _ ^|| _` {}~_{_ | _}{ `_{, _ {}~}|_ ^_`| { }|___ ^{}{^| _^{} }| ~``^ |. _ ~^__ { _ ^_{^|_ ^_`|. { _ n ]^_`{ `| ~^{~{_ ~_^|{{ ~ ~{|_ {{ _{_ |_ | ^_`|, _^__ _, _ ~^_|_ | ^|_ ^_ { (20) _ >+ª ~ _{_ { _ {}_ __^{_|| ^_ |. ]^_`{ |_ {{ {}{{ ~_{, _^__ _, _ _ | |~ {}|{. {| _ ~|~_ ~{|{ ` (15) `| {{ `^| _, | { _ ~|_ `{| |{|. _ {}~}|_ ^|}^{_{ {{ |^|}{{ __| }| ~{|_. $ >$ `#X@&#& #|X_@X +$#@X ]$+${#&+X#X{X @$ `+$]^{$_{$#$ +#, @X& %X `+&`+\_%$& >$ `_X#%$#& {@#&@&+$ *$ {|^{ X £X|#\+$ @$ %&{X 3 X*`|*%$@X[ @$ ^+&>$. ) ) ] q { (11) 1 $#X{$#& ^#@$ *$ %=>$%$@& (12). *%$>&#& {@#&@&+$ *$ `+$] (11). (¢X. 8) 2 #$%&#& {@#&@&+$ *$ `+$] @$> {£$#$ *$ {|^{, @$#X@&#& `|$#X@$#$ (14), *$ >$ #%+X#& >\+=$_$ @$ £X|#\+$ X >$ X*`+$*@X#& \>\+=$@X&# % {£$#$ *$ {|^{. (¢X. 9) ] ^ } (7) ) ]^_~^{_ _ `| ~^_^|_ {^| ^_`, }| `| |{_ `|{ ) 1 2 3 ) 4 5 {{^| ~^|{. ]{__ {|_ {^|, | |{_ |||_ | |~|{_| | ~{|_ | ^_`|. ]^_~^{_ _ `| }|__ {^| _` {{ `| ~{ | `{|, }|{{ | _ {}~}|_ ^_`|. *`+$*@&#& {@#&@&+$ *$ `+$], {${# & `{$*$@ % +$*>&| "~~ ~ ¤~ ~ ~ (11)". *%$>&#& £X|#\+$ (7). $#X@&#& `|^-{+\|X[ >\+=$_ &>@$ +\{$, *$ >$ X*%$>X#& X*]$&@X[ £X|#\+ # >\+=$_$ (¢X. 10). @X$#&|@ `#^`$#& X*%$>&@X[ £X|#\+ % #&@$#$ @$ {£$#$ *$ {|^{, *$ >$ X*]%\+|X#& @$#+^`$@X[ `+$] X {|^{. {| _ {}~}|_ ~^|||| ^ _} {^ (7). _X#&#& £X|#\+$ `+&>#% `_X#%$?$#$ _&#{$ (6) (¢X.11). \+@&#& `_X#&@X[ £X|#\+ % >\+=$_$ X|X `#$%&#& @% £X|#\+, ${ & @&]>X. ] q { (11) 1 $#X@&#& ^#@$ (13). #*X @$_X@ ?& %>X#& `_X#%$?X[ >^| (15) (¢X. 12). 2 $%\+#&#& `_X#%$?X[ >^|, %>&#& >%&#& `|$#X@X X ##+$@&#& {$`${$. 3 _X#&#& %\#+& @##$ @$ {@#&@&+$ `+&>#% `_X#%$?$#$ _&#{$ (6) (¢X.13). 4 *`|*%$#& `_X#%$?$#$ _&#{$, *$ >$ `_X#X#& `_X#%$?X[ >^| (15) X >^|$ #%+$ *$ `+X#{ @$ %\*>^] X #>^ @X{$ (¢X. 13). _ ~{|_ ~{|{ ` `|. 5 #$%&#& {@#&@&+$ *$ `+$] % {+`^$ @$ ^+&>$. $#X@&#& {@#&@&+$, >{$# @& _^&#& ?+${%$@&, {&# `{$*%$, _& ^+&>\# & `#$%&@ `+$%X|@ % {+`^$. ) 124 #¥¬%?[[ #+ª?%?[ ] ^ ] (9) ) _ {}~}|_ _|| || ~ {{{, _{ {{ ~`_ _^|| ~^. 1 #${X%$ |^_$X >&@#X+$#& `+X#$%{$#$ @$ _&#{$#$ # %|${@$ (10). $%\+#&#& `+X#$%{$#$ @$ _&#{$#$ # %|${@$ X #%+&#& |[%$#$ X >[@$#$ `|$#X@$ (¢X. 14). 2 $ >$ `>&@X#& _&#{$#$ # %|${@$ (9), X*>\+`$#& [ X `#$%&#& @%$ @$ [## @$ #$+$#$ (¢X.14). ]x_ ] $ >$ `#X@&#& #|X_@X +$#@X ]$+${#&+X#X{X @$ `+$]^{$_{$#$ +#, @X& %X `+&`+\_%$& >$ `_X#%$#& +|{X#& X _&#{X#& @$ %&{X 3 X*`|*%$@X[ @$ ^+&>$. ~ (22) ~ (23) 1 $#X@&#& `|$#X@$#$ X `%>X@&#& *$#[$?X[ |# (¢X.15). %{_ _ `||. 2 *%$>&#& +|{X#& (22) X (23). 3 _X#&#& +|{X#& `+&>#% `_X#%$?$#$ _&#{$ (6) (¢X.16). 4 #$%&#& #@% +|{X#& X %\+@&#& *$#[$?X[ |#, {$# @$#X@&#&, >{$# _^&#& ?+${%$@&, {&# `{$*%$, _& & `#$%&@ `+$%X|@. , "~ (8) , ]{|_ ^_` ^|{|| _|, }| `| ~^_`^|{_ }{|_ | _{}~^|{ ~^{ ^||| | ~^|||| ^. 1 ##+$@&#& +\Q& @$#+^`$@X#& {X X `+$] % #+$@X_@$#$ _&#{$. 2 ~{ #`$>\QX#& $ & `|&|X {| _&#{$#$, X*`|*%$#& @=XQX, *$ >$ X ##+$@X#&. ? _ _`{, ^|}{_ {| { ^|__ ^|{|| _| (8) ^~| }| ~-__{ ~{|_ (¦{.17). 3 \+@&#& #+$@X_@$#$ _&#{$ @$ [## . , ]x_ ] "~~ 1 $*%X#& %X@#%&#& @$ {|&|$#$ (¢X.18). 2 *%$>&#& {|&|$#$ # {+`^$ X X X `_X#&#&. _ ~{|_ _|| `|, | {{ |}|. ¢^__ _|| | { { }|{_ {__ ~| | _^|. ) ) " ~{ `+&>@# {|&| & |{X+$@ X|X @& & %\+#X %>@, X*%$>&#& *$ `_X#%$@& (¢X.18). 1 *%$>&#& {|&|# `?#$ @$ X@#+^&@#, {# =& >$ |^=X {$# |#. 2 $ >$ `#$%X#& +$#@ |&> `_X#%$@&, @$#X@&#& {|&|# % {+`^$. ] _ (25) _ (27) , ]``^ |_ {^|_^_{_ `|{{ {{, }| `| ^|{ ~^|{ ~^|||| ^. 1 _X#&#& &@*+X#& `$^_&@ `|$# X|X &{$ {\+`$ (¢X.19). #¥¬%?[[ #+ª?%?[ 125 bg ] _ n ]^_^__ `|{ ^_`| _ {}| `|. ) ]{|_ ^_`| ~^_`{ ~^|| ~^_|, _~^_`_ _` | ~^_| { _` ~^` {__ ~_^{` _} ~^_|. $|| _ {^{_ ~^|{|| ^|| | ^_`| { _ ` {_ ~_}{ {. 1 _X#%$#& ^+&>$ #%\@ %|$=@$ {\+`$. & X*`|*%$#& +$*#%+X#&|X X|X $+$*X%@X %&?&#%$ *$ `_X#%$@&. _^ _^ ] (}~!.20) 1 $%\+#&#& {|_$|{$#$ @$ {$`${$ @$ $#&+X[#$ (6), >{$# & %>X {$`${\# (5). 2 #$%&#& $#&+XX#& % #>&|&@X&#, `+&>@$*@$_&@ *$ #$*X Q&|. +%&+&#& >$|X `|=X#&|@X#& X #+XQ$#&|@X#& &|&{#+>X $ % `+$%X|@# `|=&@X&. }|`__ |_^{{_, | |_ `| _ {}~}|_ ~^|||| ^ }| ` ~_^{` ^__. , _^ _ q] (}~!.21) 1 #%+&#& {$`${$ @$ #>&|&@X&# *$ $#&+XX. 2 #$%&#& $#&+XX#& % #>&|&@X&#, `+&>@$*@$_&@ *$ #$*X Q&|. +%&+&#& >$|X `|=X#&|@X#& X #+XQ$#&|@X#& &|&{#+>X $ % `+$%X|@# `|=&@X&. }|`__ |_^{{_, | |_ `| _ {}~}|_ ~^|||| ^ }| ` ~_^{` ^__. , 126 ]\£? ? @?$[%$[ . HRVATSKA SIGURNOSNE NAPOMENE • Pažljivo proitajte ove upute prije uporabe aparata. • Ovaj je prirunik neizostavan dio proizvoda. Sauvajte ga na sigurnom mjestu za budu u uporabu. • Aparat je namijenjen samo za uporabu u kuanstvu. Nije namijenjen za industrijske potrebe. Aparat je opasno koristiti na nain koji nije opisan u uputama (npr. za usisavanje tekuina, prašine nakon gra®evinskih radova, cementa itd.) • Djeca moraju biti pod nadzorom kako se bi igrala s aparatom. • Ovaj aparat ne smiju koristiti osobe (ukljuujui djecu) smanjenih fizikih, osjetilnih ili mentalnih sposobnosti, neiskusne osobe i osobe koje ne poznaju aparat, osim uz nadzor ili upute osoba odgovornih za njihovu sigurnost. • Aparat nemojte prilago®avati niti popravljati. U sluaju kvara na kabelu ili bilo kojem drugom dijelu aparata, prestanite ga koristiti i odnesite ga u ovlašteni servis. • Ne koristite dijelove ili pribor koje ne isporuuje ili preporua SOLAC. • Prije prikljuivanja aparata na elektrinu mrežu provjerite odgovara li napon s natpisne ploice aparata naponu mreže u vašem kuanstvu. • Prije sastavljanja ili uklanjanja dijelova te prije išenja i održavanja ure®aja, uvijek iskljuite ure®aj i iskopajte kabel napajanja. U sluaju nestanka struje tako®er iskljuite ure®aj. • Aparat ne vješajte za kabel. Nikada ne iskljuujte aparat povlaenjem kabela - izvucite utika. • Kabel držite podalje od oštrih rubova i vruih površina. Kabel ne smije visjeti s ruba stola ili pulta jer ga djeca mogu povui i izazvati pad aparata. d • • • • • • • Nikada ne potapajte ure®aj u vodu niti kakvu drugu tekuinu, te ga ne stavljajte u perilicu posu®a. Ne dodirujte usisava ili kabel mokrim rukama. Svoj robot usisava držite dalje od izvora topline. Nikada ne koristite robot usisava bez pravilno namještenog spremnika za prašinu ili zaštitnog filtra. Modul usisavaa neka uvijek bude ist. Kosu, odjeu, prste i druge dijelove tijela držite podalje od modula usisavaa, valjaka i kotaa. Usisiva nemojte koristiti za išenje životinja. Aparat nemojte koristiti u zatvorenim prostorima u kojima se mogu nakupiti eksplozivne ili otrovne pare. • Nemojte koristiti aparat na mokrim površinama ili na otvorenom. • Redovito provjeravajte stanje kabela napajanja, elektrinog adaptera. • Nemojte vodom poprskati postaju za punjenje, adapter ni kabel za napajanje. • Postaju za punjenje ili adapter ne koristite pokraj kade, umivaonika, tuš kabine, niti bilo kojeg drugog predmeta koji sadrži vodu. • Koristite samo priloženi adapter. • Adapter ili postaju za punjenje ne dodirujte mokrim rukama dok su ukljueni u struju. • Ne ostavljajte ure®aj ili postaju za punjenje na mokroj površini ili krpi kada je ukljuen. • Ne sjedite i ne gazite na ure®aj ili ispred njega jer biste tako mogli oštetiti ure®aj. SIGURNOSNE NAPOMENE 127 hr • Pobrinite se da na podu nema žica, kabela, niti drugih predmeta duljih od 150 mm jer bi se mogli zapetljati me®u valjcima. OPREZ! Kada ure®aj želite baciti u otpad, NIKADA ga nemojte baciti u kantu za smee. Ure®aj odnesite na RECIKLAŽNO DVORIŠTE ili najbliže odlagalište radi pravilne daljnje obrade ure®aja. Time ete pomoi u brizi za okoliš. q GLAVNI DIJELOVI 1 2 3 4 5 6 7 8 9 10 11 12 13 14 15 Kuište Daljinski upravlja Postaja za automatsko punjenje Virtualna barijera Adapter etka za išenje Filtar (dvije jedinice) Bona etka (dvije jedinice) Krpa Nastavak s krpom Spremnik za prašinu Gumb za osloba®anje spremnika za prašinu Tipka za otpuštanje modula usisavaa Jeziak filtra Modul usisavaa 16 17 18 19 20 21 22 23 24 25 26 27 28 29 Infracrveni senzor Ruka Prednji odbojnik Prikljuak adaptera baterije Prekida za uklj./isklj. Kontrolna ploa s gumbima Gumeni valjak Središnji valjak Boni kotai Senzor sudara Prikljuci kontakata postaje za punjenje Senzor detektora stepenica Prednji kota UV svjetlo PRIPREMA UREAJA ZA PUNJENJE ROBOT USISAVAA n Koristite samo priloženi adapter i postaju za punjenje. Ne koristite ne koristite nikakve druge. , Vrijeme punjenja je približno 5 sati za 60-90 min rada. Prilikom prvog punjenja baterije, ostavite je da se puni preko noi. GLAVNI DIJELOVI POSTAJE ZA PUNJENJE (A) 1A 2A 3A 4A Ukrasna LED Prekida ukrasne LED Prijenosni signal LED indikator ukljuenosti 5A Indikator punjenja 6A Kontaktni prikljuci 7A Prikljuak adaptera PUNJENJE POMOU POSTAJE ZA PUNJENJE (sl. 1) ) Ne ostavljajte nikakve predmete pokraj postaje za punjenje i pobrinite se da u okruženju nema namještaja ili prepreka (pogledajte dijagram preporuenih udaljenosti). Ako postoje prepreke, robot nee pronai postaju za punjenje. Postavite postaju za punjenje na isto mjesto bez prepreke. Ako se prekrije odašilja infracrvenog signala (3A), robot nee pronai postaju za punjenje. 1 Postaju za punjenje postavite na isto tlo te uz okomiti zid. 2 Adapter (7A) prikljuite u prikljuak postaje za punjenje. 3 Ukopajte adapter u elektrino napajanje. ) ) , LED indikator ukljuenosti (4A) zasvijetlit e crveno. 128 GLAVNI DIJELOVI ) Kabel napajanja postaje za punjenje položite uz zid inae bi se robom mogao zapetljati s kabelom. 4 Pritisnite upravljaki gumb na daljinskom upravljau ili gumb na upravljakoj ploi robota. Robot usisava e potražiti postaju za punjenje ako se ista nalazi na zadovoljavajuoj udaljenosti i povezati se s njom. 5 Ako želite tijekom traženja želite poništiti naredbu za punjenje, ponovno pritisnite upravljaki gumb na daljinskom upravljau ili gumb . Robot usisava e se zaustaviti. Provjerite da li prikljuci robota (26) pravilno naliježu na prikljuke postaje za punjenje (6A). Tijekom punjenja treptat e indikatori punjenja na postaji za punjenje (5A) i upravljakoj ploi . Kada se punjenje završi, indikatori punjenja na postaji za punjenje (5A) i upravljakoj ploi prestat e treptati i nastavit e svijetliti. Ure®aj je spreman za uporabu. ) , , Tijekom punjenja ne iskljuujte postaju za punjenje jer e se robot usisava vratiti na nju radi punjenja ako se njegova baterija isprazni. Ako želite, u središte dekorativne LED (1A) možete staviti malu koliinu mirisa. 6 Pritisnite prekida (2A). , LED (1A) e zasvijetliti. Nakon što se zagrije, ugodan miris iz unutrašnjosti LED-a širit ) e se naokolo. Odre®eni mirisi mogu oštetiti plastine površine. Prije uporabe se uvjerite da miris nee oštetiti površinu. PUNJENJE BEZ POSTAJE ZA PUNJENJE (sl. 2) 1 Kabel adaptera ukopajte neposredno u prikljuak (19) na kuištu robot usisavaa (11). 2 Ukopajte adapter u elektrino napajanje. , LED indikator na upravljakoj ploi robota e treptati tijekom punjenja i prestat e treptati kada se punjenje završi. , Robot se ne može pokrenuti dok se puni preko kabela napajanja. 3 Nakon punjenja adapter iskljuite iz struje i potom izvucite kabel iz prikljuka (19). Ure¥aj je spreman za uporabu. Adapter se tijekom punjenja zagrijava. To je uobiajeno stanje, osim ako se ne postane previše vru. ) AUTOMATSKO PUNJENJE , Tijekom išenja, robot e uvijek automatski potražiti postaju za punjenje kada se njegova baterija isprazni. ) Nakon išenja, temperatura baterije može biti visoka te stoga vrijeme punjenja može biti dulje. Savjeti za dulji vijek trajanja baterije • Ne ostavljajte adapter prikljuen dulje vrijeme. Iskopajte ga kada se punjenje završi. • Ure¥aj nemojte ostavljati ili puniti u blizini radijatora ili ostalih izvora topline i ne izlažite ga izravnoj sunevoj svjetlosti. • Ure¥aj nemojte puniti u prljavim ili vlažnim prostorijama. Sobna temperatura mora biti izme¥u 15ºC i 35ºC. • Svakih nekoliko mjeseci u potpunosti ispraznite i ponovno napunite baterije. Kako biste ispraznili baterije, ure¥aj koristite u bežinom nainu dok ne stane, a postaju za punjenje iskljuite. Potom napunite baterija na gore opisan nain. PRIPREMA URE¯AJA ZA PUNJENJE ROBOT USISAVAA 129 hr • Prilikom spremanja ure¥aja na dulje vrijeme, preporuujemo da do kraja napunite bateriju i potom je izvadite i uvate na hladnom i suhom mjestu. UPORABA UREAJA , Ovaj je ure8aj posebno namijenjen za usisavanje podova i tepiha. ) ) ) ) , Ovaj je ure8aj namijenjen za svakodnevno održavanje poda, uz izbjegavanje nakupljanja prljavštine i malja. Nikada ne usisavajte vrui pepeo, krhotine ili duge oštre predmete ili tekuine. Nikada ne usisavajte upaljene šibice i opuške cigareta. Ne usisavajte otrovne materijale (amonijak itd.). Skinite sve dijelove koji se koriste za pakiranje i prijevoz. Robot usisava ne koristite za išenje me®u malim stolovima, stolicama ili u vrlo malim prostorima, je bi se tako ure®aj mogao oštetiti. Robot usisavai koriste postavke išenja za uinkovito išenje itavog poda: spiralno kretanje za intenzivnije išenje na mjestima na kojim je detektirana neistoa, praenje zidova radi išenja rubova prostorije i križanje prostorije kako bi se osigurala potpuna istoa. , Robot usisavau je potrebno približno 45 minuta za išenje prosjene prostorije, uz nekoliko prolazaka preko istih mjesta kako bi se osiguralo da cijela površina bude ista. UPRAVLJAKA PLOA ROBOT USISAVAA Gumb za pokretanje/zaustavljanje robot usisavaa Gumb za punjenje: Svijetli kada se pritisne, iskljuuje se kada se robot prikljui na postaju za punjenje. Indikator napunjenosti: Treperi tijekom punjenja. Ostaje svijetliti kada se punjenje završi. Ultra ljubiasto svjetlo: Svijetli kada se pritisne, svjetlo za dezinfekciju radit e dok robot isti. 1 Uklonite s tla sve predmeta koji bi se mogli razbiti ili oštetiti robot usisava (npr. lampe, boce). 2 Provjerite je li spremnik za prašinu (11) pravilno postavljen. Pogledajte odlomak („IŠ¦ENJE I SPREMANJE“). 3 Virtualnu barijeru (4) postavite na mjesto gdje želite sprijeiti da robot u¥e u odre¥eno podruje. Pogledajte odlomak („VIRTUALNA BARIJERA“). 4 Pokrenite robot usisava. Postavite radni prekida (20) u položaj ON (Ukljueno). 5 Pobrinite se da robot za išenje bude pun. , Ako treperi LED indikator na upravljakoj ploi robota postavite robot usisava na punjenje. Pogledajte odlomak („PRIPREMA URE§AJA. PUNJENJE ROBOT USISAVAA“) 6 Ako želite koristiti robot usisiva u automatskom nainu, programirajte njegov rad pomou daljinskog upravljaa. Pogledajte odlomak („DALJINSKI UPRAVLJA“). 7 Pritisnite gumb na upravljakoj ploi robota. Robot usisava e tada poeti raditi i pratiti svoje predloške za išenje. 130 UPORABA URE¯AJA , Ako želite, možete upravljati njegovim kretanjem ili funkcijama koje koristi uporabom gumba na daljinskom upravljau (pogledajte poglavlje "DALJINSKI UPRAVLJA") ili korištenjem gumba na upravljakoj ploi kuišta robot usisavaa. , Pritisnite gumb UV ako želite sterilizirati podruje. Ova funkcija je osobito preporuljiva za ljude koji pate od alergija i za domove s kunim ljubimcima, budui da sterilizira tlo protiv virusa i bakterija. 8 Ponovno pritisnite gumb kako biste privremeno prekinuli postupak išenja. 9 Ako ne želite programirano tjedno išenje, nakon išenja iskljuite ure¥aj. Postavite radni prekida (20) u položaj OFF (Iskljueno) ili pritisnite gumb ON/OFF (Uklj./isklj.) na daljinskom upravljau. 10 Iskopajte postaju za punjenje iz napajanja. VIRTUALNA BARIJERA GLAVNI DIJELOVI (B) 1B Prekida za ukljuivanje i duljinu virtualne barijere Iskljueno Kratki domet = 4 m Srednji domet = 6 m Dugi domet = 8 m 2B 3B 4B 5B 6B LED indikator ukljuenosti Glava senzora blizine Glava senzora virtualne barijere Poklopac odjeljka s baterijama Spojnica poklopca za baterije RAD , Uporabite virtualnu barijeru za odre®ivanje željenog podruja za išenje. ) ) ) , 1 2 3 4 Uporabite za sprjeavanje robota da u®e u podruje s kabelima ili u odre®enu prostoriju. Postavite virtualnu barijeru na istu razinu na površini na kojoj ete koristiti robot usisava. Virtualnu barijeru i postaju za punjenje postavite na me®usobnoj udaljenosti veoj od 3 m kako biste sprijeili smetnje. Postaju za punjenja ne postavljajte u dometu signala virtualne barijere. Glava senzora blizine (3B) sprjeava sudar robota s virtualnom barijerom, sprjeavajui tako da robot do®e na udaljenost manju od 0,5-1 m od barijere. Pobrinite se da baterije nisu ispražnjene. Postavite virtualnu barijeru tako da blokira podruje u koje ne želite ra robot usisava u¥e. (sl. 3). Uklonite sve predmete koji bi se mogli nalaziti ispred virtualne barijere kako biste sprijeili neželjen rad. Odaberite željenu duljinu virtualne barijere. Postavite prekida (B) za odabir kratkog , srednjeg ili dugog dometa. , Uporabite željenu duljinu barijere. Trajanje baterije ovisi o odabranoj udaljenosti senzora. , LED indikator ukljuenosti (2B) treptat e svakih 8 sekundi sve dio se baterija ne isprazni. 5 Uvjerite se da robot usisava ne može prijei granicu postavljenu virtualnom barijerom. 6 Prekida (B) postavite u iskljueni položaj , kada virtualna barijera nije potrebna. , Može doi do odre®enih razlika izme®u smjera infracrvenog signala virtualne barijere i dometa prijama robota uslijed kretanja robota tijekom uporabe. Ove razlike mogu VIRTUALNA BARIJERA 131 hr varirati ovisno o radnom okruženju i razini napunjenosti baterije robota i virtualne barijere. DALJINSKI UPRAVLJA DIJELOVI (C) 1 2 3 4 UKLJUIVANJE/ISKLJUIVANJE Gumbi za smjer Gumb za potvrdu Upravljake tipke Poetak/nedjelja Privremeno zaustavljanje/ponedjeljak 5 Prikaz (sl. 4) a Ikona "prijenosnog signala" b Programirani dani u tjednu c Trenutni dan u tjednu d Vrijeme e Ikona pogreške f Ikona funkcije Postavljanje vremena/utorak Punjenje/srijeda Tajmer/etvrtak Brzo išenje/petak išenje nakon punjenja/subota Sporo išenje/svaki dan TAJMER Sinkronizacija daljinskog upravljaa i robot usisavaa (sl. 5) , Prije prve uporabe i nakon održavanja sinkronizirajte daljinski upravlja i robot usisava. Postupite na sljedei nain: 1 Provjerite jesu li baterije robot usisavaa i daljinskog upravljaa dovoljno napunjene. 2 Iskljuite robota. Postavite radni prekida (20) u položaj OFF (Iskljueno). 3 Pritisnite gumb na više od 4 sekunde. Postavite radni prekida (20) u položaj ON (Ukljueno) bez otpuštanja gumba . , Nakon uspješne sinkronizacije, robot e se oglasiti s dva zvuna signala. Postavljanje dana i vremena (sl. 6) , Da biste osigurali da se robot pokrene u oekivano vrijeme, morate podesiti trenutan 1 2 3 4 ) dan u tjednu i vrijeme. Pritisnite gumb . Time se otvara funkcija postavljanja dana. Pritisnite gumb gumb za dan u skladu s trenutnim danom u tjednu (SU= nedjelja, MO= ponedjeljak, TU= utorak, WE= srijeda, TH= etvrtak, FR= petak, SA= subota). Pritisnite strelice za kretanje preko polja "hour" (sat) i "minutes" (minute). Pritisnite strelice za odabir trenutnog sata i minuta. Pritisnite gumb za potvrdu odabira. Pritisnite ako želite poništiti postavku. Programirano automatsko tjedno išenje (sl. 7) S iskljuenim robotom. 1 Pritisnite gumb na daljinskom upravljau. 2 Pritisnite gumb za dan u skladu s danom u tjednu za kojeg želite programirati išenje. Odaberite jedan, nekoliko ili sve dane u tjednu. Odabrani e dani treptati. 3 Pritisnite strelice kako biste postavili tono vrijeme išenja. Pritisnite strelice "gore" i "dolje" kako biste odabrali sate i minute. 132 DALJINSKI UPRAVLJA 4 Pritisnite gumb za potvrdu odabira. Pritisnite gumb za uklj./isklj. ako želite poništiti postavku. Da bi se robot usisava mogao pokrenuti u planirano vrijeme, mora biti ukljuen. Postavite radni prekida (20) u položaj ON (Ukljueno) i e svijetliti. ) ) DODATNE FUNKCIJE Funkcija FULL GO (potpuno išenje) ) Ako odaberete ovu funkciju, robot usisava e biti programiran za nastavak išenja nakon što se u potpunosti napuni. 1 Pritisnite gumb . Robot usisava mora biti ukljuen. , FULL GO e zasvijetliti na zaslonu daljinskog upravljaa. Robot usisava e potražiti postaju za punjenje prije nego se njegova baterija isprazni i automatski e poeti s išenjem nakon što se do kraja napuni. Funkcija SPEED (brzina) 1 Pritisnite gumb na za odabir brzog išenja. 2 Pritisnite gumb na za odabir sporog išenja. , FAST e zasvijetliti na zaslonu daljinskog upravljaa. , SLOW e zasvijetliti na zaslonu daljinskog upravljaa. ŠIFRE POGREŠAKA Ako robot ne funkcionira pravilno uslijed jednog od sljedeih razloga, svi e gumbi na upravljakoj ploi robota istovremeno treptati. 1 Pritisnite gumb na daljinskom upravljau. Pobrinite se da signal daljinskog upravljaa bude u dometu ure¥aja. , Ikona pogreške pojavit e se na zaslonu daljinskog upravljaa pokraj jedne od šifri pogrešaka opisanih dolje. 2 Poduzmite korake opisane dolje, ovisno o prikazanoj pogrešci. ŠIFRA POGREŠKE UZROK POGREŠKE RJEŠENJE E01 Senzor detektora stepenica Oistite senzore (27). E02 Središnji valjak Uklonite svu prljavštinu i dlake s valjaka (23). E03 Slaba baterija Napunite bateriju. E04 Boni kotai Uklonite svu prljavštinu i dlake s kotaa. E05 Spremnik za prašinu Pravilno namjestite spremnik za prašinu (11). hr , Ako se pogreška javlja i nakon poduzimanja ovih koraka, ne koristite ure®aj i odnesite ga u ovlašteni servis. Nemojte mijenjati niti popravljati ure®aj. SPREMANJE I IŠENJE n Prije bilo kakvog išenja ili održavanja obvezno postavite radni prekida (20) u položaj OFF (Isklj.) i iskopajte ure®aj iz napajanja. ) Prije sastavljanja se pobrinite da svi elementi budu potpuno suhi. ) Modul usisavaa (15) nikada ne uranjajte u vodu ili neku drugu tekuinu i ne stavljajte ga u perilicu za posu®e. Ne koristite abrazivna sredstva za išenje ni otapala. SPREMANJE I IŠ°ENJE 133 Za najbolju uinkovitost robot usisavaa, preporuujemo da spremnik za prašinu istite nakon svake 3 uporabe. PRAŽNJENJE SPREMNIKA ZA PRAŠINU (11) 1 Pritisnite i držite gumb za osloba¥anje (12). Uklonite spremnik za prašinu (11). (sl. 8) 2 Postavite spremnik za prašinu nad kantu za smee, povucite jeziak (14) kako biste otvorili drža filtra i ispraznite sadržaj spremnika u kantu za smee. (sl. 9) IŠENJE I ZAMJENA FILTRA (7) ) Preporuljivo je redovito provjeravati filtar kako biste provjerili radi li pravilno. Filtar temeljito oistite ako primijetite da je usisna snaga ure®aja slabija. ) Zamjena filtra se preporua jednom ili dvaput godišnje, ovisno o uestalosti uporabe 1 2 3 ) 4 5 ure®aja. Ispraznite spremnik za prašinu na nain opisan u poglavlju “PRAŽNJENJE SPREMNIKA ZA PRAŠINU (11)”. Uklonite filtar (7). Pritisnite polukružni drža jednom rukom kako biste izvadili iskorišteni filtar iz držaa (sl. 10) Nježno uklonjenim filtrom udarite nekoliko puta o rub kante za smee kako biste izbacili prekomjernu prašinu i neistoe. Nikada nemojte koristiti robot usisava bez filtra (7). Filtar oistite uz pomo etke za išenje (6) (sl. 11). Vratite oišeni filtar (ili po potrebi novi filtar), u njegov drža. IŠENJE SPREMNIKA ZA PRAŠINU (11) 1 Pritisnite gumb (13). Time ete osloboditi modul usisavaa (15) (sl. 12). 2 Preokrenite modul usisavaa, oslobodite dva jezike i uklonite poklopac. 3 Oistite unutarnje dijelove spremnika za prašinu uz pomo etke za išenje (6) (sl. 13). 4 Uporabite etku za išenje kako biste oistili modul usisavaa (15) i ulaz i izlaz zraka jedinice (sl. 13). Modul usisavaa ne perite vodom. 5 Namjestite spremnik za prašinu u u kuište ure¥aja. Pritisnite spremnik dok ne zaujete klik, što znai da je spremnik pravilno smješten u kuište. ) IŠENJE I ZAMJENA KRPE (9) ) Krpu ne koristite na sagovima, tepisima ili podovima koji nisu potpuno glatki. 1 U takvim sluajevima uklonite dodatak s krpom (10). Okrenite dodatak s krpom i oslobodite lijevi i desni jeziak (sl. 14). 2 Za izmjenu krpe (9), izvucite je i stavite novu na njezino mjesto (sl.14). UKLANJANJE I IŠENJE ETKI Za najbolju uinkovitost robot usisavaa, preporuujemo da valjke i etke istite nakon svake 3 uporabe. Valjci (22) i (23) 1 Pritisnite crni jeziak i podignite preku za privršivanje (sl.15). , Oslobodit e se valjci. 2 Uklonite valjke (22) i (23). 3 Valjke oistite uz pomo etke za išenje (6) (sl. 16). 4 Ponovno umetnite valjke i privrstite preku za privršivanje. Pritisnite dok ne zaujete klik, što znai da je pravilno smješteno 134 SPREMANJE I IŠ°ENJE Bona etka (8) , Redovito istite bonu etku kako biste sprijeili kvar robot usisavaa. 1 Rukama uklonite dlake i prašinu uhvaene na bonoj etki. 2 Ako se neistoa jako zapetlja oko etke, prerežite ju škarama. , Po potrebi odvijte vijak i uklonite bonu etku (8) s kuišta radi uinkovitijeg išenja (sl.17). 3 Vratite bonu etku natrag u njezino kuište. UKLANJANJE I IŠENJE KOTAA Boni kotai 1 Odvijte vijke na kotaima (sl.18). 2 Odvojite kotae od kuišta i oistite ih. Kotae ne perite vodom, uljem ili mašu. Vratite kotae natrag u njihova kuišta i zavijte ih uz pomo odvijaa. ) ) Prednji kota Ako se prednji kota zaglavi ili se slobodno ne vrti, uklonite ga radi išenja (sl.18). 1 Uklonite kota uz pomo alata koji služi kao poluga. 2 Da biste ga vratili nakon išenja, pritisnite kota u njegovo kuište. OISTITE SENZORE SUDARA (25) i SENZORE STEPENICA (27) , Infracrveni senzor morta biti ist kako bi robot usisava mogao pravilno raditi. 1 Oistite senzore pamukom ili mekom krpom (sl.19). IŠENJE UREAJA n Pripazite da u ure®aj ne u®e voda. ) Oistite ure®aj nakon prve uporabe, odmah nakon svake uporabe i nakon dužeg stajanja. Na taj ete nain osigurati ispravan rad ure®aja i produljiti njegov vijek trajanja. 1 Vanjski dio ure¥aja oistite navlaženom krpom. Ne koristite abrazivna sredstva za išenje ni otapala. ZAMJENA BATERIJA ZAMJENA BATERIJA VIRTUALNE BARIJERE (sl. 20) 1 Okrenite blokadu pokrova baterije (6B) dok se pokrov ne oslobodi (5B). 2 Umetnite baterije u odjeljak namijenjen za tu svrhu. Provjerite jesu li negativne i pozitivne elektrode na pravilnim stranama. , Izvadite baterija ako robot usisava neete koristiti dulje vrijeme. ZAMJENA BATERIJA DALJINSKOG UPRAVLJAA (sl. 21) 1 Otvorite pokrov odjeljka s baterijama. 2 Umetnite baterije u odjeljak namijenjen za tu svrhu. Provjerite jesu li negativne i pozitivne elektrode na pravilnim stranama. , Izvadite baterija ako robot usisava neete koristiti dulje vrijeme. ZAMJENA BATERIJA 135 hr . ROMANA M#SURI DE SIGURAN# • Citi³i cu aten³ie aceste instruc³iuni înainte de a utiliza aparatul. • Acest manual reprezint9 o parte integrant9 a produsului. P9stra:i-l la loc sigur, pentru a putea fi consultat în viitor. • Acest aparat este destinat exclusiv utiliz´rii la domiciliu µi nu utiliz´rii industriale. Utilizarea acestuia în alte scopuri decât cele indicate (de ex. pentru aspirarea lichidelor, a prafului rezultat în urma lucr´rilor de construc³ii, a cimentului etc.) este periculoas´. • Supraveghea³i copiii, pentru a v´ asigura c´ nu se joac´ cu aparatul. • Nu se recomand´ utilizarea aparatului de c´tre persoane (inclusiv copii) ale c´ror capacit´³i fizice, senzoriale sau mentale sunt afectate sau care nu au suficientã experien³´ sau suficiente cunoµtin³e pentru a-l utiliza. Este indicat ca aceste persoane sã foloseascã aparatul numai dac´ sunt supravegheate sau dac´ au fost instruite în privin³a modului de utilizare a acestuia de c´tre o persoan´ r´spunz´toare pentru siguran³a lor. • Nu încerca³i s´ modifica³i sau s´ repara³i aparatul. Dac´ identifica³i orice tip de anomalie la cablul de alimentare sau la oricare alt´ component´ a aparatului, nu îl mai folosi³i, ci duce³i-l la o unitate service autorizat´. • Nu utiliza p´r³i sau accesorii care nu sunt furnizate sau recomandate de c´tre compania SOLAC. • Înainte de a introduce aparatul în priz´, verifica³i dac´ tensiunea indicat´ pe aparat corespunde cu cea din locuin³a dumneavoastr´. • Opri³i µi scoate³i din priz´ dispozitivul înainte de demontarea sau asamblarea pieselor µi înainte de orice opera³ie de între³inere sau cur´³are. De asemenea, scoate³i aparatul din priz´ în cazul întreruperii aliment´rii cu energie electric´. • Nu folosi³i cablul de alimentare pentru a ag´³a aparatul. Deconecta³i întotdeauna aparatul tr´gând de µtecher. Nu trage³i de cablu. • Feri³i cablul de alimentare de contactul cu obiecte ascu³ite sau cu suprafe³e fierbin³i. Nu l´sa³i cablul de alimentare s´ atârne peste marginea meselor sau a suprafe³elor de lucru, deoarece copiii ar putea s´ trag´ de el, r´sturnând astfel aparatul. d • • • • • • • • • • 136 Nu introduce³i aparatul în ap´ sau în alt lichid µi nu îl sp´la³i în maµina de sp´lat vase. Nu atinge³i aspiratorul sau µtecherul cu mâinile ude. Feri³i aspiratorul robot de sursele de c´ldur´. Nu folosi³i niciodat´ aspiratorul robot dac´ recipientul pentru gunoi sau filtrul de protec³ie nu este montat corect. P´stra³i întotdeauna curat modulul de aspirare. Feri³i p´rul, hainele, degetele µi orice alte p´r³i ale corpului dumneavoastr´ de modulul de aspirare, role µi ro³i. Nu utiliza³i aspiratorul pentru a cur´³a blana animalelor. Nu folosi³i aspiratorul în spa³ii închise, unde se pot forma vapori toxici sau explozivi. Nu folosi³i aparatul pe suprafe³e ude sau în exterior. Verifica³i la intervale regulate starea cablului de alimentare, adaptorului de alimentare µi a conexiunii. Evita³i s´ stropi³i sta³ia de înc´rcare, adaptorul sau cablul de alimentare. M±SURI DE SIGURAN²± • În timpul utiliz´rii, sta³ia de înc´rcare sau adaptorul nu trebuie s´ se afle în apropierea c´zilor de baie, a chiuvetelor, a duµurilor sau în orice alt loc care con³ine ap´. • Folosi³i numai adaptorul furnizat. • Nu atinge³i adaptorul sau sta³ia de înc´rcare cu mâinile ude atunci când aceasta este conectat´ la re³eaua de alimentare. • Nu l´sa³i aparatul sau sta³ia de înc´rcare pe o suprafa³´ sau o cârp´ ud´ atunci când este în func³iune. • Nu v´ aµeza³i pe dispozitiv µi nu sta³i în fa³a acestuia deoarece acesta ar putea fi deteriorat. • Asigura³i-v´ c´ nu exist´ fire, cabluri sau alte obiecte mai lungi de 150 mm pe podea deoarece acestea s-ar putea prinde de role. ATEN²IE! Atunci când dori³i s´ arunca³i aparatul, nu îl arunca³i NICIODAT± împreun´ cu gunoiul menajer. Duce³i-l la cel mai apropiat PUNCT DE COLECTARE a materialelor uzate, pentru a fi prelucrat corespunz´tor. Astfel, ve³i contribui la ocrotirea mediului înconjur´tor. q COMPONENTELE PRINCIPALE 1 2 3 4 5 6 7 8 9 10 11 12 13 14 15 Corpul principal Telecomanda Sta³ia automat´ de înc´rcare Bariera virtual´ Adaptorul Peria de cur´³are Filtrul (dou´ unit´³i) Peria lateral´ (dou´ unit´³i) Mopul Accesoriul pentru mop Recipientul pentru gunoi Butonul de eliberare a recipientului pentru gunoi Butonul de eliberare a modulului de aspirare Vârful filtrului Modulul de aspirare 16 17 18 19 20 21 22 23 24 25 26 27 28 29 Senzorul cu infraroµii Mânerul Bara de protec³ie din fa³´ Conectorul adaptorului acumulatorului Butonul de ac³ionare Panoul de control cu butoane Rola din cauciuc Rola central´ Ro³ile laterale Senzorii de coliziune Conectorii de contact ai sta³iei de înc´rcare Senzorii de detectare a treptelor Roata din fa³´ Lampa de ultraviolete PREG#TIREA DISPOZITIVULUI - ÎNC#RCAREA ASPIRATORULUI ROBOT ro n Folosi³i numai adaptorul µi sta³ia de înc´rcare furnizate. Nu folosi³i alte tipuri. , Timpul de înc´rcare este de aproximativ 5 ore pentru 60-90 de minute de func³ionare. Prima dat´ când înc´rca³i acumulatorul, l´sa³i-l la înc´rcat peste noapte. COMPONENTELE PRINCIPALE 137 PRINCIPALELE COMPONENTE ALE STAIEI DE ÎNC#RCARE (A) 1A 2A 3A 4A Ledul decorativ Butonul ledului decorativ Semnalul transmisiei Indicatorul luminos LED APRINS 5A Indicatorul pentru înc´rcare 6A Conectorii de contact 7A Conectorul adaptorului ÎNC#RCAREA CU AJUTORUL STAIEI DE ÎNC#RCARE (fig. 1) ) Nu aµeza³i niciun obiect lâng´ sta³ia de înc´rcare µi asigura³i-v´ c´ zona din jur este liber´ de mobil´ sau obstacole (consulta³i distan³ele recomandate din figur´). ) Robotul nu va g´si sta³ia de înc´rcare dac´ sunt obstacole. Aµeza³i sta³ia de înc´rcare într-o zon´ liber´, f´r´ obstacole. ) Robotul nu va g´si sta³ia de înc´rcare dac´ transmi³´torul de semnale infraroµii (3A) este acoperit. 1 A©ezaªi staªia de înc¬rcare pe o podea curat¬, sprijinit¬ de un perete vertical. 2 Conectaªi adaptorul (7A) la conectorul staªiei de înc¬rcare. 3 Conectaªi adaptorul la reªeaua de alimentare cu energie electric¬. , Indicatorul luminos LED APRINS (4A) se va aprinde, având culoarea roµie. ) Trage³i cablul de alimentare al sta³iei de înc´rcare de-a lungul peretelui; în caz contrar, robotul s-a putea încurca în acesta. 4 Ap¬saªi pe butonul de control al telecomenzii sau pe butonul al panoului de control al robotului. Aspiratorul robot va c¬uta staªia de înc¬rcare, dac¬ se afl¬ la o distanª¬ corespunz¬toare ©i se va conecta la aceasta. 5 Dac¬ doriªi s¬ anulaªi comanda de înc¬rcare în timpul c¬ut¬rii, ap¬saªi din nou pe butonul de control sau pe butonul de control al telecomenzii . Aspiratorul robot se va opri. Verifica³i conectarea corespunz´toare a conectorilor robotului (26) la conectorii sta³iei de înc´rcare (6A). ) , În timpul înc´rc´rii, indicatoarele luminoase de înc´rcare ale sta³iei de înc´rcare (5A) µi panoului de control vor lumina intermitent. Dup´ ce înc´rcarea se încheie, indicatoarele luminoase de înc´rcare ale sta³iei de înc´rcare (5A) µi panoului de control vor înceta s´ mai lumineze intermitent µi vor r´mâne aprinse. Aparatul este preg´tit pentru utilizare. , Nu opri³i sta³ia de înc´rcare în timp ce aspira³i deoarece aspiratorul robot se va întoarce pentru înc´rcare dac´ nivelul de înc´rcare al acumulatorului scade prea mult. Dac¬ doriªi, puteªi s¬ puneªi o cantitate mic¬ din parfumul preferat în centrul ledului decorativ (1A). 6 Ap¬saªi pe buton (2A). , Ledul (1A) se va aprinde. Atunci când se înc´lzeµte, parfumul din interiorul ledului se va r´spândi. ) Unele parfumuri pot deteriora suprafa³a din plastic. Înainte de utilizare, verifica³i dac´ parfumul deterioreaz´ suprafa³a. ÎNC#RCAREA F#R# STAIA DE ÎNC#RCARE (fig. 2) 1 Conectaªi cablul adaptorului direct la conectorul (19) corpului robotului aspirator (11). 2 Conectaªi adaptorul la reªeaua de alimentare cu energie electric¬. , Indicatorul luminos cu led de pe panoul de control al robotului va lumina intermitent în timpul înc´rc´rii µi se va opri din luminat atunci când înc´rcarea se termin´. , Robotul nu poate fi pornit atunci când este înc´rcat direct cu cablul de alimentare. 138 PREG±TIREA DISPOZITIVULUI - ÎNC±RCAREA ASPIRATORULUI 3 Dup¬ înc¬rcare, deconectaªi adaptorul de la reªeaua de alimentare ©i apoi deconectaªi cablul de la conector (19). Aparatul este preg¬tit pentru utilizare. Adaptorul se înc´lzeµte uµor în timpul înc´rc´rii.. Acest lucru este normal, cu condi³ia s´ nu se înc´lzeasc´ foarte tare. ) ÎNC#RCAREA AUTOMAT# , În timpul aspir´rii, robotul va c´uta întotdeauna automat sta³ia de înc´rcare atunci când nivelul de înc´rcare al acumulatorului este prea sc´zut. ) Dup´ aspirare, temperatura acumulatorului poate fi ridicat´ µi, de aceea, timpul de înc´rcare poate fi mai lung. Sfaturi pentru prelungirea duratei de via a acumulatorului • Nu l¬saªi adaptorul conectat timp îndelungat. Deconectaªi-l atunci când înc¬rcarea s-a finalizat. • Nu p¬straªi ©i nu înc¬rcaªi aparatul în apropierea radiatoarelor sau a altor surse de c¬ldur¬ ©i nu îl expuneªi la acªiunea direct¬ a razelor solare. • Nu înc¬rcaªi aparatul în locuri murdare sau umede. Se recomand¬ ca temperatura camerei s¬ fie cuprins¬ între 15 ºC ©i 35 ºC. • O dat¬ la câteva luni, desc¬rcaªi complet acumulatorii ©i apoi înc¬rcaªi-i complet. Pentru a-i desc¬rca, folosiªi aparatul f¬r¬ a-l conecta la reªea pân¬ când acesta se opre©te, cu staªia de înc¬rcare oprit¬. Apoi, reînc¬rcaªi acumulatorii conform indicaªiilor de mai sus. • La depozitarea aparatului pentru o perioad¬ lung¬ de timp, v¬ recomand¬m s¬ înc¬rcaªi complet acumulatorul ©i apoi s¬ îl scoateªi pentru a-l depozita într-un loc r¬coros ©i uscat. UTILIZAREA APARATULUI , Acest aparat a fost proiectat special pentru a cur9:a podele ;i covoare. ) ) ) ) Acest aparat este destinat între:inerii zilnice a podelei, pentru a evita acumularea de praf ;i apari:ia pufului. Nu aspira³i niciodat´ cenuµ´ fierbinte, aµchii, alte obiecte ascu³ite sau lichide. Nu aspira³i niciodat´ be³e de chibrit sau mucuri de ³igar´ aprinse. Nu aspira³i materiale toxice (de exemplu, amoniac). Îndep´rta³i complet toate elementele utilizate pentru ambalare µi transport. Nu folosi³i aspiratorul robot între mese mici, scaune sau în locuri foarte înguste deoarece ar putea duce la deteriorarea acestuia. , Aspiratorul robot foloseµte diferite set´ri de aspirare pentru a cur´³a eficient podeaua: miµcare în spiral´ pentru o aspirare mai intens´ atunci când a fost detectat´ mult´ mizerie, miµcarea de-a lungul peretelui pentru aspirarea perimetrului camerei µi aspirarea în diagonal´ pentru o cur´³are complet´. , Aspiratorul robot va acea nevoie de aproximativ 45 de minute pentru a aspira o camer´ de dimensiuni medii, trecând deasupra aceleiaµi zone de mai multe ori pentru a asigura aspirarea întregii suprafe³e. UTILIZAREA APARATULUI 139 ro PANOUL DE CONTROL AL ASPIRATORULUI ROBOT Pornirea/oprirea aspiratorului robot (Start/Stop) Butonul Charge (înc´rcare): se aprinde atunci când este ap´sat, se stinge atunci când robotul se conecteaz´ la sta³ia de înc´rcare. Indicatorul Charge: lumineaz´ intermitent în timpul înc´rc´rii. R´mâne aprins atunci când înc´rcarea se încheie. 1 2 3 4 5 Lampa cu ultraviolete: se aprinde atunci când este ap´sat´, lampa de dezinfectare va func³iona în timp ce robotul aspir´. Îndep¬rtaªi de pe podea toate obiectele care ar putea sparge sau deteriora aspiratorul robot (de exemplu, l¬mpi, sticle). Verificaªi dac¬ recipientul pentru gunoi (11) este bine fixat. Consultaªi secªiunea („CUR®AREA ¯I DEPOZITAREA”). A©ezaªi bariera virtual¬ (4) atunci când doriªi s¬ împiedicaªi intrarea robotului într-o anumit¬ zon¬. Consultaªi secªiunea („BARIERA VIRTUAL”). Porniªi aspiratorul robot. Pentru aceasta, treceªi butonul de acªionare (20) în poziªia PORNIT. Asiguraªi-v¬ c¬ aspiratorul robot este înc¬rcat. , Dac´ indicatorul luminos cu led din panoul de control al robotului lumineaz´ intermitent, preg´ti³i robotul de înc´rcare. Consultaªi secªiunea („PREGTIREA DISPOZITIVULUI. ÎNCRCAREA ASPIRATORULUI ROBOT”). 6 Dac¬ doriªi s¬ folosiªi aspiratorul robot în modul automat, programaªi funcªionarea sa cu ajutorul telecomenzii. Consultaªi secªiunea („TELECOMANDA”). 7 Ap¬saªi pe butonul din panoul robotului. Aspiratorul robot va începe apoi s¬ funcªioneze, respectând modelul de aspirare. , Dac´ dori³i, pute³i controla miµc´rile sau func³iile cu ajutorul butoanelor telecomenzii (consulta³i sec³iunea „TELECOMANDA”) sau al butoanelor panoului de control de pe corpul aspiratorului robot. , Ap´sa³i pe tasta UV, dac´ dori³i s´ steriliza³i zona din fa³´. Aceast´ func³ie este recomandat´ în special pentru oamenii care sufer´ de alergii µi pentru cei care au animale de companie, deoarece sterilizeaz´ podeaua µi elimin´ viruµii µi bacteriile. 8 Ap¬saªi din nou pe butonul pentru a opri procesul de aspirare. 9 Dac¬ nu doriªi o aspirare s¬pt¬mânal¬ programat¬, opriªi aparatul dup¬ aspirare. Pentru aceasta, treceªi butonul de acªionare (20) în poziªia OPRIT sau ap¬saªi pe butonul ON/OFF (pornit/oprit) de pe telecomand¬. 10 Deconectaªi aparatul de la reªeaua de alimentare cu energie electric¬. 140 UTILIZAREA APARATULUI BARIERA VIRTUAL# COMPONENTELE PRINCIPALE (B) 1B Butonul PORNIT µi lungimea barierei virtuale Off (oprit) Raz´ scurt´ = 4 m Raz´ medie = 6 m Raz´ lung´ = 8 m 2B 3B 4B 5B Indicatorul luminos LED APRINS Capul senzorului de proximitate Capul senzorului barierei virtuale Capacul compartimentului acumulatorului 6B Clema capacului acumulatorului FUNCIONAREA , Folosi³i bariera virtual´ pentru a defini zona de aspirare dorit´, împiedicând robotul s´ intre în zone în care nu este necesar sau nu dori³i s´ intre. Folosi³i-o pentru a împiedica robotul s´ intre în zone cu cabluri sau într-o anumit´ camer´. Aµeza³i bariera virtual´ la acelaµi nivel pe suprafa³a pe care dori³i s´ folosi³i aspiratorul robot. Aµeza³i bariera virtual´ µi sta³ia de înc´rcare la o dep´rtare de peste 3 m, pentru a preveni interferen³ele. Nu aµeza³i sta³ia de înc´rcare în raza semnalului barierei virtuale. ) ) ) , Capul senzorului de proximitate (3B) previne impactul dintre aspiratorul robot µi bariera 1 2 3 4 virtual´, împiedicând apropierea acestuia la o distan³´ mai mic´ de 0,5 - 1 m de aceasta. Asiguraªi-v¬ c¬ acumulatorii nu sunt desc¬rcaªi. A©ezaªi bariera virtual¬ astfel încât s¬ blocheze zona în care nu doriªi s¬ intre aspiratorul robot. (fig. 3) Îndep¬rtaªi orice obiecte care se pot afla în faªa barierei virtuale, pentru a împiedica funcªionarea necorespunz¬toare a acesteia. Alegeªi lungimea dorit¬ a barierei virtuale. Pentru aceasta, poziªionaªi butonul (B) astfel încât s¬ alegeªi raza scurt¬ , medie sau lung¬ . , Folosi³i o barier´ cu o lungime corespunz´toare. Durata de func³ionare a acumulatorului depinde de distan³a selectat´ a senzorului. , Indicatorul luminos LED APRINS (2B) va lumina intermitent la fiecare 8 secunde pân´ când acumulatorul se goleµte. 5 Verificaªi dac¬ aspiratorul robot dep¬©e©te limita creat¬ de bariera virtual¬. 6 Treceªi butonul (B) în poziªia OPRIT atunci când bariera virtual¬ nu este necesar¬. , Pot ap´rea unele diferen³e în direc³ia semnalului de infraroµii al barierei virtuale µi a razei de recep³ie a robotului datorit´ miµc´rii acestuia în timpul func³ion´rii. Aceast´ diferen³´ poate varia în func³ie de mediul de lucru µi nivelul de înc´rcare al robotului µi barierei virtuale. BARIERA VIRTUAL± 141 ro TELECOMANDA COMPONENTELE (C)) 1 2 3 4 Aspiratorul robot PORNIT/OPRIT Butoanele de direc³ie Butonul de confirmare Tastele de control Start/duminic´ 5 Oprire provizorie/luni Afiµajul (fig. 4) a Pictograma „se transmite mesajul” b Zilele programate ale s´pt´mânii c Ziua curent´ a s´pt´mânii d Ora e Pictograma de eroare f Pictograma de func³ii Setarea orei/mar³i Înc´rcare/miercuri Cronometru/joi Aspirare rapid´/vineri Aspirare dup´ înc´rcare/sâmb´t´ Aspirare lent´/în fiecare zi CRONOMETRUL Sincronizarea telecomenzii i a aspiratorului robot (fig. 5) , Sincroniza³i telecomanda µi aspiratorul înainte de prima folosire µi urm´toarele opera³iuni de între³inere. Pentru a face acest lucru: 1 Verificaªi dac¬ acumulatorii aspiratorului robot ©i ai telecomenzii sunt suficient de înc¬rcaªi. 2 Opriªi robotul. Pentru aceasta, treceªi butonul de acªionare (20) în poziªia OPRIT. 3 Ap¬saªi pe butonul pentru mai mult de 4 secunde. Readuceªi butonul de acªionare (20) în poziªia PORNIT, f¬r¬ a elibera butonul. , Atunci când sincronizarea a fost efectuat´ corespunz´tor, robotul va emite dou´ semnale sonore scurte. Stabilirea zilei i a orei (fig. 6) , Pentru a v´ asigura c´ robotul începe s´ func³ioneze la ora prev´zut´, ziua curent´ a 1 2 3 4 ) s´pt´mânii µi ora trebuie s´ fie salvate. Ap¬saªi pe butonul . Se deschide funcªia de stabilire a zilei. Ap¬saªi butonul zilei corespunz¬toare zilei curente a s¬pt¬mânii (SU= duminic, MO= luni, TU= mari, WE= miercuri, TH= joi, FR= vineri, SA= sâmbt). Ap¬saªi pe s¬geªile pentru a derula câmpurile „or¬” ©i „minut”. Ap¬saªi pe s¬geªile pentru a selecta „ora” ©i „minutul” curente. Ap¬saªi pe pentru a confirma selecªia. Ap´sa³i pe dac´ dori³i s´ anula³i setarea. Programarea aspirrii sptmânale automate (fig. 7) Cu robotul oprit. 1 Ap¬saªi pe butonul al telecomenzii. 2 Ap¬saªi pe butonul zilei corespunz¬toare zilei s¬pt¬mânii pe care doriªi s¬ o programaªi. Selectaªi una, mai multe sau toate zilele s¬pt¬mânii. Zilele selectate vor lumina scurt. 3 Ap¬saªi pe s¬geªile pentru a stabili ora exact¬ a aspir¬rii. Ap¬saªi pe s¬geªile „sus” ©i „jos” pentru a selecta ora ©i minutul. 142 TELECOMANDA 4 Ap¬saªi pe pentru a confirma selecªia. Ap´sa³i pe butonul PORNIT/OPRIT dac´ dori³i s´ anula³i setarea. Pentru ca robotul s´ înceap´ la ora planificat´, trebuie s´ fie pornit. Butonul de ac³ionare (20) în pozi³ia PORNIT µi aprins. ) ) FUNCIILE SUPLIMENTARE Funcia CONTINUARE DUP# ÎNC#RCARE ) Dac´ aceast´ func³ie este selectat´, aspiratorul este programat s´ continue aspirarea dup´ ce este complet înc´rcat. 1 Ap¬saªi pe butonul . Aspiratorul robot trebuie s¬ fie pornit. , FULL GO (continuare dup´ înc´rcare) se va aprinde în afiµajul de control al telecomenzii. Aspiratorul robot va c´uta sta³ia de înc´rcare înainte ca acumulatorul s´ se termine µi va începe automat aspirarea atunci când este complet înc´rcat. Funcia VITEZ# 1 Ap¬saªi pe butonul pentru a alege aspirarea rapid¬. 2 Ap¬saªi pe butonul pentru a alege aspirarea lent¬. , FAST (rapid) se va aprinde în afiµajul de control al telecomenzii. , SLOW (lent) se va aprinde în afiµajul de control al telecomenzii. CODURILE DE EROARE Dac¬ robotul nu funcªioneaz¬ corespunz¬tor datorit¬ uneia din urm¬toarele circumstanªe, toate butoanele panoului de control al robotului vor lumina intermitent simultan. 1 Ap¬saªi pe butonul al telecomenzii. Asiguraªi-v¬ c¬ semnalul telecomenzii este în raza activ¬ a aparatului. , Pictograma de eroare va ap´rea în afiµajul telecomenzii lâng´ codurile de eroare descrise mai jos. 2 Efectuaªi acªiunile descrise mai jos în funcªie de eroarea afi©at¬. CODUL DE CAUZA FUNCION#RII SOLUIA EROARE NECORESPUNZ#TOARE E01 Senzorii de detectare a treptelor Cur¬ªaªi senzorii (27). E02 Rola central¬ E03 Acumulator aproape consumat Înc¬rcaªi acumulatorul. E04 Roªile laterale Îndep¬rtaªi mizeria ©i p¬rul prinse de roªi. E05 Recipientul pentru gunoi Fixaªi corespunz¬tor recipientul pentru gunoi (11). Îndep¬rtaªi mizeria ©i p¬rul prinse de rol¬ (23). ro , Dac´ func³ionarea necorespunz´toare persist´ dup´ efectuarea acestor ac³iuni, nu folosi³i robotul µi duce³i-l la un service autorizat pentru asisten³´. Nu modifica³i µi nu repara³i aparatul. CUR#AREA I DEPOZITAREA n Înainte de opera³ia de cur´³are sau între³inere, asigura³i-v´ c´ butonul de ac³ionare ) (20) este în pozi³ia OPRIT µi c´ aparatul nu este conectat la re³eaua de alimentare cu energie electric´. Asigura³i-v´ c´ toate elementele sp´late sunt complet uscate înainte de asamblare. CUR±²AREA ¶I DEPOZITAREA 143 ) Nu introduce³i niciodat´ modulul de aspirare (15) în ap´ sau în alt lichid µi nu îl sp´la³i în maµina de sp´lat vase. Nu folosi³i produse abrazive sau solven³i. Pentru performanªe excelente ale aspiratorului, v¬ recomand¬m s¬ cur¬ªaªi recipientul pentru gunoi ©i filtrul dup¬ 3 utiliz¬ri. GOLIREA RECIPIENTULUI PENTRU GUNOI (11) 1 ®ineªi ap¬sat butonul de eliberare (12). Scoateªi recipientul pentru gunoi (11). (fig. 8) 2 A©ezaªi recipientul pentru gunoi peste un co© de gunoi, trageªi de vârful (14) pentru a deschide suportul filtrului ©i goliªi conªinutul în co©ul de gunoi. (fig. 9) CUR#AREA I ÎNLOCUIREA FILTRULUI (7) ) Se ) 1 2 3 ) 4 5 recomand´ s´ inspecta³i regulat filtrul pentru a verifica dac´ func³ioneaz´ corespunz´tor. Cur´³a³i filtrul cu aten³ie dac´ detecta³i o reducere a capacit´³ii de aspirare a aparatului. Se recomand´ înlocuirea filtrului o dat´ sau de dou´ ori pe an, în func³ie de cât de des folosi³i aparatul. Goliªi recipientul pentru gunoi a©a cum este indicat în secªiunea „GOLIREA RECIPIENTULUI PENTRU GUNOI (11)”. Scoateªi filtrul (7). Ap¬saªi pe suportul semicircular cu o mân¬ pentru a scoate filtrul folosit din suport (fig. 10) Loviªi u©or filtrul demontat de laterala co©ului de gunoi pentru a desprinde praful ©i mizeria în exces. Nu folosi³i aspiratorul robot f´r´ filtru (7). Cur¬ªaªi filtrul folosind peria de cur¬ªare (6) (fig. 11). Introduceªi filtrul curat sau noul filtru dac¬ este necesar, în suport. CUR#AREA RECIPIENTULUI PENTRU GUNOI (11) 1 2 3 4 Ap¬saªi pe butonul (13). Astfel veªi elibera modulul de aspirare (15) (fig. 12). Rotiªi modulul de aspirare, eliberaªi cele dou¬ vârfuri ©i scoateªi capacul. Cur¬ªaªi interiorul recipientului folosind peria de cur¬ªare (6) (fig. 13). Folosiªi peria de cur¬ªare pentru a cur¬ªa modulul de aspirare (15) ©i unitatea de admisie ©i evacuare a aerului (fig. 13). Nu cur´³a³i modulul de aspirare cu ap´. 5 Montaªi recipientul pentru gunoi în corpul aparatului. Ap¬saªi pe recipient pân¬ când auziªi un clic ceea ce indic¬ faptul c¬ este montat corespunz¬tor pe corp. ) CUR#AREA I ÎNLOCUIREA MOPULUI (9) ) Nu folosi³i mopul pe carpete, covoare sau podele care nu sunt complet drepte. 1 În aceste cazuri, demontaªi mopul (10). Rotiªi mopul ata©at ©i desfaceªi vârfurile din stânga ©i din dreapta (fig. 14). 2 Pentru a înlocui mopul (9), scoateªi-l ©i înlocuiªi-l cu unul nou (fig.14). DEMONTAREA I CUR#AREA PERIILOR Pentru performanªe excelente ale aspiratorului robot, v¬ recomand¬m s¬ cur¬ªaªi rolele ©i periile dup¬ 3 utiliz¬ri. Rolele (22) i (23) 1 Ap¬saªi înapoi pe vârf ©i bara de fixare (fig.15). , Rolele vor fi eliberate. 2 Scoateªi rolele (22) ©i (23) 3 Cur¬ªaªi rolele folosind peria de cur¬ªare (6) (fig. 16). 4 Reintroduceªi rolele ©i înlocuiªi bara de fixare, ap¬sând-o pân¬ când auziªi un clic, ceea ce indic¬ faptul c¬ este fixat¬ corespunz¬tor. 144 CUR±²AREA ¶I DEPOZITAREA Peria lateral (8): , Cur´³a³i periodic peria lateral´ pentru a preveni defectarea aspiratorului robot. 1 Folosiªi mâinile pentru a îndep¬rta p¬rul ©i praful prinse în peria lateral¬. 2 Dac¬ mizeria este prea încurcat¬ în perie, t¬iaªi-o cu foarfecele. , Dac´ este necesar, deµuruba³i µurubul µi scoate³i peria lateral´ (8) din corp pentru o cur´³are eficient´ (fig. 17). 3 Introduceªi peria lateral¬ în carcasa sa. DEMONTAREA I CUR#AREA ROILOR Roile laterale 1 De©urubaªi ©uruburile roªilor (fig. 18). 2 Scoateªi roªile din carcas¬ ©i cur¬ªaªi-le. Nu cur´³a³i ro³ile cu ap´, ulei sau unsoare. Introduce³i ro³ile în carcas´ µi înµuruba³i µuruburile cu o µurubelni³´. ) ) Roata din fa Dac¬ roata din faª¬ este blocat¬ sau nu se rote©te liber, scoateªi-o pentru cur¬ªare (fig. 18). 1 Scoateªi roata cu ajutorul unui instrument care serve©te drept pârghie. 2 Pentru a o reintroduce dup¬ cur¬ªare, ap¬saªi roata în carcas¬. CUR#AREA SENZORILOR DE COLIZIUNE (25) I A SENZORILOR PENTRU SC#RI (27) , P´stra³i senzorii cu infraroµii cura³i pentru ca aspiratorul robot s´ poat´ func³iona corect. 1 Cur¬ªaªi senzorii cu o bucat¬ de bumbac sau o pânz¬ moale (fig.19). CUR#AREA APARATULUI n Asigura³i-v´ c´ în aparat nu p´trunde ap´. ) Cur´³a³i aparatul dup´ prima utilizare, imediat dup´ fiecare utilizare µi dup´ ce nu a fost folosit o perioad´ îndelungat´. Astfel, asigura³i func³ionarea corect´ a aparatului µi îi prelungi³i durata de via³´. 1 Cur¬ªaªi partea exterioar¬ a aparatului cu o cârp¬ umed¬. Nu folosiªi produse abrazive sau solvenªi. ÎNLOCUIREA ACUMULATORILOR ÎNLOCUIREA ACUMULATORILOR BARIEREI VIRTUALE (fig. 20) 1 Rotiªi dispozitivul de închidere al capacului acumulatorului (6B) pân¬ când capacul este eliberat (5B). 2 A©ezaªi acumulatorii în compartimentul prev¬zut în acest scop. Verificaªi dac¬ electrozii pozitiv ©i negativ sunt în poziªiile corecte. , Scoate³i acumulatorii dac´ nu folosi³i aspiratorul robot pentru a perioad´ lung´ de timp. ÎNLOCUIREA ACUMULATORILOR TELECOMENZII (fig. 21) 1 Deschideªi capacul compartimentului acumulatorilor. 2 A©ezaªi acumulatorii în compartimentul prev¬zut în acest scop. Verificaªi dac¬ electrozii pozitiv ©i negativ sunt în poziªiile corecte. , Scoate³i acumulatorii dac´ nu folosi³i aspiratorul robot pentru a perioad´ lung´ de timp. ÎNLOCUIREA ACUMULATORILOR 145 ro
This document in other languages
- română: Solac AA3400
- français: Solac AA3400
- español: Solac AA3400
- Deutsch: Solac AA3400
- Nederlands: Solac AA3400
- polski: Solac AA3400
- čeština: Solac AA3400
- slovenčina: Solac AA3400
- italiano: Solac AA3400
- português: Solac AA3400