Transcript
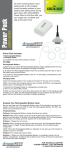
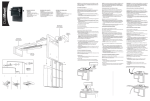
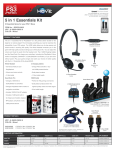
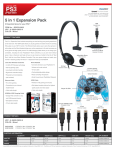
DGPS3-3812
All dreamGEAR/i.Sound products come with a limited warranty and
have been subjected to a thorough series of tests to ensure the highest
level of dependability and compatibility. It is unlikely that you will
experience any problem, but if a defect should become apparent
during the use of this product, dreamGEAR warrants to the original
consumer purchaser that this product will be free from defects in
material and workmanship for a period of 120 days from the date of
your original purchase. If a defect covered by this warranty occurs,
dreamGEAR, at its option, will repair or replace the product purchased
at no charge. If a replacement is necessary and your product is no
longer available, a comparable product may be substituted at the sole
discretion of dreamGEAR.
This warranty does not cover normal wear and tear, abusive use or
misuse, modification, tampering or by any other cause not related to
either materials or workmanship. This warranty does not apply to
products used for any industrial, professional or commercial purposes.
For service on any defective product under the 120-day warranty
policy, please contact Consumer Support
to obtain a Return Authorization Number.
NOTE: dreamGEAR will not process any defective claims without
a Return Authorization Number.
Consumer Support Hotline:
877-999-DREAM (3732) (U.S. and Canada only) or
310-222-1045 (International)
Consumer Support Email: [email protected]
Websites:
www.dreamgear.net
www.isound.net
PACKAGE CONTENTS:
• Power Up
• Charging Cable
• User’s Guide/Warranty Card
• Registration Card
How to Setup the Power Up:
NOTE: The Power Up can only be used on a PlayStation 3
DualShock 3 or SIXAXIS controller.
1. Slide the bottom swivel towards the back of the Power Up.
2. Connect the mini-USB plug on the Power Up to the
mini-USB port located on the top of the PlayStation 3
controller. Make sure that the mini-USB plug is placed
completely in the port.
3. Slide the bottom swivel on the Power Up towards you and
lock the Power Up to the controller. The Power Up will snap
into place confirming that the Power Up is secure.
4. To begin charging the controller, press the button located on
the back of the Power Up.
5. To remove the Power Up from the controller, pull down on
the swivel tab and pull up on the Power Up until it is
completely out of the controller.
Sleep Mode:
When the controller is fully charged, the Power Up will go into
Sleep Mode after one minute of inactivity. To activate the
Power Up, press the button located on the back.
NOTES:
• You can charge both the Power Up and controller simultan
ously by plugging the charging cable into the top of the
Power Up.
• Although the Power Up includes Overcharge Protection, it is
suggested that you should disconnect the charging cable
from the Power Up once the Power Up is fully charged.
• Charging times may vary depending on the controller. Please
refer to the User’s Guide of the controller for charging times
and charging instructions.
NOTE: Pressing the button on the back will show the battery
charge LEDs located on the front of the Power Up. This
indicates how much battery life the Power Up has.
4 Blue LEDs = 100% charge
3 Blue LEDs = 75% charge
2 Blue LEDs = 50% charge
1 Blue LED = 25% charge
FOR TECHNICAL SUPPORT
PLEASE CONTACT: 1-877-999-DREAM
or [email protected]
CONTENIDO DEL PAQUETE:
• Power Up
• Cable de Carga
• Manual de Usuario/Tarjeta de Garantía
• Tarjeta de Registro
Modo de Suspensión:
Cuando el mando esté completamente cargado, tras un
minuto de inactividad, el Power Up entrará en Modo de
Suspensión. Para activar el Power Up, pulse el botón situado
en la parte trasera.
Cómo instalar el Power Up:
NOTA: El Power Up sólo puede utilizarse en mandos
DualShok 3 o SIXAXIS de PlayStation 3.
1. Deslice la pestaña inferior hacia la parte trasera del
Power Up.
2. Conecte la clavija mini-USB del Power Up al puerto
mini-USB situado en la parte superior del mando de la
PlayStation 3. Asegúrese de que la clavija mini-USB está
completamente introducida en el puerto.
3. Deslice la pestaña inferior del Power Up hacia usted y fije el
Power Up al mando. El Power Up encajará en su lugar,
confirmando que el Power Up está bien sujeto.
4. Para comenzar a cargar el mando, pulse el botón situado
en la parte trasera del Power Up.
5. Para retirar el Power Up del mando, baje la pestaña y tire
del Power Up hasta que esté completamente fuera
del mando.
NOTAS:
• Puede cargar simultáneamente el Power Up y el mando,
enchufando el cable de carga en la parte superior del
Power Up.
• Aunque el Power Up dispone de Protección contra Sobrecarga, se recomienda que desconecte el cable de carga del
Power Up una vez esté completamente cargado.
• Los tiempos de carga pueden variar dependiendo del
mando. Por favor, consulte en el Manual de Usuario los
tiempos y las instrucciones de carga.
NOTA: Pulsando el botón trasero, se mostrarán los pilotos de
carga de la batería, situados en la parte delantera del Power
Up. Esto indica cuánta vida de batería le queda al Power Up.
4 Pilotos azules = cargado al 100%
3 Pilotos azules = cargado al 75%
2 Pilotos azules = cargado al 50%
1 Piloto azul = cargado al 25%
CONTENU DE L'EMBALLAGE :
• Power Up
• Câble de recharge
• Guide d'utilisation/Carte de garantie
• Carte d’enregistrement
Comment installer le Power Up:
REMARQUE: Power Up ne peut être utilisé qu'avec une
manette PlayStation 3 DualShock 3 ou SIXAXIS.
1. Faites glisser le pivot inférieur vers l'arrière de Power Up.
2. Branchez le connecteur mini-USB du Power Up au port
mini-USB situé au dessus de la manette PlayStation 3.
Veillez à ce que le connecteur mini-USB soit inséré
complètement dans le port.
3. Faites glisser le pivot inférieur du Power Up vers vous et
verrouiller le Power Up sur la manette. Power Up va
s'enclencher confirmant que le Power Up est sécurisé.
4. Pour démarrer le chargement de la manette, appuyez sur le
bouton situé à l'arrière de Power Up.
5. Pour retirer Power Up de la manette, baissez la languette du
pivot et soulevez Power Up jusqu'à ce qu'il soit complèt
ment sorti.
PARA SOPORTE TÉCNICO
CONTACTE AL: 1-877-999-DREAM
o [email protected]
Mode Veille Automatique:
Lorsque la manette est entièrement chargée, Power Up passe
en mode veille après une minute d'inactivité. Pour activer
Power Up, appuyez sur le bouton situé à l'arrière.
REMARQUES:
• Vous pouvez recharger Power Up et la manette en même
temps en branchant le câble de charge dans au dessus de
Power Up.
• Bien que Power Up soit équipé d'une protection contre la
surcharge, il est conseillé de déconnecter le câble de charge
du Power Up une fois ce dernier est complètement chargé.
• La durée de recharge varie en fonction de la manette.
Reportez-vous au Guide de l'utilisateur de la manette pour la
durée et les instructions de charge.
REMARQUE: En appuyant sur le bouton situé à l'arrière, les
témoins de charge de la batterie situés à l'avant du Power Up
s'allument. Cela indique la capacité restante de la batterie du
Power Up.
4 témoins Bleus = 100% de charge
3 témoins Bleus = 75% de charge
2 témoins Bleus = 50% de charge
1 témoin Bleu = 25% de charge
POUR ASSISTANCE TECHNIQUE
VEUILLEZ CONTACTER : 1-877-999-DREAM
Ou [email protected]