1
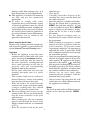
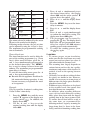
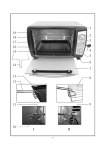
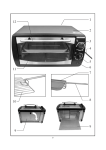
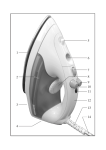
5
13
6
8
14
9
7
1
3
4
2
10
11
12
Food steamer
Dear Customer,
Before using the appliance, the user should
read the following instructions carefully.
●
Connection to the mains supply
The appliance should only be connected to
an earthed socket installed in accordance
with the regulations. Make sure that the
supply voltage corresponds with the voltage
marked on the rating label. This product
complies with all binding CE labelling
directives.
●
●
●
Familiarisation
1. Water-level indicator
2. Display area
3. Water filler opening
4. Power cord with plug
5. Lid
6. Stacking ring
7. Steamer bowl
8. Juice collection tray
9. Water container
10. Housing
11. Control panel
12. Rating label (on underside of
appliance)
13. Rice container
14. Steam tube
●
●
●
Important safety instructions
● Before the appliance is used, the main
body including the power cord as well as
any attachment fitted should be checked
thoroughly for any defects. Should the
appliance, for instance, have been
dropped onto a hard surface, it must no
longer be used: even invisible damage
may have adverse effects on the
operational safety of the appliance.
● During operation, the appliance must be
placed on a surface resistant to heat and
water.
● Do not position the food steamer on or
●
●
●
6
near hot surfaces or open flames such as
hot-plates or gas flames. Do not operate
the appliance underneath easily damaged
objects or furniture such as wallcupboards, as hot steam is emitted from
the lid during use.
Always remove the plug from the wall
socket
- after use,
- in case of any malfunction, and
- during cleaning.
When removing the plug from the wall
socket, never pull on the power cord;
always grip the plug itself.
Do not let the power cord hang free, and
keep the cord well away from hot parts
of the appliance.
When operating this appliance, ensure
that
- only genuine accessories are used,
- the appliance is under supervision at all
times,
- the water container has been filled with
clean water.
Do not use the food steamer without the
steam tube, as this ensures that the steam
is directed upwards.
The accessible housing surfaces become
very hot during operation. Do not touch
any part of the appliance except the
handles.
Always use an oven cloth when
removing the rice container. Caution:
when removing the lid or lifting off the
steamer bowls, beware of escaping steam
and drops of hot condensed moisture:
danger of scalding.
This appliance is not intended for use by
any person (including children) with
reduced physical, sensory or mental
capabilities, or lacking experience and
knowledge, unless they have been given
supervision or instruction concerning the
use of the appliance by a person
responsible for their safety.
Children should be supervised to ensure
that they do not play with the appliance.
No responsibility will be accepted if
damage results from improper use, or if
these instructions are not complied with.
● This appliance is intended for domestic
use only and not for commercial
applications.
● In order to comply with safety
regulations and to avoid hazards, repairs
of electrical appliances must be carried
out by qualified personnel, including the
replacement of the power cord. If repairs
are needed, please send the appliance to
one of our customer service departments.
The address can be found in the
appendix to this manual.
-
-
Before using for the first time
Remove any packing materials completely,
and clean the appliance as described in the
section General Care and Cleaning below.
Operation
- Before the appliance is used, the water
container must be filled with cold, clean
water, observing the maximum marking.
- Place the steam tube into the centre of
the water container, ensuring that the
three small openings on the tube fit
properly onto the corresponding
alignment studs in the container.
- Fit the juice collection tray onto the
housing and make sure it is safely
attached.
- The steamer bowls can be stacked as
desired. However, ensure that stacking
rings are placed between the bowls.
- Place the food to be cooked into the
steamer bowl. Larger food items require
a longer cooking time; they should
therefore be placed in a lower bowl.
● When steaming food, always use the
steamer bowls. Do not put food directly
into the water container or the juice
collection tray.
- When cooking rice, the rice container
must be placed inside the lowest bowl.
Fill the container with rice to a maximum
of 375 g.
- Place the steamer bowls on the juice
-
-
collection tray.
Close the lid.
Carefully check that all parts of the
assembly have been correctly fitted and
are safely connected.
Insert the plug into a suitable wall socket.
First set the current time by pressing the
MENÜ -key and then using the + and
- keys to adjust the hour. Press MENÜ
again to change to the minutes’ setting.
Again, use the + and - keys to adjust
the minutes.
Set the desired steaming time as
described in the section ‘Menus’ and start
the programme.
While steaming is in progress, a certain
amount of water evaporates from the
water container. To prevent it from
evaporating completely, it is important to
replenish the water in good time. Refill
with a sufficient amount of water through
the water filler opening.
Once the programmed steaming time has
elapsed, an acoustic signal is heard. The
arrow symbol ▼ appears on the display
right above the symbol
, indicating
that the pre-set cooking time has elapsed.
Carefully proceed to lift off the steamer
bowls from the appliance and place them
on a surface resistant to heat and water.
Always use an oven cloth when
removing the rice container: hold the
container only by its handles.
Always remove the plug from the wall
socket after use; allow sufficient time for
the appliance to cool down.
Menus
The food steamer offers 6 different menus,
which can be called up with the MENÜ key.
7
Symbol
Food-type
Pre-set time
Poultry
0:25
Fish
0:15
4.
Meat
0:20
5.
Rice
0:30
6.
Eggs
0:20
7.
Vegetables
0:20
3.
8.
The menu selected is indicated by the arrow
▼ next to the symbol on the display.
Following menu selection, the pre-set time
can be adjusted by using the + and - keys.
The maximum pre-programmable cooking
time is 60 minutes.
9.
Timer-delayed start
The timer function can be used to delay the
start of the cooking programme (e.g. 1 hour
later). After menu selection, press the +
and - keys simultaneously and proceed to
set the desired timer-delay. The MENÜ key is used to change between hours and
minutes. The maximum pre-programmable
timer-delay is 24 hours.
To exit the timer-delay menu, press the +
and - keys again simultaneously.
● But note that the appliance should not be
left unattended during operation: it may
become necessary to replenish the water
as it evaporates.
Useful hints
- To ensure proper steam circulation,
make sure that the food items are evenly
spaced out and not placed too close to
each other inside the steamer bowl.
- The steaming time largely depends on
various factors such as the size, quality,
consistency and nature of the food to be
cooked, as well as the spacing between
the pieces.
- Generally, best results are achieved when
the pieces are similar in size. However,
should it be necessary to steam pieces of
different sizes, the larger pieces should be
placed in a lower bowl.
- If different types of food are to be placed
in the steamer bowls, first ensure first
that their flavours are compatible.
- In addition, when steaming different
types of food with different cooking
times, place those items with the longest
cooking time in the lower steamer bowl.
To ensure that all food will be ready at
the same time, we recommend the
following method: begin by steaming the
larger items first (i.e. those in the lower
bowl), until their remaining cooking time
Example:
250g of vegetables, 8 minutes’ cooking time,
1 hour 15 mins’. timer-delay
1.
2.
Press + and - simultaneously to set
the desired timer-delay; the display
shows 0:00, and the arrow symbol ▼
appears above the symbol
.
Press + or - until the display shows
1:00.
Press the MENÜ -key to set the timerdelay to minutes.
Press + or - until the display shows
1:15.
Press + and - again simultaneously
to confirm the timer-delay setting. The
display now shows 0:08 again.
The programme can be started by
pressing the
-key. The display shows
1:15. Once the pre-programmed timerdelay has elapsed, the 0:08 minutes
cooking process starts automatically.
To cancel the cooking process, press
the
-key again.
Press the MENÜ -key until the arrow
symbol ▼ appears on the display next
to the symbol
. In addition, the
display shows 0:20.
Use the + and - keys to set the
required cooking time until the display
shows 0:08.
8
equals the cooking time of the food yet to be cooked; now add the other bowl(s) to the
assembly.
- When steaming larger food quantities, carefully remove the lid halfway through the
steaming process, turn the food over and replace the lid. Caution: beware of escaping
steam: there is danger of scalding.
- The juice collected in the collection tray during the steaming process can be used for sauces
etc.
Type of food
Fish fillet
Fish steak
Lobster
Mussels, clams
fresh
eel, herring
fresh
fresh
Weight
(in g)
250
250
2 pieces
500
Chicken parts
Mutton
Pork
Beef
boneless
steak
steak
steak
500
500
500
500
10
11
13
11
remove fat
remove fat
remove fat
remove fat
Cauliflower
Potatoes
Spinach
Vegetables
Mushrooms
fresh
fresh
fresh
fresh
fresh
500
500
250
250
250
14
14
7
8
12
turn halfway through steaming
turn halfway through steaming
375
32
fill the rice container with 375ml
of cold water first
Rice
Steaming time Remarks
(in minutes)
8
prepare before steaming
10
prepare before steaming
6:30
8
turn halfway through steaming
rice container, steam tube and juice
collection tray can be cleaned with hot
water or in a dish-washer.
- Pour any remaining water out of the
water container and wipe it clean.
The steaming times listed are approximate
only, as each type of food to be cooked is of
a different nature and consistency.
General Care and Cleaning
● Before cleaning the appliance, ensure it is
disconnected from the power supply and
has cooled down completely.
● To avoid the risk of electric shock, do not
clean the appliance with water and do
not immerse it in water.
● Do not use abrasives or harsh cleaning
solutions.
- The exterior of the appliance may be
cleaned with a damp, lint-free cloth.
- The lid, steamer bowls, stacking rings,
Descaling
Depending on the frequency of use as well
as the water quality in your area, lime
deposits may build up on the heating
element. It is advisable to remove any such
deposits at regular intervals. A mixture of
water and three tablespoons of vinegar
essence is suitable.
- Fill the water container to its maximum
marking.
9
- Add three tablespoons of vinegar
essence.
- Do not fit any attachments.
- Insert the plug into a wall socket.
- Select any menu programme.
- Set the timer to 5 minutes and press the
-key to start the programme.
● Do not inhale the fumes emitted during
the descaling process.
- Once the acoustic signal is heard, remove
the plug from the wall socket and allow
sufficient time for the appliance to cool
down.
- Empty the water container.
● Do not pour descalers down enamelcoated sinks.
- Pour any remaining water out of the
water container and wipe it clean.
and ceramic items, bulbs etc. If the product
fails to operate and needs to be returned,
pack it carefully, enclosing your name and
address and the reason for return. If within
the guarantee period, please also provide the
guarantee card and proof of purchase.
Additional accessories
Additional steamer bowls may be obtained
through SEVERIN Service, quoting the
article number of the appliance.
However, do not stack more than a total of 3
bowls at any time.
Disposal
Do not dispose of old or defective
appliances in domestic garbage;
this should only be done through
public collection points.
Guarantee
This product is guaranteed against defects in
materials and workmanship for a period of
two years from the date of purchase. Under
this guarantee the manufacturer undertakes
to repair or replace any parts found to be
defective, providing the product is returned
to one of our authorised service centres. This
guarantee is only valid if the appliance has
been used in accordance with the
instructions, and provided that it has not
been modified, repaired or interfered with
by any unauthorised person, or damaged
through misuse.
This guarantee naturally does not cover
wear and tear, nor breakables such as glass
10