1
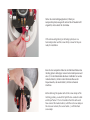
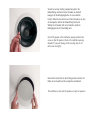
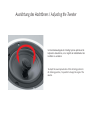
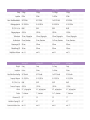
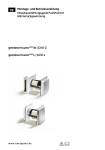
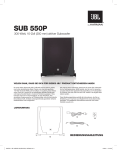
InCeiling
Montageanleitung · Owners manual
pure music
Herzlichen Dank für Ihr Vertrauen, das Sie uns mit dem Kauf dieser
Lautsprecher entgegenbringen. Sie haben sich für ein hochwertiges
InCeiling System entschieden und damit Ihren hohen Anspruch an Klangund Verarbeitungsqualität bewiesen. Wir wünschen Ihnen viel Spaß und
Freude mit Ihren InCeiling Lautsprechern.
Thank you very much for the confidence you have placed in us with
your purchase of Canton loudspeakers. You have chosen a high
quality InCeiling system, thus demonstrating your high standards of
excellence in acoustics and craftsmanship. We hope you very much
enjoy the performance of your InCeiling speakers.
Canton hat diese Systeme speziell für den Einbau in Decken und Wände
konzipiert und entwickelt. Die Lautsprecher werden elegant von einer
farblich angepaßten Blende mit feinem Lochblechgitter abgedeckt. Die
Canton InCeiling Systeme eignen sich perfekt für die Beschallung privater
und kommerziell genutzter Räume wie Bars, Restaurants, Fitness-Studios
oder Konferenzräume. Eine weitere Einsatzmöglichkeit ist die Integration
in Heimkino-Anlagen, speziell als Surround-Lautsprecher.
Canton has designed and developed these systems especially for
installation in walls and ceilings. The speakers are stylishly covered
with a color-coordinated grille of finely perforated sheet metal.
Canton InCeiling systems are perfect for both private homes and
commercial premises such as bars, restaurants, fitness studios and
conference rooms. The speakers can also be integrated in Home
Theater systems, especially as Surround Speakers.
Allgemeine Einbauempfehlungen / General Installation Recommendations
Bitte beachten: Der Einbau der InCeiling Systeme setzt ein gewisses
handwerkliches Geschick im Umgang mit Werkzeugen voraus.
Überzeugen Sie sich vor der Montage, dass die Installation an der
vorgesehenen Stelle möglich ist und keine Leitungen für Strom, Wasser,
Gas, etc. beschädigt werden können.
Zum Lieferumfang gehören eine Schablone für die Einbauöffnung und
Schrauben zur optimalen Befestigung der Lautsprecher.
Da die Installation der InCeiling Lautsprecher von bleibender Dauer ist,
sollte der Einbauort sorgfältig überlegt werden. Bedenken Sie hierbei:
Man verschiebt zwar öfters die Möbel, der einmal gewählte Einbauplatz
der InCeiling Systeme lässt sich jedoch nicht mehr so leicht verändern.
Um zwischen InCeiling System und Einbauoberfläche eine optimale
Dichtigkeit zu gewährleisten, sollte die Montage unbedingt an einer
ebenen Fläche erfolgen. Wenden Sie bitte keine Gewalt bei der Montage
der Lautsprecher an.
Please note: Installation of InCeiling systems calls for a certain
amount of skill in working with tools. Before installation, make sure
that mounting at the point selected is possible and that no lines for
electricity, water, gas, etc. can be damaged.
The factory-supplied items include a template for the installation
opening and screws for perfect speaker mounting.
Since installation of InCeiling speakers is permanent, the installation
point should be carefully considered. Keep in mind that furniture
may be moved at times and that, once selected, the installation
point of the InCeiling systems cannot be changed all that easily.
To assure optimum flush-mounting between InCeiling system and
surface, installation should definitely be on an even surface. Please
do not use force when installing the speakers.
Lautsprecherkabel / Loudspeaker Cables
Die Canton InCeiling Systeme werden über zweiadrige
Lautsprecherkabel mit dem Verstärker verbunden. Die erforderliche
Kabelstärke hängt von ihrer Länge ab. Alle InCeiling Lautsprecher sind
mit vergoldeten Klemmanschlüssen ausgerüstet, die Kabel bis zu einer
Stärke von 10 mm aufnehmen können. Für kurze Verbindungen bis 5 m
sollten Sie Kabel mit einem Querschnitt von 2,5 mm verwenden, bei
einer Länge von über 5 m empfehlen wir eine Stärke von 4 mm.
Canton InCeiling systems are connected with the amplifier via twoconductor loudspeaker cable. The gauge of cable required depends
on its length. All InCeiling loudspeakers are equipped with goldplated screw clamps which can accept cable of up to 10 mm gauge.
For short connections of up to 5 meters, cable with a gauge of 2.5
mm should be used; for greater lengths, over 5 meters, we
recommend a gauge of 4 mm.
Achten Sie beim Anschließen der Lautsprecher unbedingt auf die richtige
Polung: Plus an Plus, Minus an Minus. Eine unterschiedliche Polung etwa
des linken und rechten Lautsprechers würde zu Klangverfälschungen,
insbesondere im Bassbereich führen. Bei den InCeilings wie bei
Verstärkern sind die Anschlussklemmen mit entsprechenden Symbolen
gekennzeichnet; außerdem sind – in der Regel – die Pluspole rot
hervorgehoben.
When connecting speakers to the amplifier, be sure to observe
correct polarity: i.e., make sure that „plus“ is linked to „plus“,
„minus“ to „minus“. Different polarity of left and right speakers
would cause acoustic distortion, particularly in the bass range.
Connecting clamps on both the InCeilings and the amplifier are
identified by corresponding symbols: additionally, the plus poles are
generally emphasized in red.
An den Kennzeichnungen am Verstärker erkennen Sie, welche
Lautsprecher der Anlage mit welchem Anschlußpaar zu verbinden sind:
rechter und linker Lautsprecher in einer einfachen Stereoanlage; rechter
und linker Frontlautsprecher, Center- und Surround-Lautsprecher in einer
Heimkino-Anlage.
From the markings on the amplifier, you can tell which loudspeakers
in the system are to be linked with which pair of poles: right and
left speakers in a standard stereo system; right and left Front
Speakers, Center Speaker and Surround Speakers in a Home
Theater system.
Anschlusswerte / Power Ratings
Cantons InCeiling Lautsprecher sind problemlos an jedem handelsüblichen Verstärker anschließbar.
Canton InCeiling speakers can be unhesitatingly operated with any
standard amplifier.
Impedanz / Impedance
Wie die technischen Daten ausweisen, liegt die Impedanz (der
Scheinwiderstand) dieser Systeme bei 8 Ohm. Nahezu alle heute
angebotenen Verstärker lassen sich problemlos mit diesen
Lautsprechern verbinden. Möchten Sie zwei Lautsprecher an einen
Verstärkerkanal anschließen, können Sie diese parallel schalten.
Versichern Sie sich aber, dass die Impedanz dieser Konfiguration
nicht unter die untere Impedanz-Grenze ihres Verstärkers fällt.
As indicated by the Technical Data, the impedance (nominal
resistance) of these systems is 8 ohms. Virtually all amplifiers on the
market today can safely be connected with these speakers. If you
wish to drive two speakers from one amplifier channel, you can
connect them in parallel. However, make sure that the impedance
of this configuration is not less than the lower impedance limit of
your amplifier.
Anschlussmöglichkeiten / Wiring Possibilities
8 Ohm
8 Ohm
4/8 Ohm
Die minimale Lastimpedanz des Verstärkers sollte zwischen 4-8
Ohm liegen.
The minimum load impedance of the amplifier should be
between 4 and 8 ohms.
8 Ohm
8 Ohm
8 Ohm
8 Ohm
The minimum load impedance of the amplifier must be 4 ohms.
When the InCeiling systems are connected in parallel,
impedance is reduced by half – from 8 ohms to 4 ohms.
4 Ohm
8 Ohm
8 Ohm
Bei Parallelschaltung des InCeiling Systems halbiert sich die
Impedanz von 8 Ohm auf 4 Ohm. Die minimale Lastimpedanz
des Verstärkers muß bei 4 Ohm liegen.
8 Ohm
8 Ohm
Durch Kombination einer Reihen- und einer Parallelschaltung
des InCeiling Systems verändert sich die Impedanz nicht.
16 Ohm
16 Ohm
4/8 Ohm
16 Ohm
16 Ohm
Combined series/parallel circuitry of the InCeiling system does
not alter the impedance.
8 Ohm
8 Ohm
8 Ohm
8 Ohm
Belastbarkeit / Power Handling
Achten Sie darauf, die Systeme nicht zu überlasten. Am sichersten ist dies
gewährleistet, wenn Ausgangsleistung des Verstärkers und Belastbarkeit
der Lautsprecher einander entsprechen. Aber auch Verstärker mit
größerer Leistung stellen dann keine Gefahr dar, wenn Sie darauf achten,
den Lautstärkeregler nicht höher als zuträglich aufzudrehen. Eine
Überlastung der Lautsprecher macht sich durch unüberhörbare
Verzerrungen bemerkbar.
In der Regel geht eine Gefahr eher von zu leistungsschwachen
Verstärkern aus, da sie beim Versuch, durch Aufdrehen von Lautstärkeund Klangreglern mehr Schalldruck zu erzielen, übersteuert werden und
durch sogenanntes “Clipping” Obertöne erzeugen, die insbesondere die
Hochtöner des Systems zerstören können.
Um eine Beschädigung der Lautsprecher-Chassis zu verhindern, sind
unsere InCeiling Lautsprecher mit einem Überlastungsschutz
ausgestattet. Bei drohender Überlastung wird – deutlich hörbar – der
Pegel abgesenkt. Drehen Sie in diesem Fall bitte den Lautstärkeregler
Ihres Verstärkers zurück. Nach erfolgter Abkühlung arbeiten die
Lautsprecher wieder normal.
Be careful not to overload the system. The most reliable way to
assure this is to see that the output power of the amplifier and the
power handling rating of the speakers conform with each other.
However, even amplifiers with greater power are no danger if you
are sure not to turn up the volume higher than tolerable. Speaker
overload quickly makes itself audible as unmistakable distortion.
As a rule, danger to loudspeakers is more likely to be caused by lowpowered amplifiers since, when attempting to achieve greater
sound pressure by turning up the volume and tone controls, they are
overdriven and go into so-called „clipping“, creating overtones
which can destroy speaker tweeters in particular.
To prevent damage to loudspeaker drivers, our InCeiling speakers
feature overload protection. In event of impending overload, the
level is audibly lowered. In this case, please turn down the volume
control on your amplifier. After cooling off, the speakers will again
perform normally.
Packungsinhalt / Package Contents
2 x InCeiling Lautsprecher
Systeme*
2 x InCeiling Loudspeaker
Systems*
2 x Gitter*
2 x Grilles*
1 x Einbau-Schablone
1 x Installation Template
*InCeiling 650 DT nur 1 x
*InCeiling 650 DT only 1 x
Montage / Installation
Benutzen Sie die beigefügte Einbauschablone, um die
genaue Größe des Ausschnittes festzulegen. Der Innenrand der
Schablone gibt die Größe der Einbauöffnung vor.
Use the enclosed installation template to ascertain the exact size
of the wall cutout. The inner edge indicates the size of the
installation opening.
Schaffen Sie nun eine entsprechende Einbauöffnung in Ihrer Wand
bzw. Decke. Beim Verlegen der Lautsprecherkabel vom Verstärker zum
Einbauort ist zu beachten, dass die Kabelenden etwa 30 cm über den
Wandausschnitt hinausragen. Dies erleichtert Ihnen später die
Befestigung an den Lautsprecherklemmen der InCeiling Systeme.
Now hollow out an appropriate installation opening in the
wall/ceiling. When laying loudspeaker cable from amplifier to
installation point, be sure that the cable ends protrude about
30 cm (12“) beyond the wall cutout. This later simplifies
fastening to the InCeiling systems’ speaker clamps.
Stehen die roten Befestigungslaschen (4 Stück pro
Lautsprechersystem) waagerecht und sind die Schrauben leicht
eingedreht, sind sie bereit für den Einbau.
If the red mounting tabs (4 per InCeiling system) are in a
horizontal position and the screws firmly screwed in they are
ready for installation.
Bevor Sie die Lautsprecher-Kabel an den Klemmanschlüssen des
InCeiling Systems befestigen, müssen Sie die Kabel spreizen und
etwa 1,5 cm der Kabelenden abisolieren. Verbinden Sie nun das
markierte Kabel (+) mit dem roten Klemmanschluss an der
Frequenzweiche, das zweite Kabel (-) mit dem schwarzen
Anschluss.
Before fastening the speaker cable to the screw clamps of the
InCeiling systems, you must first split the two-conductor cable
and strip off about 1.5 cm of insulation from the cable ends.
Now connect the marked cable (+) with the red screw clamp on
the crossover network, the second cable (-) with the black
screw clamp.
Stecken Sie nun das InCeiling Lautsprechersystem in die
Einbauöffnung und ziehen Sie die Schrauben an. Dadurch
bewegen sich die Befestigungslaschen in eine senkrechte
Position. Ziehen Sie die Laschen nun mit der Schraube so an, dass
der Lautsprecher stabil in der Einbauöffnung fixiert wird.
Wichtig: Die Schrauben nicht zu fest andrehen, damit die
Befestigungslasche nicht beschädigt wird.
Now fit the speaker in the installation opening and fasten the
screws, so that the speaker is fixed in the installation opening.
Important: To prevent damage to the mounting tab, do not
twist screws too tightly.
Nun können Sie die Gitter in das InCeiling System einsetzen. Der
Einbau ist nun beendet und die Lautsprecher einsatzbereit.
The installation is done and the speaker are ready for operation.
Anpassung des Hochtonpegels / Adjusting the Treble Level
Die Frequenzweichen der beiden InCeiling Systeme bieten eine
an Hörgeschmack und Einbauort orientierte Anpassung des
Hochtonpegels um +/- 2 dB. Hierzu finden Sie an der Frontseite
der InCeiling Systeme einen Schalter. Für eine Wiedergabe mit
linearem Pegel befindet sich der Schalter in der Mittelposition
(0). Sie können aber auch den Pegel um – 2 dB absenken
(Schalter auf linke Position) oder den Hochtonpegel um + 2 dB
anheben (Schalter auf rechte Position).
The crossover networks of the InCeiling systems provide for
adjustment of treble level by +/- 2 dB to suit personal listening
preference and acoustic conditions. On the front of the
InCeiling system you will find a switch. For sound reproduction
with flat frequency response, the control is set in a neutral
position (O). The treble level can be reduced by 2 dB (switch in
the left position) or can be boosted by 2 dB (switch in the right
position).
Ausrichtung des Hochtöners / Adjusting the Tweeter
Um die Musikwiedergabe der InCeiling Systeme optimal auf die
Hörposition abzustimmen, ist es möglich den Abstrahlwinkel der
Hochtöner zu verändern.
To adjust the sound reproduction of the InCeiling systems to
the listening position, it is possible to change the angle of the
tweeter.
Lackierung / Painting
Der Rahmen der InCeiling Systeme besteht aus weißem ABSKunststoff und kann ebenso wie das weiß lackierte
Lochblechgitter ohne weiteres mit handelsüblichen Lacken
individuell überlackiert werden.
The Frames of the InCeiling systems are made of white ABS
plastic and, like the white-painted perforated grille, can be
overpainted with standard paints to suit individual taste.
Wiedergabe im Stereo- bzw. Heimkino-Betrieb / Reproduction in Stereo and Home Theater Operation
Die Canton InCeiling Lautsprecher werden, wenn Sie für den
konventionellen Stereobetrieb bestimmt sind, nach der allgemein
bekannten Regel des “Stereodreiecks” eingebaut. Für eine bestmögliche
Wiedergabequalität sollten die Lautsprecher in einem Abstand von
mindestens zwei Metern voneinander platziert werden. Der Abstand vom
linken zum rechten Lautsprecher (die “Basis”) sollte ungefähr so groß
sein, wie die Distanz des Hörers zu den Lautsprechern.
In einer Heimkino-Anlage können die InCeiling Lautsprecher
hervorragend für die Wiedergabe der Surroundeffekte eingesetzt werden
und liefern so die räumliche Atmosphäre.
Beachten Sie bitte: Werden die InCeiling Systeme in der Nähe eines
Fernsehers eingesetzt, sollten die Lautsprecher in einem Abstand von
etwa 1,5 m zum Gerät positioniert werden. Die Magnete der
Lautsprecher können unter ungünstigen Bedingungen eine Beeinflussung
der Qualität des Fernsehbildes verursachen.
Zum Ausbau einer kompletten Heimkino-Anlage benötigen Sie einen
speziellen, magnetisch abgeschirmten Center-Speaker. Als Ergänzung zu
den Lautsprechern für den linken und rechten Kanal gibt er den
Mittelkanal wieder. Deshalb steht oder liegt er am besten direkt über
oder unter dem Fernseher. Im aktuellen Canton Lautsprecher Programm
finden Sie eine große Auswahl an Center-Speakern zur HeimkinoErweiterung.
When intended for normal stereo operation, Canton InCeiling
speakers are installed by the familiar „stereo triangle“ rule. For
best possible sound quality, the speakers should be set up at a
minimum distance of two meters from each other. The distance
from left to right speaker (the „base“) should be approximately
equal to the listener’s distance from the speakers.
In a Home Theater system, InCeiling speakers are outstanding for
the reproduction of Surround effects, thus delivering the spatial
atmosphere.
Please note: If InCeiling systems are to be used near a TV set, the
speakers should be positioned at a distance of about 1.5 meters (5
feet)from the set. Under certain unfavorable conditions, speaker
magnets could otherwise detract from the quality of the TV picture.
To expand a stereo system into a complete Home Theater system,
you will require a special magnetically-shielded Center Speaker.
Augmenting speakers for left and right channels, it reproduces the
center channel. So it is best positioned directly above or below the
TV set. You will find a large selection of Center Speakers for
expanding stereo setups into Home Theater systems in the current
Canton loudspeaker range.
Prinzip
○
○
○
○
○
○
○
○
○
○
○
Impedanz
○
○
○
○
○
○
○
○
○
○
○
Nenn-/Musikbelastbarkkeit
○
○
○
○
○
○
○
○
○
○
○
○
○
○
Übertragungsbereich
○
○
○
○
○
○
○
○
SPL (1 W in 1 m)
○
○
○
○
○
○
○
○
○
○
○
○
○
○
○
Übergangsfrequenz
○
○
○
○
○
○
○
Tieftonchassis
○
○
○
○
○
○
○
○
○
○
○
○
○
○
○
○
Hochtonchassis
○
○
○
○
○
○
Abmessungen (Ø)
○
○
○
○
○
○
○
○
○
○
○
○
○
○
○
Einbauöffnung (Ø)
○
○
○
○
○
○
○
Empfohlenes Volumen
○
○
○
○
○
○
○
○
○
○
○
Principle
○
○
○
○
○
○
○
○
○
○
○
Impedance
○
○
○
○
○
○
○
○
○
○
○
Nom./Music Power Handling
○
○
○
○
○
○
○
○
○
○
○
Frequency Response
○
○
○
○
○
○
○
○
○
○
○
○
○
○
○
○
SPL (1 W at 1 m)
○
○
○
○
○
○
Crossover Frequency
○
○
○
○
○
○
○
○
○
○
○
○
○
○
○
○
○
○
○
Woofer
○
○
○
Tweeter
○
○
○
○
○
○
○
○
○
○
○
○
○
○
○
○
Dimensions (Ø)
○
○
○
○
○
○
Installation Opening (Ø)
○
○
○
○
○
○
○
○
○
○
○
Recommended Installation Volume
○
○
○
○
○
○
○
○
○
○
○
InCeiling 500
InCeiling 650
InCeiling 650 DT
2-Wege
2-Wege
2 x 2-Wege
○
○
○
○
○
○
○
○
○
○
○
○
8 Ohm
○
○
○
○
○
○
○
○
○
○
○
○
50/100 Watt
○
○
○
○
○
○
○
○
○
○
○
○
○
○
○
○
○
○
○
○
○
○
○
○
○
○
○
○
○
○
○
○
○
○
○
○
○
○
○
○
○
○
○
○
○
○
○
○
○
○
○
○
○
○
○
○
○
○
○
○
○
○
○
○
○
○
○
○
○
○
○
○
○
○
○
○
○
○
○
○
○
○
○
○
○
○
○
○
○
○
○
○
○
○
○
○
○
○
○
○
○
○
○
○
○
○
○
○
○
○
○
○
○
○
○
○
○
○
○
○
○
○
○
○
○
○
○
○
○
○
○
○
○
○
○
○
○
○
○
○
○
2-Wege
○
○
○
○
○
○
○
○
○
○
○
○
○
○
○
○
○
○
○
○
○
○
○
○
○
○
○
○
○
○
○
○
○
○
○
○
○
○
○
○
○
○
○
○
○
○
○
○
○
○
○
○
○
○
○
○
○
○
○
○
○
○
○
○
○
○
○
○
○
○
○
○
○
○
○
○
○
○
○
○
○
○
○
○
○
○
○
○
○
○
○
○
○
○
○
○
○
○
○
○
○
○
○
○
○
○
○
○
○
○
○
○
○
○
○
○
○
○
○
○
○
○
○
○
○
○
○
○
○
○
○
○
○
○
○
○
○
○
○
○
○
○
○
○
○
○
○
○
○
○
○
○
○
○
○
○
○
○
○
○
○
○
○
○
○
○
○
○
○
○
○
○
○
○
○
○
○
○
○
○
○
○
○
○
○
○
○
○
○
○
○
○
○
○
○
○
○
○
○
○
○
○
○
○
○
○
○
○
○
○
○
○
○
○
○
○
○
○
○
○
○
○
○
○
○
○
○
○
○
○
○
○
○
○
○
○
○
○
○
○
○
○
○
○
○
○
○
○
○
○
○
○
○
○
○
○
○
○
○
○
○
○
○
○
○
○
○
○
○
○
○
○
○
○
○
○
○
○
○
○
○
○
○
○
○
○
○
○
○
○
○
○
○
○
○
○
○
○
○
○
○
○
○
○
○
○
○
○
○
○
○
○
○
○
○
○
○
○
○
○
○
○
○
○
○
○
○
○
○
○
○
○
○
○
○
○
○
○
○
○
○
○
○
○
○
○
○
○
○
○
○
○
○
○
○
○
○
○
○
○
○
○
○
○
○
○
○
○
○
○
InCeiling 650
InCeiling 650 DT
InCeiling 800
2-way
2-way
2 x 2-way
2-way
○
○
○
○
○
○
○
○
○
○
○
○
○
○
○
○
○
○
○
○
○
○
○
○
○
○
○
○
○
○
○
50/100 watts
○
○
○
○
○
○
○
○
○
○
○
○
○
○
○
○
○
○
○
○
○
○
○
○
○
○
○
○
○
○
○
○
○
○
○
○
○
○
○
○
○
○
○
○
○
○
○
○
○
○
○
○
○
○
○
○
○
○
○
○
○
○
○
○
○
○
○
○
○
○
○
○
○
○
○
○
○
○
○
○
○
○
○
○
○
○
○
○
○
○
○
○
○
○
○
○
○
○
○
○
○
○
○
○
○
○
○
○
○
○
○
○
○
○
○
○
○
○
○
○
○
○
○
○
○
○
○
○
○
○
○
○
○
○
○
○
○
○
○
○
○
○
○
○
○
○
○
○
○
○
○
○
○
○
○
○
○
○
○
○
○
○
○
○
○
○
○
○
○
○
○
○
○
○
○
○
○
○
○
○
○
○
○
○
○
○
○
○
○
○
○
○
○
○
○
○
○
○
○
○
○
○
○
○
○
○
○
○
○
○
○
○
○
○
○
○
○
○
○
○
○
○
○
○
○
○
○
○
○
○
○
○
○
○
○
○
○
○
○
○
○
○
○
○
○
○
○
○
○
○
○
○
○
○
○
○
○
○
○
○
○
○
○
○
○
○
○
○
○
○
○
○
○
○
○
○
○
○
○
○
○
○
○
○
○
○
○
○
○
○
○
○
○
○
○
○
○
○
○
○
○
○
○
○
○
○
○
○
○
○
○
○
○
○
○
○
○
○
○
○
○
○
○
○
○
○
○
○
○
○
○
○
○
○
○
○
○
○
○
○
○
○
○
○
○
○
○
○
○
○
○
○
○
○
○
○
○
○
○
○
○
○
○
○
○
○
○
○
○
○
○
○
○
○
○
○
○
○
○
○
○
○
○
○
○
○
○
○
○
○
○
○
○
○
○
○
○
○
○
○
○
○
○
○
○
○
○
○
○
○
○
○
○
○
○
○
○
○
○
○
○
○
○
○
○
○
○
○
○
○
○
○
○
○
○
○
○
○
○
○
○
○
○
○
○
○
○
○
○
○
○
○
○
○
○
○
○
○
○
○
○
○
○
○
○
○
○
○
○
○
○
○
○
○
○
○
○
○
○
○
○
○
9.7“
○
○
○
○
○
○
○
○
○
○
○
○
○
○
○
○
○
○
min. 6 L
○
○
11“
8.1“
○
○
1“, aluminum
9.4“
○
○
8.3“, polypropylene
2 x 1“, aluminum
○
○
3,300 Hz
6.5“, polypropylene
○
○
88 dB
3,000 Hz
○
○
42...30,000 Hz
87 dB
○
○
90/140 watts
45...30,000 Hz
○
○
8 ohms
2 x 60/110 watts
min. 5 L
○
○
2 x 8 ohms
8.1“
min. 4 L
○
○
9.4“
6.5“
○
○
1“, aluminum
7.9“
○
○
6.5“, polypropylene
1“, aluminum
○
○
3,300 Hz
5.3“, polypropylene
○
○
87 dB
4,000 Hz
○
○
45...30,000 Hz
86 dB
○
○
60/110 watts
50...30,000 Hz
○
○
8 ohms
○
min. 7 L
InCeiling 500
8 ohms
○
246 mm
min. 6 L
○
○
○
280 mm
206 mm
○
○
25 mm, Aluminium
240 mm
○
○
210 mm, Polypropylen
2 x 20 mm, Aluminium
○
○
3.300 Hz
165 mm, Polypropylen
○
○
88 dB
3.000 Hz
○
○
42...30.000 Hz
87 dB
○
○
90/140 Watt
45...30.000 Hz
○
○
8 Ohm
2 x 60/110 Watt
min. 5 L
○
○
2 x 8 Ohm
206 mm
min. 4 L
○
○
240 mm
166 mm
○
○
25 mm, Aluminium
200 mm
○
○
165 mm, Polypropylen
25 mm, Aluminium
○
○
3.300 Hz
135 mm, Polypropylen
○
○
87 dB
4.000 Hz
○
○
45...30.000 Hz
86 dB
○
○
60/110 Watt
50...30.000 Hz
○
○
8 Ohm
InCeiling 800
○
○
○
○
min. 7 L
○
○
○
Garantie-Leistung
Garantie-Urkunde · Warranty-Card
Seriennummer / Serial number
Canton gewährt auf alle InWall Syteme fünf Jahre Vollgarantie. Vollgarantie bedeutet,
daß im Reparaturfall die Kosten für Material, Arbeitszeit und den Rückversand gedeckt
sind. Wenden Sie sich bitte im Schadensfall an Ihren Fachhändler oder direkt an den
Canton Service. Der Garantieanspruch verlängert sich nicht durch den Austausch von
Bauteilen innerhalb der Garantiezeit. Beachten Sie bitte, daß sich die Garantie nur auf
Lautsprecherboxen erstreckt, die bei einem autorisierten Canton Fachhändler gekauft
wurden. Die Adressen der internationalen Vertriebspartner finden Sie unter:
www.canton.de
Guarantee-Performance
Name d. Käufers / Buyer’s name
Canton grants a guarantee of 5 years on all InWall systems.
During the warranty period any defects in materials or manufacture will be corrected
free of charge. The warranty period is not extended by performance of warranty work,
not even for replaced or repaired parts. Repairs under this gurantee will be performed
in Germany by an authorized Canton Dealer or by the Canton Customer Service.
Responsible for repairs of Canton products in other countries are the local Canton
Representatives. Their addresses can be found at: www.canton.de
Adresse / Address
Händlerstempel / Dealer’s Stamp
Canton Elektronik GmbH + Co KG
Neugasse 21-23
D-61276 Weilrod
Deutschland / Germany
Canton Electronics Corp.
504 Malcolm Avenue SE, Suite 400
Minneapolis, MN 55414
USA
Tel.:
Fax:
Phone:
Fax:
+49(0) 60 83 28 70
+49(0) 60 83 28 113
e-mail: [email protected]
www.canton.de
+1-612-706-9250
+1-612-706-9255
e-mail: [email protected]
Art. Nr. 12867