1
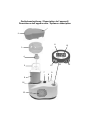
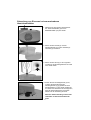
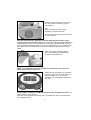
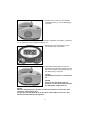
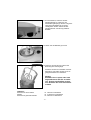
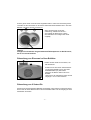
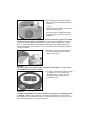
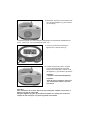
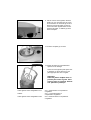
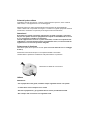
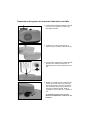
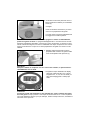
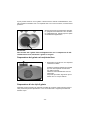
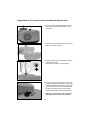
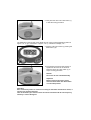
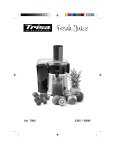
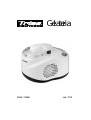
Gelateria
230V / 150W
Art. 7713
Gerätebeschreibung / Description de l’appareil /
Descrizione dell’apparecchio / Apliance description
1
2
11
12
3
4
13
5
7
8
6
16
15
9
10
14
Gebrauchsanweisung
Trisa Gelateria, Art. 7713
Vielen Dank, dass Sie sich für unsere “Gelateria” entschieden haben. Das Trisa
Electro Team wünscht Ihnen viel Freude mit diesem Gerät und einen guten Appetit!
Vor dem Benutzen
Bitte lesen Sie alle in dieser Gebrauchsanweisung aufgeführten Informationen aufmerksam
durch. Sie geben Ihnen wichtige Hinweise für den Gebrauch, die Sicherheit und die Wartung des Gerätes. Bewahren Sie die Gebrauchsanweisung sorgfältig auf und geben Sie
diese gegebenenfalls an Nachbenutzer weiter.
Das Gerät darf nur für den vorgesehenen Zweck, gemäss dieser Gebrauchsanweisung,
verwendet werden.
Beachten Sie die Sicherheitshinweise.
Verpackungsmaterial ordnungsgemäss entsorgen.
Beschreibung
1
2
3
4
5
6
7
8
9
10
11
12
13
14
15
16
EIN / AUS Schalter für Rührgerät
Antriebsgehäuse
Deckel mit Einfüllöffnung
Verbindungsschraube von Deckel und Antriebsgehäuse
Quirl
Herausnehmbarer Behälter
Steckverbindung
Deckelöffnungsknopf
EIN / AUS Schalter für Kühlung
Display
Kühlungstemperatur Anzeige
Zeitanzeige
Start / Stop Taste
Select Taste
Luftaustrittsöffnung
Fixierter Behälter
Technische Daten
Einfüllmenge:
Spannung:
Leistung:
Gewicht:
0.7l = 1,4 Liter Eiscreme
230 V
150 Watt
10.8kg
1
Vor dem Erstgebrauch
Prüfen Sie bereits beim Auspacken des Gerätes ob alle Zubehörteile gemäss dieser
Gebrauchsanweisung enthalten sind und das Gerät keine Schäden aufweist.
Sauberkeit und Hygiene ist sehr wichtig bei der Verarbeitung von Lebensmitteln. Spülen
Sie alle Teile die mit der Eiscreme in Berührung kommen (Edelstahl- Alubehälter, Quirl und
Deckel) und trocknen alles sorgfältig ab.
Achtung!
Während des Transports ist das Gerät möglicherweise umgekippt oder auf den Kopf
gestellt worden. Dies kann bewirken, dass die Kühlflüssigkeit im Kreislauf verteilt ist
und dem Kompressor nicht zur Verfügung steht.
Stellen Sie das Gerät 12 Stunden auf eine waagrechte Fläche, so dass sich die
Kühlflüssigkeit wieder sammelt. Auch wenn in der Folgezeit sich das Gerät in falscher Lage befindet, diesen Vorgang wiederholen.
Erste Inbetriebnahme
Den Stecker ans Stromnetz anschliessen. (Nur an Wechselstrom mit Spannung von 230
Volt).
Stellen Sie das Gerät immer auf eine stabile, waagrechte Oberfläche.
Die Lüftungsöffnungen auf der Vorder- und Rückseite dürfen nicht abgedeckt sein.
20cm
Halten Sie einen Abstand von 20cm ein.
20cm
Anwendung
Achtung
- Bitte benützen Sie bei der Zubereitung von Eiscreme immer frische und einwandfreie Zutaten.
- Die Früchte müssen immer frisch und gewaschen sein.
- Die Zutaten sollten bei der Verarbeitung möglichst vorgekühlt sein.
- Nie heisse Zutaten in die Maschine füllen!
-2-
Zubereitung von Eiscreme im herausnehmbaren
Aluminiumbehälter.
1. Platzieren Sie den leeren herausnehmbaren Aluminiumbehälter (6) im fixen
Edelstahlbehälter (16) des Geräts.
2. Setzen Sie den Deckel (3) und das
Antriebsgehäuse (2) mit der Verbindungsschraube (4) zusammen.
3. Setzen Sie den Quirl (5) in die vorgesehene Öffnung des Antriebsgehäuses. Der Quirl
muss locker sitzen.
4. Setzen Sie das Antriebsgehäuse (2) auf,
so dass die Steckverbindung am
Antriebsgehäuse (2) gegenüber der fixen
Steckverbindung (7) des Geräts positioniert
ist. Drehen Sie den Deckel im Uhrzeigersinn,
dass die Steckverbindungen ineinanderklicken und die Arretierung einrastet.
Wenn die Steckverbindung nicht korrekt
verbunden ist läuft der Antriebsmotor
nicht.
-3-
5. Schalten Sie das Gerät ein, indem Sie den
Ein / Aus Schalter für Kühlung (9) nach
unten drücken.
Tipp:
Gerät einschalten und dann mit der
Zubereitung des Eises beginnen.
Somit hat die Kühlung beim einfüllen bereits
die volle Leistung.
Nach dem Einschalten des Rührmotors darf das Kühlagregat erst wieder ausgeschaltet werden, wenn das Eis fertig ist. Ein Ausschalten oder Stromausfall während der
Eiszubereitung führt dazu, dass der Kompressor nach dem Wiedereinschalten auf Grund
einer integrierten Sicherheitsschaltung erst nach einer Standzeit von 5 min. wieder zu kühlen beginnt. Dies könnte dazu führen, dass die Zubereitung der Eiscreme nicht optimal
gelingt.
6. Füllen Sie nun die vorbereitete Masse
durch die Einfüllöffnung des Deckels (3)
langsam in die Eismaschine.
Wichtig
Füllen Sie nur Masse bis 3 cm unter dem Rand in die Schüssel, denn durch die
Kühlung dehnt sich die Masse aus!
7. Wählen Sie auf dem DIsplay die gewünschte Zeit aus, indem Sie die Select Taste (14)
drücken. (wählbar 5, 10, 20, 35 oder
40 Minuten) Die gewünschte Zeit blinkt nun
grün auf.
Hinweis:
Je nach Rezept, Temperatur und Menge kann die Zeit der Fertigstellung varieren. Es
dauert jedoch ca. 20-40 Minuten.
Falls noch eine ungenügende Festigung, kann nach Ablauf der Zeit z.B. nochmals 5min
neu eingestellt werden.
-4-
8. Drücken Sie nun den EIN / AUS Schalter
für das Rührgerät (1) um den Rührvorgang
zu starten.
Die linke Angabe auf dem Display ist die momentane Temperatur der Kühlung. (startet bei
ca. -18°C bis max. -22°C) Anzeige auf Display “18” .
9. Aktivieren Sie den Rührvorgang, indem
Sie die Start Taste (13) drücken.
10. Wenn die Zeit abgelaufen ist, ertönt ein
Signalton für 30 sekunden. Drücken Sie den
EIN / AUS Schalter für das Rührgerät(1) um
den Rührvorgang zu stoppen.
Hinweis
Das Rührgerät schaltet sich automatisch
ab.
Wichtig
Bevor Sie das Rührgerät entfernen,
beachten Sie, dass der EIN /AUS Schalter
des Rührgeräts ausgeschaltet ist.
Wichtig
Wenn die Eiskonsistenz für den Quirl und den Antriebsmotor zu stark wird, dreht
sich dieser auf die andere Seite.
Schalten Sie das Rührgerät (4) ab um den Quirl und den Motor zu schonen. Eine
Garantie bei Missachtung wird abgelehnt.
-5-
11 .Zur Eisentnahme, entfernen Sie das
Antriebsgehäuse (2), indem Sie den
Deckelöffnungsknopf (8) drücken und gleichzeitig das Antriebsgehäuse (2) gegen
Uhrzeigersinn drehen. Heben Sie das
Antriebsgehäuse. Der Quirl (5) bleibt im
Behälter.
12. Ziehen Sie den Behälter (6) heraus.
13. Entfernen Sie den Quirl (5) gleich nach
Beendung des Rührvorgangs.
Servieren Sie das Eis unmittelbar nach der
Zubereitung oder füllen Sie das Eis in ein
geeignetes Gefäss zum Tieffrieren.
Wichtig
Benützen Sie nie spitze oder harte
Gegenstände um das Eis zu entfernen. Es kann den Behälter zerkratzen. Benützen Sie einen Kunststoffschaber
Haltbarkeit
Eiscreme mit rohen Zutaten
Sorbets
Eiscreme mit gekochten Zutaten
ca. 1 Woche im Gefrierfach
ca. 1-2 Wochen im Gefrierfach
ca. 2 Wochen im Gefrierfach
-6-
Es kann gleich wieder neue Eiscreme hergestellt werden. Lassen Sie die Kühlung laufen
und füllen Sie die neue Masse in den leeren herausnehmbaren Behälter oder in den fixen
Behälter und setzen Sie den Vorgang fort.
Wenn Sie fertig sind mit der Eiszubereitung, schalten Sie den Ein /
Aus Schalter für Kühlung aus, ziehen
den Netzstecker und reinigen das Gerät
sorgfältig.
Hinweis
Fertiges Eis niemals bei eingeschaltetem Kühlkompressor im Gerät lassen,
da es sich sonst festfriert.
Zubereitung von Eiscreme im fixen Behälter
1. Stellen Sie das Gerät auf eine ebene, stabile Oberfläche.
Entnehmen Sie den leeren herausnehmbaren Aluminiumbehälter (6) aus dem fixen
Edelstahlbehälter (16) des Geräts.
Füllen Sie die Masse direkt in den fixen
Behälter.
Jetzt können Sie weiterfahren indem Sie die
Vorgänge 2-12 von oben beachten.
Zubereitung von 2 Sorten Eis
Zuerst Eis im herausnehmbaren Behälter (6) herstellen. Wenn dieser Vorgang beendet ist
können Sie die zweite Masse direkt in den fixen Behälter füllen und den Vorgang wie oben
beschrieben anwenden.
-7-
Reinigung und Pflege
-
Den Netzstecker vor jeder Reinigung ziehen.
-
Entfernen Sie den Deckel, indem Sie den Öffnungsknopf des Deckels drücken und
gleichzeitig den Deckel im Gegenuhrzeigersinn drehen.
Lösen Sie den Quirl vom Deckel, indem Sie diese einfach herausziehen. Entfernen Sie
den transparenten Teil des Deckels durch lösen der Verbindungsschraube. Spülen Sie
alle Teile gründlich und trocknen diese sorgfältig ab.
-
Das Gehäuse bei Bedarf mit einem feuchten Tuch abwischen und nachtrocknen. Keine
Scheuermittel und keine Lösungsmittel wie Benzin, Petroleum, Möbelreiniger oder
Farbverdünner verwenden.
Entsorgung
Ausgediente Geräte sofort unbrauchbar machen. Netzstecker ziehen und Netzkabel durchtrennen.
Elektro-Geräte sind im Verkaufsgeschäft oder bei einer Sammelstelle abzugeben.
Allgemeine Sicherheitshinweise
Gerät nur an Wechselstrom mit Netzspannung gemäss Typenschild anschliessen.
Ein Elektrogerät ist kein Kinderspielzeug. Kinder erkennen die Gefahren nicht, die
beim Umgang mit Elektrogeräten entstehen können. Das Gerät deshalb ausser
Reichweite von Kindern und gebrechlichen Leuten benutzen und aufbewahren.
Das Gerät nie auf den Kopf stellen.
Nie scharfe Gegenstände benützen, wenn Sie das Eis entfernen.
Netzkabel nicht herunterhängen lassen. Verpackungsmaterialien wie z.B.
Folienbeutel gehören nicht in Kinderhände.
Benützen Sie dieses Gerät nicht in der Nähe von Wasser, das in Badewannen,
Waschbecken oder anderen Gefässen enthalten ist und setzen Sie es weder
Regen noch anderer Feuchtigkeit aus.
Sollte das Gerät doch einmal ins Wasser gefallen sein, nehmen Sie es erst dann
heraus,wenn der Netzstecker gezogen ist. Danach Gerät nicht mehr in Betrieb
nehmen, sondern zuerst von einer zugelassenen Servicestelle überprüfen
lassen.
Das Gerät nie im freien betreiben.
Prüfen Sie regelmässig, ob das Netzkabel Schadstellen aufweist. In diesem Fall
darf das Gerät nicht in Betrieb genommen werden (Netzstecker sofort ziehen) und
das Gerät zur Reparatur an den Hersteller übergeben.
-8-
Das Gerät darf nicht in Betrieb genommen werden (Netzstecker sofort ziehen),
wenn:
* das Gerät, das Gehäuse oder Kabel beschädigt ist.
* das Gerät sichtbare Schäden aufweist.
* der Verdacht auf einen Defekt nach einem Sturz oder ähnlichem besteht.
* bei Störungen während des Gebrauchs.
* vor der Reinigung, Umplazierung.
* nach dem Gebrauch.
Den Stecker niemals am Netzkabel oder mit nassen Händen aus der Steckdose
ziehen.
Das Gerät nie am Netzkabel tragen oder ziehen.
Das Netzkabel nicht über scharfe Kanten ziehen oder einklemmen.
Knicken Sie das Netzkabel nicht, und wickeln Sie es nicht um das Gerät.
Stellen Sie das Gerät nie auf heisse Oberflächen oder in die Nähe von offenen
Flammen und verlegen Sie das Netzkabel so, dass es ebenfalls nicht mit heissen
oder scharfkantigen Gegenständen in Berührung kommt. Benützen Sie das Gerät
nicht, wenn Sie sich auf feuchtem Boden befinden oder wenn Ihre Hände oder
das Gerät nass sind.
Lassen Sie das Gerät nicht unbeaufsichtigt, solange es angeschlossen ist.
Dieses Gerät ist nicht für den gewerblichen Gebrauch bestimmt, sondern aus
schliesslich für die Benützung im privaten Haushalt.
Reparaturen an Elektrogeräten dürfen nur von Fachkräften durchgeführt werden.
Durch nicht fachgerechte Reparaturen können erhebliche Gefahren für den
Benutzer entstehen.
Bei Beschädigung der Anschlussleitung darf diese nur durch eine vom Hersteller
genehmigte Kundendienststelle ersetzt werden.
Wird das Gerät zweckentfremdet, falsch bedient oder nicht fachgerecht
repariert, kann keine Haftung für eventuelle Schäden übernommen werden.
In diesem Fall erlischt der Garantieanspruch.
-9-
Mode d'emploi
Trisa Gelateria, Art. 7713
Nous vous remercions d'avoir choisi notre "Gelateria". L'équipe de Trisa Electro
vous souhaite beaucoup de plaisir avec cet appareil et un bon appétit !
Avant l'utilisation
Veuillez lire attentivement ce mode d'emploi dans son intégralité. Il contient des consignes
importantes pour l'utilisation, la sécurité et l'entretien de l'appareil. Veuillez conserver précieusement ce mode d'emploi et, le cas échéant, le remettre à l'utilisateur ultérieur.
L'appareil ne doit être utilisé qu'aux fins prévues et conformément à ce mode d'emploi.
Veuillez respecter les consignes de sécurité.
Eliminez l'emballage selon la législation en vigueur.
Description
1
2
3
4
5
6
7
8
9
10
11
12
13
14
15
16
Interrupteur marche / arrêt pour l'agitateur
Boîtier de commande
Couvercle avec ouverture de remplissage
Vis jonction entre le couvercle et le boîtier
Batteur
Récipient amovible
Fiches
Bouton d'ouverture du couvercle
Interrupteur marche / arrêt pour le refroidissement
Ecran
Affichage de la température de refroidissement
Affichage du temps
Touche Start / Stop
Touche de sélection Select
Orifice d'évacuation de l'air
Récipient fixe
Fiche technique
Capacité :
Tension :
Puissance :
Poids :
0,7 L = 1,4 litre de crème glacée
230 V
150 watt
10,8 kg
- 10 -
Avant la première utilisation
Lors du déballage, vérifiez que l'appareil compte bien tous les accessoires en vous référant au mode d'emploi, et qu'il n'est pas endommagé.
La propreté et l'hygiène sont des caractéristiques très importantes pour la préparation de
produits alimentaires. Rincez toutes les pièces qui entrent en contact avec la crème glacée
(récipients en inox et en aluminium, batteur et couvercle) et essuyez-les minutieusement.
Attention!
Il se peut que, pendant le transport, l'appareil ait été renversé ou posé à l'envers. De
ce fait, il est possible que le liquide de refroidissement soit réparti dans le circuit et
que le compresseur ne soit pas en état de marche.
Posez l'appareil pendant 12 heures sur une surface horizontale afin que le liquide de
refroidissement se rassemble. Si, par la suite, l'appareil est de nouveau placé dans
une position incorrecte, répétez cette opération.
Première mise en service
Branchez la fiche dans la prise de courant. (Ne raccordez qu'à du courant alternatif
d'une tension de 230 volt).
Veuillez toujours poser l'appareil sur une surface horizontale et stable.
Les ouvertures d'aération situées à l'avant et à l'arrière ne doivent pas être obstruées.
20cm
Réservez un écart de 20cm avec tout autre objet.
20cm
Application
Attention
- Pour réparer la crème glacée, veuillez n'utiliser que des ingrédients frais et impeccables.
- Les fruits doivent toujours être frais et lavés.
- Si possible, faites refroidir les ingrédients avant la préparation.
- Ne versez jamais d'ingrédients chauds dans la machine!
- 11 -
Préparation de crème glacée dans le récipient en aluminium
amovible.
1. Placez le récipient vide en aluminium (6)
dans le récipient en inox (16) de l'appareil.
2. Assemblez le couvercle (3) et le boîtier (2)
à l'aide de la vis de jonction (4).
3. Placez le batteur (5) dans l'ouverture du
boîtier prévue à cet effet .
Le batteur doit être un peu lâche.
4. Posez le boîtier de l'entraînement (2) de
manière que la fiche du boîtier (2) soit positionnée en face de la fiche fixe (7) de l'appareil. Tournez le couvercle dans le sens
des aiguilles d'une montre jusqu'à ce que
les fiches s'encliquettent l'une dans l'autre
et le cran d'arrêt soit enclenché.
Si les fiches ne sont pas correctement
raccordées, le moteur d'entraînement ne
tourne pas.
- 12 -
5. Allumez l'appareil en pressant le bouton
marche / arrêt pour le refroidissement (9)
vers le bas.
Conseil :
Allumez l'appareil et ensuite commencez à
préparer la crème glacée.
De cette manière, le refroidissement est
entièrement prêt lorsque vous versez la
préparation.
Une fois le moteur de l'agitateur allumé, il ne faut pas éteindre le groupe de refroidissement avant que la glace ne soit terminée. Si vous éteignez l'appareil ou s'il y a une
coupure de courant pendant la préparation de la glace, après avoir rallumé le compresseur, un circuit de sécurité intégré l'empêche de recommencer à refroidir pendant une
période de veille de 5 minutes. Dans ce cas, il se pourrait que la crème glacée préparée
ne soit pas optimale.
6. Maintenant, versez lentement la mixture
dans la machine par l'ouverture située
dans le couvercle (3).
Important:
Versez la mixture au maximum jusqu'à 3 cm du bord du récipient, car sous l'action
de refroidissement la mixture se dilate!
7. Sur l'écran, sélectionnez le temps souhaité
en appuyant sur la touche Select (14).
(choisissez entre 5, 10, 20, 35 ou 40
minutes) Le temps souhaité clignote
maintenant en vert.
Indication:
Le temps de préparation peut varier en fonction de la recette, de la température et de
la quantité. Toutefois, il faut compter sur une durée approximative de 20 à 40 minutes.
Si la préparation n'est suffisamment ferme, une fois le temps écoulé, vous pouvez de nouveau régler l'appareil pour 5 minutes par exemple.
8. Maintenant, appuyez sur l'interrupteur marche / arrêt de l'agitateur (1) pour commencer le mélange
Le chiffre de gauche sur l'écran indique la température momentanée de refroidissement.
(d'env. -18°C à max. -22°C) Affichage sur l'écran "18".
9. Activez le processus de mélange en
appuyant sur la touche Start (13).
10. Lorsque le temps est écoulé, un signal
sonore retentit pendant 30 secondes.
Appuyez sur l'interrupteur marche / arrêt
de l'agitateur (1) pour arrêter le processus.
Indication
L'agitateur s'éteint automatiquement.
Important
Avant de retirer l'agitateur, veillez à ce
que l'interrupteur marche / arrêt soit
bien éteint.
Important
Si la consistance de la crème glacée est trop solide pour le batteur et le moteur, le
batteur se tourne de l'autre côté.
Eteignez l'agitateur (4) pour de pas abîmer le batteur et le moteur. En cas de nonrespect de cette consigne, une prise en garantie sera refusée.
- 14 -
11. Afin de sortir la crème glacée, retirez le
boîtier (2). Pour cela appuyez sur le bou
ton d'ouverture du couvercle (8) et simul
tanément tournez le boîtier (2) dans le
sens inverse des aiguilles d'une montre.
Soulevez le boîtier. Le batteur (5) reste
dans le récipient.
12. Sortez le récipient (6) en tirant.
13. Retirez le batteur (5) immédiatement
après la fin du mélange.
Servez la crème glacée juste après l'avoir préparée ou versez-la dans un réci
pient approprié afin de la congeler.
Important
N'utilisez jamais d'objets durs ou
pointus pour sortir la glace. Vous
pourriez rayer le récipient. Utilisez
une spatule en plastique.
Conservation
Crème glacée à base d'ingrédients crus
Sorbets
Crème glacée à base d'ingrédients cuits
env. 1 semaine dans le compartiment
congélateur
env. 1 à 2 semaines dans le
compartiment congélateur
env. 2 semaines dans le compartiment
congélateur
- 15 -
Vous pouvez à nouveau préparer de la crème glacée sans attendre. Laissez tourner le
dispositif de refroidissement et versez une nouvelle mixture dans le récipient vide amovible
ou dans le récipient fixe et continuez comme indiqué précédemment.
Une fois que vous avez terminé, éteignez l'appareil à l'aide de l'interrupteur marche / arrêt
pour le refroidissement, débranchez la fiche de
la prise et nettoyez l'appareil minutieusement.
Indication
Ne laissez jamais la crème glacée dans l'appareil avec le compresseur de
refroidissement allumé car elle pourrait congeler totalement.
Préparation de crème glacée dans le récipient fixe
1. Posez l'appareil sur une surface plane et
stable.
Sortez le récipient amovible vide en alumi
nium (6) du récipient fixe en inox (16) de
l'appareil.
Versez la mixture directement dans le récipient fixe.
Maintenant, vous pouvez procéder comme
indiqué aux points 2 à 12.
Préparation de 2 sortes de crèmes glacées
En premier lieu, préparez de la crème glacée dans le récipient amovible (6). Quand la
glace est prête, vous pouvez préparer la seconde mixture directement dans le récipient fixe
et procédez comme décrit ci-dessus.
- 16 -
Nettoyage et entretien
- Avant le nettoyage, débranchez toujours la fiche de la prise.
- Retirez le couvercle en appuyant sur le bouton d'ouverture du couvercle et simultanément
tournez le couvercle dans le sens inverse des aiguilles d'une montre.
Détachez le batteur du couvercle en le tirant tout simplement. Retirez la partie transpa
rente du couvercle en desserrant la vis de jonction. Rincez tous les éléments à grande
eau et essuyez-les avec soin.
- Si nécessaire, essuyez l'extérieur de l'appareil avec un chiffon humide et séchez.
N'utilisez pas de produits abrasifs ni de solvants tels que de l'essence, du pétrole, du nettoyant pour meubles ou de diluant coloré.
Elimination
Mettre immédiatement hors d’usage les appareils usés. Retirer la fiche de contact et couper le câble d’alimentation.
Les appareils électriques doivent être remis au magasin de vente ou à un dépôt.
Directives générales de sécurité
Ne branchez l'appareil que sur une prise de courant alternatif. Vérifiez que la ten
sion du secteur corresponde bien à celle indiquée sur la plaquette signalétique.
Un appareil électrique n'est pas un jouet. Les enfants ou les handicapés ne sont
pas conscients des dangers inhérents au maniement d'appareils électrique. Par
conséquent, utilisez-le et rangez-le hors d'atteinte des entfants.
Le matériel d'emballage, tel que les sachets de vinyl ne doivt pas ètre remis
aux mains d'enfants.
Ne posez jamais l'appareil à l'envers.
N'utilisez jamais d'objets pointus pour sortir la crème glacée.
Ne pliez pas le cordon et ne le roulez pas autour de l'appareil.
N'employez pas cet appareil à proximité d'eau dans des baignoires, lavabos ou
d'autres recipients et ne l'exposez ni à la pluie ni à d'autre humidité.
Au cas où l'appareil serait tombé à l'eau, ne le sortez qu'après avoir retiré la fiche.
Ensuite ne plus faire marcher l'appareil mais d'abord le faire contrôler par
un magasin spécialisé autorisé.
Contrôlez régulièrement si le cordon est défectueux. Dans ce cas l'appareil ne
doit pas etre mis en marche (immédiatement tirer la fiche) et envoyer l'appareil au
fabricant pour réparation.
Ne jamais utiliser cet appareil dehors.
- 17 -
N'utilisez pas l'appareil (débranchez-le aussitôt):
* si l'appareil, le boîtier ou le cordon secteur sont endommagés.
* si l'appareil présente une défectuosité apparente.
* si vous pensez que l'appareil a été endommagé en chutant.
* en cas de mauvais fonctionnement.
* avant chaque nettoyage ou entretien.
* en cas d'interruption ou après utilisation.
Ne débranchez jamais la fiche en tirant sur le cordon ni avec les mains mouillées.
Ne portez ni ne retirez jamais l'appareil par le cordon.
Ne tirez pas le cordon par-dessus des bords tranchants. Ne le coincez pas.
Ne mettez jamais l'appareil sur des surfaces chaudes, ni à proximité de flammes
ouvertes. Veillez à ce que le cordon ne touche pas des objets chauds ou des
arêtes coupantes. N 'employez pas l'appareil si vous vous trouvez sur un plancher
humide ou si vos mains ou l'appareil sont mouillés.
Ne laissez pas l'appareil sans surveillance pendant qu'il est branché.
Cet appareil n'est pas destiné à l'usage industriel, mais exclusivement à l'emploi
dans le ménage privé.
Les réparations d'appareils électriques doivent uniquement être effectuées par
des spécialistes. Des réparations impropres peuvent causer des dangers considé
rables pour l'usager.
En cas de défectuosité du cordon d'alimentation, celui-ci ne peut être remplacé
que par un technicien spécialisé agréé par le fabricant.
Au cas où l'appareil est désaffecté, manié ou réparé d'une manière incorrecte,
nous déclinons la responsibilité de dommages éventuels. Dans ce cas la revendi
cation de garantie est annulé.
- 18 -
Istruzioni per l'uso
Trisa, Art. 7713
Gentile cliente, La ringraziamo di aver scelto la nostra "Gelateria". Il Team di Trisa
Electro Le augura buon divertimento con questa macchina e buon appetito!
Prima dell'utilizzo
Leggere attentamente tutte le informazioni qui riportate. Esse offrono indicazioni importanti
per l'utilizzo, la sicurezza e la manutenzione della macchina. Conservare le istruzioni per
l'uso accuratamente, e darle eventualmente all'utente della macchina successivo.
La macchina può essere utilizzata solo per lo scopo previsto, conforme a queste istruzioni
per l'uso.
Osservate attentamente le indicazioni di sicurezza.
Smaltire il materiale d'imballaggio secondo le norme previste.
Descrizione
1
2
3
4
5
6
7
8
9
10
11
12
13
14
15
16
Interruttore ON/OFF del miscelatore
Contenitore del motore
Coperchio con foro di riempimento
Vite per il fissaggio del coperchio al contenitore del motore
Miscelatore
recipiente rimovibile
Parte d'aggancio
Tasto per l'apertura del coperchio
Interruttore ON / OFF per il raffreddamento
Display
Indicatore della temperatura di raffreddamento
Timer
Tasto START / STOP
Tasto SELECT
Apertura per uscita dell'aria
Recipiente fisso
Dati tecnici
Quantità di riempimento:
Voltaggio:
Potenza:
Peso:
0,7Ltr.= 1,4 Ltr. di crema di gelato
230 V
150 Watt
10,8 Kg
- 19 -
Prima del primo utilizzo
Controllare che tutti gli accessori, conformi a queste istruzioni per l'uso, siano contenuti
nella scatola, e che l'apparecchio non sia danneggiato.
Pulizia ed igiene sono molto importanti durante la lavorazione di generi alimentari.
Lavare a fondo tutti i componenti che vengono a contatto con il gelato (recipiente d'acciaio
e d'alluminio, miscelatore e coperchio) ed asciugare il tutto accuratamente.
Attenzione!
È possibile che durante il trasporto l'apparecchio sia stato rovesciato o capovolto.
Ciò può aver potuto causare lo spargimento del liquido di raffreddamento nel circuito, e il compressore potrebbe non funzionare.
Lasciate l'apparecchio 12 ore su un piano orizzontale, in modo che il liquido di raffreddamento si raccolga. Ripetere questo procedimento anche, se successivamente
l'apparecchio si trova in una posizione sbagliata.
Prima messa in funzione
Attaccate la spina ad una presa di corrente. (Solo a corrente alternata con un voltaggio
di 230 V)
Posizionate la macchina sempre su una superficie stabile e orizzontale.
Lasciate libere le aperture di ventilazione sulla parte anteriore e posteriore.
20cm
Mantenere una distanza di circa 20cm.
20cm
Utilizzo
Attenzione:
- Per la preparazione del gelato, utilizzare sempre ingredienti freschi e di qualità.
- La frutta deve essere sempre fresca e lavata
- Durante la preparazione, gli ingredienti devono essere possibilmente freddi
- Non riempire mai la macchina con ingredienti caldi
- 20 -
Preparazione del gelato nel recipiente d'alluminio rimovibile
1. Posizionate il recipiente d'alluminio rimovibile (6) vuoto nel recipiente d'acciaio (16)
fisso della macchina.
2. Avvitate con la vite per fissaggio (4) il
coperchio (3) al contenitore del motore (2).
3. Posizionate il miscelatore (5) nelle apposite
aperture del contenitore del motore. Il
miscelatore deve essere facilmente rimovibile.
4. Mettete il coperchio (3) sul contenitore del
motore (2) in modo tale che le parti d'aggancio del coperchio e le parti d'aggancio
del contenitore del motore (7) siano posizionate l'una davanti all'altra. Girate il
coperchio in senso orario, fino a sentire un
clic.
Se entrambi gli accessori non sono
attaccati correttamente, il motore di non
funziona.
- 21 -
5. Accendete la macchina premendo verso il
basso l'interruttore ON/OFF per il raffreddamento (9).
Consiglio:
Prima accendere la macchina e poi cominciare con la preparazione del gelato.
In questo modo il motore di raffreddamento
ha raggiunto la massima potenza.
Una volta acceso il motore miscelatore non spegnere il motore di raffreddamento,
prima che il gelato sia finito. Lo spegnere dell'apparecchio o una mancanza di corrente
durante la preparazione del gelato, cansono far sì che il compressore, a causa di un interruttore di sicurezza integrato, rincominci a raffreddare solo dopo una pausa di circa 5 minuti dopo la riaccensione. Ciò può far sì che la preparazione del gelato non riesca in modo
ottimale.
6. Riempire adesso lentamente la massa
preparata nella macchina da gelato tramite
il foro di riempimento del coperchio (3).
Importante!
Riempite la massa nel recipiente solo fino a 3cm sotto il bordo, in quanto tramite il
raffreddamento essa si dilata.
7. Scegliete il tempo desiderato sul display,
premendo il tasto SELECT (14). (Si può
scegliere tra 5, 10, 20, 35 o 40 minuti) La
spia verde lampeggiante è il tempo pre
scelto.
Indicazione:
In base alla ricetta, alla temperatura e alla quantità può, variare la durata di preparazione del gelato. Il tempo previsto è comunque dai 20-40 minuti circa. In caso la quantità
non fosse abbastanza densa, si può per esempio, scaduto il tempo trascorso, accendere la
macchina ancora per 5min.
- 22 -
8. Premete ora l'interruttore ON / OFF del
miscelatore (1), per metterlo in movimento.
L'indicazione a sinistra sul display è la temperatura di raffreddamento momentanea.
(comincia da circa -18°C fino a massimo -22°C) Indicazione sul display "18".
9. Attivate il processo di miscelazione pre
mendo il tasto START (13)
10. A tempo scaduto sentirete un segnale
acustico per 30 secondi. Premete l'interruttore ON / OFF del miscelatore (1) per
bloccare il processo.
Indicazione:
Il miscelatore si spegne automaticamente.
Importante:
Prima di togliere il miscelatore, assicuratevi che l'interruttore ON / OFF del
miscelatore sia spento.
Importante:
Se la consistenza di gelato diventa troppo densa per il motore di azionamento e per
il miscelatore, quest'ultimo gira in senso contrario.
Spegnete il miscelatore per non danneggiare quest'ultimo ed il motore.
Guasti in caso di uso improprio dell'apparecchio sono esclusi dalla garanzia.
- 23 -
11.Per estrarre il gelato, aprite il coperchio
(3) premendo il tasto per l'apertura del
coperchio (8) e girando contemporaneamente in senso antiorario il contenitore del
motore (2). Sollevate il coperchio. Il miscelatore (5) rimane nel recipiente.
12.Togliete il recipiente(6).
13.Togliete il miscelatore (5) subito dopo la
fine del processo di miscelazione.
Servite il gelato subito dopo la preparazione o mettetelo in un contenitore adatto per
il congelamento.
Importante:
Non utilizzate oggetti appuntiti o
duri per estrarre il gelato.
Potrebbero danneggiare il recipiente. Utilizzate un raschietto di plastica.
Periodo di conservazione:
Gelato con ingredienti crudi:
Sorbetto:
Gelato con ingredienti pronti:
circa 1 settimana nel congelatore
circa 1-2 settimane nel congelatore
circa 2 settimane nel congelatore
- 24 -
Si può produrre subito un nuovo gelato. Lasciate acceso il motore di raffreddamento, riempite il recipiente rimovibile vuoto o il recipiente fisso con una nuova massa, e ricominciate il
processo.
Quando avete finito la preparazione del gelato, spegnete l'interruttore ON / OFF del motore di raffreddamento, togliete la spina e pulite
accuratamente l'apparecchio.
Avvertenza:
Non lasciare mai il gelato finito nell'apparecchio con il compressore di raffreddamento acceso, altrimenti il gelato si congela.
Preparazione del gelato nel recipiente fisso
1. Posizionate la macchina su una superficie
orizzontale e stabile.
Togliete il recipiente d'alluminio rimovibile
(6) vuoto dal recipiente d'acciaio fisso
(16) della macchina.
Versate la massa direttamente nel recipiente fisso.
Ora potete procedere, seguendo i procedimenti da 2 a 12 sopra indicati
Preparazione di due tipi di gelato
Dapprima produrre il gelato nel recipiente rimovibile (6). Quando questo processo è terminato, potete riempire il recipiente fisso con la seconda massa e seguire il procedimento
descritto sopra.
- 25 -
Pulizia e cura
- Tirare la spina prima di ogni pulizia.
- Togliete il coperchio premendo il tasto per l'apertura del coperchio e girando contempor
aneamente il coperchio in senso antiorario.
Staccate il miscelatore dal coperchio semplicemente tirando. Togliete la parte trasparente
del coperchio svitando la vite. Lavate tutti gli accessori a fondo e asciugateli accurata
mente.
- In caso di necessità pulire la macchina con panno umido e asciugare.
Non usare nessun tipo di abrasivo e solventi come benzina, petrolio, prodotti per mobili o
diluenti.
Smaltimento
Rendere subito inutilizabili gli apparecchi fuori uso. Togliete la spina e staccate il cavo
portacorrente.
Gli apparecchi elettrici devono essere ceduti in un negozio di vendita o presso un centro
di raccolta.
Direttive di sicurezza
L'apparecchio va collegato solo a corrente alterna con tensione pari a quella indicata
sulla targhetta di designazione.
Un apparecchio non è un giocattolo. I bambini non si rendono conto dei pericoli che si
possono risultare maneggiando degli apparecchi elettrici. In conseguenza usare e conservare l'apparecchio lontano dei bambini e persone devole.
Non capovolgere mai la macchina.
Non utilizzare mai oggetti taglienti quando si estrae il gelato.
Non lasciare pendere il cavo. Materiale d'imballaggio per esempio buste di plastica
devono stare lontano dai bambini.
Non utilizzare quest' apparecchio presso di acqua contenuta in vasche da bagno, lavandini o altri recipienti e non esporrlo nè alla pioggia nè ad altra umidità.
Se però è caduto una volta nell'acqua, non prenderlo fuori prima di tirare la spina. Poi
non più utilizzare l'apparecchio, ma lasciarlo controllare da un negozio specializato autorizzato.
Non usare l’apparecchio all aperto.
Controllate regolarmente se il cavo è difettoso. In questo caso l'apparecchio non deve
essere messo in opera (subito tirare la spina) e mandare l'apparecchio al fabbricante
per riparazione.
- 26 -
Non mettere l'apparecchio in funzione (oppure tirare subito la spina) se:
* l'apparecchio, il mobile o il cavo di rete è danneggiato.
* l'apparecchio mostra dei danni.
* sospettate che ci sia un difetto dopo una caduta o qualche cosa di simile.
* in caso di disturbi durante l'uso.
* prima di pulire l'apparecchio oppure quando lo si deve spostare in un altro luogo.
* dopo l'uso.
Non estraete mai la spina fuori della presa al cavo ne con mani bagnate.
Non trasportate ne tirate mai l'apparecchio al cavo.
Non tirate il cavo attraverso bordi taglianti. Non schiacciatelo. Non piegare il cavo e non
avvolgerlo attorno all’apparecchio.
Mai mettere l'apparecchio sopra superfici calde ne vicino a fiamme aperte. Fate attenzione che non tocchi oggetti caldi o oggetti ad angoli acuti. Non utilizzare l'apprecchio se
vi trovate su un pavimento umido o se le vostre mani o l'apparecchio sono bagnati.
Non lasciare l'apparecchio senza sorveglianza mentre che funziona.
Questo apparecchio non è destinato all'uso industriale ma esclusivamente all'uso a
casa.
Reparazioni di apparecchi elettrici devono unicamente essere effettuate per specialisti.
Reparazioni improprie possono causare dei pericoli gravi per l'utente.
In caso di un guasto al cavo d'alimentazione, questo potrà solo essere sostituito da un
tecnico autorizzato dal produttore.
Nel caso che l'apparecchio viene usato a scopi originalmente non intenzionati,
usato o riparato in modo scorretto, non possiamo assumere una responsabilità
per danni eventuali. In questo caso la rivendicazione di garanzia è fuori causa.
- 27 -
Instructions for use
Trisa Gelateria, Art. 7713
Thank you for buying our product "Gelateria". The Trisa Electro crew hopes that you
will enjoy working with our device. Bon appetit!
Before use
Please read carefully all information given in this instruction manual. It provides you with
important instructions concerning use, safety and maintenance of the device. Please keep
the instruction manual in a safe place and pass it on to the next user, if the occasion
should arise.
The device may only be used for the intended purpose according to this instruction manual.
Please pay attention to the safety instructions.
Please dispose of packaging material properly.
Description
1
2
3
4
5
6
7
8
9
10
11
12
13
14
15
16
Mixer ON / OFF switch
Drive housing
Lid with filler opening
Connection bolt of lid and drive housing
Beater
Removable tank
Plug connection
Lid opening button
Cooling ON / OFF switch
Display
Display cooling temperature
Time display
Start / Stop button
Select button
Air outlet
Fixed tank
Technical data
Fill-in quantity:
Voltage:
Output:
Weight:
0.7 l = 1.4 l ice-cream
230 V
150 Watt
10.8 kg
- 28 -
Before initial use
Please check already when unpacking the device if all accessory parts, as stated in the
instruction manual, are included and if the device is not damaged.
Cleanness and hygiene are very important when processing food. Wash up all parts that
come into contact with ice cream (stainless steel and aluminium tank, beater and lid) and
dry them carefully.
Attention!
During transportation the device may have been fallen over or put upside down - the
cooling liquid then may be spread out in the cooling cycle and the compressor may
not work.
Place the device on an even surface for 12 hours so that the cooling liquid will accumulate. Please also repeat this process if the device will be in wrong position in the
future.
First use
Connect mains plug. (Only connect to alternating current with a voltage of 230 Volt).
Always place the device on a solid and even surface.
The ventilation opening on front and back must not be covered.
20cm
Keep a distance of at least 20 cm.
20cm
Use
Attention
- Please always use only fresh and impeccable ingredients when making ice cream.
- Fruits must always be fresh and washed.
- Ingredients should be pre-cooled for processing.
- Never fill hot ingredients into the device!
- 29 -
Preparation of ice cream in the removable aluminium tank
1. Place the empty removable aluminium tank
(6) in the fixed stainless steel tank (16) of
the device.
2. Connect the lid (3) and the drive housing (2)
with the connection bolt (4).
3. Place the beater (5) in the intended opening
of the drive housing.
The beater must be in a loose position.
4. Put on the drive housing (2) in a way so that
the plug connection on the drive housing (2)
is placed opposite the fixed plug connection
(7) of the device. Turn the lid clockwise that
the plug connections click into each other
and the locking device will click into place.
If the plug connection is not connected
properly, the drive motor will not work
- 30 -
5. Switch on the device by pressing down
the cooling ON / OFF switch (9).
Tip:
At first, switch on device and then start
preparing ice cream.
So cooling is already at full power when
filling in.
After switching on the mixer motor the cooling aggregate may only be switched off
when the preparation of the ice cream has been finished. In case of switching-off or
power failure during ice-cream preparation, the compressor will start cooling after rerunning
only with a waiting period of 5 minutes. This is caused by an integrated safety circuit. This
may result in an insufficient preparation of the ice cream
6. Now slowly fill in the prepared mixture into
the ice cream maker through the filler
opening of the lid (3).
Important
Only fill in the mixture up to 3 cm below the edge of the bowl, as the mixture will
increase in volume because of the cooling!
7. Select the desired period of time on the
display by pressing the select button (14)
(possible period of time are 5, 10, 20, 35
or 40 minutes). The desired period of time
will now flash in green.
Remark:
Depending on recipe, temperature and quantity, the period of time for preparation
may vary. It takes approx. 20 - 40 minutes.
If the ice cream is not solid enough, another period of time, e.g. 5 minutes, may be selected after completion.
- 31 -
8. Now press the mixer ON / OFF button (1)
to start the mixing procedure
The statement on the left side of the display shows current cooling temperature (starts at
approx. -18 °C up to a maximum of approx. -22 °C). Indication on display "18".
9. Start the mixing procedure by pressing the
Start button (13).
10.If the period of time has been expired, a
signal tone will sound for 30 seconds.
Press the mixer ON / OFF switch (1) to
stop the mixing procedure.
Remark
The mixer will turn off automatically.
Important
Before removing the mixer, please
ensure that the mixer ON / OFF switch
is in the OFF position.
Important:
If the consistency of the ice cream is too strong for the beater and the drive motor, it
will turn into opposite direction.
Turn off the mixer (4) to remove stress from mixer and motor. We do not accept any
warranty in case of disregard.
- 32 -
11. In order to take ice-cream from the device,
remove the drive housing (2) by pressing
the lid opening button (8) und simultaneously turning the drive housing (2) counter-clockwise. Lift the drive housing. The
beater (5) remains in with tank.
12. Pull out the tank (6).
13. Remove the beater (5) right after termination of the mixing procedure.
Serve the ice cream immediately after preparation or fill the ice cream into a suitable
container for deep-freezing.
Important
Never use pointed or solid objects
to remove the ice cream. It may
scratch the tank. Use a plastic scraper instead.
Keeping time
Ice cream with raw ingredients
Sorbets
Ice cream with cooked ingredients
approx. 1 week in the freezer
approx. 1 - 2 weeks in the freezer
approx. 2 weeks in the freezer
- 33 -
Right after, new ice cream can be made again. Keep the cooling working and fill in the new
mixture into the empty removable tank or into the fixed tank and continue the procedure.
When the preparation of the ice cream is finished, switch off the cooling ON / OFF switch,
disconnect the mains plug and carefully clean
the device.
Remark
Never leave ice cream with the device with running cooling compressor,
because the ice cream will freeze to the device.
Preparation of ice cream in the fixed tank
1. Place the device on an even and solid sur face.
Remove the empty removable aluminium
tank (6) from the stainless steel tank (16) of
the device.
Directly fill in the mixture into the fixed tank.
Now you may proceed as stated in the procedures 2 - 12 that are mentioned above.
Preparation of 2 different kinds of ice-cream
First prepare ice cream in the removable tank (6). When this procedure is finished you can
fill in the second mixture directly into the fixed tank and execute the procedure as mentioned above.
- 34 -
Cleaning and care
-
Always disconnect mains plug before cleaning.
-
Remove lid by pressing the lid opening button and simultaneously turning the lid counter-clockwise. Remove beater from lid by just pulling it out. Remove the transparent
part of the lid by loosening the connection bolt. Wash up all parts carefully and dry them
thoroughly.
-
Wipe the housing, if necessary, with a damp cloth and dry it. Do not use scouring
agents or solvents like benzine, petroleum, furniture cleaner or thinner.
Disposal
Make worn out appliances unusable. Pull out the mains plug and sever the cord.
Electric appliances are to be returned to a shop of sale or handed over to an official
dump.
Safety regulations
Plug the appliance only in an outlet as mentioned on the rating plate.
An electric appliance is not a children's toy. Children are not aware of the hazards
of electrical appliances. Therefore close supervision is necessary when the appliance
is used by children.
Never put the device upside down.
Never use sharp objects to remove ice cream.
Never hang down the main cable. Keep children away from packing material, e.g.,
plastic bags.
Do not use this appliance near the water contained in bath-tubs, washbasins or other
receptables nor expose it to rain or other humidity.
Should however the appliance fall into water, only take it out after pulling the plug.
Then do not use the appliance anymore, but first have it checked by an authorized
service department.
Never use the appliance outdoor.
Regulary check if the main cable is defective. In this case the appliance must not be
put into operation (immediately pull the plug). Send it to the manufacturer for repair.
The appliance must not be operated (disconnect the mains plug immediately) when:
* the appliance, casing or cable is damaged.
* the appliance shows visible signs of damage.
* a fault is suspected after a fall or the like.
* in case of faults during use.
* before cleaning or moving the appliance from place to place.
* after use.
- 35 -
Never pull the plug out of the socket with wet hands.
Never carry nor pull the appliance by the flex.
Don't pull the flex over sharp edges. Don't wedge it.
Do not bend the flex nor wind it around the appliance.
Never put the appliance on hot surfaces nor near open flames. Lay the cord so that it
does not touch hot or sharp-edged objects. Do not use the appliance while standing on a
humid floor or when your hands or the appliance are wet.
Do not leave the appliance unattended while it is connected to the power source.
This appliance is not meant for commercial use only exclusively for private use.
Only trained personnel should repair electrical appliances. Unskilled repairs can cause
considerable danger to the user.
In case of damage to the power cable this may only be replaced by a customer service
authorized by the manufacturer.
No warranty for any possible damage can be accepted if the appliance is used for
impro per purpose, wrongly operated or unprofessionally repaired. In such a case,
any warran ty claim is void.
- 36 -
Switzerland
Trisa Electro AG
Kantonsstrasse 121
CH-6234 Triengen
[email protected]
++ 41 41 933 00 30
Austria
Franz Holzbauer
Service GmbH
Unterhaus 33
A-2851 Krumbach
[email protected]
++ 43 (2647)4304070
Germany
HKS
Satellitentechnik Vertriebs GmbH
Graf von Stauffenbergstrasse 8
D-63150 Heusenstamm
[email protected]
++49 (6104) 5920