1
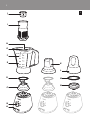
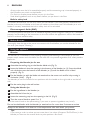
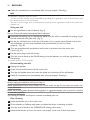
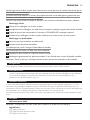
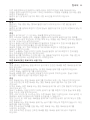
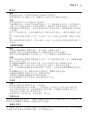
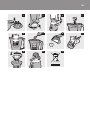
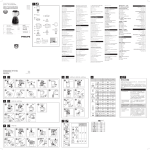
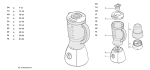
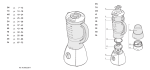
HR2003
2
3
1
J
I
H
G
F
E
K
L
D
C
B
A
M
N
4
HR2003
English 6
Français 14
한국어 22
简体中文 30
6
English
Introduction
Congratulations on your purchase and welcome to Philips! To fully benefit from the support that
Philips offers, register your product at www.philips.com/welcome.
General description (Fig. 1)
A
B
C
D
E
F
G
H
I
J
K
L
M
N
Motor unit
Control knob with pulse setting and speed settings
Blender blade unit
Sealing ring of blender
Plastic blender jar
Level indication
Lid of blender jar
Opening in lid
Fruit filter
Measuring cup
Dry mill beaker
Wet mill beaker
Sealing ring of wet mill
Wet mill blade unit
Important
Read this user manual carefully before you use the appliance and save it for future reference.
General
Danger
-- Never immerse the motor unit in water or any other liquid, nor rinse it under the tap. Use only
a moist cloth to clean the motor unit.
Warning
-- Check if the voltage indicated on the appliance corresponds to the local mains voltage before
you connect the appliance.
-- Do not use the appliance if the plug, the mains cord or other parts are damaged.
-- If the mains cord is damaged, you must have it replaced by Philips, a service centre authorised by
Philips or similarly qualified persons in order to avoid a hazard.
-- Never use the blender jar, the dry mill beaker or the wet mill beaker to switch the blender on
and off.
-- Never let the blender run unattended.
-- This appliance is not intended for use by persons (including children) with reduced physical,
sensory or mental capabilities, or lack of experience and knowledge, unless they have been given
supervision or instruction concerning use of the appliance by a person responsible for their
safety.
-- Children should be supervised to ensure that they do not play with the appliance.
-- Do not touch the blades, especially when the blender is plugged in. The blades are very sharp.
-- If the blades get stuck, unplug the blender before you remove the ingredients that block the
blades.
-- Make sure the blade unit is securely fastened to the blender jar or mill beaker before you
assemble the blender jar or mill beaker onto the motor unit.
Caution
-- Always unplug the blender before you assemble, disassemble or make adjustments to the
blender jar, the dry mill or the wet mill and before you start to clean the blender.
English
7
-- Never use any accessories or parts from other manufacturers or that Philips does
not specifically recommend. If you use such accessories or parts, your guarantee becomes
invalid.
-- Do not exceed the maximum level indicated on the blender jar and the mill beakers.
Blender
Warning
-- Never reach into the blender jar with your fingers or an object while the blender is running.
-- Make sure the blade unit is securely fastened to the blender jar before you assemble the
blender jar onto the motor unit.
Caution
-- Never fill the blender jar with ingredients hotter than 80ºC.
-- To prevent spillage, do not put more than 1 litre of liquid in the blender jar, especially when you
process at a high speed. Do not put more than 750ml in the blender jar when you process hot
liquids or ingredients that tend to foam.
-- If food sticks to the wall of the blender jar, switch off the blender and unplug it. Then use a
spatula to remove the food from the wall.
-- Always make sure the lid is properly assembled on the jar and the measuring cup is inserted
properly in the lid before you switch on the appliance.
-- Never forget to place the sealing ring on the blade unit before you connect the blade unit to
the blender jar, otherwise leakage occurs.
-- Do not let the blender with the blender jar attached run for more than 3 minutes at a time. Let
it cool down to room temperature between processing cycles.
Dry mill and wet mill
Warning
-- Do not use the dry mill to grind very hard ingredients such as nutmeg, Chinese rock sugar and
ice cubes.
-- Do not use the wet mill to mix liquids or to crush ice cubes. Use the blender jar to process
these ingredients.
-- Do not touch the cutting edges of the blade unit when you clean it. The cutting edges are very
sharp and you could easily cut your fingers on them.
Caution
-- Never use the dry mill or wet mill for more than 30 seconds without interruption. Let the dry
mill or wet mill cool down for at least 1 minute between processing batches.
-- Let hot ingredients cool down before you process them in the dry or wet mill (max.
temperature 80°C).
-- Never forget to place the sealing ring in the blade unit before you assemble the mill beaker,
otherwise leakage occurs.
-- Always process cloves, star anise and aniseed together with other ingredients. If processed
separately, these ingredients may attack the plastic materials of the mill.
-- The mill beakers may become discoloured when you use them to process ingredients such as
cloves, anise and cinnamon.
-- The dry mill and wet mill are not suitable for chopping raw meat. Use the blender instead.
-- Do not use the dry mill or wet mill to process liquids such as fruit juice.
-- Do not process dry ingredients such as coffee beans and dried beans in the wet mill.
Filter
Caution
-- Never use the filter to process ingredients hotter than 80°C.
-- Never overload the filter. Do not put more than 70g dried soy beans or 150g fruit in the filter
at the same time.
8
English
-- Always make sure the lid is assembled properly and the measuring cup is inserted properly in
the lid before you switch on the blender.
-- Cut fruit into smaller pieces before you put it in the filter.
-- Soak dried ingredients, such as soy beans, before you put them in the filter.
Built-in safety lock
This feature ensures that you can only switch on the blender if you have properly assembled the
blender jar, the dry mill beaker or the wet mill beaker on the motor unit. If the blender jar or mill
beaker is correctly assembled, the built-in safety lock will be unlocked.
Electromagnetic fields (EMF)
This Philips appliance complies with all standards regarding electromagnetic fields (EMF). If handled
properly and according to the instructions in this user manual, the appliance is safe to use based on
scientific evidence available today.
Before first use
Thoroughly clean the parts that come into contact with food before you use the blender for the
first time (see chapter ‘Cleaning’).
Using the appliance
Blender
The blender jar is intended for fine pureeing, chopping and blending. In the blender jar you can
prepare soups, sauces and milk shakes. You can also use it to process vegetables, fruit, meat, pancake
batter etc.
Preparing the blender jar for use
1 Assemble the sealing ring on the blender blade unit (Fig. 2).
2 Insert the blade unit into the opening in the bottom of the blender jar (1). Screw the blade
unit clockwise onto the bottom of the blender jar (2) until the blade unit it is fixed
properly.  (Fig. 3)
3 Put the blender jar with the blade unit attached on the motor unit and fix it by turning it
clockwise (‘click’).   (Fig. 4)
The blender jar can be mounted in two positions: with the handle on the right side or on the left
side.
4 Put the mains plug in the wall socket.
Using the blender jar
1 Put the ingredients in the blender jar.
2 Assemble the lid on the jar.
3 Insert the measuring cup into the opening in the lid.  (Fig. 5)
4 Turn the control knob to speed 1 or 2.
Turn the control knob to the pulse setting if you want to process ingredients very briefly.
Do not let the blender with the blender jar attached run for more than 3 minutes at a time.
Always let the blender cool down to room temperature after each batch you process.
Tips
-- If you want to crush ice cubes, put not more than 6 ice cubes (of approx. 25x35x25mm) in the
blender jar. Then turn the control knob to pulse position a few times.
English
9
-- Cut meat or other solid ingredients into smaller pieces before putting them in the blender jar.
-- Do not process a large quantity of solid ingredients at the same time. To get good results, we
advise you to process these ingredients in a series of small batches.
-- To make tomato juice, cut the tomatoes in four and drop the pieces through the opening in the
lid onto the rotating blades.
Disassembling the blender jar
1 Remove the mains plug from the wall socket.
2 Remove the lid with the measuring cup from the blender jar.
3 Turn the blender jar with the blade unit attached anticlockwise to remove it from the motor
unit.
4 Clean all removable parts immediately after use (see chapter ‘Cleaning’).
Filter
With the filter you can make delicious fresh fruit juices, cocktails or soy milk. The filter prevents pips
and skins from ending up in your drink.
Never overload the filter. Do not put more than 70g soy beans (unsoaked weight) or 150g fruit
in the filter at the same time.
Preparing the filter for use
1 Mount the blender jar with the blade unit attached on the motor unit and fix it by turning it
clockwise (‘click’) (Fig. 4).
The blender jar can be mounted in two positions: with the handle on the right side or on the left
side.
2 Put the filter in the blender jar (Fig. 6).
Make sure that the grooves of the filter fit exactly onto the ribs inside the blender jar.
3 Put the mains plug in the wall socket.
Using the filter
1 Assemble the lid on the jar.
2 Put the ingredients in the filter.  (Fig. 7)
3 Pour water or another liquid (milk, juice, etc.) into the blender jar.
4 Insert the measuring cup into the hole in the lid.
5 Let the blender run for approx. 40 seconds.
6 Switch off the blender and remove the blender jar with the blade unit attached from the
motor unit.
Do not remove the lid. Leave the measuring cup and the filter in the jar.
7 Turn the lid to the unlock position and pour out the drink through the pouring lip of the
blender jar.  (Fig. 8)
Tip: For optimal results, put the jar with the remaining ingredients back onto the blender and let it run for
a few more seconds.
Note:When you process a large quantity, we advise you not to put all the ingredients in the filter at the
same time. Start to process a small quantity and let the blender run for a few seconds.Then switch off
the blender and add another small quantity. Repeat this procedure until you have processed all the
ingredients. Always keep the lid on the blender jar during processing.
10
English
8 Clean all removable parts immediately after use (see chapter ‘Cleaning’).
Mill
This blender is supplied with two mills:
-- The dry mill (the smaller one) is intended for grinding dry ingredients, such as dried beans, dried
rice, dried shrimps or dry tea leaves.
-- The wet mill (the larger one) is intended for chopping moist ingredients, such as chili paste and
soaked rice.
Using the mill
1 Put the ingredients in the mill beaker (Fig. 9).
Do not fill the mill beaker beyond the MAX indication.
2 Assemble the sealing ring on the blender blade unit (dry mill) or assemble the sealing ring on
the wet mill blade unit (wet mill).  (Fig. 2)
3 Put the dry mill blade unit on the dry mill beaker (1) or put the wet mill blade unit on the
wet mill beaker (1) and screw the blade unit anticlockwise (2) until it is fixed
properly.   (Fig. 10)
4 Turn the assembled mill upside down and screw it clockwise onto the motor unit
(‘click’) (Fig. 11).
5 Put the mains plug in the wall socket.
6 Turn the control knob to the PULSE setting to let the blender run until the ingredients are
fine enough.
This takes approx. 10-30 seconds.
Disassembling the mill
1 Unplug the blender.
2 Screw the mill anticlockwise off the motor unit.
3 Turn the mill upside down and screw the blade unit clockwise off the mill beaker.
4 Clean all removable parts immediately after use (see chapter ‘Cleaning’).
Cleaning
Always unplug the appliance before you clean it.
Never immerse the motor unit in water, nor rinse it under the tap. Do not clean the motor unit
in the dishwasher.
Never use scouring pads, abrasive cleaning agents or aggressive liquids such as petrol or acetone
to clean the appliance.
Tip: Cleaning the blender and its parts is easiest immediately after use.
Easy cleaning
1 Leave the blender jar on the motor unit.
2 Fill the blender jar halfway with water and add a few drops of washing-up liquid.
3 Turn the control knob to the CLEAN/PULSE setting a few times.
4 Remove the blender jar from the motor unit, empty it and rinse it with clean water.
English 11
Thorough cleaning
1 Make sure the blender is unplugged.
2 Disassemble all removable parts.
Do not forget to remove the blender sealing ring.
Do not touch the blades. The blades are very sharp.
3 Clean the motor unit with a moist cloth.
4 Clean the removable parts in hot water with some washing-up liquid.
Note: All parts except the motor unit can be cleaned in the dishwasher
Storage
To store the mains cord, wind it round the base of the motor unit.
Environment
-- Do not throw away the appliance with the normal household waste at the end of its life, but
hand it in at an official collection point for recycling. By doing this, you help to preserve the
environment (Fig. 12).
Guarantee and service
If you need service or information or if you have a problem, please visit the Philips website at www.
philips.com or contact the Philips Consumer Care Centre in your country (you find its phone
number in the worldwide guarantee leaflet). If there is no Consumer Care Centre in your country,
go to your local Philips dealer.
Recipes
Baby food
Note:This recipe can be prepared in the blender jar.
-----
Ingredients
250g cooked chicken meat
250g cooked potatoes
250g green beans
450ml milk
1 Precut the ingredients into pieces of 2x2x2cm.
2 Put all ingredients in the blender jar.
3 Turn the control knob to speed 2 and blend for 75 seconds.
Garam massala
Note:This recipe can be prepared with the dry mill.
-----
Ingredients
10g cloves
10g cinnamon (cut into 1cm pieces)
5g cardamom
10g black pepper
1 Put all ingredients in the dry mill.
12
English
2 Use the PULSE setting to process the ingredients for 30 seconds.
Five spices powder
Note:This recipe can be prepared with the dry mill.
-----
Ingredients
2g aniseed
2g star anise
2g (Chinese) cassia
2g (Chinese) liquorice
1 Put all ingredients in the dry mill.
2 Use the PULSE setting to process the ingredients for 30 seconds.
Thai mosaman curry paste
Note:This recipe can be prepared with the wet mill.
------------
Ingredients
20g shallots
15g garlic
7g galangal (cut into approx. 1cm thick slices)
9g lemon grass
2pcs cloves
1tbsp coriander seeds
1tbsp cumin seeds
3pcs dried chillies
5pcs peppercorns
1tbsp shrimp paste
1tbsp salt
1 Put all ingredients in the wet mill.
2 Use the PULSE setting to process the ingredients for 30 seconds.
Chili paste
Note:This recipe can be prepared with the wet mill.
------
Ingredients
6g dried chili, deseeded
20g fresh chili, deseeded
30g shallots
1pc garlic
1tbsp water
1 Put all ingredients in the wet mill.
2 Use the PULSE setting to process the ingredients for 30 seconds.
Soy milk
Always let the appliance cool down to room temperature after each batch you process.
Ingredients
-- 70g dried soy beans
-- 600ml water
1 Soak the soy beans for 4 hours before you process them. Then let them drain.
English 13
2 Put the soaked soy beans in the filter and pour the water into the blender jar. Blend for 30
seconds.
3 Pour the soy milk into a pan and bring to the boil. Then add some sugar and let the soy milk
simmer until all sugar has dissolved.
4 Serve hot or cold.
Nourishing vegetable soup from Budapest
-----------
Ingredients
100g kohlrabi
150g potatoes
150g celery
50g carrots
100g smoked pork
0.55ltr water
100g lentils (canned)
125g crème fraîche
10g parsley
salt, freshly ground pepper, 1 stock cube, 1 bay leaf
1 Precut the ingredients into pieces of 2x2x2cm.
2 Put the kohlrabi, potatoes, celery, carrots and 0.35ltr water in the blender jar in this order.
Then blend for 30 seconds.
3 Put the blended ingredients in a pan and bring them to boil. Add the rest of the water (0.2ltr),
crème fraîche, lentils, meat, herbs, stock cube and seasonings.
4 Let the soup simmer for 30 minutes. Stir the soup regularly.
14
Français
Introduction
Félicitations pour votre achat et bienvenue dans l’univers Philips ! Pour profiter pleinement de
l’assistance Philips, enregistrez votre produit sur le site à l’adresse suivante : www.philips.com/
welcome.
Description générale (fig. 1)
A
B
C
D
E
F
G
H
I
J
K
L
M
N
Bloc moteur
Bouton de commande avec position Pulse et réglage de la vitesse
Ensemble lames du blender
Bague d’étanchéité du blender
Blender en plastique
Indication du niveau
Couvercle du blender
Ouverture à couvercle
Filtre à fruits
Verre doseur
Bol du moulin à sec
Bol du moulin étanche
Bague d’étanchéité du moulin étanche
Ensemble de lames du moulin étanche
Important
Lisez attentivement ce mode d’emploi avant d’utiliser l’appareil et conservez-le pour un usage
ultérieur.
Général
Danger
-- Ne plongez jamais le bloc moteur dans l’eau, ni dans d’autres liquides et ne le rincez pas.
Nettoyez-le avec un chiffon humide.
Avertissement
-- Avant de brancher l’appareil, vérifiez que la tension indiquée sur l’appareil correspond à la
tension secteur locale.
-- N’utilisez pas l’appareil si la fiche, le cordon d’alimentation ou d’autres pièces sont
endommagées.
-- Si le cordon d’alimentation est endommagé, il doit être remplacé par Philips, par un Centre
Service Agréé Philips ou par un technicien qualifié afin d’éviter tout accident.
-- N’utilisez jamais le bol mélangeur, le bol du moulin à sec ou le bol du moulin étanche pour
mettre en marche ou arrêter le blender.
-- Ne laissez jamais le blender fonctionner sans surveillance.
-- Cet appareil n’est pas destiné à être utilisé par des personnes (notamment des enfants) dont les
capacités physiques, sensorielles ou intellectuelles sont réduites, ou par des personnes manquant
d’expérience ou de connaissances, à moins que celles-ci ne soient sous surveillance ou qu’elles
n’aient reçu des instructions quant à l’utilisation de l’appareil par une personne responsable de
leur sécurité.
-- Veillez à ce que les enfants ne puissent pas jouer avec l’appareil.
-- Ne touchez pas les lames, surtout lorsque le blender est branché, car elles sont très coupantes.
-- Si les lames se bloquent, débranchez toujours le blender avant de retirer les ingrédients à
l’origine du blocage.
-- Assurez-vous que l’ensemble lames est correctement fixé sur le bol mélangeur ou le bol du
moulin avant d’installer celui-ci sur le bloc moteur.
Français 15
Attention
-- Débranchez toujours le blender avant d’installer, de retirer ou de positionner des accessoires sur
le bol mélangeur, le moulin à sec ou le moulin étanche, et avant de le nettoyer.
-- N’utilisez jamais d’accessoires, ni de pièces d’autres fabricants ou qui n’ont pas été
spécifiquement recommandés par Philips. Votre garantie ne sera pas valable en cas d’utilisation
de tels accessoires ou pièces.
-- Ne dépassez pas le niveau maximal indiqué sur le bol mélangeur et les bols du moulin.
Blender
Avertissement
-- Ne mettez jamais vos doigts ou tout autre objet dans le bol mélangeur lorsque le blender est
en cours de fonctionnement.
-- Assurez-vous que l’ensemble lames est correctement fixé sur le blender avant d’installer celui-ci
sur le bloc moteur.
Attention
-- Ne remplissez jamais le blender avec des ingrédients dont la température dépasse 80 °C.
-- Pour éviter tout risque d’éclaboussure, ne versez jamais plus de 1 litre d’ingrédients liquides dans
le bol mélangeur, surtout si vous avez l’intention de les mixer à haute vitesse. Réduisez cette
quantité à 750 ml si vous préparez des ingrédients liquides chauds ou susceptibles de mousser.
-- Si des ingrédients s’accumulent sur les parois du bol mélangeur, éteignez le blender, puis
débranchez-le. Détachez les ingrédients des parois au moyen d’une spatule.
-- Assurez-vous que le couvercle est correctement fixé sur le bol et que la mesure graduée est
correctement insérée dans le couvercle avant de mettre l’appareil en marche.
-- N’oubliez jamais de placer la bague d’étanchéité sur l’ensemble lames avant d’installer l’ensemble
lames sur le bol mélangeur afin d’éviter toute fuite.
-- Ne faites pas fonctionner le blender et le bol mélangeur pendant plus de 3 minutes sans
interruption. Laissez refroidir l’appareil entre deux préparations.
Moulin à sec et le moulin étanche
Avertissement
-- N’utilisez pas le moulin à sec pour moudre des ingrédients très durs tels que la muscade, le
sucre candi et les glaçons.
-- N’utilisez pas le moulin étanche pour mélanger des liquides ou pour obtenir de la glace pilée.
Pour ces ingrédients, utilisez le bol mélangeur.
-- Ne touchez pas les lames de l’ensemble lames lors du nettoyage, au risque de vous blesser.
Attention
-- N’utilisez jamais le moulin à sec ou le moulin étanche pendant plus de 30 secondes sans
interruption. Laissez le moulin refroidir au moins 1 minute entre deux cycles de préparation.
-- Laissez refroidir les aliments chauds avant de les hacher dans le moulin à sec ou étanche
(température max. : 80°C).
-- N’oubliez jamais de placer la bague d’étanchéité sur l’ensemble lames avant d’installer le bol du
moulin afin d’éviter toute fuite.
-- Hachez toujours les clous de girofle, l’anis étoilé et les graines d’anis avec d’autres ingrédients. Si
vous les hachez séparément, ils pourraient rayer le moulin.
-- La couleur du bol du moulin peut s’altérer suite au mixage d’ingrédients tels que les clous de
girofle, l’anis et la cannelle.
-- Le moulin à sec et le moulin étanche ne sont pas appropriés pour hacher de la viande crue.
Utilisez plutôt le blender.
-- N’utilisez pas le moulin à sec ou le moulin étanche pour des préparations liquides telles que les
jus de fruits.
-- Le moulin étanche ne permet pas de mixer des ingrédients secs tels que des grains de café et
des graines séchées.
16
Français
Filtre
Attention
-- N’utilisez jamais le filtre pour préparer des ingrédients dont la température dépasse 80 °C.
-- Ne surchargez pas le filtre. Ne mettez pas plus de 70 g de graines de soja séchées ou 150 g de
fruits à la fois dans le filtre.
-- Assurez-vous que le couvercle est correctement fixé et que la mesure graduée y est
correctement insérée avant de mettre le blender en marche.
-- Coupez les fruits en morceaux avant de les mettre dans le filtre.
-- Faites tremper les ingrédients secs, tels que les graines de soja, avant de les mettre dans le filtre.
Verrou de sécurité intégré
Grâce à cette fonctionnalité, le blender se met en marche uniquement lorsque le bol mélangeur, le
bol du moulin à sec ou étanche est correctement placé sur le bloc moteur. Dans ce cas, le verrou
de sécurité se désactive automatiquement.
Champs électromagnétiques (CEM)
Cet appareil Philips est conforme à toutes les normes relatives aux champs électromagnétiques
(CEM). Il répond aux règles de sécurité établies sur la base des connaissances scientifiques actuelles
s’il est manipulé correctement et conformément aux instructions de ce mode d’emploi.
Avant la première utilisation
Avant la première utilisation, nettoyez soigneusement toutes les pièces en contact avec des aliments
(voir le chapitre « Nettoyage »).
Utilisation de l’appareil
Blender
Le bol mélangeur sert à réduire en purée, à hacher et à mixer. Vous pouvez préparer des soupes,
des sauces et des milk-shakes, mais aussi mixer des légumes, des fruits, de la viande, de la pâte à
crêpes, etc.
Préparation du bol mélangeur
1 Placez la bague d’étanchéité sur l’ensemble lames du blender (fig. 2).
2 Insérez l’ensemble lames au fond du bol mélangeur (1).Vissez l’ensemble lames sur le fond du
bol mélangeur (2), jusqu’à ce qu’il soit correctement fixé.  (fig. 3)
3 Placez le blender et l’ensemble lames sur le bloc moteur et faites tourner le bol dans le sens
des aiguilles d’une montre jusqu’à ce qu’il s’enclenche (clic).  (fig. 4)
Le blender peut être installé de deux façons : poignée sur le côté droit ou gauche.
4 Branchez le cordon d’alimentation sur la prise secteur.
Utilisation du bol mélangeur
1 Placez les ingrédients dans le blender.
2 Placez le couvercle sur le bol.
3 Insérez la mesure graduée dans l’orifice du couvercle.  (fig. 5)
4 Réglez le bouton de commande sur la vitesse 1 ou 2.
Réglez le bouton de commande sur la position Pulse pour mixer des ingrédients très brièvement.
Ne faites pas fonctionner le blender avec le bol mélangeur pendant plus de 3 minutes
consécutives.
Français 17
Laissez toujours le blender refroidir après avoir préparé une portion.
Conseils
-- Pour obtenir de la glace pilée, placez au maximum 6 glaçons (d’environ 25 x 35 x 25 mm) dans
le bol mélangeur, puis réglez le bouton de commande sur la position Pulse à plusieurs reprises.
-- Coupez la viande et les autres aliments solides en morceaux avant de les placer dans le blender.
-- Si vous devez mixer d’importantes quantités d’aliments, il est recommandé de procéder par
petites portions.
-- Pour faire du jus de tomates, coupez les tomates en quatre et insérez les morceaux via l’orifice
du couvercle, directement sur les lames en mouvement.
Démontage du bol mélangeur
1 Retirez le cordon d’alimentation de la prise secteur.
2 Retirez le couvercle et la mesure graduée du blender.
3 Retirez le blender et l’ensemble lames du bloc moteur en faisant tourner le bol dans le sens
inverse des aiguilles d’une montre.
4 Nettoyez toutes les pièces amovibles immédiatement après utilisation (voir le chapitre
« Nettoyage »).
Filtre
Le filtre permet de concocter de délicieux jus de fruits frais, des cocktails ou du lait de soja sans
pépins ni peaux.
Ne surchargez pas le filtre. Ne mettez pas plus de 70 g de graines de soja (pesées séchées) ou
150 g de fruits à la fois dans le filtre.
Préparation du filtre
1 Placez le blender et l’ensemble lames sur le bloc moteur et faites tourner le bol dans le sens
des aiguilles d’une montre jusqu’à ce qu’il s’enclenche (clic) (fig. 4).
Le blender peut être installé de deux façons : poignée sur le côté droit ou gauche.
2 Placez le filtre dans le blender (fig. 6).
Assurez-vous que les rainures du filtre s’insèrent correctement dans les nervures à l’intérieur du
blender.
3 Branchez le cordon d’alimentation sur la prise secteur.
Utilisation du filtre
1 Placez le couvercle sur le bol.
2 Placez les ingrédients dans le filtre.  (fig. 7)
3 Versez de l’eau ou tout autre liquide (lait, jus, etc.) dans le blender.
4 Insérez la mesure graduée dans l’orifice du couvercle.
5 Laissez le blender fonctionner environ 40 secondes.
6 Éteignez le blender et retirez le bol mélangeur et l’ensemble lames du bloc moteur.
Ne retirez pas le couvercle. Laissez la mesure graduée et le filtre dans le bol.
7 Tournez le couvercle de façon à le déverrouiller et versez la boisson par le bec verseur du
bol mélangeur.  (fig. 8)
18
Français
Conseil : Pour obtenir des résultats optimaux, replacez le bol avec les ingrédients restants sur le blender
et faites-le fonctionner encore quelques secondes.
Remarque : Si vous traitez de grandes quantités, il est recommandé de ne pas mettre tous les ingrédients
à la fois dans le filtre. Commencez par une petite portion et faites fonctionner le blender pendant
quelques secondes, puis arrêtez-le et ajoutez une autre portion. Répétez l’opération jusqu’à ce que vous
ayez mixé tous les ingrédients. Ne soulevez jamais le couvercle du bol mélangeur pendant que l’appareil
fonctionne.
8 Nettoyez toutes les pièces amovibles immédiatement après utilisation (voir le chapitre
« Nettoyage »).
Moulin
Ce blender est fourni avec deux moulins :
-- Le moulin à sec (le plus petit) sert à moudre des ingrédients secs tels que des graines séchées,
du riz sec, des crevettes séchées ou des feuilles de thé séchées.
-- Le moulin étanche (le plus grand) sert à hacher des ingrédients humides tels que de la pâte aux
piments ou du riz cuit.
Utilisation du moulin
1 Placez les ingrédients dans le bol du moulin (fig. 9).
Ne remplissez pas le bol du moulin au-delà de l’indication de niveau maximal.
2 Placez la bague d’étanchéité sur l’ensemble lames du blender (moulin à sec) ou placez la
bague d’étanchéité sur l’ensemble lames du moulin étanche (moulin étanche).  (fig. 2)
3 Placez l’ensemble lames du moulin à sec sur le bol du moulin à sec (1) ou placez l’ensemble
lames du moulin étanche sur le bol du moulin étanche (1) et vissez l’ensemble lames dans le
sens inverse des aiguilles d’une montre (2) jusqu’à ce qu’il soit correctement fixé.  (fig. 10)
4 Retournez le moulin, puis vissez-le sur le bloc moteur dans le sens des aiguilles d’une montre
(jusqu’à entendre un clic) (fig. 11).
5 Branchez le cordon d’alimentation sur la prise secteur.
6 Tournez le bouton de commande sur la position Pulse pour faire fonctionner le blender
jusqu’à ce que les ingrédients soient suffisamment fins.
Cette opération dure entre 10 et 30 secondes.
Démontage du moulin
1 Débranchez le blender.
2 Tournez le moulin dans le sens inverse des aiguilles d’une montre pour le retirer du bloc
moteur.
3 Retournez le moulin et tournez l’ensemble lames dans le sens des aiguilles d’une montre
pour le retirer du bol du moulin.
4 Nettoyez toutes les pièces amovibles immédiatement après utilisation (voir le chapitre
« Nettoyage »).
Nettoyage
Débranchez toujours l’appareil avant de le nettoyer.
Français 19
Ne plongez jamais le bloc moteur dans l’eau et ne le rincez pas sous le robinet. Ne passez pas le
bloc moteur au lave-vaisselle.
N’utilisez jamais de tampons à récurer, de produits abrasifs ou de détergents agressifs tels que
l’essence ou l’acétone pour nettoyer l’appareil.
Conseil : Il est recommandé de nettoyer le blender et ses accessoires immédiatement après utilisation.
Nettoyage facile
1 Placez le bol mélangeur sur le bloc moteur.
2 Remplissez le bol mélangeur à moitié d’eau et ajoutez-y quelques gouttes de produit vaisselle.
3 Réglez le bouton de commande sur la position CLEAN/PULSE à quelques reprises.
4 Enlevez le bol mélangeur du bloc moteur, videz-le et le rincez-le avec de l’eau propre.
Nettoyage en profondeur
1 Assurez-vous que le blender est débranché.
2 Retirez toutes les pièces amovibles.
N’oubliez pas de retirer la bague d’étanchéité du blender.
Ne touchez pas les lames, car elles sont très coupantes.
3 Nettoyez le bloc moteur à l’aide d’un chiffon humide.
4 Nettoyez soigneusement les pièces amovibles à l’eau chaude avec un peu de liquide vaisselle.
Remarque :Toutes les pièces, à l’exception du bloc moteur, peuvent être nettoyées au lave-vaisselle.
Rangement
Pour ranger le cordon d’alimentation, enroulez-le autour de la base du bloc moteur.
Environnement
-- Lorsqu’il ne fonctionnera plus, ne jetez pas l’appareil avec les ordures ménagères, mais déposezle à un endroit assigné à cet effet, où il pourra être recyclé. Vous contribuerez ainsi à la
protection de l’environnement (fig. 12).
Garantie et service
Si vous souhaitez obtenir des informations supplémentaires ou faire réparer l’appareil, ou si vous
rencontrez un problème, rendez-vous sur le site Web de Philips à l’adresse www.philips.com ou
contactez le Service Consommateurs Philips de votre pays (vous trouverez le numéro de téléphone
correspondant sur le dépliant de garantie internationale). S’il n’existe pas de
Service Consommateurs Philips dans votre pays, renseignez-vous auprès de votre revendeur Philips
local.
Recettes
Aliments pour bébé
Remarque : La préparation de cette recette peut s’effectuer au moyen du bol mélangeur.
Ingrédients
-- 250 g de poulet cuit
-- 250 g de pommes de terre cuites
-- 250 g de haricots verts
20
Français
-- 450 ml de lait
1 Coupez les ingrédients en petits morceaux de 2 cm environ.
2 Mettez tous les ingrédients dans le bol mélangeur.
3 Tournez le bouton de commande sur la vitesse 2 et mixez pendant 75 secondes.
Garam massala
Remarque : La préparation de cette recette peut s’effectuer au moyen du moulin à sec.
-----
Ingrédients
10 g de clous de girofle
10 g de cannelle (morceaux d’environ 1 cm)
5 g de cardamome
10 g de poivre noir
1 Placez tous les ingrédients dans le moulin à sec.
2 Utilisez la position Pulse pour préparer les ingrédients pendant 30 secondes.
Poudre de 5 épices
Remarque : La préparation de cette recette peut s’effectuer au moyen du moulin à sec.
-----
Ingrédients
2 g de graines d’anis
2 g d’anis étoilé
2 g de cannelle de Chine
2 g de réglisse de Chine
1 Placez tous les ingrédients dans le moulin à sec.
2 Utilisez la position Pulse pour préparer les ingrédients pendant 30 secondes.
Pâte de curry Massaman Thaï
Remarque : La préparation de cette recette peut s’effectuer au moyen du moulin étanche.
------------
Ingrédients
20 g d’échalote
15 g d’ail
7 g de galangal (coupé en tranches d’environ 1 cm)
9 g de citronnelle
2 clous de girofle
1 cuillère à soupe de graines de coriandre
1 cuillère à soupe de graines de cumin
3 piments séchés
5 grains de poivre
1 cuillère à soupe de pâte de crevettes
1 cuillère à soupe de sel
1 Placez tous les ingrédients dans le moulin étanche.
2 Utilisez la position PULSE pour préparer les ingrédients pendant 30 secondes.
Pâte aux piments
Remarque : La préparation de cette recette peut s’effectuer au moyen du moulin étanche.
Ingrédients
-- 6 g de piment séché, épépiné
Français 21
-----
20 g de piment frais, épépiné
30 g d’échalote
1 gousse d’ail
1 cuillère à soupe d’eau
1 Placez tous les ingrédients dans le moulin étanche.
2 Utilisez la position PULSE pour préparer les ingrédients pendant 30 secondes.
Lait de soja
Laissez toujours l’appareil refroidir après avoir préparé une portion.
Ingrédients
-- 70 g de graines de soja séchées
-- 600 ml d’eau
1 Faites tremper les graines de soja pendant au moins 4 heures, puis laissez-les sécher.
2 Placez les graines de soja dans le filtre.Versez l’eau dans le blender, puis mixez pendant
30 secondes.
3 Faites bouillir le lait de soja dans une casserole, ajoutez du sucre et laissez cuire à feu doux
jusqu’à ce que le sucre soit fondu.
4 Servez chaud ou froid.
Soupe de légumes de Budapest
-----------
Ingrédients
100 g de chou-rave
150 g de pommes de terre
150 g de céleri
50 g de carottes
100 g de porc fumé
0,55 l d’eau
100 g de lentilles (en conserve)
125 g de crème fraîche
10 g de persil
Sel, poivre frais, 1 bouillon-cube, 1 feuille de laurier
1 Coupez les ingrédients en petits morceaux de 2 cm environ.
2 Introduisez, dans l’ordre, le chou-rave, les pommes de terre, le céleri, les carottes et 0,35  l
d’eau dans le blender. Mixez pendant 30 secondes.
3 Placez les ingrédients préparés dans une casserole et portez à ébullition. Ajoutez le reste de
l’eau (0,2 l), la crème fraîche, les lentilles, la viande, les herbes, le bouillon-cube et les
assaisonnements.
4 Laissez mijoter pendant 30 minutes. Remuez régulièrement.
22
한국어
소개
필립스 제품을 구입해 주셔서 감사합니다! 필립스가 드리는 지원 혜택을 받으실 수
있도록 www.philips.co.kr에서 제품을 등록하십시오.
각 부의 명칭 (그림 1)
A
B
C
D
E
F
G
H
I
J
K
L
M
N
본체
순간작동 설정 및 속도 설정을 갖춘 속도 조절기
블렌더 칼날
블렌더 봉합 링
플라스틱 블렌더용기
용량 표시
블렌더 용기 뚜껑
덮개 구멍
과즙 필터
계량컵
마른 재료용 분쇄기 용기
젖은 재료용 분쇄기 용기
젖은 재료용 분쇄기 봉합 링
젖은 재료용 분쇄기 칼날
중요 사항
본 제품을 사용하기 전에 이 사용 설명서를 주의 깊게 읽고 나중에 참조할 수 있도록 잘
보관하십시오.
일반
위험
-- 절대로 본체를 물 또는 다른 액체에 넣거나 흐르는 수돗물로 세척하지 마십시오.
본체를 청소할 경우에는 젖은 천을 사용하십시오.
경고
-- 제품에 전원을 연결하기 전에, 제품에 표시된 전압과 사용 지역의 전압이 일치하는지
확인하십시오.
-- 플러그, 전원 코드 또는 기타 부품이 손상된 경우에는 제품을 사용하지 마십시오.
-- 전원 코드가 손상된 경우, 안전을 위해 필립스 서비스 센터 또는 필립스 서비스
지정점에 의뢰하여 교체하십시오.
-- 블렌더 용기, 마른 재료용 분쇄기 용기 또는 젖은 재료용 분쇄기 용기를 이용하여
전원을 켜거나 끄지 마십시오.
-- 블렌더가 작동 중일 때는 자리를 비우지 마십시오.
-- 신체적인 감각 및 정신적인 능력이 떨어지거나 경험과 지식이 풍부하지 않은 성인 및
어린이는 혼자 제품을 사용하지 말고 제품 사용과 관련하여 안전에 책임 질 수
있도록 지시사항을 충분히 숙지한 사람의 도움을 받으십시오.
-- 어린이가 제품을 가지고 놀지 못하도록 지도해 주십시오.
-- 특히 블렌더가 전원에 연결되어 있을 때는 칼날을 만지지 마십시오. 칼날은 매우
날카롭습니다.
-- 칼날에 음식물이 끼어 움직이지 않으면 먼저 전원 코드를 뽑은 다음, 칼날의
움직임을 방해하는 음식물을 꺼내십시오.
-- 블렌더 용기나 분쇄기 용기를 본체에 조립하기 전에 칼날이 블렌더 용기 또는 분쇄기
용기에 단단히 고정되어 있는지 확인하십시오.
주의
-- 블렌더 용기, 마른 재료용 분쇄기, 젖은 재료용 분쇄기를 분리, 조립 및 조정하기
전과 블렌더를 세척하기 전에 반드시 블렌더의 전원 코드를 뽑으십시오.
한국어 23
-- 다른 제조업체에서 만들었거나 필립스에서 권장하지 않은 제품 액세서리 또는
부품은 절대 사용하지 마십시오. 이러한 액세서리나 부품을 사용했을 경우에는 품질
보증이 무효화됩니다.
-- 블렌더 용기 및 분쇄기 용기의 최대 수량 표시선을 초과하지 마십시오.
블렌더
경고
-- 블렌더가 작동 중일 때는 절대로 블렌더 용기 내부에 손이나 다른 물건을 넣지
마십시오.
-- 블렌더 용기를 본체에 조립하기 전에 칼날이 블렌더 용기에 단단히 고정되어 있는지
확인하십시오.
주의
-- 블렌더 용기에 80°C 이상 되는 재료를 절대 넣지 마십시오.
-- 특히 고속으로 작동할 경우, 내용물이 흘러나오지 않도록 블렌더 용기에 액체를
1000ml 이상 넣지 마십시오. 뜨거운 액체 또는 거품을 내는 재료인 경우에는 블렌더
용기에 750ml 이상 넣지 마십시오.
-- 음식이 블렌더 용기의 벽면에 붙으면 블렌더의 전원을 끄고 전원 코드를 뽑은 후
주걱을 사용하여 벽면에 붙은 음식을 떼어내십시오.
-- 제품의 전원을 켜기 전에 뚜껑을 용기에 제대로 조립하고 계량컵을 올바르게
꽂았는지 확인하십시오.
-- 재료가 누출되는 것을 방지하기 위해, 칼날을 블렌더 용기에 조립하기 전에 봉합
링이 장착되었는지 반드시 확인하십시오.
-- 블렌더 용기를 장착해서 한 번에 3분 이상 제품을 작동하지 마십시오. 작동 중간에
제품을 실내 온도와 비슷해질 때까지 식혀주십시오.
마른 재료와 젖은 재료 모두 사용 가능
경고
-- 넛맥, 중국산 암염 또는 얼음 조각과 같이 매우 단단한 재료를 마른 재료용 분쇄기로
갈지 마십시오.
-- 액체를 섞거나 각얼음을 분쇄하는 데 젖은 재료용 분쇄기를 사용하지 마십시오.
이러한 재료는 블렌더 용기를 사용하십시오.
-- 칼날을 세척할 경우, 날카로운 부분을 만지지 않도록 주의하십시오. 칼날이 매우
날카롭기 때문에 손을 다칠 위험이 있습니다.
주의
-- 마른 재료용 또는 젖은 재료용 분쇄기를 연속해서 30초 이상 작동시키지 마십시오.
가공 과정 중간에 마른 재료용 또는 젖은 재료용 분쇄기를 최소 1분 정도 식혀
주십시오.
-- 뜨거운 재료는 마른 재료용 또는 젖은 재료용 분쇄기에 넣기 전에 충분히 식히십시오
(최고 온도 80°C).
-- 재료가 누출되는 것을 방지하기 위해, 분쇄기 용기를 조립하기 전에 칼날 위에 봉합
링을 끼우는 것을 잊지 마십시오.
-- 정향, 스타 아니스 및 아니스는 항상 다른 재료와 함께 가공하십시오. 따로 넣으면 이
재료들이 분쇄기의 플라스틱 부품에 손상을 줄 수 있습니다.
-- 정향, 아니스 및 계피 같은 재료들을 분쇄기로 가공하면 분쇄기 용기의 색상이 변할
수도 있습니다.
-- 마른 재료용 또는 젖은 재료용 분쇄기는 날고기를 다지는데 적합하지 않습니다. 대신
블렌더를 사용하십시오.
-- 과일 주스와 같은 액체를 만들 때는 마른 재료용 또는 젖은 재료용 분쇄기를
사용하지 마십시오.
-- 커피 원두와 마른 콩 같은 건조한 재료를 젖은 재료용 분쇄기에 넣고 작동하지
마십시오.
24
한국어
필터
주의
-- 80°C 이상의 재료 가공시에는 절대로 필터를 사용하지 마십시오.
-- 필터를 무리하게 사용하지 마십시오. 한 번에 70g 이상의 말린 콩 또는 150g의
과일을 넣지 마십시오.
-- 블렌더의 전원을 켜기 전에 용기 뚜껑을 제대로 닫았는지, 그리고 계량컵을 올바르게
꽂았는지 확인하십시오.
-- 과일은 잘게 잘라 필터 안에 넣으십시오.
-- 콩과 같은 마른 음식 재료를 필터에 넣기 전에 우선 물에 담궈서 불리십시오.
내장된 안전 잠금 장치
이 기능은 블렌더 용기나 마른 재료용 또는 젖은 재료용 분쇄기 용기를 제품에 올바르게
장착한 경우에만 작동하며, 블렌더 용기 또는 분쇄기 용기가 올바르게 조립된 경우에만
내장된 안전 잠금 장치가 해제됩니다.
EMF(전자기장)
이 필립스 제품은 EMF(전자기장)와 관련된 모든 기준을 준수합니다. 이 사용 설명서의
지침에 따라 적절하게 취급할 경우 이 제품은 안전하게 사용할 수 있으며 이는
현재까지의 과학적 증거에 근거하고 있습니다.
최초 사용 전
블렌더를 처음 사용하기 전에 음식과 닿는 부품은 깨끗이 세척하십시오(‘청소’란
참조).
제품 사용
블렌더
블렌더 용기는 고운 퓨레를 만들고 재료를 다지고 혼합하기 위한 제품입니다. 블렌더
용기를 이용해 수프와 소스, 밀크쉐이크를 만들 수 있습니다. 또한 야채, 과일, 고기
그리고 팬케익 반죽 등을 만들 수 있습니다.
블렌더 용기 사용 전 준비
1블렌더 칼날부에 봉합링을 조립하십시오 (그림 2).
2칼날을 블렌더 용기 바닥에 넣고(1) 칼날이 올바르게 고정될 때까지 시계 방향으로
돌려 고정하십시오(2).  (그림 3)
3칼날을 조립한 블렌더 용기를 본체에 놓고 시계 방향으로 돌려 고정하십시오(‘
딸각’ 소리가 남).  (그림 4)
블렌더 용기는 손잡이가 오른쪽 또는 왼쪽, 양쪽 방향으로 고정할 수 있습니다.
4전원 플러그를 벽면 콘센트에 꽂으십시오.
블렌더 용기 사용 방법
1재료를 블렌더 용기에 넣으십시오.
2용기에 뚜껑을 덮으십시오.
3계량컵을 뚜껑 입구에 꽂으십시오.  (그림 5)
4속도 조절기를 1 또는 2로 돌리십시오.
재료를 짧은 시간에 섞는 경우, 속도 조절기를 순간작동 설정으로 돌리십시오.
칼날을 장착한 블렌더를 한 번에 3분 이상 작동하지 마십시오.
한국어 25
여러 번 작동할 경우 매 사용 후에는 블렌더를 실내 온도와 비슷해질 때까지 식혀
주십시오.
도움말
-- 조각 얼음을 분쇄하고 싶을 때는 조각 얼음(약 25x35x25mm) 6개 이하를 블렌더
용기에 넣고 속도 조절기를 순간작동 위치로 여러 차례 돌리십시오.
-- 육류나 기타 단단한 재료는 블렌더 용기에 넣기 전에 잘게 잘라 주십시오.
-- 단단한 재료를 한 번에 너무 많이 조리하지 마십시오. 조금씩 여러 번에 나누어서
가공하는 것이 좋습니다.
-- 토마토 주스를 만들려면 토마토를 네 조각으로 잘라 뚜껑의 구멍을 통해 회전하는
칼날 위에 떨어뜨리십시오.
블렌더 용기 분리
1벽면 콘센트에서 전원 플러그를 뽑으십시오.
2블렌더 용기에서 계량컵이 있는 뚜껑을 여십시오.
3칼날이 부착된 블렌더 용기를 시계 반대 방향으로 돌려 본체에서 분리하십시오.
4사용 후에는 분리 가능한 모든 부품을 세척하십시오(‘청소’란 참조).
필터
필터를 사용하여 신선한 과일 주스, 칵테일 또는 두유를 만들 수 있습니다. 이 필터는
씨나 껍질 등이 음료 안으로 섞이는 것을 방지합니다.
필터를 무리하게 사용하지 마십시오. 한 번에 70g(건조 중량) 이상의 불린 대두 또는
150g 이상의 과일을 넣지 마십시오.
필터 사용 전 준비
1칼날을 조립한 블렌더 용기를 본체에 놓고 시계 방향으로 돌려 고정하십시오(‘
딸각’ 소리가 남) (그림 4).
블렌더 용기는 손잡이가 오른쪽 또는 왼쪽, 양쪽 방향으로 고정할 수 있습니다.
2블렌더 용기에 필터를 넣으십시오 (그림 6).
필터의 홈 부위가 블렌더 용기 안쪽의 돌출부에 정확히 끼워지도록 하십시오.
3전원 플러그를 벽면 콘센트에 꽂으십시오.
필터 사용 방법
1용기에 뚜껑을 덮으십시오.
2재료를 필터안에 넣으십시오.  (그림 7)
3블렌더 용기에 물 또는 기타 액체(우유, 쥬스 등)를 부으십시오.
4뚜껑에 있는 구멍에 계량컵을 끼우십시오.
5약 40초 동안 작동시키십시오.
6블렌더의 전원을 끄고, 칼날을 조립한 블렌더 용기를 본체에서 분리하십시오.
뚜껑을 분리하지 마시고 계량컵 및 필터는 그대로 두십시오.
7뚜껑을 ‘열림’ 상태로 돌리고 블렌더 용기의 주입구로 음료를 부어주십시오.  (
그림 8)
도움말: 최상의 결과를 얻으려면 남은 재료를 다시 용기에 넣고 블렌더에 꽂은 다음 몇
초간 작동하십시오.
26
한국어
참고: 많은 양을 가공할 때는 필터에 모든 재료를 한꺼번에 넣지 마십시오. 소량만 넣고
잠깐 동안 블렌더를 작동하여 가공한 다음 블렌더를 끄고 소량을 더 넣으십시오. 이
방법을 반복하여 모든 재료를 가공하십시오. 가공 중에는 절대로 용기의 뚜껑을 열지
마십시오.
8사용 후에는 분리 가능한 모든 부품을 세척하십시오(‘청소’란 참조).
분쇄기
이 블렌더에는 두 종류의 분쇄기가 제공됩니다.
-- 마른 재료용 분쇄기(작은 쪽)는 마른 콩, 쌀, 새우나 찻잎과 같은 건조한 재료를
으깨는 데 사용됩니다.
-- 젖은 재료용 분쇄기(큰 쪽)는 칠리 소스나 불린 쌀과 같은 젖은 재료를 으깨는 데
사용됩니다.
분쇄기 사용 방법
1분쇄기 용기에 재료를 넣으십시오 (그림 9).
분쇄기 용기의 최대량 표시인 MAX 눈금 이상으로 재료를 넣지 마십시오.
2블렌더 칼날(마른 재료용 분쇄기용)이나 젖은 재료용 분쇄기 칼날(젖은 재료용
분쇄기용)에 봉합 링을 끼우십시오.  (그림 2)
3마른 재료용 분쇄기 칼날을 마른 재료용 분쇄기 용기에(1), 젖은 재료용 분쇄기
칼날을 젖은 재료용 분쇄기 용기에 끼우고(1) 칼날이 올바르게 고정될 때까지 시계
반대 방향으로 돌려 고정하십시오(2).  (그림 10)
4조립된 분쇄기를 거꾸로 들고 시계 방향으로 돌려 본체에 고정하십시오 (‘찰칵’
소리가 남) (그림 11).
5전원 플러그를 벽면 콘센트에 꽂으십시오.
6순간작동 설정으로 속도 조절기를 돌려 재료가 충분히 갈릴 때까지 블렌더를
작동하십시오.
이 작업은 약 10초에서 30초 정도 소요됩니다.
분쇄기 분리
1블렌더의 코드를 뽑으십시오.
2분쇄기를 시계 반대 방향으로 돌려 본체를 분리합니다.
3분쇄기를 거꾸로 들고 칼날을 시계 방향으로 돌려 분쇄기 용기를 분리하십시오.
4사용 후에는 분리 가능한 모든 부품을 세척하십시오(‘청소’란 참조).
청소
제품을 청소하기 전에는 항상 제품의 전원 코드를 뽑으십시오.
본체는 절대로 물에 담그거나 헹구지 마십시오. 또한, 식기세척기로 본체를 세척하지
마십시오.
제품을 세척할 때 수세미, 연마성 세제나 휘발유, 아세톤과 같은 강력 세제를 사용하지
마십시오.
도움말: 사용 후 바로 블렌더와 부품을 청소하는 것이 가장 편리합니다.
손쉬운 청소
1블렌더 용기를 본체에 그대로 두십시오.
2블렌더 용기에 미지근한 물을 반 정도 채우고 세제를 몇 방울 넣으십시오.
한국어 27
3속도 조절기를 세척/순간작동 설정으로 몇 번 돌리십시오.
4블렌더 용기를 본체에서 분리하고, 속을 비운 후 깨끗한 물로 헹구십시오.
꼼꼼하게 청소하기
1전원 플러그가 분리되어 있는지 확인하십시오.
2분리 가능한 부품을 모두 분리하십시오.
블렌더 고무 봉합 링을 분리하는 것을 잊지 마십시오.
칼날부를 만지지 마십시오. 매우 날카롭습니다.
3본체는 젖은 천으로 닦으십시오.
4분리 가능한 부품을 소량의 세제와 따뜻한 물로 닦으십시오.
참고: 본체를 제외한 모든 부품은 식기세척기를 사용하여 세척할 수 있습니다.
저장
전원 코드를 보관하려면 본체 하단에 감아주십시오.
환경
-- 수명이 다 된 제품은 일반 가정용 쓰레기와 함께 버리지 마시고 지정된 재활용 수거
장소에 버리십시오. 이런 방법으로 환경 보호에 동참하실 수 있습니다 (그림 12).
품질 보증 및 서비스
보다 자세한 정보가 필요하시거나, 사용상의 문제가 있을 경우에는 필립스전자 홈페이지
(www.philips.co.kr)를 방문하시거나 필립스 고객 상담실로 문의하십시오. 전국
서비스센터 안내는 제품 보증서를 참조하십시오. *(주)필립스전자: (02)709-1200 *
고객 상담실: (080)600-6600(수신자부담)
요리법
이유식
참고: 이 요리는 블렌더 용기로 조리할 수 있습니다.
-----
재료
삶은 닭고기 250g
삶은 감자 250g
깍지콩 250g
우유 450ml
1재료를 2x2x2cm 크기로 미리 썰어 놓습니다.
2블렌더 용기에 모든 재료를 넣으십시오.
3속도 조절기를 2로 돌리고 75초 동안 갈아주십시오.
가람 마살라
참고: 이 요리법은 마른 재료용 분쇄기로 조리할 수 있습니다.
-----
재료
정향 10g
계피 10g(1cm 크기로 자름)
소두구 5g
후추 10g
28
한국어
1마른 재료용 분쇄기에 모든 재료를 넣으십시오.
2순간작동 설정을 사용해서 재료를 30초간 갈아주십시오.
오향 가루
참고: 이 요리법은 마른 재료용 분쇄기로 조리할 수 있습니다.
-----
재료
아니스 2g
스타아니스 2g
계피 2g
감초 2g
1마른 재료용 분쇄기에 모든 재료를 넣으십시오.
2순간작동 설정을 사용해서 재료를 30초간 갈아주십시오.
태국 모사만 커리 소스
참고: 이 요리법은 젖은 재료용 분쇄기로 조리할 수 있습니다.
------------
재료
샬롯(작은 양파) 20g
마늘 15g
양강근 7g(약 1cm 두께로 자름)
레몬그라스 9g
정향 2조각
고수 씨앗 1큰스푼
쿠민 씨앗 1큰스푼
마른 고추 3조각
통후추 5조각
새우 페이스트 1큰스푼
소금 1큰스푼
1젖은 재료용 분쇄기에 모든 재료를 넣으십시오.
2순간작동 설정을 사용해서 재료를 30초간 갈아주십시오.
칠리 소스
참고: 이 요리법은 젖은 재료용 분쇄기로 조리할 수 있습니다.
------
재료
씨를 뺀 마른 칠리 6g
씨를 뺀 신선한 칠리 20g
샬롯(작은 양파) 30g
마늘 1조각
물 1큰스푼
1젖은 재료용 분쇄기에 모든 재료를 넣으십시오.
2순간작동 설정을 사용해서 재료를 30초간 갈아주십시오.
두유
여러번 작동할 경우 매 사용 후에는 제품을 실내 온도와 비슷해질 때까지 식혀 주십시오.
재료
-- 말린 콩 70g
한국어 29
-- 물 600ml
1요리하기 전에 콩을 4시간 동안 불린 다음 물기를 빼십시오.
2불린 대두를 필터 안에 넣으십시오. 블렌더 용기에 물을 붓고 30초 동안
갈아주십시오.
3냄비에 두유를 붓고 끓인 다음, 일정량의 설탕을 넣고 설탕이 녹을 때까지
끓이십시오.
4뜨겁거나 차게 해서 드십시오.
헝가리식 영양 야채 스프
-----------
재료
양배추(콜라비) 100g
감자 150g
셀러리 150g
당근 50g
훈제 돼지 고기100g
물 0.55 리터
렌틸콩(통조림) 100g
크렘 프레시 125g
파슬리 10g
소금, 가는 후추, 스프용 고기 1개, 말린 월계수 잎 1개
1재료를 2x2x2cm 크기로 미리 썰어 놓습니다.
2둥근 양배추, 감자, 셀러리, 당근과 0.35 리터의 물을 순서대로 블렌더 용기에 넣고
30초 동안 섞으십시오.
3냄비에 혼합된 재료를 넣고 끓이십시오. 남은 물(0.2 리터)과, 크렘 프레시, 렌틸콩,
고기 허브, 스프용 고기 및 조미료를 넣습니다.
430분간 스프를 끓이는 동안 간간이 휘저어 주시십시오.
30
简体中文
简介
感谢您的惠顾,欢迎光临飞利浦!为了您能充分享受飞利浦提供的支持,请在 www.
philips.com/welcome 上注册您的产品。
一般说明 (图 1)
A
B
C
D
E
F
G
H
I
J
K
L
M
N
马达组件
带有暂动设定和速度设定的控制钮
搅拌杯刀片组件
搅拌杯密封圈
塑料搅拌杯
水位标记
搅拌杯盖
搅拌杯上盖设加料口
果汁过滤网
量杯
干磨杯
湿磨杯
湿磨杯密封圈
湿磨杯刀片组件
注意事项
使用本产品之前,请仔细阅读本使用说明书,并妥善保管以备日后参考。
概述
危险
-- 切勿将马达浸入水或其他液体中,也不要在自来水下冲洗。只能用湿布擦洗马达装
置。
警告
-- 在将产品连接电源之前,请先检查产品所标电压与当地的供电电压是否相符。
-- 如果插头、电源线或其它部件受损,则不要使用产品。
-- 如果电源软线损坏,为了避免危险,必须由制造商、其维修部或类似部门的专业人员
来更换。
-- 切勿使用搅拌杯、干磨杯或湿磨杯打开和关闭搅拌机。
-- 切勿让搅拌机在无人看管的情况下运行。
-- 本产品不打算肢体不健全、感觉或精神上有障碍或缺乏相关经验和知识的人(包括儿
童)使用,除非有负责他们安全的人对他们使用本产品进行监督或指导。
-- 应照看好儿童,确保他们不玩耍该产品。
-- 请勿触摸刀片,特别是搅拌机插在电源上时。刀片非常锋利。
-- 如果刀片被卡住,请先拔下搅拌机的电源插头,然后清除堵塞刀片的物料。
-- 确保已装刀片组件牢固地固定在搅拌杯或碾磨杯上,再将搅拌杯或碾磨杯组装到马达
装置。
注意
-- 在拆、装或调校搅拌杯、干磨器或湿磨器以及开始清洗搅拌机之前,务必拔下电源插
头。
-- 切勿使用其它制造商生产的或未经飞利浦特别推荐的附件或部件。如果您使用了此类
附件或部件,则本产品的保修将会失效。
-- 不要超出搅拌杯和碾磨杯上所标注的最大刻度。
简体中文 31
搅拌机
警告
-- 在搅拌机运转时,切勿将手指或其它物体伸入搅拌杯中。
-- 将搅拌杯装在马达装置上之前,请确保刀片组件已牢牢固定在搅拌杯上。
注意
-- 切勿将温度超过 80°C 的物料装入搅拌杯。
-- 为避免物料溢出,搅拌杯中的液体不能超过 1 升。特别是高速加工时,更不能超过这
个量。加工热液体或可能产生泡沫的物料时,搅拌杯中的物料不能超过 750 毫升。
-- 如果食物粘在搅拌杯壁上,请关闭搅拌机并拔下搅拌机电源。然后使用刮铲去除杯壁
上的食物。
-- 在打开产品电源之前,应始终确保杯盖已正确安装在搅拌杯上,量杯也正确插入盖子
中。
-- 将刀片组件安装在搅拌杯上之前,千万别忘了在刀片组件上放密封圈,否则会引起泄
漏。
-- 请勿让装有搅拌杯的搅拌机一次运行超过 3 分钟。应让搅拌机冷却至室温再开始下一
次操作。
干磨器和湿磨器
警告
-- 不要用干磨器碾碎非常硬的原料,如肉豆蔻、冰糖和冰块等。
-- 湿磨器不可用于混合液体或碾碎冰块。请使用搅拌杯加工这些物料。
-- 清洗时切勿接触碾磨器刀片组件的刀刃。刀刃非常锋利,很容易割伤手指。
注意
-- 切勿不间断使用干磨器或湿磨器超过 30 秒。加工每批原料的间隙,应让干磨器或湿磨
器至少冷却 1 分钟。
-- 在干磨器或湿磨器中加工热食材之前,应先让热原料冷却(温度最多 80°C)。
-- 装上碾磨杯之前,切勿忘记在刀片部件上装上密封环,否则会发生泄漏。
-- 丁香、八角茴香和茴香籽必须和别的物料一起加工。否则可能会磨损碾磨器的塑料材
料。
-- 使用碾磨杯加工丁香、茴香和肉桂这些原料时,碾磨杯可能会变色。
-- 干磨器和湿磨器不适用于切生肉。应使用搅拌机。
-- 不要使用干磨器或湿磨器来加工果汁等液体。
-- 请勿在湿磨器中加工干的物料,例如咖啡豆和干大豆。
过滤网
------
注意
切勿用过滤网加工温度高于 80°C 的原料。
切勿将过量的物料装入过滤器中。一次不能超过 70 克的干大豆或 150 克的水果。
在打开搅拌机电源之前,应始终确保盖子安装正确,并且量杯也正确插入盖子中。
水果在放入过滤网之前,需切成小块。
干物料在装入过滤网之前,必须先泡软,如大豆。
内置安全锁
此功能可确保您仅在搅拌杯、干磨杯或湿磨杯正确装到马达装置的情况下打开搅拌机。如
果搅拌杯或碾磨杯正确组装,内置安全锁将会解锁。
电磁场 (EMF)
本飞利浦产品符合关于电磁场 (EMF) 的所有相关标准。据目前的科学证明,如果正确使用
并按照本用户手册中的说明进行操作,本产品是安全的。
32
简体中文
首次使用之前
在初次使用搅拌机之前,请彻底清洗与食品接触的部件(见“清洁”一章)。
使用本产品
搅拌机
搅拌杯可用于制作菜泥、切块和搅拌。搅拌杯还可用于准备汤、酱和奶昔。您还可以用搅
拌杯加工蔬菜、水果、肉和薄饼面糊等等。
搅拌杯使用准备
1将密封圈安装在搅拌杯刀片组件上。 (图 2)
2将刀片组件插入搅拌杯底部的开口 (1)。将刀片组件顺时针拧到搅拌杯底部 (2) 直到完
全固定。  (图 3)
3将带有刀片组件的搅拌杯安装在马达装置上,顺时针转动将其固定(可听到“咔
哒”一声)。  (图 4)
搅拌杯可通过两种方式安装:手柄在右侧或者手柄在左侧。
4将电源插头插入插座。
使用搅拌杯
1将原料放入搅拌杯。
2将杯盖装到搅拌杯上。
3将量杯插入盖子的开口。  (图 5)
4将控制按钮转到速度 1 或 2。
如果想快速加工物料,则将控制旋钮旋至暂动设置。
不要让装上了搅拌杯的搅拌机一次运转超过 3 分钟。
每加工一批物料之后,应始终让搅拌机冷却至室温。
提示
-- 如果要碾碎冰块,向搅拌杯中放入不多于 6 块的冰块(大约 25x35x25mm),然后将
控制按钮旋转到暂动位置几次。
-- 肉或其它固体物料要先切成小块,再放入搅拌杯中。
-- 不要一次加工很多固体物料。为得到好的效果,建议您将物料分批加工。
-- 做蕃茄汁时,先将蕃茄切成四瓣,然后通过盖上的开口将蕃茄瓣放到旋转刀片上。
拆卸搅拌杯
1将插头从电源插座中拔下:
2从搅拌杯上取下盖子和量杯。
3从马达装置上逆时针转动并取下搅拌杯及其附带的刀片组件。
4使用之后立即清洁所有可拆卸部件(见“清洁”一章)。
过滤网
用此过滤网可以做出美味的新鲜果汁、鸡尾酒和豆浆。它能防止果核和果皮混入饮料中。
切勿在过滤网中装入过量的物料。一次不能超过 70 克(浸泡前的重量)的大豆或 150 克
的水果。
简体中文 33
过滤网使用准备
1将带有刀片组件的搅拌杯安装在马达装置上,顺时针转动将其固定(可听到“咔
哒”一声)。 (图 4)
搅拌杯可通过两种方式安装:手柄在右侧或者手柄在左侧。
2将过滤网放入搅拌杯。 (图 6)
确保过滤器上的凹槽正好对准搅拌杯内的塑料凸槽。
3将电源插头插入插座。
使用过滤网
1将杯盖装到搅拌杯上。
2将物料倒入过滤网。  (图 7)
3将水或其它液体(牛奶、果汁等)倒入搅拌杯。
4将量杯插入盖子上的孔内。
5让搅拌机运转约 40 秒。
6关闭搅拌机并从马达装置上取下装有刀片组件的搅拌杯。
请勿取下盖子。将量杯和滤网留在搅拌杯中。
7将盖子旋到解锁位置,并通过搅拌杯的出液口倒出饮料。  (图 8)
提示: 要获得最佳效果,可将装有剩余原料的搅拌杯重新放回到搅拌机上,并让其再运转
数秒钟。
注意: 加工大量原料时,建议您不要一次放入全部原料。首先加工一小部分原料,让搅拌
机运转几秒钟,然后关闭搅拌机,再加入一小部分原料。重复这一过程,直至加工完所有
的原料。加工过程中盖子应始终盖在搅拌杯上。
8使用之后立即清洁所有可拆卸部件(见“清洁”一章)。
干磨器
此搅拌机随附两个碾磨器:
-- 干磨器(小号)用于碾磨干大豆、炒米、虾米或干茶叶等干原料。
-- 湿磨器(大号)用于剁碎辣椒酱和泡饭等湿材料。
使用碾磨器
1将物料放入碾磨杯。 (图 9)
切勿超过 MAX 最高刻度。
2将密封圈装到搅拌机刀片组件(干磨器)或将密封圈将到湿磨器刀片组件(湿磨器)
上。  (图 2)
3将干磨器刀片组件装到干磨杯 (1) 或将湿磨器刀片组件装到湿磨杯 (1) 上,然后逆时针
拧紧刀片组件 (2),直到其正确固定。  (图 10)
4将安装好的碾磨器翻转过来,顺时针拧到马达装置上(可听到“咔哒”一
声)。 (图 11)
5将电源插头插入插座。
6将控制旋钮旋到“PULSE“(暂动)设置,使搅拌机运转,直到原料足够细。
这需要大约 10-30 秒。
34
简体中文
拆卸碾磨器
1拔掉搅拌机插头。
2将碾磨器从马达装置上逆时针拧掉。
3将碾磨器翻转过来,顺时针拧动刀片组件将其从碾磨杯上卸下。
4使用之后立即清洁所有可拆卸部件(见“清洁”一章)。
清洁
清洁产品前,务必先将电源插头拔掉。
切勿将马达装置浸入水中或在水龙头下冲洗。不要在洗碗机中清洗马达装置。
不要使用钢丝绒、研磨性清洁剂或腐蚀性液体(例如汽油或丙酮)来清洁产品。
提示: 使用后立即清洗搅拌机及其部件最为容易。
方便清洁
1将搅拌杯放在马达装置上。
2在搅拌杯中装入半杯水,再加入几滴洗涤剂。
3将控制旋钮旋至“CLEAN/PULSE”(清洁/暂动)设置数次。
4将搅拌杯从马达装置上取下,倒掉里面的水,再用干净的水冲洗搅拌杯。
彻底清洁
1确保已经拔下搅拌机的电源插头。
2卸除所有可拆卸部件。
请勿忘记卸除搅拌机密封圈。
请勿触碰刀片。刀片非常锋利。
3用湿布清洁马达装置。
4用热水和一些洗涤剂清洗可拆卸部件。
注意: 除马达装置之外的所有部件均可以用洗碗机清洗
存储
要存放电源线,请将其缠绕在马达装置的底座上。
环保
-- 弃置产品时,请不要将其与一般生活垃圾堆放在一起;应将其交给官方指定的回收
点。这样做有利于环保。 (图 12)
保修和服务
如果您需要服务或信息,或者有任何疑问,请访问飞利浦网站:www.philips.com。您也
可与您所在地的飞利浦客户服务中心联系(可从全球保修卡中找到其电话号码)。如果您
的所在地没有飞利浦顾客服务中心,则可以与当地的飞利浦经销商联系。
食谱
婴儿食物
注意: 以下是可以使用搅拌杯准备的食谱。
简体中文 35
-----
原料
250 克熟鸡肉
250 克煮熟的土豆
250 克绿豆
450 毫升牛奶
1将原料预先切成 2x2x2cm 见方的小块。
2将所有原料放到搅拌杯中。
3将控制旋钮旋到 2 档速度并搅拌 75 秒。
麻辣沙拉
注意: 以下是可以使用干磨器准备的食谱。
-----
原料
10 克丁香
10 克肉桂(切成 1 厘米见方)
5 克小豆蔻
10 克黑胡椒
1将所有原料放入干磨杯。
2使用“PULSE”(暂动)设置加工原料 30 秒。
五香粉
注意: 以下是可以使用干磨器准备的食谱。
-----
原料
2 克茴香
2 克八角
2 克肉桂
2 克甘草
1将所有原料放入干磨杯。
2使用“PULSE”(暂动)设置加工原料 30 秒。
泰式麻撒马咖哩酱
注意: 以下是可以使用湿磨器准备的食谱。
------------
原料
20 克葱
15 克大蒜
7 成沙姜(切成厚约 1 厘米的小片)
9 克柠檬草
2 片丁香
1 汤匙芫荽籽
1 汤匙孜然籽
3 片干红辣椒
5 颗花椒
1 汤匙虾酱
1 汤匙盐
1将所有原料放入湿磨杯。
2使用“PULSE”(暂动)设置加工原料 30 秒。
36
简体中文
辣椒酱
注意: 以下是可以使用湿磨器准备的食谱。
------
原料
6 克干红辣椒,去籽
20 克鲜红辣椒,去籽
30 克葱
1 颗大蒜
1 汤匙水
1将所有原料放入湿磨杯。
2使用“PULSE”(暂动)设置加工原料 30 秒。
豆浆
每加工一批物料之后,应始终让产品冷却至室温。
原料
-- 70 克干大豆
-- 600 毫升水
1加工大豆之前先将其浸泡 4 小时,然后将水沥干。
2将浸泡过的大豆放入过滤器并将水倒入搅拌杯。搅拌 30 秒钟。
3将豆浆倒入锅中并煮沸。然后添加一些糖并让豆浆慢煮,直到糖全部溶解。
4冷饮热饮均可。
布达佩斯营养蔬菜汤
-----------
原料
100 克甘蓝
150 克土豆
150 克芹菜
50 克胡罗卜
100 克熏猪肉
0.55 升水
100 克小扁豆(罐装)
125 克酸鲜奶油
10 克欧芹
盐,鲜胡椒粉,1 份浓缩固体汤料,1 份月桂叶
1将原料预先切成 2x2x2cm 见方的小块。
2将甘蓝、土豆、芹菜、胡萝卜和 0.35 升水依次放入搅拌杯中。然后搅拌 30 秒。
3将搅拌过的原料放入锅内并煮沸。添加剩余的水(0.2l 升)、酸鲜奶油、小扁豆、
肉、香草、浓缩固体汤料和调料。
4让汤慢煮 30 分钟。每隔一段时间对汤进行搅动。
简体中文 37
TYPEPLATE ON DFU
HR2003
2010/12/08
2010/11/05
38
2
3
4
5
6
7
8
9
10
11
12
2
1
2
1
39
100% 循环再造纸
4222.005.0157.2