1
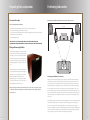
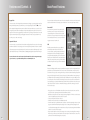
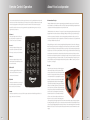
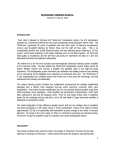
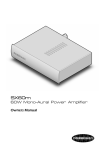
Palladium® P-312W Owner’s Manual Important Safety Instructions 1. 2. 3. 4. 5. 6. 7. 8. 9. 10. 11. 12. 13. 14. 15. 16. 17. Page 2 READ these instructions. KEEP these instructions. HEED all warnings. FOLLOW all instructions. DO NOT use this apparatus near water. CLEAN ONLY with dry cloth. DO NOT block any ventilation openings. Install in accordance with the manufacturer’s instructions. DO NOT install near any heat sources such as radiators, heat registers, stoves, or other apparatus (including amplifiers) that produce heat. DO NOT defeat the safety purpose of the polarized or grounding type plug. A polarized plug has two blades with one wider than the other. A grounding type plug has two blades and a third grounding prong. The wider blade or the third prong are provided for your safety. If the provided plug does not fit into your outlet, consult an electrician for replacement of the obsolete outlet. PROTECT the power cord from being walked on or pinched, particularly at plugs, convenience receptacles, and the point where they exit from the apparatus. ONLY USE attachments/accessories specified by the manufacturer. USE only with a cart, stand, tripod, bracket, or table specifiedby the manufacturer, or sold with the apparatus. When a cart is used, use caution when moving the cart/apparatus combination to avoid injury from tip-over. UNPLUG this apparatus during lightning storms or when unused for long periods of time. REFER all servicing to qualified service personnel. Servicing is required when the apparatus has been damaged in any way, such as powersupply cord or plug is damaged, liquid has been spilled or objects have fallen into the apparatus, the apparatus has been exposed to rain or moisture, does not operate normally, or has been dropped. DO NOT expose this apparatus to dripping or splashing and ensure that no objects filled with liquids, such as vases, are placed on the apparatus. To completely disconnect this apparatus from the AC Mains, disconnect the power supply cord plug from the AC receptacle. The mains plug of the power supply cord shall remain readily operable. The exclamation point, within an equilateral triangle, is intended to alert the user to the presence of important operating and maintenance (servicing) instructions in the literature accompanying the product. The lightning flash with arrowhead symbol within an equilateral triangle, is intended to alert the user to the presence of uninsulated “dangerous voltage” within the product’s enclosure that may be of sufficient magnitude to constitute a risk of electrical shock to persons. WARNING: To reduce the risk of fire or electrical shock, do not expose this apparatus to rain or moisture. WARNING: Batteries (battery pack or batteries installed) shall not be exposed to excessive heat such as sunshine, fire or the like. Getting Started Unpacking This subwoofer is heavy! Do not lift or move this subwoofer by yourself. Always have someone help you. What’s in the box? • Powercord • The grille box contains: one grille for the front of the subwoofer. (The side grilles are installed at the factory and should not be removed.) • The Accessories box contains: remote control, calibration microphone with storage bag, microphone tripod and microphone cable. • There is a pair of gloves located in a pocket in the side of the packing carton under the Owner’s manual. Identify all the components. If any item is missing or damaged, report this immediately to your Klipsch dealer and the transport contractor for action. WARNING: Danger of explosion if battery is incorrectly replaced. Replace only with same or equivalent type. No naked flame sources – such as candles – should be placed on the product. CAUTION! Risk of electric shock do not open WARNING: Do Not Open! Risk of Electrical Shock. Voltages in this equipment are hazardous to life. No user-serviceable parts inside. Refer all servicing to qualified service personnel. Place the equipment near a main power supply outlet and make sure that you can easily access the power breaker switch. WARNING: This product is intended to be operated ONLY from the AC Voltages listed on the back panel or included power supply of the product. Operation from other voltages other than those indicated may cause irreversible damage to the product and void the products warranty. The use of AC Plug Adapters is cautioned because it can allow the product to be plugged into voltages in which the product was not designed to operate. If the product is equipped with a detachable power cord, use only the type provided with your product or by your local distributor and/or retailer. If you are unsure of the correct operational voltage, please contact your local distributor and/or retailer. Page 3 Preparing the Loudspeaker Positioning Subwoofers Connection Procedure: Never allow objects or furniture to impede the subwoofer or place objects on top of it! There is a specific procedure to be followed: • • • • • Switch off and unplug the amplifier/s and all source electronics from the mains power. Place the subwoofer in the general area where you want it. Connect the subwoofer following the instructions under the “connecting the subwoofer” section of this manual. Finalize the position of the loudspeakers. Fit the front grille (if desired) 6’ - 16’ LFE 2 LFE 1 L CENTER R TAKE CARE NOT TO TOUCH THE DRIVE UNITS WHEN YOU MOVE THE SUBWOOFER AROUND. TO PRESERVE THE FINISH, WHEN HANDLING YOUR SUBWOOFER USE THE GLOVES THAT ARE PROVIDED. Fitting and Removing the Grilles To fit the front grille: align the posts on the grille with the post cups on the front of the subwoofer and gently press on the grille. Use care to ensure that the grille clears the aluminum control panel extrusion area around the logo. Do not strike or forcibly press on the grille or grille posts as damage to the grille or finish of your subwoofer could occur. The round side grilles cover the two passive radiators and come pre-installed from the factory. They are attached via rubber capture posts to special fasteners on the passive radiators. If these grilles should ever need to be reinstalled, make sure you orient them properly so that the curve of the grille follows the curve of the subwoofer side panel and gently press them back into place. Although operating the P-312W subwoofer with the front grille on or off is a matter of personal taste, moving or connecting the subwoofer should always be done with the front grille removed. Be especially careful not to touch the drive unit. Positioning your Palladium Series subwoofer Klipsch powered subwoofers are designed to reproduce deep bass and deliver the impact that makes your movies and music come alive. Typically, optimum performance will result if you place your subwoofer in a corner of the room on the same wall as your front channel speakers. Please note that room placement can have a dramatic effect upon the performance of your powered subwoofer. Corner placement, as suggested above, will increase the amount of bass output; placing the subwoofer along the middle of a wall, or out in the room will decrease the amount of bass output. Experiment with a number of different placement options and control settings to find the one that best suits your particular room and preferences. When choosing your subwoofer’s location, keep in mind that you will need to connect the subwoofer’s built-in amplifier to an AC power outlet. The Palladium Series subwoofer features Klipsch’s proprietary “Adaptive Room Correction”. This patent-pending technology will identify the major acoustic anomalies in the low frequency range of your listening room’s acoustics and compensate for them automatically. While the corrected response may at first sound like a reduction in bass quantity, the benefit is a much higher quality bass reproduction featuring audibly faster transient response and more noticeable extension of extremely low frequency program material. (See the “Adaptive Room Correction” section of this manual for further information on this feature.) Page 4 Page 5 Connecting the Subwoofer Features and Controls Caution: Turn off your preamplifier/receiver and your subwoofer before making any connections! Touch Panel Controls Inputs and Outputs Line In Your Palladium Series powered subwoofer is connected via line-level connections only. RCA-type and XLR inputs are provided and either may be used. Do not connect both at the same time. Use the “Subwoofer”, “LFE” or “Pre-amp” outputs of your system’s electronics to connect to the “LINE IN” input connections of your subwoofer. Use high-quality, shielded, line-level cables for these connections. Line Out This jack can be used as an alternate method of connecting a second subwoofer to your system. This second subwoofer can function as a “slave” to the primary subwoofer. (For more on this, see the “Back Panel Features” section of this manual.) RCA-type and XLR inputs are provided and either may be used. Do not connect both at the same time. Use high-quality, shielded, line-level cables for these connections. All of the subwoofer’s controls and settings are accessed through the touch-panel key pad and display located on the top of the subwoofer’s cabinet. The only exception to this is the main AC power switch, which is located on the rear panel of the subwoofer. • Use the (Up) or (Down) touch keys to scroll through the list of control options. • Use the (Left) or (Right) touch keys to make adjustments to a given control setting. • Use the (Enter) touch key when the or “Enter” appears on the display to store and recall custom settings or to lock the keypad. • After adjusting the individual control parameters for “Volume”, “EQ Mode”, “Lowpass”, “Lowpass Slope” and “Phase”, your settings can be stored in one of five user memories (“Movie”, “Music”, “Night”, “User 1” and “User 2”). This allows for global recall of all of the above settings to tailor the subwoofer’s performance to compensate for differing source material and uses. • The display backlighting will turn off if no keypad inputs are made for 10 seconds. • The display will return to the “Volume” screen if no keypad inputs are made for 10 seconds. • If the display is in standby mode or on the default volume menu during normal operation, the initial key press will turn on the display backlighting. The second key press will initiate a control adjustment or the selection of another mode. • In periods of low humidity, it is possible that a static electricity discharge to the subwoofer may cause a momentary interruption in the subwoofers output or changes to the LCD display content. Any display content errors will be corrected when the screen changes modes. Volume Use the left and right touch keys to adjust the subwoofer’s volume level to match the output of your main speakers. Press and hold (or press and release) the Left touch key to decrease the subwoofer’s volume. Press and hold (or press and release) the Right touch key to increase the subwoofer’s volume to the desired level. From this screen, press the Down touch key to access other control settings. Recall Settings This screen is used to select any one of five user-defined memory presets titled “Movie”, “Music”, “Night”, “User 1” and “User 2”. Use the Left/Right touch keys to select the desired group of stored control settings and press the Enter key to apply them. “Settings Recalled!” will then be displayed. During initial setup, skip this screen until all other initial control adjustments have been made. If nothing has been saved in the selected preset, the display will read “Preset Empty”. From this screen, press the Down or Up touch key to access other control settings. Page 6 Page 7 Features and Controls - 2 Features and Controls - 3 EQ Mode Room Correction This screen is used to select two different bass emphasis settings titled “Punch” and “Depth”. They are designed to complement different types of program material, such as movie soundtracks or music. The “Punch” setting emphasizes the 55Hz region, while the “Depth” setting boosts the 30Hz range. A third setting is titled “Flat”, which defeats these two settings. Use the Left/Right touch keys to select the desired EQ setting. From this screen, press the Down or Up touch key to access other control settings. This screen is used to activate the automatic Adaptive Room Correction (ARC) feature. Plug the supplied microphone into the “MIC IN” jack on the subwoofer’s rear panel and place it in the intended listening position. Press the Enter key to activate the calibration sequence. “Calibrate” will be displayed along with the ascending frequency of the test tone and a bar graph of the sound level (loudness). The subwoofer will measure the room’s acoustic effect and compensate for it. When the calibration sequence is complete, “Calibration Successful!” will be displayed. If the subwoofer’s volume level is too low or the microphone was either disconnected or improperly connected, “Calibration Unsuccessful” will be displayed. From this screen, press the Down or Up touch key to access other control settings. Room Correction On/Off This screen indicates whether the “Room Correction” filter is engaged. (See the section on “Room Correction” for more information.) Press either the Left or Right touch keys to turn this function on or off. This screen will not appear if the “Room Correction” function has not been activated, the “Room Correction” calibration was unsuccessful or the user memories have been erased using the “System Reset” function described under the “Save Settings” feature described in this section of the manual. Lowpass This screen is used to adjust the subwoofer’s upper frequency limit to achieve a proper blend with your system’s main speakers. A higher frequency (Hz) is typically used with smaller, bass limited main speakers and a lower frequency setting is customarily used with larger floorstanding models. This filter can be adjusted from 40Hz to 120Hz, as required, or defeated if the low pass filter function is being performed by your system’s electronics. Use the Left/Right touch keys to adjust the lowpass filter. To defeat this filter, press and hold the Right touch key until “Lowpass Off LFE Mode” is displayed. Refer to your surround processor’s owner’s manual for more Bass Management information. From this screen, press the Down or Up touch key to access other control settings. Lowpass Slope This screen is used to adjust how aggressively the subwoofer rejects frequencies above the low pass filter’s setting. This screen is not visible if the “Lowpass” filter above is set to “Lowpass Off LFE Mode”. There are four settings to choose from: “18, 24, 36 & 48dB/octave”. The higher the number, the more the upper frequencies are removed from the subwoofer’s output. Use the Left/Right touch keys to select the desired filter slope. Start with either the 24 or 36dB/octave setting and adjust from there if required. Adjustment of this parameter can help to optimize the acoustic blend with your main speakers. The proper setting will depend on room acoustics, your main speaker’s performance, the placement of the speakers and the subwoofer in the room. From this screen, press the Down or Up touch key to access other control settings. Page 8 Save Settings This screen is used to store all of the above control settings in one of five memory presets (“Movie”, “Music”, “Night”, “User 1” and “User 2”). Use the Left/Right touch keys to select the desired preset and press the Enter key to store your current control settings. “Settings Saved!” will be displayed. After the settings are stored in memory the display will return to the default “Volume” adjustment screen. All of the user settings in the five presets can be erased and restored to their default values by scrolling down to the last “System Info” screen. Press the Right touch key twice to get to the “System Reset” screen. Press the Enter key and all user settings will be replaced with the default settings. “Reset Complete!” will be displayed. From this screen press the Down or Up touch key to access other control settings. Disp Brightness This screen is used to adjust the brightness level of the display screen when the backlighting is on. Use the Left/ Right touch keys to select from the brightness intensities. From this screen, press the Down or Up touch key to access other control settings. Power This screen is used to select the “Auto On” or the “Always On” power mode for the subwoofer’s amplifier. Use the Left/Right touch keys to select between these two modes. When “Auto On” is selected, the subwoofer will automatically turn on when it senses a signal. It will automatically turn off after 20 minutes if no signal is present and the display screen will show “Standby”. In the “Always On” setting, the subwoofer will remain on as long as the main AC power switch on the subwoofer’s rear panel is in the “On” position. From this screen, press the Down or Up touch key to access other control settings. Phase Play Demo This screen is used to adjust the subwoofer’s acoustic phase to match that of your main speakers. Use the Left/ Right touch keys to adjust the subwoofer’s phase from 0°to 180°. The proper setting of this control is highly dependant on room acoustics and the position of your subwoofer in the room. After setting the volume and lowpass controls, adjust the phase to 0° and listen to a recording with a prominent, repeating bass line in your intended listening position. Repeat this process with the 180° setting and use the setting that yields the greatest amount of bass output. If neither of these settings is better than the other, experiment with intermediate settings. From this screen press the Down or Up touch key to access other control settings. Use this screen to activate either of two 12-second demonstration programs. Use the Left/Right touch keys to select the desired demo and press the Enter key to start playing the selection. From this screen, press the Down or Up touch key to access other control settings. Page 9 Features and Controls - 4 Back Panel Features Keypad Lock This section describes the features and connections found on the amplifier on the back panel of the subwoofer. It also describes the manner for connecting a second subwoofer as a “slave” unit to the primary subwoofer. This screen is used to lock the keypad and prevent unintentional changes to your settings by other users. After making all desired adjustments, press the Enter key to lock the keypad. “Keypad Locked Hold to Unlock” will be displayed. The display will then return to the default “Volume” screen after about 20 seconds. To unlock the keypad, press and hold the Left and Right touch keys until the display returns to the “Volume” screen. The keypad is now unlocked. It is suggested that you write down all of your settings for future reference in case the keypad is unlocked and your settings are changed by another user. From this screen, press the Down or Up touch key to access other control settings. System Info Press This screen is used to access the software “Version” number and “System Reset” function to clear all user settings and memories (Refer to the “Save Settings” section of this manual). If the “System Reset” function is activated all of the memory presets are erased and the subwoofer’s controls are restored to the default settings of: “Volume 0db”, “EQ Mode Flat”, “Lowpass Off LFE Mode”, “Phase 0°”, “Disp Brightness” (highest level) and “Power Always On. For more information on the controls mentioned in this manual and on the bass management settings of your electronics, see your authorized Klipsch dealer or visit www.klipsch.com. Power On/Off This is the main AC power switch for the subwoofer. This switch must be in the “On” position for the subwoofer to operate and for the “Auto On” feature to function. Set this switch to the “Off” position if the subwoofer will not be used for an extended period of time (i.e. vacation) or when making any connections to the subwoofer. USB This USB computer interface allows access to additional advanced features within the subwoofer’s ARC room correction software. Optional, proprietary Klipsch software and a higher level of technical knowledge are required to correctly utilize this capability. This port can also function as an alternative control interface with A/V control systems that can utilize a USB connection. Please contact your authorized Klipsch dealer or Klipsch Technical Support for more information. Line Out There are both RCA-type and XLR connections provided for line out signals. Choose the one appropriate for your system. Do not use both at the same time. This connection can be used as an alternate connection point for a second subwoofer as opposed to connecting them both to your electronics. Be aware that the signal output from these jacks is affected by the “Volume”, “EQ”, “Lowpass”, “Lowpass Slope”, “Phase” and “Room Correction” settings of your Palladium subwoofer. The advantage of this is the ability of the Adaptive Room Correction (ARC) function to correct the response of the second subwoofer resulting in a more accurate response. If the second subwoofer is connected directly to your system, the Palladium subwoofer’s ARC will react to, rather than control, the response of the other subwoofer. As a result, we recommend the following procedure when connecting a second subwoofer to these outputs: • • • • • • Page 10 Play a signal, such as one of the Palladium subwoofer’s two demo tracks and set the volume control of the second subwoofer to approximately match that of the Palladium subwoofer. Defeat the secondary subwoofer’s lowpass setting by selecting the “Bypass” or “LFE” mode or set the lowpass control to its highest frequency if these options are not present. Set the secondary subwoofer’s phase control to 0°. Run the “Room Correction” function on the Palladium subwoofer. As with the initial setup of your Palladium subwoofer, listen to a track with a repeating bass line in your listening position. Experiment with alternate phase settings on the secondary sub, while repeating this track. If one of these alternate settings yields an increased amount of bass, choose that setting and run the Palladium subwoofer’s room correction function again. Please note that if either the volume or phase settings on the secondary sub are changed after running the ARC function, you will have to either reset them to the location they were at when the room correction was performed or run the ARC calibration again to compensate. Page 11 Remote Control Operation About Your Loudspeaker This section describes the features found on the supplied remote control for your Palladium P-312W subwoofer. The remote control works via infrared and, as such, will need a clear line of sight to the infrared receiver located on the lower right quadrant of the front panel. The remote will work with or without the front-panel grille installed. The codes from the remote can be programmed into any standard learning remote control if your system includes such a device. An International Project Volume + / These buttons adjust the level of the subwoofer up and down as described in the “Volume” control section of this manual. X-over + / These buttons adjust the frequency of the lowpass filter up and down as described in the “Lowpass” control section of this manual. Phase + / These buttons adjust the phase control up and down as described in the “Phase” control section of this manual. ARC On/Off This button toggles the ARC feature on and off as described in the “Room Correction” control section of this manual. EQ Mode These buttons provide direct access to any of the three EQ modes as described in the “EQ Mode” control section of this manual. Presets These buttons provide direct access to any of the five presets as described in the “Recall Settings” and “Save Settings” control sections of this manual. Page 12 The Klipsch Palladium Series has drawn on engineering, design and manufacturing resources from all over the world. In addition to our formidable team in the USA, we have used European industrial designers, British theoretical physicists and manufacturing and production specialists from China. The Palladium Series is the culmination of over 60 years of research and engineering advancements, having been designed with the most advanced computer aided design (CAD) tools available, rigorously evaluated using our own in-house proprietary software, built to the most stringent quality standards and voiced by a panel of our most experienced listeners. No Klipsch loudspeaker has ever had more care and attention to every detail lavished on it than your Palladium Series subwoofer. Although building one subwoofer is relatively straightforward, building hundreds of subwoofers is challenging. Measurements play an important role in analyzing subwoofer characteristics, but the human ear is the ultimate test gear for evaluating its reproduction quality . At Klipsch, every design is strictly evaluated, using listening tests designed to expose even the very smallest weakness. All final voicing is performed under blind conditions, using trained listeners and standard audio sound tracks selected based on their particular area of auditory excellence. All information is tabulated and reported back to the designer for analysis. In almost all cases, Klipsch products are evaluated against similarly priced competitive models. It is only in this manner that Klipsch can truly rely on the quality of feedback received, eliminating skewed data that may result due to influences caused by price, brand recognition, or visual appeal. Design The P-312W is a triple-driver subwoofer with high output and extremely low distortion. The three drivers of the P312W are comprised of an active, front-firing 12-inch aluminum / fiber-composite hybrid cone and a pair of side-firing 12-inch aluminum / fiber-composite hybrid cone passive radiators. These drivers are mated with an internal BASH® digital hybrid amplifier and Klipsch’s advanced Digitally Controlled Subwoofer (DCS) operating system. All features and functions of the DCS system are accessed via a touchpanel located on top of the subwoofer. Inputs and outputs are located on a panel below the amplifier heatsink on the rear of the enclosure. This arrangement locates cabling behind the subwoofer for a clean installation and keeps all of the controls up front readily accessible for the user. When not in use, the touch-panel control lighting turns off, leaving nothing but the elegant appearance of the aluminum trim and black glass panel juxtaposed against the striking zebra-grain veneer. The superior components used in the P-312W are complemented by the unique enclosure design and highlighted by the elemental performance of the industrial design. The massive laminated MDF enclosure is based on a curved non-parallel wall structure for minimal resonance and maximum structural rigidity. Page 13 Conclusion Care and Maintenance FCC AND CANADA EMC COMPLIANCE INFORMATION Very little maintenance is required. To maintain the finish of the loudspeakers, wipe them carefully with a soft lint-free polishing cloth. Occasionally, and to remove fingermarks etc., wipe the cabinets with a barely damp clean soft cloth and finish with a lint-free polishing cloth. NEVER use any form of spray, furniture polish, saturated polishing cloth, or the like. Doing so will dull and streak the fine finish of the cabinets. NOTE: This equipment has been tested and found to comply with the limits for a Class B digital device, pursuant to part 15 of the FCC Rules. These limits are designed to provide reasonable protection against harmful interference in a residential installation. This equipment generates, uses and can radiate radio frequency energy and, if not in-stalled and used in accordance with the instructions, may cause harmful interference to radio communications. However, there is no guarantee that interference will not occur in a particular installation. If this equipment does cause harmful interference to radio or television reception, which can be determined by turning the equipment off and on, the user is encouraged to try to correct the interference by one or more of the following measures: Do NOT use a vacuum cleaner to clean the grilles while they are installed on the cabinet. To clean the grilles, remove them, brush them out by hand with a soft brush and replace them. Never touch the drive units either with your hands or with any tool or other object. This may damage the drive units irreparably. Do NOT store the microphone in a high humidity environment. Also avoid shocks and drops. Warranty The Warranty below is valid only for sales to consumers in the United States and Canada. KLIPSCH, L.L.C. (“KLIPSCH”) warrants this product to be free from defects in materials or workmanship (subject to the terms set forth below) for a period of five (5) years from the date of purchase. During the Warranty period, Klipsch will repair or replace (at KLIPSCH’s option) this product or any defective parts (excluding electronics and amplifiers). For products that have electronics or amplifiers, the Warranty period on those parts is for a period of two (2) years from the date of purchase. To obtain Warranty service, please contact the KLIPSCH authorized dealer from which you purchased this product. If your dealer is not equipped to perform the repair of your KLIPSCH product, it can be returned, freight paid, to KLIPSCH for repair. Please call KLIPSCH at 1-800-KLIPSCH for instructions. You will need to ship this product in either its original packaging or packaging affording an equal degree of protection. Proof of purchase in the form of a bill of sale or receipted invoice, which is evidence that this product is within the Warranty period,must be presented or indicated to obtain Warranty service. This Warranty is invalid if (a) the factory-applied serial number has been altered or removed from this product or (b) this product was not purchased from a KLIPSCH authorized dealer. You may call 1-800-KLIPSCH to confirm that you have an unaltered serial number and/or you purchased from a KLIPSCH authorized dealer. This Warranty is valid only for the original purchaser and will automatically terminate prior to expiration if this product is sold or otherwise transferred to another party. This Warranty does not cover cosmetic damage or damage due to misuse, abuse, negligence, acts of God, accident, commercial use or modification of, or to any part of, the product. This Warranty does not cover damage due to improper operation, maintenance or installation, or attempted repair by anyone other than KLIPSCH or a KLIPSCH dealer which is authorized to do KLIPSCH warranty work. Any unauthorized repair will void this Warranty. This Warranty does not cover product sold AS IS or WITH ALL FAULTS. REPAIRS OR REPLACEMENTS AS PROVIDED UNDER THIS WARRANTY ARE THE EXCLUSIVE REMEDY OF THE CONSUMER. KLIPSCH SHALL NOT BE LIABLE FOR ANY INCIDENTAL OR CONSEQUENTIAL DAMAGES FOR BREACH OF ANY EXPRESS OR IMPLIED WARRANTY ON THIS PRODUCT. EXCEPT TO THE EXTENT PROHIBITED BY LAW, THIS WARRANTY IS EXCLUSIVE AND IN LIEU OF ALL OTHER EXPRESS AND IMPLIED WARRANTIES WHATSOEVER, INCLUDING BUT NOT LIMITED TO, THE WARRANTY OF MERCHANTABILITY AND FITNESS FOR A PRACTICAL PURPOSE. Some states do not allow the exclusion of incidental or consequential damages or implied warranties so the above exclusions may not apply to you. This Warranty gives you specific legal rights, and you may have other rights, which vary from state to state. • • • • Reorient or relocate the receiving antenna. Increase the separation between the equipment and receiver. Connect the equipment into an outlet on a circuit different from that to which the receiver is connected. Consult the dealer or an experienced radio/TV technician for help. Approved under the verification provision of FCC Part 15 as a Class B Digital Device. Caution: Changes or modifications not expressly approved by the manufacturer could void the user’s authority to operate this device. This Class B digital apparatus complies with Canadian ICES-003. Cet appareil numérique de la classe B est conforme à la norme NMB-003 du Canada. EU COMPLIANCE INFORMATION Eligible to bear the CE mark, Conforms to European Union Low Voltage Directive 2006/95/EC; Conforms to European Union EMC Directive 2004/108/EC. WEEE NOTICE Note: This mark applies only to countries within the European Union (EU) and Norway. This appliance is labeled in accordance with European Directive 2002/96/EC concerning waste electrical and electronic equipment (WEEE). This label indicates that this product should not be disposed of with household waste. It should be deposited at an appropriate facility to enable recovery and recycling. Warranty Outside The United States and Canada The warranty on this product, if it is sold to a consumer outside of the United States or Canada, shall comply with applicable law and shall be the sole responsibility of the distributor that supplied this product. To obtain any applicable warranty service, please contact the dealer from which you purchased this product, or the distributor that supplied this product. Page 14 Page 15 3502 Woodview Trace, Suite 200 Indianapolis, Indiana 46268 USA 1.800.KLIPSCH • www.klipsch.com www.klipsch.com/palladium