1
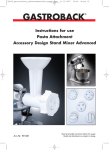
98101_fleischwolfaufsatz_deskuechmaschadv_manual.qxp
11.12.2007
15:12
Seite 16
GASTROBACK
®
Instructions for use
Meat Grinder / Cookie Attachment
Accessory Design Stand Mixer Advanced
Art.-Nr. 98101
Read all provided instructions before first usage!
Model and attachments are subject to change
d
98101_fleischwolfaufsatz_deskuechmaschadv_manual.qxp
!
11.12.2007
15:12
Seite 17
Carefully read all provided instructions before you start running the
appliance and pay regard to the warnings mentioned in these
instructions.
Important Instructions
• The appliance is designed for normal household quantities. Do not operate or store
the appliance outdoors or in damp or wet areas.
• Before use, always make sure that the appliance and accessory is properly and
completely assembled. Always IMMEDIATELY unplug the appliance after each operation
and before assembling or disassembling accessories. Always ensure, that the accessories
are engaged firmly before connecting the appliance to the mains power supply (see
´Operation`). Always handle the entire appliance and the tools with care and without
violence.
• Do not grab into the assembled attachment with your hands or any other objects
when the appliance is connected to the poweroutlet.
• CAUTION: Do not block the ventilation slits on the back of the appliance and do
not use the appliance in continuous operation for more than 10 minutes to avoid overheating.
If processing large quantities of food, regularly interrupt operation and unplug the
appliance for a few minutes, to let the motor cool down.
• ATTENTION: Avoid contact the moving parts. Keep hands, hair, clothing,
as well as spatula and other utensils, away from accessory during
operation to prevent injury and/or damage to the mixer or the attachment.
• DO NOT immerse the motor housing or power cord in any liquids or spill any
liquids on it.
• Never leave the appliance unattended when in operational mode.
Do not leave the appliance unattended while connected to the power supply. Always
switch ´Off` the appliance and IMMEDIATELY unplug the appliance after operation and
if it is not in use, cleaning and/or assembling or disassembling the processing tools.
Always grasp the plug to disconnect the appliance from the power outlet.
17
98101_fleischwolfaufsatz_deskuechmaschadv_manual.qxp
11.12.2007
15:12
Seite 18
The Meat Grinder Attachment
9
8
10
7
6
3
1
2
4
5
12
11
1.
2.
3.
4.
5.
6.
7.
8.
9.
spanner for the ring nut
ring nut
fine screen
coarse screen
scrape
scroll
housing
tray
food pusher
10. 2 litre storage container can be used as
dust protection while storing the
attachment or as meat tray when
processing meat.
11. cookie attachment holder
12. multi-shaped cookie blade
18
98101_fleischwolfaufsatz_deskuechmaschadv_manual.qxp
11.12.2007
15:12
Seite 19
Meat Grinder Attachment
Operating
Before first use of the Meat Grinder Attachment
Remove all promotional materials and packing as well as any foreign objects, but do
not remove the model label. Before first use and after a long period of storage, clean
the processing tools in warm soapy water (see ´Care and Cleaning`).
Using the Meat Grinder Attachment
WARNING: Always switch ´Off` the appliance, wait until the motor stops completely
and unplug the appliance before assembling/disassembling the attachment. To turn the
appliance ´Off` you have to turn the speed control anticlockwise into the ´Off`-position.
Assemble the Meat Grinder Attachment
1. Take the housing into your left hand. The part with the
thread has to face the front and the feed chute has to
face upwards.
A
2. Take the scroll into your right hand and place it into the
housing. The axis has to face the housing when sliding the
scroll into the housing (picture A).
NOTE: The scroll is correctly located when the scroll is
pushed up all the way inside the housing and the end of
the axis pokes out of the back end of the housing.
B
3. Fit the scrape over the square end of the drive shaft
ensuring that it is correctly located. The rounded side of the
knife must face the scroll, the smooth side is in contact with
the screen (picture B).
NOTE: Meat will not be minced if the knife is mounted
the wrong way round.
IMPORTANT: Failure to correctly position the scrape over
the end of the drive shaft may cause permanent damage to
your attachment.
protrusion
C
4. Select the desired screen and place against the scrape.
IMPORTANT: Make sure that the notch in the screen fits
over the protrusion of the housing (picture B/C). The
scrape does not flush 100 %with the rim of the housing
when correctly located.
19
notch
98101_fleischwolfaufsatz_deskuechmaschadv_manual.qxp
11.12.2007
5. Take the ring nut and screw it onto the thread of the housing
turning it clockwise. You can use the spanner to securely tighten
the ring nut (picture D/E).
15:12
Seite 20
D
NOTE: Do not tighten the ring nut too much to avoid overwinding
the thread.
The Meat Grinder Attachment is now assembled and can be
attached to the Design Standmixer Advanced.
6. Prop up the attachment access (picture F).
7. Press down the attachment ejector (picture G) and slide the
Meat Grinder Attachment into the opening. Release the attachment
ejector and turn the Meat Grinder Attachment slightly so that the
shaft engages in the socket with pin of the access opening located
in the hole of the attachment.
E
8. Place the tray cover on top of the feed chute in a convenient
position (picture H).
You can place the storage container beneath the outlet to collect
the food.
F
The Meat Grinder Attachment is now ready for use.
To operate the Meat Grinder Attachment
WARNING: For the case that liquid runs over the appliance
while operating turn the appliance ´Off` immediately and pull
the plug. Clean and dry the appliance according to the
instructions ´Care and cleaning`.
G
TIP: If you use special mince-recipes you can mix the ingredients
(for example steamed onions or spices) with the meat before
mincing. This way the ingredients get mixed really well.
IMPORTANT: The appliance can not mince hard or stingily
ingredients (for example: bones, nuts, ginger). If you use hard
ingredients like onions or carrots, you have to steam them before
adding them to the meet. Place a dry towel beside the appliance
to dry off overrunning liquids.
1. Cut the meat into pieces of 2,5 cm square size and remove
hard parts like bones, shells or stems.
2. Assemble the Meat Grinder Attachment as described, attach
it to the Design Standmixer Advanced and place a plate or dish
(for example the provided storage container) in front of the outlet.
20
H
98101_fleischwolfaufsatz_deskuechmaschadv_manual.qxp
11.12.2007
15:12
Seite 21
WARNING: Always make sure that the appliance is turned ´Off` before plugging
in the power supply.
3. Plug the power supply cable into a mains socket.
WARNING: Never hold your face or other body parts over the feed chute when the
motor is running because little pieces of food could be thrown out of the feed chute.
Never push the food into the feed chute with your fingers or put foreign substances
(hair, towels, cutlery) into the feed chute. Always use the food pusher for this purpose!
ATTENTION: Avoid contact the moving parts. Keep hands, hair, clothing,
as well as spatula and other utensils, away from feed chute during
operation to prevent injury and/or damage to the appliance.
4. Switch on the appliance using speed setting 4.
IMPORTANT: Speed setting 4 is the highest speed setting you are allowed to
choose, when using the Meat Grinder Attachment.
5. Slowly feed the meat pieces (a piece at a time) through the feed chute and push down
with the food pusher. Do not apply excessive force when pushing down the food
pusher. Use only the food pusher to press down the meat. Never use the fingers!
IMPORTANT: Operate in a slow and constant pace. Do not try to rush the procedure
by pushing down the meat with force. This way the scroll might gets blocked and
stops operating. If no meat is coming out the outlet even though there is still meat in
the feed chute turn the appliance ´Off` and work according to the instructions ´Trouble
shooting guide`.
6. Switch ´Off` the appliance after use and disconnect the power supply cable
from the mains socket.
7. As soon as the last bit is minced turn the appliance ´Off` and pull the plug.
8. Clean and disassemble the appliance right after use and make sure that no
leftover food desiccate on the appliance. Work according to the instructions ´Care
and cleaning`.
Dissemble the Meat Grinder Attachment
1. Switch ´Off` the appliance after use and disconnect the
power supply cable from the mains socket.
2. Take the tray out of the feed chute.
3. Press down the attachment ejector (picture A) and pull the
Meat Grinder Attachment out off the access opening.
4. Take off the ring nut by turning it anticlockwise. You can use
21
A
98101_fleischwolfaufsatz_deskuechmaschadv_manual.qxp
11.12.2007
15:12
Seite 22
the provided spanner to loosen the ring nut.
B
5. Take the screen, scrape and the scroll
out of the housing (picture B).
Care and Cleaning
Clean the appliance directly after use and do not leave any food dry on the surfaces
of the appliance.
WARNING: To avoid injuries to persons and damage, always switch ´Off` the appliance,
wait for the motor to stop completely and unplug the appliance immediately after operation
and before disassembling or cleaning the appliance. With the appliance connected to
the power supply, keep hands, hair, clothing, as well as spatula and other utensils,
away from feed chute to prevent injury and/or damage to the appliance.
DO NOT place the appliance, accessories or power cord in an automatic dishwasher.
Do not immerse the motor housing or power cord in any liquids or spill any liquids on
it. Always wipe off spilled liquids immediately.
CAUTION: Do not use abrasive cleaners, cleaning pads, corrosive chemicals (disinfectants,
bleach) or any sharp or hard objects (i.e. metal scouring pads) for cleaning, for this
could damage the surfaces. Carefully clean the appliance with a damped sponge or
cloth and warm soapy water.
1. Switch ´Off` (speed control into ‘Off’-position), wait for the motor to stop completely
and unplug the appliance from the power outlet.
2. Disassemble the attachment regarding the instructions ´Disassemble the Meat Grinder
Attachment` and remove meat residues on the scroll and the feed chute. Use a wooden
spoon for emptying the tray.
Follow the cleaning instructions step by step
3. Wash all parts thoroughly in hot soapy water. Do not use aggressive detergents.
The parts are not suitable for dishwasher. Soak parts with desiccated food leftovers
a few minutes in warm soapy water and use a nylon cleaning brush or cleaning
sponge for cleaning. Rinse all parts with running water and dry them accurately.
4. Grease the screen, scroll and scrape with salad oil to prevent air corrosion.
22
98101_fleischwolfaufsatz_deskuechmaschadv_manual.qxp
11.12.2007
15:12
Seite 23
5. Wipe the appliance and power cord with a damp soft cloth. Take care not to spill
or drip water or any other liquids on the appliance.
6. Thoroughly dry the appliance and all parts of the appliance and attachment after each
cleaning. Leave all parts dry naturally where they are out of reach of young children.
Clear a blocking
If the outlet is blocked no mince comes out of the outlet while operating.
ATTENTION: If a blocking occurs turn ´Off` the appliance immediately. Clear the
problem before turning on the motor again.
1. Turn the appliance ´Off` and then take the food pusher out of the feed chute.
2. Turn the motor ´On` (speed control 1-4) and ´Off` by turns to loosen the blocking.
ATTENTION: If the motor still does not start running turn the appliance ´Off`, pull
the plug and clean the appliance.
Trouble shooting guide
Possible problem
Easy solution
The mince is not fine enough.
Use a smaller mince plate and/or mince the ingredients more
then once.
There are still ingredients in the feed chute The attachment is blocked. Turn the appliance ´Off` immediately and
but nothing is coming out of the outlet.
operate according to the instructions ´Clear a blocking`.
The motor stops running while operating.
Turn the appliance ´Off` immediately and operate according to the
instructions ´Clear a blocking`.
After cleaning the motor does not get started
again when turning the appliance ´On`.
• Is the power cord plugged in?
• The motor might be blocked with some hard substance
(for example a bone). Turn the appliance ´Off` immediately
and pull the plug.
• Disassemble and clean the appliance. Operate according
to the instructions ´Care and cleaning`.
• If the problem is not solved after the cleaning, take the
appliance for technical maintenance and repair to an authorised
specialised reparation shop.
• To ensure that the attachment does not seize, never operate it
under excessive pressure. Operate in a slow and constant pace.
Do not try to rush the procedure by pushing down the food
with force.
• For mincing hard ingredients really fine start with the coarse screen.
Mincing the second time use the fine screen.
The attachment blocks up permanently
while operating.
23
98101_fleischwolfaufsatz_deskuechmaschadv_manual.qxp
11.12.2007
15:12
Seite 24
The attachment moves or loosened while
operating.
The attachment is not correctly assembled or not securely locked to
the attachment access. Turn the appliance ´Off` immediately.
Operate according to the instructions ´Assemble the
Meat Grinder Attachment`.
The food leaks out at the side of the
ring nut.
The ring nut is not screwed on tight enough. Turn the appliance
´Off` immediately and then pull the plug. Tighten the ring nut but do
not overwind the thread. If the problem still occurs disassemble and
clean the appliance.
Cookie Attachment
Operating
Before first use of the Cookie Attachment
Remove all promotional materials and packing as well as any foreign objects, but do
not remove the model label. Before first use and after a long period of storage, clean
the processing tools in warm soapy water (see ´Care and Cleaning`).
Using the Cookie Attachment
WARNING: Always switch ´Off` the appliance, wait until the motor stops completely
and unplug the appliance before assembling/disassembling the attachment. To turn the
appliance ´Off` you have to turn the speed control anticlockwise into the ´Off`-position.
Assemble the Cookie Attachment
1. Take the housing into your left hand. The part with the
thread has to face the front and the feed chute upwards.
A
2. Take the scroll into your right hand and place it into the
housing. The axis has to face the housing when sliding the
scroll into the housing (picture A).
NOTE: The scroll is correctly located when the scroll is
pushed up all the way inside the housing and the end of
the axis pokes out of the back end of the housing.
3. Fit the cookie attachment holder over the end of the drive
shaft ensuring that it is correctly located (picture B).
NOTE: Ensure the cookie attachment holder sits correctly over
the squared end of the scroll with the rim flush the housing
before tightening the ring nut. You should be able to slide
the multi-shaped blade into the slots of the holder horizontally to ease the handle.
24
B
98101_fleischwolfaufsatz_deskuechmaschadv_manual.qxp
11.12.2007
4. Take the ring nut and screw it onto the thread of the
housing turning it clockwise. You can use the spanner to
securely tighten the ring nut (picture C).
15:12
Seite 25
C
NOTE: Do not tighten the ring nut too much to avoid
overwinding the thread.
The Cookie Attachment is now assembled and can be
attached to the Design Standmixer Advanced.
D
5. Prop up the attachment access (picture D).
6. Press down the attachment ejector (picture E) and slide the
Cookie Attachment into the opening. Release the attachment ejector
and turn the Cookie Attachment slightly so that the shaft engages
in the socket with pin of the access opening located in the hole
of the attachment.
E
7. Place the tray on top of the feed chute in a convenient position
(picture F).
8. Slide the multi-shaped blade into the slot of the cookie attachment
holder, making sure that the handle is situated away from the
attachment (picture G). If the handle is facing the other side you
are not able to select the cookie shape that is the closest to the
handle. Select the desired cookie shape by moving the handle
until the shape required fits over the opening of the cookie
attachment holder.
Place a plate beneath the outlet to collect the shaped
dough.
F
G
The Cookie Attachment is now ready for use.
To operate the Cookie Attachment
WARNING: Use the cookie attachment for cookie dough only.
For the case that liquid runs over the appliance while operating turn the appliance
´Off` immediately and pull the plug. Clean and dry the appliance according
to the instructions ´Care and cleaning`.
1. Prepare cookie dough (you find recipes in the back of the instruction manual).
2. Assemble the Cookie Attachment as described, attach it to the Design Standmixer
Advanced and place a plate or dish in front of the outlet.
WARNING: Always make sure that the appliance is turned ´Off` before plugging
in the power supply.
25
98101_fleischwolfaufsatz_deskuechmaschadv_manual.qxp
11.12.2007
15:12
Seite 26
3. Plug the power supply cable into a mains socket.
WARNING: Never hold your face or other body parts over the feed chute when the
motor is running because little pieces of food could be thrown out of the feed chute.
Never push the food into the feed chute with your fingers or put foreign substances
(hair, towels, cutlery) into the feed chute. Always use the food pusher for this purpose!
ATTENTION: Avoid contact the moving parts. Keep hands, hair, clothing,
as well as spatula and other utensils, away from feed chute during
operation to prevent injury and/or damage to the appliance.
4. Switch ´On` the appliance using a slow speed setting (1-4) to start with.
NOTE: Any speed can be used depending upon the skills of the operator.
5. Feed cookie mixture through the attachment a little at a time and push down with the
food pusher. Do not apply excessive force when pushing down the food pusher. Use
only the food pusher to press down the meat. Never use the fingers!
IMPORTANT: Operate in a slow and constant pace. Do not try to rush the procedure
by pushing down the dough with force. This way the scroll might gets blocked and
stops operating. If no dough is coming out the outlet even though there is still dough
in the feed chute turn the appliance ´Off` and work according to the instructions
´Trouble shooting guide`.
6. Cut the extruded cookie mixture into suitable length, shape it if required and place onto
a greased baking tray. Cook in the middle of a hot oven (200 degree) for approx. 10
minutes or until cooked.
NOTE: To assist with the removal of some of the dough left inside the attachment,
a small amount of bread can be fed through the attachment. The appliance should
be stopped as soon as the bread becomes visible through the multi-shaped blade.
ATTENTION: Do not try to force the bread through the multi-shaped blade as this
might damages the attachment.
7. Switch ´Off` the appliance after use and disconnect the power supply cable
from the mains socket.
8. As soon as the last bit is minced turn the appliance ´Off` and pull the plug.
9. Clean and disassemble the appliance right after use and make sure that no
leftover food desiccate on the appliance. Work according to the instructions ´Care
and cleaning`.
26
98101_fleischwolfaufsatz_deskuechmaschadv_manual.qxp
11.12.2007
15:12
Seite 27
Dissemble the Meat Grinder Attachment
1. Switch ´Off` the appliance after use and disconnect the
power supply cable from the mains socket.
A
2. Take the tray out of the feed chute.
3. Press down the attachment ejector (picture A) and pull the
Cookie Attachment out off the access opening.
4. Take off the ring nut by turning it anticlockwise. You can use
the provided spanner to loosen the ring nut (picture B).
B
5. Take the cookie attachment holder and the scroll out of the
housing. Slide the multi-shaped blade out of the cookie
attachment holder.
Care and Cleaning
Clean the appliance directly after use and do not leave any food dry on the surfaces
of the appliance.
WARNING: To avoid injuries to persons and damage, always switch ´Off` the appliance,
wait for the motor to stop completely and unplug the appliance immediately after operation
and before disassembling or cleaning the appliance. With the appliance connected to
the power supply, keep hands, hair, clothing, as well as spatula and other utensils,
away from feed chute to prevent injury and/or damage to the appliance.
DO NOT place the appliance, accessories or power cord in an automatic dishwasher.
Do not immerse the motor housing or power cord in any liquids or spill any liquids on
it. Always wipe off spilled liquids immediately.
CAUTION: Do not use abrasive cleaners, cleaning pads, corrosive chemicals (disinfectants,
bleach) or any sharp or hard objects (i.e. metal scouring pads) for cleaning, for this
could damage the surfaces. Carefully clean the appliance with a damped sponge or
cloth and warm soapy water.
1. Switch ´Off` (speed control into ‘Off’-position), wait for the motor to stop completely
and unplug the appliance from the power outlet.
2. Disassemble the attachment regarding the instructions ´Disassemble the Cookie
Attachment` and remove dough residues on the scroll and the feed chute. Use a wooden
spoon for emptying the tray.
Follow the cleaning instructions step by step
3. Wash all parts thoroughly in hot soapy water. Do not use aggressive detergents.
The parts are not suitable for dishwasher. Soak parts with desiccated food leftovers
27
98101_fleischwolfaufsatz_deskuechmaschadv_manual.qxp
11.12.2007
15:12
Seite 28
a few minutes in warm soapy water and use a nylon cleaning brush or cleaning
sponge for cleaning. Rinse all parts with running water and dry them accurately.
4. Grease the scroll, cookie attachment and multi-shaped blade with salad oil to prevent
air corrosion.
5. Wipe the appliance and power cord with a damp soft cloth. Take care not to spill
or drip water or any other liquids on the appliance.
6. Thoroughly dry the appliance and all parts of the appliance and attachment after each
cleaning. Leave all parts dry naturally where they are out of reach of young children.
Storage
Always clean the appliance and attachment before storing (see ´Care and Cleaning`).
Ensure to store the appliance and attachment where it is clean, dry and safe from frost,
direct sunlight and inadmissible strain (mechanical or electric shock, heat, moisture) and
where it is out of reach of young children.
Place the appliance and attachment on a clean and stable surface, where it can not
fall. Do not place any hard or heavy objects on the appliance or the attachment.
Notes for disposal
Dispose of the appliance must be effected in accordance with the corresponding
local regulations and requirements for electrical appliances. Please contact your local
disposal company.
Warranty
We guarantee that all our products are free of defects at the time of purchase. Any
demonstrable manufacturing or material defects will be to the exclusion of any further
claim and within 2 years after purchasing the appliance free of charge repaired or
substituted. There is no Warranty claim of the purchaser if the damage or defect of
the appliance is caused by inappropriate treatment, over loading or installation mistakes.
The Warranty claim expires if there is any technical interference of a third party
without an written agreement. The purchaser has to present the sales slip in
assertion-of-claims and has to bear all charges of costs and risk of the transport.
28
98101_fleischwolfaufsatz_deskuechmaschadv_manual.qxp
11.12.2007
15:12
Seite 29
Recipes
Almond Cookies
125g
150g
250g
1 small
40g
1/2 teaspoon
soft butter
sugar
flour
egg
ground almonds
baking powder
lemon essence (optional)
Cream butter and sugar together using the beater until the mixture is light and fluffy.
Beat in egg, then fold in the sifted flour, baking powder, nuts and lemon essence.
Pass the mixture through the attachment, having selected the desired shape and cut
into length. Place onto greased sheet and bake in the centre of hot oven 200 degree
for approx. 10 minutes or until cooked.
Plain Cookies
150g
2 small
150g
300g
soft butter
eggs
sugar
flour
lemon essence (optional)
Cream butter and sugar together using the beater until the mixture is light and fluffy.
Beat in eggs, then fold in the sifted flour and lemon essence. Pass the mixture
through the attachment, having selected the desired shape and cut into length. Place
onto greased sheet and bake in the centre of hot oven 200 degree for approx. 10
minutes or until cooked.
Chocolate Cookies
200g
125g
2 small
25g
250g
sugar
soft butter
eggs
cacao powder
flour
Cream butter and sugar together using the beater until the mixture is light and fluffy.
Beat in eggs, then fold in the sifted flour and cacao powder. Pass the mixture
through the attachment, having selected the desired shape and cut into length. Place
onto greased sheet and bake in the centre of hot oven 200 degree for approx. 10
minutes or until cooked.
29
98101_fleischwolfaufsatz_deskuechmaschadv_manual.qxp
11.12.2007
15:12
Seite 30
Accessories for the Design Stand Mixer Advanced
You will get the accessories from your specialty retailer.
Pasta Maker Attachment
Art.-Nr.: 98100
Meat Grinder / Cookie
Attachment
Art.-Nr.: 98101
Food Slicer/
Shredder Attachment
Art.-Nr.: 98102
Additional stainless steel bowl
Art.-Nr.: 98103
30
98101_fleischwolfaufsatz_deskuechmaschadv_manual.qxp
11.12.2007
15:13
GASTROBACK GmbH
Gewerbestraße 20 • D-21279 Hollenstedt/Germany
http://www.gastroback.de • E-Mail: [email protected]
Seite 32