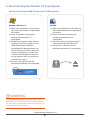
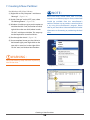
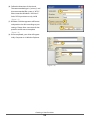
1
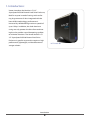
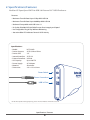
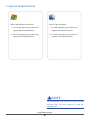
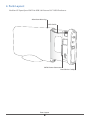
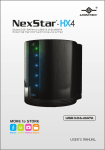
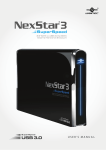
USER’S MANUAL
Package Contents:
NexStar CX 3.5” SATA to SuperSpeed USB 3.0
External Hard Drive Enclosure
1
2
3
4
5
6
3.5" NexStar CX HDD Enclosure
Power Adapter
USB 3.0 Cable (3ft A to B Cable)
Enclosure Stand
User’s Manual
Installation Screws
1
2
4
3
5
6
USER’S MANUAL
TRADEMARKS
MS-DOS, Microsoft, Windows NT/2000/XP/Vista/7 are trademarks of Microsoft Corporation.
Apple, Macintosh and Mac are trademarks of Apple Computer.
NexStar is a registered trademark of Vantec Thermal Technologies.
*All other third-party brands and names are the property of their respective owners.
Table of Contents:
1. Introduction
................................................................................................................02
2. Specifications/Features..................................................................................... 03
3. System Requirements ..........................................................................................04
4. Parts Layout ..................................................................................................................05
5. Installation
5.1 Hardware Installation ..................................................................................................06
6. Disconnecting the NexStar CX ....................................................................09
7. Creating A New Partition ..................................................................................10
8. Warranty ...........................................................................................................................13
9. Contact ...............................................................................................................................13
Table of Contents
1
1. Introduction:
Vantec introduces the NexStar® CX 3.5"
SuperSpeed USB 3.0 External Hard Drive Enclosure,
ideal for anyone in need of storing and transferring large amounts of data. Integrated with the
latest USB 3.0 technology, performance is
increased by 10 fold offering maximum speeds of
up to 5 Gbps. In addition, the sleek aluminum
casing not only protects the drive from overheating but also provides sound dampening qualities
to minimize vibrations. The Vantec NexStar® CX
3.5" SuperSpeed USB 3.0 External Hard Drive
Enclosure is great for anyone who requires a high
performance, lightweight, and durable external
NST-310S3-BK
storage solution.
Introduction
2
2. Specifications/Features:
NexStar CX SuperSpeed SATA to USB 3.0 External 3.5” HDD Enclosure:
Features:
• Maximum Transfer Rates Up to 5 Gbps With USB 3.0
• Maximum Transfer Rates Up to 480 Mbps With USB 2.0
• Backward-Compatible with USB 2.0 or 1.1
• Hi-Quality Shielded USB 3.0 Cable Ensures Data Integrity and Speed
• Hot-Swappable: Plug & Play Without Rebooting
• Attractive Blue LED Indicates Power & HDD Activity
Specifications:
•
•
•
•
•
•
•
•
•
Model:
Device Support:
Device Size:
Internal Interface:
External Interface:
HD Capacity:
Power Supply:
Material:
Dimension:
NST-310S3
SATA I/II Hard Drive
3.5”
SATA I/II
USB 3.0
Up to 2.0 TB*
AC Adapter
Aluminum
215 x 123 x 31mm
Power Switch
Power Connection
USB 3.0 Port
*For the most updated Storage Capacity, please check our website: www.vantecusa.com
Specifications/Features
3
3. System Requirements:
Microsoft Windows XP/Vista/7
Mac OS 10.4 & greater
1. For USB 2.0 speeds, the system must
1. For USB 2.0 speeds, the system must
support USB 2.0 specifications
support USB 2.0 specifications
2. For USB 3.0 speeds, the system must
2. For USB 3.0 speeds, the system must
support USB 3.0 specifications
support USB 3.0 specifications
NOTE :
USB 3.0 products will work with a USB 2.0 ports
however they will only function at USB 2.0
specifications.
System Requirements
4
4. Parts Layout:
NexStar CX SuperSpeed SATA to USB 3.0 External 3.5” HDD Enclosure:
Aluminum Housing
LED Cable
SATA/Power Connector
Hard Drive Caddy
Parts Layout
5
5. Installation:
NexStar CX SuperSpeed SATA to USB 3.0 External 3.5” HDD Enclosure:
5.1. Hardware Installation:
Preparing the hard drive:
(1) If there are jumper settings on the hard
drive, please set the hard drive jumpers to
MASTER or SINGLE DRIVE ONLY. Please
refer to the hard drive manufacturer’s
documenttation for further information on
your jumper settings.
Preparing the NexStar CX:
(1) Remove the side of the NexStar CX
SuperSpeed wih the power and USB
connection ports.
(2) Carefully slide out the hard drive caddy.
( figure 5.1-A )
Installation
6
Installing the hard drive to the NexStar CX SuperSpeed:
(1) Connect the SATA and power connector to
the hard drive as pictured. ( figure 5.1-B )
( figure 5.1-B )
(2) Align the hard drive mounting holes with the
holes on the back of the drive caddy and secure
the hard drive with the screws provided.
( figure 5.1-C )
( figure 5.1-C )
(3) Insert the drive caddy back into the aluminum
housing. Be sure to reconnect the LED cable
before closing the unit. When reinserting the
caddy, also be sure to align the caddy with the
guide rails within the housing.
( figure 5.1-D)
( figure 5.1-D )
Installation
7
NOTE :
Connecting the NexStar CX to your computer:
(1) Connect the type (B) USB connector to the
NexStar CX SuperSpeed and the type (A) USB
connector to an available USB port on your
system. ( figure 5.1-E )
(2) Connect the power cable to the NexStar CX
SuperSpeed and plug the cable into an
available outlet. ( figure 5.1-E )
(3) Turn on the NexStar CX SuperSpeed via the
power switch. ( figure 5.1-E )
For new hard drives, you will need to initialize and
partition your hard drive before it will appear in
Windows Explorer or on your Mac desktop. Please
refer to your hard drive manufacturer's documentation or read the "Creating a New Partition" section
of this manual.
(3)
(2)
(4) Your operating system should detect the
NexStar CX SuperSpeed and automatically
install the necessary drivers. Once your
operating system finishes setting up the
NexStar CX, it will mount your hard drive. On
Mac OS systems, the new volume should
appear on desktop. On a Windows PC, the new
volume will appear under My Computer.
(5) Your NexStar CX SuperSpeed External Hard
Drive is now ready for use.
(1)
USB 3.0 Cable
( figure 5.1-E )
NOTE :
If you can see the USB icon in the system tray ,
but there is no any disk appear in your computer,
please confirm your hard disk is partitioned.
Installation
8
6. Disconnecting the NexStar CX SuperSpeed:
NexStar CX SuperSpeed USB 3.0 External 3.5" HDD Enclosure:
Windows XP/Vista/7:
Mac OS:
(1) Make sure all operations using the hard
drive within the NexStar CX SuperSpeed
has ceased.
(2) Close any windows and programs
pertaining to the NexStar CX
SuperSpeed.
(3) Double click the green “Safely Remove
Hardware” icon in the system tray and
select [Safely Remove USB Mass
Storage Device]. Select the device you
wish to remove and click on [Stop]. The
system should prompt, “It is now safe
to remove the USB device.” If not, wait
for any programs still using the device
to finish and try again.
(4) You may now safely turn off and
disconnect the NexStar CX SuperSpeed.
(1) Make sure all operations using the hard
drive within the NexStar CX SuperSpeed
has ceased.
(2) Close any windows and programs
pertaining to the NexStar CX
SuperSpeed.
(3) From the Desktop, drag the NexStar CX
SuperSpeed hard drive to the trash.
(4) You may now safely turn off and
disconnect the NexStar CX SuperSpeed.
WARNING :
NEVER remove the NexStar CX SuperSpeed while the
hard drive is in use. Doing so may corrupt the data on
the hard drive or damage the hard drive, NexStar CX
SuperSpeed and the computer.
Disconnecting the NexStar CX
9
7. Creating A New Partition:
For Windows XP/ Vista/7 Users:
NOTE :
(1) Right click on “My Computer” and choose
Most hard drives should come with a CD that
includes an installation program. If not, a download
should be available from the manufacturer's
website. The best way to partition a new hard drive
is by using the manufacturer’s program. Please
refer to your hard drive’s documentation for further
information on formatting or partitioning the hard
drive.
“Manage”. ( figure 7-A )
(2) Under “Storage” on the LEFT pane, select
“Disk Management”. ( figure 7-B )
(3) Windows should now give you the option to
initialize the disk. If not, locate the new disk,
right-click on the new disk (where it reads
“Disk #”) and choose Initialize. This step may
not be required for some hard drives.
(4) Go through the wizard. ( figure 7-B )
(5) Once complete, locate your hard drive in
the bottom right pane. Right click on the
area with a status bar (to the right of the
1
“Disk #” area) and choose New Partition.
WARNING :
Doing the following setup will erase any existing
data on the drive.
( figure 7-A )
2
3
( figure 7-B )
Creating a New Partition
10
(6) Follow the directions of the wizard.
The recommended type is “primary” and
1
the recommended file system is “NTFS.”
VANTEC
Please note that Windows® XP/Vista/7
limits FAT32 partitions to only 32GB.
( figure 7-C )
2
(7) Windows Disk Management will format
and partition the disk according to your
settings. Please allow some time for the
3
partition and format to complete.
( figure 7-C )
( figure 7-D )
(8) Once completed, your drive will appear
in My Computer or in Window Explorer.
1
VANTEC (E:)
( figure 7-D )
Creating a New Partition
11
2
Formatting for Mac Users
(1) Connect the device to the computer. Once
NOTE :
connected please turn on the device.
If the hard drive will not mount on your system,
format the drive into FAT32 or NTFS partition
through a PC system first. Once formatted, connect
the NexStar Enclosure to your Mac and run the Disk
Utility Tool again. The Disk Utility Tool should be
able detect the hard drive and allowing you to
format or mount the hard drive.
(2) Select Utilities from the Go menu in the
Finder menu bar.
(3) Select Disk Utility which is in the Utilities
Folder.
(4) When the Disk Utility window is open, select
the volume labeled Vantec Desktop Hard
Disk from the list of available hard drives on
the left side of the window.
(5) Select the Partition tab.
(6) From the Volume Scheme menu, choose the
desired number of partitions (Mac OS 10.x
gives you the option of dividing the drive
into at most 16 partitions). You may adjust
the size of each partition using the slide bar
between the partitions in the Volume
Scheme area.
(7) In the Volume Information section, enter the
desired name for each volume (partition).
You may choose one of the following
volume format (Mac OS Extended, Mac OS
( figure 7-E )
Standard, UNIX File System, or MS-DOS).
(8) Once you have finalized the volume options,
click Partition. An alert message should
appear, click Partition again.
(9) Mac Disk Utility will format and partition the
disk according to your settings. When
partitioning is complete, your drive will be
ready for use.
WARNING :
Following these steps will erase the Hard Disk. If
you have data that you want to protect or
continue to use, please backup your data before
performing these steps.
Creating a New Partition
12
8. Warranty:
The NexStar CX SuperSpeed comes with a 1
year limited warranty ( 90 day parts ) . If your
unit should become defective within that
time frame, please go to www.vantecusa.com
for information on how to receive warranty
exchange or repair. Cosmetic defects and
missing parts are not covered under this
warranty. Please check the contents of the
unit to make sure you received all parts. Also,
check for any cosmetic flaws. If any parts are
missing or if there are cosmetic defects,
please contact the retailer from which you
purchased the unit immediately and ask for a
replacement.
9. Contact :
Vantec Thermal Technologies
website: www.vantecusa.com
Copyright © 2010 Vantec Thermal Technologies. All Right Reserved.
All Registered Trademarks Belong To Their Respective Companies.
Warranty/ Contact
13