1
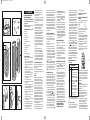
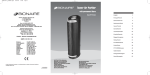
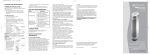
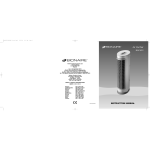
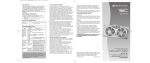
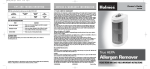
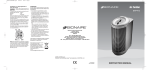
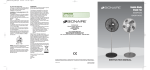
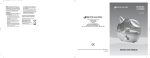
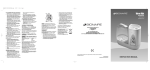
BAP1550-IUK_07EM1.qxd
4/25/07
20:46
Page 1
• We are promptly informed of the defect.
• The appliance has not been altered in any
way or subjected to misuse or repair by a
person other than a person authorised by
Holmes Products (Europe) Ltd.
• Faults that occur through normal wear and
tear are not covered by this guarantee.
• No rights are given under this guarantee to a
person acquiring the appliance second hand
or for commercial or communal uses.
• Any repaired or replaced appliance will be
guaranteed on these terms for the remaining
portion of the guarantee.
THIS PRODUCT IS MANUFACTURED TO
COMPLY WITH THE E.E.C. DIRECTIVES
73/23/EEC, 2004/108/EC and 98/37/EEC.
Waste electrical products
should not be disposed of
with Household waste.
Please recycle where
facilities exist.
Check on the following
website for further recycling
and WEEE information:
www.bionaire.com or e-mail
[email protected]
®
By Du Pasquier at 5:08 pm, May 08, 2007
Tower Air Purifier
with permanent filters
BAP1550
Holmes Products (Europe) Ltd
1 Francis Grove
London SW19 4DT
England
Fax: +44 (0)20 8947 8272
Email: [email protected]
Website address: www.bionaire.com
UK - Free phone Customer Service Helpline – 0800 052 3615
© 2007 Sunbeam Products, Inc. doing business as Jarden Consumer Solutions.
All Rights Reserved.
9100040002963
BAP1550IUK07EM1
INSTRUCTION MANUAL
BAP1550-IUK_07EM1.qxd
4/25/07
20:46
Page 5
U.K. and IRELAND
Fig. 1
PLEASE READ AND SAVE THESE
IMPORTANT INSTRUCTIONS.
A
B
C
D
E
D
With proper care and use, this Bionaire®
air purifier will give you fresh, clean air
for many years.
NOTE: Before reading these instructions, please
view the corresponding illustrations.
E
B
F
K
B
L
J
G
C
H
I
Fig. 2
Fig. 3
Fig. 4
DESCRIPTIONS (SEE FIG. 1 & FIG. 1-A)
A. Power Light
B. Speed Control
C.Ioniser Control
D.Filter Indicator Light
E. Ioniser Light
F. Washable Foam Pre-filter
G.Inlet Grill
H.Permanent HEPA filters (2 pcs)
I. Filtered Air Outlet
J. Power Button
K. Infrared
L. Operation Indicator Light
SAFETY PRECAUTION
Carefully read and retain all instructions before
using the air purifier.
• To avoid fire or shock hazard, check that the
voltage on the product corresponds to your
electricity supply and plug directly into an
electrical outlet.
• Keep cord out of heavy traffic areas and to
avoid fire hazard, never put the cord under
rugs, or near any heat source.
• Carefully discard any plastic wrapping that
was used for the packaging. If the filter is
covered by a bag when shipped, remove
plastic bag before use.
• Do not use the air purifier outside.
• Do not place the unit near any heat source or
in direct sunlight.
• Always unplug the air purifier before moving it,
opening the grill, changing the filters, cleaning the
air purifier or whenever it is not in use.
• Do not use in or around water or any other
liquids. Do not attempt to wash the unit under
running water.
• Use appliance only for intended household
use as described in this manual.
• Ensure that all air openings are not restricted
or covered in any way.
• Do not place anything on top of the unit.
• Never insert any object into any openings.
• Do not use the air purifier if any part is
missing or damaged in any way.
• Do not attempt to repair or adjust any
•
•
•
•
•
mechanical functions of this unit. If the unit
becomes damaged return to the place of
purchase or phone the helpline number on
the back of this leaflet.
If the supply cord or plug is damaged, it must
be replaced by the manufacturer or its service
agent or a similarly qualified person in order
to avoid hazard.
The air purifier contains no user serviceable
parts and should the product suffer damage
or breakdown it must be returned to the
manufacturer or its service agent.
Should the air purifier stop working, first check the
fuse in the plug (UK only) or fuse/circuit breaker at
the distribution board is operating, before
contacting the manufacturer or service agent.
The ioniser may cause a static charge to build
up on the air output grill. A static charge may
be felt if the unit is not properly grounded. To
avoid a static charge, plug the unit into a
grounded outlet, or properly install a ground
adaptor. The static shock will not occur if the
ioniser is off.
This appliance is not intended for use by
persons (including children) with reduced
physical, sensory or mental capabilities, or lack
of experience and knowledge, unless they have
been given supervision or instruction concerning
use of the appliance by a person responsible for
their safety. Children should be supervised to
ensure that they do not play with the appliance.
HOW THE AIR PURIFIER WORKS
Dirty, dust laden air is drawn through the back of
the air purifier and through the multi-stage
filtration system.
The permanent HEPA filter entraps 99% of all
smaller visible and non-visible particles down to
2 microns in size.
IONISER
Your Bionaire® Air Purifier has an independently
controlled ioniser, which when turned on,
releases negative ions into the outgoing filtered
air. Ions are tiny particles that carry either a
positive or negative charge. These ions exist
naturally all around us in the air, water and
ground. Both positive and negative ions are
colourless, odourless and completely harmless.
Negative ions help the air purification process
by attaching themselves to very small airborne
particles in the room. These particles take on a
negative charge and may join with positively
charged particles, such as dust, pollen, smoke
and pet dander to form larger particles that are
then more readily captured by the filter system,
or they may be attracted to positively charged
surfaces like walls or floors.
You may also note, after extended use, that dust
may have collected around the grills or front panel.
This is from the ionisation effect caused by the
negative ions exiting from the air outlet.This dust
does not come from the air output, but is drawn out
of the uncleaned air going past the air outlet.
This is additional evidence of the air cleaning
effectiveness of negative ions. The dust can be easily
removed with a clean, dampened cloth or soft brush.
NOTE: it is important to clean the permanent
HEPA filters at recommended intervals. Using the
ioniser in conjunction with dirty filters may result in
dirty particles exiting the air purifier and being
attracted to walls, carpets, furniture and other
household objects. These dirty particles may prove
very difficult to remove.
PRE-OPERATING INSTRUCTIONS
1. After removing the unit from the box, remove
the plastic covering from the unit.
2. Select a firm level place where there are no
obstructions to the air inlet (rear grill) or
filtered air outlet.
3. Remove the inlet grill by pulling the grill
towards you.
4. Remove both permanent HEPA filters by
gripping on both sides and pulling forward.
5. The filter clip can only be attached to the
hang tabs on the filter one way (see Fig. 2).
The filter clip should easily slide onto the filter
hang tabs. Do not use force whilst attaching
the filter clip to the filter. Align the clip on the
permanent HEPA filter with the rails on the
inside of the unit.(see Fig. 3)
NOTE: The pleated material and rubber gasket
should be facing towards the unit when applied.
6. Replace the inlet grill by sliding back on to the
unit. Make sure that it snaps securely into
position (the grill only goes on one way).
NOTE: Do not point outlet towards wall.
OPERATING INSTRUCTIONS
Your remote control requires (2) AAA batteries
(not included) for operation. To install the
batteries, simply depress and slide the back of
the remote control with your thumb on the arrow
indentation. Insert batteries according to the
diagram shown inside and replace cover. Remove
batteries before discarding the remote control.
• DO NOT mix old and new batteries.
• DO NOT mix alkaline, standard (carbon-zinc)
or rechargeable (nickel-cadmium) batteries.
1. Plug into a suitable electrical outlet.
2. Press the power button (
) on the control
panel or the remote control. The unit will turn
on high only the first time the unit is turned
on. All other times it is turned on, the unit
remembers the last speed selected and will
turn on at that speed, and the power light will
illuminate letting you know the power is on.
3. You can then select the desired speed
setting. This air cleaner has three speed
settings. You can select from HIGH ( ),
MEDIUM( ), or LOW ( ) by pushing the
desired operating speed button on the control
panel or the remote control.
4. To release negative ions into the filtered air,
press the ioniser button (
) to either on the
control panel or the remote control and the
light will illuminate.
5. The ioniser will not work unless the unit is running.
6. For optimum air filtration, it is recommended to
operate the air purifier continuously. Its rugged
motor is designed to give many years of service.
7. For continuous use it is recommended to operate
the air purifier at the Medium ( ) setting. For
quieter operation or use in a bedroom, select the
Low ( ) setting. When high levels of air pollution
are present, select the HI ( ) setting to quickly
circulate clean filtered air.
CLEANING AND MAINTENANCE
1. Turn the air purifier off and unplug it before
cleaning.
2. The outside of the air purifier can be cleaned
with a soft, clean dampened cloth.
3. The rear air inlet grill can be removed and
washed in warm soapy water (not dishwasher
safe). Dry before replacing in the unit.
4. The filtered air outlet can be cleaned of dust
with a small, soft brush.
5. If you wish to clean the inside of the air purifier,
please only use a dry, soft cloth to wipe it down.
PERMANENT HEPA FILTER CLEANING
Filter Indicator Light ( ) - Your air purifier has
an indicator light that illuminates when it is time
to clean the permanent HEPA filters.
1. Every few weeks check the condition of the
pre-filter.
2. Remove the inlet grill. If the foam pre-filter has
collected a noticeable amount of dust, remove it
from the inlet of the grill and wash it in warm soapy
water. Rinse and dry the pre-filter thoroughly
before replacing it in the inlet of the grill.
3. With the inlet grill removed, check the
condition of your permanent HEPA filters. If
the filters are dirty, remove them by gripping
on both sides and pulling forward.
4. To clean the permanent HEPA filters use a
crevice tool or brush attachment with your
vacuum cleaner. Run the attachment along the
inlet and outlet side of the filter trying to clean
between the pleated filter layers. (see Fig. 4).
NOTE: Vacuuming will restore performance
of the permanent HEPA filter however, the
filter may appear stained. This is normal and
does not affect performance in any way.
DO NOT USE WATER OR ANY OTHER
HOUSEHOLD CLEANERS OR
DETERGENTS TO CLEAN THE
PERMANENT HEPA FILTERs.
5. This model utilises a hang tab and filter clips to
insure that the filter is properly in place. Before
replacing the permanent HEPA filter make sure
that the hang tab is securely in place.
6. Align the clips on the side of your permanent
HEPA filter with the rails on the inside of the
unit. Gently slide the filter onto the rails.
7. The filter clip should easily slide onto the filter
hang tabs. Do not use force while attaching the
filter clip to the filter. Align the clip on the side
of your permanent HEPA filter with the rails on
the inside of the unit. (see Fig. 2 and 3)
NOTE: The pleated material and rubber gasket
should be facing towards the unit when applied.
8. Replace the inlet grill by sliding back on to the
unit. Make sure that it snaps securely into
position (the grill only goes on one way).
NOTE: Do not point outlet towards wall.
9. The filter life indicator (
) must be reset
once the permanent filters have been cleaned.
Reset indicator by pressing the power button
( ) on the control panel for 2 seconds.
Filter Life – The filter has been designed to never
need replacement, however, it does need servicing.
We recommend that under normal conditions of
continuous use, the filters should be cleaned at least
every 3 months to help maintain optimal performance.
Should the filter become damaged during
cleaning replacements are available by calling
0870 759 9000.
"Installation of a plug" below.
Installation of a plug Applicable to
U.K. and Ireland.
WARNING - THIS APPLIANCE MUST BE
EARTHED
The wires in the mains lead are coloured as such:
GREEN AND YELLOW
- EARTH
BROWN
- LIVE
BLUE
- NEUTRAL
Please note that the colour of these mains wires
may not correspond with the colour markings
that identify the terminals in your plug.
Please proceed as follows:
The wire which is coloured GREEN AND YELLOW
must be connected to the terminal which is marked
with the letter 'E' or by the earth symbol
or
coloured GREEN AND YELLOW.
The BROWN coloured wire must be connected
to the terminal, which is marked with the letter
"L" or is coloured RED.
The BLUE coloured wire must be connected to
the terminal, which is marked with the letter "N"
or is coloured BLACK.
PERMANENT HEPA filter Filters
(Usage: 2 pcs)
TROUBLESHOOTING
Solution
Problem
Unit will not
Check to make sure the unit is
operate.
plugged in.
Check to make sure the unit is on
by pressing the power button.
Make sure the filters are properly
installed and firmly close the door.
Decreased
If the Filter Life Indicator ( ) is
air flow.
red, the permanent HEPA filter
should be cleaned.
Check the filter to make sure
they are in good condition.
Check to ensure nothing is blocking
the air inlet and filtered air outlet.
Noise
Make sure filter bags are
removed if present.
Holmes Products (Europe) Ltd reserves the right
to change or modify any specifications without
notice.
For U.K. and Ireland only:
If the plug is not suitable for the socket outlets in
your home, it can be removed and replaced by
a plug of the correct type. Please refer to
NOTE: If the terminals in the plug are not marked
or if you are unsure or in doubt about the installation
of the plug please contact a qualified electrician.
If a 13A 3-pin plug is fitted, it must be an ASTA
approved plug, conforming to BS1363 standard.
Replacement 3A fuses must be BSI or ASTA
BS1362 approved.
GUARANTEE
PLEASE KEEP YOUR RECEIPT AS THIS WILL
BE REQUIRED FOR ANY CLAIMS UNDER
THIS GUARANTEE.
• This appliance is guaranteed for 2 years.
• In the unlikely event of breakdown from a
manufacturing related fault, please return it to
the place of purchase, with your till receipt
and a copy of this guarantee.
• The rights and benefits under this guarantee
are additional to your statutory rights which
are not affected by this guarantee.
• Holmes Products (Europe) Ltd undertakes
within the specifiied period, to repair or replace free
of charge, any part of the appliance found to be
defective from a manufacturing fault provided that: