1
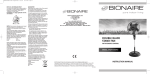
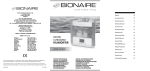
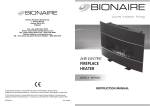
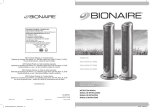
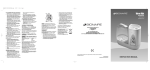
BU7000-IUK_IM.qxd:BASF40WIUK05EM1.qxd
TROUBLE SHOOTING
PROBLEM
Control panel screen
is dark, no mist and
no airflow from the unit
Control panel screen is
illuminated and flashing,
and there is no mist
There is not
enough mist
2/23/09
CAUSE
Unit not turned on
Not connected to main supply
Abnormal noise
Page 1
SOLUTION
Turn on unit
Connect to main supply
No water in the water tanks
Refill water in water tanks
The Mist Control is on the
Lo Setting
Change the Mist Control to Hi
Setting (see Mist Control instructions)
Resonance from the surface
bearing the unit
Scale covers the transducer
Mist has bad odour
3:56 PM
Place the unit on a steady surface or
on the ground
Clean the transducer softly with
a damp cotton ball. Transducer
surface is delicate, avoid applying
excessive pressure.
The water is too dirty or the water Clean the water tank, change to fresh,
in the tanks has been kept there clean water
too long, so it’s not fresh
The machine is new or the water Open the water tank and place the
is not clean
appliance in a cool area for 12 hours.
Wash the tank out or change the water.
Resonance effect due to too little Refill water in the water tank
water in the water tank
Resonance from the surface
bearing the unit
Place the unit on a steady surface or
on the ground
GUARANTEE
Please keep your receipt as this will be required
for any claims under this guarantee.
This appliance is guaranteed for 2 years after
your purchase as described in this document.
During this guaranteed period, if in the unlikely
event the appliance no longer functions due to a
design or manufacturing fault, please take it
back to the place of purchase, with your till
receipt and a copy of this guarantee.
The rights and benefits under this guarantee are
additional to your statutory rights, which are not
affected by this guarantee. Only Holmes
Products (Europe) Ltd. (“Holmes”) has the right
to change these terms.
Holmes undertakes within the guarantee period
to repair or replace the appliance, or any part of
appliance found to be not working properly free
of charge provided that:
• you promptly notify the place of purchase or
Holmes of the problem; and
• the appliance has not been altered in any
way or subjected to damage, misuse,
abuse, repair or alteration by a person
other than a person authorised by Holmes.
Faults that occur through, improper use, damage,
abuse, use with incorrect voltage, acts of nature,
events beyond the control of Holmes, repair or
alteration by a person other than a person
authorised by Holmes or failure to follow
instructions for use are not covered by this
guarantee. Additionally, normal wear and tear,
including, but not limited to, minor discoloration
and scratches are not covered by this guarantee.
The rights under this guarantee shall only apply
to the original purchaser and shall not extend to
commercial or communal use.
If your appliance includes a country-specific
guarantee or warranty insert please refer to the
terms and conditions of such guarantee or
warranty in place of this guarantee or contact
your local authorized dealer for more
information.
Waste electrical products should not be
disposed of with Household waste. Please
recycle where facilities exist. E-mail us at
[email protected] for further
recycling and WEEE information.
Holmes Products (Europe) Limited
1 Francis Grove
London
SW19 4DT
UK
pure indoor living
Holmes Products (Europe) Ltd.
1 Francis Grove
London SW19 4DT
England
Fax: +44 (0)20 8947 8272
Email: [email protected]
UK - Filter Sales Order Line - 0870 759 9000
Website address: www.bionaire.com
UK - Free phone Customer Service Helpline – 0800 052 3615
ULTRASONIC
HUMIDIFIER
MODEL# BU7000
© 2009 Sunbeam Products, Inc. doing business as Jarden Consumer Solutions. All rights reserved. Distributed by
Holmes Products (Europe) Ltd., 1 Francis Grove, London SW19 4DT, United Kingdom. Printed in PRC
© 2009 Sunbeam Products, Inc. faisant affaires sous le nom de Jarden Consumer Solutions. Tous droits réservés.
Distribué par Holmes Products (Europe) Ltd., 1 Francis Grove, London SW19 4DT, United Kingdom. Imprimé en RPC
SPR-022309
P/N: 129169
INSTRUCTION MANUAL
2/23/09
3:56 PM
Page 5
ENGLISH
A
BU7000
B
Fig. 1
A
B
C
D
E
F
G
H
I
J
K
Mist Nozzle
Handle
Water Tank
Tank Cap
Filter (x1)
Transducer
Water level security switch
(not visible)
Airflow outlet
Water Basin
Base
Control Panel
K1 Power ON OFF
K2 Mist Setting Control
C
H
Fig. 2
J
D
G
E
F
K
K1
K2
I
Congratulations
By choosing a BionaireTM humidifier, you have
chosen one of the finest humidifiers on the
market today!
PLEASE READ AND SAVE THESE
IMPORTANT INSTRUCTIONS
NOTE: Before reading these
instructions, please review the
corresponding illustrations.
GENERAL DESCRIPTION (SEE FIG. 1)
A Mist Nozzle
B Handle
C Water Tank
D Tank Cap
E Filter (x1)
F Transducer
G Water level security switch (not visible)
H Airflow outlet
I Water Basin
J Base
K Control Panel
K1 Power ON OFF
K2 Mist Setting Control
IMPORTANT SAFETY PRECAUTIONS
When using electrical appliances, basic safety
precautions should always be followed to reduce
the risk of fire, electric shock, and injury to
persons, including the following:
1. Read all instructions before using the appliance.
2. To avoid fire or shock hazard, plug the
appliance directly into an electrical outlet
and fully insert the plug.
3. Keep the cord out of heavy traffic areas. To
avoid fire hazard, NEVER put the cord under
rugs, or near radiators, stoves, or heaters.
4. DO NOT place humidifier near heat sources
such as stoves, radiators, and heaters. Do
locate your humidifier on an inside wall near an
electrical outlet.The humidifier should be at least
10cm/4" away from the wall for best results.
5. WARNING: Never use a humidifier in a
closed room. (i.e: doors and windows
closed) as it may result in excessive
humidity.
6. WARNING: Do not attempt to refill
humidifier without first unplugging the unit
from its electrical outlet. Be sure to pull by
the plug and not the cord.
7. NEVER drop or insert any object into any
openings. DO NOT place hands, face, or
body directly over or near Moisture Outlet
while unit is in operation. DO NOT cover
Moisture Outlet or place anything over it
while the unit is operating.
8. DO NOT operate any appliance with a
damaged cord or plug, after the appliance
malfunctions, or if it has been dropped or
damaged in any manner. Return appliance to
manufacturer for examination, electrical or
mechanical adjustment, or repair.
9. Use appliance only for intended household
use as described in this manual. Any other
use not recommended by the manufacturer
may cause fire, electric shock, or injury to
persons. The use of attachments not
recommended or sold by Holmes Products
(Europe) Ltd. may cause hazards.
10. DO NOT use outdoors.
11. Always place humidifier on a firm, flat,
level surface. A waterproof mat or pad is
recommended for under the humidifier.
NEVER place it on a surface that may
become damaged by exposure to water
and moisture (i.e. finished floor).
12. DO NOT allow the Moisture Outlet to directly
face the wall. Moisture could cause
damage, particularly to wallpaper.
13. Humidifier should be unplugged when not
in use.
14. NEVER tilt, move, or attempt to empty unit
while it is operating. Shut off and unplug before
removing the water tank and moving the unit.
DO NOT attempt to remove the water tank
within 15 minutes after the humidifier is turned
off and unplugged. Serious injury may result.
15. This humidifier requires regular maintenance
to operate appropriately. Refer to cleaning
and maintenance procedures.
16. NEVER use detergents, petrol, glass
cleaner, furniture polish, paint thinner, or
other household solvents to clean any part of
the humidifier.
17. Excessive humidity in a room can cause water
condensation on windows and some furniture.
If this happens, turn the humidifier OFF
18. Do not use humidifier in an area where
humidity level is in excess of 55%.
19. DO NOT attempt to repair or adjust any
electrical or mechanical functions on this
unit. The inside of the unit contains no user
serviceable parts. All servicing should be
performed by qualified personnel only.
20. If the supply cord is damaged, it must be
replaced by the manufacturer or its service
agent or a similarly qualified person.
21. This appliance is not intended for use by
persons (including children) with reduced
physical, sensory or mental capabilities, or
lack of experience and knowledge, unless
they have been given supervision or
instruction concerning use of the appliance
by a person responsible for their safety.
Children should be supervised to ensure that
they do not play with the appliance.
22. CAUTION: In order to avoid a hazard due to
inadvertent resetting of the thermal cutout,
this appliance must not be supplied through
an external switching device, such as a timer,
or connected to a circuit that is regularly
switched on and off by the utility.
ASSEMBLY INSTRUCTIONS
1. Be sure the humidifier is switched off
and disconnected from the wall outlet.
2. Install the Water Filter (E) into the base (J)
matching the filter hole with the base pin.
WARNING: When installing a new Water
Filter, be sure to first remove the plastic bag,
then follow “Filter Use Instructions”.
IMPORTANT: To eliminate the emission of
minerals from the water, it is recommended
that the Water Filter be used.
3. Place the water tank (C) onto the base.
IMPORTANT: Make sure the water tank
as well as the water basin (I) are clean
before using the appliance and after storing
for a long time.
4. Ensure humidifier is level.If the humidifier is not
level always turn the power off before handling it.
OPERATING INSTRUCTIONS
Fill Water Tank
NOTE: Be sure the humidifier is switched off and
disconnected from the wall outlet. The water you
put into the water tank should be clean and not
be over 40° C. (cold boiled water or
demineralised water are recommended).
1. Remove the water tank out from the base.
2. Unscrew the tank cap (D).
3. Fill the tank with clean water and screw the
tank cap back tightly onto the tank.
4. Put the water tank back on the base.
Switch the Unit On and Off (See Fig.2 K1)
1. Put the plug into the main supply.
2. Press Power ( ) (K1) to switch on and off
the Ultrasonic Humidifier. The control panel
(K) is illuminated with one of three colours
depending on the rooms humidity when the
power is on.
NOTE: This unit has a memory. The control
panel will remember the previous mist output
level setting after the unit has been turned off.
However, if the unit is unplugged, the control
panel will reset to Hi ( ) and will no longer
remember the previous mist output level setting.
Mist Control/ Humidity Level Control
To raise or lower the humidity level, you will
need to touch the lower portion (K2) of the
control panel where the three separate droplets
are located, this will adjust between the mist
output levels.
Low Mist Output
= 1 beep
Medium Mist Output = 2 beeps
High Mist Output
= 3 beeps
CONTROL PANEL
The control panel has a humidity indicator light
and will show differing colours as follows:
Amber
= Low humidity. (0-30%
Relative Humidity Level)
Green
= Ideal Humidity Level
Blue
= High humidity. (Above 56%
Relative Humidity Level)
Screen flashes = Water level is low, refill tank
AUTO SAFETY SHUT OFF (G)
This Ultrasonic Humidifier has a built in
safety device:
1. When the water level in the basin is low,
the unit will beep 10 times and the control
panel will continuously flash, the transducer
(F) will automatically shut off. Refill the tank
as instructed in “Operating Instructions” to
operate the humidifier again.
FILTER USE
The Water filter is used to retain minerals in your
water and to provide clean moisture. The filter
life is determined by the average daily use of
your humidifier and the water hardness in your
area. The harder the water, the greater the
amount of minerals in the water and the more
often you will need to replace the filter. It is
strongly recommended that the filter is replaced
every 2 months, (depending on use), or when
white dust is emitted from the unit.
1. Make sure the unit is turned off and disconnect
from the mains outlet. Remove Water Tank.
2. If replacing, remove the Filter from the base
and dispose of according to local regulations.
3. Remove the protective plastic bag from
the new filter. Soak filter thoroughly by
immersing filter in water for 5 minutes. Install
the filter into the base.
4. Fill the water tank with clean, cool tap water
and replace it in the base. Wait 15 minutes
for water to pass through the filter before
turning on the unit. The 15 minute wait is
necessary to ensure that the filter is properly
saturated and the water is at its optimal level
for best performance.
Cleaning and Maintenance Instruction
Humidifiers provide comfort by adding moisture
to dry, heated indoor air. To get the most benefit
from the humidifier and to avoid product misuse,
follow all instructions carefully, specifically the
operation, care and maintenance guidelines.
Please note this is an electrical appliance and
requires attention when in use.
Cleaning your humidifier every one or two weeks,
depending on the water conditions is important
in order to maintain efficient, healthy, odour-free
operation. Water quality varies widely and,
combined with build-up of mineral scale in your
humidifier, may under certain conditions promote
the growth of micro-organisms in the water tank.
Before cleaning, Please note the following:
• DO NOT use soap, detergents, abrasives,
gasoline, glass or furniture polish, or boiling
water to clean any part of your Ultrasonic
Humidifier. These will interfere with the
proper operation of your unit and may affect
its appearance.
• DO NOT use sharp or metal objects to clean
mineral deposits in the reservoir. Contact
with sharp objects can result in damage to
the plastic.
• Mineral deposits should be soaked for up to
20 minutes in plain vinegar and water to help
with their removal.
• DO NOT clean any part of your humidifier in
the dishwasher.
Daily maintenance:
1. Before cleaning, switch off the unit and
unplug the unit from the electrical outlet.
2. Lift and remove the tank of the humidifier.
3. Drain and rinse the base and tank thoroughly
to remove any sediment or dirt. Wipe clean
and dry with a clean cloth or paper towel.
4. Refill the tanks as instructed in “Operating
Instructions”. Do not over fill.
5. If moisture forms on walls or windows in your
home, turn the humidifier off.
STORAGE TIPS
If you do not plan to use your unit for an
extended period of time, it is important that you
follow these instructions to help prevent
stagnation of water in the unit.
1. Turn the unit off and disconnect from the
outlet. Remove the water tanks, then empty
the tanks and the base completely. Clean the
humidifier as instructed in the cleaning
instruction section.
2. Dry the unit thoroughly. DO NOT leave any
water in the unit when storing.
3. Pack the humidifier in its original carton and
store in a cool, dry place.
SERVICE INSTRUCTIONS
1. DO NOT attempt to repair or adjust any
electrical or mechanical functions on this
unit. Doing so will void the warranty.
The insides of the unit contain no user
serviceable parts. Only qualified personnel
should perform all servicing.
2. Should the unit stop working, first check the
fuse in the plug (UK only) or fuse/circuit
breaker at the distribution board is operating,
before contacting the manufacturer or service
agent.
3. If you need to exchange the unit, please
return it in its original carton, with a sales
receipt, to the store where you purchased it.
4. Should your humidifier require service,
please contact your local dealer.
ACCESSORIES FOR MODEL
• BWF7000 Water Purification Filter
• BionaireTM Cleaning Solution
TECHNICAL SPECIFICATIONS
Input voltage:
220-240 V~ 50 Hz
Power consumption: 23 Watts
Holmes Products (Europe) Ltd. reserves the
right to change or modify any specifications
without notice.
FOR U.K. AND IRELAND ONLY
If the plug is not suitable for the socket outlets in
your home, it can be removed and replaced by a
plug of the correct type. Please refer to
"Installation of a plug" below.
Installation of a plug applicable to U.K.
and Ireland
3 amp
BU7000-IUK_IM.qxd:BASF40WIUK05EM1.qxd
NOTE: If the terminals in the plug are not
marked or if you are unsure or in doubt about
the installation of the plug please contact a
qualified electrician.
If a 13A 3-pin plug is fitted, it must be an ASTA
approved plug, conforming to BS1363 standard.
Replacement 3A fuses must be BSI or
ASTABS1362 approved.
This product is fitted with a 13A plug complying
to BS1363. If this plug is unsuitable or needs to
be replaced, please note the following: The
wires in the mains lead are coloured as such:
BROWN
LIVE
BLUE
NEUTRAL
Please note that the colour of these mains wires
may not correspond with the colour markings
that identify the terminals in your plug. Please
proceed as follows:
The BROWN coloured wire must be connected
to the terminal, which is marked with the letter
"L" or is coloured RED.
The BLUE coloured wire must be connected to the
terminal, which is marked with the letter "N" or is
coloured BLACK.
DO NOT CONNECT either of these wires to the
earth terminal in the plug. The earth terminal plug
is marked with the letter "E", or with the earth
symbol
, or coloured GREEN, or GREEN and
YELLOW.