1
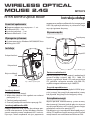
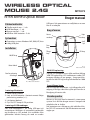
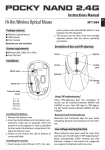
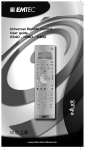
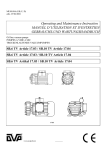
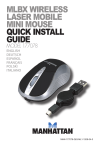
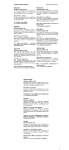
WIRELESS OPTICAL
MOUSE 2.4G
Hi-Res Wireless Optical Mouse
MT1073
Instructions Manual
puter system will automatically detect it and
prepare it for full operation.
2. The mouse may use then. If the user wrongly
operates, please redo the above operating
procedures.
Package contents
■ Wireless Optical Mouse
■ USB receiver
■ 2 AAA alkaline batteries
■ User manual
Description of keys and DPI adjusting
System requirements
■ Windows ME, 2000, XP or Vista
■ Free USB Port
Left key
Installation
Right key
Scrolling
wheel
Forward
ON/OFF switch
Backward
DPI-adjusting
key
Battery cover
Position for storing
receiver
Using “DPI-adjusting key”
Diagram 1
Diagram 2
Installing the battery
1. Remove the battery cover.
2. Insert two AAA batteries into the battery compartment, make sure to properly orient the
positive (+) and negative (-) ends as specified
by the marks in the battery compartment. Replace the battery cover.
3. Switch on the mouse, the LED in bottom of
mouse will blink.
Installing the receiver
1. Insert receiver into USB port of PC, the com-
Using “DPI-adjusting key”, the resolution of
mouse can be switched between 800DPI and
1600DPI in turn. That LED light in “DPI-adjusting key” blinks slowly indicates 800DPI and fast
1600DPI.
Backward and Frontward keys
Backward and Frontward keys for your easily
navigating forward and backward on the Internet.
Low-voltage alarming function
When batteries have been used for some time
and discover the LED light in“DPI-adjusting key”
blinks automatically, which reminds you that
batteries voltage is becoming low, suggested
you replace the batteries with new ones.
EN
WIRELESS OPTICAL
MOUSE 2.4G
Hi-Res Wireless Optical Mouse
Zawartość opakowania
■ Bezprzewodowa mysz optyczna – 1 szt.
■ Odbiornik USB – 1 szt.
■ Instrukcja obsługi – 1 szt.
■ Bateria alkaliczna – 2 szt.
Wymagania systemowe
Instrukcja obsługi
rozpoznane podłącz odbiornik do innego portu
USB. Gdy operacja zakończy się sukcesem Twoja
mysz jest gotowa do pracy.
Używanie myszki
Przycisk lewy
■ System operacyjny: Windows ME/2000/XP/Vista
■ Wolny port USB
Instalacja
MT1073
Przycisk prawy
Rolka
przewijania
Wprzód
Wstecz
Przełącznik zasilania
Przycisk CPI
Pokrywa baterii
Rys. 3. Widok z góry
Zmiana rozdzielczości
Miejsce na odbiornik
USB
Rys. 1. Widok spodu myszki
Rys. 2. Odbiornik USB
Instalacja baterii
1. Otwórz pokrywę baterii.
2. Włóż dwie baterie AAA zgodnie ze znakami
polaryzacji (+/-).
3. Zamknij pokrywę baterii.
4. Przesuń przełącznik zasilania w pozycję ON.
Instalacja odbiornika USB
Podłącz odbiornik USB myszki do wolnego portu USB w komputerze. System Windows automatycznie rozpozna nowe urządzenie HID i zainstaluje mysz. Jeżeli urządzenie nie jest poprawnie
Naciśnij przycisk CPI aby zmienić rozdzielczość
sensora między trybami 800 CPI i 1600 CPI.
Zmianę sygnalizuje dioda LED pod przyciskiem
CPI, powolne mruganie oznacza tryb 800 CPI,
szybkie mruganie oznacza tryb 1600 CPI.
Przycisk wprzód/wstecz
Podczas korzystanie z przeglądarki WWW przyciśnij „wstecz” aby przejść do poprzedniej strony
lub „wprzód” aby przejść do następnej strony.
Oszczędzanie energii
Myszka posiada zaawansowany system oszczędzania energii. Niemniej jednak gdy nie używasz
myszki przez dłuższy czas wyłącz ją przesuwając
przełącznik zasilania w pozycję OFF.
Gdy baterie są już wyczerpane dioda pod przyciskiem CPI będzie mrugała samoczynnie. Wymień
wtedy baterie na nowe baterie alkaliczne AAA.
PL
WIRELESS OPTICAL
MOUSE 2.4G
Hi-Res Wireless Optical Mouse
Lieferumfang
■ 1x Kabellose, optische Maus
■ 1x USB Empfänger
■ 1x Gebrauchsanleitung
■ 2x AAA Alkali-Batterien
Gebrauchsanleitung
nicht erkennen, dann stecken Sie den USB Empfänger in einen anderen, freien USB Steckplatz
ein. Sobald der Vorgang erfolgreich abgeschlossen wurde, können Sie die Maus verwenden.
Benutzung der Maus
linke Taste
Systemvoraussetzung
■ Benutzersystem: Windows ME, 2000, XP, Vista
■ Freier USB Steckplatz
Installation
MT1073
rechte Taste
Scroll
Rad
Vorwärts
Taste
Rückwärts
Taste
Ein-/Ausschalter
CPI Knopf
Batteriefach
Abb. 3.
Frontansicht der Maus
Ablagefach für den
Empfänger
Abb.1 Maus Unterseite
Abb.2 USB Empfänger
Batterien einlegen
1. Öffnen Sie das Batteriefach
2. Setzen Sie die zwei AAA Batterien in das Batteriefach ein - Achten Sie bitte auf die Polarität (+/-).
3. Schließen Sie das Batteriefach
4. Stellen Sie den Schalter auf ON, um die Maus
einzuschalten.
USB Empfänger installieren
Stecken Sie den USB Empfänger in einen freien
USB Anschluss in Ihrem Computer ein. Windows
wird das Gerät automatisch erkennen und das
USB Gerät installieren. Sollte Windows das Gerät
CPI Auflösung ändern
Drücken Sie den CPI Knopf, um zwischen einer
Auflösung von 800 und 1600 CPI zu wählen. Die
LED Statusanzeige unter dem CPI Knopf, wird ein
paar mal blinken – langsames blinken = 800 CPI,
schnelles blinken = 1600 CPI.
Vor-/Rückwärtstasten
Beim surfen im Internet, können Sie sich entsprechend die vorherige oder die nächste Seite
anzeigen lassen.
Stromsparen
Die Maus ist mit einem automatischen Stromsparmodus ausgestattet. Wir empfehlen Ihnen,
bei längerer nicht Benutzung, den Schalter auf
die Position „OFF“ zu stellen.
Sobald die Batterien entladen sein sollte, wird Ihnen dies durch eine blinkende CPI LED Statusanzeige signalisiert. Bitte ersetzen Sie die Batterien
durch ein neues paar Batterien.
DE
WIRELESS OPTICAL
MOUSE 2.4G
Hi-Res Wireless Optical Mouse
Pakken Indeholder
■ Trådløs optisk mus – 1 stk.
■ USB Modtager – 1 stk.
■ Bruger manual – 1 stk.
■ Alkaline AAA batterier - 2 stk.
System krav
■ Operations system: Windows ME, 2000, XP, Vista
■ Ledig USB port
Installation
MT1073
Bruger manual
USB-port. Når operationen er vellykket er musen
klar til at arbejde.
Brug af musen
Venstre
museknap
Højre
museknap
Scroll
hjul
Frem
knap
Tilbage
knap
DPI knap
ON/OFF knap
Batteri dæksel
Pic. 3.
Mus set fra oven
Skift DPI opløsning
Rum for opbevaring
af modtager
Pic. 1 Mus set fra bunden
Tryk på DPI-knappen for at skifte mellem 800 og
1600 DPI opløsning. LED indikatoren under DPI
knappen blinker et par gange - langsomt blinkende for 800 DPI og hurtigt blinkende for 1600
DPI.
Frem/tilbage-knap
Pic. 2 USB modtager
Isætning af batterier
1. Åben batteri dæksel
2. Isæt to AAA batterier i batterirummet ifølge
polarisering mærker (+/-).
3. Luk batteri dæksel
4. Flyt ON/OFF knap til ON position.
Isætning af USB modtager
Sæt USB-modtageren i en ledig USB-port på
computeren. Windows vil automatisk genkende
og installere ny HID enhed. Hvis enheden ikke
genkendes korrekt forsøg da med en anden
Når du surfer på Internettet - tryk tilbage for at få
adgang til forrige side eller trykke på frem for at
få adgang til næste side.
Strømbesparelse
Musen er forsynet med automatisk strømspare
system. Hvis du ikke bruger musen i længere tid
anbefales det at slukke.
Når batterierne er slidt op og skal udskiftes blinker DPI LED automatisk. Udskift batterierne med
nogle nye.
DK