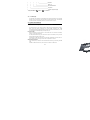
1
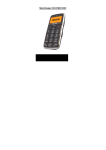
Contents 1. SAFETY AND PRECAUTIONS ............................................................. 3 2. CARE AND MAINTENANCE ................................................................ 4 FURTHER SAFETY INFORMATION ........................................... 6 EMERGENCY CALLS IMPORTANT! ............................................ 8 CERTIFICATION INFORMATION (SAR) ................................... 8 3. Appearance ....................................................................................... 9 3.1 3.2 3.3 3.4 Keys ......................................................................................... 10 LCD Display............................................................................... 11 Status Icons .............................................................................. 11 LCD Backlight ............................................................................ 11 4. Quick Introduction ....................................................................... 11 4.1 4.2 4.3 4.4 4.5 4.6 4.7 Remove the Battery Cover and Insert the SIM Card ..................... 11 How To Install ........................................................................ 11 SIM Card Precautions: ........................................................... 12 Install the Battery and Battery Cover .......................................... 12 Charge/Recharge the Battery ..................................................... 12 Use of Battery ........................................................................... 12 Monitoring Battery Power...................................................... 12 Battery Power Reminder ........................................................ 13 Turn On or Off ........................................................................... 13 Make a Call ............................................................................... 13 Use of Passwords / Codes .......................................................... 13 Phone Lock .............................................................................. 14 PIN Code ................................................................................. 14 PUK Code................................................................................. 14 PIN2 Code ............................................................................... 14 PUK2 Code .............................................................................. 14 5. General Functions ........................................................................ 15 5.1 5.2 5.3 Dial a Number ........................................................................... 15 International Call ................................................................... 15 Dial a Number By Use of the Phonebook .............................. 15 Re-dial the Last Outgoing Number ........................................ 15 Short-cut Key: ............................................................................ 16 Adjust Volume ........................................................................... 16 Answer a Call ............................................................................ 16 1 5.4 5.5 5.6 Options During a Call ................................................................. 16 Call Holding ............................................................................. 16 Receipt of a Second Call......................................................... 16 Mute and Hold ........................................................................ 17 Hands-Free.............................................................................. 17 Input Methods ........................................................................... 17 Keypad Lock .............................................................................. 18 6. Menu Instructions ........................................................................ 18 6.1 Phonebook ................................................................................ 18 Search ..................................................................................... 18 Copy......................................................................................... 20 Setting ..................................................................................... 20 Storage Status ........................................................................ 20 Read Message ........................................................................... 21 6.2 Inbox ....................................................................................... 21 Call Records .............................................................................. 21 6.3 Incoming Calls / Outgoing Calls / Missed Calls .............................. 22 6.4 Tools......................................................................................... 23 Profiles ..................................................................................... 24 6.5 To choose a preset profile : ........................................................ 24 6.6 Display Settings ......................................................................... 25 Back Light: .............................................................................. 25 Greeting Text: ......................................................................... 25 Clock Settings ......................................................................... 25 6.7 Security .................................................................................... 26 Language .................................................................................. 27 6.8 6.9 Auto On .................................................................................... 27 6.10 Auto Off .................................................................................... 27 6.11 Keypad Lock .............................................................................. 27 6.12 Recover Default Value ................................................................ 28 7. Extras ........................................................................................... 28 7.1 Specification Parameters ............................................................ 28 2 1. SAFETY AND PRECAUTIONS Please read these simple guidelines. Not following them may be dangerous or illegal. Read the complete user guide for further information. Switch off the phone in the vicinity of chemical plants, gas stations and other locations containing explosive objects. Keep the phone far away from children. When driving, please use the hands free calling device to ensure safety. Please park the car at roadside for communication unless in emergency. Switch off the phone when boarding an airplane and do not switch the phone on during the flight. Be careful when using the mobile phone in the vicinity of such devices as pacemakers, hearing aids and other electro-medical equipment, which may be interfered by the mobile phone. No guarantee for the accessories and parts not produced by the original factory. Never attempt to disassemble the phone by yourself. Contact the supplier in case of any trouble with your mobile phone. Do not recharge the phone without battery being installed. Charge the phone in well-ventilated environment and keep away from inflammable and high explosive articles. To avoid demagnetization, keep the handset away from magnetic substances, such as magnetic discs or credit cards. 3 Keep the phone away from liquid. If soaking or erosion occurs, take the battery out and contact the supplier. Avoid using the phone in too high or too low temperature environments. Never leave the phone exposed under direct sunlight, in high humidity or in a dusty environment. Do not use liquid or a damp cloth with strong detergents to clean the handset. Wireless phones may be susceptible to interference, which can affect performance。 Use only approved enhancements and batteries. Do not connect incompatible products. Use only in the normal position as explained in the produce documentation. Do not touch the antenna unnecessarily. Ensure the phone is switched on and in service. Enter the emergency number, then press the call key. Give your location. Do not end the call until given permission to do so. 2. CARE AND MAINTENANCE Battery care Your device is powered by a rechargeable battery. When the charge is low, please re-charge the battery. In order to extend the lifetime of the battery allow the battery to run out of power before recharging. Unplug the charger from power source and the phone when not in 4 use. Do not leave the battery connected to a charger once the battery is full. Overcharging may shorten battery lifetime. Extreme temperature can affect the ability of your battery to charge. Battery works only at room temperature (between 15 and 25°C). If the temperature of the battery is too hot or too cold, the battery will not charge and can malfunction. Extreme temperatures reduce and cause malfunctions in the battery. 1. Use the battery only for intended purpose. Never use unauthorized charger or battery or that is damaged. 2. Do not short-circuit the battery. Accidental short-circuiting can occur when a metallic object such as a coin, clip, or pen causes direct connection of the polarity; (+) and (-) terminals of the battery (metal stripes on the battery). This might happen, for example, when you have a spare battery or magnetic objects in the vicinity. Short-circuiting the terminals can damage the battery or the connectors. 3. Do not leave the battery in very warm or cold places, such as in a closed car in summer or winter. Damaged batteries can damage or ruin components ( eg. Plastics ). All of the above suggestions apply to the phone, battery, charger, or any accessory. If phone or accessories are not working properly, take only to authorised service facilities. When the phone or accessories return to normal temperature, moisture can form inside and damage circuit boards. Do not attempt to open the phone or accessories other than as instructed in this guide. Do not drop, knock, or shake the phone or accessories. Rough handling can break internal circuit boards and fine mechanics. Do not use chemicals, solvents, or detergents to clean the phone or accessories. Do not paint the phone or accessories. Paint can clog the moving parts and prevent proper operation. 5 Use only the supplied or authorised replacement parts. Unauthorized parts, modifications, or attachments can damage the phone and may violate regulations governing radio devices. Do not dispose of batteries in a fire! Dispose of batteries according to local regulations. Please recycle when possible. Do not dispose as household waste. Mobile phone maintenance Keep the device dry. Precipitation, humidity, and all types of liquids or moisture can contain minerals that will corrode internal parts and circuits. If your device does get wet, remove the battery and allow the device to dry completely before replacing it. Do not use or store the device in dusty, dirty areas to avoid damage to moving parts and components. Do not store the phone or accessories in warm areas. High temperatures reduce the life of electronic devices. Do not dispose as household waste. Do not use the mobile phone during charging. Keep the phone away from charger before use. FURTHER SAFETY INFORMATION The unit and the accessories can contain small parts. Keep them out of the reach of small children. OPERATING ENVIRONMENT Remember to follow any particular rules that may apply wherever you happen to be,and always turn off the unit whenever its use is forbidden, or it can cause interference or danger. Only use the units in its normal user position. This unit complies with guidelines for radiation when it is used either in a normal position against your ear, or when it is at least 2.2 cm (7/8 inch) from your body. If the unit is carried close to your body in a case, belt holder or other holder, these should not contain any metal, and the product should be placed at the distance from yr body specified above. Make sure that the distance instructions above are followed 6 until the transfer is complete. Parts of the unit are magnetic, The unit can attract metal object. Do not keep credit cards or other magnetic media near the unit, as information stored on them can be erase. MEDICAL UNITS The use of equipment that transmits radio signals, e.g. mobile phones, can interfere with insufficiently protected medical apparatus. Consult a doctor or the manufacturer of the apparatus to determine if it has adequate protection against external radio signals, or if you have any question. If notices have been put up at health care facilities instructing you to turn off the unit while you are there, you should comply. Hospitals and other health care facilities sometimes use equipment that can be sensitive to external radio signals. PACEMAKER Pacemaker manufacturers recommend a distance at least 15 cm. (6 inches) between a mobile phone and a pacemaker to avoid the risk of interference with the pacemaker. These recommendations are in accordance with independent research and recommendations from Wireless Technology Research. People with pacemakers should: - always keep the unit at a distance of at least 15 cm from the pacemaker not carry the unit in a breast pocket hold the unit against the ear on the opposite side from the pacemaker to reduce the risk of interference If you suspect that there is a risk of interference, turn off the unit and move it further away. HEARING AIDS 7 Some digital wireless units can cause interference to some hearing aids. Contact yr operator in case of interference. VEHICLES Radio signals can affect electronic systems in motor vehicles (e.g. electronic fuel injection, ABS brakes, automatic cruise control, air bag systems) that have been incorrectly installed or are inadequately protected. Contact the manufacturer or its representative for more information about yr vehicle or any additional equipment. Do not keep or transport flammable liquid gases or explosives together with the unit or its accessories. For vehicles equipped with air bags: remember that air bags fill with air with considerable force. Do not place objects, including fixed or portable radio equipment in the area above the airbag or the area where it might expand. Serious injuries may be caused if the mobile phone equipment is incorrectly installed and the airbag fills with air. It is forbidden to use the unit whilst flying. Turn off the unit before you board a plane. Using wireless telecom units inside a plane can involve risk for air safety and interfere with telecommunications. It can also be illegal. AREAS WITH EXPLOSION RISK Always turn off the unit when you are in an area where there is a risk of explosion and follow all signs and instructions. An explosion risk exists in the places that include areas where your normally requested to turn off your car engine. Within such an area, sparks can cause explosion or fire which can lead to personal injuries, even death. Turn off the unit at filling stations i.e. near petrol pumps and garages. Follow the restrictions that are in force on the use of radio equipment near places where fuel is stored and sold, chemical factories and places where blasting is in progress. Areas with risk for explosion are often – but not always – clearly marked. This also applies to below decks on ships: the transport or storage of chemicals; vehicles that use liquid fuel (such as propane or butane); areas where the air contains chemicals or particles, such as grain, dust or metal powder. EMERGENCY CALLS IMPORTANT! 8 Mobile phones such as this unit use radio signals, the mobile phone network, the terrestrial network and user-programmed functions. This means that connection in all circumstances cannot be guaranteed. Therefore you should never rely solely on a mobile phone for very important calls such as medical emergencies. CERTIFICATION INFORMATION (SAR) This model meets international guidelines for exposure to radio waves. Your mobile device is a radio transmitter and receiver. It is designed not to exceed the limits for exposure to radio waves recommended by international guidelines. These guidelines were developed by the independent scientific organization ICNIRP and include safety margins designed to assure the protection of all persons regardless of age and health. The guidelines use a unit of measurement known as the Specific Absorption Rate, or SAR. The ICNIRP SAR limit for mobile devices used by the general public is 2.0 W/kg. As SAR is measured utilising the device’s highest transmitting power, the actual SAR of the device while operating is typically below the above indicated level. This is due to automatic changes to the power level of the device to ensure it only uses the minimum level requested to reach the network. While there may be differences between the SAR levels of various phones and at various positions, they all meet the governmental requirements for safe exposure. The World Health Organization has stated that present scientific information does not indicate the need for any special precaution for the use of mobile devices. They note that if you want to reduce your exposure then you can do so by limiting the length of calls or using a “hands-free” device to keep the mobile phone away from the head and body. 9 3. Appearance 1 Torch button 4 Earpiece 2 Alarm clock shot cut 5 Screen 7 End Key 8 Send Key 10 3 Switch on/off 6 Shortcut Key M1 & M2 9 Numeric Key 10 Microphone 11 Earphone/Charger plug 14 Speaker 13 Volume Down 16 Back cover 3.1 17 Torch 12 Volume Up 15 SOS button 18 Table charger plug Keys This phone has the following keys: Key Name Send Key End Key Short -cut keys Up, Dow n Key OK/ Menu key Annotations Dial or answer a call. In Idle mode, press this key to browse the Outgoing Calls. End a call. In the Menu options, press to return to Idle mode. Press key to select the phone number saved in each key. In Menu options M1 is used to be left soft key and M2 to be right soft key. To scroll the options in menus or the items in the Phonebook In Edit mode, moves the cursor up or down. During conversation to adjust volume loudness. In the idle screen, press the key to access Main men. It also can be used to confirm or select. 11 Keyp ad Powe r key Torc h key Alar m clock key SOS Key Keypad for input of numbers, letters and some available special characters. In the Edit screen, press # to change the input method; press * to switch to the Symbol interface. In Idle mode, Long press the # key to switch between the current profile and the Conference mode. This key is used to switch on/ off the handset. Pressing torch key for 2seconds to light up/ extinguish the torch. Pressing this key for 2seconds to get into Alarm setting interface. Keep pressing for 3seconds, the phone would send SMS to the pre-save number in advance, then dial them one by one in turn. 3.2 LCD Display The Display shows different information Status icons: Text and Graphics Area are in the middle, which shows numbers, words and icons. Names of the instruction are shown at the bottom. 3.3 | Status Icons | | | | |____________ Battery power level 12 | | | | | | | |_______________________ Alarm on |_________________ Call divert | | |_____________________________ International Roam | |___________________________________ Earphone |_______________________________________ Ring tone status: --- Mute Network Signal strength ----- Vibration 3.4 LCD Backlight The backlight time duration on the display screen and keypad can be set in Display Settings. If you do not press any key within a certain period of time, the backlight will be turned off automatically when the set time duration expires. 4. Quick Introduction 4.1 Remove the Battery Cover and Insert the SIM Card The SIM card stores your phone numbers, PIN (personal identification number), PIN2, PUK (PIN phone unlocking key), PUK2 (PIN2 unlocking key), IMSI (international mobile subscriber identity) codes and network information, as well as Phonebook and SMS (Message service) data, etc. How To Install Before installing the phone must be turned off and not connected to battery charger or any other accessory. Put the phone backside up, press the concave part on the battery cover; push the battery back downward to take it out. Gently slide the SIM card into the slot metal side downwards until the card is in place, Please ensure cut angle of the card corresponds to the slot. SIM Card Precautions: Turn off the phone, and wait a few seconds before removing or inserting the SIM card. Handle the SIM card with care, do not bend or scratch the SIM card. 13 When SIM card is incorrectly inserted or damaged, the screen will display “No SIM Card” After the phone is turned on. Check the SIM card is correctly inserted and not damaged and then turn on the phone again. If the screen displays “SIM Card Damaged”, please forward it to the network operator for repair. 4.2 Install the Battery and Battery Cover Gently push the battery into the battery slot, ensuring the metal contacts on the battery are faced downwards and in the position to be in contact with the metal contacts in the phone. Insert the battery cover, by gently pushing it upward until in place. 4.3 Charge/Recharge the Battery Insert the charger into the charger socket; Be careful that only the original charger is used and in correct position. Connect the electrical plug side of the charger into electric power plug. When charging is complete always disconnect first form electrical source and then from the phone. Notes: When battery power is low the phone can not be turned on, keep under charge until the screen resumes indication of power in the battery. Make sure that the standard voltage and power match the voltage and power indicated on the charger. During the charging/recharging period, it is best to keep phone turned off. Use the battery only for its intended purpose. Never use any charger or battery that is damaged or not original. 4.4 Use of Battery Monitoring Battery Power When the battery is low or nearly empty: The battery low message displays. The empty battery icon blinks and phone turns off. 14 Battery Power Reminder If the battery is not used for long periods, fully charge the battery before use again. The battery can be charged and discharged hundreds of times, but it will eventually wear out. When the talk and standby times are noticeably shorter than normal, replace the battery. If the battery is completely discharged, it may take many minutes before the charging indicator appears on the display or before the phone can be used. Your device is powered by a rechargeable battery. The full performance of a new battery is achieved only after two or three complete charge and discharge cycles. If a replacement battery is being used for the first time or if the battery has not been used for a long period, it maybe necessary to connect, disconnect and then reconnect the charger before charging occurs. 4.5 Turn On or Off Press the Power key for a several seconds and until the phone powers on. The idle screen appears in the display. If phone lock password has been set you will be requested to enter the same, then press the OK key to confirm. If PIN code has been set you will be requested to enter the same, then press the OK key to confirm. To turn phone off Press the Power key until phone turns off. Note: The background screen appears when the phone is turned on and is in standby. 4.6 Make a Call Enter the phone number to be dialed and then press the Send Key Note: Before using the phone, ensure SIM Card is inserted and battery has been correctly fully charged. 4.7 Use of Passwords / Codes Your phone and SIM card have different passwords/codes, which help prevent unauthorized use of your phone and SIM card. Enter the correct password/code when prompted, then press the Send Key or M1 Key to confirm. If you enter a wrong password, press the End Key to delete the wrong password/code, then re-enter the correct passwords. In the Menu “Security” there are the various options relating to the PIN, PUK and Phone passwords/codes. 15 Phone Lock The phone lock password /code is used to prevent your phone from being used with authorization. The default password/code is 0000. Everytime the phone is turned on, the password/code must be entered to activate the phone PIN Code PIN code (4-8 digits) is used to prevent your SIM card being used without authorisation. The PIN code is normally provided together with the SIM card by the network operator. Everytime the phone is turned on or SIM inserted into a phone, the code must be entered to activate the SIM Card Warning: IF SIM Card code is entered incorrectly three times, the SIM card is blocked and can be unblocked only be entering the PUK code. The PUK password is normally supplied by the SIM card network operator. PUK Code The PUK code is used when the PIN code is blocked. The PUK code is provided with the SIM card by the network operator. If not supplied, please contact your network operator. If the PUK code is entered incorrectly 10 times, then the SIM card will be invalidated. You must connect the network operator for replacement. PIN2 Code The PIN2 code (4-8 digits) is provided with the SIM card, and used to set such functions as “Call Cost” and “Fixed Dial”, etc, if supported by the network operator. If the PIN2 code is incorrectly entered 3 times, the PIN2 code is blocked. It can only be unblocked by using the PUK2 code. PUK2 Code The PUK2 code is used when the PIN2 code is blocked. The PUK2 code is provided with the SIM card by the network operator. If not supplied, please contact your network operator. If the PUK2 code is entered incorrectly 10 times, then the SIM card will be invalidated. You must connect the network operator for replacement. 16 5. General Functions 5.1 Dial a Number In Idle mode, enter the telephone number, and press the Send Key number. Press the End key to dial the to end the call. International Call: Press the key twice, the screen shows a “+” symbol. This symbol is used to activate the international phone code (example 00) Dial the country and phone number to be called, and press the Send Key dial. to Dial a Number By Use of the Phonebook In Idle mode, press the OK button to enter Main menu. Press up/down key to select Phonebook menu and press the M1 button to access. Press up/down key to select Search and press the M1 button to access. To find the number to dial press the up/down key. Quick method: When searching press the key containing the first letter of the name to start search from that letter, and then press Up/Down button on the left side to find the name. Press the Send Key to dial the number. Re-dial the Last Outgoing Number In Idle mode, press the Send Key to display the outgoing call list. Use the Up/Down button on the left side to select the number to dial 17 Press the Send Key Short-cut Key to dial the number. To save a number in the speed dial keys M1/M2 key. In the idle screen digit the Phone number to be saved. Press the speed dial key to which the number is to be saved. Press the M1 to confirm and save or press the End key to not save. To dial a number from the speed dial keys. Press the M1/M2 key, then press the Send key to dial the number. 5.2 Adjust Volume During a call, you can press the volume. and button on the left side to adjust the 5.3 Answer a Call To answer an incoming call: 2) Press the Send Key to answer the call. 3) To end the call, press the End key 4) To refuse a call, press the End key Note: If the caller ID can be identified, the phone will show the telephone number of the caller (if this telephone number has been stored into your Phonebook, then the caller’s name will be displayed). 5.4 Options During a Call During a call, you can use various control functions. Call Holding If the network supports the Call Holding function, you can make another call whilst already in conversation: 18 Enter a number or select the phone number from the Phonebook, press the Send Key to make the second call. The first call automatically is put on hold. End this call to return to call on hold. Receipt of a Second Call Press Send Key to answer the second call, and the first call (conversation) is automatically put on hold. Press End key to refuse the second call, and continue with your current conversation. Mute and Hold This function can turn off or on the phone’s microphone. The “Mute” function prevents the person you are talking to from hearing your voice. During conversation press the OK key to enter menu. Press the up/down key to select: Mute : Press the M1 key to activate. To deactivate the Mute, press the M1 key to select options and deactivate (Unmute). Hold: Press the M1 key to activate. To deactivate the Hold, press the M1 key to select options and deactivate (Unhold). Hands-Free This function turns on and off the phone’s loudspeaker. During a call, press the M2 key to turn on the loudspeaker and When the loudspeaker is on, press the M2 key again to turn off the loudspeaker, and return to the normal talking status. 5.5 Input Methods To input words, number and symbols and punctuation marks. To Choose Alphabetical and Symbol Input Methods to switch the input method, in the top left hand In the Edit mode, press the key corner of the screen the input method is shown: To Input Symbols Press the key to go to the Symbol selection screen and select symbol to be inserted. The M1 key makes the cursor scroll to the left, the M2 key make the cursor scroll to the right. The Up/down key makes the cursor scroll up and down. 19 When the cursor is on the symbol to be input, Press the M1 key to confirm. To choose Alphanumerical input methods: abc This input method enters all the letters as small letters. This input method inserts all letters in capitals. This input method enters the first letter as a capital and following as small letters. When you use this input method, you can enter the numbers on the keypad. To input letters Press once to enter the first letter on the key. Press twice to enter the second letter on the key. Press three times to enter the third letter on the key. Note: The Zero key works as space bar. 5.6 Keypad Lock In Idle mode, press the key “OK”, then press the key To unblock, Press the “OK” button, and then press the key to block the keypad to unlock. 6. Menu Instructions Brief explanation of the various menus in the phone. 6.1 Phonebook Please note that in the Phonebook menu when the name of an option appears fragmented this is because there are no records, and therefore the command can not be executed. In the idle mode, press OK button on the left side to enter Main Menu. Press the Up/Down button on the left side to find the “Phonebook Menu”, press the M1 button to enter. To enter the various sub-menus always press the up/Down key to select menu and 20 M1 button to enter. Press the End key to exit. Search This function allows you to browse the telephone records in Phonebook in alphabetic order. To enter the Search menu press the M1 key. Press the key with the letter of the entry to display records that start with that letter or press the M1 key to brows all entries. Press Up/Down button to browse. Press the M1 key to select record. To choose the option Dial or Edit press the Up/Down Key and then M1 key to confirm. Dial: To call the phone number, press Send key to dial the record selected. Edit: To modify the record. Press the M1 key to modify the name. Press the M1 key to confirm. Press the up/down key to modify the number. Press M1 to modify. Press the End Key to confirm the modifications effected to both name and number. Delete: Press the up/down key to select the option. Press M1 to confirm. Copy: Press the up/down key to automatically copy to SIM Card if record is on phone OR to Phone if record is on the SIM Card. Move: Press the up/down key to move the record to SIM Card if record is on phone OR to Phone if record is on the SIM Card Create: To insert a record in the phone book; Select “Create” and press the M1 key to enter. Press the up/down key to select where entry is to be stored; to Sim Card or to Phone. Insert name to be associated to the number. Press M1 key to confirm. Press up/down key to insert number. Press M1 key to enter Number screen and insert the number Press M1 key to confirm, then press End Key to save the entry. Press End Key a second time to return to previous screens and idle screen. Note: During editing the end key is used to delete incorrect entry of letters or numbers. 21 Delete Press the OK key to enter Menu. Press the up/down key to select Delete. Press the M1 key to enter. Press the up/down key to select: Delete one by one: Press M1 to confirm. Press up/down key to select record. Press M1 key to select record. Press M1 a second time to confirm. Note : Only records on the Phone can be deleted with this function. To Delete records separately from the SIM card. The option must be choosen from the Menu “search”. Delete All: Press M1 to confirm. Press up/down key to select option. Delete All from Phone Book: Press M1 key to confirm Delete All from SIM: Press M1 key to confirm. Move: If the number is stored in the SIM card, then it will be moved into the phone; on the contrary, it will be moved into the SIM card. Storage Status: Displays memory capacity information Copy To duplicate the records from the Phone to the SIM Card or from the SIM Card to the phone. To copy the records one by one From the option Search. Press the up/down key to choose the record to be copied. Press the OK key to go to Option menu and press the up/down key to choose Copy. Press the M1 key to copy the record. Note: the record will automatically be copied either to the SIM if existing on Phone or to the Phone if existing on the SIM card. To copy all the records. Press the OK key to enter Menu. Press the up/down key to select Phonebook. Press the M1 key to enter. Press the up/down key to select copy. Press M1 to confirm. Press up/down key to choose the option; From Sim card to Phone OR From Phone to Sim card. Press M1 key to confirm. Delete Press the OK key to enter Menu. Press the up/down key to select Delete. Press the M1 key to enter. 22 Press the up/down key to select: Delete one by one: Press M1 to confirm. Press up/down key to select record. Press M1 key to select record. Press M1 a second time to confirm. Note Only records on the Phone can be deleted with this function. Delete All: Press M1 to confirm. Press up/down key to select option. Delete All from Phone Book: Press M1 key to confirm Delete All from SIM: Press M1 key to confirm. Setting It includes Fixed dial and Service Dial No. These two functions need network support. Please consult your local network operator for verification. Storage Status Display the utilised memory capacity and the total memory capacity in Phonebook on the phone and in the SIM card. Press the OK key to enter menu. Press the up/down key to select option. Press M1 to Display storage status. 6.2 Read Message In Idle mode, press OK key on the left side to enter Main Menu. Press the Up/Down key to find the “Read Message” function. Press M1 button read the message received. Press the End key to exit. Inbox Displays the messages received. Press the OK key to enter menu. Press the up/down key to option Read Message. Press the M1 key to enter. The Inbox displays the messages received. Press the up/down key to select the message to be read. Press the M1 key to read the message To enter the options for each message press the M1 key. Delete: Press the M1 key to delete the message Extract Number: To read the phone number. Press the M1 key to view options and up/down key to choose. Call: Press the Send key to dial the number. Save: Press the M1 key to enter options for saving. Press the up/down key to 23 choose: Save to Sim: Press M1 to enter and proceed as per instructions in Phonebook, Create. Save to Phone: Press M1 to enter and proceed as per instructions in Phonebook, Create. Call Back: Press the Send key to select and dial the number. 6.3 Call Records In Idle mode, press the OK key enter Main Menu. Press the Up/Down key select “Call Records”. Press the M1 key to enter various options. Press the End key to exit.Incoming Calls / Outgoing Calls / Missed Calls Press the M1 key to enter option and display the call records. Incoming calls: calls received. Outgoing calls: numbers dialed Note: In idle mode press send Key to view outgoing call list. Missed calls: Incoming calls not answered. Press the up/down key to select record. Press the M1 key for options and press up/down key to select. Press M1 key again to enter. Dial: Press Send key to dial the number: Edit Number: Press M1 key to enter options. Call: Press Send key to dial the number Save: Press M1 key to enter and proceed as per instructions in Phonebook, Create. Save Number: Press M1 key to enter and proceed as per instruction in Phonebook, Create. Delete: Press M1 key to confirm and delete the record. Delete All: Press M1 key to confirm and delete all records. Delete: Press M1 key to enter. Press Up/down key to select records to be deleted: Incoming Calls, Outgoing Calls or Missed Calls: Press M1 key to confirm: Note: All the records in the option will be deleted. Delete All: Press M1 key to delele all records in all above options. Call Duration: Press M1 key to enter and view durations of calls. Press up/down key to view all counters. 24 Note: Press M1 key to clear counters. 6.4 Tools 1) In Idle mode, press the OK key to enter menu. 2) Press the Up/Down key to select “Tools”. 3) Press the M1 key to enter. 4) Press the End key to exit. Calendar: To visualize a date and to move the cursor: Press the Up/Down key to select month. Alarm: Three Alarms can be set: Press M1 key to enter. Press up/down key to select Alarm 1 or 2. Press M1 key to confirm. Press up/down key to select ON or OFF. Press M1 key to confirm and go to time setting. Time Setting: Press keypad to enter or edit time. Press M1 to confirm and go to date setting: One Shot: One time always only. Weekly: Different days of the week can be choosen or all days. Press up/down key to select choice. Press key to confirm each choice. Press M1 key to save days choosen in the weekly options. Edit: Press M1 key to enter, this allows resetting of the alarm confirmed. Note: ALARM OFF does not allow time settings or date settings. Note: When the alarm rings, and the option snooze is selected or the alarm ringing is not stopped. The alarm at brief intervals rings again 3 times. After which the alarm stops ringing. Calculator: This function effects simple mathematical operations; addition, subtraction, multiplication and division. Press M1 to enter. Digit the numbers by pressing M1 to choose the operations. Press to add the decimal . Press to give the result. 6.5 Profiles This menu allows you to choose and customize ringtones and various ring tones for 25 other features such as incomings calls and alarm. There are five preset options for Standard, Indoor, Outdoor, Conference and Headset. 1) 2) 3) 4) In Idle mode, press the OK button to enter Main Menu. Press the Up/Down button on the left side to find the “Profiles” Press the M1 button on the left side to enter. Press the End key to exit. To choose a preset profile: A. Set as default Press the M1 key to select Option preferred: Standard, Indoor, Outdoor, Conference and Headset Press the “Set as default”, and then press the M1 button to activate the setting. B. Personalize Ringtones and volume can be personalized. Press M1 key to enter. Press up/down key to choose option. Press M1 key to confirm. Press End key to exit. Ring Tone: You can select your desired tone as the incoming call ring. SMS Alert Tone: You can select your desired tone as SMS alert ring. Alarm Tone: You can select your desired tone as the alarm ring. Alert Type: You can select single ring or repeat ring. Single: the ring tone is heard once only. Repeat: the ring tone repeats uninterruptedly. Ring Tone Volume: Press the Up or Down button to adjust the volume. Key Volume: Press the Up or Down button to adjust the volume. Vibration: You can select enable or disable the function. 6.6 Display Settings 1) In Idle mode, press the M1 key to enter Main Menu. 2) Press the Up/Down key to select “Display Settings”. 3) Press the M1 key to enter. 4) Press the End key to exit. Back Light: Press M1 key to enter. Press the Up/Down button to select Always on or amount of seconds before the 26 backlight turns off automatically. Press M1 to confirm. Greeting Text This text will be displayed on the screen when the phone is turned on. Press the Up/Down key to select Enable or Disable Press the M1 button to confirm. Enable to edit or insert the text. Press the M1 key to enter screen. Use the keypad to insert test, press the End Key to correct text. Press the M1 button to save the text. Press the End Key to exit menu Clock Settings Press the M1 key to enter the menu and choose the options Date & Time Settings: Press the M1 key to enter. The screen displays the format of the time. Insert the time using the keypad. Press M1 to confirm time inserted. The date screen is automatically shown. Insert the date as per format displayed on the screen. Insert the date using the keypad. Press M1 to confirm. Date Display Format: To set how the date is displayed. Press M1 key to enter. Use the up/down key to scroll options and select format by pressing M1 key. Time Display Format: To set how the time is displayed. Press M1 key to enter. Use the up/down key to scroll options and select format by pressing M1 key. Date Time Display: To display the time and date on the idle screen this function must be enabled. Press the M1 key to enter. Press the Up/Down button to select Enable or Disable. Press the M1 button to confirm. 6.7 Security This menu is to set various security settings: In Idle mode, press the OK button to enter Main Menu. Press the Up/Down button on the left side to find the menu “Security”. Press the M1 button on the left side to enter. 27 Press the End key to exit. Power On PIN: You can choose On or Off, and you can also change PIN code. When the Power On PIN is active (on) each time the phone is turned on the PIN Code must be entered. Press the M1 key to enter. Press Up/down key to choose options. Press M1 key to confirm. If ON is chosen, the PIN must be entered to confirm. Then to choose OFF again the PIN must be entered to confirm. Change PIN2: The PIN2 code is supplied by your network operator. Please ensure you have this code before entering this menu. Phone Lock: You can choose On or Off, When the Phone Lock is active (on ) each time the phone is turned on the Phone Code must be entered, before the Idle screen and SIM card will be activated. Press M1 key to enter menu. Press up/down key to select option. Press M1 key to confirm. When Phone Lock is on. The Code must be entered as per below: Verify power-on: Press M1 to enter. Insert the Code to confirm and the code must be entered before phone is active. Verify with New SIM : Press M1 to enter. Insert the Code to confirm and the code must be entered before a new SIM card is activated. Note: Verify power-on must be activated to activate the Phone Lock. 6.8 Language In Idle mode, press the M1 key to enter. Press the Up/Down key to select the menu “Language”. Press the M1 button to enter. Press the End key to exit. Language can be chosen as per list available. Press up/down key to select language (English, French, Italian, Spanish and German) and M1 key to confirm. Automatic: the Phone will automatically chose the language of the SIM Card operator if available, If not available the English language will be chosen. 6.9 Auto On You can set the time the phone will automatically power on. The time must be set before activating this function. In Idle mode, press the OK key to enter Main Menu. 28 Press the Up/Down key to select the menu “Auto On” . Press the M1 key to enter to enter. Press the End key to exit. Time Settings: Press the M1 key to enter. Insert the time using the key pad. Press M1 key to confirm. Activate: Press M1 to select and activate or deactivate. Press the end key to confirm and exit menu. 6.10 Auto Off You can set the time the phone will automatically power off. The time must be set before activating this function. In Idle mode, press the OK key to enter Main Menu. Press the Up/Down key to select the menu “Auto Off” . Press M1 key to enter to enter. Press the End key to exit. Time Settings: Press the M1 key to enter. Insert the time using the key pad. Press M1 key to confirm. Activate: Press the M1 to select and activate or deactivate. Press the end key to confirm and exit menu. 6.11 Keypad Lock This function deactivates the keypad to avoid the accidental pressing of the keys; For example when in a handbag or pocket. In Idle mode, press the OK key to enter Menu. Press the Up/Down key select the menu “Keypad Lock”. Press the M1 keyto enter to enter. Press the End key to exit. Press the Up/Down button to choose: Disable: Keypad lock function is never active. 30 Seconds: activates automatically after 30 seconds the Phone is in standby. / 60 Seconds: activates automatically after 30 seconds the Phone is in standby. Press the M1 button to confirm. 6.12 Recover Default Value To reset all the menu and functions of the phone as per the standard factory settings: In Idle mode, press the OK key to enter Menu. Press the Up/Down key to select the menu “Recover Default Value”. Press the M1 key to enter. Press a second time the M1 key to confirm. Enter the Phone Lock Code and then the OK key to confirm and all settings will 29 return to standard factory settings (when the phone is turned on for the first time ). Press the End key to exit. 7. Extras: 7.1 Specification Parameters: Network Type: GSM850MHz/DCS1900MHz LCD: 2.20” , Blue and White color, 128*96 matrix (width*height) Dimensions: 126.8mm*56.6mm*16.05mm (length*width*height) Working Voltage: 3.7V-4.2V Battery : BL-6C Standby Time duration : approximately 100-200 hours (depends on usage and network) Maximum Call Time : approximately 2-3 hours (depends on usage and the network) SIM card working voltage: 3V/1.8V 30