1
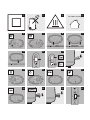
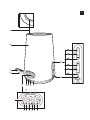
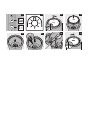
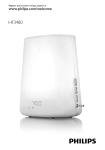
Register your product and get support at
www.philips.com/welcome
HF3470
4
1
2
4
3
For indoor use only
6
7
8
9
10
11
12
13
14
15
16
17
18
19
20
21
5
A
B
1
2
3
K
4
5
C
D
6
J
E
FGH I
10
9
8
1
2
3
4
5
6
7
22
23
24
25
26
27
28
29
HF3470
English 8
8
English
IMPORTANT SAFETY
INSTRUCTIONS
-- This portable light has a polarized plug (one blade is wider than the other) as a feature to
reduce the risk of electric shock. This plug will fit in a polarized outlet only one way. If the plug
does not fit fully in the outlet, reverse the plug. If it still does not fit, contact a qualified
electrician. Never use with an extension cord unless the plug can be fully inserted. Do not alter
the plug.
INSTRUCTIONS PERTAINING TO
A RISK OF FIRE, ELECTRIC
SHOCK, OR INJURY TO PERSONS
Lighted lamp is HOT:
WARNING – To reduce the risk of FIRE, ELECTRIC SHOCK, OR INJURY TO
PERSONS:
1.
Keep away from combustbiles. Unplug to change bulb (lamp). Do not touch bulb (lamp).
2.
Do not operate without complete bulb (lamp) enclosure in place or if lens is damaged.
3.
Unplug and allow to cool before replacing bulb (lamp).
4.
Bulb (lamp) gets HOT quickly! Only contact switch/plug when turning on.
5.
Do not touch hot lens, guard, or enclosure.
6.
Do not remain in light if skin feels warm.
7.
Do not look directly at lighted lamp.
8.
Keep lamp away from materials that may burn.
9.
Use only with a 12V, 50 watt, GY6.35 Tungsten Halogen bulb (lamp).
10. Do not touch the bulb (lamp) at any time. Use a soft cloth. Oil from skin may damage bulb (lamp).
11. Do not operate the portable luminaire with a missing or damaged guard, lamp containment barrier, or UV filter.
SAVE THESE INSTRUCTIONS
IMPORTANT
-- Read this user manual carefully before you use the appliance and save it for future reference.
-- This appliance is double insulated according to Class II (Fig. 1).
-- When using an electric appliance, basic precautions should always be followed, including the
following:
Danger
-- Water and electricity are a dangerous combination. Do not use this appliance in wet
surroundings (e.g. in the bathroom or near a shower or swimming pool).
-- Do not let water run into the appliance or spill water onto the appliance (Fig. 2).
Warning
-- Check if the voltage indicated on the appliance corresponds to the local voltage before you
connect the appliance.
-- The appliance is suitable for voltages of 120V and 60Hz.
English
9
-- If the power cord is damaged, do not use the appliance. Visit our website: www.philips.com or
call 1-866-832-4361 for assistance.
-- Always let the appliance cool down for approx. 15 minutes before you open the top cap to
remove the lamp. The lamp and the metal part of the top cover become hot during use and you
may burn your fingers when you touch them.  (Fig. 3)
-- Close supervision is necessary when this appliance is used by, or near children or invalids.
-- Children should be supervised to ensure that they do not play with the appliance.
-- This appliance is for indoor use only (Fig. 4).
Caution
-- Do not drop the appliance or expose it to heavy shocks.
-- Place the appliance on a stable, level and non-slippery surface.
-- Do not use the appliance at room temperatures lower than 50°F/10°C or higher than
95°F/35°C.
-- Make sure the vents in the top and in the bottom of the appliance remain open during use.
-- Never use the appliance if the lamp housing or top cover is damaged, broken or missing.
-- To prevent possible damage to the cord, do not wrap the cord around the appliance.
-- Consult your doctor before you start using the appliance if you have suffered from or are
suffering from serious depression.
-- Do not use this appliance as a means to reduce your hours of sleep. The purpose of this
appliance is to help you wake up more easily. It does not diminish your need for sleep.
-- The appliance has no on/off switch. To disconnect the appliance from the power source, remove
the plug from the wall outlet.
-- Use this appliance for its intended household use as described in this manual. Do not use
attachments not recommended by Philips Electronics North America Corporation.
General
-- This appliance allows you to choose the light intensity level you want to wake up to (see section
‘Using the lamp’, chapter ‘Using the appliance’).
-- If you often wake up too early or with a headache, reduce the light level.
-- If you share a bedroom with someone else, this person may unintentionally wake up from the
light of the appliance, even though this person is further removed from the appliance. This is the
result of differences in light sensitivity between people.
FCC Information
-- This device generates and uses radio frequency (RF) energy, and if not installed and used
properly, this equipment may cause interference to radio and television reception. These rules
are designed to provide reasonable protection against radio and television interference in a
residential installation. However, there is no guarantee that interference will not occur in
particular installations. If this equipment does cause interference to radio or television reception
(which you can determine by unplugging the unit), try to correct the interference by one or
more of the following measures: Reorient the receiving antenna (that is, the antenna for the
radio or television that is “receiving” the interference). Move the unit away from the equipment
that is receiving interference. Plug the unit into a different wall outlet so that the unit and the
equipment receiving interference are on different branch circuits. If these measures do not
eliminate the interference, please consult your dealer or an experienced radio/television
technician for additional suggestions. Also, the Federal Communications Commission has
prepared a helpful booklet, “How To Identify and Resolve Radio TV Interference Problem”. This
booklet is available from the U.S. Government Printing Office, Washington, DC 20402. Please
specify stock number 004-000-00345-4 when ordering copies. This equipment has been
type-tested and found to comply with the specifications in Subpart J of Part 15 of FCC Rules.
10
English
-- This appliance meets the requirements of the low voltage directive 2006/95/EC and the EMC
directive 2004/108/EC.Int
Introduction
Congratulations on your purchase and welcome to Philips! To fully benefit from the support that
Philips offers, register your product at www.philips.com/welcome.
The Philips Wake-up Light helps you wake up more pleasantly. The light intensity of the lamp
gradually increases to the set level in the 30 minutes before the set wake-up time. The light gently
prepares your body for waking up at the programmed time. To make waking up an even more
pleasant experience, you can use natural wake-up sounds or the FM radio.
The effects of the Wake-up Light
The Philips Wake-up Light gently prepares your body for waking up during the last half hour of
sleep. In the early morning hours our eyes are more sensitive to light than when we are awake.
During that period the relatively low light levels of a simulated natural sunrise prepare our body for
waking up and getting alert. People who use the Wake-up Light wake up more easily, have a better
overall mood in the morning and feel more energetic. Because the sensitivity to light differs per
person, you can set the light intensity of your Wake-up Light to a level that matches your light
sensitivity for an optimal start of the day.
For more information about the Wake-up Light, see www.philips.com.
General description (Fig. 5)
A Vents
B Lamp housing
C Power cord
D Antenna
E Display
1 Hour indication of clock time/alarm time
2 Clock time symbol
3 Alarm symbol
4 Radio symbol
5 ’Birds’ sound symbol
6 ‘Beep’ sound symbol
7 Display brightness symbol
8 Sound level symbol
9 Radio frequency symbol
10 Light symbol
F Menu ‘–’ button
G MENU button
H SELECT button
I Menu ‘+’ button
J Control lever with ‘alarm off ’, ‘alarm on’ and ‘snooze’ positions
K Buttons on the side of the appliance
1 Light intensity ‘+’ button
2 Light on/off button
3 Light intensity ‘–’ button
4 Volume increase button
5 Radio on/off button
6 Volume decrease button
English 11
Preparing for use
Before first use
1 Place the Wake-up Light 16-20in/40-50cm from your head, for example on a bedside table.
2Put the plug in the wall outlet.
-- The hour indication on the display starts flashing to indicate that you have to set the clock
time (Fig. 6).
Setting the clock time
You cannot use the Wake-up Light until you have set the clock time.
1When the hour indication on the display flashes, press the menu + or – button to set the
hour.
Note:You can only do this when you are in the set clock menu and when the hour indication flashes. If
this is not the case, press the MENU button, use the menu + or – button to select the set clock menu
and press the SELECT button to confirm.You are now in the set clock menu.
2Press the SELECT button to confirm.
,, The minute indication starts flashing (Fig. 7).
3Press the menu + or – button to set the minutes.
4Press the SELECT button to confirm.
,, The appliance leaves the menu and the display shows the set clock time.
The appliance is now ready for use.
Note: Every time you remove the plug from the wall outlet for more than approximately 15 minutes, you
have to set the clock time again.To change the set clock time when the plug is still in the wall outlet, see
section ‘Menu functions’ in chapter ‘Using the appliance’.
Using the appliance
Use this appliance for its intended household use as described in this manual...
Menu functions
Below find a description of all functions that can be set in the menu. These functions appear in the
menu in the following order:
-- Clock time
-- Alarm time
-- Alarm sound
-- Display brightness: You can choose a display brightness between 1 and 4.
You can set the menu functions in the following way:
1Press the MENU button to enter the menu (Fig. 8).
2Press the menu + or – button to select a function (Fig. 9).
3Press the SELECT button to enter this function (Fig. 10).
4Press the menu + or – button to change a setting (Fig. 9).
5Press the SELECT button to confirm (Fig. 10).
12
English
Using the lamp
You can use the appliance as a bedside lamp.
1To switch on the lamp, press the lamp on/off button (Fig. 11).
2Press the light intensity + and – buttons to select a light intensity (Fig. 12).
You can choose a light intensity between 1 and 20.
Note: It takes approx. 1 second for the lamp to go on.This is normal, the lamp needs to heat up.
Note:The light intensity you have selected is automatically set as the light intensity level for the alarm as
well.
Tip:When you use the appliance for the first time, set the light intensity to 20.The moment you wake up,
check which light intensity level the appliance has reached by briefly pressing the light intensity + or –
button.When you do this, the current alarm light intensity level appears on the display. Set the alarm light
intensity to this level for the next day.
3To switch off the lamp, press the lamp on/off button again.
Setting the alarm
When you set the alarm, you choose an alarm time and the type of sound you want to wake up to.
The alarm is set when the alarm symbol is visible on the display. The light intensity slowly increases
to the selected level during the last 30 minutes before the set alarm time. The sound slowly
increases in 90 seconds to the selected level after the set alarm time.
Note:You can set the light intensity by pressing the light on/off button and then pressing the light intensity
+ or - button and you can set the alarm volume by pressing the volume increase or decrease button. If
you do not want to wake up to the lamp or to a sound, set the light intensity or volume level to OFF. See
sections ‘Using the lamp’ and ‘Radio/volume’ in this chapter.
1Push the control lever down to the middle position to switch on the alarm (Fig. 13).
,, The hour indication of the alarm time flashes (Fig. 14).
,, To adjust the time, follow steps 2 to 5. If the alarm time is correct, just wait a few seconds.
2Press the menu + or – buttons to select the hour (Fig. 9).
Note:You can only do this when the hour indication flashes. If this is not the case, push the control lever
up and down again to enter the alarm time mode.You can also set the alarm time in the menu. See
section ‘Menu functions’ in this chapter.
3Press the SELECT button to confirm (Fig. 10).
,, The minute indication of the alarm time starts to flash (Fig. 15).
4Press the menu + and – buttons to select the minutes (Fig. 9).
5Press the SELECT button to confirm or wait for a few seconds (Fig. 10).
,, The appliance leaves the menu and the display shows the clock time.
The alarm time is now set.
Switching off the alarm
To switch off the alarm function, push up the control lever to the top position.
Note:The lamp stays on to light your room.You can switch off the lamp by pressing the light on/off
button.
Note:The alarm (sound and/or light) automatically switches off after 90 minutes.
English 13
Setting the alarm sound
See section ‘Menu functions’.
You can choose one of the following sounds:
-- Radio (Fig. 16)
-- Birds (Fig. 17)
-- Beep (Fig. 18)
Snoozing
1Push down the control lever to the bottom position when the alarm goes off (Fig. 19).
,, The lamp continues to be on at the selected intensity level, but the alarm sound stops. After
9 minutes, the wake-up sound is automatically played again.
Note:The 9-minute snooze time is fixed.This time cannot be adjusted.
Note: If you push down the control lever with too much force, it may jump back to off position.
Alarm demonstration
If you want to get a quick demonstration (60 seconds) of the gradually increasing light level and
sound level, activate the test function of the appliance.
1Push the control lever down to the bottom position for a few seconds until TEST appears on
the display (Fig. 20).
2Push the control lever down again to stop the demonstration.
Note:The appliance continues to run the alarm demonstration until you push down the control lever
again.The test automatically stops after 9 hours.
Radio/volume
1To switch on the radio, press the radio on/off button (Fig. 21).
2To select the desired radio frequency, press the menu + and – button (Fig. 9).
Tip:To scan radio frequencies automatically, press and hold the menu + or – button for approx. 2
seconds.
Tip:To make sure you get a good radio signal, fully unwind the antenna and move it around until you
have found a position at which reception is best.
3To switch off the radio, press the radio on/off button again.
Volume
1To set the volume, press the volume increase or decrease button (Fig. 22).
You can choose a volume level between 1 and 20.
Note:The volume level you have selected is automatically set as the volume level for the alarm as well.
Setting the display brightness
1Press the MENU button to enter the menu (Fig. 8).
2Press the menu + or – button to select the display brightness menu (Fig. 9).
3Press the SELECT button to enter the display brightness menu (Fig. 10).
4Press the menu + and – button to change the display brightness (Fig. 9).
5Press SELECT to confirm (Fig. 10).
14
English
Cleaning and maintenance
Never use scouring pads, abrasive cleaning agents or aggressive liquids such as alcohol or acetone
to clean the appliance.
Regularly remove dust from the outside of the appliance with a dry cloth.
1Always unplug the appliance before you clean it.
2Clean the outside of the appliance with a dry cloth.
Do not let water run into the appliance or spill water onto the appliance (Fig. 2).
Replacement
The lamp has to be replaced when it stops burning or when the light output decreases. You must
replace the lamp with a Philips Halogen lamp, 50W, 12V, GY6.35. Only this lamp provides the
correct light intensity.
Note:This appliance has been designed to be used with self-shielded lamps only (Fig. 23).
For more information, see chapter ‘Assistance’.
Replacing the lamp
1Unplug the appliance before you replace the lamp.
2Let the appliance cool down for approx. 15 minutes.
3Unlock the top cover of the appliance by pressing it and turning it counterclockwise, until the
O symbol on the top cover is aligned with the symbol 1 on the lamp housing (Fig. 24).
4Remove the top cover (Fig. 25).
5Remove the old lamp from the lamp holder (Fig. 26).
6Insert the pins of the new lamp into the lamp holder (Fig. 27).
Do not touch the lamp with your fingers. Use a cloth or paper towel when you replace
the lamp (Fig. 28).
7 Place the top cover back onto the appliance.
8Lock the top cover by turning it clockwise until the 1 symbol on the top cover and the 1
symbol on the lamp housing are aligned (Fig. 29).
This appliance has no other user-serviceable parts. For assistance, call 1-866-832-4361.
Storage
-- If the appliance will not be used for an extended period of time, remove the power cord from
the wall outlet and store the appliance in a safe, dry location where it will not be crushed,
banged, or subject to damage.
-- Do not wrap the power cord around the appliance when storing it.
Disposal
-- Dispose of the appliance in accordance with local regulations.
-- Your local or national recycling organizations may also have disposal information.
-- For assistance go to www.recycle.philips.com or call 1-866-832-4361.
English 15
Assistance
For assistance visit our website: www.philips.com/support or call toll free: 1-866-832-4361.
45-Day Money-Back Guarantee
If you are not fully satisfied with your Philips Wake-up Light, send the product back and we’ll refund
you the full purchase price.
The Wake-up Light must be shipped prepaid by insured mail, insurance prepaid, have the original
sales receipt, indicating purchase price and the date of purchase, and the money-back guarantee
return authorization form enclosed. We cannot be responsible for lost mail.
The Wake-up Light must be postmarked no later than 45 days after the date of purchase. Philips
reserves the right to verify the purchase price of the Wake-up Light and limit refunds not to exceed
suggested retail price.
To obtain a Money-Back Guarantee Return Authorization form, call 1-866-832-4361.
Delivery of refund check will occur 6-8 weeks AFTER receipt of returned product.
Full Two-Year Warranty
Philips Electronics North America Corporation (USA) and Philips Electronics Ltd (Canada) warrant
each new Philips product, model HF3470 against defects in materials or workmanship for a period
of two years from the date of purchase, and agree to repair or replace any defective product
without charge. IMPORTANT: This warranty does not cover damage resulting from accident, misuse
or abuse, lack of reasonable care, or the affixing of any attachment not provided with the product.
NO RESPONSIBILITY IS ASSUMED FOR ANY SPECIAL, INCIDENTAL OR CONSEQUENTIAL
DAMAGES.
In order to obtain warranty service, simply call toll-free 1-866-832-4361.
In US Manufactured for: Philips Consumer Lifestyle, A Division of Philips Electronics North America
Corporation, P.O. Box 10313, Stamford, CT 06904.
In Canada Imported for: Philips Electronics LTD, 281 Hillmount Road, Markham, Ontario L6C 2S3.
PHILIPS is a Registered Trademark of Koninklijke Philips Electronics N.V.
© 2012 Philips Electronics North America Corporation
All Rights Reserved.
Troubleshooting
This chapter summarizes the most common problems you could encounter with the appliance. If
you are unable to solve the problem with the information below, visit our website: www.philips.com/
support or call 1-866-832-4361 for assistance.
Problem
Solution
The appliance does not
work at all.
Perhaps the plug is not inserted properly in the wall outlet. Put the
plug properly in the wall outlet.
Perhaps there is a power failure. Check if the power supply works by
connecting another appliance.
The appliance functions Perhaps the lamp has reached the end of its life. The lamp has an
properly, but the lamp
expected life of more than 4,000 hours (more than 4 years of normal
does not work anymore. use). The life depends on the use of the appliance. In case of heavy use,
the lamp may not last as long as you expect. If the lamp stops working,
go to www.philips.com/support or call 1-866-832-4361 for assistance.
16
English
English 17
Problem
Solution
Problem
Solution
The appliance becomes
hot during use.
This is normal, as the appliance is heated up by the light of the lamp
and the electronics. Always let the appliance cool down, before you
replace the lamp.
The light wakes me too
early.
Perhaps the light intensity level you have set is not appropriate for you.
Try a lower light intensity level if you wake up too early. If light intensity
1 is not low enough, move the appliance further away from the bed.
The appliance does not
respond when I try to
set different functions.
Remove the plug from the wall outlet and reinsert it. If you reinsert the
plug within approximately 15 minutes, the appliance remembers all
settings. If you reinsert the plug after a longer period of time, the
appliance will go back to factory settings. You need to set all functions
again.
The light wakes me too
late.
Perhaps the appliance is positioned at a lower level than your head.
Make sure the appliance is located at a height at which the light is not
blocked by your bed, comforter/blanket or pillow. Also make sure the
appliance is not placed too far away.
The lamp does not go
Perhaps you set a light intensity level that is too low. Increase the light
on when the alarm goes intensity level.
off.
Perhaps you switched off the alarm by setting the control lever to the
top position. To switch on the alarm, set the control lever to the middle
position.
The lamp does not go
on right away when I
switch it on.
It takes approx. 1 second for the lamp to go on. This is normal, the
lamp needs to heat up.
I do not hear the alarm
sound when the alarm
goes off.
Perhaps you set a sound level that is too low. To set a higher sound
level, see chapter ‘Using the appliance’, section ‘Radio/volume’.
Perhaps you switched off the alarm by setting the control lever to the
top position.
Switch on the radio after you switch off the alarm to check if the radio
works. If it does not work, call 1-866-832-4361 for assistance.
The radio does not
work.
Call 1-866-832-4361 for assistance.
The radio produces a
crackling sound.
Perhaps the broadcast signal is weak. Adjust the frequency (see chapter
‘Using the appliance’ section ‘Radio/volume’) and/or change the
position of the antenna by moving it around. Make sure you have
unwound the antenna completely.
The alarm went off
yesterday, but it did not
go off today.
Perhaps you switched off the alarm by setting the control lever to the
top position.
Perhaps you set a sound level and/or light intensity level that is too low.
Set a higher sound and/or light intensity level.
Perhaps there was a power failure that lasted more than approximately
15 minutes. In this case the appliance goes back to factory settings. You
need to set all functions again.
The alarm did not go off Perhaps you pushed the control lever down with so much force that it
9 minutes after I pushed jumped to off position.
the control lever down
to snooze.
Perhaps you set the volume level to OFF.
Perhaps the appliance is not suitable for the voltage to which it is
connected. Make sure that the voltage indicated on the appliance
corresponds to the local voltage.
4222.002.7550.2