1
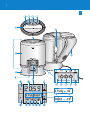
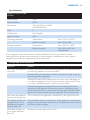
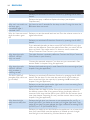
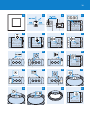
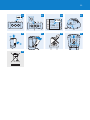
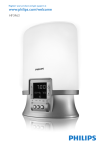
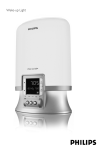
Wake-up Light
1
HF3462/10, HF3462/20, HF3461, HF3451
English 6
Français 16
Nederlands 26
English
Introduction
Congratulations on your purchase and welcome to Philips! To fully benefit from the support that
Philips offers, register your product at www.philips.com/welcome.
This appliance helps you wake up feeling fitter and more energetic. It creates a summer dawn
experience that makes awakening and getting up easier. The light intensity slowly increases to the
chosen level during 30 minutes. Light in the morning increases the production of the cortisol
hormone that makes you feel more energetic when you wake up. You can have the appliance wake
you up by light only or by light and sound. The appliance can also be used as a reading lamp. Light and the biological clock
Exposure to light regulates the biological clock that controls the body’s circadian rhythms. The
melatonin level rises in the evening, preparing our body for sleep and lowering the core body
temperature. The light in the morning stimulates the secretion of the hormone cortisol, which makes
us awake and alert. Optimally, the circadian rhythms are in sync with our sleep-wake rhythm.
Disturbed sleep and circadian rhythms can severely impact our health, performance and productivity.
In autumn and winter, when the days are shorter and darker, many people experience tiredness and
need more sleep. Lack of energy and trouble to get up in the morning are common symptoms of
the winter blues. Other symptoms may be unexpected mood changes, concentration problems and
a craving for food rich in fattening carbohydrates. Some people may even develop a serious
depression (seasonal affective disorder or SAD), which disappears when spring comes.
The effects of dawn simulation
The Philips Wake-up Light gently prepares your body for waking up during the last half hour of
sleep. In the early morning hours our eyes are more sensitive to light than when we are awake.
During that period the relatively low light levels of a simulated natural sunrise elevate the cortisol
level shortly after awakening. Clinical studies have shown that regular use of a dawn simulator can
alleviate even the severest symptoms of the winter blues, improving productivity and concentration.
In addition, people who use the Wake-up Light wake up more easily, have a better overall mood in
the morning and feel more energetic. With the Philips Wake-up Light, you can set the light level that
corresponds to your light sensitivity for optimum dawn simulation.
For more information about the health benefits, see www.philips.com, search word “Wake-up Light”.
General description (Fig. 1)
A Base
B Vents
C Lamp housing
D Top control panel
1
2
3
4
SNOOZE/SCREEN BRIGHTNESS CONTROL button
@& button (light on/off)
3 button (light and sound on/off)
# button (sound off)
E 100W lamp (HF3462/HF3461) or 75W lamp (HF3451)
F Lamp replacement hatch
G Bottom control panel
1 @ wheel (turn to set the light intensity)
2 ALARM button
3 RADIO button (HF3462/HF3461 only)
4 QUICK CHECK button
5 $ wheel (turn to set volume)
H Display section
1 % button
2 Time indication English
3 ( button (to set clock time)
4 * button (to set alarm time) 5 Natural pond sound symbol (HF3462/HF3461 only)
6 Natural sea sound symbol (HF3462/HF3461 only)
7 Natural forest sound symbol
8 Gentle beep symbol
9 Radio symbol (HF3462/HF3461 only)
10 ^ button
11 Radio frequency indication (HF3462/HF3461 only)
12 Light level indication (visible when light level is adjusted)
13 Alarm time indication
14 Sound level indication (visible when sound level is adjusted)
I Reset button
Note:The HF3462/20 and the HF3462/10 are technically the same and only differ in colour. For this
reason, these two versions will simply be called HF3462 in this user manual.
Important
-
-
-
-
Read this user manual carefully before you use the appliance and save it for future reference.
This appliance is double insulated according to Class II (Fig. 2).
This appliance meets the requirements of the European Medical Device Directive MDD
2007/47/EC.
Danger
Water and electricity are a dangerous combination. Do not use this appliance in wet
surroundings (e.g. in the bathroom or near a shower or swimming pool).
Do not let water run into the appliance or spill water onto the appliance.
Warning
Check if the voltage indicated on the appliance corresponds to the local mains voltage before
you connect the appliance.
The appliance is suitable for mains voltages of 230V.
If the mains cord is damaged, you must have it replaced by Philips, a service centre authorised by
Philips or similarly qualified persons in order to avoid a hazard.
This appliance is not intended for use by persons (including children) with reduced physical,
sensory or mental capabilities, or lack of experience and knowledge, unless they have been given
supervision or instruction concerning use of the appliance by a person responsible for their
safety.
Children should be supervised to ensure that they do not play with the appliance.
Regularly remove dust from the inside of the appliance with a dry cloth, as accumulated dust
close to a powerful lamp presents a potential fire hazard. See chapter ‘Cleaning and
maintenance’ for more details. Caution
Do not subject the appliance to heavy shocks.
Place the appliance on a stable, level surface and make sure there is at least 15cm free space
around it and 40cm above it to prevent overheating. (Fig. 3)
Do not use the appliance at room temperatures lower than 10°C or higher than 35°C.
Make sure the vents in the base and on top of the appliance remain open during use.
Let the appliance cool down for approx. 15 minutes before you clean or store it.
Never use the appliance when the lamp housing is damaged, broken or missing.
If you wake up too early or with a headache, reduce the light level.
Consult your doctor before you start using the Philips Wake-up Light if you have suffered from
or are suffering from a serious depression.
-
-
-
English
Do not use this appliance as a means to reduce your hours of sleep. The purpose of this
appliance is to help you wake up more easily. It does not diminish your need for sleep.
Always replace the lamp with a Philips 75W E27 SOFTONE softwhite 230V T55 (HF3451) or a
Philips 100W E27 SOFTONE softwhite 230V T55 lamp (HF3462/HF3461).
The appliance has no on/off switch. To disconnect the appliance from the mains, remove the
plug from the wall socket.
This appliance is only intended for household use, including similar use like in hotels.
General
The appliance has been fitted with an automatic protection against overheating. If the appliance
is insufficiently cooled (e.g. because the vents are covered), the appliance switches off
automatically. Remove the cause of overheating, unplug the appliance and let it cool down for
approx. 20 minutes. Then switch the appliance back on by plugging it in again.
We advise you to set the light intensity for waking up to a setting between 9 and 20 (for the
HF3451 with 75W lamp) or between 7 and 15 (for the HF3462/HF3461 with 100W lamp).
These settings correspond to light intensity levels of 100 to 300 lux. The correct setting depends
on your light sensitivity and will have to be determined by yourself. It is possible to select a
higher or lower setting. See chapter ‘Using the appliance’ for more details. If light level 20 of the
HF3451 is not high enough, we advise you to move the appliance closer to the bed.
If you share a bedroom with someone else, this person may unintentionally wake up from the
light of the appliance, even though this person is further removed from the appliance. This
phenomenon is the result of differences in light sensitivity between people.
If you start having trouble waking up again, this is possibly due to a decrease in the lamp’s light
output that occurs after some time. In that case, you can increase the light level or replace the
lamp.
If the appliance is used in an industrial area and/or near a power station, it may occur that, under
certain circumstances, the lamp goes off after it has come on. This does not have an adverse or
harmful effect on the safe functioning of the appliance the next time it is used.
Electromagnetic fields (EMF)
This Philips appliance complies with all standards regarding electromagnetic fields (EMF). If handled
properly and according to the instructions in this user manual, the appliance is safe to use based on
scientific evidence available today.
Preparing for use
Installation
1 Before first use, open the hatch in the back of the appliance (see chapter ‘Replacement’) and
screw the lamp into the lamp holder.
2 Place the appliance at 40-50cm from your head, for example on a bedside table (Fig. 4).
3 Put the plug in the wall socket.
, The time on the display starts flashing and arrows appear above and below the time to
indicate that the clock time has to be set (Fig. 5).
Note: If the display does not light up after you have plugged in the appliance, press the reset button on
the bottom of the appliance.
Setting the clock time
1 Use the ^ and the % buttons to set the time.
2 Hold the button down longer to put the time forward or backward more quickly.
English
Note: After you have set the time for the first time, you have to press the ‘set time’ button before you can
adjust the time again.The time on the display starts flashing and arrows appear above and below the
time to indicate that the clock time can be set.
3 When you have set the correct time, press the ‘set time’ button to confirm the time (Fig. 6).
, The time on the display stops flashing and the arrows disappear.
Note: If you do not confirm the time, the flashing stops and the arrows disappear after 10 seconds.This
indicates that the time has been set.
The appliance is now ready for use.
Using the appliance
Setting the alarm
When you set the alarm, you choose the light intensity level, the type of sound and the sound level.
The alarm is set when the light ring round the ALARM button burns. The light intensity slowly
increases to the chosen level during the last 30 minutes before the set alarm time. The sound slowly
increases in 90 seconds to the chosen level after the set alarm time.
Setting the alarm time
1 Press the alarm time button ( *) to set the alarm. (Fig. 7)
, The alarm time starts flashing and two arrows appear above and below the alarm
time (Fig. 8).
2 Use the % and the ^ buttons to set the alarm time, i.e. the time at which you wish to get
up. (Fig. 9)
3 Press the button longer to put the time forward or backward more quickly.
4 Press the alarm time button ( *) again to confirm the alarm time. (Fig. 7)
, The arrows disappear and the alarm time stops flashing.
Note: If you do not confirm the alarm time, the flashing stops after 10 seconds.This means that the
alarm time has been set.
Setting the sound and the sound level
1 Press the ALARM button (Fig. 10).
, The light ring round the ALARM button goes on (Fig. 11).
, The first sound symbol (radio symbol for HF3462/HF3461 and gentle beep symbol for
HF3451) flashes for 3 seconds and the sound can be heard.
2 Press the ALARM button again if you want to select another wake-up sound. When you have
found the sound you want to use, do not press the ALARM button again (Fig. 10).
, After 3 seconds, the symbol of the sound selected stops flashing to indicate that it has been
selected.
, The alarm has been set and continues to work until you switch off the alarm function. When
you do this, the sound symbol disappears from the display and the light ring round the
ALARM button goes out. See also section ‘Switching the alarm on or off’.
3 Turn the volume control wheel $ to set the sound level. (Fig. 12)
, The $ appears on the display. (Fig. 13)
4 If you want no sound at wake-up time, select level 0.
Setting the light intensity level
1 Use the light adjustment wheel @ to set the light intensity level. (Fig. 14)
, The @ appears on the display.
10
English
Tip:We advise a light intensity between 9 and 20 (for the HF3451 with 75W lamp) or between 7 and
15 (for the HF3462/HF3461 with 100W lamp) for the alarm function. Set the light intensity to your
own preference by trying out the alarm function at different light intensity levels.
2 If you do not want the light to go on at wake-up time, select light intensity level 0.
Quick alarm check
1 Press the QUICK CHECK button to start an accelerated wake-up alarm test (Fig. 15).
, The light ring round the QUICK CHECK button goes on (Fig. 16).
, During the first 50 seconds of the test, you see a rapid increase of the light intensity to the
selected level. During the last 40 seconds, you hear the selected sound gradually increase to
the selected level.
2 Press the QUICK CHECK button again to stop the test (Fig. 15).
, The light ring round the QUICK CHECK button goes out.
Note:The appliance continues to run the accelerated wake-up alarm test until you press the QUICK
CHECK button.
Switching the alarm on or off
The light ring round the ALARM button burns when the alarm is on. At the set time, the wake-up
sound is played and the lamp has reached the selected light intensity level.
1 Press the 3 button to switch off the light and the wake-up sound. (Fig. 17)
, The light ring round the ALARM button continues to burn. The alarm function is still active
and the wake-up alarm will go off at the set time and with the set sound and light intensity
the next day (Fig. 11).
2 Press the # button if you want to switch off the sound when the alarm goes off. (Fig. 18)
3 Press the @& button if you want to switch off the lamp when the alarm goes off. (Fig. 19)
4 If you want to switch off the alarm function altogether, press the ALARM button one or
more times until there is no sound symbol on the display and the light ring round the
ALARM button goes out.
Snoozing
1 Press the SNOOZE/SCREEN BRIGHTNESS CONTROL button to switch off the sound for 9
minutes when the alarm has gone off (Fig. 20).
The lamp continues to burn at the selected intensity level. After 9 minutes, the wake-up sound is
automatically played again.
2 Press the SNOOZE/SCREEN BRIGHTNESS CONTROL button longer to dim the light.
Note:You can only do this once. After you release the button, it functions as SCREEN BRIGHTNESS
CONTROL button again.
Note:You can only use the snooze function within 15 minutes after the alarm starts to go off. After those
15 minutes, the button no longer functions as SNOOZE button and only functions as
SCREEN BRIGHTNESS CONTROL button.
Adjusting the light intensity during the wake-up phase
1 Turn the light adjustment wheel @ to select a higher or lower light intensity. (Fig. 14)
The lamp burns at the selected intensity during the rest of the wake-up phase.
Adjusting the brightness of the display
1 Press the SNOOZE/SCREEN BRIGHTNESS CONTROL button to adjust the brightness of
the display (Fig. 20).
English 11
Press the button again to set the brightness to another level. There are three levels.
Note:This button cannot be used to adjust the display brightness when the alarm goes off and during
snoozing.
3 button
1 When the alarm goes off at the set wake-up time, press the 3 button to switch off the
wake-up alarm light and sound.
Note:The alarm function remains active and the light ring round the alarm button continues to burn.
2 When you have switched on the reading lamp and/or the radio, press the 3 button to switch
off the reading lamp and/or the radio.
When you press the 3 button again, only the light goes on.
Note:When the alarm function is active, pressing the 3 button does not affect the alarm settings.
Reading lamp
1 Press the @& button to switch the lamp on or off. (Fig. 19)
2 Turn the light adjustment wheel @ upwards or downwards to increase or decrease the light
intensity level. (Fig. 14)
, The light level indication on the display @ shows the light intensity level (00 to 20). (Fig. 21)
Tip:We advise you to set the light intensity to 20 (maximum level) for reading. If this light level is not
strong enough, switch on an extra lamp.
Do not forget to set the light intensity level back to the wake-up level!
Radio (HF3462/HF3461 only)
1 Press the RADIO button to switch on the radio (Fig. 22).
, The light ring round the button goes on (Fig. 23).
2 Use the % and the ^ buttons to select the frequency of your favourite station. (Fig. 24)
You can choose FM stations.
3 You can use the external antenna for better reception. Insert the external antenna into the
antenna socket next to symbol ò on the back of the appliance.
4 Press the RADIO button to switch off the radio (Fig. 22).
Power failure
To make sure the alarm goes off at the set time after a short power failure, the appliance has been
provided with a backup system. This system has a self-charging battery that does not have to be
replaced. The system remembers the time for a few minutes.
, After a long power failure, the display shows an incorrect clock time and the alarm time is
00.00. Set the correct clock time (see chapter ‘Preparing for use’) and the correct alarm time
(see chapter ‘Using the appliance’) (Fig. 5).
Reset
1 If the appliance does not respond well, remove the plug from the wall socket and then
reinsert it. If this does not help, press the reset button on the bottom of the appliance to
reset the display to the factory default settings (Fig. 25).
Cleaning and maintenance
Always unplug the appliance and let it cool down for approx. 15 minutes before you start
cleaning it.
12
English
Never use scouring pads, abrasive cleaning agents or aggressive liquids such as petrol or acetone
to clean the appliance.
Regularly remove dust from the inside of the appliance with a dry cloth, as accumulated dust
close to a powerful lamp presents a potential fire hazard.
1 Clean the outside of the appliance with a damp cloth.
2 Clean the inside of the appliance with a dry cloth.
, Open the lamp replacement hatch by first pushing the rib at the bottom inwards and then
upwards with some force (Fig. 26).
, Tilt the lamp replacement hatch outwards as far as it goes (Fig. 27).
, Do not let water run into the appliance or spill water onto the appliance (Fig. 28).
Replacement
Except for the lamp, the appliance does not contain any serviceable parts.
The lamp has to be replaced when it stops burning or when the light output decreases (also see
chapter ‘Important’). You must replace the lamp with a Philips 75W E27 SOFTONE softwhite 230V
T55 (HF3451) or a Philips 100W E27 SOFTONE softwhite 230V T55 lamp (HF3462/HF3461).Only
this lamp provides the correct light intensity.
Replacing the lamp
1 Unplug the appliance.
2 Let the appliance cool down for approx. 15 minutes.
3 Open the lamp replacement hatch by first pushing the rib at the bottom inwards and then
upwards with some force (Fig. 26).
4 Tilt the lamp replacement hatch outwards as far as it goes (Fig. 27).
5 Remove the old lamp from the lamp holder (Fig. 29).
6 Screw a new lamp in the lamp holder.
Environment
-
Do not throw away the appliance with the normal household waste at the end of its life, but
hand it in at an official collection point for recycling. By doing this, you help to preserve the
environment (Fig. 30).
Guarantee and service
If you need service or information or if you have a problem, please visit the Philips website at
www.philips.com or contact the Philips Customer Care Centre in your country (you find its phone
number in the worldwide guarantee leaflet). If there is no Customer Care Centre in your country,
go to your local Philips dealer or contact the Service Department of Philips Consumer Lifestyle BV.
Guarantee restrictions
The international guarantee does not cover the lamp.
English 13
Specifications
Models HF3451/HF3461/
HF3462
Rated voltage
230V
Rated frequency
50Hz
Rated input
75W (HF3451) or 100W
(HF3462/HF3461)
Class
II
Classification
Not classified
Ingress of water
IPX0
Operating conditions
Temperature
from +10°C to +35°C
Relative humidity
from 30% to 90%
Temperature
from -20°C to +50°C
Relative humidity
from 30% to 90% (no
condensation)
Storage conditions
Circuit diagrams, parts lists and other technical descriptions will be provided on request.
Take measures to prevent the occurrence of electromagnetic interference or other types of
interference between this appliance and other appliances.
Frequently asked questions
Question
Answer
Why does the appliance
not work?
Perhaps you have not inserted the plug properly into the wall socket.
Put the plug properly into the wall socket.
Perhaps there is a power failure. Check if the power supply works by
connecting another appliance.
Perhaps the mains cord is damaged. If the mains cord is damaged, you
must have it replaced by Philips, a service centre authorised by Philips
or similarly qualified persons in order to avoid a hazard.
Perhaps the appliance overheated and the overheating protection
switched off the appliance. Remove the cause of overheating (e.g. a
towel that blocks one or more vents) and unplug the appliance. Wait
approx. 20 minutes and then put the plug back into the wall socket.
Why does the appliance
become hot during use?
This is normal, as the appliance is heated up by the light of the lamp.
The appliance does not
respond when I try to
set different functions.
What should I do?
Press the Reset button in the bottom of the appliance or remove the
plug from the wall socket and reinsert it. The appliance is then reset to
the factory default settings.
Why does the light not
go on when the alarm
goes off?
Perhaps you set the light level too low.
14
English
Question
Answer
Perhaps you switched off the alarm function by pressing the ALARM
button.
Perhaps the lamp is defective. Replace the lamp (see chapter
‘Replacement’).
Why can I not switch on You have to wait 3 seconds for the lamp to dim. During this time, the the lamp again
3 button does not work.
immediately after I
switched it off?
Why do I hear no sound Perhaps you set the sound level too low. Turn the volume control to a
when the alarm goes
higher sound level.
off?
Perhaps you switched off the alarm function by pressing the ALARM
button.
If you selected the radio as alarm sound (HF3462/HF3461 only), the
radio may be defective. Press the radio button after you switch off the
alarm to check if the radio works. If it does not work, contact the
Philips Customer Care Centre in your country.
Why does the radio
(HF3462, HF3461
only) not work?
The radio function is probably defective. Contact the Philips Customer
Care Centre in your country.
Connect the external antenna if you have not yet connected it. See
section ‘Radio’ in chapter ‘Using the appliance’.
Why does the radio
(HF3462, HF3461
only) produce a
crackling sound?
Perhaps the broadcast signal is weak. Search for the correct signal (see
chapter ‘Using the appliance’).
The alarm went off
Perhaps you switched off the alarm function by pressing the ALARM
yesterday. Why did it not button. Set the alarm for the next day and switch off the wake-up
alarm sound and light the next day by pressing the 3 button (see
go off today?
chapter ‘Using the appliance’).
Perhaps you set the sound and/or light level to a too low setting. Set a
higher sound and/or light level.
Perhaps there has been a power failure that outlasted the capacity of
the backup system. After a long power failure, the display shows an
incorrect clock time and the alarm time is 00.00. Set the correct clock
time (see chapter ‘Preparing for use’) and the correct alarm time (see
chapter ‘Using the appliance’).
Why does the light
wake me too early/too
late?
Perhaps the light level you have set is not appropriate for you. Try a
lower light level if you wake up too early or a higher light level if you
wake up too late. For most people, the light is effective at settings 9-20
(HF3451) or 7-15 (HF3462/HF3461).
Perhaps you woke up too late because the appliance is at a lower level
than your head. Make sure the appliance is located at such a height
that the light is not blocked by your bed, duvet or pillow.
English 15
Question
Answer
Why does the
SNOOZE button not
function?
The snooze function can only be used within 15 minutes after the
alarm starts to go off. After those 15 minutes, the button no longer
functions as SNOOZE button and only functions as SCREEN
BRIGHTNESS CONTROL button.
16
Français
Introduction
Félicitations pour votre achat et bienvenue dans l’univers Philips ! Pour profiter pleinement de
l’assistance Philips, enregistrez vos produits sur le site à l’adresse suivante : www.philips.com/
welcome.
Cet appareil apporte une sensation de bien-être et de dynamisme dès le réveil. Il crée une aube
estivale qui permet de se réveiller et de se lever plus facilement. L’intensité lumineuse augmente
doucement pendant 30 minutes jusqu’à ce qu’elle atteigne le niveau choisi. La lumière du matin
favorise la production de cortisol, une hormone qui procure une sensation de dynamisme lorsque
vous vous réveillez. L’appareil permet de vous réveiller par la lumière uniquement ou par la lumière
et le son. Il peut également servir de lampe de chevet.
La lumière et l’horloge biologique
L’exposition à la lumière conditionne l’horloge biologique qui contrôle en retour les rythmes
circadiens. Le niveau de mélatonine augmente le soir afin de préparer le corps au sommeil en
abaissant sa température. La lumière du matin stimule la sécrétion de cortisol, ce qui permet de
rétablir un état éveillé et alerte. Idéalement, les rythmes circadiens sont synchronisés avec le cycle
sommeil-éveil. Les troubles du sommeil et du rythme circadien peuvent avoir un effet sur le bienêtre. En automne et en hiver, alors que les jours sont plus courts et plus sombres, de nombreuses
personnes se sentent plus fatiguées et doivent dormir davantage. Le manque d’énergie et la
difficulté à se lever le matin sont des symptômes communs de la mélancolie. D’autres symptômes se
traduisent par des sautes d’humeur, des problèmes de concentration et une véritable boulimie pour
les glucides qui risque de donner lieu à une prise de poids significative.
Bénéfices de la simulation d’aube
L’Éveil lumière de Philips permet tout en douceur de préparer votre corps au réveil pendant la
dernière demi-heure de sommeil. Tôt le matin, nos yeux sont plus sensibles à la lumière que pendant
la journée. Au cours de cette période, une lumière relativement faible et simulant un lever de soleil
permet d’élever le niveau de cortisol peu de temps après le réveil. Des études cliniques ont
démontré que l’utilisation régulière d’un simulateur d’aube permet de soulager les principales
manifestations de la mélancolie. Les personnes qui utilisent l’Éveil lumière se lèvent plus facilement
et se sentent plus énergiques. Leur humeur générale, leur productivité et leur capacité à se
concentrer s’en trouvent améliorées. Avec l’Éveil lumière de Philips, vous pouvez définir le niveau de
luminosité correspondant à votre sensibilité pour une simulation d’aube optimale.
Pour plus d’informations sur les avantages pour le bien-être de l’Éveil lumière, consultez le site Web
www.philips.com et recherchez « Éveil lumière ».
Description générale (fig. 1)
A Socle
B Orifices de ventilation
C Corps de la lampe
D Bloc de commande supérieur
1 Bouton SNOOZE/SCREEN BRIGHTNESS CONTROL (bouton de répétition/contrôle de la
luminosité de l’affichage)
2 @& (bouton d’activation/de désactivation de la lumière)
3 3 (bouton d’activation/de désactivation de la lumière et du son)
4 # (bouton de désactivation du son)
E Ampoule de 100 W (HF3462, HF3461) ou 75 W (HF3451)
F Panneau d’accès pour le remplacement de l’ampoule
G Bloc de commande inférieur
1 @ (molette de réglage de l’intensité lumineuse)
2 Bouton ALARM (bouton d’alarme)
3 Bouton RADIO (HF3462, HF3461 uniquement)
Français 17
4 Bouton QUICK CHECK (bouton de contrôle rapide)
5 $ (molette de réglage du volume)
H Affichage
1 % (bouton)
2 Indicateur de l’heure
3 ( (bouton de réglage de l’heure)
4 * (bouton de réglage de l’heure de l’alarme) 5 Symbole du son naturel « étang » (HF3462, HF3461 uniquement)
6 Symbole du son naturel « mer » (HF3462, HF3461 uniquement)
7 Symbole du son naturel « forêt »
8 Symbole de l’alarme douce
9 Symbole Radio (HF3462, HF3461 uniquement)
10 ^ (bouton)
11 Indicateur de fréquence radio (HF3462, HF3461 uniquement)
12 Indicateur du niveau de luminosité (visible pendant le réglage de la luminosité)
13 Indicateur de l’heure de l’alarme
14 Indicateur du niveau sonore (visible pendant le réglage du son)
I Bouton de réinitialisation
Remarque : le HF3462/20 et le HF3462/10 sont identiques d’un point de vue technique. Seule leur
couleur diffère. De ce fait, les deux versions seront simplement désignées par HF3462 dans ce mode
d’emploi.
Important
-
-
-
-
Lisez attentivement ce mode d’emploi avant d’utiliser l’appareil et conservez-le pour un usage
ultérieur.
Cet appareil bénéficie d’une double isolation conformément aux normes classe II (fig. 2).
Cet appareil répond aux normes de la directive européenne relative aux dispositifs médicaux
2007/47/EC.
Danger
L’eau et l’électricité ne font pas bon ménage. N’utilisez jamais l’appareil dans un environnement
humide (dans la salle de bain ou près d’une douche ou d’une piscine par exemple).
Veillez à ne pas faire pénétrer d’eau dans l’appareil ni à en renverser sur celui-ci.
Avertissement
Avant de brancher l’appareil, vérifiez que la tension indiquée sur l’appareil correspond à la
tension secteur locale.
Cet appareil est conçu pour une tension secteur de 230 V.
Si le cordon d’alimentation est endommagé, il doit être remplacé par Philips, un
Centre Service Agréé ou un technicien qualifié afin d’éviter tout accident.
Cet appareil n’est pas destiné à être utilisé par des personnes (notamment des enfants) dont les
capacités physiques, sensorielles ou intellectuelles sont réduites, ou par des personnes manquant
d’expérience ou de connaissances, à moins que celles-ci ne soient sous surveillance ou qu’elles
aient reçu des instructions quant à l’utilisation de l’appareil par une personne responsable de
leur sécurité.
Veillez à ce que les enfants ne puissent pas jouer avec l’appareil.
Ôtez régulièrement la poussière pouvant s’accumuler à l’intérieur de l’appareil à l’aide d’un
chiffon sec. À proximité d’une lampe puissante, celle-ci pourrait en effet présenter un risque
potentiel d’incendie. Voir le chapitre « Nettoyage et entretien » pour plus d’informations. Attention
Ne soumettez pas l’appareil à des chocs violents.
18
-
-
-
-
Français
Posez l’appareil sur une surface stable et plane, et veillez à laisser un espace libre de 15 cm tout
autour et de 40 cm au-dessus pour éviter les surchauffes. (fig. 3)
N’utilisez pas l’appareil lorsque la température de la pièce est inférieure à 10 ºC ou supérieure à
35 ºC.
En cours de fonctionnement, n’obturez pas les orifices d’aération à l’arrière de l’appareil.
Laissez l’appareil refroidir pendant 15 minutes environ avant de le nettoyer ou le ranger.
N’utilisez pas l’appareil si le corps de la lampe est endommagé, cassé ou absent.
Si vous vous réveillez trop tôt ou avez des maux de tête, réduisez le niveau de luminosité.
Consultez un médecin avant d’utiliser l’Éveil lumière de Philips si vous avez souffert ou souffrez
de dépression sévère.
N’utilisez pas cet appareil pour réduire votre nombre d’heures de sommeil. Cet appareil a été
conçu uniquement pour faciliter votre éveil mais ne saurait en aucun cas réduire le nombre
d’heures de repos dont vous avez besoin.
Remplacez systématiquement l’ampoule par une ampoule Philips 75 W E27 SOFTONE blanche
230 V T55 (HF3451) ou Philips 100 W E27 SOFTONE blanche 230 V T55 (HF3462, HF3461).
L’appareil n’est doté d’aucun bouton marche/arrêt. Pour le débrancher, retirez la fiche du cordon
d’alimentation de la prise secteur.
Cet appareil est destiné à un usage domestique uniquement, y compris à un usage similaire dans
les hôtels, par exemple.
Général
L’appareil bénéficie d’une protection intégrée contre les surchauffes. Si le refroidissement est
insuffisant (en cas d’obstruction des aérations, par exemple), l’appareil se met hors tension
automatiquement. Éliminez la cause de la surchauffe, débranchez l’appareil et laissez-le refroidir
pendant 20 minutes environ avant de le remettre en marche.
Nous recommandons de régler l’intensité lumineuse de réveil entre 9 et 20 (HF3451 avec
ampoule de 75 W) ou entre 7 et 15 (HF3462 et HF3461 avec ampoule de 100 W). Ces valeurs
correspondent à un niveau d’intensité lumineuse de 100 à 300 lux. Le réglage définitif dépend
de votre sensibilité à la lumière et de vos préférences. Il est possible de sélectionner une valeur
plus ou moins élevée. Consultez le chapitre « Utilisation de l’appareil » pour plus de détails. Si le
niveau d’intensité lumineuse 20 du HF3451 est insuffisant, nous vous conseillons de rapprocher
l’appareil de votre lit.
Si vous partagez votre chambre, l’autre personne risque d’être également réveillée par la
lumière de l’appareil, même si cette dernière est relativement éloignée. Ce phénomène est dû à
la différence de sensibilité à la lumière d’une personne à l’autre.
Si vous avez de nouveau du mal à vous réveiller, ceci peut être lié à une réduction de l’intensité
lumineuse de la lampe, ce qui est normal au bout d’un certain temps. Dans ce cas, vous pouvez
augmenter le niveau de luminosité ou remplacer l’ampoule.
Si l’appareil est utilisé sur un site industriel ou proche d’une centrale électrique, il se peut que
dans certaines circonstances la lampe s’éteigne juste après avoir été allumée. Ceci n’a aucun
effet sur le fonctionnement de l’appareil et il pourra être réutilisé sans aucune difficulté.
Champs électromagnétiques (CEM)
Cet appareil Philips est conforme à toutes les normes relatives aux champs électromagnétiques
(CEM). Il répond aux règles de sécurité établies sur la base des connaissances scientifiques actuelles
s’il est manipulé correctement et conformément aux instructions de ce mode d’emploi.
Avant utilisation
Installation
1 Avant la première utilisation, ouvrez le panneau d’accès à l’arrière de l’appareil (reportezvous au chapitre « Remplacement ») et vissez l’ampoule dans son support.
Français 19
2 Placez l’appareil à une distance comprise entre 40 cm et 50 cm de votre tête, sur une table
de chevet par exemple (fig. 4).
3 Branchez le cordon d’alimentation sur la prise secteur.
, L’heure affichée commence à clignoter et des flèches s’affichent au-dessus et en dessous de
l’heure pour indiquer que cette dernière doit être réglée (fig. 5).
Remarque : si l’affichage ne s’allume pas après avoir branché l’appareil, appuyez sur le bouton de
réinitialisation à la base de l’appareil.
Réglage de l’heure du réveil
1 Utilisez les boutons ^ et % pour régler l’heure.
2 Maintenez le bouton enfoncé quelques instants de plus pour régler l’heure plus rapidement.
Remarque : lorsque vous réglez l’heure pour la première fois, vous devez appuyer sur le bouton de
réglage de l’heure avant de pouvoir régler l’heure à nouveau. L’heure affichée commence à clignoter et
des flèches s’affichent au-dessus et en dessous de l’heure pour indiquer que cette dernière peut être
réglée.
3 Lorsque l’heure exacte est définie, appuyez sur le bouton de réglage de l’heure pour
confirmer l’heure (fig. 6).
, L’heure affichée cesse de clignoter et les flèches disparaissent.
Remarque : si vous ne confirmez pas l’heure, le clignotement s’arrête et les flèches disparaissent au bout
de 10 secondes. Ceci indique que l’heure a été définie.
L’appareil est désormais prêt à l’emploi.
Utilisation de l’appareil
Réglage de l’alarme
Lors du réglage de l’alarme, vous choisissez l’intensité lumineuse, le type de son et le volume.
L’alarme est définie lorsque l’anneau lumineux entourant le bouton ALARM s’allume. L’intensité
lumineuse augmente progressivement au cours des 30 minutes précédant l’heure de réveil
demandée. Le son augmente progressivement pendant les 90 secondes qui précèdent l’heure de
l’alarme.
Réglage de l’heure de l’alarme
1 Appuyez sur le bouton de réglage de l’heure de l’alarme ( *) pour la définir. (fig. 7)
, L’heure de l’alarme clignote et deux flèches s’affichent au-dessus et en dessous de celleci (fig. 8).
2 Utilisez les boutons % et ^ pour définir l’heure de l’alarme, qui correspond à l’heure à
laquelle vous souhaitez vous réveiller. (fig. 9)
3 Maintenez le bouton enfoncé quelques instants de plus pour faire avancer ou reculer l’heure
plus rapidement.
4 Appuyez de nouveau sur le bouton de réglage de l’heure de l’alarme ( *) pour la
confirmer. (fig. 7)
, Les flèches disparaissent et l’heure de l’alarme cesse de clignoter.
Remarque : si vous ne confirmez pas l’heure de l’alarme, le clignotement s’arrête au bout de
10 secondes. Ceci indique que l’heure d’alarme a été définie.
Sélection du son et du volume
1 Appuyez sur le bouton ALARM (fig. 10).
, L’anneau lumineux entourant ce bouton s’allume (fig. 11).
20
,
Français
Le premier symbole de son (symbole radio pour le HF3462 et le HF3461, symbole de signal
sonore doux pour le HF3451) clignote pendant 3 secondes avant que le signal sonore se
déclenche.
2 Si nécessaire, appuyez de nouveau sur le bouton ALARM pour sélectionner un autre son. Une
fois le son voulu sélectionné, n’appuyez plus sur le bouton ALARM (fig. 10).
, Au bout de 3 secondes, le symbole du son cesse de clignoter pour indiquer qu’il a été
sélectionné.
, L’alarme est réglée et reste opérationnelle jusqu’à ce que vous désactiviez la fonction
afférente. Dans ce cas, le symbole du son disparaît et l’anneau lumineux du bouton ALARM
s’éteint. Reportez-vous également à la section « Activation/Désactivation de l’alarme ».
3 Faites tourner la molette de réglage du volume $ pour régler le son. (fig. 12)
, Le symbole $ s’affiche. (fig. 13)
4 Si vous ne souhaitez pas définir de son, sélectionnez 0.
Réglage de l’intensité lumineuse
1 Faites tourner la molette de réglage de l’intensité lumineuse @ pour sélectionner le niveau
de lumière voulu. (fig. 14)
, Le symbole @ s’affiche.
Conseil : Nous préconisons un niveau d’intensité lumineuse compris entre 9 et 20 (HF3451 avec
ampoule de 75 W) ou entre 7 et 15 (HF3462 et HF3461 avec ampoule de 100 W) pour la fonction
d’alarme. Réglez l’intensité lumineuse finale en fonction de vos préférences en essayant les différents
niveaux.
2 Si vous ne souhaitez pas être réveillé par la lumière, sélectionnez 0 pour l’intensité lumineuse.
Vérification rapide de l’alarme
1 Appuyez sur le bouton QUICK CHECK pour activer le test rapide de l’alarme (fig. 15).
, L’anneau lumineux entourant le bouton QUICK CHECK s’allume (fig. 16).
, Pendant les 50 premières secondes de ce test, l’intensité lumineuse augmente rapidement
pour atteindre le niveau sélectionné. Au cours des 40 dernières secondes, le son sélectionné
atteint progressivement le niveau demandé.
2 Appuyez de nouveau sur le bouton QUICK CHECK pour mettre fin au test (fig. 15).
, L’anneau lumineux entourant le bouton QUICK CHECK s’éteint.
Remarque : le test d’alarme accélérée se poursuit. Appuyez de nouveau sur le bouton QUICK CHECK
pour y mettre fin.
Activation/Désactivation de l’alarme
Lorsque l’alarme est active, l’anneau lumineux entourant le bouton ALARM est allumé. À l’heure
demandée, le son est diffusé et la lumière atteint l’intensité maximale sélectionnée.
1 Appuyez sur le bouton 3 pour éteindre la lumière et couper le son. (fig. 17)
, L’anneau lumineux entourant le bouton ALARM reste allumé. La fonction d’alarme reste
active et se déclenche le jour suivant, à l’heure sélectionnée, en diffusant le son et en
allumant la lumière avec l’intensité choisie (fig. 11).
2 Appuyez sur le bouton # pour couper le son lorsque l’alarme se déclenche. (fig. 18)
3 Appuyez sur le bouton @& pour éteindre la lampe lorsque l’alarme se déclenche. (fig. 19)
4 Pour désactiver la fonction d’alarme, appuyez une ou plusieurs fois sur le bouton ALARM de
manière à faire disparaître le symbole du son et à éteindre l’anneau lumineux entourant le
bouton ALARM.
Français 21
Répétition
1 Appuyez sur le bouton SNOOZE/SCREEN BRIGHTNESS CONTROL pour désactiver le son
pendant 9 minutes après déclenchement de l’alarme (fig. 20).
La lampe reste allumée à l’intensité sélectionnée. Au bout de 9 minutes, le son de réveil est diffusé
de nouveau.
2 Appuyez un peu plus longtemps sur le bouton SNOOZE/SCREEN BRIGHTNESS CONTROL
pour réduire la luminosité.
Remarque :Vous ne pouvez effectuer cette opération qu’une seule fois. Une fois le bouton relâché, il se
cantonne à sa fonction de contrôle de la luminosité de l’affichage.
Remarque :Vous ne pouvez utiliser la fonction de répétition que dans les 15 minutes qui suivent le
déclenchement de l’alarme. Une fois ce délai dépassé, le bouton n’assure plus de fonction de répétition
et sert uniquement à contrôler la luminosité de l’affichage.
Réglage de l’intensité lumineuse pendant la phase de réveil
1 Faites tourner la molette de réglage de la lumière @ pour accroître ou réduire la
luminosité. (fig. 14)
La lampe demeure à l’intensité sélectionnée pendant tout le reste de la phase d’éveil.
Réglage de la luminosité de l’affichage
1 Appuyez sur le bouton SNOOZE/SCREEN BRIGHTNESS CONTROL pour régler la
luminosité de l’affichage (fig. 20).
Appuyez de nouveau sur ce bouton pour changer le niveau de luminosité. Vous avez le choix entre
trois niveaux.
Remarque : Ce bouton ne permet pas de régler la luminosité de l’affichage lorsque l’alarme se déclenche
et lorsque la fonction de répétition est activée.
3 (bouton)
1 Lorsque l’alarme se déclenche à l’heure de réveil programmée, appuyez sur le bouton 3
pour désactiver la lumière et le son.
Remarque : la fonction d’alarme reste active et l’anneau lumineux entourant le bouton d’alarme reste
allumé.
2 Si vous aviez allumé la lampe de chevet ou la radio, utilisez le bouton 3 pour l’éteindre.
Si vous appuyez une nouvelle fois sur le bouton 3, seul l’éclairage s’allume.
Remarque : Lorsque la fonction d’alarme est active, une pression sur le bouton 3 ne modifie pas les
réglages.
Lampe de chevet
1 Appuyez sur le bouton @& pour allumer ou éteindre la lampe. (fig. 19)
2 Faites tourner la molette de réglage du volume @ vers le haut ou le bas pour accroître ou
réduire l’intensité lumineuse. (fig. 14)
, L’indicateur du niveau de luminosité de l’affichage @ indique l’intensité lumineuse (00 à
20). (fig. 21)
Conseil : Nous recommandons de régler l’intensité lumineuse sur 20 (niveau maximum) pour la lecture.
Si le niveau de luminosité est insuffisant, allumez une autre lampe.
N’oubliez pas de rétablir l’intensité lumineuse voulue pour le réveil.
22
Français
Radio (HF3462, HF3461 uniquement)
1 Appuyez sur le bouton RADIO pour écouter la radio (fig. 22).
, L’anneau lumineux entourant ce bouton s’allume (fig. 23).
2 Utilisez les boutons % et ^ pour sélectionner la fréquence radio voulue. (fig. 24)
Vous pouvez choisir des stations FM.
3 Vous pouvez utiliser l’antenne externe pour améliorer la réception. Pour ce faire, branchez
l’antenne externe sur la prise d’antenne située à proximité du symbole ò à l’arrière de
l’appareil.
4 Appuyez sur le bouton RADIO pour éteindre la radio (fig. 22).
Panne de courant
Afin de prémunir l’appareil contre les pannes de courant, celui-ci est doté d’une batterie de secours.
Cette batterie se recharge automatiquement et ne doit pas être remplacée. Elle permet de
conserver l’heure pendant quelques minutes.
, Après une coupure de courant prolongée, l’affichage indique une heure incorrecte et l’heure
d’alarme revient à 00:00. Réglez l’heure (voir le chapitre « Avant utilisation ») et l’heure de
l’alarme (voir le chapitre « Utilisation de l’appareil ») (fig. 5).
Réinitialisation
1 Si l’appareil ne répond pas correctement, retirez la fiche de la prise secteur, puis réinsérez-la.
Si le problème persiste, appuyez sur le bouton de réinitialisation au bas de l’appareil afin de
rétablir les réglages par défaut de l’affichage (fig. 25).
Nettoyage et entretien
Débranchez l’appareil et laissez-le refroidir pendant 15 minutes environ avant de le nettoyer.
N’utilisez jamais de tampons à récurer, de produits abrasifs ou de détergents agressifs tels que de
l’essence ou de l’acétone pour nettoyer l’appareil.
Ôtez régulièrement la poussière pouvant s’accumuler à l’intérieur de l’appareil à l’aide d’un
chiffon sec. À proximité d’une lampe puissante, celle-ci pourrait en effet présenter un risque
potentiel d’incendie.
1 Nettoyez l’extérieur de l’appareil à l’aide d’un chiffon humide.
2 Nettoyez l’intérieur de l’appareil à l’aide d’un chiffon sec.
, Ouvrez le panneau d’accès à l’ampoule. Pour ce faire, appuyez sur la languette inférieure et
poussez fermement le panneau vers le haut (fig. 26).
, Faites-le pivoter vers l’extérieur, aussi loin que possible (fig. 27).
, Veillez à ne pas faire pénétrer d’eau dans l’appareil ni à en renverser sur celui-ci (fig. 28).
Remplacement
À l’exception de l’ampoule, l’appareil ne contient aucune pièce réparable.
L’ampoule doit être remplacée lorsqu’elle ne s’allume plus ou n’atteint plus l’intensité habituelle (voir
également le chapitre « Important »). Remplacez l’ampoule par une ampoule Philips 75 W
E27 SOFTONE blanche 230 V T55 (HF3451) ou Philips 100 W E27 SOFTONE blanche 230 V T55
(HF3462, HF3461). Cette ampoule est la seule qui puisse fournir l’intensité lumineuse demandée.
Remplacement de l’ampoule
1 Débranchez l’appareil.
2 Laissez-le refroidir pendant 15 minutes environ.
Français 23
3 Ouvrez le panneau d’accès à l’ampoule. Pour ce faire, appuyez sur la languette inférieure et
poussez fermement le panneau vers le haut (fig. 26).
4 Faites-le pivoter vers l’extérieur, aussi loin que possible (fig. 27).
5 Enlevez l’ampoule de son support (fig. 29).
6 Remplacez-la par une ampoule neuve.
Environnement
-
Lorsqu’il ne fonctionnera plus, ne jetez pas l’appareil avec les ordures ménagères, mais déposezle à un endroit assigné à cet effet, où il pourra être recyclé. Vous contribuerez ainsi à la
protection de l’environnement (fig. 30).
Garantie et service
Si vous souhaitez obtenir des informations supplémentaires ou si vous rencontrez un problème,
visitez le site Web de Philips à l’adresse www.philips.com ou contactez le
Service Consommateurs Philips de votre pays (vous trouverez le numéro de téléphone
correspondant sur le dépliant de garantie internationale). S’il n’existe pas de
Service Consommateurs Philips dans votre pays, renseignez-vous auprès de votre revendeur local
ou contactez le « Service Department of Philips Consumer Lifestyle BV ».
Limitation de garantie
La garantie internationale ne couvre pas l’ampoule.
Caractéristiques
Modèles HF3451, HF3461 et
HF3462
Tension nominale
230 V
Fréquence nominale
50 Hz
Entrée nominale
75 W (HF3451) ou 100 W
(HF3462, HF3461)
Classe
II
Classification
Non classifié
Entrée d’eau
IPX0
Conditions de fonctionnement
Température
de +10 °C à +35 °C
Taux d’humidité relative
de 30 % à 90 %
Température
de -20 °C à +50 °C
Taux d’humidité relative
de 30 % à 90 % (sans
condensation)
Conditions de stockage
Les schémas de circuits, les nomenclatures et autres descriptions techniques sont disponibles sur
demande.
Prenez les mesures nécessaires pour prévenir les interférences électromagnétiques ou tout autre
type d’interférence entre cet appareil et les autres appareils domestiques.
24
Français
Foire aux questions
Question
Réponse
Pourquoi l’appareil ne
fonctionne-t-il pas ?
Vous n’avez peut-être pas inséré correctement la fiche du cordon
d’alimentation dans la prise secteur. Vérifiez si la fiche a été
correctement insérée dans la prise secteur.
Il y a peut être une panne de courant. Vérifiez si l’alimentation
électrique fonctionne en branchant un autre appareil.
Si le cordon d’alimentation est peut-être endommagé. Si tel est le cas, il
doit être remplacé par Philips, un Centre Service Agréé ou un
technicien qualifié afin d’éviter tout accident.
L’appareil a peut-être subi une surchauffe et le système de protection
contre les surchauffes l’a éteint. Éliminez la cause de la surchauffe (une
serviette obturant un ou plusieurs orifices de ventilation par exemple)
et débranchez l’appareil. Patientez 20 minutes environ avant de
rebrancher la fiche d’alimentation sur la prise secteur.
Pourquoi l’appareil
devient-il chaud en
cours d’utilisation ?
Ce phénomène est normal car l’appareil accumule la chaleur dégagée
par l’ampoule.
L’appareil ne répond
pas lorsque j’essaie de
régler différentes
fonctions. Que dois-je
faire ?
Appuyez sur le bouton de réinitialisation en dessous de l’appareil ou
débranchez la fiche d’alimentation de la prise secteur, puis rebranchezla. Les réglages par défaut de l’appareil sont alors restaurés.
Pourquoi la lumière ne
s’allume-t-elle pas
lorsque l’alarme se
déclenche ?
Le niveau de luminosité est peut-être trop faible.
Vous avez peut-être désactivé l’alarme en appuyant sur le
bouton ALARM.
L’ampoule est peut-être défectueuse. Changez l’ampoule (voir le
chapitre « Remplacement »).
Pourquoi ne puis-je pas
rallumer la lampe
immédiatement après
l’avoir éteinte ?
L’ampoule met 3 secondes pour réduire sa luminosité. Pendant ce
temps, le bouton 3 ne fonctionne pas.
Pourquoi n’y a-t-il aucun Le volume est peut-être réglé sur un niveau trop bas. Augmentez-le.
son lorsque l’alarme se
déclenche ?
Vous avez peut-désactivé l’alarme en appuyant sur le bouton ALARM.
Si vous avez sélectionné la radio comme sonnerie d’alarme (HF3462,
HF3461 uniquement), il se peut que la radio présente un
dysfonctionnement. Désactivez l’alarme, puis appuyez sur le bouton de
la radio pour vérifier si elle fonctionne correctement. Si ce n’est pas le
cas, contactez le Service Consommateurs Philips de votre pays.
Français 25
Question
Réponse
Pourquoi la radio
(HF3462, HF3461
uniquement) ne
fonctionne-t-elle pas ?
La fonction radio est sans doute défectueuse. Contactez le Service
Consommateurs Philips de votre pays.
Raccordez l’antenne externe si vous ne l’avez pas déjà fait. Voir la
section « Radio » du chapitre « Utilisation de l’appareil ».
Pourquoi la radio émetelle des grésillements
(HF3462, HF3461
uniquement) ?
Le signal d’émission est peut-être trop faible. Recherchez un signal
adapté (voir le chapitre « Utilisation de l’appareil »).
L’alarme s’est
déclenchée hier, mais
pas aujourd’hui.
Pourquoi ?
Vous avez peut-désactivé l’alarme en appuyant sur le bouton ALARM.
Réglez l’alarme et, le lendemain, appuyez sur le bouton 3 pour couper
l’alarme sonore et la lumière (voir le chapitre « Utilisation de
l’appareil »).
Le volume sonore et le niveau de luminosité sont peut-être trop faibles.
Augmentez le volume et l’intensité lumineuse.
Une coupure de courant s’est peut-être prolongée au-delà des
capacités du système de secours. Après une coupure de courant
prolongée, l’affichage indique une heure incorrecte et l’heure d’alarme
revient à 00:00. Réglez l’heure (voir le chapitre « Avant utilisation ») et
l’heure de l’alarme (voir le chapitre « Utilisation de l’appareil »).
Pourquoi la lumière me
réveille-t-elle trop tôt/
trop tard ?
Vous avez peut-être choisi un niveau d’intensité qui ne vous convient
pas. Si vous vous réveillez trop tôt, réduisez l’intensité lumineuse. Dans
le cas contraire, augmentez-la. L’intensité efficace pour la plupart des
gens est située entre 9 et 20 (HF3451) ou 7 et 15 (HF3462, HF3461).
Vous vous êtes peut-être réveillé(e) trop tard parce que l’appareil est
plus bas que votre tête. Assurez-vous que l’appareil est situé à un
niveau tel que la lumière ne peut pas être masquée par votre lit, votre
couette ou votre oreiller.
Pourquoi le
bouton SNOOZE ne
fonctionne-t-il pas ?
La fonction de répétition ne peut être utilisée que dans les 15 minutes
qui suivent le déclenchement de l’alarme. Une fois ce délai dépassé, le
bouton n’assure plus de fonction de répétition et sert uniquement à
contrôler la luminosité de l’affichage.
26
Nederlands
Inleiding
Gefeliciteerd met uw aankoop en welkom bij Philips! Als u volledig wilt profiteren van de
ondersteuning die Philips biedt, registreer uw product dan op www.philips.com/welcome.
Met dit apparaat voelt u zich fitter en energieker wanneer u wakker wordt. De lamp creëert een
zomerse dageraadervaring, waardoor u makkelijker wakker wordt en opstaat. De lichtintensiteit
neemt gedurende 30 minuten langzaam toe naar het ingestelde niveau. Ochtendlicht verhoogt de
productie van het hormoon cortisol, waardoor u zich energieker voelt wanneer u wakker wordt. U
kunt het apparaat zo instellen dat u alleen door licht wordt gewekt of door licht én geluid. Het
apparaat kan tevens worden gebruikt als leeslamp.
Licht en de biologische klok
Blootstelling aan licht reguleert de biologische klok die van invloed is op het circadiaans ritme van
het lichaam. Het melatonineniveau neemt ‘s avonds toe, waardoor het lichaam wordt voorbereid op
het slapengaan en de kerntemperatuur van het lichaam lager wordt. Het ochtendlicht stimuleert de
afgifte van het hormoon cortisol, waardoor we wakker worden en alert zijn. Onder optimale
omstandigheden is het circadiaans ritme gelijk aan ons slaap-waakritme. Verstoorde slaap en een
verstoord circadiaans ritme kunnen een enorm effect hebben op onze gezondheid, prestaties en
productiviteit. In de herfst en de winter, wanneer de dagen korter en donkerder zijn, zijn veel
mensen vermoeid en hebben ze meer slaap nodig. Gebrek aan energie en moeite hebben met
opstaan zijn veelvoorkomende symptomen van de winterblues. Andere symptomen zijn plotselinge
stemmingswisselingen, concentratieproblemen en behoefte aan voedsel met dikmakende
koolhydraten. Sommige mensen kunnen zelfs een ernstige depressie krijgen (SAD of Seasonal
Affective Disorder; seizoensafhankelijke depressie, ook wel winterdepressie genaamd), die verdwijnt
wanneer het lente wordt.
De effecten van dageraadsimulatie
Tijdens het laatste halfuur slaap bereidt de Philips Wake-up Light uw lichaam op een aangename
manier voor op het ontwaken. In de vroege ochtenduren zijn onze ogen gevoeliger voor licht dan
wanneer we wakker zijn. Tijdens die periode zorgen de relatief lage lichtniveaus van een
gesimuleerde natuurlijke zonsopgang ervoor dat het cortisolniveau kort na het ontwaken toeneemt.
Klinisch onderzoek heeft aangetoond dat regelmatig gebruik van een dageraadsimulator zelfs de
zwaarste symptomen van de winterblues kan doen afnemen, waardoor de productiviteit en het
concentratievermogen toenemen. Mensen die de Wake-up Light gebruiken worden makkelijker
wakker, hebben ‘s ochtends een beter humeur en voelen zich energieker. Met de Philips Wake-up
Light kunt u het lichtniveau instellen dat past bij uw lichtgevoeligheid voor een optimale
dageraadsimulatie.
Zie www.philips.nl (zoekwoord: Wake-up Light) voor meer informatie over de voordelen voor de
gezondheid.
Algemene beschrijving (fig. 1)
A Voet
B Ventilatieopeningen
C Lampbehuizing
D Bedieningspaneel bovenkant
1 SNOOZE/SCREEN BRIGHTNESS CONTROL (sluimerknop/knop voor helderheid van het
display)
2 @& knop (licht aan/uit)
3 3 knop (licht en geluid aan/uit)
4 # knop (geluid uit)
E 100W-lamp (HF3462/HF3461) of 75W-lamp (HF3451)
F Klep voor het vervangen van de lamp
G Bedieningspaneel voet
Nederlands 27
1
2
3
4
5
@ wieltje (draaien om de lichtintensiteit in te stellen)
ALARM-knop (wekker)
RADIO-knop (alleen HF3462/HF3461)
QUICK CHECK-knop (snel controleren)
$ wieltje (draaien om volume in te stellen)
H Displaygedeelte
1 % knop
2 Tijdaanduiding
3 ( knop (om tijd in te stellen)
4 * knop (om wektijd in te stellen) 5 Symbool voor natuurgetrouwe vijvergeluiden (alleen HF3462/HF3461)
6 Symbool voor natuurgetrouwe zeegeluiden (alleen HF3462/HF3461)
7 Symbool voor natuurgetrouwe bosgeluiden
8 Symbool voor zacht piepje
9 Radiosymbool (alleen HF3462/HF3461)
10 ^ knop
11 Aanduiding radiofrequentie (alleen HF3462/HF3461)
12 Aanduiding lichtniveau (zichtbaar wanneer lichtniveau wordt aangepast)
13 Aanduiding wektijd
14 Aanduiding geluidsniveau (zichtbaar wanneer geluidsniveau wordt aangepast)
I Resetknop
Opmerking: De HF3462/20 en de HF3462/10 hebben dezelfde technische specificaties, maar
verschillende kleuren. Daarom worden deze versies in de rest van deze gebruiksaanwijzing gewoon
aangeduid als HF3462.
Belangrijk
-
-
-
Lees deze gebruiksaanwijzing zorgvuldig door voordat u het apparaat gaat gebruiken. Bewaar de
gebruiksaanwijzing om deze indien nodig te kunnen raadplegen.
Dit apparaat is dubbel geïsoleerd volgens Klasse II (fig. 2).
Dit apparaat voldoet aan de eisen van de Europese Richtlijn Medische Hulpmiddelen MDD
2007/47/EG.
Gevaar
Water en elektriciteit vormen een gevaarlijke combinatie. Gebruik dit apparaat daarom niet in
een vochtige omgeving (bijv. in de badkamer of in de buurt van een douche of zwembad).
Laat geen water in het apparaat lopen of op het apparaat terechtkomen.
Waarschuwing
Controleer of het voltage aangegeven op het apparaat overeenkomt met de plaatselijke
netspanning voordat u het apparaat aansluit.
Het apparaat is geschikt voor voltages van 230V.
Indien het netsnoer beschadigd is, moet u het laten vervangen door Philips, een door Philips
geautoriseerd servicecentrum of personen met vergelijkbare kwalificaties om gevaar te
voorkomen.
Dit apparaat is niet bedoeld voor gebruik door personen (waaronder kinderen) met
verminderde lichamelijke, zintuiglijke of geestelijke vermogens, of die gebrek aan ervaring of
kennis hebben, tenzij iemand die verantwoordelijk is voor hun veiligheid toezicht op hen houdt
of hen heeft uitgelegd hoe het apparaat dient te worden gebruikt.
Houd toezicht op kinderen om te voorkomen dat ze met het apparaat gaan spelen.
Verwijder regelmatig stof van de binnenkant van het apparaat met een droge doek, omdat stof
dat zich dichtbij een krachtige lamp heeft verzameld, mogelijk brandgevaar kan opleveren. Voor
meer informatie, zie hoofdstuk ‘Schoonmaken en onderhoud’. 28
-
-
-
-
Nederlands
Let op
Stel het apparaat niet bloot aan zware schokken.
Plaats het apparaat op een stabiele, vlakke ondergrond en zorg ervoor dat er minstens 15 cm
vrije ruimte rondom het apparaat en 40 cm vrije ruimte boven het apparaat is om
oververhitting te voorkomen. (fig. 3)
Gebruik het apparaat niet bij kamertemperaturen lager dan 10°C of hoger dan 35°C.
Zorg ervoor dat de ventilatieopeningen in de voet en boven op het apparaat tijdens gebruik
open blijven.
Laat het apparaat ongeveer 15 minuten afkoelen voordat u het schoonmaakt of opbergt.
Gebruik het apparaat nooit als de lampbehuizing beschadigd of kapot is of als deze ontbreekt.
Als u te vroeg wakker wordt of als u wakker wordt met hoofdpijn, verlaag dan het lichtniveau.
Als u aan een ernstige depressie lijdt of hebt geleden, raadpleeg dan uw arts voordat u de
Philips Wake-up Light gaat gebruiken.
Gebruik dit apparaat niet om uw slaaptijd te verkorten. Het doel van dit apparaat is om u
makkelijker wakker te laten worden; het heeft geen invloed op uw slaapbehoefte.
Vervang de lamp altijd door een Philips 75W E27 SOFTONE softwhite 230V T55-lamp
(HF3451) of een Philips 100W E27 SOFTONE softwhite 230V T55-lamp (HF3462/HF3461).
Het apparaat heeft geen aan/uitschakelaar. Als u het apparaat wilt loskoppelen van het
elektriciteitsnet, haal dan de stekker uit het stopcontact.
Dit apparaat is uitsluitend bedoeld voor huishoudelijk gebruik alsmede vergelijkbaar gebruik
zoals bijvoorbeeld in hotels.
Algemeen
Het apparaat is voorzien van een automatische beveiliging tegen oververhitting. Als het apparaat
onvoldoende wordt gekoeld (bijv. omdat de ventilatieopeningen zijn afgedekt), schakelt het
apparaat automatisch uit. Neem de oorzaak van de oververhitting weg, haal de stekker uit het
stopcontact en laat het apparaat ongeveer 20 minuten afkoelen. Steek vervolgens de stekker
weer in het stopcontact.
We raden u aan de lichtintensiteit voor ontwaken in te stellen tussen 9 en 20 (HF3451 met een
75W-lamp) of tussen 7 en 15 (HF3462/HF3461 met een 100W-lamp). Deze instellingen komen
overeen met lichtintensiteitniveaus van 100 tot 300 lux. De juiste stand hangt af van uw
lichtgevoeligheid. Deze moet u zelf bepalen. Het is mogelijk om een hogere of een lagere stand
te selecteren. Zie hoofdstuk ‘Het apparaat gebruiken’ voor meer informatie. Als lichtniveau 20
van de HF3451 niet hoog genoeg is, raden we u aan het apparaat dichter bij het bed te plaatsen.
Als u de slaapkamer deelt met iemand anders, kan deze persoon onbedoeld wakker worden
door het licht van het apparaat, zelfs als deze persoon zich verder van het apparaat bevindt. Dit
is het gevolg van verschillen in lichtgevoeligheid tussen mensen onderling.
Als u weer moeite begint te krijgen met wakker worden, kan dit mogelijk het gevolg zijn van een
afname van de lichtsterkte van de lamp. Dit gebeurt na verloop van tijd. In zo’n geval kunt u het
lichtniveau verhogen of de lamp vervangen.
Als het apparaat wordt gebruikt op een industrieterrein en/of in de buurt van een elektrische
centrale, kan het onder bepaalde omstandigheden mogelijk zijn dat de lamp wordt uitgeschakeld
nadat deze is ingeschakeld. Dit heeft geen nadelig effect op de veilige werking van het apparaat
de eerstvolgende keer dat het wordt gebruikt.
Elektromagnetische velden (EMV)
Dit Philips-apparaat voldoet aan alle richtlijnen met betrekking tot elektromagnetische velden (EMV).
Mits het apparaat op de juiste wijze en volgens de instructies in deze gebruiksaanwijzing wordt
gebruikt, is het veilig te gebruiken volgens het nu beschikbare wetenschappelijke bewijs.
Nederlands 29
Klaarmaken voor gebruik
Installatie
1 Open voor het eerste gebruik de klep aan de achterzijde van het apparaat (zie hoofdstuk
‘Vervangen’) en schroef de lamp in de lamphouder.
2 Plaats het apparaat op 40-50 cm afstand van uw hoofd, bijvoorbeeld op een
nachtkastje (fig. 4).
3 Steek de stekker in het stopcontact.
, De tijd op het display begint te knipperen en er verschijnen pijlen boven en onder de tijd om
aan te geven dat de tijd dient te worden ingesteld (fig. 5).
Opmerking: Als het display niet oplicht nadat u de stekker van het apparaat in het stopcontact hebt
gestoken, druk dan op de resetknop aan de onderkant van het apparaat.
De tijd instellen
1 Gebruik de knoppen ^ en % om de tijd in te stellen.
2 Houd de knop wat langer ingedrukt om de tijd sneller vooruit of achteruit te laten lopen.
Opmerking: Nadat u de tijd voor de eerste keer hebt ingesteld, dient u nogmaals op de knop voor
tijdsinstelling te drukken voordat u de tijd opnieuw kunt wijzigen. De tijd op het display begint te
knipperen en er verschijnen pijlen boven en onder de tijd om aan te geven dat de tijd kan worden
ingesteld.
3 Wanneer u de juiste tijd hebt ingesteld, drukt u op de knop voor tijdsinstelling om de tijd te
bevestigen (fig. 6).
, De tijd op het display stopt met knipperen en de pijlen verdwijnen.
Opmerking: Als u de tijd niet bevestigt, stopt het knipperen en verdwijnen de pijlen na 10 seconden. Dit
geeft aan dat de tijd is ingesteld.
Het apparaat is nu klaar voor gebruik.
Het apparaat gebruiken
De wekker instellen
Wanneer u de wekker instelt, kiest u het lichtintensiteitsniveau, het type geluid en het geluidsniveau.
De wekker is ingesteld wanneer de lichtring rond de ALARM-knop brandt. De lichtintensiteit neemt
langzaam toe tot het gewenste niveau tijdens de laatste 30 minuten voor de wektijd. Het geluid
neemt na de wektijd gedurende 90 seconden langzaam toe tot aan het gekozen niveau.
De wektijd instellen
1 Druk op de wektijdknop (*) om de wekker in te stellen. (fig. 7)
, De wektijd begint te knipperen en er verschijnen twee pijlen boven en onder de
wektijd (fig. 8).
2 Gebruik de knoppen % en ^ om de wektijd in te stellen, d.w.z. het tijdstip waarop u wenst
te worden gewekt. (fig. 9)
3 Houd de knop wat langer ingedrukt om de tijd sneller vooruit of achteruit te laten lopen.
4 Druk nogmaals op de wektijdknop (*) om de wektijd te bevestigen. (fig. 7)
, De pijlen verdwijnen en de wektijd stopt met knipperen.
Opmerking: Als u de wektijd niet bevestigt, stopt het knipperen na 10 seconden. Dit betekent dat de
wektijd is ingesteld.
30
Nederlands
Het geluid en het geluidsniveau instellen
1 Druk op de ALARM-knop (fig. 10).
, De lichtring rond de ALARM-knop gaat aan (fig. 11).
, Het eerste geluidssymbool (radiosymbool bij de HF3462/HF3461 en een symbool voor een
zacht piepje bij de HF3451) knippert 3 seconden en het geluid is hoorbaar.
2 Druk nogmaals op de ALARM-knop wanneer u een ander wekgeluid wilt selecteren. Druk
niet opnieuw op de ALARM-knop wanneer u een geluid hebt gevonden dat u wilt
gebruiken (fig. 10).
, Na 3 seconden stopt het symbool van het geselecteerde geluid met knipperen om aan te
geven dat het geluid is geselecteerd.
, De wekker is ingesteld en blijft werken totdat u de wekfunctie uitschakelt. Wanneer u dit
doet, verdwijnt het geluidssymbool van het display en gaat de lichtring rond de ALARM-knop
uit. Zie ook ‘De wekker in- of uitschakelen’.
3 Draai aan het volumewieltje $ om het geluidsniveau in te stellen. (fig. 12)
, $ verschijnt op het display. (fig. 13)
4 Als u niet wilt worden gewekt met geluid, selecteer dan niveau 0.
Het lichtintensiteitsniveau instellen
1 Gebruik het lichtaanpassingswieltje @ om het lichtintensiteitsniveau in te stellen. (fig. 14)
, @ verschijnt op het display.
Tip We raden een lichtintensiteit aan tussen 9 en 20 (HF3451 met een 75W-lamp) of tussen 7 en 15
(HF3462/HF3461 met 100W-lamp) voor de wekfunctie. Stel de lichtintensiteit in naar uw eigen
voorkeur door de wekfunctie te proberen met verschillende lichtintensiteitsniveaus.
2 Als u niet wilt dat het licht wordt ingeschakeld op het wektijdstip, selecteer dan
lichtintensiteitsniveau 0.
Snelle wekkercontrole
1 Druk op de QUICK CHECK-knop om een versnelde wekkertest uit te voeren (fig. 15).
, De lichtring rond de QUICK CHECK-knop gaat aan (fig. 16).
, Tijdens de eerste 50 seconden van de test ziet u de lichtintensiteit snel toenemen naar het
ingestelde niveau. Tijdens de laatste 40 seconden hoort u het geselecteerde geluid langzaam
toenemen tot het geselecteerde niveau.
2 Druk nogmaals op de QUICK CHECK-knop om de test te beëindigen (fig. 15).
, De lichtring rond de QUICK CHECK-knop gaat uit.
Opmerking: Het apparaat gaat door met de versnelde wekkertest totdat u op de QUICK CHECK-knop
drukt.
De wekker in- of uitschakelen
De lichtring rond de ALARM-knop brandt wanneer de wekker is ingeschakeld. Op het ingestelde
tijdstip wordt het wekgeluid afgespeeld en heeft de lamp het geselecteerde lichtintensiteitsniveau
bereikt.
1 Druk op de knop 3 om het licht en het wekgeluid uit te schakelen. (fig. 17)
, De lichtring rond de ALARM-knop blijft branden. De wekfunctie is nog steeds actief en de
wekker gaat de volgende dag af op het ingestelde tijdstip en met het ingestelde geluid en de
ingestelde lichtintensiteit (fig. 11).
2 Druk op de knop # als u het geluid wilt uitschakelen wanneer de wekker afgaat. (fig. 18)
3 Druk op de knop @& als u de lamp wilt uitschakelen wanneer de wekker afgaat. (fig. 19)
Nederlands 31
4 Als u de wekfunctie wilt uitschakelen, drukt u een of meerdere keren op de ALARM-knop
totdat u geen geluidssymbool meer op het display ziet en de lichtring rond de ALARM-knop
niet meer brandt.
Sluimeren
1 Druk op de SNOOZE/SCREEN BRIGHTNESS CONTROL-knop om het geluid 9 minuten uit
te schakelen nadat de wekker is afgegaan (fig. 20).
De lamp blijft branden op het geselecteerde intensiteitsniveau. Na 9 minuten wordt het wekgeluid
automatisch opnieuw afgespeeld.
2 Druk wat langer op de SNOOZE/SCREEN BRIGHTNESS CONTROL-knop om het licht te
dimmen.
Opmerking: U kunt dit slechts één keer doen. Nadat u de knop loslaat, werkt de knop weer als knop
voor de instelling van de helderheid van het display.
Opmerking: U kunt de sluimerfunctie alleen gebruiken binnen 15 minuten nadat de wekker afgaat. Na
die 15 minuten werkt de knop niet meer als sluimerknop, maar alleen nog als knop voor de instelling
van de helderheid van het display.
De lichtintensiteit aanpassen tijdens de wekfase
1 Draai aan het lichtaanpassingswieltje @ om een hogere of lagere lichtintensiteit te
selecteren. (fig. 14)
De lamp brandt op het geselecteerde intensiteitsniveau tijdens de rest van de wekfase.
De helderheid van het display aanpassen
1 Druk op de SNOOZE/SCREEN BRIGHTNESS CONTROL-knop om de helderheid van het
display aan te passen (fig. 20).
Druk nogmaals op de knop om de helderheid op een ander niveau in te stellen. Er zijn drie niveaus.
Opmerking: Deze knop kan niet worden gebruikt om de helderheid van het display aan te passen
wanneer de wekker afgaat of tijdens het sluimeren.
3 knop
1 Wanneer de wekker afgaat op het ingestelde wektijdstip, drukt u op de knop 3 om het
geluid en het licht bij het afgaan van de wekker uit te schakelen.
Opmerking: De wekfunctie blijft actief en het licht rond de ALARM-knop blijft branden.
2 Als u de leeslamp en/of de radio hebt ingeschakeld, drukt u op de knop 3 om de leeslamp
en/of de radio uit te schakelen.
Als u nogmaals op de knop 3 drukt, gaat alleen de lamp aan.
Opmerking: Als de wekfunctie actief is, heeft drukken op de knop 3 geen invloed op de wekinstellingen.
Leeslamp
1 Druk op de knop @& om de lamp in of uit te schakelen. (fig. 19)
2 Draai het lichtaanpassingswieltje @ naar boven of naar beneden om het lichtintensiteitsniveau
te verhogen of te verlagen. (fig. 14)
, De aanduiding van het lichtniveau op het display @ geeft het lichtintensiteitsniveau weer (00
tot 20). (fig. 21)
Tip We raden u aan de lichtintensiteit in te stellen op 20 (hoogste niveau) als u wilt lezen. Doe een extra
lamp aan als dit lichtniveau niet sterk genoeg is.
Vergeet niet het lichtintensiteitsniveau opnieuw in te stellen op het wekniveau!
32
Nederlands
Radio (alleen HF3462/HF3461)
1 Druk op de RADIO-knop om de radio in te schakelen (fig. 22).
, De lichtring rond de knop gaat aan (fig. 23).
2 Gebruik de knoppen % en ^ om de frequentie van uw favoriete zender te
selecteren. (fig. 24)
U kunt FM-zenders kiezen.
3 U kunt de externe antenne gebruiken voor een betere ontvangst. Steek de externe antenne
in het aansluitpunt voor de antenne naast het symbool ò aan de achterkant van het apparaat.
4 Druk op de RADIO-knop om de radio uit te schakelen (fig. 22).
Stroomstoring
Om er zeker van te zijn dat de wekker afgaat op het ingestelde tijdstip na een korte stroomstoring,
is het apparaat voorzien van een reservesysteem. Dit systeem heeft een zelfopladende batterij die
niet hoeft te worden vervangen. Het systeem onthoudt het tijdstip een paar minuten.
, Na een lange stroomstoring wordt er op het display een verkeerde kloktijd weergegeven en
is de wektijd 00.00. Stel de juiste kloktijd in (zie hoofdstuk ‘Klaarmaken voor gebruik’) en stel
de juiste wektijd in (zie hoofdstuk ‘Het apparaat gebruiken’) (fig. 5).
Resetten
1 Als het apparaat niet goed werkt, haal dan de stekker uit het stopcontact en steek deze er
vervolgens weer in. Is het probleem hiermee niet verholpen, druk dan op de resetknop aan
de onderkant van het apparaat om het display te resetten naar de
standaardinstellingen (fig. 25).
Schoonmaken en onderhoud
Haal altijd de stekker uit het stopcontact en laat het apparaat ongeveer 15 minuten afkoelen
voordat u het gaat schoonmaken.
Gebruik nooit schuursponzen, schurende schoonmaakmiddelen of agressieve vloeistoffen zoals
benzine of aceton om het apparaat schoon te maken.
Verwijder regelmatig stof van de binnenkant van het apparaat met een droge doek, omdat stof
dat zich dichtbij een krachtige lamp heeft verzameld, mogelijk brandgevaar kan opleveren.
1 Maak de buitenkant van het apparaat schoon met een vochtige doek.
2 Maak de binnenkant van het apparaat schoon met een droge doek.
, Open de klep voor het vervangen van de lamp door eerst de onderkant naar binnen te
duwen en vervolgens met enige kracht naar boven te duwen (fig. 26).
, Beweeg de klep voor het vervangen van de lamp zo ver mogelijk naar buiten (fig. 27).
, Laat geen water in het apparaat lopen of op het apparaat terechtkomen (fig. 28).
Vervangen
Afgezien van de lamp, bevat dit apparaat geen repareerbare onderdelen.
De lamp dient te worden vervangen wanneer deze niet meer brandt of wanneer de lichtsterkte
afneemt (zie ook hoofdstuk ‘Belangrijk’). U dient de lamp te vervangen door een Philips 75W E27
SOFTONE softwhite 230V T55-lamp (HF3451) of een Philips 100W E27 SOFTONE softwhite
230V T55-lamp (HF3462/HF3461). Alleen deze lamp biedt de juiste lichtintensiteit.
De lamp vervangen
1 Haal de stekker uit het stopcontact.
Nederlands 33
2 Laat het apparaat ongeveer 15 minuten afkoelen.
3 Open de klep voor het vervangen van de lamp door eerst de onderkant naar binnen te
duwen en vervolgens met enige kracht naar boven te duwen (fig. 26).
4 Beweeg de klep voor het vervangen van de lamp zo ver mogelijk naar buiten (fig. 27).
5 Verwijder de oude lamp uit de lamphouder (fig. 29).
6 Draai een nieuwe lamp in de lamphouder.
Milieu
-
Gooi het apparaat aan het einde van zijn levensduur niet weg met het normale huisvuil, maar
lever het in op een door de overheid aangewezen inzamelpunt om het te laten recyclen. Op die
manier levert u een bijdrage aan een schonere leefomgeving (fig. 30).
Garantie en service
Als u service of informatie nodig hebt of als u een probleem hebt, bezoek dan de Philips-website
www.philips.com, of neem contact op met het Philips Customer Care Centre in uw land (u vindt
het telefoonnummer in het ‘worldwide guarantee’-vouwblad). Als er geen Customer Care Centre in
uw land is, ga dan naar uw Philips-dealer of neem contact op met de afdeling Service van Philips
Consumer Lifestyle BV.
Garantiebeperkingen
De lamp valt niet onder de internationale garantie:
Specificaties
Modellen HF3451/HF3461/
HF3462
Nominale spanning
230V
Nominale frequentie
50Hz
Nominaal ingangsvermogen
75W (HF3451) of 100W
(HF3462/HF3461)
Klasse
II
Classificatie
Niet geclassificeerd
Binnendringen van water
IPX0
Gebruiksomstandigheden
Temperatuur
van +10°C tot +35°C
Relatieve vochtigheid
van 30% tot 90%
Temperatuur
van -20°C tot +50°C
Relatieve vochtigheid
van 30% tot 90% (geen
condens)
Opbergomstandigheden
Schakeldiagrammen, lijsten met onderdelen en andere technische omschrijvingen zijn op aanvraag
beschikbaar.
U dient maatregelen te treffen om elektromagnetische storingen of andere storingen tussen dit
apparaat en andere apparaten te voorkomen.
34
Nederlands
Veelgestelde vragen
Vraag
Antwoord
Waarom werkt het
apparaat niet?
Misschien zit de stekker niet goed in het stopcontact. Steek de stekker
goed in het stopcontact.
Mogelijk is er een stroomstoring opgetreden. Controleer of dit zo is
door een ander apparaat aan te sluiten.
Misschien is het netsnoer beschadigd. Indien het netsnoer beschadigd is,
moet u het laten vervangen door Philips, een door Philips geautoriseerd
servicecentrum of personen met vergelijkbare kwalificaties om gevaar
te voorkomen.
Misschien is het apparaat oververhit geraakt en heeft de
oververhittingsbeveiliging het apparaat uitgeschakeld. Neem de oorzaak
van de oververhitting weg (bijv. een handdoek die een of meer
ventilatieopeningen blokkeert) en haal de stekker uit het stopcontact.
Wacht ongeveer 20 minuten en steek vervolgens de stekker weer in
het stopcontact.
Waarom wordt het
apparaat heet tijdens
gebruik?
Dit is normaal, want het apparaat wordt verwarmd door het licht van
de lamp.
Het apparaat reageert
niet wanneer ik
verschillende functies
probeer in te stellen.
Wat moet ik doen?
Druk op de resetknop op de onderkant van het apparaat of haal de
stekker uit het stopcontact en steek deze er vervolgens weer in. Het
apparaat wordt vervolgens gereset naar de standaardinstellingen.
Waarom gaat het licht
niet aan wanneer de
wekker afgaat?
Misschien hebt u een te laag lichtniveau ingesteld.
Misschien hebt u de wekfunctie uitgeschakeld door op de ALARM-knop
te drukken.
De lamp is mogelijk defect. Vervang de lamp (zie hoofdstuk ‘Vervangen’).
Waarom kan ik de
lamp niet meteen
inschakelen nadat ik
deze heb
uitgeschakeld?
U dient 3 seconden te wachten zodat de lamp kan dimmen. Tijdens
deze 3 seconden werkt de knop 3 niet.
Waarom hoor ik geen
geluid als de wekker
afgaat?
Misschien hebt u een te laag geluidsniveau ingesteld. Draai de
volumeregelaar naar een hoger geluidsniveau.
Misschien hebt u de wekfunctie uitgeschakeld door op de ALARM-knop
te drukken.
Als u de radio hebt geselecteerd als wekgeluid (alleen HF3462/
HF3461), is de radio mogelijk defect. Druk op de RADIO-knop nadat u
het alarm hebt uitgeschakeld om te zien of de radio werkt. Als deze nog
steeds niet werkt, neem dan contact op met het Philips Customer Care
Centre in uw land.
Nederlands 35
Vraag
Antwoord
Waarom werkt de
radio (alleen HF3462/
HF3461) niet?
De radiofunctie is mogelijk defect. Neem contact op met het Philips
Customer Care Centre in uw land.
Sluit de externe antenne aan als dit nog niet is gebeurd. Zie ‘Radio’ in
hoofdstuk ‘Het apparaat gebruiken’.
Waarom hoor ik
kraakgeluiden op de
radio (alleen HF3462/
HF3461)?
Misschien is het uitzendsignaal zwak. Zoek het juiste signaal (zie
hoofdstuk ‘Het apparaat gebruiken’).
De wekker ging
gisteren af. Waarom
ging deze vandaag niet
af?
Misschien hebt u de wekfunctie uitgeschakeld door op de ALARM-knop
te drukken. Stel de wekker in voor de volgende dag en schakel de
volgende dag het wekgeluid en het weklicht uit door op de knop 3 te
drukken (zie hoofdstuk ‘Het apparaat gebruiken’).
Misschien hebt u een te laag geluids- en/of lichtniveau ingesteld. Stel een
hoger geluids- en of lichtniveau in.
Misschien is er een stroomstoring opgetreden die langer heeft geduurd
dan het reservesysteem aan kan. Na een lange stroomstoring verschijnt
er op het display een verkeerde kloktijd en is de wektijd 00.00. Stel de
juiste kloktijd in (zie hoofdstuk ‘Klaarmaken voor gebruik’) en stel de
juiste wektijd in (zie hoofdstuk ‘Het apparaat gebruiken’).
Waarom wekt het licht
mij te vroeg/te laat?
Misschien is het door u ingestelde lichtniveau niet geschikt voor u.
Probeer een lager lichtniveau als u te vroeg wakker wordt of een hoger
lichtniveau als u te laat wakker wordt. Voor de meeste mensen is het
licht effectief tussen stand 9-20 (HF3451) of 7-15 (Hf3462/HF3461).
Misschien bent u te laat wakker geworden omdat het apparaat lager
staat dan uw hoofd. Zorg ervoor dat het apparaat zo hoog wordt
geplaatst dat het licht niet wordt geblokkeerd door uw bed, dekbed of
kussen.
Waarom werkt
SNOOZE niet?
U kunt de sluimerfunctie alleen gebruiken binnen 15 minuten nadat de
wekker afgaat. Na die 15 minuten, werkt de knop niet meer als
sluimerknop, maar alleen nog als knop voor de instelling van de
helderheid van het display.
36
37
38
2
3
4
5
6
7
8
9
10
11
12
13
14
15
16
17
18
19
20
21
39
22
23
24
25
26
27
28
29
30
4222.002.6448.5