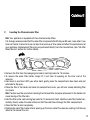
1
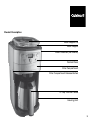
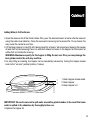
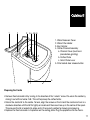
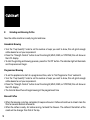
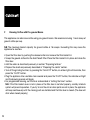
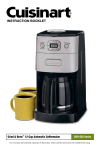
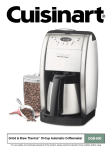
Grind & Brew Plus
DGB900BCU
Congratulations on your purchase of the Cuisinart Grind & Brew Plus
For over 30 years Cuisinart’s aim has been to produce the very finest kitchen equipment so that cooks
at home as well as professional chefs have the tools to express their creativity.
All Cuisinart products are engineered for exceptionally long life, and designed to be easy to use as
well as to give excellent performance day after day. That is why they have come to be regarded as the
defining machines in their field by chefs across the world.
Whatever you cook, cook it better with Cuisinart.
CONTENTS
Product Description 5
Safety Cautions 6
Instructions for Use
9
A
Control panel B
Programming
Setting the Clock
Setting the Programme Time
C
Inserting the Charcoal Water Filter
D
Preparing to Brew
Inserting the Filter
Adding Water & Coffee Beans
Locking the Bean Hopper
Preparing the Carafe
E
Grinding & Brewing Coffee
Immediate Brewing
Programmed Brewing
Brewed Coffee
F
Brew Coffee with Pre-ground Beans
9
11
11
12
13
14
14
15
16
17
18
18
18
18
20
Cleaning & Maintenance
21
Descaling
23
Troubleshooting
24
UK Guarantee
26
UK After Sales Service
27
Product Description
Bean Hopper Lid
Bean Hopper
Water Reservoir (not shown)
Control Panel
Filter Compartment
Filter Compartment Release Button
12 Cup Thermal Carafe
Housing Unit
Safety Cautions
Carefully read all the instructions thoroughly before using the appliance and keep in a safe place for
future reference.
Always follow these safety cautions when using this appliance to avoid personal injury or damage to
the appliance. This appliance should be used only as described within this instruction book.
ß Always inspect the appliance before use for noticeable signs of damage. Do not use if damaged,
or if the appliance has been dropped. In the event of damage, remove the plug from the mains then
contact the Cuisinart Helpline (see “UK After Sales Service” section).
ß Do not use this appliance if the lead is damaged. In the event of a damaged lead discontinue use
immediately. Contact the Cuisinart Helpline. (See “UK After Sales Service”).
ß Unplug from the mains when not in use and before cleaning. Allow to cool before cleaning the
appliance. To disconnect, push the ‘On/Off’ button, and then remove the plug from the mains. Never
pull the plug out of the mains socket by its lead.
ß This appliance should not be used by adults or children whose lack of experience, product knowledge
or disability might cause a hazard, unless they have been correctly instructed and are adequately
supervised.
ß Children should always be supervised to ensure that they do not play with this product.
ß Do not use any accessory or attachments with this appliance other than those recommended by
Cuisinart.
ß Do not place the appliance on or near a hot gas or electric burner or in a heated oven.
ß To protect against fire, electric shock or personal injury, do not immerse cord, plug or unit in water
or other liquids.
ß Do not leave the lead hanging over the edge of a kitchen table or worktop. Avoid contact between
the lead and hot surfaces.
ß For indoor use only.
ß For domestic use only.
ß Do not exceed the maximum capacity of this appliance. (See page 15)
ß This appliance should be used only for grinding coffee beans and brewing coffee as described within
the Instructions for Use. Please retain these instructions for further use.
ß Always ensure that your hands are dry before removing the plug from the mains socket.
ß This appliance complies with the requirements of Directives 04/108/EEC (Electromagnetic
Compatibility) and 06/95/CE (Electrical Safety of Domestic Appliances) amended by Directive
93/68/EEC (CE marketing).
ß No repair should be carried out by the user. In case of fault, contact the Cuisinart Helpline, (See ‘UK
After Sales Service’ section).
WARNING: A cut off plug inserted into a 13 amp socket is a serious safety (shock) hazard. Ensure
the cut off plug is disposed of safely.
The symbol
on the product or on its packaging indicates that this product may not be treated as
household waste. Instead it should be handed over to an appropriate collection point for the recycling
of electrical and electronic equipment.
By ensuring this product is disposed of correctly, you will help prevent potential negative consequences
for the environment and human health, which could otherwise be caused by inappropriate waste
handling of this product. For more detailed information about the recycling of this product, please
contact your local council office or your household waste disposal service.
Safety during use
ß Do not touch hot surfaces. Use handles and knobs
ß Always fill water reservoir first, then plug into a suitable power outlet. To disconnect, push the ‘On/
Off’ button to switch off the appliance, then remove the plug from the wall outlet.
ß Ensure lid is securely attached to the carafe before serving any beverages.
ß Liquids will reach to approximately 90˚C. Be careful when pouring beverages.
ß The thermal carafe is designed for use with this appliance only.
ß Do not use the carafe if cracked or if the handle is loose.
ß Do not clean carafe or resting plate with cleansers, steel wool pads, or other abrasive materials.
ß Avoid contact with moving parts.
ß Check grinder basket before use for presence of foreign objects.
ß Use the coffee grinder to grind roasted coffee beans only. Do not use to grind other substances, e.g
nuts, spices or un-roasted beans as this may damage the plates or cause injury.
ß Do not place cloth or otherwise restrict airflow beneath coffeemaker.
ß Use only the Cuisinart Gold Tone® Commercial Style Filter with this unit. Other Gold Tone®
permanent filters or normal paper filters may cause the unit to overflow.
ß Do not place the hot carafe on a cold or wet surface.
WARNING: Scalding may occur if the lid is removed during the brewing cycle.
WARNING Polythene bags over the product or packaging may be dangerous. To avoid danger of
suffocation, keep away from babies and children. These bags are not toys.
Instructions For Use
Before use, check the appliance for presence of foreign objects.
A
Control Panel
Programme
1 2
3
4
5
6
7
8
1. On/Off button with LED Indicator
Featuring an audible tone (not shown) which beeps 5 times after the coffee has finished brewing.
Unit will automatically shut off.
2. Grind Off Button with LED Indicator
Use to turn off the grinder when using pre-ground coffee.
3 & 6. Hour and Minute Buttons
Press and hold either Hour or Min for approximately 2 seconds to enter Time Set Mode.
4. Cup Quantity Knob
Turn the Cup Quantity to choose the desired amount of coffee beans to grind (up to 12 cups).
5. Clock/LCD Display
Displays time of day (and programme setting when Programme button is pressed). Displays Strength
Control setting (MILD, MED or STRONG)
7. Strength Control Button
Press to select the required coffee strength: (MILD, MED or STRONG). Selected coffee strength will
show on the Clock Display.
8. Programme Button with LED Indicator
Press to display or set Auto On time.
10
B
Programming
Setting the Clock
When the Grind & Brew Plus is plugged in, “12:00” will appear until you set the time.
Entering “Time Set” mode:
To set the time, press and hold either the “Hours” or “Minutes” button until the clock begins to flash
(approx. 2 seconds). This signals that you have entered the “Time set” mode. The desired time can be
set by pressing the “Hours” and “Minutes” buttons to scroll forward through the digits. The buttons
can be held down to scroll through the digits, or pressed and released lightly to advance one digit at
a time.
N.B. Be careful to make sure that the “PM” indicator is on if a “PM” time is desired.
Exiting “Time Set” mode:
There are 2 ways to exit the “Time Set Mode”:
ß Press any button besides the “Hours” or “Minutes” button. This will exit the “Time Set” mode and
activated the selected function.
ß Do not press any of the buttons on the control panel. If neither “Hours” nor “Minutes” button is
pressed for a period of 5 seconds, the “Time Set” mode will be exited automatically.
11
Setting the Programme Time
This feature allows you to pre-programme brewing for the desired time. By pressing the ’Programme’
button the digital display shows the current programme time. This default setting is 12:00pm.
Entering “Set Programme Time” mode:
Press and hold the “Programme Set” button until the green light and LCD display begin to flash,
this signals that you have entered the “Set Programme Time” mode. The desired time can be set by
pressing the “Hours” and “Minutes” buttons to scroll forward through the digits. The buttons can be
held down to scroll through the digits or pressed and released lightly to advance one digit at a time.
The coffee maker will start to brew at the programmed time.
N.B. The “Programme” mode cannot be entered if the coffeemaker is in a “brew” cycle.
N.B. When setting the programme time, ensure coffee and water are placed in the machine before
the automatic start (see “Preparing to Brew”)
Exiting “Set Programme Time” mode:
There are 3 ways to exit the “Set Programme Time”:
ß Press the “Programme” button, this acts as a “cancel” button and will cause the coffeemaker to
revert to its previous state. If it was OFF, it will return to the OFF position. If “Programmed” it will
revert to this state, and so on. This is a safety feature.
ß Press any other button (except “Hours” or “Minutes”). “Set Programme Time” mode will be exited
and the function of that button will be activated.
ß Leave the control. If neither “Hours” nor “Minutes” button is pressed for a period of 5 seconds, the
“Set Programme Time” mode will be exited automatically and the programmed setting will be in
effect.
12
C
Inserting the Charcoal water filter
N.B. Your appliance is supplied with two charcoal water filters.
It is strongly recommended that the water filter is replaced after 90 days or 90 uses; more often if you
have hard water. Failure to do so can lead to a build-up of lime scale and affect the performance of
your appliance. Replacement filters can be purchased directly from the manufacturer, (see “UK After
Sales Service” section for further details).
ß Remove the filter from its packaging and soak in cold tap water for 15 minutes.
ß To remove the water filter holder, simply lift it out from its opening on the inner wall of the
reservoir.
ß Hold stem in one hand. With your other hand, gently press the compartment door down and pull
outwards to flip open.
ß Place the filter in the holder and close the compartment cover; you will hear a snap indicating filter
is in place.
N.B. Caution must be used when inserting the charcoal filter. Improper placement in the holder can
cause tearing of the filter skin.
ß Hold the filter under cold running tap water for 10 seconds to flush. Hold the water filter holder horizontally, directly under the water stream so that the water flows through the filter compartment.
ß Allow the filter to drain completely.
ß Replace the water filter holder into its opening on the inner wall of the reservoir, pushing it all the way
down to the base of the unit.
13
D
Preparing to Brew
N.B. Before making coffee for the first time, we recommend operating the appliance once, using only
water, to remove any dust or residue that may remain in the system from the manufacturing process.
Ensure the burr grinder operates without beans for first use.
Inserting the Filter
ß Press the filter basket door release button and remove the filter basket cover. When removing the
filter basket cover (especially after brewing) use the tab with the marking “lift” to do so as parts may
be hot after use. Ensure the Gold Tone® filter is positioned with the handle facing away from main
body of the appliance.
N.B. If the handle is not facing away, it may interfere with the flow of ground coffee into the filter
basket. Place the filter basket cover in place, ensuring that the “GRIND” arrow is matching the “LIFT”
arrow and then close the filter compartment door.
N.B. If the filter basket cover is not in place or the filter door is not shut properly, a safety interlock
system will prevent operation. If you try to turn the unit on when parts are not in place, the appliance
will beep continuously until the missing parts are installed and the filter door is closed. (The door will
click when closed properly)
1. Filter Basket Cover
2. Gold Tone® Filter
3. Filter Basket Door
14
4. Filter Basket
Adding Water & Coffee Beans
ß Open the reservoir lid of the Grind & Brew Plus, pour the desired amount of water into the reservoir
using the water level indicator. Close the reservoir lid ensuring not to exceed the 12-cup line as this
may cause the carafe to over flow.
ß Lift the Bean Hopper Lid and fill with desired quantity of beans. We recommend keeping the hopper
at least half full and ensuring there is a sufficient amount of beans in the hopper for the amount of
coffee that is intended for brewing.
WARNING: Maximum capacity for the hopper is 225g. Do not over fill or you may damage the
burr grinder and/or the unit may overflow.
ß For easy filling or cleaning, the hopper can be completely removed by turning the hopper release
knob to the “un-lock” position (picture 1 below)
3
1
2
1. Bean Hopper release knob
2. Bean Hopper
3. Bean Hopper Lid
IMPORTANT: Take extra care not to spill water around the grind chamber. In the event that some
water is spilled in the chamber, dry thoroughly before use.
ß Replace the hopper lid
15
Locking the Bean Hopper
ß When replacing the hopper back onto the unit, ensure the hopper container release knob is in the
un-lock position. Once in place, turn the knob back into the locked position
N.B. If the hopper is not locked into place, the appliance will not operate. If you try to turn the unit on
with the hopper is not locked into place the appliance will beep continuously until the missing parts
are installed and you close the lid.
N.B. The Channel Cover must be in place before grinding otherwise the appliance will not function.
(see diagram below)
Restarting the process will not affect coffee results. If you do not want the grinder to restart, press
the “Grind off” button before pressing the ‘On/Off’ button. Once the hopper is locked back into place, the beeping will stop. Press the ‘On/Off’ button and the grind and brew process will start again
from the beginning.
16
1
2 3
4a 4b 4c
1. Water Reservoir Cover
2. Water Filter Holder
3. Burr Grinder
4. Coffee Channel Assembly
a. C
hannel Cover (must be in
place before grinding)
b. Coffee Chute
c. Grind Chute Lever
5. Filter basket door release button
5
Preparing the Carafe
ß Remove thermal carafe lid by turning in the direction of the “unlock” arrow. Pre-warm the carafe by
rinsing it out with hot water. N.B. This will help keep the coffee hotter.
ß Return the carafe lid to the carafe. To lock, align the arrows on the lid and the carafe and turn in a
clockwise direction until the lid fits tightly on carafe and the arrow lines up in the centre of the spout.
This ensures the lid is locked into place and in the correct position for brewing and pouring.
ß Replace the thermal carafe in its position on the resting plate. Plug the appliance into the mains.
17
E
Grinding and Brewing Coffee
Now the coffee machine is ready to grind and brew.
Immediate Brewing
ß Turn the “Cup Quantity” knob to set the number of cups you want to brew, this will grind enough
coffee beans to suit your requirement
ß Press the “Strength Control” button to set the strength (MILD, MED, or STRONG) this will show on
the LCD display.
ß To start the grinding and brewing process, press the ‘On/Off’ button. The indicator light will illuminate
and the process will begin.
Programmed Brewing
ß To set the appliance to start at a programmed time, refer to “Set Programme Time” section B.
ßT
urn the “Cup Quantity” knob to set the number of cups you want to brew, this will grind enough
coffee beans to suit your requirement.
ß Press the “Strength Control” button to set the strength (MILD, MED, or STRONG) this will show on
the LCD display.
ß The Grind & Brew Plus will begin brewing at the programmed time
Brewed Coffee
ß When the brewing cycle has completed, 5 beeps will sound. Coffee will continue to stream from the
filter for several seconds afterwards.
ß When the coffee is ready, stir before serving, to blend the flavours. The coffee at the bottom of the
carafe will be stronger than that at the top.
18
ß The brew-through, pour-through lid allows coffee to drip from appliance through the closed lid.
When brewing is complete, the lid seals itself so air stays out and coffee freshness and temperature
are maintained. No need to turn or adjust the lid before pouring.
ß After brewing, the appliance will automatically shut off. The thermal carafe will keep the coffee hot
for hours.
ß The ‘Automatic Brew Pause’ feature allows you to remove the carafe during mid-brew. The brewing
process does not stop during this period, only the flow of coffee from the basket to the carafe stops.
WARNING: do not remove the carafe for longer than 20 second or the coffee may overflow the
basket.
N.B. Whilst we offer this feature for your convenience, we do not recommend that you pour coffee
before the cycle has reached completion, since the coffee brewed at the beginning of the cycle has
a very different flavour profile to that made at the end of the cycle. Removing a cup during the cycle
will alter the flavour of the finished pot.
CAUTION: The bottom of the thermal carafe is hot to touch for several minutes after
brewing.
19
F
Brewing Coffee with Pre-ground Beans
This appliance can also brew coffee using pre-ground beans. We recommend using 1 level scoop of
ground coffee per cup.
N.B The maximum basket capacity for ground coffee is 16 scoops. Exceeding this may cause the
appliance to overflow.
ß Open the filter door by pushing the release button and remove the filter basket lid.
ß Scoop the ground coffee into the Gold Tone® filter. Place the filter basket lid in place and close the
filter door.
ß Add the water as described previously in section “Preparing to Brew”
ß Prepare the carafe as previously described in “Preparing the carafe” section.
ß Turn off the grinding function, by pressing the “Grind Off” button, an amber light will illuminate, then
press the ‘On/Off’ button.
ß Plug the appliance into a suitable mains socket and press the ‘On/Off’ button, the indicator will light
and the brewing process will begin.
ß For programmed brewing, set the timer as described in “setting the timer” section.
N.B. If the filter basket cover is not in place or the filter door is not shut properly, a safety interlock
system will prevent operation. If you try to turn the unit on when parts are not in place, the appliance
will beep continuously until the missing parts are installed and the filter door is closed. (The door will
click when closed properly)
20
Cleaning & Maintenance
ß Completely clean and dry all parts after every use.
ß Always turn coffeemaker off and remove the plug from the electrical outlet before cleaning.
ß After every use, ensure the appliance has cooled down, open filter basket door by pressing filter
basket door release button. Remove filter basket cover, filter basket and Gold Tone® filter. Discard
ground coffee.
ß The filter, filter basket and filter basket cover can be washed in warm soapy water and rinsed
thoroughly, or cleaned in the upper rack of the dishwasher. Dry all parts thoroughly after every use.
ß Once clean, replace all the parts.
ß Remove the carafe from the resting plate. Discard any remaining coffee. The carafe and lid can be
washed in warm soapy water and rinsed thoroughly, or placed in a dishwasher, on the upper rack only.
ß Do not use scouring agents or harsh cleaning agents on any part of the appliance.
ß Never immerse the main housing unit in water or other liquid. To clean the base, simply wipe with a
clean damp cloth and dry before storing.
ß Wipe resting plate with a clean, damp cloth. Never use rough, abrasive materials or harsh cleaning
agents to clean the resting plate.
ß Do not dry the inside of the water reservoir with a cloth as lint may remain.
Cleaning the Bean Hopper
ß We suggest cleaning the hopper and coffee chute every 1-2 weeks depending on frequency of
use.
ß To clean the hopper, remove hopper container and lid by turning the hopper container release knob
to the unlocked position. Discard any left over coffee beans.
ß The hopper container and hopper container lid can be washed in warm soapy water and rinsed
thoroughly, or cleaned in the upper rack of the dishwasher. Dry all parts after every use.
ß IMPORTANT: Do not put any water in the unit once the hopper container has been removed as
this may cause damage to the appliance.
21
ß Wipe the area under the hopper container with a damp cloth.
ß The coffee channel cover can be flipped back for easy cleaning of the coffee chute. Push the
coffee channel cover tab away from you and lift up. Use a small brush to remove any ground coffee
that remains. Brush grounds toward you (when facing the unit head-on) and pull the grind chute
lever toward you to send grounds through the chute. Be sure the filter basket is in place to catch the
grounds.
ß NOTE: Failing to properly clean the coffee chute may lead to grind accumulations which can result
in weak-tasting coffee.
22
Descaling
ß Always use the charcoal water filters provided and replace on a regular basis (i.e. every 90 days or
90 uses)
ß It is strongly recommended that you descale the appliance from time to time. The frequency
depends upon the hardness of your tap water and how often you use the appliance.
To descale
ß Fill the water reservoir completely with a mixture of 1/3 white vinegar and 2/3 water and switch the
appliance on. One cycle should be sufficient to de-scale the appliance.
ß Press the “Grind Off” button, and turn the coffeemaker on by pressing the ‘On/Off’ button.
ß Once the cycle has been completed and 5 beeps sound, switch the appliance off. Repeat the cycle
once more using cold tap water.
23
Troubleshooting
PROBLEM
CAUSE
SOLUTION
Continuous
beeping
Bean Hopper not locked in pla- • Check to see if the Bean Hopper release knob is in
ce (when brewing with whole
the unlocked position
beans)
• Place the Bean Hopper on the unit
• Turn the knob to the locked position
• Press On/Off to resume; if programming, reset
Filter door not closed
• Check to be sure that all components of the filter
compartment are in place
• Close filter door (you will hear a click if the door is properly
shut)
• Press On/Off twice to resume; if programming, reset
Filter basket not in place
• Open filter door by pressing the filter door release button
• Hook filter basket with cover onto door
• Close filter door (you will hear a click if the door is properly
shut)
• Press On/Off twice to resume; if programming, reset
Filter basket cover not in place
• Open filter door by pressing the filter door release button
• Put on cover, matching “grind” arrows
• Hook filter basket with cover onto door
• Close filter door (you will hear a click if the door is properly
shut)
• Press On/Off twice to resume; if programming, reset
Filter Basket not emptied of used • Open filter door by pressing the filter door release button
grinds
• Remove filter basket with cover
• Discard used grounds
• Replace filter basket with cover and close door
• Press On/Off twice to resume; if programming, reset
24
Coffee is weaker
than usual
Coffee chute is clogged
• Remove the Bean Hopper from the unit
• Lift coffee channel cover
• Clean out coffee chute
• Replace channel cover and hopper
• Your coffeemaker is now ready to brew again
Not enough beans in hop- • Be sure there are enough beans in your hopper for the
per
amount of coffee you intend to brew
Strength setting is incorrect
• Check your strength setting — displayed on the LCD
screen
• To change your strength settings press the strength control
button
25
UK Guarantee
ß This Cuisinart appliance is guaranteed for domestic consumer use for 3 years.
ß The guarantee covers defects under normal use from date of purchase and ceases to be valid in the
event of alteration or repair by unauthorized persons.
ß If the appliance does not perform satisfactorily due to defects of material or manufacture, it will be
repaired or replaced by the manufacturer (see UK after sales service for details).
ß This guarantee is only valid in the United Kingdom and Eire (includes Channel Islands and The Isle
of Man).
ß No responsibility will be accepted for any damage caused in transit.
ß A charge may be made if goods are returned outside the relevant guarantee period or if the product
is returned unnecessarily.
ß The manufacturer reserves the right to amend terms and specifications without prior notice.
ß This guarantee in no way affects your statutory rights.
26
UK After Sales Service
For further advice on using your Cuisinart Cook & Hold and other products in the Cuisinart range,
contact the Cuisinart Customer Care Line on 0870 240 6902 (09:00 to 17:00 hrs Monday to Friday) or,
alternatively, email your enquiry to [email protected].
In Guarantee
Firstly, please call the Cuisinart Helpline 0870 240 6902.
Return the product to the Cuisinart Service Centre at the following address:
Cuisinart Service Centre
P.O. Box 506
WIGAN
WN1 9AA
Enclose your name and address, together with proof of purchase and details of the fault.
Cuisinart will either repair or replace the product, as appropriate.
Out of Guarantee
Contact the Cuisinart Customer Care Line on 0870 240 6902 (09:00 to 17:00 hrs Monday to Friday)
or, alternatively, email your enquiry to [email protected] for details of the standard repair or
replacement charge. If you wish to proceed with the repair or replacement, return the product to the
Cuisinart Service Centre at the following address:
Cuisinart Service Centre
P.O. Box 506
WIGAN
WN1 9AA
27
www.cuisinart.co.uk
28