1
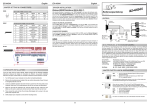
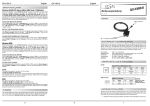
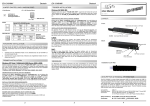
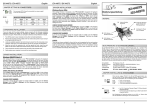
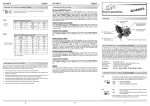
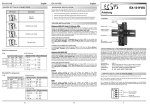
EX
EX--40032
English
EX
EX--40032
English
JUMPER SETTING & CONNECTORS:
The EX-40032 give you the possibility configure +5V or +12V to the four different pins
from the 9 pin (S1) and (S2) male connector :
Attention !! The jumpers for +5Volt or +12Volt are set from the factory to disable. For
normal use never change the jumper.
Vers. 1.1 / 01.10.07
S2
S1
AUFBAU :
S1+S2
Interrupt
3 bis 15
Pin 9
Pin 8
Pin 4
Pin 1
+ 5 Volt
+ 12 Volt
Disable
Pin 9
Pin 8
Pin 4
+ 5 Volt
+ 12 Volt
Disable
Pin 1
Bedienungsanleitung
S1
DB9M:
I/O Adressen
COM 1-7
Serial 9 Pin D-SUB male connector (S1 and S2):
Pin
Signal
Pin
Signal
Pin
1
CDC
4
DTR
7
RTS
2
RXD
5
GROUND
8
CTS
3
TXD
6
DSR
9
RI
S2 9 Pin Stecker
Seriell Anschluss
S2
Signal
S1 9 Pin Stecker
I/O Adressen
COM 1-7
Seriell Anschluss
+5V oder +12V
einstellbar auf den
9 Pin Stecker
BESCHREIBUNG & TECHNISCHE DATEN :
DRIVER INSTALLATION :
Die EX-40032 2S RS-232 Seriell ISA Karte, ist mit zwei High-Speed FIFO 16C550
Interface ausgestattet. Die 16C550 Bausteine haben einen 16-Byte Buffer. Die EX40032 verfügt über zwei 9 Pin D-SUB Stecker für den Anschluss von Peripheriegeräten
mit Standard RS-232 Seriell Interface (Modem, Plotter, Maus usw.). Bei Bedarf besteht die
Möglichkeit, +5V- oder +12V auf einen der vier Pins von den beiden 9 Pin Stecker zu legen.
Windows 9x/ME/2000/XP & Vista:
Start Windows 2000 / XP and click to >Start< >Setting< >Control Panel< >Add/Remove
Hardware< >Next<. Mark >Add/Troubleshoot a Device< and click >Next<. Mark >Add
a new device< and click >Next<. Mark >Yes, search for new hardware<. Click to
>Next<. Windows 2000 / XP give now following information to the screen „Detected
hardware“ „Install Communications Port“. Click to >Next< and >Finish<.
Die EX-40032 ist mit einem Adress-Decoder ausgestattet, der es Ihnen ermöglicht, alle I/O
Adressen auf einfache und problemlose Art einzustellen. Die Seriellen Ausgänge können
wahlweise mit den I/O Adressen 3F8 (COM1), 2F8 (COM2), 3E8 (COM3), 2E8 (COM4),
250 (COM5), 258 (COM6) oder 260 (COM7) betrieben werden. Außerdem können zu den
I/O Adressen folgende elf Interrupts (IRQ 3, 4, 5, 6, 7, 9, 10, 11, 12, 14, 15) eingestellt
werden. Die Seriellen Ausgänge können bei Bedarf abgeschaltet werden (DIS).
The EX-40032 is now configured with COM3 and COM4 in the Device-Manager.
CHECK THE INSTALLED DRIVER:
Click at Start<>Run< then enter “compmgmt.msc“ and click at >OK<. In the windows
that open select >Device Manager<. Under ”Ports (COM and LPT)“ you should find one
or more new ”PCI Ports“ as sample (COM3). If you see this or similar entries the card is
installed correctly.
Kompatibilität:
Betriebs Systeme:
Anschlüsse:
Lieferumfang:
ISA 8– oder 16-Bit
DOS/WIN 9x/ME/NT4.0/2000/XP/Server2003/Vista/(Linux v. OS)
2 x 9 Pin Seriell D-SUB Stecker
EX-40032, Deutsche Anleitung
If you like to change the port number for example COM 3 to COM5, open the >Device
Manager< click at >COM3<, >Settings< and then >Advance<. There you can change
between COM 3 to 256.
Zertifikate:
CE / FCC / RoHS / WEEE
Windows NT 4.0:
Die EX-40032 muss vor dem Einbau in ein Computersystem konfiguriert werden. Dabei
ist zu beachten, dass keine I/O Adressen und Interrupts doppelt belegt werden. Die
Einstellungen erfolgen mittels den Steckbrücken (Jumper). Wird bei den I/O Adressen
der Jumper auf „DIS“ installiert, ist die entsprechende Funktion automatisch deaktiviert
(Disable). Die nachstehende Abbildung zeigt die Standardkonfiguration ab Werk.
CHANGE PORT NUMBER:
DE97424562 / WHQL
KONFIGURATION:
Start Windows NT 4.0. The operating system will install automatically the EX-40032 with
COM3 and COM4. This you can check if you click to >Start< >Setting< >Control Panel<
>Ports<. You must see then the setting COM3 and COM4. You can check the EX-40032
also under NT-Diagnostic. Klick to. >Start< >Programs< >Administrative Tools
[Common]< >Windows NT-Diagnostics< after you click to >Resource< >IRQ<. You can
see then the setting „03E8-03EE Serial 0 ISA“ and „02E8-02EE Serial 0 ISA.
JUMPER EINSTELLUNG & ANSCHLÜSSE:
The EX-40032 it’s install now correctly.
6
I/O adr.
Interrupt
S1
3E8 (COM3)
IRQ 4
S2
2E8 (COM4)
IRQ 3
Interrupt (IRQ)
IRQ 3
IRQ 4
IRQ 5
IRQ 6
IRQ 7
IRQ 9
IRQ 10
IRQ 11
IRQ 12
IRQ 14
IRQ 15
5
Port
I/O Adressen
3F8
2F8
3E8
2E8
250
258
260
DIS
Werkseinstellung
1
EX
EX--40032
Deutsch
EX
EX--40032
Deutsch
JUMPER EINSTELLUNG & ANSCHLÜSSE:
Mit der EX-40032 haben Sie die Möglichkeit +5V- oder +12V auf einen der folgenden
vier Pins von S1 oder S2 zu konfigurieren :
User Manual
Achtung !! Nur konfigurieren wenn für das Peripheriegerät auch +5Volt oder +12Volt
gebraucht wird. Für normale Anwendungen, Jumper nicht verändern.
S2
S1
LAYOUT :
S1+S2
Interrupt
3 to 15
Pin 9
Pin 8
Pin 4
Pin 1
+ 5 Volt
+ 12 Volt
Disable
Pin 9
Pin 8
Pin 4
+ 5 Volt
+ 12 Volt
Disable
Pin 1
Vers. 1.1 / 01.10.07
S1
DB9M:
I/O addresses
COM 1-7
Seriell 9 Pin D-SUB Stecker (S1 und S2):
Pin
Signal
Pin
Signal
Pin
Signal
1
CDC
4
DTR
7
RTS
2
RXD
5
GROUND
8
CTS
3
TXD
6
DSR
9
RI
S2 9 pin male
Serial connector
S2
I/O addresses
COM 1-7
TREIBER INSTALLATION :
S1 9 pin male
Serial connector
+5V or +12V
setting to the 9 Pin
male connector
DESCRIPTION & TECNICAL INFORMATION :
Windows 9x/ME/2000/XP & Vista:
Starten Sie Windows 9.x, ME, 2000, XP oder Vista und klicken Sie dann auf >Start<
>Einstellung< >Systemsteuerung< >Hardware< >Weiter<. Markieren Sie >Geräte
hinzufügen< und klicken Sie auf >Weiter<. Markieren Sie >Ja nach neuen Hardwarekomponenten suchen<. Klicken Sie auf >Weiter<.
The EX-40032 16-Bit RS-232 serial card is equipped with two high-speed 16-Byte FIFO
16C550 port. The EX-40032 includes one external 9- and 25 pins D-SUB male connector for attaching peripherals unit with standard RS-232 serial interface (Modem, Mouse,
Plotter etc.).
Windows wird jetzt folgend Info auf dem Bildschirm anzeigen „Gefundene Hardwarekomponenten“ „Kommunikationsanschluss installieren“. Klicken Sie auf >Weiter<
und >Fertig stellen<.
The EX-40032 serial card has an extended address decoder, which allows easy configuration with all seven I/O addresses 3F8 (COM1), 2F8 (COM2), 3E8 (COM3), 2E8
(COM4), 250 (COM5), 258 (COM6) and 260 (COM7). In addition to the I/O addresses,
it’s possible to adding eleven interrupts (IRQ 3, 4, 5, 6, 7, 9, 10, 11, 12, 14, 15). The
serial ports can be disabled (DIS).
Die EX-40032 ist jetzt im Gerätemanager als COM3 und COM4 konfiguriert.
ÜBERPRÜFEN DER INSTALLIERTEN TREIBER:
Klicken Sie auf Start< >Ausführen< geben sie “compmgmt.msc“ ein und klicken sie
auf >OK<. Wählen sie nun >GeräteManager<. Dort müssten Sie unter „Anschlüsse
(COM und LPT)“ einen oder mehrere neue “PCI Ports“ z.B. (COM3) sehen. Wenn
Sie diese oder ähnliche Einträge sehen, ist die Karte korrekt installiert.
ÄNDERN DER PORT NUMMER:
Compatibility:
Operating system:
Connections:
Extent of delivery:
ISA 8– or 16-Bit
DOS/WIN9x/ME/NT4.0/2000/XP/Server2003/Vista/(Linux by OS)
2 x 9 pin D-SUB serial male connector
EX-40032, English manual
Certificates:
CE / FCC / RoHS / WEEE
DE97424562 / WHQL
CONFIGURATION:
Hier können sie die Ports ändern, klicken sie z.B. auf >COM3< >Anschlusseinstellung<
und >Erweitert<. Sie können dann zwischen COM3 und 256 wählen!
The EX-40032 16-Bit serial card must be configured, before is installed into a computer
system. Never Use the same I/O address and Interrupt with more than one port.
Jumper are used to configure the card according to the system environment. With the
Jumper “DIS” you can disabled the I/O addresses. The following table shows the standard factory settings.
Windows NT 4.0:
Starten Sie Windows NT. Das Betriebssystem installiert automatisch die EX-40052 als
COM 3 und COM 4. Dies kann wie folgt überprüft werden. Klicken Sie auf >Start<
>Einstellung< >Systemsteuerung< >Anschlüsse<. Es muss jetzt einen neuen Eintrag mit COM 3 und COM 4 zu sehen sein. Es kann auch unter NT-Diagnostik die EX40052 überprüft werden. Klicken Sie auf >Programme< >Verwaltung< >Windows NT
-Diagnose< >Resourcen<. Bei IRQ sehen Sie die EX-40052 mit „04 Serial ISA“ und
„03
Serial
ISA“. Unter I/O-Port, sollten Sie den Eintrag „03E8-03EE Serial
0
ISA“ und „02E8-02EE Serial 0 ISA“ sehen.
JUMPER SETTING & CONNECTORS:
I/O addresses
Interrupt (IRQ)
3F8
2F8
3E8
2E8
250
258
260
DIS
IRQ 3
IRQ 4
IRQ 5
IRQ 6
IRQ 7
IRQ 9
IRQ 10
IRQ 11
IRQ 12
IRQ 14
IRQ 15
Factory setting
Die EX-40032 wurde somit von Windows NT erkannt und korrekt eingetragen.
2
3
Port
I/O adr.
Interrupt
S1
3E8 (COM3)
IRQ 4
S2
2E8 (COM4)
IRQ 3
4