1
Avaya one-X™ Deskphone Edition
for 9650 IP Telephone
Getting Started Guide
16-601963
Issue 1
January 2007
© 2007 Avaya Inc.
All Rights Reserved.
Notice
While reasonable efforts were made to ensure that the
information in this document was complete and accurate at the
time of printing, Avaya Inc. can assume no liability for any
errors. Changes and corrections to the information in this
document may be incorporated in future releases.
Note: Using a cell, mobile, or GSM phone, or a two-way radio in
close proximity to an Avaya IP Phone might cause interference.
For full legal page information, please see the complete
document, Avaya Legal Page for Hardware Documentation,
Document number 03-600759.
To locate this document on our Web site, simply go to
http://www.avaya.com/support and search for the
document number in the search box.
Documentation disclaimer
Avaya Inc. is not responsible for any modifications, additions, or
deletions to the original published version of this documentation
unless such modifications, additions, or deletions were performed
by Avaya. Customer and/or End User agree to indemnify and
hold harmless Avaya, Avaya's agents, servants and employees
against all claims, lawsuits, demands and judgments arising out
of, or in connection with, subsequent modifications, additions or
deletions to this documentation to the extent made by the
Customer or End User.
Link disclaimer
Avaya Inc. is not responsible for the contents or reliability of any
linked Web sites referenced elsewhere within this documentation,
and Avaya does not necessarily endorse the products, services,
or information described or offered within them. We cannot
guarantee that these links will work all of the time and we have
no control over the availability of the linked pages
Warranty
Avaya Inc. provides a limited warranty on this product. Refer to
your sales agreement to establish the terms of the limited
warranty. In addition, Avaya’s standard warranty language, as
well as information regarding support for this product, while
under warranty, is available through the following Web site:
http://www.avaya.com/support
Avaya support
Avaya provides a telephone number for you to use to report
problems or to ask questions about your product. The support
telephone number is 1-800-242-2121 in the United States. For
additional support telephone numbers, see the Avaya Web site
http://www.avaya.com/support
Software License
USE OR INSTALLATION OF THE PRODUCT INDICATES THE END
USER’S ACCEPTANCE OF THE TERMS SET FORTH HEREIN AND
THE GENERAL LICENSE TERMS AVAILABLE ON THE AVAYA
WEBSITE AT http://support.avaya.com/LicenseInfo/(“GENERAL
LICENSE TERMS”). IF YOU DO NOT WISH TO BE BOUND BY
THESE TERMS, YOU MUST RETURN THE PRODUCT(S) TO THE
POINT OF PURCHASE WITHIN TEN (10) DAYS OF DELIVERY FOR
A REFUND OR CREDIT.
Avaya grants End User a license within the scope of the license
types described below. The applicable number of licenses and
units of capacity for which the license is granted will be one (1),
unless a different number of licenses or units of capacity is
specified in the Documentation or other materials available to
End User. “Designated Processor” means a single stand-alone
computing device. “Server” means a Designated Processor that
hosts a software application to be accessed by multiple users.
“Software” means the computer programs in object code,
originally licensed by Avaya and ultimately utilized by End User,
whether as stand-alone Products or pre-installed on Hardware.
“Hardware” means the standard hardware Products, originally
sold by Avaya and ultimately utilized by End User.
License Type(s):
Designated System(s) License (DS). End User may install and
use each copy of the Software on only one Designated Processor,
unless a different number of Designated Processors is indicated
in the Documentation or other materials available to End User.
Avaya may require the Designated Processor(s) to be identified
by type, serial number, feature key, location or other specific
designation, or to be provided by End User to Avaya through
electronic means established by Avaya specifically for this
purpose.
Third-party Components
Certain software programs or portions thereof included in the
Product may contain software distributed under third party
agreements (“Third Party Components”), which may contain
terms that expand or limit rights to use certain portions of the
Product (“Third Party Terms”). Information identifying Third Party
Components and the Third Party Terms that apply to them is
available on Avaya’s Web site at:
http://support.avaya.com/ThirdPartyLicense/
Interference
Using a cell, mobile, or GSM telephone, or a two-way radio in
close proximity to an Avaya IP Telephone might cause
interference.
Security
See http://support.avaya.com/security to locate and/or report
known vulnerabilities in Avaya products. See
http://support.avaya.com to locate the latest software patches
and upgrades. For information about secure configuration of
equipment and mitigation of toll fraud threats, see the Avaya Toll
Fraud and Security Handbook at http://support.avaya.com/.
Introduction
Use this guide to start working with your 9650 IP Telephone. It describes how to use the phone's menus
and softkeys, how to make and answer calls, and how to use the built-in Contacts and Call Log
applications.
A special feature of the 9650 is the set of auxiliary buttons ("Aux buttons") that provide direct access to
bridged extensions, speed dial buttons, and other features. This guide includes detailed explanations of
their use.
We've added a list of some common definitions at the end of this guide, in case you are unfamiliar with
some of the terms we use. For a complete reference on how your telephone operates go to the
Avaya one-X™ Deskphone Edition for 9650 IP Telephone User Guide at http://www.avaya.com/support.
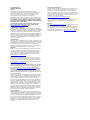
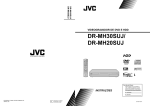
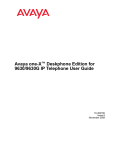
9650 IP Telephone
Missed Call Indicator,
Extension #, Date/Time
Application Lines (3)
Message Waiting
Indicator
Prompt Line
Line Buttons
Softkey Labels
Aux Shift Button
Aux Labels
Softkeys
Aux Buttons
Navigation Arrows
Messages
Phone Button
OK Button
Avaya Menu
For More Information:
Go to http://www.ayaya.com/support for the latest support information including the user guide for
this telephone. Features and auxiliary (Aux) buttons are administered according to your user
profile. For questions, contact your system administrator.
9650 IP Telephone Getting Started Guide
3
16-601963 Issue 1 January 2007
Application Buttons, Navigation, and Softkeys
The screen has three application lines that you use to view and manage your calls, your contacts, your
call log, and your options and settings.
•
Press the Phone button
•
Press the Contacts button
•
Press the Call Log button
to view your calls.
to view your contacts list.
to see a list of your most recent incoming and outgoing calls.
At any time, one of the application lines is highlighted – with white text on a black background. This is the
selected line. Use the Up
and Down
arrows on the navigation keys to select a line by scrolling up
or down.
The four softkey labels at the bottom of the screen go with the softkeys directly below the screen. They
show the available actions for the selected line. Pressing a softkey carries out the action shown on the
softkey label.
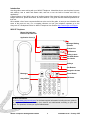
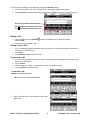
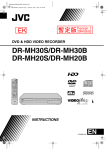
Example: The sample below shows the Phone screen, with an active call on the first application line,
which is selected.
The softkey labels show that you can put the call on hold, initiate a conference call, transfer the call, or
drop it.
Selected line
Unselected lines
Softkey labels
There is a Line button to the right of each application line. Pressing a Line button is a shortcut for
selecting the line and carrying out a default action. For example, in the Phone screen, pressing the line
button next to a line that is not being used takes gives you dial tone so you can dial a call on that line.
is another shortcut that carries out the default action on the selected line.
The OK button
For example, when you select (highlight) an entry in your Contacts list, pressing OK places a call to that
person.
About Aux Buttons
Your phone has two rows of extra, auxiliary buttons, or Aux buttons, below the softkeys. You can use the
Aux buttons for call management, speed dial buttons, or features. The Aux buttons go with the Aux button
labels on the bottom two rows of the screen. The Aux button labels show the function of each of the Aux
buttons.
There are two sets, or pages, of Aux buttons. Use the Aux Shift button, located to the right of the Aux
button labels, to switch between the two pages of Aux buttons.
The particular features available on your Aux buttons depend on how your system administrator has set
up your phone.
Each Aux button has an LED, which is illuminated if a call appearance or feature assigned to that button
is active. The Aux Shift button also has an LED, which is illuminated if there is a call on one of the Aux
buttons on the alternate, “hidden” page.
Example: if Aux buttons 1-8 are currently visible and you have a call on Hold on the Aux button # 9, the
Aux Shift LED will be illuminated.
•
Press the Aux Shift button to bring up the second page of Aux buttons so you can see button # 9.
9650 IP Telephone Getting Started Guide
4
16-601963 Issue 1 January 2007
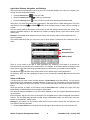
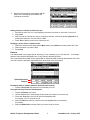
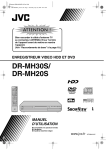
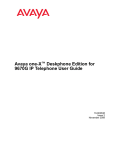
Example: Two “Pages” of Aux Buttons
This first page of 8 Aux buttons has bridged
extensions and EC500 features.
This second page of 8 Aux buttons has speed dial
buttons for Sue, Helen, Rachel, and Steve on the first
line and, Directory features (Dir, Next, Make Call), and a
Priority calling feature on the second line.
Aux Buttons and Bridged Lines
Aux buttons are particularly useful for monitoring and managing other people’s extensions, for example, for
answering your boss’s calls. If an Aux button has a bridged line associated with it pressing the Aux button is the
same as selecting the line directly and pressing the line button.
•
•
If a line is on Hold, pressing the Aux button resumes the call.
If a line is ringing, pressing the Aux button answers the call.
• If your boss or someone else for whom you have a bridged extension is on the line (Aux button LED is
lighted), you can press that Aux button to join the call. For example, when the bridged extension is in use,
and you get an incoming call to that same line, you can conference the caller into the existing call.
Note: Use the Aux button for anything you need to do with a bridged line – to answer a call, to resume a call on
hold, or to join an existing call. Use the Aux button LED and the icon on the Aux button label to view the status
of a bridged line.
Making and Answering Calls
Use the Phone screen to view and manage calls.
Press Phone
to view the main Phone screen at any time.
Select the call appearance you want to deal with and use the sofkeys or the line or OK button to choose an
action.
If you have more than three call appearances (for example, if you use bridged appearances to monitor your
boss’s extension) you may need to scroll or use the Aux buttons to get to the line you want.
Answering an Incoming Call to Your Own Extension:
If you are not on
another call:
Lift the handset or press the line button next to the incoming call.
You can also press Speaker or Headset to answer an incoming call.
If you are on
another call:
From the Phone screen, press the Phone button to move to the top of your call appearance
list to answer your primary line and/or scroll to the line with the incoming call. Then press
Answer or OK or press the line button next to the incoming call.
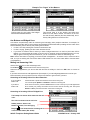
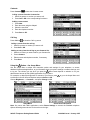
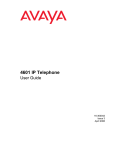
Answering an Incoming Call to a Bridged Line:
The Prompt Line shows which extension the call
is for.
The Call Line shows who the call is for.
Softkey actions: Answer call,
Send to voicemail, Turn off ringing.
icon shows that the incoming call is
Ringing
on the 3rd Aux button (Ext. 30763).
9650 IP Telephone Getting Started Guide
5
16-601963 Issue 1 January 2007
If an Aux button is flashing, press that button or press the Answer softkey.
1. If the Aux Shift button is lit, the incoming call is on the “hidden” page of Aux buttons.
2. Press Aux Shift to view the hidden page then press the flashing Aux button of the incoming call.
The Call Line shows call information.
The Ringing icon changes to the Active
Call
icon when you answer the call.
Making a Call
1. Lift the handset or press Speaker
and press OK.
2. Dial the number you want to call.
or select an available line or an idle Aux button
Putting a Call on Hold
1. If it’s not already highlighted, select the call you want to put on Hold by pressing the line button or
Aux button or by scrolling to it.
2. Press Hold.
3. Press Resume or OK to retrieve the call.
Transferring a Call
1. If it’s not already highlighted, select the call you want to transfer by pressing the line button or Aux
button or by scrolling to it.
2. Press Transfer.
3. Dial the telephone number, or use Contacts or Call Log to place the call.
4. Press Complete to transfer the call.
Conference Calls
Setting up a conference call:
1. Start with an active call and press Conf.
2. Dial the second party, or use Contacts or Call Log to
place a call.
9650 IP Telephone Getting Started Guide
6
16-601963 Issue 1 January 2007
3. When the party answers, press Join to add the
person to the existing call and establish the
conference connection.
Adding a person on hold to a conference call:
1. Start with an active call. If it is not highlighted, press the line button or Aux button or scroll to it.
2. Press Conf.
3. Select the call on hold that you want to conference and take it off hold by pressing Resume or by
pressing the line button, the Aux button, or OK.
4. Press Join to add the person to the conference call.
Dropping a person from a conference call:
1. Select the conference call and press the More softkey, then Details to see the parties on the call.
2. Select the person you want to drop.
3. Press Drop.
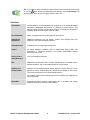
Features
Your administrator may assign specific features you use frequently to your Aux buttons – for example,
Send All Calls, Directory/Next/Make Call, or Call Forward, and Send All Calls.
The screen below has autodial entries (Speed Dial or Abbreviated Dial numbers) administered on the first
row of Aux buttons, and features administered on the second row of Aux buttons.
Speed Dial buttons
Features
Forwarding Calls to another extension (Send All Calls Feature):
1. Press the Send Calls Aux button to turn forwarding on or off.
Using the Directory Feature to Call Someone:
1. Press the Directory Aux button.
2. Use the dialpad keys to start spelling the last name of the person you want to call.
3. Press each dialpad key one time for each corresponding letter.
For example, for “Hill,” press 4, 4, 5, 5.
4. Select the Next Aux button to view the next name alphabetically in the directory,
if necessary.
5. Select the Make Call Aux button when you see the name you want.
9650 IP Telephone Getting Started Guide
7
16-601963 Issue 1 January 2007
Contacts
Press Contacts
to show the Contacts screen.
Calling a person from the Contacts list:
1. Select the person or number you want to call.
2. Press Call or OK or the corresponding line button.
Adding a new contact:
1. Press New.
2. Enter the name using the dialpad.
3. Select the next field.
4. Enter the telephone number.
5. Press Save or OK.
Call Log
Press Call Log
to show the Call Log screen
Calling a person from the call log:
1. Select the person or number you want to call.
2. Press Call or OK.
Adding an entry from the call log to your Contacts list:
1. Select the number you want to add to your Contacts list.
2. Press +Contact.
3. Edit the name and telephone number, if necessary.
4. Press Save.
Using the
Button – the Avaya Menu
Use the Avaya Menu to adjust and customize options and settings for your telephone, to access
additional Web-based applications, to get information about your phone settings or network settings, and
to log out. The choices you see when you press the
Menu button depend on whether or not your
administrator has set up Web (WML) applications for your phone.
For example, to adjust the brightness or contrast of your screen, press
scroll down to Screen & Sound Options and press Select or OK.
Choose Brightness… or Contrast… and press Change or OK.
to go to the Avaya Menu and
Avaya Menu
Screen & Sound Options
Note: On menus with WML applications, select Phone Settings to access the standard telephone
Options & Settings menu shown on the screen to the right.
9650 IP Telephone Getting Started Guide
8
16-601963 Issue 1 January 2007
Tip: If you want to make sure that you see the Phone screen whenever a call comes
in, use the
Menu button to access Options & Settings. Select Call Settings and
check that the “Go to phone on ringing” option is set to “On.”
Definitions
Aux buttons
Auxiliary buttons. Your administrator can program up to 16 additional bridged
extensions, abbreviated dial buttons, or features on these buttons. Aux
buttons function just like a built-in button module, to expand your telephone’s
capability. Eight Aux buttons are visible at a time.
Aux Shift button
Shifts, or toggles between the two pages of Aux buttons.
Bridged Call
Appearance
Additional extensions you can answer, monitor, and manage from your
telephone. Also called a bridged extension.
Call Appearance
A telephone line for outgoing/incoming calls.
Feature
An added telephone capability such as Abbreviated Dialing (AD), Call
Forwarding, or Telephone Directory. Your system administrator assigns
features to your phone.
Primary Line or
Call Appearance
Your own telephone extension.
SAC
Abbreviation for Send All Calls, a feature that allows you to forward calls to
another extension. SAC is often administered on an Aux button.
Softkeys and
Softkey Labels
Softkeys are the buttons located directly below the screen that you use to
perform an action. Softkey labels are located at the bottom of the screen.
They show the actions for the corresponding softkeys.
For example, Call and Conf (Conference) are two softkeys you might see on
the Phone screen.
Speed Dial
Administered feature buttons (abbreviated dial or autodial) that assign
telephone numbers to buttons for quick dialing.
9650 IP Telephone Getting Started Guide
9
16-601963 Issue 1 January 2007