1
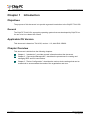
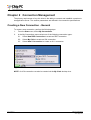
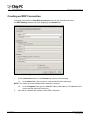
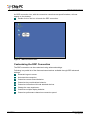
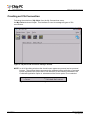
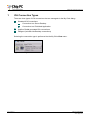
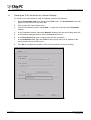
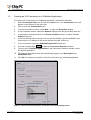
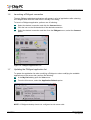
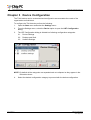
Introduction to ChipPC ThinX OS
Introduction to ChipPC ThinX OS
Technical Brief
Document Version 1.0
Ref: DL128B-1.0
1
Chip PC Technologies
www.chippc.com
Introduction to ChipPC ThinX OS
COPYRIGHT NOTICE
© 2009 Chip PC Inc., Chip PC (Israel) Ltd., Chip PC (UK) Ltd., Chip PC GmbH
All rights reserved.
This product and/or associated software are protected by copyright, international treaties
and various patents.
This manual and the software, firmware and/or hardware described in it are copyrighted.
You may not reproduce, transmit, transcribe, store in a retrieval system, or translate into any
language or computer language, in any form or by any means, electronic, mechanical,
magnetic, optical, chemical, manual, or otherwise, any part of this publication without
express written permission from Chip PC.
CHIP PC SHALL NOT BE LIABLE FOR TECHNICAL OR EDITORIAL ERRORS OR
OMISSIONS CONTAINED HEREIN; NOR FOR INCIDENTAL OR CONSEQUENTIAL
DAMAGES RESULTING FROM THE FURNISHING, PERFORMANCE, OR USE OF THIS
MATERIAL.
The information contained in this document represents the current view of Chip PC on the
issues discussed as of the date of publication. Because Chip PC must respond to changing
market conditions, it should not be interpreted to be a commitment on the part of Chip PC,
and Chip PC cannot guarantee the accuracy of any information presented after the date of
publication.
This Guide is for informational purposes only. CHIP PC MAKES NO WARRANTIES,
EXPRESS OR IMPLIED, IN THIS DOCUMENT.
TRADEMARKS
Chip PC, Xcalibur, Xtreme PC, Jack PC, Plug PC, ThinX, and the Chip PC logo are either
trademarks or registered trademarks of Chip PC.
Products mentioned in this document may be registered trademarks or trademarks of their
respective owners
The Energy Star emblem does not represent endorsement of any product or service.
U.S. GOVERNMENT RESTRICTED RIGHTS
The Software and documentation are provided with RESTRICTED RIGHTS.
You agree to comply with all applicable international and national laws that apply to the
Software, including the U.S. Export Administration Regulations, as well as end-user, enduse and country destination restrictions issued by U.S. and other governments.
The information and specifications in this document are subject to change without prior
notice.
Images are for demonstration purposes only.
Ref: DL128B-1.0
2
Chip PC Technologies
www.chippc.com
Introduction to ChipPC ThinX OS
Table of Contents
TABLE OF CONTENTS ............................................................................................................................................3
CHAPTER 1
INTRODUCTION ....................................................................................................... 4
OBJECTIVES .........................................................................................................................................................4
GENERAL .............................................................................................................................................................4
APPLICABLE OS VERSION.....................................................................................................................................4
CHAPTER OVERVIEW.............................................................................................................................................4
CHAPTER 2
CONNECTION MANAGEMENT ................................................................................ 5
CREATING A NEW CONNECTION - GENERAL ...........................................................................................................5
CREATING AN RDP CONNECTION ..........................................................................................................................6
CREATING AN ICA CONNECTION............................................................................................................................8
CHAPTER 3
DEVICE CONFIGURATION..................................................................................... 15
DEVICE SETTINGS .............................................................................................................................................. 16
DESKTOP AND SHELL......................................................................................................................................... 22
XCALIBUR SETTINGS .......................................................................................................................................... 24
Ref: DL128B-1.0
3
Chip PC Technologies
www.chippc.com
Introduction to ChipPC ThinX OS
Chapter 1
Introduction
Objectives
The purpose of this document is to provide a general introduction to the ChipPC ThinX OS.
General
The ChipPC ThinX OS is a propriety operating system that was developed by ChipPC Inc.
for use in its Linux based thin clients.
Applicable OS Version
This document is based on ThinX OS, version 1.1.0, build RL0.150802.
Chapter Overview
This document is divided into the following chapters:
Chapter 1, “Introduction”, provides general information about the document.
Chapter 2, “Connection Management”, describes the procedures for creating and
managing RDP and ICA connections.
Chapter 3, ”Device Configuration”, describes the various device settings that can be
customized to accommodate the needs of the organization and user.
Ref: DL128B-1.0
4
Chip PC Technologies
www.chippc.com
Introduction to ChipPC ThinX OS
Chapter 2 Connection Management
The primary requirement of any thin client is the ability to connect and establish a session to
an application server. The session parameters are defined in its connection specifications.
Creating a New Connection - General
To create a new connection, perform the following steps:
1.
From the Start menu, select My Connections.
2.
In the My Connections menu select one of the following connection types:
2.1.
Select New RDP Connection to create an RDP connection.
2.2.
Select My Citrix to create an ICA connection.
2.3.
Select New X Connection to create an X11 connection.
Figure 1 – Connections Menu
NOTE An ICA connection can also be created via the My Citrix desktop icon.
Ref: DL128B-1.0
5
Chip PC Technologies
www.chippc.com
Introduction to ChipPC ThinX OS
Creating an RDP Connection
Following the selection of New RDP Connection from the My Connections menu,
the RDP Settings window will open displaying the General tab.
Figure 2 – RDP Settings > General Tab
1.
In the Connection section of the General tab, perform the following:
1.1.
In the Name field, type a name to uniquely identify this connection.
NOTE The Name must not include blank characters (spaces).
1.2.
2.
Ref: DL128B-1.0
In the Computer field, type the NetBIOS name (Host name) or IP address of the
server that the client will connect to.
Click OK to complete the creation of the RDP connection.
6
Chip PC Technologies
www.chippc.com
Introduction to ChipPC ThinX OS
An RDP connection icon, with the connection name that was specified above, will now
appear on the desktop.
Double click on the icon to launch the RDP connection.
Figure 3 - RDP Connection Icon
Customizing the RDP Connection
The RDP connection can be customized using advanced settings.
Following is a partial list of the features/customizations available through RDP advanced
settings:
Automatic logon to server.
Auto-start the connection.
Customize remote Sound behavior.
Customize key combinations behavior.
Customize interaction with local attached devices.
Change the user experience..
Customize multiple display behavior.
Customize performance based on connection speed.
Ref: DL128B-1.0
7
Chip PC Technologies
www.chippc.com
Introduction to ChipPC ThinX OS
Creating an ICA Connection
Following the selection of My Citrix from the My Connections menu,
the My Citrix window will open. This interface is used to manage all types of ICA
connections.
Figure 4 – My Citrix ICA connection manager window
NOTE In all of the dialog windows the check boxes appear as pressed and un-pressed
buttons. The pressed button represents the selected option while the un-pressed
button represents the option that is not selected. In the following illustration, the
Published Application option is selected and the Server option is not selected
Figure 5 – Check box selection images
Ref: DL128B-1.0
8
Chip PC Technologies
www.chippc.com
Introduction to ChipPC ThinX OS
1
ICA Connection Types
There are three types of ICA connections that are managed via the My Citrix dialog:
Standard ICA Connections
Connection to a Server Desktop
Connection to a Published Application
Xcalibur Global generated ICA connections
PNAgent (includes XenDesktop connections)
Selecting the connection type is performed via the My Citrix View menu:
Figure 6 – The My Citrix View Menu
Ref: DL128B-1.0
9
Chip PC Technologies
www.chippc.com
Introduction to ChipPC ThinX OS
1.1
Creating an ICA Connection to a Server Desktop
To create an ICA connection to a Server Desktop, perform the following:
1.
Select Connection View from the My Citrix View menu. The Connections menu will
appear on the left side of the menu bar.
2.
Click to open the Connections menu.
3.
From the Connections menu, select New… to open the ICA connection Properties
window.
4.
In the Properties window, select the Network settings from the top left drop down list.
5.
In the Network settings window, select the Server check box.
6.
In the Description field, type a unique name for the connection.
7.
In the Destination field, type the NetBIOS name (Host name) or IP address of the
server that the client will connect to.
8.
Click OK to complete the creation of the ICA connection to a server desktop.
Figure 7 – ICA Connection Properties: Connection to a Server Desktop
Ref: DL128B-1.0
10
Chip PC Technologies
www.chippc.com
Introduction to ChipPC ThinX OS
1.2
Creating an ICA Connection to a Published Application
To create an ICA connection to a Published Application, perform the following:
1.
Select Connection View from the ICA client View menu. The Connections menu will
appear on the left side of the menu bar.
2.
Click to open the Connections menu.
3.
From the Connections menu, select New… to open the Properties window.
4.
In the Properties window, select the Network settings from the top left drop down list.
5.
In the Network settings window, in the Server Location section, un-select the Use
Default check box.
6.
In the Use Default field (currently set to not use the default), type the NetBIOS name
(Host name) or IP address of the server that the client will connect to.
7.
In the next section, select the Published Application check box.
8.
Click the browse button (
9.
From the list of Published Applications in the Connection Selection window, select
the desired application.
) to open the Connection Selection window.
10. The selected application name will automatically appear in the Description and
Destination fields.
11. Click OK to complete the creation of the ICA connection to a published application.
.
Figure 8 – ICA Connection Properties: Connection to a Published Application
Ref: DL128B-1.0
11
Chip PC Technologies
www.chippc.com
Introduction to ChipPC ThinX OS
1.3
Launching an ICA connection
The newly created connection will appear in a list of ICA connections that are displayed
when selecting the Connection View from the View menu in the My Citrix dialog.
To launch the ICA connection, perform one of following:
Select the desired connection and click the Connect button.
Click the icon on the left-hand side of the desired connection.
Select the desired connection and then from the Connections menu, select the
Connect option.
Figure 9 – New ICA connections in connection list
1.4
Creating a ICA connection shortcut on the Desktop
To add an icon of an ICA connection to the desktop, perform the following:
1.
From the list of ICA connections mentioned above, select the desired connection.
2.
From the Connections menu select Send to.
3.
From the Send to menu, select one of the following options:
Ref: DL128B-1.0
3.1.
Desktop (Create Shortcut) – will place a shortcut on the desktop.
3.2.
Desktop (Autostart Shortcut) – will place a shortcut on the desktop that will be
automatically executed when a user logs on to the device.
12
Chip PC Technologies
www.chippc.com
Introduction to ChipPC ThinX OS
1.5
Creating a PNAgent Connection
To create a PNAgent connection, perform the following:
1.
Select PNAgent View from the My Citrix View menu. The PNAgent menu will appear
on the left side of the menu bar.
2.
If this is not the first time the PNAgent is configured, skip to step 5.
3.
If this is the first time a PNAgent connection is configured, the PNA Configuration
dialog will automatically appear. In the PNA Configuration dialog, type the URL of the
server that the PNAgent will connect to.
NOTE When using XenDesktop, enter the URL of the XenDesktop server.
4.
Click Update to accept the PNA Configuration settings.
Figure 10 – PNA Configuration Dialog
5.
The Program Neighborhood Agent Logon dialog will automatically appear.
6.
In the Program Neighborhood Agent Logon dialog, type the following credentials for
connecting to the PNAgent server:
6.1.
Username.
6.2.
Password.
6.3.
Domain.
7.
The Save Password option may be selected in order to save the credentials for future
PNAgent connections.
8.
Click OK to complete the creation of the PNAgent connection
Figure 11 – Program Neighborhood Agent Logon
Ref: DL128B-1.0
13
Chip PC Technologies
www.chippc.com
Introduction to ChipPC ThinX OS
1.6
Launching a PNAgent connection
The new PNAgent published applications will appear in a list of applications after selecting
the PNAgent View from the View menu in the My Citrix dialog.
To launch a PNAgent application, perform one of following:
Select the desired connection and click the Connect button.
Click the icon on the left-hand side of the desired connection.
Select the desired connection and then from the PNAgent menu, select the Connect
option.
Figure 12 – PNAgent applications List
1.7
Updating the PNAgent application list
To update the application list when modifying a PNAgent or when modifying the available
applications on the server side, perform the following:
In the My Citrix dialog open the View menu.
From the View menu, select the Application Refresh option.
Figure 13 – PNAgent Application Refresh
NOTE A PNAgent desktop shortcut is configured on the server side.
Ref: DL128B-1.0
14
Chip PC Technologies
www.chippc.com
Introduction to ChipPC ThinX OS
Chapter 3 Device Configuration
The ThinX device can be customized and configured to accommodate the needs of the
organization and individual.
To configure the ThinX device perform the following:
1.
Open the Start menu and select the Settings menu.
2.
From the Settings menu, select the Device option to open the LBT Configuration
dialog.
3.
The LBT Configuration dialog is divided into following configuration categories:
3.1.
Device Settings.
3.2.
Desktop and Shell.
3.3.
Xcalibur Settings.
Figure 14 – LBT Configuration
NOTE By default all the categories are expanded and not collapsed as they appear in the
illustration above.
4.
Ref: DL128B-1.0
Select the desired configuration category to proceed with the device configuration.
15
Chip PC Technologies
www.chippc.com
Introduction to ChipPC ThinX OS
Device Settings
The Device Setting category offers the following configuration areas:
General
Advanced Info
Authentication
Mouse
Display
Keyboard Properties
Layout Properties
Time
Sound
Network
Mount Point
Network ID
Printers
Security
Plugins
Licenses
The following sections offer explanations regarding the common options available in the
Device Settings configuration areas.
Ref: DL128B-1.0
16
Chip PC Technologies
www.chippc.com
Introduction to ChipPC ThinX OS
1
General
This configuration area provides general system information and the option to restore the
device to factory-default settings.
Figure 15 – General settings
To restore the device to factory-default settings perform the following:
1.
Click the Reset button to open the Restore Now dialog.
2.
In the Restore Now dialog select both check boxes and click OK.
Figure 16 – Restore Now
Ref: DL128B-1.0
17
Chip PC Technologies
www.chippc.com
Introduction to ChipPC ThinX OS
2
Advanced Info
This configuration area provides advanced system information and software version info.
3
Authentication
This configuration area is used to enable and configure the IEEE 802.1x protocol
(authenticated network access) for cabled networks.
4
Mouse
This configuration area allows the customization of Mouse related properties.
5
Display
This configuration area allows the modification of the Display related settings.
The dialog offers the following options:
Adjust the Display Properties by selecting values from the drop down lists available
for the Colors, Screen Area (resolution) and Refresh Frequency. Click the Test
button to make sure that your monitor support’s the adjusted Display Properties.
Select the Enable Video check box to support video acceleration on the device.
The Monitor Settings is used to determine the device behavior when using multiple
displays.
Adjust the Energy Saving Scheme to reach the desired energy saving configuration.
Figure 17 – Display Configuration
Ref: DL128B-1.0
18
Chip PC Technologies
www.chippc.com
Introduction to ChipPC ThinX OS
6
Keyboard Properties
This configuration area allows the customization of the Keyboard related settings.
7
Layout Properties
This configuration area allows the customization of the Language related settings.
The dialog offers the following options:
Adjust the Switch between input locales key-combo using the dropdown list.
Add a new language by clicking on the Add button and selecting the new language
from the drop down list that appears.
Remove an existing language by selecting the language and clicking the Remove
button.
Select a default language by clicking on the radio button in the Default column of the
desired language.
Select the Enable indicator on the Task Bar check box to add an indicator of the
currently selected language in the task bar.
Select the NumLock on boot check box to activate NumLock when the device boots.
Ref: DL128B-1.0
19
Chip PC Technologies
www.chippc.com
Introduction to ChipPC ThinX OS
8
Time
This configuration area allows the modification of Time related settings.
The dialog offers the following options:
Adjust the current date using the displayed calendar.
Adjust the current time in the Current Time field.
Modify the time zone by clicking on the Select ‘Time Zone’ button and selecting a
value from the list in the Time Zones dialog.
Select the checkbox Add icon to the Taskbar Notification Area to add an indicator of
the currently time in the task bar
9
Sound
This configuration area allows the modification of Sound related settings.
10
Network
This configuration area allows the modification of Network related settings.
The dialog offers the following options:
Select the Disable Network interface check box to prevent any cabled network
connection.
Select the checkbox Add Network icon to Taskbar Notification Area to add an
indicator in the task bar displaying the current network connection status
Select the check box Prohibit DNS resolver cache to disable the cashing if DNS
query results.
Select the check box Do not display link Negotiation error message to prevent such
messages from appearing when the device boots.
A new NetBIOS name for the device can be typed in the Terminal Name field.
The device TCP/IP settings can be set using one of the following options:
Select Obtain IP address from DHCP server to obtain the settings from a
DHCP server. Click the Network info button to display these settings.
Select Use the following IP address to manually enter the settings. Click the
DNS/WINS button to configure the settings for the DNS and WINS servers.
The network speed can be adjusted using he Network Speed dropdown list.
11
Mount Point
This configuration area is used to enable and configure network file sharing using the NFS
protocol.
Ref: DL128B-1.0
20
Chip PC Technologies
www.chippc.com
Introduction to ChipPC ThinX OS
12
Network ID
This configuration area allows the modification of the device’s authentication behavior when
accessing windows SMB shares as well as site access via the web browser.
13
Printers
This configuration area is used to manage connections to local USB printers.
14
Security
This configuration area is used to modify the settings that are designed to prevent
unauthorized modification of the device settings.
The dialog offers the following options:
Select the check box Secure Terminal Settings and click the Password button to
protect the LBT Configuration dialog from unauthorized access.
Select the check box Enable My LBT Setup to create a customized LBT configuration
dialog that is not password protected. Click the Customize button to open a dialog that
enables the selection of the tabs that will be available in the My LBT Setup dialog. The
customized LBT configuration dialog is accessible via the following menus:
Start > Settings > My LBT Setup.
15
Plugins
This configuration area is used to view all third party plug-ins that are currently installed on
the device and to manage the plug-ins that are installed manually (that is to say not via
Xcalibur Global).
The dialog offers the following options:
The Available Plug-ins section, displays a list of the currently installed plug-ins.
The New button allows the user to install a new plug-in.
The Delete button allows the user to delete an installed plug-in.
The Configure button is used to modify plug-in settings.
The Advance button is used to define the properties of the plug-in installation policy.
16
Licenses
This configuration area is used to manage all licenses that are currently installed on the
device.
The dialog offers the following options:
The Installed Licenses section, displays a list of the currently installed licences.
The New license button allows the user to install a new plug-in.
The Delete button allows the user to delete an installed license.
Ref: DL128B-1.0
21
Chip PC Technologies
www.chippc.com
Introduction to ChipPC ThinX OS
Desktop and Shell
The Desktop and Shell category offers the following configuration areas:
Desktop Settings
Taskbar
The following sections offer explanations regarding the common options available in the
Device Settings configuration areas.
1
Desktop Settings
This configuration area allows the modification of the device Desktop interface behavior and
appearance.
The dialog offers the following options:
Select the check box Disable connections configuration to prevent users from
editing connection settings.
Select the check box Hide ‘My Citrix’ icon from Desktop to disable the display of the
‘My Citrix’ icon on the desktop.
Select the check box Hide all connection shortcuts from Desktop to disable the
display any connection shortcut on the desktop.
Select the check box Hide ‘Media Player’ icon from Desktop to disable the display of
the ‘Media Player’ icon on the desktop.
Select the check box After user logged-off from all sessions perform device logoff to force the device to reboot when all sessions are closed.
Select the check box Allow running only one concurrent session to prevent more
than one session running at the same time.
Select the check box Run VNC Server to run the server side of the VNC application.
Select the check box Autostart ‘My Citrix’ to open the ‘My Citrix’ dialog as soon as the
desktop appears.
Ref: DL128B-1.0
22
Chip PC Technologies
www.chippc.com
Introduction to ChipPC ThinX OS
2
Taskbar
This configuration area allows the modification of the device Taskbar interface behavior and
appearance.
The dialog offers the following options:
Select the check box Show Network Status to add a network status icon to the
taskbar notification area.
Select the check box Show Process Status to add a process status icon to the
taskbar notification area.
Select the check box Hide ‘Shutdown’ item from Start Menu to disable the display of
the ‘Shutdown’ item in the Start menu.
Select the check box Hide ‘Reboot’ item from Start Menu to disable the display of the
‘Reboot’ item in the Start menu.
Select the check box Hide ‘Applications’ item from Start Menu to disable the display
of the ‘Applications’ item in the Start menu.
Select the check box Hide ‘My Connections’ item from Start Menu to disable the
display of the ‘My Connections’ item on in the Start menu.
CAUTION! Use the next 2 settings very carefully
Select the check box Hide ‘Settings’ item from Start Menu to disable the display of
the ‘Settings’ item in the Start menu.
Select the check box Hide ‘Device’ item from Settings menu to disable the display of
the ‘Device’ item in the Settings menu.
Select the check box Hide ‘Upgrade’ item from Settings menu to disable the display
of the ‘Upgrade’ item in the Start menu.
Ref: DL128B-1.0
23
Chip PC Technologies
www.chippc.com
Introduction to ChipPC ThinX OS
Xcalibur Settings
The Xcalibur Settings category offers the following configuration areas:
General
Server List
Locator
DHCP
SNMP
Protocol Param
The following sections offer explanations regarding the common options available in each of
the Xcalibur Settings configuration areas.
1
General
This configuration area allows the user to manage the behavior of the Xcalibur client.
The dialog offers the following options:
Select the check box Enable connection to Xcalibur Server Farm to manually
activate the Xcalibur client.
Select the check box Add Xcalibur-Status icon to Taskbar Notification Area to add
an icon that displays the Xcalibur client connection status.
Select the check box Ping each Server on the Farm before connect to test the
connectivity to Xcalibur Global servers before connecting.
In the section Define Xcalibur Communications Failure/Disable Behavior, use the
drop down list to select the device behavior if it fails to create a connection to an
Xcalibur Global server.
Click the Clear button to clear all policies obtained from Xcalibur Global.
2
Server List
This configuration area allows the user to manage a locally configured list of servers that will
be used when attempting to connect to Xcalibur Global. In addition to communication
parameters, each server has a priority setting to support Redundancy and Load Balancing.
3
Locator
The Xcalibur client can obtain information regarding the Xcalibur server from various
sources. This interface is used to disable/enable various sources and to determine the
priority of each source.
Ref: DL128B-1.0
24
Chip PC Technologies
www.chippc.com
Introduction to ChipPC ThinX OS
4
DHCP
When using the DHCP protocol to obtain information about the Xcalibur Global server, this
interface can be used for the following tasks:
Configuring the method used to retrieve the information from the DHCP server.
Display information obtained from the DHCP server.
5
SNMP
This interface is used to configure the device SNMP setting. These settings will affect the
ability of Xcalibur Global to locate this device using the SNMP protocol
6
Protocol Param
Use this interface to fine tune the Xcalibur Protocol.
Ref: DL128B-1.0
25
Chip PC Technologies
www.chippc.com