1
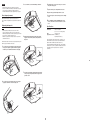
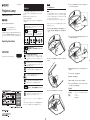
4-101-187-05 (1)
4 ランプユニットを手で支えながら、左右のストッパーを押し込み、ラン
日本語
プユニットをまっすぐに引き出す。
Projector Lamp
プロジェクターランプ
取扱説明書
ランプの交換のしかた
安全のために
ソニー製品は安全に充分に配慮して設計されています。しかし、まち
がった使いかたをすると、火災や人身事故につながることがあり、危
険です。
事故を防ぐために次のことを必ずお守りください。
• 安全のための注意事項を守る。
• 破損したら使わずに、お買い上げ店またはソニーの相談窓口に修理
を依頼する。
お買い上げいただきありがとうございます。
警告表示の意味
安全のための注意事項を守らないと、
火災や人身事故になることがあります。
この説明書には、事故を防ぐための重要な注意事項と製品の取り扱いかたを
示してあります。この説明書をよくお読みのうえ、製品を安全にお使いくだ
さい。お読みになったあとは、いつでも見られるところに必ず保管してくだ
さい。
この取扱説明書および製品では、次のような表示をしています。表示の内容を
よく理解してから本文をお読みください。
ご注意
• ランプを交換する場合は、必ずプロジェクターの電源を切り、電源
コードを抜いてから行ってください。また、プロジェクターを使用し
たあとにランプを交換する場合は、ランプを十分冷やすため、1時間
以上たってからランプを交換してください。
• ランプを交換するときは、必ずエアフィルターも交換してください。
下図はすべて、プロジェクターを天井に設置した状態でランプを交換
する場合を示しています。
1
プロジェクター後面の、天板を固定しているネジ2本を付属のドライ
バーを使ってゆるめ
(1)
、天板を後側にスライドさせながら取りはずす
この表示の注意事項を守らないと、火
災や高温などにより死亡や大けがなど
人身事故につながることがあります。
行為を指示する記号
(2)
。
この表示の注意事項を守らないと、事
故によりけがをしたり周辺の物品に損
害を与えたりすることがあります。
行為を禁止する記号
5 新しいランプユニットをまっすぐ奥まで押し込み、左右のストッパーを
注意を促す記号
カチッと音がするまで引き出す。
Operating Instructions
1
下記の注意を守らないと、
高温や火災により、死亡や大けがにつながることがあ
2
ります。
LMP-H700
Sony Corporation © 2003 Printed in Japan
ランプ交換は、充分にランプが冷えてから
ランプ交換の際は、電源を切ってから、1時間以上たって、充分にラ
ンプが冷えてから行ってください。? / 1キーで電源を切った直後は
ランプが高温になっており、さわるとやけどの原因となることがあ
ります。
2
ランプカバーのネジ2本を付属のドライバーでゆるめ、ランプカバーを
取り外す。
他の製品に使用しない
このプロジェクターランプは、ソニープロジェクター用の交換用ラ
ンプです。他の製品には絶対にお使いにならないでください。火災や
故障などの原因になります。
6
ランプの分解や改造をしない
ランプを分解・改造して使用すると火災や感電の原因となります。
手順3でゆるめたネジ3本で、新しいランプユニットをプロジェクターに
固定する。
ランプ交換の際はプラグをコンセントから抜く
ランプを交換する前に必ず電源を切り、電源プラグをコンセントか
ら抜いてください。感電の原因となります。
ランプの収納部に異物を入れない
ランプを抜いた後のランプの収納部に金属類や燃えやすい物などの
異物を入れないでください。火災や感電の原因となります。
7
ランプカバーを戻し、ネジ2本で固定する。
8
天板を戻し、ネジ2本で固定する。
9
電源コードを接続し、プロジェクターをスタンバイ状態にする。
10 リモコンのボタンをRESETボタン、< ボタン、, ボタン、ENTER
ボタンの順に、それぞれ5秒以内に押す。
下記の注意を守らないと、
けがをしたり、周辺の物品に損害を与えることがありま
主な仕様
す。
ランプを傾けて持たない
ランプを傾けて持つとランプの破損時にランプの破片が飛び、けが
の原因となることがあります。水平に持ってください。
このプロジェクターランプは、ソニープロジェクターの交換用ランプ
です。
お使いになる前に、お手持ちのプロジェクターの取扱説明書をご覧に
なり、このランプが使用できるかどうかを必ず確認してください。
3
ランプユニットのネジ3本をプラスドライバーでゆるめる。
最大外形寸法
質量
付属品
180 × 157 × 163 mm (幅/高さ/奥行き)
1.8 kg
ドライバー(1)
取扱説明書(1)
6
Tighten the three screws loosen in step 3 to secure the
lamp unit to the projector.
• This lamp is designed for use with the Sony projector.
• Be sure to confirm that this lamp is usable with your projector
before using it by reading the Operating Instruction or
Installations Manual for Dealers supplied with your projector.
7
Replace the lamp cover and tighten the two screws.
8
Replace the top panel and tighten the two screws.
About lamp replacement
9
Connect the power cord and set the projector to standby
mode.
Attaching the lamp may cause fire or injury to persons.
Users should ask a qualified Sony representative to attach the
lamp.
10 Press the RESET, <, ,, and ENTER buttons on the
3
English
Loosen the three screws with a Phillips screwdriver.
remote control in this order for less than five seconds
each.
Replacing the lamp unit
Specifications
Note
• Before replacing the lamp unit, be sure to turn off the
projector and disconnect the power cord of the projector.
When replacing the lamp unit after using the projector, wait at
least one hour to allow the lamp unit to cool.
• Whenever you replace the lamp unit, be sure to replace the
air filter with a new one.
4
Holding the lamp unit with your hand, push back the
stoppers on the left and right sides, then pull out the
lamp unit.
The illustrations below show the case of replacing the lamp unit
with the projector installed on the ceiling.
1
Loosen the two screws fixing the top panel at the rear of
the projector using the supplied screwdriver (1), then
slide the top cover backward and lift it to remove (2).
1
2
5
2
Loosen the two screws fixing the lamp cover using the
supplied screwdriver to remove the lamp cover.
180 × 157 × 163 mm
(7 1/8 × 6 1/4 × 6 1/2 inches) (w/h/d)
Mass
1.8 kg (3 lb 15 oz)
Supplied accessories Screwdriver (1)
Operating Instructions (1)
Dimensions
Insert the new lamp unit straight all the way in until it is
securely in place, and pull out both the stoppers until
you hear a click.
The manufacturer of this product is Sony Corporation, 1-7-1
Konan, Minato-ku, Tokyo, 108-0075 Japan. The Authorized
Representative for EMC and product safety is Sony
Deutschland GmbH, Hedelfinger Strasse 61, 70327 Stuttgart,
Germany. For any service or guarantee matters please refer to
the addresses given in separate service or guarantee
documents.