1
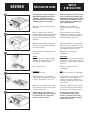
BROTHER
DR-2000
LASER TONER CARTRIDGE
INSTALLATION GUIDE
NOTICE D´INSTALLATION
BEDIENUNGSANLEITUNG
MANUAL DE INSTALACIÓN
MANUALE DI INSTALLAZIONE
BROTHER
1
2
3
4
5
INSTALLATION GUIDE
NOTICE
D´INSTALLATION
Thank you for choosing our Imation
High Quality Remanufactured Toner
Cartridges. Listed below are the
simple instructions for installing the
cartridge into your laser printer.
Nous vous remercions d‘avoir acheté
notre cartouche toner Imation remanufacturée haute qualité. Nous allons
maintenant vous expliquer le moyen
le plus simple pour l‘installer dans
votre imprimante laser.
Open the front cover and pull out the
drum unit.
Ouvrez le couvercle avant de
l’imprimante et retirez le tambour
usagé.
Place the drum unit on a flat and
horizontal surface. While pushing down
the blue bolt with your left hand pull
the toner cartridge upwards out of the
drum unit.
Posez le tambour sur une surface
propre, plane et horizontale. Sortez la
cartouche de l’ensemble tambour en
abaissant le levier de blocage.
Unpack the new drum unit and push
the toner cartridge into the new drum
unit until it engages.
Après avoir déballer le nouveau tambour installez-y la cartouche de toner.
Poussez la cartouche de toner délicatement jusqu’à entendre un déclic.
Cautiously put the new drum unit into
the printer.
Réinstallez le tambour dans
l’imprimante.
Printer
Leave the front cover opened and and
push the “Go” button until all 4 LED
glow. Release the button again.
Imprimante
Tout en ayant le couvercle avant ouvert,
appuyez sur la touche “Go” jusqu’à ce
que toutes les LED s’allument. Relâchez
la touche.
Close the front cover.
Fermez le couvercle avant de
l’imprimante.
Fax device
Close the front cover.
Fax
Refermez le couvercle de l’imprimante.
Push the “Options” key. You will be
asked on the display whether you want
to replace the drum kit. Select “Yes”.
Tout en ayant le couvercle avant ouvert,
appuyez sur le bouton “Option”, le
message “voulez-vous remplacer le
tambour” apparait sur l’écran, selectionnez “Oui”.
Replace the old cartridge in the empty
box and return the box to us as indicated on the instructions.
Emballez la cartouche usagée dans le
carton vide. Merci de nous la renvoyer
en suivant les instructions de retour.
You will now be able to judge the
perfect quality of our toner cartridge
for yourself. We are certain it will
provide results you expect.
Laissez-vous convaincre par le
fonctionnement irréprochable
de notre cartouche de toner. Elle
vous permettra d´obtenir la qualité
d´impression désirée.
BEDIENUNGSANLEITUNG
MANUAL DE
INSTALACIÓN
MANUALE DI
INSTALLAZIONE
Vielen Dank, dass Sie sich für unsere
Imation High Quality Remanufactured
Toner Cartridges entschieden haben.
Wir werden Ihnen nun erklären, wie
Sie diese am einfachsten in Ihren
Laserdrucker einbauen.
Gracias por elegir nuestro cartucho de
alta calidad. A continuación le explicamos cómo instalarlo de la manera más
fácil en su impresora láser.
Vi ringraziamo per aver scelto le
cartucce toner rigenerate High Quality
Imation. Di seguito troverete le semplici istruzioni per l‘installazione della
cartuccia nella vostra stampante laser.
Öffnen Sie die vordere Abdeckung und
ziehen Sie die Trommeleinheit heraus.
Abra la cubierta delantera y quite la
unidad de tambor de la impresora.
Aprite la copertura anteriore e tirate
fuori il gruppo tamburo.
Legen Sie die Trommeleinheit auf eine
flache und horizontale Oberfläche.
Ziehen Sie die Tonerkartusche nach oben
aus der Trommeleinheit. Dafür müssen
Sie den blauen Riegel mit der linken
Hand herunterdrücken.
Póngala encima de una superficie plana
y horizontal. Saque el cartucho tóner de
la unidad de tambor de la impresora
tirando hacia arriba. Para poder hacerlo
tiene que empujar hacia abajo el pasador azul a mano derecha.
Appoggiate il gruppo tamburo su di una
superficie piana ed orizzontale. Estraete
la cartuccia toner dal gruppo tamburo
tirandola verso l‘alto. A tal fine dovete
premere verso il basso con la mano
sinistra la levetta blu.
Packen Sie die neue Trommeleinheit aus
und schieben Sie die Tonerkartusche
in die neue Trommeleinheit bis sie
einrastet.
Quite la envoltura de la nueva unidad
de tambor e introduzca el cartucho tóner
dentro de la unidad de tambor hasta
que encaje.
Disimballate il nuovo gruppo tamburo e
introducete la cartuccia toner nel nuovo
gruppo tamburo fino a farla innestare.
Setzen Sie die neue Trommeleinheit
vorsichtig in den Drucker ein.
Coloque con cuidado la nueva unidad de
tambor dentro de la impresora.
Inserite prudentemente nella stampante
il nuovo gruppo tamburo.
Drucker
Lassen Sie die vordere Abdeckung
geöffnet und drücken Sie auf die Taste
“Go” bis alle 4 LED läuchten. Lassen Sie
die Taste wieder los.
Poner a cero el tambor
Deje la cubierta delantera abierta,
oprima la tecla „GO“ hasta que las 4
LED se iluminen y suelte la tecla.
Stampante
Lasciate aperta la copertura anteriore
e premete il pulsante „Go“ finché si
accenderanno i 4 LED. Rilasciate il
pulsante.
Schließen Sie die vordere Abdeckung.
Cierre la cubierta delantera y superior.
Chiudete la copertura anteriore.
Fax Gerät
Schließen Sie die vordere Abdeckung.
Poner el fax
Cierre la cubierta delantera y superior.
Fax
Chiudete la copertura anteriore.
Drucken Sie auf die “Optionen” Taste.
Es wird auf dem Display gefragt ob Sie
das Drumkit ersetzen möchten, wählen
Sie “Ja”.
Pulse la tecla de opciones, en pantalla
aparece la pregunta de si quiere reemplazar el kit del tambor. Seleccione „SÍ“.
Premete il pulsante „Opzioni“. Sul display compare la domanda se desiderate
sostituire il kit tamburo, selezionate
„Sì“.
Packen Sie bitte die verbrauchte Kartusche in den leeren Karton und senden
Sie das Paket gemäß Anleitung zurück.
Guarde el cartucho usado en el envoltorio vacío y mande el paquete de vuelta
según las instrucciones.
Mettere la cartuccia usata nella scatola
vuota e preparate la spedizione secondo
le istruzioni indicate per la restituzione.
Lassen Sie sich nun von der einwandfreien Funktion unserer Tonerkartusche überzeugen. Sie wird die von
Ihnen gewünschten Druckergebnisse
liefern.
Convénzase del perfecto funcionamiento de nuestros cartuchos: ofrecen
los resultados de impresión que usted
desea.
Adesso giudicherete voi, il livello
qualitativo della nostra cartuccia
toner. Siamo certi che il risultato di
stampa soddisferà pienamente le
vostre esigenze.
Einige Cartridgetypen erfüllen die Anforderungen des Nordic
SWAN Umweltzeichens. Die Anforderungen dafür wurden vov SIS
Ecolabeling AB aufgestellt und sind im Web unter www.svanen.
nu abrufbar. Imation erfüllt mit einer Vielzahl von Tonercartridges unter der Lizenz # 308028 die entsprechenden Anforderungen. Für welche Typen dies gegeben ist, ist ebenfalls auf der
obigen Website abrufbar.
www.collecture.com
Some cartridge types fulfills the requirement of Nordic SWAN
environment label. The requirements for it are set up by SIS Ecolabeling AB and can be downloaded from the web under www.
svanen.nu. Imation meets these requirements under licence #
308028 for most of the toner cartridges. For which types this is
actually the case can as well be read from the above web page.
Registered Trademarks are property of their respective holders and for prescriptive purposes only. Any liabilities for misprints excluded.