1
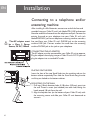
SJA9192/17
EN
User manual
2
SP
Manual de utilizador 20
EN
Contents
Special Features
Control Locations
Installation
Operation
LCD Prompts
Troubleshooting
Care & Maintenance
Technical Support
Warranty
2
3
4
5
7
13
14
15
16
16
Special Features
EN
Special Features
•
•
•
•
•
•
•
•
•
•
•
•
•
•
6.5" x 2.25" Large Liquid Crystal Display - displays three full lines of
information including time of the call.
Caller ID Record* - stores up to 90 Caller ID records each of which
up to 14 digits number and 15 characters name.
Area Code Setting - sets your local area code.
New Call Light Indicator (Green LED)* - lights up steadily when
there is a new call.
Message Waiting Light Indicator (Red LED)** - lights up steadily
when there are voice mail messages in your mailbox.
Review Scrolling - easily scroll through the Caller ID records.
Dial Button - dials the number shown on the LCD display.
Delete Button - allows you to delete one or all Caller ID record.
DIAL VM Button** - dials to your voice mail access number.
Languages - English, Spanish or French display prompts.
Real Time Clock - shows the current time on the LCD display.
LCD Display Contrast Control - allows you to adjust the display
contrast.
Wall Mountable - allows you to mount your caller ID unit on the
wall.
Backlit LCD Display
Note:
* You must subscribe to the Caller ID service from your local telephone company.
** You must subscribe to the Voice Mail service from your local telephone company to retrieve voice mail messages.
IMPORTANT :
a) The AC Power Adapter (included) must be connected to operate
your Caller ID unit.
b) 4 X AAA batteries are recommended to be installed to retain your
Caller ID memory.
3
EN
Control Locations
Control Locations
1. Message Waiting Light Indicator (red LED) - lights up steadily when
you have new voice mail messages.
2. New Call Light Indicator (green LED) - lights up steadily when new
calls are received.
3. Visual Display Panel - shows the caller’s name and / or number,
incoming call time & date, Call Counter, New Call icon (NEW) and
Voice Mail icon (
).
4. [DIAL VM] Button - dials to your voice mail access number.
5. [DELETE] Button - deletes Caller ID records.
6. [REVIEW
] / [REVIEW ] Buttons - views the Caller
ID records.
7. [DIAL] Button - dials the number shown on the display. You also
use this button to set language, area code, time and date and LCD
display contrast.
8. [FLASH] Button - activates 3-Way conference or Call Waiting calls.
9. TELEPHONE Jack - connect line cord from your telephone into
the jack labeled PHONE at the back of your caller ID unit.
10. TEL LINE Cord Jack - insert one end of the telephone line cord into
the jack labeled TEL. LINE and the other end into your wall jack.
11. DC Jack - the AC adapter must be connected for your Caller ID
unit to operate. Plug the adapter into the DC 9V jack at the back.
Installation
THE AC POWER ADAPTOR THAT COMES WITH YOUR CALLER
ID UNIT IS REQUIRED FOR THE OPERATION OF THE UNIT.
HOWEVER , IT IS RECOMMENDED TO INSTALL 4 X AAA SIZE
BATTERIES TO PREVENT LOSS OF MEMORY WHEN THERE IS A
POWER FAILURE.
Please check to be sure all supplied accessories come with your Caller
ID unit. If there is anything missing or visible damage, please contact the
original place of purchase. Do not attempt to operate your caller ID
unit if it is damaged.
4
Installation
a)
b)
c)
d)
e)
Caller ID unit
Stand studs
AC power adapter
Long phone line cord
Short phone line cord
EN
1 pc.
2 pcs.
1 pc.
1 pc
1 pc
INSTALLING BATTERIES
Please install 4 x AAA batteries (alkaline batteries are recommended)
to retain the Caller ID records and keep real time clock running in case
there is a power failure.
IMPORTANT :
a) Use only fresh batteries of the required size and recommended
type.
b) Do not mix old and new batteries, different types of batteries
(standard, alkaline or rechargeable) or rechargeable batteries of
different capacities.
c) When replacing the batteries, if you do not install the new batteries within 30 seconds after removing the old ones, you may
lose all information stored in your unit.
d) If you do not plan to use your unit with batteries for a month or
longer, remove the batteries. Batteries can leak chemicals that can
destroy electronic parts.
e) Dispose of old batteries promptly and properly. Do not burn or
bury them.
When the Low Battery icon (
) appears, replace the batteries.
1. Disconnect the telephone line.
2. Open the battery cover by inserting a sharp object (such as a clip
or a pencil) into the two slots at the top of the battery compartment cover on the bottom of your Caller ID unit.
3. Place the new batteries in the compartment following the polarity symbols (+ and -) marked inside.
4. Replace the battery cover.
5. Reconnect the telephone line.
IMPORTANT :
When replacing the batteries, if you do not install the new batteries within 30 seconds after removing the old ones, you may lose all
Caller ID records stored in your Caller ID unit.
5
Installation
EN
Connecting to a telephone and/or
answering machine
After installing 4 x AAA batteries, connect one end of the line cord
provided into your Caller ID unit's jack labeled TEL. LINE and connect
the other end of the line cord into the telephone wall jack. Connect the
existing line cord on your telephone into your Caller ID unit's jack
labeled PHONE. If you have a telephone answering machine, connect a
The AC adapter must line cord from your Caller ID unit's PHONE jack to the answering
be a Class 2 Power machine LINE jack. Connect another line cord from the answering
Source, 9V DC, 200mA machine PHONE jack to the jack on your telephone.
CONNECTING THE AC ADAPTER
The AC adapter must be connected for your Caller ID unit to operate.
Plug the adapter's barrel plug into your Caller ID unit's DC 9V jack and
plug the adapter into a standard AC outlet.
TEL. LINE
PHONE
PLACING ON THE DESK
Insert the slots of the two Stand Studs into the matching tabs on the
bottom cabinet respectively.Then slide the Stand Studs along the tabs
until they are locked to the bottom cabinet.
MOUNTING ON THE WALL
1. Drill two 1/8-inch diameter holes, 5-1/8 inches (130 mm) apart, into
the wall. Thread a screw (not included) into each hole, letting the
heads extend 1/8 inch from the wall.
2. Align the keyhole slots (on the bottom of your Caller ID unit) with
the mounting screws and slide your Caller ID unit downward to
secure it.
6
Operation
EN
Operation
IDLE MODE
When your Caller ID unit is in idle mode, the calls status and clock are
shown on the LCD display :
SETUP MENU
There are five options in the setup menu.
Set Language
Allows you to select the LCD display prompts in English, Spanish or
French. It is set at English when ex-factory.
1. During idle mode, press and hold [DIAL] button for about 3 seconds.The LCD display shows “SETUP MENU
”.
2. Press [REVIEW ] button until “SET LANGUAGE” appears.
3. Press [DIAL] button again.The LCD display shows “ENGLISH”.
4. Press [REVIEW
] or [REVIEW ] button to select English,
French or Spanish.
5. Press [DIAL] button to save your setting and [REVIEW ]button
to go to the next setting option SET AREA CODE.
Set Area Code
Area codes of all incoming calls will be compared with the area code
you entered to determine if it is a local call.
1. Press [DIAL] button when “SET AREA CODE” appears on the LCD.
The first digit of the 3- digit area code will blink.
2. Press [REVIEW ] or [REVIEW ] button to scroll digits to enter
the first digit of your area code.
3. Press [DIAL] button to move on to the second digit.
4. Repeat steps (2) and (3) until you have entered your local area code.
5. Press [DIAL] button to save your setting and [REVIEW
] button
to go to the next setting option SET TIME / DATE.
Note : If you want to change your area code, repeat the steps 1 - 4.
7
EN
Operation
Set Time / Date
Allows you to set the clock (hour and minute) and date (month and
day).The clock will also be updated by incoming Caller ID, if you have
subscribed to Caller ID service. The clock is set at “12:00AM 01/01”
when ex-factory.
1. Press [DIAL] button when “SET TIME / DATE” appears on the LCD.
The hour digit will blink.
2. Press [REVIEW
] or [REVIEW
] button to scroll digits to set
the hour. After the hour is set, press [DIAL] button to move on to
set the minute.
3. Repeat step 2 until you have set the hour, minute, month and day.
4. Press [DIAL] button to save your setting and [REVIEW]
button
to go to the next setting option
Set Contrast
Allows you to adjust the LCD display contrast at 8 different levels. It is
set at level 4 when ex-factory.
1. Press [DIAL] button when “SET CONTRAST” appears on the
LCD.
2. Press [REVIEW
] or [REVIEW ] button to decrease
or increase the LCD display contrast.
3. Press [DIAL] button to save your setting.
4. Press [REVIEW
] button to go to the next setting option
SET DIAL VM.
Set Dial VM
Allows you to set your own voice mail access number.
1. Press [DIAL] button when “SET DIAL VM” appears on the LCD.
The first digit of the voice mail access number will blink.
2. Press [REVIEW ] or [REVIEW ] button to scroll digits to
enter the first digit of the access number.
3. Press [DIAL] button to move on to the second digit.
4. Repeat steps (2) and (3) until you have entered your voice mail
access number.You are now ready to dial your voice mail access
number by pressing the [DIAL VM] button.
5. Press [DIAL] button to save your setting and [REVIEW ] button
to go to the next setting option EXIT and press [DIAL] button to
leave the setup menu.
Note : If you want to change your voice mail access number,repeat the
steps 1-4.
8
Operation
EN
CALLER ID MEMORY
If you have subscribed to the Caller ID service from your local telephone company, your Caller ID unit will receive and display incoming
caller’s name (if applicable) and number together with the date and time
of the call. It stores up to 90 records, each of which contains up to 14digit number and 15-character name.When the Caller ID memory is
full, the oldest Caller ID record will be deleted automatically to make
room for the new one.
Sequence
number of this
incoming call
It is a new call
Time and date
when this call was
received.
REVIEWING CALLER ID
1. Press [REVIEW
] button to view the Caller ID record from
the newest call (i.e. #90) to the oldest (#01).
2. Press [REVIEW
] button to view the Caller ID record from the
oldest (#01) to the newest (i.e. #90).
12:00AM 01/01 CALL #80 NEW
249-342-363
JOHN SMITH
Caller's number
Caller's name
You have new
voice mail
message(s)
Note :
a) In some areas, Caller ID information may not be available.
“UNKNOWN NAME” or “UNKNOWN CALL” will be shown on
the LCD display in such cases.
b) Callers have the option to block their Caller ID information.
“PRIVATE NAME” or “PRIVATE CALL” will be shown on the LCD
display in such cases.
c) If the area code of a caller’s number matches your pre-set local area
code, only the last 7 digits will be shown on the LCD display. (refer
to the “Set Area Code” section on page 7)
NEW CALL LIGHT INDICATOR (Green)
When your caller ID unit receives a new incoming call,the new call icon
“NEW” appears on the LCD display and the New Call Light Indicator
(Green LED) lights up steadily.The LCD display also shows the information of the new incoming call for about 10 seconds and then returns
to the idle mode.
Note :
a) You or your answering machine must answer the new incoming call
only after the first ring. Otherwise, the information of the new
incoming call will not be registered.
b) If the AC adapter is not connected, the New Call Light Indicator will
flash every 3 seconds when there is new call not yet reviewed.
9
EN
Operation
c) The New Call Light Indicator does not stop lighting up unless you
have reviewed ALL new incoming calls by pressing [REVIEW
]
or [REVIEW
] button.
VOICE MAIL
If you have subscribed to Voice Mail service from your local telephone
company, the Message Waiting Light Indicator lights up steadily when
you have voice mails in your mailbox, and the LCD icon (
) appears
on the LCD display. After you have listened to your voice mails, the
Message Waiting Light Indicator and the LCD icon (
) will turn off.
To listen to your voice mails, press [DIAL VM] button to dial your voice
mail access number. The LCD display shows "PICK UP HANDSET".
Then, lift the Handset to dial the access number. Refer to the "Set DIAL
VM" section on page 8 to set the voice mail access number.
IMPORTANT:
a) If the AC adapter is not connected, the Message Waiting Light
Indicator will flash every 3 seconds when you have new voice
mail(s).
b) If the Message Waiting Light Indicator keeps on lighting up and the
LCD icon (
) still appears after you have listened to all your voice
mails, press [DELETE] button to turn off the light and the LCD icon.
LONG DISTANCE CALL
If there is a long distance incoming call, "LONG DISTANCE" appears
alternatively with the caller's name.
DIALING FROM CALLER ID
1. When reviewing a Caller ID record,press [DIAL] button to dial the
number shown on the LCD display. If the number format of the
Caller ID is not adjustable, the LCD display shows “PICK UP
HANDSET”. Lift the Handset to dial the number.
2. If you have pre-stored an area code, the number format of the
Caller ID is adjustable (see the "Important" section on page 11).
10
Operation
EN
The LCD display shows “PICK UP OR ADJ” after you press
[DIAL] button.
3. Press [DIAL] button again to change number format among:
a) 7 digits (phone number)
b) 10 digits (area code + phone number)
c) 11 digits (1 + area code + phone number)
4. Lift the Handset to dial the number shown.
IMPORTANT:
a) You must pre-store an area code before you can adjust the numbers
format. Refer to the“Set Area Code” section on page 7.
b) If you have set your local area code, area code of all incoming numbers will be compared against your pre-set local area code to determine if it is a local call.
c) Only the last 7 digits of the incoming number will be shown on the
LCD display if it is a local call. If it is not a local call, 11digits (1 + area
code + phone number) will be shown when dialing back.
DELETING CALLER ID RECORD
When the Caller ID record is full, it automatically deletes the oldest
Caller ID record as a new call comes in.You can also delete individual
call or all calls in the Caller ID record.
To Delete A Caller ID Record
1. While reviewing a Caller ID record, press [DELETE] button and
the LCD display shows “DELETE CALL?”.
2. Press [DELETE] button again to delete.
To Delete All Caller ID Records
1. While reviewing a Caller ID record, press and hold [DELETE] button for about 3 seconds.“DEL ALL CALLS?” appears on the LCD
display.
2. Press [DELETE] button again to delete all records.
11
EN
12
Operation
LCD prompts
EN
13
EN
Troubleshooting
Solutions
Symptoms
The display is blank
a)
b)
The display is faded
a)
Adjust the LCD display contrast (refer to “Set
Contrast”)
Caller ID doesn’t work
a)
Make sure you have subscribed to the Caller
ID service.
Wait until the phone rings twice before
answering a call.
Make sure telephone line cords are connected
correctly (refer to “Connecting to a Telephone
and/or Answering Machine”).
b)
c)
14
Make sure the AC adaptor is connected to the
jack labeled DC 9V at the back of your caller
ID unit and plugged into a wall socket that is
not controlled by a wall switch.
Adjust the display contrast (refer to “Set
Contrast”)
No caller’s name
a)
Make sure you have subscribed to the Caller
ID service including the CALLERS NAME
DELIVERY feature?
The New Call Light Indicator
(green) lights up
a)
Make sure you have reviewed all the new calls.
The New Call Light Indicator
(green) doesn’t light up if
there is new call.
a)
Make sure you have connected the power
adaptor properly.
Make sure you have subscribed to the Caller
ID service.
The Message Waiting Light
Indicator (red) doesn’t light
up if you have voice
messages
a)
The Message Waiting Light
Indicator (red) lights up
a)
b)
b)
Make sure you have subscribed to the Voice
Mail service.
Make sure you have connected the power
adaptor properly.
Make sure you have accessed your voice mail
message(s)
Care & Maintenance
EN
Care & Maintenance
The following suggestions will help you care for the system so you can
enjoy it for years.
Keep the unit dry. If it gets wet, wipe it dry immediately. Liquids might
contain minerals that can corrode the electronic circuits.
Use and store the Caller ID only in normal temperature environments.
Temperature extremes can shorten the life of electronic devices, and
distort or melt plastic parts.
Handle the Caller ID gently and carefully. Dropping it can damage circuit boards and cases and can cause the unit to work improperly.
Use only fresh batteries of the required size and type.Always remove
old or weak batteries.They can leak chemicals which can destroy electronic circuits.
Keep the Caller ID away from excessive dust and dirt, which can cause
premature wear of parts.
N
BELN
E
Wipe the unit with a damp cloth occasionally to keep it looking new.
Do not use harsh chemicals, cleaning solvents, or strong detergents to
clean the system.
Modifying or tampering with the Caller ID’s internal components can
cause a malfunction and might invalidate the unit’s warranty and void
your FCC authorization to operate it. If your Caller ID is not performing as it should, call someone with qualifications for assistance.
15
EN
Technical Support
Technical Support
For technical support send an email with the model number of the
product and a detailed description of your problem to:
Email: [email protected]
©2006
Accessories Service Center
Philips
Accessories and Computer Peripherals,
Ledgewood, NJ 07852 USA
Manufactured in China
Printed in China
Warranty
Limited One-Year Warranty
What does the Philips limited warranty cover?
Philips Electronics warrants to the original purchaser of this product
("Consumer" or "you") that the product and all accessories provided by
Philips in original package ("Product") are free from material defects in
material and workmanship, subject to the terms and conditions set
forth below, when installed and used normally and in accordance with
operation instructions. This limited warranty extends only to
Consumers of Products purchased and used in the United States of
America and Canada.
16
Warranty
EN
What will Philips do if the product is not free from material
defects in materials and workmanship during the limited warranty period ("Materially Defective Product")?
During the limited warranty period, Philips will replace without charge,
a materially defective product. Philips will return repaired or replacement products to you in working condition. Philips will retain defective
parts, modules, or equipment. If Philips elects, in its sole discretion, to
replace a materially defective product, you should expect the
replacement to take approximately 30 days.
How long is the limited warranty period?
The limited warranty period for the product extends for ONE (1)
YEAR from date of purchase. This limited warranty also applies to
replacement products for a period of either (a) 90 days from the date
the replacement product is shipped to you or (b) the time remaining
on the original one-year limited warranty, whichever is longer.
What is not covered by this limited warranty?
This limited warranty does not cover:
1. Product that has been subjected to misuse, accident, shipping or
other physical damage, improper installation, abnormal operation
or handling, neglect, inundation, fire, water or other liquid intrusion;
or
2. Product that has been damaged due to repair, alteration or modification; or
3. Problems caused by signal conditions, network reliability or cable
or antenna systems; or
4. Problems caused by use with non-Philips electrical accessories; or
5. Product whose warranty/quality stickers, product serial numbers
plates or electronic serial numbers have been removed, altered or
rendered illegible; or
6. Product purchased, used, serviced, from outside the United States
or Canada, or used for commercial or institutional purposes
(including but not limited to products used for rental purposes); or
7. Product returned without valid proof of purchase (see below); or
8. Charges for installation or set up,adjustment of customer controls,
and installation or repair of systems outside the unit.
9. Please note that this warranty does not include consumable items
such as batteries and any other components with limited lifetime
and wear.
17
EN
Warranty
How do you get warranty service?
• To obtain warranty service in the United States of America. Call 1800-233-8413 for customer support and for instructions for warranty service. Before calling for service, please check the user's
manual.A check of the product controls and features may save you
a service call.
• Except as provided by applicable law, you assume the risk of loss or
damage during transit and transportation and are responsible for
delivery or handling charges incurred in the transport of product(s)
to the service location. Philips will return repaired or replaced
product under this limited warranty to you, transportation, delivery
or handling charges prepaid. Philips assumes no risk for damage or
loss of the product in transit.
• If the Product failure is not covered by this limited warranty, or
proof of purchase does not meet the terms of this limited warranty, Philips will notify you and will request that you authorize the cost
of replacement and return shipping costs for conditions not covered by this limited warranty.
What must you return with the Product to get warranty service?
1. The entire original package and contents including the product
and accessories along with a description of the malfunction or difficulty;
2. Valid “proof of purchase" (sales receipt) identifying the Product
purchased (Product model) and the date of purchase or receipt;
and
3. Your name, complete and correct mailing address, and day time
and evening telephone numbers.
Other limitations
This warranty is the complete and exclusive agreement between you
and Philips. It supersedes all other written or oral communications
related to the product. Philips provides no other warranties for the
product.The warranty exclusively describes all of Philips responsibilities
regarding the product.There are no other express warranties. No one
is authorized to make modifications to this warranty and you should
not rely on any such modification.
18
Warranty
EN
State Law Rights:
This warranty gives you specific legal rights, and you may also have
other rights which vary from state to state.
Limitations:
Implied warranties, including those of fitness for a particular purpose
(an unwritten warranty that the product is fit for ordinary use) and
merchantantability are limited to one year from date of purchase. Some
states do not allow limitations on how long an implied warranty lasts,
so the above limitation may not apply to you.
In no event shall Philips be liable for any indirect, special, incidental, consequential, or similar damages (including, but not limited to lost profits
or revenue, inability to use the product, or other associated equipment,
the cost of substitute equipment, and claims by third parties) resulting
from the use of the product. Some states may not allow the exclusion
or limitation of incidental or consequential damages, so the above limitation or exclusion may not apply to you.
19
SP
20
Contenido
Características especiales
Controle las Ubicaciones
Instalación
Operación
LED
Localización de fallas
Cuide y Limpiar
Asistencia Técnica
21
22
23
25
32
33
34
35
Garantía
35
Características especiales
SP
Características especiales
•
•
•
•
•
•
•
•
•
•
•
•
•
Pantalla grande de cristal líquido de 6.5" x 2.25": presenta tres líneas
completas de información, que incluye la hora de la llamada.
Registro de identificación de llamada*: almacena un máximo de 90
registros de identificación de llamada, con números de un máximo de
14 dígitos y nombres de hasta 15 caracteres.
Valor de ajuste del código de área: ajusta el código de área local.
Indicador luminoso de llamada nueva (LED verde )*: se ilumina ininterrumpidamente si hay una nueva llamada.
Indicador luminoso de mensaje en espera (LED rojo)**: se ilumina
ininterrumpidamente si hay mensajes de voz en el buzón.
Repaso por desplazamiento: desplace con facilidad los registros de
identificación de llamada.
Botón de marcar: marca el número que aparece en la pantalla de
cristal líquido.
Botón para marcar correo de voz**: marca el número de acceso del
correo de voz.
Idiomas: instrucciones en inglés, español o francés que aparecen en
pantalla.
Reloj de tiempo real: indica la hora actual en la pantalla de cristal líquido.
Control de contraste de la pantalla de cristal líquido: permite ajustar el
contraste de la pantalla.
Soporte de pared: permite montar la unidad de identificación de llamadas en la pared.
Pantalla de cristal líquido con retroiluminación
Nota:
* Debe suscribirse al servicio de identificación de llamadas que ofrece la
compañía telefónica local.
** Debe suscribirse al servicio de correo de voz que ofrece la compania
telefonica local para poder recuperar mensajes de correo de voz.
21
SP
Controle las Ubicaciones
Controle las Ubicaciones
1. Indicador luminoso de mensaje en espera (LED rojo): se ilumina
ininterrumpidamente si hay nuevos mensajes de voz en el buzón.
2. Indicador luminoso de llamada nueva (LED verde): se ilumina ininterrumpidamente si hay llamadas nuevas.
3. Panel de la pantalla: muestra el nombre y/o número de la persona
que llama, la fecha y hora de la llamada entrante, el contador de
llamadas, el icono de llamada nueva (NEW) y el icono de correo
de voz (
).
4. Botón [DIAL VM]: marca el número de acceso del correo de voz.
5. Botón [DELETE]: borra los registros de identificación de llamada.
6. Botones [REVIEW ] / [REVIEW
]: para ver los registros de
identificación de llamada.
7. Botón [DIAL]: marca el número que aparece en la pantalla.
También se usa este botón para ajustar el idioma, el código de
área, la hora y fecha y el contraste de la pantalla de cristal líquido.
8. Botón [FLASH]: activa las multiconferencias con 3 participantes o
las llamadas en espera.
9. Ficha telefónica: conecte el cable de línea proveniente del teléfono
en la ficha rotulada PHONE, que está situada en la parte posterior de la unidad de identificación de llamadas.
10. Enchufe del cable de línea telefónica: inserte un extremo del cable
de línea telefónica en el enchufe rotulado TEL. LINE y el otro
extremo en el enchufe de pared.
11. Ficha de CC: debe conectar el adaptador de CA para que la
unidad de identificación de llamadas pueda funcionar. Enchufe el
adaptador en la ficha de 9 V de CC situada en la parte posterior
de la unidad.
22
Instalación
SP
Instalación
SE NECESITA EL ADAPTADOR DE CA QUE ACOMPAÑA A LA
UNIDAD DE IDENTIFICACIÓN DE LLAMADAS PARA QUE ÉSTA
PUEDA FUNCIONAR. SE RECOMIENDA, SIN EMBARGO, INSTALAR 4 PILAS AAA PARA PREVENIR LA PÉRDIDA DE LA MEMORIA
EN CASO DE PRODUCIRSE UN CORTE DE ENERGÍA.
Verifique el contenido de todos los accesorios incluidos con la unidad
de identificación de llamadas. Comuníquese con el establecimiento
donde hizo la compra original en caso de faltar algún elemento o si
hay daños visibles en la unidad. No intente operar la unidad de identificación de llamadas si presenta indicios de daños.
a)
b)
c)
d)
d)
Unidad de identificación de llamadas
Soportes verticales
Adaptador de CA
Cable largo de línea telefónica
Cable corto de línea telefónica
1 pieza
2 piezas
1 pieza
1 pieza
1 pieza
INSTALACIÓN DE LAS PILAS
Instale 4 pilas AAA (se recomiendan las pilas alcalinas) para retener
los registros de identificación de llamada y mantener el funcionamiento continuo del reloj de tiempo real en caso de haber un corte de
energía.
IMPORTANTE:
a) Use solamente pilas nuevas del tamaño requerido y del tipo
recomendado.
b) No combine pilas nuevas con viejas, tipos distintos de pilas
(estándar, alcalinas o recargables) ni las pilas recargables de
capacidades diferentes.
c) Cuando cambie las pilas, ponga las nuevas dentro de 30 segundos
luego de quitar las viejas; de lo contrario, perderá toda la información almacenada en la unidad.
d) Si no va a usar la unidad con pilas por un mes o un período más
prolongado, quite las pilas. Las pilas pueden descargar sustancias
químicas que pueden destruir los componentes electrónicos.
23
SP
Instalación
e)
Elimine las pilas viejas de manera correcta y con prontitud.
No las queme ni las entierre.
Cambie las pilas si aparece el icono indicador de pilas agotadas (
).
1. Desconecte la línea telefónica.
2. Para abrir la tapa del portapilas, inserte un objeto puntiagudo (tal
como un clip o un lápiz) en las dos ranuras situadas en la parte
de arriba de la tapa del portapilas situado en el fondo de la
unidad de identificación de llamadas.
3. Coloque las nuevas pilas en el
compartimiento guiándose por los símbolos de polaridad (+ y -)
indicados en su interior.
4. Coloque la tapa en su lugar.
5. Vuelva a conectar la línea telefónica.
IMPORTANTE:
Cuando cambie las pilas, ponga las nuevas dentro de 30 segundos
luego de quitar las viejas; de lo contrario, perderá todos los registros
de identificación de llamada almacenados en la unidad.
CONEXIÓN DE LA UNIDAD A UN TELÉFONO Y/O CONTESTADOR AUTOMÁTICO
Luego de instalar las 4 pilas AAA, conecte un extremo del cable de
línea provisto en el enchufe de la unidad de identificación de llamadas
rotulado TEL. LINE y conecte el otro extremo en el enchufe telefónico de pared. Conecte el cable de línea que tiene en el teléfono en el
enchufe de la unidad de identificación de llamadas rotulado PHONE.
El adaptador de CA
Si tiene un contestador automático, use un cable de línea para conecdebe ser una fuente de
tar el enchufe de la unidad de identificación de llamadas rotulado
potencia clase 2, para 9
PHONE con el enchufe LINE del contestador automático. Conecte
V de CC y 200 mA
otro cable de línea que una el enchufe PHONE del contestador
automático con el enchufe del teléfono.
CONEXIÓN DEL ADAPTADOR DE CA
Conecte el enchufe cilíndrico del adaptador en el enchufe de 9 V de
CC de la unidad de identificación de llamadas y conecte al
24
Instalación
TEL. LINE
PHONE
SP
COLOCACIÓN DE LA UNIDAD SOBRE EL ESCRITORIO
Inserte las ranuras de los dos soportes verticales en las pestañas correspondientes situadas en el fondo de la caja. Luego deslice los
soportes verticales siguiendo las pestañas hasta que queden trabados
en el fondo de la caja.
Reloj de tiempo real Fecha
1. Practique en la pared dos orificios de 1/8 de pulgada de diámetro
a una distancia de 5 1/8 pulgadas (130 mm) el uno del otro.
Introduzca un tornillo (no se incluye) en cada orificio, dejando
que las cabezas queden a 1/8 de pulgada de la pared.
2. Alinee las ranuras tipo ojo de cerradura (situadas en el fondo de
la unidad de identificación de llamadas) con los tornillos de
soporte y deslice la unidad hacia abajo para fijarla.
Operación
Operación
MODO DE INACTIVIDAD
Cuando la unidad de identificación de llamadas esté en modo de inactividad, aparecen en la pantalla la condición de la llamada y el reloj:
MENÚ DE CONFIGURACIÓN
El menú de configuración (Setup) tiene cinco opciones.
Set Language (Fijar idioma)
Permite seleccionar las instrucciones que aparecen en la pantalla de
cristal líquido en inglés, español o francés. El valor predeterminado de
fábrica es inglés.
1. Durante el modo de inactividad, presione y mantenga así el botón
[DIAL] durante unos 3 segundos.Aparece en pantalla "SETUP
MENU
".
2. Presione el botón [REVIEW
] hasta que aparezca “SET LANGUAGE”.
3. Presione nuevamente el botón [DIAL].Ahora aparece "ENGLISH" en la pantalla.
25
SP
Operación
4.
5.
Presione el botón [REVIEW
] o [REVIEW ] para seleccionar inglés, francés o español.
Presione el botón [DIAL] para guardar el valor de ajuste y pulse
el botón [REVIEW
] para pasar a la siguiente opción de
ajuste, SET AREA CODE.
Set Area Code (Fijar código de área)
Los códigos de área de todas las llamadas entrantes serán comparadas con el código de área que el usuario ingresó para determinar si se
trata de una llamada local.
1. Presione el botón [DIAL] cuando “SET AREA CODE” aparezca
en la pantalla. El primero de los tres dígitos del código de área
parpadeará.
2. Presione el botón [REVIEW ] o [REVIEW ] para desplazar
dígitos e ingresar el primero de su código de área.
3. Presione el botón [DIAL] para pasar
al segundo dígito.
4. repita los pasos 2 y 3 hasta haber terminado de ingresar el código de área.
5. Presione el botón [DIAL] para guardar el valor de ajuste y pulse
el botón [REVIEW
] para pasar a la siguiente opción, SET
TIME / DATE.
Nota: si desea cambiar el código de área, repita los pasos 1 al 4.
26
Set Time / Date (Ajustar hora y fecha)
Permite ajustar el reloj (hora y minuto) y la fecha (mes y día).También
se actualizará el reloj con una identificación de llamada entrante, si
que está suscrito al servicio de identificación de llamadas. El valor predeterminado de fábrica es “12:00AM 01/01” en el reloj.
1. Presione el botón [DIAL] cuando “SET TIME / DATE” aparezca
en la pantalla. El dígito de la hora parpadeará.
2. Presione el botón [REVIEW
] o [REVIEW
] para
desplazar dígitos e ingresar la hora. Luego de ajustar la hora, presione el botón [DIAL] para pasar a ingresar los minutos.
3. Repita el paso 2 hasta haber ajustado la hora, los minutos, el mes
y el día.
4. Presione el botón [DIAL] para guardar el valor de ajuste y pulse
el botón [REVIEW
] para pasar a la siguiente opción, SET
CONTRAST.
Operación
SP
Set Contrast (Ajustar contraste)
Permite ajustar el contraste de la pantalla de cristal líquido en 8 niveles diferentes. El valor predeterminado de fábrica es 4.
1. Presione el botón [DIAL] cuando “SET CONTRAST” aparezca
en la pantalla.
2. Presione el botón [REVIEW
] o [REVIEW
] para disminuir o aumentar el contraste de la pantalla de cristal líquido.
3. Presione el botón [DIAL] para guardar el valor de ajuste.
4. Presione el botón [REVIEW
] para pasar a la siguiente opción
de ajuste, SET DIAL VM.
Set DIAL VM (Ajustar número de acceso de correo de voz)
Permite ajustar su propio número de acceso de correo de voz.
1. Presione el botón [DIAL] cuando “SET DIAL VM” aparezca en la
pantalla. El primer dígito del número de acceso de correo de voz
parpadeará.
2. Presione el botón [REVIEW
] o [REVIEW
] para
desplazar dígitos e ingresar el primero del número de acceso.
3. Presione el botón [DIAL] para pasar al segundo dígito.
4. Repita los pasos 2 y 3 hasta haber terminado de ingresar el
número de acceso del correo de voz.Ahora está listo para marcar el número de acceso del correo de voz presionando el
botón [DIAL VM].
5. Presione el botón [DIAL]para guardar el valor de ajuste y pulse
el botón [REVIEW
] para pasar a la siguiente opción de
ajuste, EXIT. Luego presione el botón [DIAL] para salir del menú
de configuración.
Nota: si desea cambiar el número de acceso del correo de voz, repita los pasos 1 al 4.
MEMORIA DE IDENTIFICACIONES DE LLAMADA
Si está suscrito al servicio de identificación de llamadas ofrecido
por su compañía telefónica local, la unidad de identificación de llamadas recibirá y presentará el nombre de la llamada entrante (si
corresponde) junto con el número, la fecha y la hora de la llamada. La unidad almacena un máximo de 90 registros, cada uno de
27
Operación
SP
los cuales contiene números de un máximo de 14 dígitos y nombres de hasta 15 caracteres.
Si la memoria de identificaciones de llamada está llena, se suprimirá automáticamente el registro más viejo para dar lugar al nuevo.
Nombre de la persona que llama
secuencie el número
de la llamada de fuera
El tiempo y la fecha
cuando la llamada
se recibe
es una
llamada
nueva
12:00AM 01/01 CALL #80 NEW
249-342-363
JOHN SMITH
número de persona
que llama
usted tiene los
mensajes nuevos
de buzón de voz
El tiempo y la fecha cuando la
llamada se recibenombre de
persona que llama
REVISIÓN DE IDENTIFICACIONES DE LLAMADA
1. Presione el botón [REVIEW
] para ver el registro de
identificación de llamada, desde la llamada más reciente (es
decir, la número 90) hasta la más antigua (la número 1).
2. Presione el botón [REVIEW
] para ver el registro de
identificación de llamada, desde la llamada más antigua (la
número 1) hasta la más reciente (es decir, la número 90).
Nota:
a) Quizá no disponga de información sobre la identificación de
llamadas en algunas zonas.
Aparecerán “ UNKNOWN NAME” o “UNKNOWN CALL”
en la pantalla en tales casos.
b) Las personas que llaman tienen la opción de bloquear la
información sobre su propia identificación de llamada.
Aparecerán “PRIVATE NAME” o “PRIVATE CALL” en la pantalla en tales casos.
c) Si el código de área del número de la persona que llama
coincide con el código de área local predefinido, aparecerán
en la pantalla solamente los últimos 7 dígitos. (Consulte la
sección “Set Area Code (Fijar código de área)”
INDICADOR LUMINOSO DE LLAMADA NUEVA
(verde)
Cuando la unidad de identificación de llamadas recibe una nueva
llamada entrante, aparece el icono de llamada nueva “NEW” en la
pantalla de cristal líquido y el indicador luminoso de llamada
nueva (LED verde) se prende ininterrumpidamente. Además,
aparece en la pantalla la información sobre la nueva llamada
entrante durante unos 10 segundos para luego volver al modo de
inactividad.
28
Operación
SP
Nota:
a) Usted o el contestador automático deben contestar la nueva
llamada entrante solamente después del primer timbre. De
otro modo, no quedará grabada la información sobre la
nueva llamada entrante.
b) Si el adaptador de CA no está conectado, el indicador luminoso de llamada nueva destellará cada 3 segundos cuando
haya una nueva llamada que no se ha revisado.
c) El indicador luminoso de llamada nueva no deja de iluminar a
menos que usted haya revisado TODAS las nuevas llamadas
entrantes con presionar el botón [REVIEW ] o
[REVIEW
].
CORREO DE VOZ
Si está suscrito al servicio de correo de voz ofrecido por su compañía telefónica local, el indicador luminoso de mensaje en espera
se ilumina ininterrumpidamente cuando tiene mensajes de voz en
el buzón y el icono (?) aparece en la pantalla. Luego de haber
escuchado a los mensajes de voz, se apagarán el indicador luminoso de mensaje en esperay el icono (?).
Si desea escuchar los mensajes de voz, presione el botón [DIAL
VM] para marcar el número de acceso del correo de voz. Aparece
en pantalla "PICK UP HANDSET". Luego, levante el auricular para
marcar el número de acceso. Consulte las instrucciones para ajustar el número de acceso del correo de voz en la sección "Set
DIAL VM" .
IMPORTANTE:
a) Si el adaptador de CA no está conectado, el indicador luminoso de mensaje en espera destellará cada 3 segundos cuando tenga nuevos mensajes de voz.
b) Si el indicador luminoso de mensaje en espera sigue iluminandose y todavia aparece el icono (?) luego de haber
escuchado a todos los mensajes de voz, presione el boton
[DELETE] para apagar la luz y el icono.
29
SP
Operación
MARCACIÓN DE NÚMEROS CON LA UNIDAD DE
IDENTIFICACIÓN DE LLAMADAS
1.
2.
3.
4.
Cuando revisa el registro de una identificación de llamada,
presione el botón [DIAL] para marcar el número que
aparece en la pantalla de cristal líquido. Si el formato del
número de la llamada identificada no es ajustable, aparece en
pantalla “PICK UP HANDSET”. Levante el auricular para
marcar el número.
Si ya tiene almacenado un código de área, el formato del
número de la llamada identificada es ajustable (vea la sección
"Importante" de la página 10). Aparece en la pantalla “PICK
UP OR ADM” luego de presionar el botón [DIAL] .
Presione nuevamente el botón [DIAL] para cambiar el formato del número con una de las siguientes opciones:
a) 7 dígitos (número telefónico)
b) 10 dígitos (código de área + número telefónico)
c) 11 dígitos (1 + código de área + número telefónico).
Levante el auricular para marcar el número mostrado.
IMPORTANTE:
a) Debe guardar con anterioridad el código de área antes de
poder ajustar el formato del número. Consulte la sección
“Set Area Code (Fijar código de área)” en la página 6.
b) Si ha ajustado el código de área local, el código de área de
todos los números entrantes será comparado con aquél para
determinar si se trata de una llamada local.
c) Si es una llamada local, sólo se mostrarán los últimos 7 dígitos del número entrante en la pantalla de cristal líquido. Si no
es una llamada local, se mostrarán 11 dígitos (1 + código de
área + número telefónico) al volver a marcar
SUPRESIÓN DE REGISTROS DE IDENTIFICACIÓN DE
LLAMADA
Si el archivo de registros de identificación de llamada está lleno,
se suprime automáticamente el registro más antiguo a medida
que entra una nueva llamada. Usted también puede suprimir llamadas individuales o todas las llamadas en el archivo de identifica30
Operación
SP
ciones de llamada.
Si desea suprimir uno de los registros de identificación de llamada
1. Mientras revisa el registro de una llamada identificada, presione el botón [DELETE] y aparecerá en la pantalla “DELETE
CALL?”.
2. Presione nuevamente el botón [DELETE] para efectuar la
supresión.
Si desea suprimir todos los registros de identificación de llamadas
1. Mientras revisa el registro de una llamada identificada, presione y mantenga así el botón
[DELETE] durante
unos 3 segundos. “DEL ALL CALLS ?” aparece en la pantalla
de cristal líquido.
2. Presione nuevamente el botón [DELETE] para suprimir
todos los registros.
31
SP
32
LED
Localización de fallas
Sintomas
La pantalla está
en blanco
Soluciones
b)
Asegúrese que el adaptador de corriente alterna esté
conectado al enchufe etiquetado DC 9V al reverso de su
unidad de Identificador de Llamadas y enchufado al socket
de la pared que no está controlado por un interruptor de la
pared.
Ajuste el contraste de la pantalla (véase "Fijar Contraste".)
La pantalla se
ve borrosa
a)
Ajuste el contraste de la pantalla LCD (véase "Fijar Contraste.)
No funciona el
Identificador
de Llamadas
a)
Asegúrese de haberse suscrito al servicio de Identificador
de Llamadas.
Espere hasta que el teléfono suene dos veces antes de
contestar una llamada.
Asegúrese que los cables de la linea del teléfono estén
conectados correctamente (véase "Conexión al Teléfono y/o
Contestadora").
a)
b)
c)
a)
Asegúrese que se haya suscrito al servicio de Identificador
de Llamadas incluyendo la característica de ENTREGA DEL
NOMBRE DEL LLAMDOR.
No se enciende el a)
Indicador (verde)
b)
de la Luz de
Nueva Llamada
cuando hay una
llamada nueva
Asegúrese que haya conectado adecuadamente el adaptador
de corriente.
Asegúrese que se haya suscrito al servicio de Identificador
de Llamadas.
No se enciende el a)
Indicador (rojo) de
la Luz de Mensaje b)
en Espera cuando
tiene mensajes de
voz
Asegúrese que se haya suscrito al servicio de Correo de
Voz.
Asegúrese que haya conectado adecuadamente el adaptador
de corriente.
a)
Se enciende el
Indicador (rojo) de
la Luz de Mensaje
en Espera
Asegúrese que tenga acceso a sus mensajes de correo de
voz.
Sin nombre del
llamador
SP
33
Cuide y Limpiar
SP
Cuide y Limpiar
Observe las siguientes sugerencias de cuidado de la unidad para
que la pueda usar por muchos años.
N
BELN
34
E
•
Mantenga seco el Caller ID. Séquelo de inmediato si se moja.
Los líquidos podrían contener minerales que pueden corroer
los circuitos electrónicos.
•
Use y almacene el unit solamente en entornos con temperaturas normales. Las temperaturas extremas pueden acortar la
vida útil de los dispositivos electrónicos y deformar o derretir los componentes plásticos.
•
Manipule el unit con cuidado, pues si lo deja caer podrán
dañarse las placas de circuitos y las cajas, con lo que el teléfono dejará de funcionar correctamente.
•
Use solamente pilas nuevas del tamaño requerido y del tipo
recomendado. Quite siempre las pilas viejas o de poca carga,
pues pueden descargar sustancias químicas que pueden
destruir los circuitos electrónicos.
•
Mantenga el Caller ID alejado del polvo y la suciedad excesivos, que pueden desgastar prematuramente los componentes.
•
Limpie el Caller ID con un paño húmedo de vez en cuando
para conservar el aspecto de nuevo. No emplee productos
químicos fuertes, diluyentes de limpieza ni detergentes
fuertes para limpiar el sistema.
Asistencia Técnica
SP
Asistencia Técnica
Correo electrónico:
[email protected]
Garantía
¿Qué cobertura ofrece la garantía limitada PHILIPS?
PHILIPS Electronics garantiza al comprador original de este producto (en adelante, el "consumidor" o "usted") que el producto y
todos los accesorios incluidos por Philips en el envase original (en
adelante, el "producto") están libres de todo defecto importante
de material y mano de obra, sujeto a las condiciones indicadas a
continuación, si se lo instala y utiliza normalmente y de conformidad con las instrucciones de funcionamiento. Esta garantía limitada
afecta solamente a los consumidores de productos adquiridos y
utilizados en los Estados Unidos de América y en Canadá.
¿Qué hará Philips si el producto no está libre de defectos
importantes de material y mano de obra durante el
período de la garantía limitada (en adelante, "producto
con defectos importantes")?
Durante el período de la garantía limitada, Philips reemplazará sin
cargo alguno todo producto que presente defectos importantes.
Philips devolverá en buenas condiciones de funcionamiento los
productos reparados o reemplazados. Philips se quedará con los
componentes, módulos o equipos defectuosos. Si Philips, a discreción propia, opta por reemplazar un producto con defectos
importantes, usted deberá esperar la llegada del reemplazo en 30
días aproximadamente.
¿Cuánto dura el período de la garantía limitada?
El período de la garantía limitada para el producto se prolonga
por UN (1) AÑO a partir de la fecha de compra. Esta garantía
limitada también se aplica a los productos de reemplazo a) por
35
SP
Garantía
un período de 90 días a partir de su fecha de envío al consumidor o b) por el tiempo restante en la garantía limitada original de
un año, el plazo que sea más largo.
¿Qué situaciones no cubre esta garantía limitada?
Esta garantía limitada no cubre lo siguiente:
1. El producto ha sido objeto de abuso, accidentes, averías en
tránsito o de otro tipo, instalación incorrecta, funcionamiento
o manipulación anormales, negligencia, inundación, incendio,
penetración de agua o de otros líquidos.
2. El producto ha sufrido daños debido a reparaciones,
alteraciones o modificaciones.
3. Problemas causados por condiciones de señal, confiabilidad
de la red o sistemas de cable o antenas.
4. Problemas causados por el uso de la unidad con accesorios
eléctricos no ofrecidos por Philips.
5. Se han quitado o alterado las etiquetas de garantía/calidad, las
placas de número de serie o los números de serie electrónicos del producto, o se los dejó ilegibles.
6. El producto fue comprado, usado o reparado fuera de los
Estados Unidos o Canadá, o se lo utilizó con fines comerciales o institucionales (entre otros, con el propósito de
alquilarlo).
7. Se devolvió el producto sin un comprobante de compra válido (véase a continuación).
8. Los cargos de instalación o configuración, ajuste de controles
del cliente, así como la instalación o reparación de sistemas
fuera de la unidad.
9. Tenga en cuenta que esta garantía no cubre los elementos
consumibles tales como pilas y cualquier otro componente
con vida útil limitada y que pueda sufrir desgaste.
¿Cómo puedo obtener servicio de garantía?
•
Si desea obtener servicio de garantía en los Estados Unidos
de América, llame al 1-800-233-8413 para pedir asistencia al
cliente e instrucciones para obtener servicio de garantía.
Antes de llamar para pedir servicio técnico, consulte el manual del usuario. Podrá ahorrarse una llamada al servicio técnico si primero verifica el estado de los controles y las fun-
36
Garantía
•
•
SP
ciones del producto.
Excepto por lo indicado en la legislación aplicable, el consumidor asume el riesgo de pérdida o avería en tránsito y transporte y es responsable de los gastos de entrega o manejo
aplicables en el transporte del producto o productos al lugar
de prestación del servicio técnico. Philips devolverá el producto reparado o producto de reemplazo al consumidor de
conformidad con esta garantía limitada, previo pago de los
gastos de transporte, entrega o manejo. Philips no asume
riesgo alguno de averías o pérdida del producto en tránsito.
Si el fallo del producto no tiene cobertura de esta garantía
limitada o si el comprobante de compra no cumple las condiciones de esta garantía limitada, Philips notificará al consumidor pidiéndole que autorice los costos de reemplazo y envío
por devolución para atender las condiciones exentas en esta
garantía limitada.
¿Qué debe devolverse con el producto para obtener el
servicio de garantía?
1. El envase original y su contenido, incluso el producto y los
accesorios, junto con una descripción del mal funcionamiento
o dificultad.
2. Un “comprobante de compra" válido (recibo) donde se identifique el producto adquirido (modelo del producto) y la
fecha de compra o de recibo.
3. El nombre, la dirección postal completa y correcta y los teléfonos diurnos y nocturnos del consumidor.
Limitaciones varias
Esta garantía representa el convenio definitivo y exclusivo que
usted y Philips han celebrado, y sustituye las demás comunicaciones escritas o verbales que se refieren al producto. Philips no
ofrece ninguna otra garantía para el producto. La garantía
describe exclusivamente todas las responsabilidades que Philips
tiene respecto al producto.
No existe ninguna otra garantía expresa. No hay terceros autorizados para efectuar modificaciones en esta garantía y usted no
debería depender de dichas modificaciones.
37
SP
Garantía
Derechos según legislación estatal:
Esta garantía le otorga ciertos derechos legales y tal vez tenga
otros derechos que variarán de un estado a otro.
Limitaciones:
Las garantías implícitas, incluso aquellas relativas a la aptitud para
un propósito especial (una garantía tácita de que el producto es
apto para un uso corriente) y la comerciabilidad están limitadas a
un año a partir de la fecha de compra. Como no se permiten limitaciones en la duración de una garantía implícita en algunos estados, quizá la limitación anterior no se aplique en su caso.
Philips no será tenido por responsable de los daños indirectos,
cuantificables, incidentales o similares (entre otros, la pérdida de
utilidades o ingresos, la imposibilidad de utilizar el producto o
equipos relacionados, el costo de equipos de reemplazo y reclamaciones de terceros) que resulten del uso del producto. Como
algunas jurisdicciones estatales prohíben la exclusión o limitación
de daños incidentales o indirectos, quizás la limitación o exclusión
anterior no se aplique en su caso.
Impreso en China
38
SP
39
Specifications are subject to change without notice
Trademarks are property of Philips Accessories and Computer Peripherals
2006© Philips Accessories and Computer Peripherals, Ledgewood, NJ USA
Printed in China
www.philips.com