Transcript
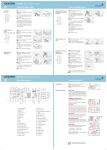
QUICKGuide d-Copia 1800/d-Copia 2200
Clearing paper jams
Cassette 1
(J11, J21)
➊ Pull out the cassette.
①
Inside the left Cover
(J20 to 50, J52 to 57,
J60, J61)
②
➋ Remove any jammed paper without
tearing it.
NOTE If the paper does happen to tear,
remove any loose scraps from inside
the machine.
➌ Push the cassette back in firmly.
NOTE Check to see if paper is out of
position in the cassette. If the paper is
out of position, set the paper properly.
NOTE If JAM21 is displayed, remove the
jammed paper referring to Paper Jam
in the Left Cover
Inside Cassette
2 to 4
(J12 to 16, J22 to 24)
➊ Open the left cover of the cassette
being used.
➋ Remove any jammed paper without
tearing it.
NOTE If the paper does happen to tear,
remove any loose scraps from inside
the machine.
❸ Close the left cover of the cassette.
➍ Pull out the cassette.
➎ Remove any jammed paper without
tearing it.
NOTE If the paper does happen to tear,
remove any loose scraps from inside
the machine.
➏ Push the cassette back in firmly.
Paper Output
Slot (J50)
➊ If jammed paper is seen through
the paper output slot, pull it out to
remove it.
NOTE If the paper does happen to tear,
remove any loose scraps from inside
the machine.
➋ Pull the left cover handle up to
open the left cover.
➌ Remove any jammed paper without
tearing it.
NOTE If the paper does happen to tear,
remove any loose scraps from inside
the machine.
➍ Close the left cover.
①
②
③
④
Multi-Purpose Tray
(J10)
⑤
①
Optional Document
Processor
(J70-75, J78)
②
③
④
Clearing paper jams
Cod.: 551807en_es
➊ Pull the left cover handle up to
②
open the left cover.
CAUTION The fixing unit is extremely
hot. Take sufficient care when working
inthis area, as there is a danger of
getting burned.
➋ Remove any jammed paper without
tearing it.
NOTE If the paper does happen to tear,
remove any loose scraps from inside
the machine.
➌ If the optional duplex unit is installed, raise the duplex unit and remove any paper.
NOTE If the paper does happen to tear,
remove any loose scraps from inside
the machine.
➍ Close the left cover.
➊ Remove all of the paper remaining
in the multi-purpose tray.
➋ Reset the paper in the multi-purpose tray. The error message disappears.
➊ Remove all of the originals
remaining in the original table.
➋ Open the left cover.
➌ Remove any jammed original
without tearing it.
➍ Raise the paper feed unit A.
➎ Remove any jammed originals
without tearing them.
➏ Turn the dial as shown in the
illustration to remove the jammed
original.
➐ Close the left cover to its original
position. Reset all the originals and
start copying again.
①
③
①
②
①
②
③
④
⑥
For more details refer to the user
manual on the co-packed CD-ROM.
QUICKGuide d-Copia 1800/d-Copia 2200
Operation panel
37
36
34
33
31
30
28 27
24
26 25 23
18
Copy Operation
17
11
14
9
7
6
2
1
32
29
20 19
22 21
1
2
3
4
5
6
7
8
9
10
11
12
13
14
15
16
17
18
19
Start Key (Indicator)
Stop/Clear Key
Reset Key
Energy Saver Key
Numeric keys
Interrupt Key
Logout Key
Key
Key
OK Key
Auto%100% Key
Paper Supply Indicator
Paper Selection Key
Paper Supply Level Indicator
Paper Misfeed Indicator
MP Indicator
No. of Copies/Zoom Display
Message Display
Original Size Key
13 16
15
12
8
➊ Place the originals on the platen or in the
optional document processor.
➋ Enter the number of copies with the TEN
PAD key.
Optional settings
Paper source
Select the desired paper source by pressing
PAPER SELECTION button. If the setting APS is active, the selected cassette with automatically
match the original format. Special sizes or papers should be used through the multi purpose tray.
Adjusting the copy exposure
Choose the document type between TEXT &
PHOTO, PHOTO and TEXT.
Press LIGHTER or DARKER button to adjust the
exposure, if needed.
Sort mode
Press COLLATE button. Enter the number of copies with the TEN PAD key. Press START button.
Note The device is able to rotate each set, if
A4 and A4-R paper is avaliable. ROTATE/OFFSET
has to be enabled to use this function. Refer to
the chapter System Setting in the user manual.
Preset Zoom
Press 100%/AUTO% to light up the Auto% indicator. Press PAPER SELECTION and select the
paper. Press START to begin copying.
Choosing Zoom ratio
Press and . Change the zoom percentage
displayed using up or down. The percentage
can also be input using the TEN PAD keys. Press
OK. Press START.
Duplex copy
Press 2-SIDED button until the desired duplex
mode is selected. Choose between:
· 1-side original --> 2 sided copy
· 2-sided original --> 2 sided copy
· Book --> 2 sided copy
When choosing book, refer to the original size
indicators of the platen.
4
3
35
Preparations
5
10
20 EcoPrint Key
21 Auto Density Key
22 Density Adjustment Key/Density
Display
23 Attention Indicator
24 Error Indicator
25 Add Toner Indicator
26 Maintenance Indicator
27 Image Quality Selection Key
28 Printer Key (Indicator)
29 2-sided Key
30 Mixed Original Size Key
31 Combine Key
32 Split Key
33 Program Key
34 Border Erase Key
35 Media Type Key
36 Collate Key
37 Margin Key
For more details refer to the user
manual on the co-packed CD-ROM.
Cod.: 551807en_es