1
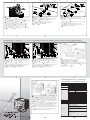
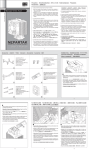
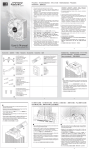
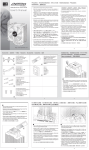
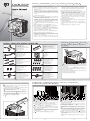
Precautions Vorsichtsmaßnahmen ↪ߩᵈᗧ Précautions ֹϡॡڦຍ Precauciones S1283V Heat-pipe Direct Touch Air Cooling System ɜ problèmes d'alimentation électrique, un accident, une négligence, une modification, une réparation, une installation incorrecte ou un mauvais test. 1. Keep and store the product away from the reach of children. 2.Check the component list and condition of the product before installation. If there is any problem, contact the shop where you purchased to get a replacement or refund. User's Manual 3.Xigmatek Co., Ltd. is not responsible for any damages due to external causes, including but not limited to, improper use, problems with electrical power, accident, neglect, alteration, repair, improper installation, and improper testing. 4.Le CPU et le carte mère sont sujets à dégâts si le produit est mal installé. ɜ 2.Revise la lista de componentes y la condición de los productos antes de la instalación. Si hay algún problema contacte la tienda donde fue comprado para que le reemplacen el producto o le devuelvan su dinero. 4.CPU and motherboard are subject to damage if the product in incorrectly installed. ɜ 3.Xigmatek Co. Ltda. . no es responsable por daños debido a causas externas, como, uso indebido, problemas con la corriente eléctrica, accidentes, negligencias, alteración, reparación, instalación indebida y testeo indebido. 1. Produkt kindersicher aufbewahren. 2.Prüfen Sie vor der Installation die Komponentenliste und den Zustand des Produktes. Sollte es dabei ein Problem gegen, wenden Sie sich an Ihren Händler zwecks Austauschs bzw. Rückerstattung. 3.Xigmatek Co., Ltd. haftet nicht für Beschädigungen durch äußere Einflüsse, einschließlich aber nicht beschränkt auf unsachgemäßen Gebrauch, Stromversorgungsprobleme, Unfall, Nachlässigkeit, Modifikationen, Reparaturen, unsachgemäße Installation und unsachgemäße Überprüfung. 4.Bei unsachgemäßer Installation können CPU und Motherboard beschädigt werden. ɜ 1. ຠߪ߅ሶ᭽ߩᚻߩዯ߆ߥߣߎࠈߦ⸳⟎߹ߚߪ▤ߒߡߊߛߐޕ 1. Mantenga el producto almacenado fuera del alcance de los niños. 4. El procesador y placa madre pueden sufrir daño si el producto es indebidamente instalado. ɜ 1. ኛயٸݡཉ̈́ᐼхޅٺආΞᛈቑಛγĄ 2.щ྅݈ኛᑭߤІϫᐂ̈́யڶېݡĄтѣЇңયᗟĂኛాඛଋٙᔉ෴۞થظ ͽ೩ֻೱఱٕߏੜఱڇચĄ 3. Xigmatek ̳Φ̙ЇңЯγొЯ৵ౄј̝ຫεĄΒ߁ҭߏ̙ࢨٺטĂ̙ ዋ༊ֹ̝ϡă˧યᗟăຍγְІăழنă࣒Լă࣒நă̙ዋ༊̝щ྅̙ዋ༊ ̝ീྏĄ 4. ̚δநጡ፟ڕдய̙ٺݡϒቁгщ྅˭ĂצٽຫचĄ 2. ขࠅઃߌࠆ೨ߦㇱຠࠬ࠻߅ࠃ߮ຠ⁁ᴫࠍ⏕ߒߡߊߛߐޕ㗴߇ࠆ ႐วߪ⽼ޔᄁᐫߦㅪ⛊ߒߡޔ឵߹ߚߪ㊄ߒߡ߽ࠄߞߡߊߛߐޕ 3.Xigmatek Co., Ltd. ߪޔਇᱜ↪ޔ㔚Ḯߦ㑐ߔࠆ㗴ޔߥ⇛☻ޔขᛒޔ ᡷㅧޔਇㆡಾߥ⸳⟎ޔਇᱜߥᬌᩏࠍߦࠄࠇߘߪߚ߹ޔ㒢ቯߐࠇߥᄖ⊛ ⷐ࿃ߦࠃࠆ߆ߥࠆ៊்ߦኻߒߡ߽⽿છࠍ⽶߹ߖࠎޕ 4.ຠࠍᱜߒߊขࠅઃߥߣޔCPU߅ࠃ߮ࡑࠩࡏ࠼߇៊்ߔࠆ႐ว߇ࠅ߹ߔޕ ɜ 1. Conservez et stockez le produit hors de portée des enfants. 2.Vérifiez la liste des composants et l'état du produit avant installation. En cas de problème, contactez le magasin où vous l'avez acheté pour obtenir un remplacement ou un remboursement. 3. Xigmatek Co., Ltd. n'est pas responsable des dégâts dus à des causes externes, y compris mais non limité à, une mauvaise utilisation, des http://www.xigmatek.com 1 2 Installation Step Installationsschritte Procédure d’installation LGA775/1366 clip X 2 ɜ High performance Thermal Grease X 1 ɜ LGA775/1366 clip X 2 ɜ Hochleistungs-Wärmeleitpaste X 1 ɜ LGA775/1366࠹ࡦ࡚ࠪࡦ2 ɜ 㜞ᕈ⢻ࠨࡑ࡞ࠣࠬ1 ɜ clip & plaque arrière LGA775/1366 X 2 ɜ Pâte thermique haute performance x 1 ɜ Clip LGA775/1366X 2 ɜ Grasa térmica de alto rendimiento X 1 ɜ LGA775/1366 љ X 2 ɜ ጱሤჼ X 1 ɜ AM2 & K8 Clip X 1 ɜ Fan X 1 ɜ AM2 & K8 Clip X 1 ɜ Lüfter X 1 ɜ AM2߅ࠃ߮K8ࠢ࠶ࡊ1 ɜ ࡈࠔࡦ1 ɜ Attache pour AM2 et K8 x 1 ɜ Ventilateur x 1 ɜ Abrazadera AM2 y K8 X 1 ɜ Ventilador X 1 ɜ AM2 & K8 љ X 1 ɜ ࢲै X 1 ɜ Anti-vibration rubber X 4 ɜ LGA775/1366 Screw X 4 ɜ Antivibrationsgummi X 4 ɜ LGA775/1366 Schraube X 4 ɜ ᝄേࠧࡓ4ᧄ ɜ LGA775/1366 ࠬࠢࡘ4ᧄ ɜ Monture silencieuse en caoutchouc-métal x 4 ɜ LGA775/1366 Vis x 4 ɜ Goma antivibración X 4 ɜ LGA775/1366 Tornillo X 4 ɜ ࢲै֨ዩါͯ X 4 ɜ LGA775/1366 ᓲක X 4 6 Pasos de instalación щ྅Վូᄲځ 4 5 8 Before installation, peel the protect label on the bottom of heat sink base off. ɜ Ziehen Sie vor der Installation das Schutzetikett von der Unterseite des Kühlkörpers ab. Screw X 2 ɜ LGA775/1366 Spring X 4 ɜ Steckverbindungsschraube X 2 ɜ LGA775/1366 Feder X 4 ɜ ࡊ࠶ࠪࡘࡇࡦࡀࠫ2ᧄ ɜ LGA775/1366 ࠬࡊࡦࠣ4ᧄ ɜ ขࠅઃߌࠆ೨ߦࠢࡦࠪ࠻ࡅޔၮㇱᐩ㕙ߩ⼔ࡌ࡞ࠍߪ߇ߒ߹ߔޕ ɜ Vis pour x 2 ɜ LGA775/1366 Ressort x 4 ɜ ɜ Tornillo del pasador X 2 ɜ LGA775/1366 Muelle X 4 Avant l’installation, décollez l'étiquette de protection en dessous de la base du dissipateur thermique. ɜ љᓲක X 2 ɜ LGA775/1366 ᇅᖊ X 4 ɜ Antes de realizar la instalación, despegue la etiqueta protectora de la parte inferior de la base del disipador. ɜ LGA775/1366 back plate X 1 ɜ LGA775/1366 Mylar X 1 ɜ ሤጡܲొغ᜕ቯֶᐝ͞ШᇧฟĄ ɜ LGA775/1366 back plate X 1 ɜ LGA775/1366 Mylar X 1 ɜ LGA775/1366ࡃ࠶ࠢࡊ࠻1 ɜ LGA775/1366 ⛘✼ࠪ࠻1 ɜ clip & plaque arrière LGA775/1366 X 1 ɜ LGA775/1366 Mylar X 1 ɜ placa posterior LGA775/1366 X 1 ɜ LGA775/1366 Adhesivo Mylar X 1 ɜ LGA775/1366ࡦ ڕX 1 ɜ LGA775/1366 ౪ٛ X 1 9 10 Para AMD K8 y AM2 2 ɜ Tear the package of thermal grease the bottom of heat sink base. ɜ Reißen Sie die Packung der Wärmeleitpaste 6 auf und tragen Sie die Paste gleichmäßig auf die Unterseite des Kühlkörpers auf. ɜ 6 ࠨࡑ࡞ࠣࠬߩࡄ࠶ࠤࠫࠍ㐿ኽߒߡࠢࡦࠪ࠻ࡅޔၮㇱᐩ㕙ߦࠨ ࡑ࡞ࠣࠬࠍဋ৻ߦႣࠅ߹ߔޕ ɜ Ouvrez le paquet de pâte thermique 6 , appliquez la pâte thermique de manière uniforme en dessous de la base du dissipateur thermique. ɜ Arranque el paquete de la grasa térmica 6 y aplique ésta uniformemente sobre la parte inferior de la base del disipador. ɜ 6 1 ɜ ɜ For AMD K8 & AM2 6 R 3 7 A W 2 of le lab is t th e i el us pe ou G se y N ea re Pl efo NI b 1 ɜ ขࠅઃߌᚻ㗅 Für AMD K8 & AM2 AMD K8߅ࠃ߮AM2ߩ႐ว Pour AMD K8 et AM2 AMD K8 & AM2 ̝щ྅Վូᄲځ off, apply thermal grease evenly to ሤჼӮ̹дሤጡତᛈ CPU ̝ొغĄ 1 2 ɜ Place 2 AM2 & K8 Clip across the fixing end of the slot at the bottom of the heat sink to engage the Retention Module. ɜ Stecken Sie den 2 AM2 & K8 Clip unter das Befestigungsende an der Unterseite des Kühlkörpers, um das Halterungsmodul einzurasten. ɜ Secure the moveable end of 2 the AM2 & K8 Clip onto the Retention Module and then screw it tight in a clockwise direction. To release, turn in the counter-clockwise direction. ɜ Befestigen Sie das bewegliche Ende des 2 the AM2 & K8 Clips am Halterungsmodul und schrauben Sie es im Uhrzeigersinn fest. Drehen Sie zum Lösen gegen den Uhrzeigersinn. ɜ 2 AM2߅ࠃ߮K8ߩࠢ࠶ࡊࠍߺ߆ߣ࡞ࡘࠫࡕࡦ࡚ࠪࡦ࠹ޔว߁ࠃ߁ ߦࠢࡦࠪ࠻ࡅޔᐩㇱߩࠬࡠ࠶࠻ߩ࿕ቯ┵ߦ㈩⟎ߒ߹ߔޕ ɜ ɜ Mettez en place l’attache 2 pour AM2 et K8 au niveau de l’extrémité de fixation de l’encoche en bas du dissipateur thermique afin de mettre en place le module de maintien. 2 AM2߅ࠃ߮K8ߩࠢ࠶ࡊߩ⌕⣕┵ࠍ࠹ࡦ࡚ࠪࡦࡕࠫࡘ࡞ߦធ⛯ߒࡀޔ ࠫࠍᤨ⸘࿁ࠅߦ࿁ߒߡ࿕ቯߒ߹ߔޕขࠅᄖߔ႐วߪޔᤨ⸘࿁ࠅߦ࿁ߒ߹ߔޕ ɜ Coloque la abrazadera AM2 y K8 2 a través del extremo de fijación de la ranura que se encuentra en la parte inferior del disipador para engranar el módulo de retención. Fixez l’extrémité mobile de l’attache 2 pour AM2 et K8 dans le module de maintien puis vissez-la fermement dans le sens des aiguilles d’une montre. Pour libérer, tourner dans le sens inverse des aiguilles d’une montre. ɜ Asegure el extremo móvil de la abrazadera AM2 y K8 2 en el módulo de retención y, a continuación, atorníllelo en el sentido de las agujas del reloj hasta que quede bien apretado. Para soltarlo, gire en sentido contrario a las agujas del reloj. ɜ ɜ ɜ 2 AM2 & K8 љፖྭሤጡొغᇿؠბљҝቱळĄ 2 AM2 & K8 љ߿̝જბљҝቱळĂึॡ੫ԳღĂ̝ͅעٵĄ For Intel LGA 775/1366 Für Intel LGA 775/1366 Intel LGA 775/1366ߩ႐ว Pour Intel LGA 775/1366 10 Intel LGA 775 / 1 3 6 6 ̝щ྅Վូᄲځ Para Intel LGA 775/1366 LGA775 LGA775 5 4 LGA775 5 LGA1366 LGA1366 10 LGA1366 5 5 1 ɜ ɜ 2 Lock 1 LGA775/1366 Clip and side of the heat sink. 4 LGA775/1366 Clip screws onto the bottom Befestigen Sie die 1 LGA775/1366 Steckverbindung und 4 LGA775/1366 Steckverbindungsschrauben an der Unterseite des Kühlkörpers. ɜ LGA775/1366ࡊ࠶ࠪࡘࡇࡦ↪ࡀࠫࠍߟ߆ߞߡ 4 1 LGA775/1366ࡊ࠶ࠪࡘ ࡇࡦࠍࡅ࠻ࠪࡦࠢᐩㇱߦ࿕ቯߒ߹ߔޕ ɜ Bloquez la barrette à ressort pour LGA775/1366 et les vis 1 pour 4 ɜ 3 Paste 10 Mylar on the 5 LGA775/1366 Back plate ɜ Legen und kleben Sie den ɜ 10 5 ߩ⛘✼ࠪ࠻ࠍߩޓ.)#ࡃ࠶ࠢࡊ࠻ߦ⾍ࠅઃߌ ɜ Coller le 10 Mylar sur la ɜ Pegue el 10 adhesivo Mylar a la placa ɜ 5 „ 10 Mylar“ auf die 5 LGA 775/1366 BACKPLATE. Asegure el pasador LGA775/1366 ɜ 1 y los tornillos del mismo 4 ɜ Setzen und kleben Sie die 5 LGA775/1366 back plate onto the back side of M/B 5 LGA775/1366 Back Plate auf die Rückseite des ɜ 5 ࡑࠩࡏ࠼ⵣߩࡀࠫⓣߦߦLGA775/1366ࡃ࠶ࠢࡊ࠻ߩࡀࠫⓣࠍ߈ ɜ Coller la ɜ Adhiera la ɜ 5 !!LGA775/1366ࡦڕ෭ܢд፟ࢬࡦڕ ߜࠎߣวࠊߒߡ⾍ࠅઃߌߡࠆޕ para LGA 775/1366 10 5 !!౪ٛ෭ܢд!!LGA775/1366ࡦ˯ڕ LGA775/1366 sur la face inférieure du dissipateur thermique. ɜ Adhere Mainboards plaque arrière LGA 775/1366 5 ɜ en el 5 plaque arrière LGA775/1366 au dos de la carte mère 5 placa LGA775/1366 en la parte posterior de la placa madre lateral inferior del disipador. 1 LGA775/1366љᄃ Fan Installation Steps 4 LGA775/1366љᓲකĂᗆܢдሤጡొغĄ Lüftermontage ࡈࠔࡦขࠅઃߌᚻ㗅 Procédure d’installation du ventilateur LGA775 8 , LGA1366 1 9 8 4 Fasten 1 LGA775/1366 clip and ɜ Befestigen Sie den 1 5 LGA775/1366 back plate together. 9 LGA775/1366 Clip und die 5 LGA775/1366 Back Plate Fasten 1 LGA775/1366 clip and ɜ Befestigen Sie den 1 5 LGA775/1366 back plate together. LGA775/1366 Clip und die 5 LGA775/1366 Back Plate gegeneinander. 5 LGA775/1366࠹ࡦ࡚ࠪࡦߣLGA775/1366ࡃ࠶ࠢࡊ࠻ࠍࡀࠫߢߣ ɜ ġ 1ġ ࠆޕ Fixer ensemble le ɜ Fije el ɜ 1 5 !!LGA775/1366љᄃ!!LGA775/1366ࡦڕઇᗆܢඕЪ 1 clip LGA775/1366 et la 5 plaque arrière LGA775/1366 clip LGA775/1366 a la 5 placa posterior LGA775/1366 ɜ Fixer ensemble le ɜ Fije el ɜ 1 5 !!LGA775/1366љᄃ!!LGA775/1366ࡦڕઇᗆܢඕЪ 1 ɜ Securely fix ɜ Befestigen Sie die ɜ 5 LGA775/1366࠹ࡦ࡚ࠪࡦߣLGA775/1366ࡃ࠶ࠢࡊ࠻ࠍࡀࠫߢߣ ࠆޕ ɜ 1 1 ɜ gegeneinander. ɜ ġ 1ġ , 5 ɜ ࢲैщ྅Վូᄲځ Pasos para instalar el ventilador 1 clip LGA775/1366 et la 5 the anti-vibration rubber on ᝄേࠧࡓࠍ 7 3 antivibrationsgummi 7 the Fan. 7 am Lüfter. ࡈࠔࡦߦߒߞ߆ࠅ࿕ቯߒ߹ߔޕ ɜ Fixez bien les monture silencieuse en caoutchouc-métal ɜ Fije de forma segura el goma antivibración del ventilador ventilador 7 . ɜ plaque arrière LGA775/1366 clip LGA775/1366 a la 5 placa posterior LGA775/1366 3 3 3 ቱ֨ዩါͯĂזؠ 7 Spécifications 7 Dark Knight-S1283V Product Number CAC-SXHH3-U05 Heat-pipe 7 Fan 2 ɜ ɜ ɜ Insert the 7 Fan’s anti-vibration rubber into the heat sink. (It is recommended to insert the anti-vibration rubber into the second piece of the Radiating Fin.) Stecken Sie die 7 antivibrationsgummi in den Kühlkörper. (Es wird empfohlen, die antivibrationsgummi in die zweite Kühlrippe des Kühlkörpers zu stecken.) 7 ᝄേࠧࡓࠍࡅ࠻ࠪࡦࠢߦᝌߒ߹ߔޕ㧔ᝄേࠧࡓߪᾲࡅߩ2⇟ ⋡ߩ⟎ߦᝌߔࠆࠃ߁߅൘ߒ߹ߔޕ㧕 Base Material H.D.T. (Heat-pipes Direct Touch) Fin Material Aluminum Alloy SPEC ͓8mm Q'ty 3 pcs. Dimension 120(W)x120(H)x25(D) mm Voltage Rating 12 V Speed 1000~2200 R.P.M. Bearing Type Long Life Bearing Air Flow 89.45 CFM (Max.) Air Pressure 4.1 mmH2O (Max.) Life Expectance 50,000 hrs Noise Level 30.1 dBA (Max.) Available color 4 white LED Connector 4 pin with PWM Dimension 120(W)x50(D)x159(H) mm Thermal Resistance 0.15 ʨ/W Weight 600g (w/fan) Insérez le monture silencieuse en caoutchouc-métal 7 dans le dissipateur thermique. (Il est recommandé d’insérer le monture silencieuse en caoutchoucmétal dans le en second lieu élément des ailettes de refroidissement). All Intel® Socket 775 CPU Core™2 Extreme / Quad / Duo Pentium® Extreme Edition / D Celeron® D ɜ Inserte el goma antivibración del ventilador 7 en el disipador. (Es recomendable insertar la goma antivibración del ventilador en la segunda pieza del alerón radiante.) All Intel Socket 1366 CPU Core™ i7 ɜ ࢲै۞ቱ֨ዩါͯӯˢሤͯ̚Ą)ޙᛉቱ֨ዩါͯ۞ӯˢҜ ཉࠎሤ᜴ͯϤ˯̈́˭ـϤ˭˯ـᇴ̝ௐ 2 ͯĄ* Application ALL AMD Socket K8 754/939/940 CPU Athlon™ 64 / FX / X2 Opteron™ Sempron™ ALL AMD Socket AM2-940 CPU Phenom™ X 3 X 4 Athlon™ 64 / FX / X2 Opteron™ Sempron™ 2008 7. en dicho Technische Daten ɜ 7 3 Especificaciones ఢॾܑ Product Name Heat Sink sur le ventilateur ࢲै˯Ą Dark Knight-S1283V Specification ᇹ 3