1
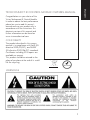
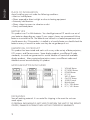
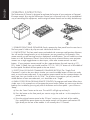
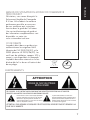
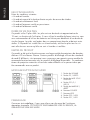
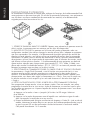
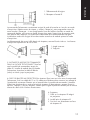
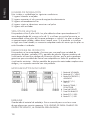
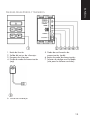
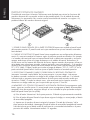
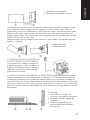
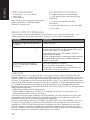
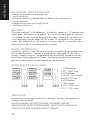
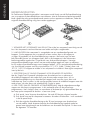
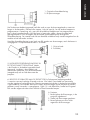
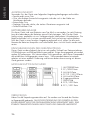
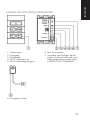
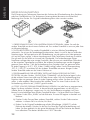
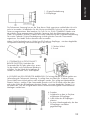
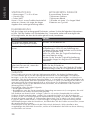
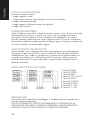
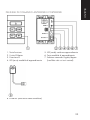
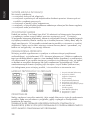
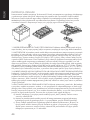
TECHCONNECT IR CONTROL MODULE OWNERS MANUAL
MANUEL DE L’UTILISATEUR DU MODULE
DE COMMANDE IR TECHCONNECT
MANUAL DEL USUARIO DEL MÓDULO DE CONTROL
POR INFRARROJOS TECHCONNECT
TECHCONNECT IR-BEDIENINGSMODULE HANDLEIDING
BENUTZERHANDBUCH FÜR DAS IR-STEUERMODUL
VON TECHCONNECT
MODULO DI CONTROLLO A RAGGI INFRAROSSI TECHCONNECT:
ISTRUZIONI PER L’USO
TECHCONNECT IR CONTROL: INSTRUKCJA OBSŁUGI
installation:innovation
ENGLISH
TECHCONNECT IR CONTROL MODULE OWNERS MANUAL
Congratulations on your choice of the
Vision Techconnect IR Control Module.
In order to obtain the best performance
please be sure to read this owner’s
manual and use your product only in
accordance with the instructions. An
electronic version of this manual and
further information can be found on
www.visionaudiovisual.com
CONFORMITY
The product described in this owners
manual is in compliance with RoHS (EU
directive 2002/95/EC), and WEEE
(EU directive 2002/96/EC) standards.
Certificates including SGS reports are
available on request.
This product should be returned to the
place of purchase at the end of its useful
life for recycling.
WEE/AB0047SY
WARNINGS
1
ENGLISH
Place of installation
Avoid installing your unit under the following conditions:
• Moist or humid places
• Places exposed to direct sunlight or close to heating equipment
• Extremely cold locations
• Places subject to excessive vibration or dust
• Poorly ventilated places
Battery Life
This product uses 2 x AAA batteries. You should get around 12 months use out of
your batteries depending on usage. If your usage is heavy we recommend Lithium
batteries to extend the life. The batteries are housed in a sealed compartment and
should remain dry. If the product is installed in a humid climate you should check the
batteries every six months to make sure they do not get damp or rust.
Limitations of Product
This product has been tested and works with a very wide variety of data projectors,
LCD screens, and Plasma screens. Some display products use different IR code
standards, so we do not guarantee this control module will control all available
display products. Many motorized projection screens use different codes and
therefore cannot be controlled by this product.
Modular Buttons Included
1.
2. 3. 4. 5. 6. 7. 8.
9.
Packaging
VOLUME Button
PC/VIDEO Button
POWER Button
PC1/2/
VID1/2 Button
ON/OFF Button
SOURCE panel
BLANK panel
PC2 / VID2 Button
PC1 / VID1 Button
Save all packing material. It is essential for shipping in the event the unit ever
needs repair.
IF ORIGINAL PACKAGING IS NOT USED TO RETURN THE UNIT TO THE SERVICE
CENTRE, DAMAGE IN TRANSIT WILL NOT BE COVERED BY WARRANTY.
2
ENGLISH
FRONT AND REAR CONTROL PANELS
1.
2.
3.
4.
Function Button
IR Blaster Output
IR Receiver
Learn Mode LED (red)
5.
6.
7.
Learn Confirmation LED (green)
Learn Mode Button
Single/Dual Code selector
(only applies to middle buttons)
8. IR Blaster (also known as emitter)
3
ENGLISH
Operating instructions
The Techconnect IR Control is designed to replicate the function of your projector or flat-panel
IR remote control. By using the Techconnect Control you will present users with a standardized
way of controlling their equipment, and the original remote control can be safely locked away.
1. SEPARATE FRONT PANEL FROM REAR Gently separate the front panel from the rear chassis.
The front panel is held on by clips on each side towards the front.
2. LOAD BUTTONS The front panel comes pre-loaded with a common configuration of buttons.
You will need to change buttons to suit the projector you are controlling. For example, if the
remote control you are learning from has separate on and off buttons, you will need to use that
button set in the Techconnect Control. Likewise for the source selection buttons some projector
remotes use a single toggle button to select inputs, while other remote controls use more
buttons. If your projector remote control has four separate buttons for each input (e.g. PC1,
PC2, Video, S-Video), then you should install the “PC1/2 / VID1/2” button set in the middle of
the front panel. Re-attach the front panel to the rear chassis.
3. SELECT DUAL OR SINGLE COMMAND FOR MIDDLE BUTTONS The “Single/Dual
Command” switch on the rear selects whether you want the middle buttons to learn one code
each, or two discreet codes each. If your projector remote control has four separate buttons for
each input, then you should set this to “Dual”. For all other circumstances you only need the
middle buttons to learn one code each, so it should be set to “Single”.
4. LEARN CODES FROM ORGINAL REMOTE CONTROL To program each button follow these
simple steps. In this example we will program the power button. Before you start ensure that the
batteries are installed by pressing any one of the buttons on the front panel – you will hear a
“beep”.
a)Press the “Learn” button on the rear. The red LED will light up and stay lit.
b)Press the button on the front panel you want to assign the code to - in this example the
power button.
c) Point the original remote control at the “IR Input” receiver on the back of the module.
Press and hold the power button on the remote control until the green confirmation LED
lights briefly on the rear of the module. It will normally take 1-2 seconds.
4
ENGLISH
1. Original Remote Control
2. IR Input receiver
The Techconnect Control has now assigned that code to the button and is no longer in learn
mode. Repeat all steps including step (a) to program the other buttons. Note: If you are
programming one of the middle buttons in dual command mode it will remain in learn mode
after you have taught it the first code. You should now press the second command on the
original remote control. The second code will be assigned to the same middle button and the
module will revert out of learn mode.
Keep the remote control 90 degrees to the receiver as shown above. The optimum learning
distance is 30-50mm.
1. Incorrect angle
2. Too close
5. INSTALL CONTROL MODULE INTO
TECHCONNECT FACEPLATE After you’ve
taught the Control Module the IR codes,
install the module into the Techconnect
faceplate, plug in the IR Blaster cable
(included) and route it to the projector.
6. ATTACH THE IR BLASTER TO THE PROJECTOR A powerful IR emitter is included with the
Techconnect Control, attached to a 10m cable. This cable can be shortened or lengthened
easily at the Phoenix connector end which plugs into the Control Module. The IR emitter should
be positioned over or near the IR receiver on the projector as shown below. Option (1) is most
effective as the IR signal can be weakened by direct sunlight or fluorescent lights.
A.Projector
1. Stuck on the IR receiver built in to
the projector
2. Sitting near the IR receiver
3. Attached to a wall directly facing
the IR receiver
5
ENGLISH
SPECIFICATIONS
ACCESSORIES INCLUDED
• Dimensions: 71 x 42 x 40mm
• Weight: 63 grams
• Colour: White
Note: Because we are committed to improving
our products, the details above may change
without prior warning.
9
1
1
1
2
x
x
x
x
x
Interchangeable button sets
Single-Gang Techconnect Backbox
Single-Gang Techconnect Surround
IR Blaster with 10m cable
AAA Batteries
TROUBLESHOOTING
If your system is not operating properly, please refer to the following information. If the problem
persists, disconnect from power and contact your AV reseller immediately.
Problem
Correction
No sound when front buttons pressed
Replace the batteries.
Module fails to learn the code
Make sure the original remote is 30-50mm away
from the receiver on the back of the module, and at
90 degrees.
Make sure the original remote has fresh batteries.
When teaching hold down the button on the original
remote for longer until the green LED lights on the
Module.
Module learns code and makes sound
but doesn’t control the projector
Re-program the buttons.
Re-position the IR blaster.
Check IR blaster cable to make sure it hasn’t been
damaged during installation.
WARRANTY
This product comes with a 2-year return to base warranty, effective from the date of purchase.
This warranty applies only to the original purchaser and is not transferable. For the avoidance
of doubt, this will be taken from the information held by the appointed national distributor at the
point of sale. If the product is DOA (dead on arrival), you have 21 days from purchase date
to notify the national distributor via your AV reseller. The liability of the manufacturer and its
appointed service company is limited to the cost of repair and/or replacement of the faulty unit
under warranty, except for death or injury (EU85/374/EEC). This warranty protects you against
the following:
• Failure of any components.
• Damage when the product is first removed from its packaging if reported within 24 hours of
purchase.
If you find you do have a problem with this product, you should contact the AV reseller you
purchased this product from. The original purchaser is responsible for shipment of the product to
the manufacturer’s appointed service centre for repair.
We will endeavour to return repaired units within 5 working days, however this may not always
be possible, in which case it will be returned as soon as practicably possible. In line with our
WEEE commitments, the manufacturer endeavours to replace the faulty parts of the product
rather than replacing the whole unit. This warranty does not protect this product against faults
caused by abuse, misuse, incorrect installation, unstable or faulty power input, which might be
caused by ignoring the guidelines set out in this manual.
6
FRANÇAIS
MANUEL DE L’UTILISATEUR DU MODULE DE COMMANDE IR
TECHCONNECT
Félicitations, vous venez d’acquérir le
Techconnect Module de Commande
IR Vision. Afin d’obtenir la meilleure
performance possible, assurez-vous
de vous conformer aux instructions
fournies dans le guide de l’utilisateur.
Une version électronique du guide et
des informations complémentaires sont
disponibles sur notre site:
www.visionaudiovisual.com
CONFORMITE
Le produit décrit dans ce guide est en
conformité avec les exigences RoHS
(directive de l’UE 2002/95/EC), et la
WEEE (directive UE 2002/96/EC). Les
certifi cats de validation, rapports SGS y
compris, sont disponibles sur demande.
Le produit devra être retourné sur le lieu
d’achat dès la fi n de son utliisation à but
de recyclage.
WEE/AB0047SY
AVERTISSEMENTS
ATTENTION
RISQUE DE CHOC ÉLECTRIQUE
NE PAS OUVRIR
ATTENTION : POUR RÉDUIRE LES RISQUES D’ÉLECTROCUTION, N’OUVREZ PAS LE PANNEAU ARRIÈRE OU LE CAPOT
DE L’APPAREIL. IL NE CONTIENT AUCUN COMPOSANT QUI PUISSE ÊTRE ENTRETENU PAR L’UTILISATEUR.
REPORTEZ-VOUS AUPRÈS D’UN SERVICE DE MAINTENANCE QUALIFIÉ.
L’éclair fléché au centre d’un triangle équilatéral
prévient l’utilisateur de la présence de courants
élevés dans l’appareil, pouvant constituer un
risque d’électrocution en cas de mise en contact
avec les composants internes.
Le point d’exclamation au centre d’un
triangle équilatéral prévient l’utilisateur de la
présence d’instructions importantes dans le
mode d’emploi concernant la mise en oeuvre
et l’entretien de l’appareil.
ATTENTION : POUR RÉDUIRE LES RISQUES D’ÉLECTROCUTION, N’EXPOSEZ PAS CET APPAREIL À LA
PLUIE OU À L’HUMIDITÉ.
7
FRANÇAIS
Lieu d’installation
Evitez les conditions suivantes:
• Un endroit humide.
• Un endroit exposé à la lumière directe ou près de sources de chaleur.
• Un endroit extrêmement froid.
• Un endroit fortement ventilé ou poussiereux.
• Un endroit faiblement ventilé.
DURÉE DE VIE DES PILES
Ce produit utilise 2 piles AAA. Les piles ont une durée de vie approximative de
12 mois, en fonction de l’utilisation. Si vous utilisez le module de façon intensive, nous
vous recommandons d’utiliser des batteries au lithium pour bénéficier d’une durée de
vie plus longue. Les piles sont logées dans un compartiment étanche et doivent rester
sèches. Si le produit est installé sous un climat humide, vérifiez les piles tous les six
mois afin de vous assurer qu’elles ne sont ni humides ni rouillées.
LIMITES DU PRODUIT
Ce produit a été testé et fonctionne avec une large variété de projecteurs de données,
d’écrans LCD et d’écrans Plasma. Certains produits d’affichage utilisent des standards
de code IR différents, c’est pourquoi nous ne pouvons pas garantir que ce module de
commande fonctionnera avec tous les produits d’affichage disponibles. De nombreux
écrans de projection motorisés utilisent des codes différents et ne peuvent donc pas
être commandés avec ce produit.
Modular Buttons Included
1. Touche de VOLUME
2. Touche PC / VIDÉO
3. Touche de MISE SOUS
TENSION
4. Touche PC1/2 /
VID1/2
5. Touche de MARCHE /
ARRÊT
6. Panneau SOURCE
7. Panneau VIDE
8. Touche PC2 / VID2
9. Touche PC1 / VID1
L’Emballage
Conservez tout emballage, il vous sera utile en cas de renvoi de l’unité pour
réparation éventuelle. SI L’UNITE EST ENDOMMAGEE LORS DU RENVOI, LA
GARANTIE NE SERA PAS VALIDE.
8
FRANÇAIS
PANNEAUX AVANT ET ARRIERE
1. Touche de fonction
2. Sortie IR Blaster
3. Récepteur IR
4. LED de mode d’acquisition (rouge)
5. LED de confirmation d’acquisition
(vert)
6. Touche de mode d’acquisition
7. Sélecteur de code « single »
(simple) ou « dual » (double)
(s’applique uniquement aux touches
centrales)
8. IR Blaster (ou émetteur)
9
FRANÇAIS
INSTRUCTIONS D’UTILISATION
La commande IR Techconnect est conçue pour répliquer les fonctions de la télécommande IR de
votre projecteur ou de votre écran plat. En utilisant la commande Techconnect, vous présenterez
aux utilisateurs une façon standardisée de commander leur matériel, et la télécommande
originale pourra être conservée en lieu sûr.
1. SÉPAREZ LE PANNEAU AVANT DE L’ARRIÈRE Séparez avec précaution le panneau avant du
châssis arrière. Le panneau avant est maintenu par des clips de chaque côté.
2. MONTEZ LES TOUCHES Le panneau est livré avec des touches prémontées selon une
configuration standard. Vous devrez changer les touches afin qu’elles s’adaptent au projecteur
que vous commandez. Par exemple, si la télécommande à acquérir présente des touches de
marche et d’arrêt séparées, vous devrez utiliser cet ensemble de touches dans la commande
Techconnect. De même, pour les touches de sélection de la source, certaines télécommandes
de projecteurs utilisent une unique touche de commutation pour la sélection des entrées, tandis
que d’autres utilisent plusieurs touches. Si la télécommande de votre projecteur est dotée de
quatre touches séparées pour chaque entrée (par exemple PC1, PC2, Vidéo, S-Vidéo), vous
devrez alors monter l’ensemble de touches « PC1/2 / VID1/2 » au centre du panneau avant.
Remettez le panneau avant en place sur le châssis arrière.
3. SÉLECTIONNEZ LA COMMANDE DOUBLE OU SIMPLE POUR LES TOUCHES CENTRALES
Le commutateur « Single/Dual Command » situé à l’arrière vous permet de choisir si vous
souhaitez que les touches centrales acquièrent un code chacune ou deux codes discrets
chacune. Si la télécommande de votre projecteur est dotée de quatre touches séparées pour
chaque entrée, vous devez alors régler ce commutateur sur « Dual ». Dans tous les autres cas,
les touches centrales n’ont à acquérir qu’un seul code chacune et il doit alors être réglé sur
« Single ».
4. FAITES L’ACQUISITION DES CODES À PARTIR DE LA TÉLÉCOMMANDE D’ORIGINE
Pour programmer chaque touche, suivez ces étapes simples. Dans cet exemple, nous allons
programmer la touche de mise sous tension. Avant de commencer, assurez-vous que les piles
sont installées en appuyant sur n’importe laquelle des touches du panneau avant - vous devez
entendre un « bip ».
a)Appuyez sur la touche « Learn » (acquérir) à l’arrière. La LED rouge s’éclaire et
reste éclairée.
b)Appuyez sur la touche du panneau avant à laquelle vous souhaitez assigner le code dans cet exemple, la touche de mise sous tension.
c) Pointez la télécommande d’origine en direction du récepteur « Entrée IR » situé au dos du
module. Maintenez la touche de mise sous tension de la télécommande enfoncée jusqu‘à
ce que le voyant LED vert de confirmation s‘éclaire brièvement à l‘arrière du module.
Cela prend normalement 1 à 2 secondes.
10
FRANÇAIS
1. Télécommande d’origine
2. Récepteur d’entrée IR
La commande Techconnect a maintenant assigné le code à la touche et n’est plus en mode
d’acquisition. Répétez toutes les étapes, y compris l’étape (a), pour programmer toutes les
autres touches. Remarque : si vous programmez l’une des touches centrales en mode de
commande double, elle restera en mode d’acquisition après l’acquisition du premier code ;
vous pouvez alors appuyer sur la deuxième commande de la télécommande d’origine.
Le deuxième code sera assigné à la même touche centrale et le module quittera le mode
d’acquisition.
La télécommande doit rester à 90 degrés du récepteur, comme illustré ci-dessus. La distance
d’acquisition optimale est de 30-50 mm.
1. Angle incorrect
2. Trop près
5. INSTALLEZ LE MODULE DE COMMANDE
DANS LA FAÇADE TECHCONNECT Une fois
que le module de commande a acquis les
codes IR, installez le module dans la façade
Techconnect, branchez le câble IR Blaster
(inclus) et tirez-le jusqu’au projecteur.
6. FIXEZ L’IR BLASTER AU PROJECTEUR Un émetteur IR puissant est inclus avec la commande
Techconnect, fixé à un câble de 10 m. Ce câble peut facilement être raccourci ou rallongé à
l’extrémité du connecteur Phoenix qui se branche dans le module de commande. L’émetteur
IR doit être placé au-dessus ou à proximité du récepteur IR du projecteur, comme illustré cidessous. L’option (1) est plus efficace, sachant que le signal IR peut être affaibli par la lumière
directe du soleil ou les lumières fluorescentes.
A.Projecteur
1. Collé sur le récepteur IR intégré
au projecteur
2. Installé près du récepteur IR
3. Fixé à un mur directement en face
du récepteur IR
11
FRANÇAIS
PROPRIETES
• Dimensions: 71 x 42 x 40mm
• Poids: 63g
• Couleur: Blanc
Note: Etant donné que nous travaillons sans
cesse à l’amélioration de nos produits,les
details ci-dessus peuvent être modifies sans
préavis.
ACCESSOIRES INCLUS
9
1
1
1
2
x
x
x
x
x
jeux de touches interchangeables
boîtier arrière Techconnect simple
châssis Techconnect simple
IR Blaster avec câble 10 m
piles AAA
PROBLEMES EVENTUELS
Si votre système ne fonctionne pas correctement, référez vous aux informations suivantes. Si le
problème persiste, coupez l’alimentation et contactez le service après vente.
Probleme
Correction
Aucun son n’est émis lors de la
pression sur les touches
Remplacez les piles
Le module ne parvient pas à acquérir
le code
Assurez-vous que la télécommande d’origine est à
une distance de 30 à 50 mm du récepteur situé au
dos du module et positionné à 90 degrés.
Assurez-vous que les piles de la télécommande
d’origine sont fonctionnelles.
Lors de l’acquisition, maintenez la touche de la
télécommande d’origine plus longtemps, jusqu’à ce
que la lumière verte s’éclaire sur le module.
Le module acquiert le code et émet
un son mais ne commande pas le
projecteur
Reprogrammez les touches.
Repositionnez l’IR Blaster.
Vérifiez le câble de l’IR Blaster afin de vous
assurer qu’il n’a pas été endommagé au cours de
l’installation.
GARANTIE
Ce produit a une garantie de 2 ans qui prend effet le jour de l’achat. Cette garantie concerne
uniquement l’acheteur initial et n’est pas transférable. Afin d’éviter tout doute, l’information
référante sera celle du revendeur du lieu d’achat.Si le produit est défectueux à l’arrivée, vous
avez 21 jours à partir de la date d’achat pour en avertir le grossiste via votre service audio
visuel. La responsabilité du fabricant et du revendeur est limitée au coût de reparation et du
remplacement de l’unité sous garantie, excepté la mort ou des dommages (EU85/374/EEC).
La garantie vous protège contre :
• Pièces défectueuses.
• Dommages à la première sortie d’emballage si vous nous en notifiez en moins de 24 heures
suivant l’’achat.
Si vous avez un problème avec ce produit, vous devez contacter le revendeur. L’acheteur
d’origine est responsable de la livraison du produit au centre de service
de réparation.
Nous ferons de notre possible pour vous retourner les unités réparées sous 5 jours ouvrables.
Cependant, ceci n’est pas toujours possible auquel cas nous nous engageons à vous la faire
parvenir le plus rapidement possible. Conformément à nos engagements WEEE, le fabricant
s’engage à, dans la mesure du possible, remplacer la pièce défectueuse plutôt que l’unité
dans son intégralité. Cette garantie ne protège pas l’unité contre des défauts causés par abus,
mauvaise utilisation, installation incorrecte ou alimentation défectueuse, issus d’un mauvais suivi
des conseils dans ce guide.
12
Español
MANUAL DEL USUARIO DEL MÓDULO DE CONTROL POR INFRARROJOS
TECHCONNECT
Felicidades por escoger su Vision
Techconnect Modulo de Control Por
Infrarrojos. Para obtener mejores
resultados, por favor, lea este manual,
y use este producto sólo de acuerdo
con las instrucciones. Una version
electrónica de este manual y mas
información se podrá encontrar en
www.visionaudiovisual.com
CONFORMIDAD
El producto descrito en este manual es
conforme a los estándares de la Directiva
RoHS (EU 2002/95/EC) y WEEE (EU
2002/96/EC). Los certificados de
validación están disponibles bajo petición.
Este producto deber ser devuelto al lugar
de compra al final de su vida útil, para
ser reciclado.
WEE/AB0047SY
ADVERTENCIAS
13
Español
Lugares de Instalación
Evite instalar su unidad bajo las siguientes condiciones:
1.Lugares húmedos o mojados
2. Lugares expuestos al sol o cerca de equipo de calentamiento
3. Lugares extremadamente fríos
4. Lugares sujetos a vibraciones excesivas o al polvo
5.Lugares mal ventilados
VIDA ÚTIL DE LAS PILAS
Este producto utiliza 2 pilas AAA. Las pilas deberían durar aproximadamente 12
meses dependiendo del uso que se les dé. Si se utilizan con mucha frecuencia, es
recomendable utilizar pilas de litio para prolongar su vida útil. Las pilas se alojan en
un compartimento sellado y deben estar siempre secas. Si el producto se instala en
un lugar con clima húmedo, es necesario comprobar cada seis meses que las pilas no
estén húmedas ni oxidadas.
LIMITACIONES DEL PRODUCTO
Este producto se ha comprobado y funciona con una amplísima variedad de
proyectores de datos, pantallas LCD y pantallas de plasma. Algunos productos de
visualización utilizan otros códigos de infrarrojos distintos, por lo que no podemos
garantizar que este módulo de control sea compatible con todos los productos de
visualización existentes. Muchas pantallas de proyección motorizadas emplean otros
códigos y no se pueden controlar con este producto.
MODULAR BUTTONS INCLUDED
1. Botón de VOLUMEN
2. Botón de PC / VÍDEO
3. Botón ENCENDIDO /
APAGADO
4. Botón PC1/2 /
VID1/2
5. Botón ACTIVAR /
DESACTIVAR
6. Panel de FUENTE
7. Panel EN BLANCO
8. Botón PC2 / VID2
9. Botón PC1 / VID1
Embalaje
Guarde todo el material de embalaje. Esto es esencial para su envío en caso
de que alguna vez necesite repararse. SI LA UNIDAD SE DAÑA CAMINO DEL
CENTRO DE SERVICIO, LA GARANTIA SERA INVALIDA.
14
Español
PANELES DELANTEROS Y TRASEROS
1. Botón de función
2. Salida del emisor de infrarrojos
3. Receptor de infrarrojos
4. Diodo de modo de memorización
(rojo)
5. Diodo de confirmación de
memorización (verde)
6. Botón de modo de memorización
7. Selector de código sencillo/doble
(solo para los botones centrales)
8. Emisor de infrarrojos
15
Español
INSTRUCCIONES DE MANEJO
El módulo de control por infrarrojos Techconnect está diseñado para imitar las funciones del
mando a distancia de su proyector o televisor de pantalla plana. Con el módulo de control
Techconnect, les presentará a los usuarios una forma estándar de controlar sus equipos. Así,
podrán olvidarse del mando a distancia original.
1.SEPARE EL PANEL FRONTAL DE LA PARTE POSTERIOR Separe con cuidado el panel frontal
del armazón posterior. El panel frontal está sujeto mediante unas pinzas laterales orientadas
hacia delante.
2.CARGUE LOS BOTONES El panel frontal viene cargado con una configuración de botones
común. Es necesario cambiar los botones según el proyector que desee controlar. Por ejemplo,
si el mando a distancia del que está memorizando tiene un botón para encender y otro para
apagar, tendrá que utilizar ese juego de botones en el módulo de control Techconnect. Lo
mismo ocurre con los botones de selección de fuente; algunos mandos de proyector utilizan un
único botón para seleccionar entradas, mientras que otros usan varios botones. Si el mando a
distancia de su proyector dispone de cuatro botones distintos para cada entrada (por ejemplo
PC1, PC2, Vídeo, S-Vídeo), tendrá que instalar el juego de botones “PC1/2 / VID1/2” en la
parte central del panel frontal. Vuelva a ajustar el panel frontal en el armazón posterior.
3.SELECCIONE COMANDO SIMPLE O DOBLE PARA LOS BOTONES CENTRALES El
interruptor “comando simple/doble” de la parte posterior sirve para elegir si desea que
los botones centrales memoricen un código o dos códigos discretos cada uno. Si el mando
a distancia de su proyector tiene cuatro botones distintos para cada entrada, tendrá que
ajustarlo a “Doble”. En todos los demás casos, solo necesitará que los botones centrales
memoricen un código cada uno, por lo que tendrá que ajustar a “Sencillo”.
4. MEMORICE LOS CÓDIGOS DEL MANDO A DISTANCIA ORIGINAL Para programar cada
botón, siga estos sencillos pasos. En este ejemplo vamos a programar el botón de encendido/
apagado. Antes de empezar, asegúrese de que se han insertado las pilas pulsando cualquier
botón del panel frontal (oirá un pitido).
a)Pulse el botón “Memorizar” de la parte posterior. El diodo rojo permanecerá encendido.
b)Pulse el botón del panel frontal al que desea asignar el código; en este ejemplo, el botón
de encendido/apagado.
c) Apunte con el mando a distancia original al receptor “Entrada de infrarrojos” de la
parte posterior del módulo. Mantenga pulsado el botón de encendido/apagado del mando
a distancia hasta que el diodo verde de confirmación se encienda brevemente en la parte
posterior del módulo. Normalmente tardará 1-2 segundos.
16
Español
1. Mando de control original
2. Receptor de entrada de infrarrojos
The Techconnect Control has now assigned that code to the button and is no longer in learn
mode. Repeat all steps including step (a) to program the other buttons. Note: If you are
programming one of the middle buttons in dual command mode it will remain in learn mode
after you have taught it the first code. You should now press the second command on the
original remote control. The second code will be assigned to the same middle button and the
module will revert out of learn mode.
Keep the remote control 90 degrees to the receiver as shown above. The optimum learning
distance is 30-50mm.
1. Ángulo incorrecto
2. Demasiado cerca
5. INSTALE EL MÓDULO DE CONTROL EN
LA PLACA FRONTAL DE TECHCONNECT
Tras memorizar los códigos infrarrojos en
el módulo de control, instale el módulo en
la placa frontal de Techconnect, conecte el
cable del emisor de infrarrojos (incluido) y
guíelo hasta el proyector.
6. AJUSTE EL EMISOR DE INFRARROJOS AL PROYECTOR El módulo de control Techconnect
incluye un potente emisor de infrarrojos con un cable de 10 m. Este cable puede acortarse
o prolongarse fácilmente en el extremo del conector Phoenix que se conecta al módulo de
control. El emisor de infrarrojos debe colocarse por encima o cerca del receptor de infrarrojos
que hay en el proyector, tal y como se muestra a continuación. La opción (1) es la más eficaz,
ya que la señal de infrarrojos puede debilitarse por el efecto de la luz solar directa o las luces
fluorescentes.
A.Proyector
1. Incrustado en el receptor de
infrarrojos integrado en el proyector
2. Apoyado cerca del receptor de
infrarrojos
3. Fijado a una pared que esté
orientada de frente al receptor
de infrarrojos
17
Español
ESPECIFICACIONES
ACCESORIOS INCLUIDOS
• Dimensiones: 71 x 42 x 40mm
• Peso: 63g
• Color: Bianco
9 x juegos de botones intercambiables
Nota: Dado nuestro compromiso de mejorar
nuestros productos, los detalles podrán
cambiar sin previo aviso.
1 x caja de conexiones de una salida de
Techconnect
1 x sistema surround de una salida
Techconnect
1 x emisor de infrarrojos con 10 m de cable
2 x pilas AAA
RESOLUCIÓN DE PROBLEMAS
Si su sistema no esta funcionando bien, favor de referirse a la siguiente información. Si el
problema persiste, desconecte del poder y contacte su comerciante inmediatamente.
Problema
Correccion
No se emite ningún sonido al pulsar
los botones
Cambie las pilas.
El módulo no memoriza el código
Compruebe que el mando a distancia original esté a
una distancia de 30-50 mm del receptor de la parte
posterior del módulo y a 90 grados.
Compruebe que las pilas del mando a distancia
original están cargadas.
Durante la memorización, mantenga pulsado el botón
del mando original hasta que el diodo verde del
módulo se encienda.
El módulo memoriza el código y
emite un sonido pero no controla
el proyector
Vuelva a programar los botones.
Vuelva a colocar el emisor de infrarrojos.
Compruebe si el cable del emisor de infrarrojos ha
sufrido daños durante la instalación.
GARANTÍA
Este producto viene con una garantía de 2 años regreso a base, efectivo desde la fecha de
compra. La garantía se aplica solamente al comprador original y no es transferible. Para evitar
cualquier duda, esto se tomará de la información guardada por el distribuidor nacional al punto
de venta. Si el producto no funciona cuando lo recibió, tiene 21 dias desde la fecha de compra
para notificar al distribuidor nacional a través de su vendedor. La responsabilidad del fabricante
y su compañía apuntada está limitada al costo de reparación o el reemplazo del producto
defectuoso bajo garantía, a excepción de muerte o de lesion (EU85/374/EEC). Esta garantía lo
proteje contra lo siguiente:
• Defecto de cualquiera de los componentes.
• Daño cuando el producto es extraído de su embalaje por primera vez, pero solo si es
reportado dentro de 24 despues de compra.
Si encuentra que tiene algún problema con este producto, por favor contacte con el punto de
venta audiovisual donde lo compró. El comprador original es responsable por el envío del
producto al centro de servicio del fabricante para reparación.
Nosotros procuraremos retornar las unidades reparadas dentro de 5 dias laborales, pero esto
no siempre será posible, en cual caso será retornado lo antes posible. En línea con nuestros
compromisos WEEE, el fabricante procurará reemplazar las partes defectuosas en vez de la
unidad completa. La garantía no proteje a este producto contra averias causadas por abuso,
mal uso, instalación incorrecta, alimentación eléctrica inestable o defectuosa, lo cual puede ser
causado por ignorar las indicaciones explicadas en este manual.
18
Nederlands
TECHCONNECT IR-BEDIENINGSMODULE HANDLEIDING
Gefeliciteerd met uw koop van
Vision Techconnect IR-Bedieningmodule.
Lees deze gebruikershandleiding
en gebruik uw product alleen in
overeenstemming met de aanwijzingen
voor een optimale prestatie. U vindt een
elektronische versie en verdere informatie
op: www.visionaudiovisual.com
CONFORMITEIT
Het product dat in deze handleiding
wordt beschreven, is in overeenstemming
met de RoHS- (EU-richtlijn 2002/95/
EC), en WEEE- (EU-richtlijn 2002/96/
EC) richtlijnen. Certificaten, waaronder
SGS-rapporten, zijn op aanvraag
verkrijgbaar. Dit product dient na
gebruik aan de verkoper te worden
geretourneerd voor hergebruik.
WEE/AB0047SY
WAARSCHUWINGEN
Voorzichtig
Risico op elektrische schok
Niet openen
KIJK UIT: OM HET RISICO OP ELEKTRISCHE SCHOKKEN TE VERLAGEN, MAG U HET DEKSEL (OF_DE_ACHTERKANT)
NIET TE VERWIJDEREN. ER BEVINDEN ZICH IN HET APPARAAT GEEN ONDERDELEN DIE DOOR DE GEBRUIKER ZELF
ONDERHOUDEN KUNNEN WORDEN. LAAT ONDERHOUD ALTIJD AAN OPGELEID PERSONEEL OVER.
De bliksemschicht met pijlpunt aan de onderkant
binnen een gelijkzijdige driehoek is bedoeld om de
gebruiker te waarschuwen voor de aanwezigheid
van “gevaarlijke spanning” binnen de afgesloten
producten omdat deze groot genoeg kan zijn om
mensen een elektrische schok toe te brengen.
Het uitroepteken binnen een gelijkzijdige
driehoek is bedoeld om de lezer te wijzen op
een belangrijke aanwijzing in de handleiding
behorende bij het apparaat over de werking
en het onderhoud.
WAARSCHUWING: OM HET RISICO OP BRAND OF ELEKTRISCHE SCHOKKEN TE VERLAGEN, DIENT
U HET APPARAAT WEG TE HOUDEN VAN REGEN OF VOCHT.
19
Nederlands
HET PLAATSEN VAN DE INSTALLATIE
Installeer uw apparaat niet op plaatsen die:
• nat of vochtig zijn
• aan direct zonlicht zijn blootgesteld of te dicht bij de verwarming zijn
• extreem koud zijn
• blootgesteld zijn aan veel trillingen of stof
• slecht geventileerd zijn
BATTERIJEN
Dit product werkt op 2 x AAA-batterijen. Uw batterijen zouden zo’n 12 maanden mee
moeten gaan, afhankelijk van het gebruik. Als u het product vaak gebruikt, raden wij
u lithiumbatterijen aan vanwege de langere levensduur. De batterijen bevinden zich
in een afgesloten ruimte en mogen niet nat worden. Als het product in een vochtige
ruimte is geïnstalleerd, dient u de batterijen om de zes maanden te controleren om er
zeker van te zijn dat ze niet vochtig worden of roesten.
PRODUCTBEPERKINGEN
Dit product is getest en werkt met een zeer grote verscheidenheid aan dataprojectors,
LCD- en plasmaschermen. Sommige displayproducten maken gebruik van andere
IR-codes. Daarom kunnen wij niet garanderen dat deze bedieningsmodule met alle
beschikbare displayproducten zal werken. Veel gemotoriseerde projectieschermen
gebruiken andere codes en werken daarom niet met dit product.
Modular Buttons Included
1.
2.
3.
4.
5.
6.
7.
8.
9.
VERPAKKING
VOLUME-knop
PC / VIDEO-knop
POWER-knop
PC1/2 / VID1/2-knop
AAN / UIT-knop
BRON-paneel
LEEG paneel
PC2 / VID2 knop
PC1 / VID1 knop
Bewaar al het verpakkingsmateriaal. Dit is belangrijk wanneer u het apparaat ter
reparatie moet vervoeren.
ALS HET APPARAAT NIET IN DE ORIGINELE VERPAKKING AAN HET
SERVICECENTRE WORDT GERETOURNEERD, VALT EVENTUELE TIJDENS HET
VERVOER ONTSTANE SCHADE BUITEN DE GARANTIE.
20
Nederlands
VOOR- EN ACHTERKANT BEDIENINGSPANEEL
1. Functieknop
2. IR-blasteroutput
3. IR-ontvanger
4. Leermodus-LED (rood)
5. Leerbevestigings-LED (groen)
6. Leermodusknop
7. Keuzeschakelaar single/dual code
(alleen van toepassing op de
middelste knoppen)
8. IR-blaster (ook wel zender genoemd)
21
Nederlands
BEDRIJFSINSTRUCTIES
De Techconnect IR-bedieningsmodule is ontworpen om de functie van de IR-afstandsbediening
van uw projector of platte beeldscherm na te bootsen. Met de Techconnect bedieningsmodule
biedt u gebruikers een gestandaardiseerde manier om hun apparatuur te bedienen, zodat de
originele afstandsbediening veilig kan worden opgeborgen.
1. VERWIJDER HET VOORPANEEL VAN DE KAST Verwijder het voorpaneel voorzichtig van de
kast. Het voorpaneel wordt met klemmen aan beide voorzijden vastgehouden.
2. LAAD KNOPPEN Het voorpaneel is voorgeladen met een standaardconfiguratie van
knoppen. Om het apparaat met uw projector te laten werken, dient u de knoppen te
wijzigen. Bijvoorbeeld, als de afstandsbediening waarvan u de functies aan het leren
bent afzonderlijke aan- en uitknoppen heeft, dient u die knoppenset in de Techconnect
bedieningsmodule te gebruiken. Dit geldt ook voor de bronselectieknoppen. Sommige
projectorafstandsbedieningen werken met een enkelvoudige toggle om inputs te selecteren,
terwijl andere afstandsbedieningen meer knoppen hebben. Als uw projectorafstandsbediening
vier verschillende knoppen voor elke input heeft (bv. PC1, PC2, Video, S-Video), dient u de
‚PC1/2 / VID1/2‘-knoppenset midden in het voorpaneel te installeren. Bevestig het voorpaneel
weer op de kast.
3. SELECTEER DUAL OF SINGLE COMMAND VOOR DE MIDDELSTE KNOPPEN
Met de ‘Single/Dual Command’-schakelaar aan de achterkant kunt u selecteren of
de middelste knoppen elk één code of elk twee discrete codes moeten leren. Als uw
projectorafstandsbediening vier afzonderlijke knoppen heeft voor elke input, dient u de
schakelaar op ‘Dual’ te zetten. In alle overige gevallen hoeven de middelste knoppen maar één
code te leren, dus dan dient u de schakelaar op ‘Single’ te zetten.
4. LEER CODES VAN DE ORIGINELE AFSTANDSBEDIENING Volg de volgende eenvoudige
stappen om elke knop te programmeren. In dit voorbeeld zullen we de power-knop
programmeren. Voor u begint, dient u te controleren of de batterijen zijn geïnstalleerd door op
een knop op het voorpaneel te drukken - u hoort een ‚biep‘.
a)Druk op de ‚Leren‘-knop op de achterkant. Het rode LED-lampje zal gaan branden.
b)Druk op de knop op het voorpaneel waaraan u de code wilt toekennen - in dit voorbeeld
is dat de power-knop.
c) Richt de originele afstandsbediening op de ‘IR Input’-ontvanger aan de achterkant
van de module. Houd de power-knop op de afstandsbediening ingedrukt totdat het
groene bevestigingslampje aan de achterkant van de module kort oplicht. Dit duurt over
het algemeen 1-2 seconden.
22
Nederlands
1. Originele afstandsbediening
2. IR Input-ontvanger
Het Techconnect bedieningspaneel heeft die code nu aan de knop toegekend en staat niet
langer in de leermodus. Herhaal alle stappen, inclusief stap (a), om de andere knoppen te
programmeren. Opmerking: als u een van de middelste knoppen aan het programmeren
bent in dual command-modus, blijft de knop in leermodus nadat u de eerste code heeft
geprogrammeerd. Druk vervolgens op de tweede commandoknop op de originele
afstandsbediening. De tweede code zal aan dezelfde middelste knop worden toegekend en de
module zal de leermodus verlaten.
Houd de afstandsbediening in een hoek van 90 graden met de ontvanger, zoals hierboven is
weergegeven. De optimale leerafstand is 30-50mm.
1. Onjuiste hoek
2. Te dichtbij
5. INSTALLEER DE BEDIENINGSMODULE IN
DE TECHCONNECT FRONTPLAAT Nadat
u de IR-codes in de bedieningsmodule heeft
ingevoerd, installeert u de module in de
Techconnect frontplaat, sluit de IR-blasterkabel
(meegeleverd) aan en leidt deze naar de
projector.
6. BEVESTIG DE IR-BLASTER AAN DE PROJECTOR De Techconnect bedieningsmodule
is voorzien van een krachtige IR-zender met een 10m kabel. Deze kabel kan eenvoudig
worden ingekort of verlengd met het Phoenix connectoruiteinde dat in de bedieningsmodule
is geïnstalleerd. De IR-zender dient op of vlakbij de IR-ontvanger op de projector te worden
geplaatst, zoals hieronder is weergegeven. Optie (1) is de effectiefste, omdat het IR-signaal
kan worden afgezwakt door direct zonlicht of fluorescerende lampen.
A.Projector
1. Bevestigd op de IR-ontvanger, in de
projector ingebouwd
2. Vlakbij de IR-ontvanger geplaatst
3. Bevestigd aan een muur recht
tegenover de IR-ontvanger
23
Nederlands
SPECIFICATIES
• Afmetingen: 71 x 42 x 40mm
• Gewicht: 63g
• Kleur: Wit
Opmerking: Omdat wij onze producten altijd
willen verbeteren, kunnen wij bovenstaande
gegevens zonder voorafgaande waarschwing wijzigen.
BIJGESLOTEN ACCESSOIRES
9
1
1
1
2
x
x
x
x
x
Verwisselbare knoppensets
Single-Gang Techconnect Backbox
Single-Gang Techconnect Surround
IR-blaster met 10m kabel
AAA-batterijen
PROBLEMENOPLOSSER
Als uw systeem niet naar behoren werkt, dient u de volgende informatie te raadplegen. Als het
probleem blijft bestaan, dient u het apparaat direct van de stroom te halen en contact op te
nemen met uw audiovisuele handelaar.
Probleem
Oplossing
Geen geluid wanneer de voorste
knoppen worden ingedrukt
Vervang de batterijen.
Module accepteert de code niet
Zorg ervoor dat de originele afstandsbediening
zich op 30-50mm afstand van de ontvanger aan de
achterkant van de module bevindt, in een hoek van
90 graden.
Zorg ervoor dat de originele afstandsbediening
nieuwe batterijen heeft.
Houd bij het programmeren de knop op de originele
afstandsbediening net zolang ingedrukt totdat de
groene LED-lampjes op de module beginnen te
branden.
Module accepteert de code en geeft
een geluid af maar werkt niet met de
projector
Programmeer de knoppen opnieuw.
Herplaats de IR-blaster.
Controleer of de kabel van de IR-blaster niet
beschadigd is tijdens de installatie.
GARANTIE
Dit product heeft een teruggeefgarantie van 2 jaar beginnend op de dag van aankoop.
Deze garantie is alleen geldig voor de koper en kan niet worden overgedragen.
Om enige twijfel te voorkomen, zal deze informatie niet voorkomen op de informatie van de aangewezen nationale
distributeur op het verkooppunt.
Als het product kapot blijkt te zijn en niet meer gerepareerd kan worden, heeft u 21 dagen vanaf de dag van aankoop de
tijd om de nationale distributeur via uw audiovisuele handelaar op de hoogte te stellen.
De aansprakelijkheid van de fabrikant en diens aangewezen servicebedrijf is beperkt tot de reparatiekosten en/of
vervanging van het gebreken vertonende deel waarvoor deze garantie geldt, behalve in geval van overlijden of letsel
(EU85/374/EEC).
Deze garantie beschermt u tegen:
• Fouten in de onderdelen.
• Wanneer het product beschadigd uit de verpakking komt, dient dit binnen 24 uur na aankoop te worden gemeld.
Indien u toch een probleem met dit product ondervindt, dient u contact op te nemen met de audiovisuele verkoper bij wie u
dit product kocht.
De koper is verantwoordelijk voor het transport van het product naar het reparerende servic centre aangewezen door de
fabrikant.
We proberen de gerepareerde onderdelen binnen 5 werkdagen terug te sturen. Dit is echter niet altijd mogelijk. In zo’n
geval sturen wij het gerepareerde onderdeel zo snel als de praktijk dat toelaat terug.
Overeenkomstig onze WEEE-verplichtingen probeert de fabrikant foutieve onderdelen van het product in plaats van het
hele product te vervangen.
Deze garantie is ongeldig bij gebreken veroorzaakt door misbruik, verkeerd gebruik of incorrecte installatie die
veroorzaakt kunnen zijn door het niet nakomen van de richtlijnen in deze handleiding.
24
DeutschE
BENUTZERHANDBUCH FÜR DAS IR-STEUERMODUL VON
TECHCONNECT
Herzlichen Glückwunsch zu Ihrer Wahl der
Vision Techconnect IR-Steuermodul von. Um
die beste Leistung zu erzielen, sollten Sie diese
Bedienungsanleitung lesen und das Produkt nur
entsprechend den Anweisungen verwenden.
Eine elektronische Ausgabe dieses Handbuchs
sowie weitere Informationen finden Sie unter
www.visionaudiovisual.com.
KONFORMITÄT
Das in diesem Besitzerhandbuch
beschriebene Produkt stimmt mit
den Normen zur Beschränkung der
Verwendung bestimmter gefährlicher
Stoffe in Elektro- und Elektronikgeräten
(RoHS) (EU-Richtlinie 2002/95/EC) und
den WEEE (EU-Richtlinie 2002/96/EC)
überein. Zertifikate sowie SGS-Berichte
sind auf Anfrage erhältlich. Dieses Produkt
sollte am Ende seiner Gebrauchsdauer an
den Ort des Kaufs zur Wiederverwertung
zurückgebracht werden.
WEE/AB0047SY
WARNUNG
Vorsicht
Stromschlag-Gefahr
Nicht öffnen
VORSICHT: UM STROMSCHLÄGE ZU VERMEIDEN, GEHÄUSE (UND RÜCKSEITE) NICHT ÖFFNEN. ENTHÄLT KEINE VOM
BENUTZER ZU WARTENDEN TEILE. WARTUNG DURCH QUALIFIZIERTES FACHPERSONAL DURCHFÜHREN LASSEN.
Der Blitz mit dem Pfeilkopf im gleichseitigen
Dreieck soll den Benutzer auf „gefährliche
Spannung” durch nicht isolierte Teile im
Gehäuseinneren hinweisen. Diese kann so groß
sein, dass bei Stromschlag eine Gefahr für
Personen besteht.
Das Ausrufungszeichen im gleichseitigen
Dreieck soll den Benutzer auf wichtige
Bedienungs- und Wartungsanweisungen
in der dem Gerät beiliegenden
Bedienungsanleitung aufmerksam machen.
25
DeutschE
AUFSTELLUNGSORT
Vermeiden Sie, das Gerät unter folgenden Umgebungsbedingungen aufzustellen:
• Feuchte oder nasse Orte
• Orte, die direktem Sonnenlicht ausgesetzt sind oder sich in der Nähe von
Heizkörpern befinden
• Extrem kalte Orte
• Staubige Orte oder solche, die starken Vibrationen ausgesetzt sind
• Schlecht belüftete Orte
BATTERIELEBENSDAUER
Für dieses Gerät sind zwei Batterien vom Typ AAA zu verwenden. Je nach Nutzung
kann die Lebensdauer der Batterien etwa ein Jahr betragen. Falls Sie das Gerät
häufig nutzen, empfehlen wir zur Verlängerung der Lebensdauer Lithiumbatterien. Die
Batterien befinden sich in einem verschlossenen Fach und müssen trocken bleiben.
Falls das Gerät in einer feuchten Umgebung aufgestellt wird, sollten Sie alle sechs
Monate die Batterien überprüfen und sicherstellen, dass sie nicht feucht werden oder
rosten.
EINSCHRÄNKUNGEN DER GERÄTENUTZUNG
Dieses Gerät wurde erfolgreich bei einer sehr großen Vielzahl von Datenprojektoren,
LCD-Bildschirmen und Plasma-Bildschirmen getestet. Einige Anzeigegeräte verwenden
andere IR-Codierungen. Wir können daher nicht garantieren, dass dieses Steuermodul
alle erhältlichen Anzeigegeräte steuern kann. Viele motorbetriebene Leinwände
arbeiten mit einer anderen Codierung und können daher ebenso wenig mit diesem
Gerät gesteuert werden.
MODULAR BUTTONS INCLUDED
1.
2.
3.
4.
5.
6.
7.
8.
8.
VERPACKUNG
LAUTSTÄRKE-Taste
PC /VIDEO-Taste
AN-/AUS-Taste
PC1/2 / VID1/2-Taste
AN- und AUS-Taste
Eingangswahltaste
FREIES Feld
PC2 / VID2-Taste
PC1 / VID1-Taste
Heben Sie alle Verpackungsmaterialien auf. Sie werden zum Versand des Gerätes
im Reparaturfall gebraucht. FALLS ZUR RÜCKSENDUNG DES GERÄTES AN DEN
KUNDENDIENST NICHT DIE ORIGINALVERPACKUNG VERWENDET WIRD, SIND
ETWAIGE TRANSPORTSCHÄDEN NICHT DURCH DIE GARANTIE ABGEDECKT
26
DeutschE
VORDERE UND RÜCKSEITIGE BEDIENFELDER
1. Funktionstaste
2. IR-Ausgang
3. IR-Empfänger
4. LED für Lernmodus (rot)
5. LED für Lernbestätigung (grün)
6. Taste für Lernmodus
7. Umschalter zum Festlegen, ob die
mittleren Tasten mit einem oder zwei
Codes programmiert werden sollen
(„SINGLE/ DUAL COMMAND“).
8. IR-Ausgang (Sender)
27
DeutschE
BEDIENUNGSANLEITUNG
Die IR-Steuerung von Techconnect übernimmt die Funktion der IR-Fernbedienung Ihres Projektors
oder Ihres Flachbildschirms. Die Techconnect Steuerung bietet Benutzern eine einheitliche
Bedienung ihrer Geräte. Die Original-Fernbedienung kann sicher verwahrt werden.
1.OBERE GEHÄUSESCHALE VON HINTEREM GEHÄUSE TRENNEN: Heben Sie sanft das
vordere Tastenfeld von dem hinteren Gehäuse ab. Das vordere Tastenfeld ist vorne an jeder Seite
mit Klemmen befestigt.
2.TASTEN BESTÜCKEN: Das vordere Eingabefeld ist mit einer üblichen Tastenbelegung
vorbestückt. Sie müssen die Tastenbelegung umbestücken, damit sie sich für den zu steuernden
Projektor eignet. Falls beispielsweise die Fernbedienung, von der gelernt wird, über getrennte
An- und Aus-Tasten verfügt, ist diese Anordnung auch in der Techconnect Steuerung zu wählen.
Dies gilt auch für die Tasten zur Auswahl der Signalquelle. Die Fernbedienungen einiger
Projektoren verfügen über eine einzige Drucktaste, über die man mit wiederholtem Tastendruck
zu den einzelnen Signalquellen umschaltet. Bei anderen Fernbedienungen werden hingegen
getrennte Tasten benutzt. Falls die Fernbedienung Ihres Projektors über vier getrennte Tasten
für jeden Eingang (z. B. PC1, PC2, Video, S-Video) verfügt, sollten Sie die Tastenanordnung
„PC1/2 / VID1/2“ im mittleren Teil des vorderen Tastenfeldes einsetzen. Bringen Sie das
vordere Tastenfeld wieder an das hintere Gehäuse an.
3.PROGRAMMIERUNG DER MITTLEREN TASTEN MIT EINEM ODER ZWEI IR-CODES
FESTLEGEN: Mit dem Schalter „SINGLE/DUAL COMMAND“ auf der Rückseite legen Sie fest,
ob die mittleren Tasten einen oder zwei IR-Codes lernen sollen. Falls die Fernbedienung Ihres
Projektors über vier getrennte Tasten für jeden Eingang verfügt, sollten Sie diese auf „DUAL“
stellen. In allen anderen Fällen brauchen die mittleren Tasten nur einen Code zu lernen. Die
Fernbedienung sollte also auf „SINGLE“ gestellt werden.
4.CODES VON DER ORGINAL-FERNBEDIENUNG LERNEN: Um jede Taste zu programmieren,
folgen Sie diesen einfachen Schritten. In diesem Beispiel programmieren wir den An-/AusSchalter. Bevor Sie beginnen, vergewissern Sie sich, ob die Batterien eingelegt sind. Dazu
können Sie eine beliebige Taste auf dem Tastenfeld drücken – Sie hören dann einen Piepton.
a)Drücken Sie die Taste „LEARN“ auf der Rückseite. Die rote LED beginnt zu leuchten und
bleibt an.
b)Drücken Sie die Taste auf dem vorderen Tastenfeld, welcher Sie den Code zuweisen
möchten - in diesem Fall ist es die An-/Aus-Taste.
c) Richten Sie die Original-Fernbedienung auf den IR-Empfänger („IR-INPUT“) auf der
Rückseite des Moduls. Drücken Sie die An-/Aus-Taste der Original-Fernbedienung und
halten Sie diese gedrückt, bis die grüne Bestätigungs-LED auf der Rückseite des Moduls
kurz aufleuchtet. Dies dauert üblicherweise 1 bis 2 Sekunden.
28
DeutschE
1. Original-Fernbedienung
2. IR-Empfänger
Die Techconnect Steuerung hat nun der Taste diesen Code zugewiesen und befindet sich nicht
mehr im Lernmodus. Wiederholen Sie alle Schritte einschließlich Schritt (a), um die weiteren
Tasten zu programmieren. Bitte beachten Sie: Falls Sie im „DUAL COMMAND“-Modus eine
der mittleren Tasten programmieren, bleibt die Steuerung nach der Übertragung des ersten
Codes im Lernmodus. Drücken Sie dann die zweite Steuertaste auf der Original-Fernbedienung.
Der zweite Code der Original-Fernbedienung wird der gleichen Taste des Steuermoduls
zugewiesen. Das Modul verlässt daraufhin den Lernmodus.
Halten Sie die Fernbedienung im Winkel von 90 Grad zum Empfänger, wie oben abgebildet.
Die optimale Entfernung zum Lernen beträgt 30 bis 50 mm.
1. Falscher Winkel
2. Zu nah
5. STEUERMODUL IN TECHCONNECT
BLENDE EINSETZEN: Nachdem das
Steuermodul die IR-Codes gelernt hat, setzen
Sie das Modul in die Techconnect Blende ein,
schließen Sie das Kabel des beigefügten IRSenders an und leiten Sie es zum Projektor.
6. IR-SENDER AN DEN PROJEKTOR ANBRINGEN: Ein leistungsfähiger IR-Sender gehört zum
Lieferumfang der Techconnect Steuerung. Er verfügt über ein Kabel von 10 Metern Länge.
Dieses Kabel kann einfach gekürzt oder verlängert werden. Dies erfolgt am Kabelende des
Phoenix Steckers, welcher in das Steuermodul gesteckt wird. Der IR-Sender sollte über dem
oder in der Nähe des IR-Empfängers platziert werden, wie unten abgebildet. Option (1) ist
am effektivsten, weil das IR-Signal durch direkte Sonneneinstrahlung oder Leuchtstoffröhren
überlagert werden kann.
A.Projektor
1. Angebracht an dem im Projektor
eingebauten IR-Empfänger
2. In der Nähe des IR-Empfängers
platziert
3. An einer Wand angebracht, die dem
IR-Empfänger unmittelbar
gegenüberliegt
29
DeutschE
SPEZIFIKATIONEN
MITGELIEFERTES ZUBEHÖR
• Abmessungen: 71 x 42 x 40 mm
• Gewicht: 63g
• Farbe: Weiß
Hinweis: Da wir unsere Produkte kontinuierlich
verbessern, können sich einige der obigen
Angaben ohne vorherige Mitteilung ändern.
9
1
1
1
2
austauschbare Tastensets
Techconnect Gehäuse
Techconnect Blende
IR-Sender mit einem 10 m langen Kabel
Batterien vom Typ AAA
FEHLERBEHEBUNG
Falls Ihre Anlage nicht ordnungsgemäß funktioniert, nehmen Sie bitte die folgenden Informationen
zu Hilfe. Falls das Problem sich nicht beheben lässt, Stromstecker ziehen und unverzüglich den
AV-Vertragshändler, bei dem der Verstärker gekauft wurde, kontaktieren.
Störung
Abhilfe
Es ist kein Ton hörbar, wenn die
vorderen Tasten gedrückt werden.
Tauschen Sie die Batterien aus.
Das Modul kann den Code nicht
lernen.
Vergewissern Sie sich, ob sich die OriginalFernbedienung in 30 bis 50 mm Entfernung vom
Empfänger hinten am Modul befindet und im Winkel
von 90 Grad gehalten wird.
Stellen Sie sicher, dass die Original-Fernbedienung
über neue Batterien verfügt.
Drücken Sie die Taste der Original-Fernbedienung
im Lernmodus länger, bis die grüne LED am Modul
aufleuchtet.
Das Modul lernt den Code und
gibt einen Ton von sich, steuert den
Projektor jedoch nicht.
Programmieren Sie die Tasten erneut.
Stellen Sie den IR-Sender um.
Vergewissern Sie sich, dass das Kabel des IR-Senders
nicht beschädigt wurde, als es angeschlossen wurde.
GARANTIE
Dieses Produkt wird mit einer 2-jährigen Werksgarantie geliefert, die ab dem Kaufdatum gültig
ist. Diese Garantie gilt nur für den ursprünglichen Käufer und ist nicht übertragbar. Um Zweifel zu
beseitigen, ist dies den Informationen seitens des autorisierten nationalen Händlers am Verkaufsort zu
entnehmen. Falls das Produkt bereits beim Kauf defekt ist, ist innerhalb von 21 Tagen ab Kaufdatum der
nationale Vertragshändler über Ihren AV-Händler in Kenntnis zu setzen. Die Haftung des Herstellers und
seiner autorisierten Dienstleistungsgesellschaft ist auf die Kosten für die Reparatur und den Austausch
des fehlerhaften Geräts, für das Garantie besteht, beschränkt, mit Ausnahme des Todes oder einer
Verletzung (EU85/374/EEC).
Diese Haftung schützt Sie gegen Folgendes:
• Ausfall jeglicher Bauteile.
• Beschädigung, wenn das Gerät erstmalig der Verpackung entnommen wird, vorausgesetzt, dies wird
innerhalb von 24 Stunden nach dem Kauf gemeldet.
Falls Probleme mit diesem Produkt vorliegen, sollten Sie sich an den Gerätehändler, bei welchem
Sie dieses Produkt erstanden haben, wenden. Der ursprüngliche Käufer ist für die Versendung des
Produktes an den vom Hersteller genannten Reparaturdienst zuständig. Wir streben an, Reparatur und
Versand der Geräte innerhalb von 5 Arbeitstagen abzuwickeln. Dies ist jedoch nicht immer möglich.
In solchen Fällen wird das Gerät so schnell wie möglich zurückgesandt. In Übereinstimmung mit den
WEEE-Verpflichtungen strebt der Hersteller an, die fehlerhaften Teile des Produkts auszutauschen, anstatt
das gesamte Gerät zu ersetzen.
Diese Garantie schützt das Produkt nicht bei Fehlern durch Missbrauch, falsche Installation bzw.
unregelmäßige oder fehlerhafte Stromzufuhr, welche auf Nichtbeachten der Richtlinien dieser Anleitung
zurückzuführen sein könnten.
30
Italiano
MODULO DI CONTROLLO A RAGGI INFRAROSSI TECHCONNECT: ISTRUZIONI PER
L’USO
Congratulazioni per aver scelto
Techconnect Modulo di Controllo a
Raggi Infrarossi di Vision. Per ottenere
la migliore prestazione, leggere questo
manuale e usare il prodotto secondo le
istruzioni. E’ possibile trovare una versione
elettronica di questo manuale e
ulteriori informazioni su
www.visionaudiovisual.com
CONFORMITA’
Il prodotto descritto in questo manuale è
conforme agli standard RoHS (direttiva
UE 2002/95/CE) e WEEE (direttiva UE
2002/96/CE).
Certificazioni comprendenti rapporti SGS
sono disponibili su richiesta. Al termine
della sua vita utile, questo prodotto
dovrebbe essere restituito al venditore
per il riciclaggio.
WEE/AB0047SY
AVVERTENZE
Attenzione
Pericolo di scossa elettrica
Non aprire
ATTENZIONE: PER RIDURRE IL PERICOLO DI SCOSSA ELETTRICA, NON TOGLIERE IL COPERCHIO (O IL PANNELLO
POSTERIORE). NON CONTIENE PARTI RIPARABILI DALL’UTENTE; RIVOLGERSI A PERSONALE TECNICO QUALIFICATO.
Il simbolo del fulmine con la punta a freccia
all’interno di un triangolo equilatero ha la
funzione di mettere in guardia l’utente sulla
presenza, all’interno del contenitore del prodotto,
di “tensioni pericolose” non isolate di entità
sufficiente da rappresentare un pericolo di
scosse elettriche per le persone.
Il punto esclamativo all’interno di un triangolo
equilatero ha la funzione di richiamare
l’attenzione dell’utente sulla presenza di
importanti istruzioni relative al funzionamento
e alla manutenzione nell’opuscolo fornito a
corredo dell’apparecchio (assistenza tecnica).
31
Italiano
LUOGO DI INSTALLAZIONE
Evitare di installare l’unità in:
• Luoghi bagnati o umidi
• Luoghi esposti alla luce solare diretta o vicino a fonti di calore
• Luoghi estremamente freddi
• Luoghi soggetti a vibrazioni eccessive o polvere
• Luoghi poco ventilati
DURATA DELLA BATTERIA
Usare 2 batterie di tipo AAA. Le batterie durano in genere circa 12 mesi a seconda
della frequenza di utilizzo. In caso di uso intenso, per una maggiore durata si
consiglia di utilizzare batterie al litio. Le batterie sono alloggiate in un vano a
chiusura ermetica e devono essere restare sempre asciutte. In caso di installazione
del modulo in ambiente umido controllare le batterie ogni sei mesi per verificare che
non siano inumidite o intaccate dalla ruggine.
LIMITI DI UTILIZZO DEL PRODOTTO
Questo modulo è stato sottoposto a test ed è compatibile con una vasta gamma
di proiettori di dati, monitor LCD e schermi al plasma. Alcuni display utilizzano
standard diversi per i codici IR, pertanto non si garantisce che questo modulo sia
in grado di controllare tutti i display disponibili sul mercato. Molti schermi per
proiettori motorizzati utilizzano codici diversi, pertanto questo modulo non è in
grado di controllarli.
MODULAR BUTTONS INCLUDED
1.
2.
3.
4.
5.
6.
7.
8.
9.
IMBALLAGGIO
Tasto VOLUME
Tasto PC/VIDEO
Tasto POWER
Tasto PC1/2 - VID1/2
Tasto ON/OFF
Pannello SOURCE
Pannello VUOTO
Tasto PC2 - VID2
Tasto PC1 - VID1
Conservare tutto il materiale di imballaggio. E’ fondamentale per la spedizione in
caso di riparazione dell’unità.
IN CASO DI MANCATO UTILIZZO DELL’IMBALLAGGIO ORIGINALE PER LA
RESTITUZIONE DELL’UNITA’ AL CENTRO ASSISTENZA, I DANNI VERIFICATISI
DURANTE IL VIAGGIO NON SARANNO COPERTI DA GARANZIA.
32
Italiano
PANNELLI DI COMANDO ANTERIORE E POSTERIORE
1. Tasto funzione
2. Uscita IR blaster
3. Ricevitore IR
4. LED (rosso) modalità di apprendimento
5. LED (verde) conferma apprendimento
6. Tasto modalità di apprendimento
7. Selettore comando singolo/doppio
(ha effetto solo sui tasti centrali)
8. IR blaster (noto anche come emettitore)
33
Italiano
ISTRUZIONI PER IL FUNZIONAMENTO
Il Modulo di controllo a raggi infrarossi Techconnect è studiato per riprodurre le funzioni dei
telecomandi a raggi infrarossi di proiettori e monitor a schermo piatto. Il Modulo di controllo
Techconnect permette di controllare in modo standardizzato i propri apparecchi e custodire in
un luogo sicuro i telecomandi originali.
1. STACCARE IL PANNELLO FRONTALE DALLA PARTE POSTERIORE Staccare con delicatezza
il pannello frontale dal telaio posteriore. Il pannello frontale è fissato tramite clip poste su ogni
lato in direzione della parte anteriore.
2. APPLICARE I TASTI Sul pannello frontale è stata preapplicata una configurazione di tasti
convenzionale. Sarà necessario modificare i tasti per adattarli al proiettore da controllare. Ad
esempio se il telecomando originale dispone di tasti ON e OFF distinti, sul Modulo di controllo
Techconnect si dovrà utilizzare lo stesso set di tasti. Lo stesso vale per i tasti di selezione della
sorgente: alcuni telecomandi per proiettori sono dotati di un unico interruttore per selezionare
gli ingressi, altri ne possiedono più di uno. Se il telecomando del proiettore in uso dispone di
quattro tasti distinti, uno per ogni ingresso (ad es. PC1, PC2, Video, S-Video), sarà necessario
installare il set di tasti “PC1/2 - VID1/2” al centro del pannello frontale. Fissare nuovamente il
pannello frontale al telaio posteriore.
3. SELEZIONARE IL COMANDO DOPPIO O SINGOLO PER I TASTI CENTRALI L’interruttore
“Single/Dual Command” posto sul retro permette di stabilire se i tasti centrali debbano
acquisire un codice ciascuno o due codici distinti ciascuno. Se il telecomando del proiettore in
uso dispone di un tasto distinto per ogni ingresso impostare il comando su “Dual”. In tutti gli
altri casi è sufficiente che i tasti centrali apprendano un codice ciascuno, pertanto impostare il
comando su “Single”.
4. APPRENDERE I CODICI DAL TELECOMANDO ORIGINALE Per programmare ciascun tasto
eseguire le semplici operazioni descritte di seguito. In questo esempio sarà programmato
il tasto Power. Prima di iniziare accertarsi che le batterie siano installate premendo uno
qualunque dei tasti presenti sul pannello frontale. Si udirà un segnale acustico
a)Premere il tasto “Learn” posto sul retro. Il LED rosso si illuminerà e resterà acceso.
b)Premere il tasto del pannello frontale cui si desidera assegnare il codice, in questo
esempio il tasto Power.
c)Puntare il telecomando originale verso il ricevitore “IR Input” posto sul retro del modulo.
Tenere premuto il tasto Power del telecomando finché il LED verde di conferma sul retro
del modulo non si illumina brevemente. Generalmente occorrono 1-2 secondi.
34
Italiano
1. Telecomando originale
2. Ricevitore IR Input
A questo punto il Modulo di controllo Techconnect ha assegnato il codice al tasto e non
è più in modalità di apprendimento. Ripetere tutte le operazioni, incluso il punto (a), per
programmare gli altri tasti. Nota: qualora si stia programmando uno dei tasti centrali nella
modalità comando doppio, dopo aver acquisito il primo codice il modulo rimarrà nella
modalità di apprendimento; a questo punto premere il secondo comando sul telecomando
originale. Il secondo codice sarà assegnato allo stesso tasto centrale e il modulo uscirà dalla
modalità di apprendimento.
Tenere il telecomando con un’angolazione di 90 gradi rispetto al ricevitore, come illustrato
sopra. La distanza di apprendimento ottimale è di 30-50 mm.
1. Angolazione errata
2. Distanza troppo ridotta
5. INSTALLARE IL MODULO DI CONTROLLO
NELLA PIASTRA FRONTALE TECHCONNECT
Una volta appresi i codici IR, installare il
modulo nella piastra frontale Techconnect,
collegare il cavo dell’IR blaster (in dotazione)
e condurlo al proiettore.
6. COLLEGARE L’IR BLASTER AL PROIETTORE Con il Modulo di controllo Techconnect è incluso
un potente emettitore IR collegato a un cavo di 10 m. Questo cavo può essere facilmente
accorciato o allungato dall’estremità con connettore Phoenix da inserire nel modulo di
controllo. L’emettitore IR deve essere posizionato sopra o vicino al ricevitore IR del proiettore,
come illustrato sotto. L’opzione (1) è la più efficace in quanto il segnale IR potrebbe essere
indebolito dalla luce solare diretta o da lampade fluorescenti.
A.Proiettore
1. Fissato al ricevitore IR integrato
nel proiettore
2. Posizionato vicino al ricevitore IR
3. Fissato al muro direttamente di
fronte al ricevitore IR
35
Italiano
SPECIFICHE
• Dimensioni: 71 x 42 x 40mm
• Peso: 63g
• Colore: Bianco
Nota: Ci impegniamo a migliorare i nostri
prodotti, pertanto i dati di cui sopra possono
subire variazioni senza preavviso.
ACCESSORI IN DOTAZIONE
9 x set di tasti intercambiabili
1 x scatola posteriore Techconnect ad
accoppiamento singolo
1 x sistema surround Techconnect ad
accoppiamento singolo
1 x IR blaster con cavo da 10 m
2 x batterie AAA
RICERCA ED_ELIMINAZIONE GUASTI
In caso di malfunzionamento del sistema, consultare le seguenti informazioni.
Se il problema persiste, staccare dalla presa di corrente e contattare immediatamente il proprio
rivenditore di AV.
Problema
Soluzione
Premendo i tasti frontali non viene
emesso alcun suono
Sostituire le batterie.
Il modulo non riesce ad apprendere
il codice
Assicurarsi che il telecomando originale sia a una
distanza di 30-50 mm dal ricevitore posto sul retro
del modulo e a un’angolazione di 90 gradi.
Assicurarsi che nel telecomando originale siano
presenti batterie cariche
Durante la fase di apprendimento tenere premuto il
tasto del telecomando originale più a lungo finché il
LED verde sul modulo non si illumina.
Il modulo apprende il codice ed
emette un suono, ma non è in grado
di controllare il proiettore
Riprogrammare i tasti.
Riposizionare l’IR blaster.
Controllare il cavo dell’IR blaster per assicurarsi che
non abbia subito danni durante l’installazione.
GARANZIA
Questo prodotto è dotato di una garanzia return to base di 2 anni, valida dalla data di acquisto.
Questa garanzia è valida solo per il primo acquirente e non è trasferibile. Allo scopo di evitare
qualsiasi dubbio, questi è colui che risulta dalle informazioni raccolte presso il punto vendita dal
distributore nazionale assegnato.
Se il prodotto è DOA (dead on arrival: non funzionante alla consegna), l’acquirente ha a disposizione
21 giorni dalla data di acquisto per informare il distributore nazionale tramite il proprio rivenditore
di AV. La responsabilità del produttore e della società di assistenza assegnata è limitata al costo della
riparazione e/o della sostituzione dell’unità difettosa in garanzia, salvo i casi di morte o lesione
(UE 85/374/CEE).
Questa garanzia tutela l’utente contro quanto segue:
• Il guasto di qualsiasi componente.
• I danni riscontrati quando il prodotto è disimballato per la prima volta, se segnalati entro 24 ore
dall’acquisto.
Qualora si ritenga di avere un problema con questo prodotto, contattare il rivenditore di AV presso cui
è stato effettuato l’acquisto. Il primo acquirente è responsabile della spedizione del prodotto al centro
assistenza del produttore per la riparazione.
Sarà compiuto ogni sforzo per restituire le unità riparate entro 5 giorni lavorativi, se ciò non fosse
possibile la restituzione avverrà al più presto. In conformità con gli obblighi imposti dalla direttiva
WEEE, il produttore farà il possibile per sostituire le parti difettose del prodotto invece di sostituire
l’intera unità. Questa garanzia non protegge il prodotto contro i guasti provocati da abuso, uso
improprio, installazione non corretta o alimentazione di corrente instabile o difettosa, che possano
essere causati dalla mancata conoscenza delle linee guida riportate in questo manuale.
36
POLSKI
MODUŁ STERUJĄCY TECHCONNECT IR CONTROL:
INSTRUKCJA OBSŁUGI
Gratulujemy wyboru modułu sterującego
Vision Techconnect. Aby móc w pełni
wykorzystać możliwości tego produktu,
należy koniecznie przeczytać niniejszą
instrukcję obsługi i używać go wyłącznie
zgodnie z zawartymi w niej zaleceniami.
Elektroniczna wersja tej instrukcji i inne
informacje są dostępne pod adresem
www.visionaudiovisual.com
ZGODNOŚĆ
Produkt opisany w tej instrukcji spełnia
normy określone dyrektywami RoHS
(2002/95/WE) i WEEE (2002/96/WE).
Na żądanie są dostępne odnośne
certyfikaty, w tym również raporty SGS.
Zużyty lub niezdatny do dalszego
użytkowania produkt należy zwrócić
w miejscu jego zakupu w celu poddania
go utylizacji.
WEE/AB0047SY
OSTRZEŻENIA
37
POLSKI
WYBÓR MIEJSCA INSTALACJI
Nie instaluj urządzenia:
• w miejscach mokrych lub wilgotnych,
• w miejscach wystawionych na bezpośrednie działanie promieni słonecznych ani
w pobliżu urządzeń grzewczych,
• w miejscach o bardzo niskiej temperaturze,
• w miejscach, w których byłoby poddawane nadmiernym wibracjom lub silnemu zapyleniu,
• w miejscach mało przewiewnych.
ŻYWOTNOŚĆ BATERII
Produkt jest zasilany 2 szt. baterii typu AAA. W zależności od intensywności korzystania
z urządzenia, zestaw nowych baterii powinien wystarczyć na ok. 12 miesięcy.
W przypadku intensywnej eksploatacji, zaleca się użycie baterii litowych, charakteryzujących
się większą trwałością. Baterie instaluje się w szczelnej komorze i należy dbać, aby nie
uległy zawilgoceniu. W przypadku zainstalowania produktu w otoczeniu o wysokiej
wilgotności, należy raz na sześć miesięcy otwierać komorę baterii i sprawdzać, czy
baterie nie zwilgotniały i nie zaczęły rdzewieć.
OGRANICZENIA PRODUKTU
Niniejszy produkt wypróbowano w praktyce z wieloma różnymi projektorami
multimedialnymi, wyświetlaczami LCD i ekranami plazmowymi. Niektóre urządzenia
tego typu działają jednak w oparciu o inne standardy kodów sygnalizacji w podczerwieni,
niż zastosowane w tym module sterującym, producent nie gwarantuje więc, że będzie
on działać ze wszystkimi dostępnymi na rynku urządzeniami wyświetlającymi. Wiele
zmechanizowanych ekranów projekcyjnych korzysta z innych kodów podczerwieni,
niż obsługiwane przez niniejszy produkt, i nie umożliwia on sterowania nimi.
MODUŁY PRZYCISKÓW W ZESTAWIE
OPAKOWANIE
1. Przycisk VOLUME (Głośność)
2. Przycisk PC/VIDEO
(Sygnał z komputera/
sprzętu wideo)
3. Przycisk POWER (Zasilanie)
4. Przycisk PC1/2/ VID1/2
5. Przycisk ON/OFF (Włącz/wyłącz)
6. Panel SOURCE
(Źródło sygnału)
7. Panel BLANK (Zaślepka)
8. Przycisk PC2 / VID2
9. Przycisk PC1 / VID1
Należy zachować wszystkie materiały, jakie zostały fabrycznie użyte do opakowania
produktu. Będą one potrzebne w przypadku, gdyby wymagał on kiedykolwiek
przesłania do naprawy.
GWARANCJA NIE OBEJMUJE USZKODZEŃ PRODUKTU POWSTAŁYCH W
TRANSPORCIE, JEŻELI W CELU JEGO PRZESŁANIA DO CENTRUM SERWISOWEGO
UŻYTO INNEGO OPAKOWANIA NIŻ ORYGINALNE.
38
1.
2.
3.
4.
Przycisk sterujący
Wyjście do nadajnika podczerwieni
Odbiornik podczerwieni
Wskaźnik LED trybu uczenia się
(czerwony)
POLSKI
PRZEDNI I TYLNY PANEL OBUDOWY
5. Wskaźnik LED potwierdzania
w trybie uczenia się (zielony)
6. Przycisk trybu uczenia się
7. Selektor kodów pojedynczych/
podwójnych (dotyczy tylko
środkowych przycisków)
8. Nadajnik podczerwieni
39
POLSKI
INSTRUKCJA OBSŁUGI
Przeznaczeniem modułu sterującego Techconnect IR Control jest zastąpienie oryginalnego, działającego
w podczerwieni pilota, fabrycznie załączonego do projektora lub wyświetlacza. Dzięki modułowi
Techconnect Control użytkownik tego rodzaju urządzenia wyświetlającego zyskuje możliwość obsługi
standardowych funkcji projektora lub wyświetlacza bez korzystania z oryginalnego pilota, który można
w rezultacie schować w bezpiecznym miejscu, nie ryzykując jego zniszczenia bądź utraty.
1. ODDZIEL PRZEDNI PANEL OD TYLNEJ CZĘŚCI OBUDOWY Delikatnie oddziel przedni panel od tylnej
części obudowy. Jest on przytrzymywany jedynie za pomocą znajdujących się na jego bokach zatrzasków.
2. WŁÓŻ PRZYCISKI W przednim panelu modułu fabrycznie zainstalowano zestaw najczęściej używanych
przycisków. W razie potrzeby, wymień je na zestawy przycisków odpowiednie dla projektora, który ma
być obsługiwany przez moduł. Na przykład, jeżeli pilot projektora, którego funkcji ma „nauczyć się”
moduł sterujący, zawiera osobne przyciski ON (włącz) i OFF (wyłącz), należy umieścić takie przyciski
w panelu modułu Techconnect Control. Podobnie, piloty niektórych projektorów zawierają jeden przycisk
wyboru źródła sygnału wejściowego, przełączający cyklicznie między kolejnymi sygnałami, inne zaś
mają więcej przycisków, z których każdy jest przypisany do innego typu źródła sygnału. Jeżeli oryginalny
pilot projektora zawiera cztery osobne przyciski dla różnych źródeł sygnału (np. PC1, PC2, Video, S-Video),
w środkowej części przedniego panelu modułu należy zainstalować zestaw przycisków „PC1/2 / VID1/2”.
Gdy zakończysz instalowanie przycisków, z powrotem złóż przedni panel z tylną częścią obudowy.
3. WYBIERZ OBSŁUGĘ KODÓW POJEDYNCZYCH LUB PODWÓJNYCH PRZEZ ŚRODKOWE PRZYCISKI
Przełącznik „Single/Dual Command” na tylnym panelu modułu sterującego pozwala określić, czy każdy
z środkowych przycisków ma „nauczyć się” po jednym kodzie, czy po dwa różne kody. Jeżeli pilot
projektora zawiera cztery osobne przyciski, po jednym dla każdego rodzaju źródła sygnału wejściowego,
wybierz ustawienie „Dual Command”. We wszystkich innych przypadkach wystarczy, że dla każdego ze
środkowych przycisków zostanie zaprogramowany jeden kod, selektor ten należy więc ustawić w położeniu
„Single Command”.
4. NAUCZ MODUŁ KODÓW ORYGINALNEGO PILOTA Wykonaj opisane niżej, proste kroki, dla każdego
z przycisków modułu sterowania z osobna, w celu przypisania mu odpowiadającego mu kodu oryginalnego pilota. Dla przykładu, niżej przedstawiono procedurę zaprogramowania przycisku zasilania.
Przed jej rozpoczęciem upewnij się, że w module zainstalowano baterie; w tym celu naciśnij dowolny
przycisk na jego przednim panelu. Powinien dać się słyszeć krótki sygnał dźwiękowy.
a) Naciśnij znajdujący się na tylnym panelu modułu przycisk „Learn” (Nauka). Zacznie świecić czerwony wskaźnik LED.
b)Naciśnij na przednim panelu modułu przycisk, do którego zamierzasz przypisać kod sterujący wybranego przycisku oryginalnego pilota - w tym przykładzie, przycisk POWER (zasilanie).
c)Skieruj nadajnik podczerwieni oryginalnego pilota na odbiornik podczerwieni („IR Input”) na
tylnym panelu modułu. Naciśnij przycisk zasilania na pilocie i przytrzymaj go wciśniętego,
dopóki przez moment nie zaświeci zielony wskaźnik LED potwierdzenia na tylnym panelu.
Następuje to przeważnie po 1-2 sekundach.
40
POLSKI
1. Oryginalny pilot
2. Odbiornik podczerwieni
W rezultacie wykonania powyższej procedury, moduł Techconnect Control przypisał użyty kod
przycisku zasilania oryginalnego pilota do własnego przycisku POWER, po czym automatycznie
wyłączył tryb uczenia się. Aby zaprogramować pozostałe przyciski modułu, powtórz dla każdego
z nich wszystkie powyższe czynności, w tym krok (a). Uwaga: Przy programowaniu środkowych
przycisków panelu, jeżeli został dla nich ustawiony tryb podwójnego działania („Dual Command”),
po przypisaniu pierwszego kodu moduł nadal pozostanie w trybie uczenia się. Naciśnij wówczas
drugi przycisk oryginalnego pilota. Jego kod również zostanie przypisany temu samemu,
środkowemu przyciskowi modułu, i dopiero wtedy moduł wyłączy tryb uczenia się.
Programując przyciski modułu, trzymaj pilota prostopadle do odbiornika podczerwieni, jak na
powyższej ilustracji, najlepiej w odległości między 30 mm a 50 mm od niego.
1. Niewłaściwy kąt
2. Zbyt mała odległość
5. ZAINSTALUJ MODUŁ STERUJĄCY
W OPRAWIE TECHCONNECT
Zakończywszy programowanie przycisków
kodami podczerwieni, zainstaluj moduł
w oprawie Techconnect, podłącz przewód
nadajnika podczerwieni (w zestawie)
i doprowadź go do projektora.
6. PODŁĄCZ NADAJNIK PODCZERWIENI DO PROJEKTORA Do modułu sterującego Techconnect
Control fabrycznie załączono dużej mocy nadajnik podczerwieni, zainstalowany na końcu przewodu
o długości 10 m. Przewód ten można łatwo skrócić lub wydłużyć po stronie wtyku Phoenix,
służącego do podłączenia nadajnika do modułu sterującego. Sam nadajnik podczerwieni należy
umieścić na odbiorniku podczerwieni w obudowie projektora, lub w jego pobliżu, jak pokazano
na poniższej ilustracji. Najskuteczniejszym sposobem podłączenia jest wariant (1), gdyż uniemożliwia
on osłabienie sygnału podczerwonego przez bezpośrednie światło słoneczne lub oświetlenie
jarzeniowe.
A.Projektor
1.Nadajnik umieszczony na odbiorniku
podczerwieni na obudowie projektora
2.Nadajnik umieszczony w pobliżu
odbiornika podczerwieni
3.Nadajnik umieszczony na ścianie
dokładnie naprzeciwko odbiornika
podczerwieni
41
POLSKI
DANE TECHNICZNE
• Wymiary: 71 mm x 42 m x 40 mm
• Masa: 63 g
• Kolor: biały
Uwaga: Ponieważ stale doskonalimy nasze
produkty, powyższe informacje mogą bez
uprzedzenia ulec zmianie.
AKCESORIA W ZESTAWIE
9 x wymienny zestaw przycisków
1 x jednomodułowa tylna część oprawy Techconnect
1 x jednomodułowa przednia część oprawy Techconnect
1 x nadajnik podczerwieni z przewodem 10 m
2 x bateria AAA
ROZWIĄZYWANIE PROBLEMÓW TECHNICZNYCH
Jeżeli produkt nie działa prawidłowo, należy zapoznać się z poniższymi wskazówkami. W przypadku
niemożności usunięcia problemu, należy odłączyć go od źródła zasilania i niezwłocznie skontaktować się
ze sprzedawcą sprzętu audio-wideo, u którego został on nabyty.
Problem
Rozwiązanie
Brak dźwięku przy naciskaniu
przycisków na przednim panelu modułu
Wymień baterie.
Moduł nie uczy się programowanych
kodów.
Upewnij się, że trzymasz oryginalnego pilota w odległości od 30 do
50 mm od odbiornika w tylnym panelu modułu, pod kątem 90 stopni.
Sprawdź, czy oryginalny pilot ma zainstalowane świeże baterie.
Programując kody, przytrzymuj wciśnięty przycisk oryginalnego
pilota tak długo, dopóki nie zaświeci zielony wskaźnik LED
z tyłu modułu sterującego.
Moduł pomyślnie uczy się kodów
i wydaje dźwięki, ale projektor nie
reaguje.
GWARANCJA
Przeprogramuj przyciski modułu.
Zmień położenie nadajnika podczerwieni przy projektorze.
Sprawdź przewód nadajnika podczerwieni pod kątem jego
ewentualnego uszkodzenia w trakcie instalacji.
Niniejszy produkt jest objęty 2-letnią gwarancją typu Return to Base (naprawa w punkcie serwisowym), o okresie
biegnącym od daty zakupu. Gwarancja ta przysługuje tylko pierwszemu nabywcy i jest nieprzenośna. W celu
uniknięcia nieporozumień, tożsamość pierwszego nabywcy jest określana na podstawie ewidencji prowadzonej
przez wyznaczonego dystrybutora w kraju zakupu produktu. W przypadku nabycia niesprawnego produktu,
nabywca jest zobowiązany w ciągu 21 dni od daty zakupu powiadomić o tym fakcie dystrybutora krajowego
za pośrednictwem sprzedawcy detalicznego. Odpowiedzialność producenta i wyznaczonego przez niego dostawcy
usług serwisowych jest ograniczona do wysokości kosztu naprawy lub wymiany wadliwego produktu na
podstawie niniejszej gwarancji, za wyjątkiem przypadków poniesionej przez konsumenta śmierci lub obrażeń
(dyrektywa 85/374/EWG). Niniejsza gwarancja chroni nabywcę w zakresie:
•wadliwości dowolnej części produktu,
•uszkodzeń stwierdzonych przy pierwszym rozpakowaniu produktu, o ile zostaną one zgłoszone w ciągu
24 godzin od zakupu.
W przypadku jakichkolwiek problemów z produktem należy skontaktować się ze sprzedawcą sprzętu
audio-wideo, u którego został on nabyty. Początkowy nabywca jest odpowiedzialny za przesłanie produktu do
autoryzowanego przez producenta punktu serwisowego w celu dokonania naprawy.
Producent dołoży starań, aby naprawiony produkt został zwrócony w ciągu 5 dni roboczych, może to jednak
w niektórych przypadkach nie być wykonalne i jego zwrot nastąpi później, w najwcześniejszym możliwym terminie.
Dążąc do realizacji wytycznych dyrektywy WEEE, producent preferuje naprawę przez wymianę wadliwych
części produktu od wymiany całego urządzenia na nowe. Niniejsza gwarancja nie chroni konsumenta przed
wadami produktu, spowodowanymi świadomym lub nieświadomym użyciem produktu niezgodnie z przeznaczeniem, bądź nieprawidłowo przeprowadzoną instalacją. Wady takie mogą wyniknąć z niezastosowania się
do wytycznych zawartych w tej instrukcji.
42