Transcript
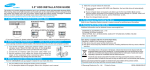
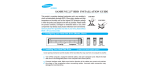
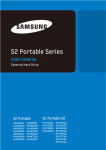
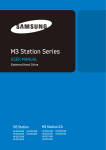
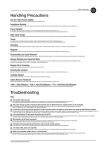
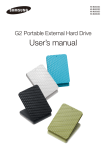
2. Making Computer Detect the New Device
3.5" Serial ATA HDD INSTALLATION GUIDE
This product is a precision designed mechanism and is very sensitive to shock and electrostatic discharge
(ESD). When storing, please avoid high temperature and humidity and use the origirnal ESD protection package
in which the product was shipped at the time of purchase. Please handle the product carefully. Damaged or
detached labels or any other components may directly cause product malfunction and void warranty.
Samsung does NOT guarantee any data on your drive, please always BACK - UP your precious data.
Run the CMOS(BIOS) set-up program to detect the new hard disk drive.
into CMOS screen during the booting of the computer.
1 Go For
descriptive details of the program, refer to the computer’s user’s manual
the computer detect the hard disk.
2 Make
If your computer supports IDE HDD Auto Detection, the hard disk drive will automatically be detected.
1
2
1. Installing the hard disk
NOTE : SATA 1.5Gb/s Speed Limit Jumper setting Only for SATA 3.0Gb/s products
In some rare cases SATA 1.5Gb/s hosts can not establish SATA interface connection with SATA 3.0Gb/s devices due to interface protocol
issues. In this case the jumper may be installed as shown on the figure below to force the device to negotiate for SATA 1.5Gb/s speed.
3
If your computer does not support auto detect, go into the User Define Mode and by referring written
information on the product, set the correct settings for Cylinder, Head, and Sector and if some Bios must
be, set the HDD Mode to LBA.
Save the changed details and exit.
3. Partitioning and Formatting the Drive
Refer to your Operating System manual or system manual for partitioning and formatting.
4. Samsung World Wide Web Site
Additional information can be obtained at www.samsunghdd.com.
SAMSUNG ELECTRONICS CO., LTD.
STORAGE SYSTEM DIVISION
HEAD OFFICE: 94-1, IM SOO-DONG, GUMI-CITY KYUNG BUK, KOREA 730-350
FAX : 82-54-479-5567
SATA interface cable
Computer
mainboard
(a) Turn off the power of your computer.
(b) Unplug the external power cables to the computer.
(c) Open the cover of your Computer.
Cover opening mechanism and the location of the hard disk
drive may vary from one computer to another.
(Consult your computer manual)
(d) Insert the HDD into an available 3.5" bay in your computer
and secure it to computer and secure it to the chassis using the provided screws.
(e) Connect Cables.
power cable
This device complies with Part 15 of the FCC Rules.
Operation is subject to the following two conditions :
(1) this device may not cause harmful interference, and
(2) this device must accept any interference received, including interference that may cause undesired operation.
Serial ATA
host adapter
This marking shown on the product or its literature, indicates that it should not be disposed with other
household wastes at the end of its working life. To prevent possible harm to the environment or
human health from uncontrolled waste disposal, please separate this from other types of wastes and
recycle it responsibly to promote the sustainable reuse of material resources.
Household users should contact either the retailer where they purchased this product, or their local
government office, for details of where and how they can take this item for environmentally safe recycling.
1. Attach the SATA interface cable to the interface connector on the hard disk drive. The connector is keyed and will fit in only one way.
2. Attach the power cable to the power receptor on the hard disk drive. The connector is keyed and will fit in only one way.
3. Check all other cable connections before turning on your computer.
Business users should contact their supplier and check the terms and conditions of the purchase contract.
This product should not be mixed with other commercial wastes for disposal.
CAUTION!: Do not force or rock the connectors into their sockets on the hard disk drive. Push them in straight until they are seated.
C
Samsung Electronics Co., Ltd.
Printed in Korea.
BF68-00174A REV04