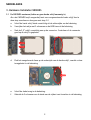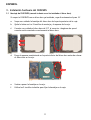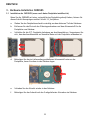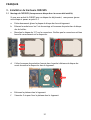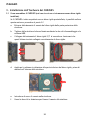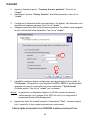
1
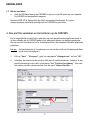
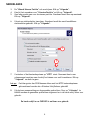
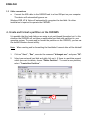
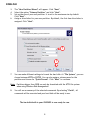
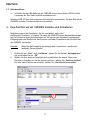
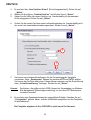
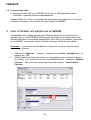
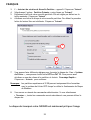
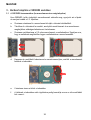
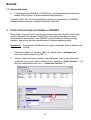
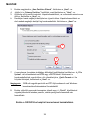
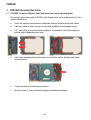
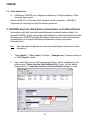
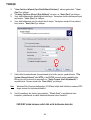
NEDERLANDS Conceptronic Grab’n’GO CHD2UES Snelstart handleiding Hartelijk gefeliciteerd met de aanschaf van uw Conceptronic 2,5” eSATA & USB harddisk box voor SATA HDD. In de bijgaande Snelstart handleiding wordt stap voor stap uitgelegd hoe u de Conceptronic CHD2UES installeert. In geval van problemen adviseren wij u onze support-site te bezoeken (ga naar: www.conceptronic.net en klik op ‘Support’). Hier vindt u een database met veelgestelde vragen waar u hoogstwaarschijnlijk de oplossing voor uw probleem kunt vinden. Heeft u andere vragen over uw product die u niet op de website kunt vinden, neem dan contact met ons op via e-mail: [email protected]. Voor meer informatie over Conceptronic producten kunt u terecht op de Conceptronic website: www.conceptronic.net. 1. Introductie Dit product is een snelle en eenvoudige manier om extra ruimte beschikbaar te maken op uw Desktop of Notebook computer. U kunt een 2,5” SATA harde schijf in de CHD2UES monteren om deze te voorzien van draagbare opslagruimte. De harde schijf box is ideaal voor het overzetten van data, het maken van back-ups of voor gebruik als 2e harde schijf op uw computer. Let op: De CHD2UES is alleen geschikt voor 2,5” Serial ATA Harde Schijven. 2,5” IDE schijven kunnen niet in deze behuizing worden geplaatst. 2. Inhoud van de verpakking De volgende onderdelen dienen aanwezig te zijn in de verpakking: 1x 2x 1x 1x 1x 1x 1x CHD2UES Assemblage schroef (niet meegeleverd indien er al een SATA-schijf geassembleerd is) HDD foam (niet meegeleverd indien er al een SATA-schijf geassembleerd is) Reistasje voor CHD2UES eSATA Kabel USB Kabel 1x USB Stroomkabel Snelstart Handleiding 1x Garantiekaart 1 NEDERLANDS 3. Hardware Installatie CHD2UES 3.1 De CHD2UES monteren (Indien er geen harde schijf aanwezig is) Als u de CHD2UES heeft aangeschaft met een voorgemonteerde harde schijf kunt u deze stap overslaan en doorgaan met stap 3.2. a. Schuif de harde schijf slede voorzichtig uit de achterzijde van de behuizing. b. Verwijder het zakje met 2 schroeven en de HDD foam uit de behuizing. c. Sluit de 2,5” schijf voorzichtig aan op de connector. Controleer of de connector goed op de schijf is geplaatst. d. Plak het meegeleverde foam op de onderzijde van de harde schijf, voordat u deze terugplaatst in de behuizing. e. Schuif de slede terug in de behuizing. f. Gebruik de 2 schroeven om de slede aan de zijkant vast te zetten in de behuizing. 2 NEDERLANDS 3.2 Kabels aansluiten a. Sluit de USB kabel aan op de CHD2UES en op een vrije USB poort op uw computer. De CHD2UES zal automatisch aangaan. Windows 2000, XP & Vista zullen de schijf automatisch herkennen. Er is geen stuurprogramma installatie benodigd om de CHD2UES te gebruiken. 4. Een partitie aanmaken en formatteren op de CHD2UES Het is mogelijk dat de schijf die u gebruikt nog niet gepartitioneerd/geformatteerd is. In deze situatie zal de CHD2UES geen schijf weergeven binnen uw besturingssysteem. Om een partitie te maken en/of te formatteren kunt u de standaard Windows applicatie gebruiken. Let op: Het partitioneren of formatteren van een harde schijf zal alle bestaande data op de schijf verwijderen! 1. Klik op “Start”, “Uitvoeren”, geef het commando “diskmgmt.msc” en kies “OK”. 2. Selecteer de externe harde schijf en klik met de rechtermuisknop. Indien er al een partitie aanwezig is die u wilt verwijderen, kies “Partitie Verwijderen”. Kies voor het maken van een nieuwe partitie voor de optie “Nieuwe Partitie...”. 2 3 NEDERLANDS 3. 4. 5. De “Wizard Nieuwe Partitie” zal verschijnen. Klik op “Volgende”. Kies bij het aanmaken voor “Primaire Partitie” en klik op “Volgende”. Geef een grootte aan voor de nieuwe partitie. Standaard staat deze op maximaal. Klik op “Volgende”. 6. U kunt een stationsletter toewijzen. Standaard wordt de eerst beschikbare stationsletter gebruikt. Klik op “Volgende”. 7 7 7. Controleer of het bestandssysteem op “NTFS” staat. Daarnaast kunt u een volumenaam toewijzen aan de schijf en kiezen voor snel formatteren. Klik op “Volgende” om door te gaan. Let op: 8. Partities groter dan 32GB kunnen alleen met het NTFS bestandssysteem geformatteerd worden als u Windows Schijfbeheer gebruikt! U krijgt een samenvatting van de gemaakte opdrachten. Door op “Voltooien” te klikken worden de gemaakte opdrachten uitgevoerd en is de harde schijf klaar voor gebruik. De harde schijf in uw CHD2UES is nu klaar voor gebruik. 4 ENGLISH Conceptronic Grab’n’GO CHD2UES Quick Installation Guide Congratulations on the purchase of your Conceptronic 2,5” eSATA & USB harddisk box for SATA HDD. The enclosed Hardware Installation Guide gives you a step-by-step explanation of how to install the Conceptronic CHD2UES. When problems occur, we advise you to go to our support-site (go to www.conceptronic.net and click ‘Support’. Here you will find the Frequently Asked Questions Database. When you have other questions about your product and you cannot find it at our website, then contact us by e-mail: [email protected]. For more information about Conceptronic products, please visit the Conceptronic Web Site: www.conceptronic.net 1. Introduction This product provides a fast and easy way to add extra storage space to your Desktop or Notebook. You can assemble a 2,5” SATA hard disk in the CHD2UES to provide you with portable storage. The hard disk box is perfect for transferring data, making backups or for use as a second hard disk on your computer. Note: The CHD2UES can only be used with 2,5” Serial ATA Harddisks. 2,5” IDE disks can not be used with this enclosure. 2. Package Contents The following items must be present in your package: 1x 2x 1x 1x 1x 1x 1x CHD2UES (not included when CHD2UES is pre-assembled) Assembly screw HDD foam (not included when CHD2UES is pre-assembled) Travel Bag for CHD2UES eSATA Cable USB Cable 1x USB Powercable Quick Installation Guide 1x Warranty Card 5 ENGLISH 3. Hardware Installation CHD2UES 3.1 Assembling the CHD2UES (When no hard disk is installed yet) If you bought the CHD2UES with a hard disk pre-installed, you can skip this step and continue to step 3.2 a. Gently slide the hard disk tray out of the back of the housing. b. Remove the bag with the 2 assembly screws and HDD foam from the housing. c. Connect the 2,5” hard disk gently to the connector. Make sure the connector is connected correctly to the hard disk. d. Stick the included foam on the bottom of the harddisk, before you place the harddisk in the housing. e. Slide back the tray in the housing. f. Use the 2 delivered screws to secure the tray in the housing. 6 ENGLISH 3.2 Cable connections a. Connect the USB cable to the CHD2UES and to a free USB port on your computer. The device will automatically power on. Windows 2000, XP & Vista will automatically recognize the hard disk. No driver installation is required to operate the CHD2UES. 4. Create and format a partition on the CHD2UES It is possible that the hard disk you are using is not partitioned/formatted yet. In this situation the CHD2UES will not show a replaceable hard disk with partitions in your operating system. To create and/or format the partition on the CHD2UES, you can use the default Windows format utility. Note: When creating and/or formatting the Harddisk all current data will be deleted! 1. Click on “Start”, “Run”, execute the command “diskmgmt.msc” and press “OK”. 2. Select your external hard disk and right click on it. If there is a partition present which you want to delete, choose “Delete Partition”. To create a new partition, select “Create New Partition”. 2 7 ENGLISH 3. 4. 5. 6. The “New Partition Wizard” will appear. Click “Next”. Select the option “Primary Partition” and click “Next”. Set up the size of your new partition. It is set to the maximum size by default. Click “Next”. Assign a drive letter for your new partition. By default, the first free drive letter is assigned. Click “Next”. 7 7 7. You can make different settings to format the hard disk. At “File System”, you can choose between NTFS or FAT32. You can also assign a volume name for the partition and choose for “Quick Format”. Click “Next” to continue. Note: Partitions bigger than 32GB can only be formatted with the NTFS file system when using Windows Disk Management! 8. You will see a summary of the selected commands. By selecting “Finish”, all commands will be executed and your hard disk will be ready to use. The hard disk built-in your CHD2UES is now ready for use. 8 DECLARATION OF CE CONFORMITY The manufacturer 2L International BV Address Databankweg 7 3821 AL Amersfoort, the Netherlands Hereby declares that the product Type 2,5” USB/eSATA HDD Product CHD2UES Brandname Conceptronic Complies with following directives: 2004/108/EEC EMC directive: Electromagnetic Compatibility 73/23/EEC Low Voltage Directive: Electrical equipment designed for use within certain voltage limits The following standards were consulted to assess conformity: EN55022/9.98 Class B EN55024/9.98 EN 50081-1/1994 EN 61000-3-2/3/4/1995 EN 50082-1/1994 EN 60950/1995 The symbol confirms that this product conforms to the above named standards and regulations. Place and date of issue: Amersfoort, 03/08/2007 (dd/mm/yyyy) Herman Looijen, Product Marketing Manager 9 ESPAÑOL Conceptronic Grab’n’GO CHD2UES Guia de iniciación rápida Felicidades por la compra de su caja de disco duro eSATA y USB de 2,5” para disco duro SATA de Conceptronic. La Guía de instalación del hardware incluida le ofrece una explicación paso a paso de cómo instalar Conceptronic CHD2UES. Si encuentra problemas, le aconsejamos que se dirija a nuestra página web www.conceptronic.net y haga clic en «Support». Aquí encontrará la base de datos de las preguntas más frecuentes o FAQ. Si tiene otras preguntas sobre su producto y no las encuentra en nuestro sitio web, póngase en contacto con nuestro servicio técnico por correo electrónico: [email protected] Para obtener más información acerca de productos de Conceptronic por favor visite el lugar Web de Conceptronic: www.conceptronic.net 1. Introducción Este producto le proporciona una forma rápida y fácil de añadir capacidad de almacenamiento a su ordenador de sobremesa o portátil. Puede montar un disco duro 2,5” SATA en el CHD2UES para obtener almacenamiento portátil. El disco duro externo es perfecto para transferir datos, realizar copias de seguridad o para usar como segundo disco duro de su ordenador. Nota: El CHD2UES puede utilizarse tan sólo con discos duros 2,5” Serial ATA. Los discos 2,5” IDE no pueden utilizarse con este dispositivo. 2. Contenido del paquete El paquete debe contener los siguientes elementos: 1 2 1 1 1 1 1 CHD2UES tornillo de montaje (no incluido cuando el CHD2UES está ya montado) espuma para disco duro (no incluida cuando el CHD2UES está ya montado) bolsa de transporte para el CHD2UES cable eSATA cable USB 1 cable de alimentación USB guía de instalación rápida 1 tarjeta de garantía 10 ESPAÑOL 3. Instalación hardware del CHD2UES 3.1 Montaje del CHD2UES (cuando todavía no se ha instalado el disco duro) Si compró el CHD2UES con un disco duro ya instalado, vaya directamente al paso 3.2 a. Saque con cuidado la bandeja del disco duro de la parte posterior de la caja. b. Quite la bolsa con los 2 tornillos de montaje y la espuma de la caja. c. Conecte con cuidado el disco duro de 2,5” al conector. Asegúrese de que el conector está conectado correctamente al disco duro. d. Ponga la espuma suministrada en la parte inferior del disco duro antes de colocar el disco duro en la caja. e. Vuelva a poner la bandeja en la caja. f. Utilice los 2 tornillos incluidos para fijar la bandeja en la caja. 11 ESPAÑOL 3.2 Conexión de los cables a. Conecte el cable USB en el CHD2UES y a un puerto USB libre de su ordenador. El dispositivo se encenderá automáticamente. Windows 2000, XP y Vista reconocen automáticamente el disco duro. La instalación de los drivers no es necesaria para el funcionamiento del CHD2UES. 4. Crear y formatear una partición en el CHD2UES Es posible que el disco duro que esté usando no esté todavía particionado/formateado. En este caso, el CHD2UES no mostrará un disco duro extraíble con particiones en su sistema operativo. Para crear y/o formatear la partición en el CHD2UES, puede usar la utilidad predeterminada de formato de Windows. Nota: 1. 2. Si crea y/o formatea el disco duro, se eliminarán todos los datos actuales. Haga clic en “Inicio”, en “Ejecutar”, ejecute el comando “diskmgmt.msc” y pulse “Aceptar”. Seleccione su disco duro externo y haga clic con el botón derecho sobre él. Si hay una partición que desea eliminar, seleccione “Eliminar partición”. Para crear una nueva partición, seleccione “Crear nueva partición”. 2 12 ESPAÑOL 3. 4. 5. 6. A continuación aparecerá el “Asistente para crear una nueva partición”. Haga clic en “Siguiente”. Seleccione la opción “Partición primaria” y haga clic en “Siguiente”. Configure el tamaño de la nueva partición. Por defecto está configurada en el tamaño máximo. Haga clic en “Siguiente”. Asigne una letra de unidad para la nueva partición. Por defecto se asigna la primera letra de la unidad libre. Haga clic en “Siguiente”. 7 7 7. Puede aplicar diferentes ajustes para formatear el disco duro. En “Sistema de archivos” puede elegir entre NTFS o FAT32. También puede asignar un nombre de volumen a la partición y seleccionar “Formato rápido”. Haga clic en “Siguiente” para continuar. Nota: Las particiones superiores a 32 GB sólo se podrán formatear con el sistema de archivo NTFS cuando se utiliza el Gestor de Disco de Windows. 8. Finalmente aparecerá un resumen de los comandos seleccionados. Al seleccionar “Finalizar”, se ejecutarán todos los comandos y el disco duro estará listo para su uso. El disco duro incorporado su CHD2UES está ahora listo para el uso. 13 DECLARACIÓN DE CONFORMIDAD El fabricante Dirección: 2L Internacional BV Databankweg 7 3821 AL Amersfoort, Países Bajos, tel. +31 (0)33 4549401 CIF/NIF NL801729877B01 Declara mediante este documento que el producto Tipo 2,5” USB/eSATA HDD Producto CHD2UES Marca Conceptronic Cumple con las siguientes directivas: Directiva EMC 2004/108/CE EMC Directiva 2004/108/EEC EMC (transpuesta a la legislación española mediante RD 1580/2006: Compatibilidad electromagnética. Directiva 73/23/EEC española Directiva sobre bajo voltaje (transpuesta a la legislación mediante RD 7/1998): Material eléctrico destinado a utilizarse con determinados límites de tensión Este producto ha sido diseñado para su uso sólo en interiores. La marca CE certifica que este producto se adecua a las especificaciones y regulaciones arriba mencionadas. Este producto es adecuado para todos los países de la UE. Lugar y fecha de emisión: Amersfoort, 03/08/2007 (dd/mm/yy) Herman Looijen, Director de marketing 14 DEUTSCH Conceptronic Grab’n’GO CHD2UES Schnellstart Anleitung Wir gratulieren Ihnen zum Kauf Ihrer Conceptronic 2,5” eSATA- & USB-Festplattenbox für SATAFestplattenlaufwerke. In der beigefügten Intallationsanweisung für die Hardware finden Sie schrittweise Erklärungen für die Installation ihres Conceptronic CHD2UES. Sollten irgendwelche Probleme auftreten, empfehlen wir ihnen, auf unsere Support-Seite im Internet zu gehen (www.conceptronic.net) und auf 'Support’ zu klicken. Dort werden sie die "Frequently Asked Questions" Datenbank finden. Falls sie andere Fragen zu ihrem Produkt haben und sie diese nicht auf unserer Website finden können, kontaktieren sie uns bitte per E-Mail: [email protected]. Weitere Informationen zu den Conceptronic Produkte finden Sie auf der Website von Conceptronic: www.conceptronic.net. 1. Einleitung Dieses Produkt bietet auf schnelle und einfache Weise zusätzlichen Speicherplatz für Ihren Desktop- oder Notebook-Computer. Sie können eine 2,5“ SATA-Festplatte als tragbaren Speicher im CHD2UES installieren. Die Festplattenbox ist ideal für die Übertragung von Daten, das Erstellen von Backups oder als zweite Festplatte für Ihren Computer. Hinweis: Die CHD2UES kann nur mit 2,5” Serial ATA Harddisks benutzt werden. 2,5” IDE Disks können nicht verwendet werden. 2. Packungsinhalt In der Verpackung ist Folgendes enthalten: 1x 2x CHD2UES Montageschrauben 1x Schaumstoff für Festplatte 1x 1x 1x 1x Reiseetui für CHD2UES eSATA-Kabel USB-Kabel 1x Schnellinstallationsanleitung 1x (nicht im Lieferumfang enthalten, wenn die CHD2UES bereits vorinstalliert ist) (nicht im Lieferumfang enthalten, wenn die CHD2UES bereits vorinstalliert ist) USB-Stromkabel Garantiekarte 15 DEUTSCH 3. Hardware-Installation CHD2UES 3.1 Installation der CHD2UES (wenn noch keine Festplatte installiert ist) Wenn Sie die CHD2UES mit einer vorinstallierten Festplatte gekauft haben, können Sie diesen Schritt überspringen und bei Schritt 3.2 fortfahren. a. Ziehen Sie den Festplattenschacht vorsichtig aus dem hinteren Teil des Gehäuses. b. Entfernen Sie das Etui mit den 2 Montageschrauben und dem Schaumstoff für die Festplatte vom Gehäuse. c. Schließen Sie die 2,5“-Festplatte behutsam am Anschlussstück an. Vergewissern Sie sich, dass das Anschlussstück auf korrekte Weise mit der Festplatte verbunden ist. d. Befestigen Sie den im Lieferumfang enthaltenen Schaumstoff unter an der Festplatte, bevor Sie diese in das Gehäuse legen. e. Schieben Sie den Schacht wieder in das Gehäuse. f. Befestigen Sie den Schacht mit den 2 mitgelieferten Schrauben im Gehäuse. 16 DEUTSCH 3.2 Kabelanschlüsse a. Schließen Sie das USB-Kabel an der CHD2UES und an einen freien USB-Port Ihres Computers an. Das Gerät schaltet automatisch ein. Windows 2000, XP und Vista erkennen die Festplatte automatisch. Für den Betrieb der CHD2UES ist keine Treiberinstallation erforderlich. 4. Eine Partition auf der CHD2UES erstellen und formatieren Möglicherweise ist die Festplatte, die Sie verwenden, noch nicht partitioniert/formatiert. In diesem Fall zeigt die CHD2UES keinen Wechseldatenträger mit Partitionen in Ihrem Betriebssystem an. Sie können das Standard-FormatierungsHilfsprogramm von Windows für das Erstellen und/oder Formatieren der Partition auf der CHD2UES verwenden. Hinweis: 1. 2. Wenn Sie die Festplatte neu anlegen bzw. formatieren, werden alle laufenden Daten gelöscht! Klicken Sie auf „Start” und „Ausführen”, geben Sie den Befehl „diskmgmt.msc” ein und klicken Sie auf „OK”. Wählen Sie Ihre externe Festplatte und rechtsklicken Sie darauf. Wenn eine Partition vorhanden ist, die Sie löschen möchten, wählen Sie „Partition löschen”. Um eine neue Partition zu erstellen, wählen Sie „Neue Partition erstellen“. 2 17 DEUTSCH 3. 4. 5. 6. Es erscheint der „New Partition Wizard” [Einrichtungsassistent], Klicken Sie auf „Weiter". Wählen Sie die Option „Primäre Partition” und klicken Sie auf „Weiter”. Geben Sie die Größe der neuen Partition ein. Standardmäßig ist die maximale Größe eingegeben. Klicken Sie auf „Weiter". Ordnen Sie der neuen Partition einen Laufwerkbuchstaben zu. Standardmäßig wird der erste freie Laufwerkbuchstaben zugeordnet. Klicken Sie auf „Weiter". 7 7 7. Sie können verschiedene Einstellungen für die Formatierung der Festplatte vornehmen. Unter „Dateisystem“ können Sie zwischen NTFS und FAT32 wählen. Sie können der Partition auch einen Volume-Namen zuweisen und die Durchführung einer „Schnellformatierung” festlegen. Klicken Sie auf „Weiter“. Hinweis: 8. Partitionen, die größer sind als 32GB, können bei Verwendung von Windows Disk Management [Datenträgerverwaltung] nur mit dem NTFS-Dateisystem formatiert werden! Es erscheint eine Zusammenfassung der ausgewählten Befehle. Nachdem Sie auf „Fertigstellen” geklickt haben, werden alle Befehle ausgeführt und die Festplatte ist betriebsbereit. Die Festplatte eingebaut in Ihre CHD2UES ist jetzt bereit für Gebrauch. 18 CE - KONFORMITÄTSERKLÄRUNG Der Hersteller Adresse 2L International BV Databankweg 7 3821 AL Amersfoort, Niederlande erklärt hiermit, dass das Produkt Typ 2,5” USB/eSATA HDD Produkt CHD2UES Markenname Conceptronic den folgenden Richtlinien entspricht: 2004/108/EWG EMV-Richtlinie: Elektromagnetische Verträglichkeit 73/23/EWG Niederspannungs-Richtlinie Elektrische Betriebsmittel zur Verwendung innerhalb bestimmter Spannungsgrenzen Für die Beurteilung der Einhaltung der Konformität angewandte Normen: EN55022/9.98 Klasse B EN55024/9.98 EN 50081-1/1994 EN 61000-3-2/3/4/1995 EN 50082-1/1994 EN 60950/1995 Das Zeichen bestätigt, dass dieses Produkt oben aufgeführte Normen und Bestimmungen erfüllt. Ort und Datum der Ausstellung: Amersfoort, 03/08/2007 (dd/mm/yyyy) Herman Looijen, Product Marketing Manager 19 FRANÇAIS Conceptronic Grab’n’GO CHD2UES Guide de démarrage rapide Nous vous félicitons d'avoir acheté votre boîtier de disque dur eSATA & USB 2,5" pour disque dur SATA de Conceptronic. Le Guide d'Installation du Matériel ci-joint vous expliquera pas à pas comment installer le CHD2UES de Conceptronic. En cas de problèmes, nous vous recommandons de vous adresser à notre service technique (allez à www.conceptronic.net et cliquez sur « support »).Vous trouverez dans cette section la Base de Données des Foires Aux Questions. Si vous avez d’autres questions concernant votre produit et que vous ne trouvez pas la solution sur notre site web, contactez-nous par e-mail : [email protected]. Pour plus d'informations sur les produits de Conceptronic, visitez notre Site Internet Conceptronic: www.conceptronic.net 1. Introduction Ce produit vous permet de disposer facilement et rapidement d'un espace de stockage supplémentaire dans votre ordinateur de bureau ou votre ordinateur portable. Vous pouvez monter un disque dur en 2,5’ SATA sur le CHD2UES pour disposer d'un stockage portable. Le disque dur est parfait pour transférer des données, faire des copies de sauvegarde et peut aussi être utilisé comme 2nd disque dur sur votre ordinateur. Remarque: le CHD2UES ne peut être utilisé qu’avec des disques durs série ATA de 2,5”. Les disques IDE de 2,5” ne peuvent pas être utilisés avec ce dispositif. 2. Contenus du Coffret Les éléments suivants sont fournis dans votre boîte : 1 2 1 1 1 1 1 CHD2UES Vis de montage (non fournies lorsque le CH2UES est livré déjà monté) Mousse de protection de disque dur (non fournies lorsque le CH2UES est livré déjà monté) Sacoche de Transport pour CHD2UES Câble eSATA Câble USB 1 Câble d'alimentation USB Guide d'installation rapide 1 Carte de garantie 20 FRANÇAIS 3. Installation du Hardware CHD2UES 3.1 Montage du CHD2UES (Lorsque aucun disque dur n'a encore été installé). Si vous avez acheté le CH2UES avec un disque dur déjà monté, vous pouvez ignorer cette étape et passer au point 3.2 a. Faites doucement glisser la plaque du disque dur hors du logement. b. Enlevez le sachet avec les 2 vis de montage et la mousse de protection du disque dur du boîtier. c. Branchez le disque dur 2,5" sur le connecteur. Vérifiez que le connecteur est bien branché correctement sur le disque dur. d. Collez la mousse de protection fournie dans la partie inférieure du disque dur avant de mettre le disque dur dans le logement. e. Enfoncez le plateau dans le logement. f. Vissez les 2 vis pour fixer le plateau dans le logement. 21 FRANÇAIS 3.2 Connexion des câbles a. Branchez le câble USB sur le CHD2UES et sur un port USB disponible de votre ordinateur. L'appareil s'allume automatiquement. Windows 2000, XP et Vista reconnaissent automatiquement le disque dur. Il n'est pas nécessaire d'installer un driver pour faire fonctionner le CHD2UES. 4. Créer et formater une partition sur le CHD2UES Il est possible que le disque dur que vous utilisez ne soit pas encore partitionné ou formaté. Dans ce cas le CHD2UES n'affichera pas de disque dur de remplacement avec des partitions dans votre système d'exploitation. Pour créer et/ou formater la partition sur le CHD2UES, vous pouvez utiliser l'outil de formatage de Windows par défaut. Remarque: 1. 2. si vous créez ou formatez votre disque dur, toutes les données seront effacées ! Cliquez sur « Démarrer», « Lancer », exécutez la commande « diskmgmt.msc » et appuyez sur « OK » Sélectionnez votre disque dur externe et cliquez dessus avec la touche de droite de la souris. S’il y a une partition que vous souhaitez effacer, choisissez « Éliminer Partition ». Pour créer une nouvelle partition sélectionnez « Créer Nouvelle Partition ». 2 22 FRANÇAIS 3. 4. 5. 6. L' « Assistant de création de Nouvelle Partition » apparaît. Cliquez sur "Suivant". Sélectionnez l’option « Partition Primaire » puis cliquez sur "Suivant". Définissez la taille de votre nouvelle partition. Elle est réglée par défaut sur la taille maximale. Cliquez sur "Suivant". Attribuez une lettre de disque à votre nouvelle partition. Par défaut la première lettre de lecteur libre est attribuée. Cliquez sur "Suivant". 7 7 7. Vous pouvez faire différents réglages pour formater le disque dur. Dans « Système de Fichier », vous pouvez choisir entre NTFS ou FAT 32. Vous pouvez aussi attribuer un nom de volume à la partition et choisir « Formatage Rapide ». Cliquez sur « Suivant » pour continuer. Remarque: Les partitions supérieures à 32 GB peuvent uniquement être formatées avec le système de fichier NTFS lorsqu’on utilise le Gestionnaire de Disque de Windows. 8. Vous verrez un résumé des commandes sélectionnées. Si vous sélectionnez « Terminer », toutes les commandes seront exécutées et vous pourrez utiliser le disque dur. Le disque dur incorporé votre CHD2UES est maintenant prêt pour l'usage. 23 DECLARATION DE CONFORMITE CE Le fabricant Adresse 2L International BV Databankweg 7 3821 AL Amersfoort, the Netherlands (Pays-Bas) Déclare, par la présente, que le produit Type 2,5” USB/eSATA HDD Produit CHD2UES Enseigne Conceptronic Observe les directives suivantes: 2004/108/EEC Directive EMC relative à la: Compatibilité Électromagnétique (Electromagnetic Compatibility) 73/23/EEC Directive Basse Tension (Low Voltage Directive) relative aux: Équipements Électriques conçus pour un usage dans certaines limites de tension Les normes suivantes ont été considérées pour en déterminer la bonne conformité: EN55022/9.98 Catégorie B EN55024/9.98 EN 50081-1/1994 EN 61000-3-2/3/4/1995 EN 50082-1/1994 EN 60950/1995 L’apposition du marquage garantit la conformité de ce produit aux normes et à la réglementation susmentionnées. Lieu et date de publication: Amersfoort, 03/08/2007 (dd/mm/yyyy) Herman Looijen, Responsable Marketing Produit 24 ITALIANO Conceptronic Grab’n’GO CHD2UES Guida d’installazione rapida Vi ringraziamo per aver acquistato l’hard disk box 2,5” eSATA e USB per unità disco rigido SATA di Conceptronic. La guida per l’installazione dell’hardware acclusa spiegherà passo a passo la CHD2UES Conceptronic. Se dovessero esserci dei problemi, vi consigliamo di visitare il nostro sito di supporto (andate su www.conceptronic.net e cliccate ‘support’), dove potrete trovare il Database delle Risposte alle Domande più Frequenti (FQA). Se doveste avere altre domande riguardanti il prodotto che non trovate sul nostro sito Web vi preghiamo di contattarci attraverso l’e-mail: [email protected] Per ulteriori informazioni dei prodotti Conceptronic, la preghiamo di visitare il sito Web della Conceptronic: www.conceptronic.net 1. Introduzione Grazie a questo prodotto potrete ampliare la capacità di memoria del desktop o del notebook in maniera facile e veloce. Aggiungendo un disco rigido 2,5” SATA al CHD2UES, potrete disporre di una memoria portatile. Il box hard disk è ideale per trasferire dati, realizzare backup, o per essere usato coma disco rigido secondario del computer. Nota: Il CHD2UES si può usare solo con dischi rigidi Serial ATA da 2,5”. I dischi IDE da 2,5” non si possono usare con questa protezione. 2. Contenuto della confezione La confezione deve essere composta dai seguenti elementi: 1 2 1 1 1 1 1 CHD2UES Viti di assemblaggio (non comprese se il CHD2UES è stato preassemblato) Schiuma HDD (non compresa se il CHD2UES è stato preassemblato) Borsa da viaggio per il CHD2UES Cavo eSATA Cavo USB 1 Cavo di alimentazione USB Guida d’installazione rapida 1 Scheda di garanzia 25 ITALIANO 3. Installazione dell’hardware del CHD2UES 3.1 Come assemblare il CHD2UES (nel caso in cui non vi sia ancora nessun disco rigido installato) Se il CHD2UES è stato acquistato con un disco rigido preinstallato, è possibile saltare questa sezione e procedere al punto 3.2 a. Estrarre delicatamente il vassoio del disco rigido dalla parte posteriore della struttura. b. Togliere dalla struttura la borsa fissata mediante le due viti di assemblaggio e la schiuma HDD. c. Collegare delicatamente il disco rigido 2,5” al connettore. Assicurarsi che quest’ultimo sia stato collegato correttamente al disco rigido. d. Applicare la schiuma in dotazione alla parte inferiore del disco rigido, prima di metterlo all’interno della struttura. e. Introdurre di nuovo il vassoio nella struttura. f. Usare le due viti in dotazione per fissare il vassoio alla struttura. 26 ITALIANO 3.2 Connessioni cavi a. Collegare il cavo USB al CHD2UES e a una porta USB disponibile del computer. Il dispositivo si accenderà automaticamente. Windows 2000, XP & Vista rileveranno automaticamente il disco rigido. Non è necessaria nessuna installazione di driver per far funzionare il CHD2UES. 4. Creare e dare formato a una partizione nel CHD2UES Potrebbe darsi il caso che il disco rigido in uso non sia ancora partizionato o formattato. In tal caso il CHD2UES non mostrerà un disco rigido sostituibile con partizioni nel sistema operativo in uso. Per creare e/o dare formato alla partizione del CHD2UES, è possibile usare l’utility di formattazione di default di Windows. Nota: 1. 2. ogni volta che si crea o si dà formato al disco rigido, tutti i dati in esso contenuti verranno cancellati! Fare clic su “Start”, “Esegui”, e scrivere il comando “diskmgmt.msc” dopo di che premere “OK”. Selezionare il disco rigido esterno e fare clic su di esso con il pulsante destro del mouse. Nel caso in cui esista una partizione che si desidera eliminare, selezionare “Delete Partition” (Elimina partizione). Per creare una nuova partizione selezionare “Create New Partition” (Crea nuova partizione). 2 27 ITALIANO 3. 4. 5. 6. Apparirà l’assistente per la “Creazione di nuove partizioni”. Fare clic su “Avanti”. Selezionare l’opzione “Primary Partition” (Partizione primaria) e fare clic su “Avanti”. Configurare le dimensioni della nuova partizione. Per default, tali dimensioni sono impostate sul massimo permesso. Fare clic su “Avanti”. Assegnare una lettera dell’unità alla nuova partizione. Per default viene assegnata la prima lettera dell’unità disponibile. Fare clic su “Avanti”. 7 7 7. è possibile realizzare diverse configurazioni per dare formato al disco rigido. In “File System” (Sistema file) si può scegliere fra NTFS o FAT32. È anche possibile assegnare un nome di volume alla partizione e selezionare “Quick Format” (Formato rapido). Fare clic su “Avanti” per continuare. Avviso: 8. Le partizioni con dimensioni superiori ai 32 GB si possono formattare esclusivamente con il sistema di file NTFS nel caso in cui venga usato il programma Windows Disk Management! Apparirà un sunto dei comandi prescelti. Selezionando “Fine”, verranno eseguiti tutti i comandi e il disco rigido sarà pronto per essere usato. Il disco rigido incorporato il suo CHD2UES è adesso pronto per l'uso. 28 DICHIARAZIONE DI CONFORMITÀ CE In fabbricante Indirizzo 2L International BV Databankweg 7 3821 AL Amersfoort, Paesi Bassi Dichiara qui di seguito che il prodotto Tipo 2,5” USB/eSATA HDD Prodotto CHD2UES Nome marca Conceptronic Risulta in conformità a quanto previsto dalle seguenti direttive comunitarie: 2004/108/CE Direttiva CEM: Compatibilità elettromagnetica 73/23/CE Direttiva Bassa Tensione: Materiale elettrico destinato ad essere adoperato entro taluni limiti di tensione Sono stati applicati i seguenti standard per assicurarne la conformità: EN55022/9.98 Class B EN55024/9.98 EN 50081-1/1994 EN 61000-3-2/3/4/1995 EN 50082-1/1994 EN 60950/1995 Il simbolo CE conferma che questo prodotto è conforme ai suddetti standard e regolamentazioni. Luogo e data di rilascio: Amersfoort, 03/08/2007 (dd/mm/yyyy) Herman Looijen, Product Marketing Manager 29 PORTUGUÊS Conceptronic Grab’n’GO CHD2UES Iniciação Rápida Parabéns pela compra do disco eSATA de 2,5” e USB para HDD SATA da Conceptronic. O Guia de Instalação do Hardware que se inclui fornece-lhe uma explicação passo a passo de como instalar CHD2UES Conceptronic. Se tiver algum problema, aconselhamos consultar o nosso site de assistência (vá a www.conceptronic.net e clique em ‘assistência’ Aqui pode encontrar a Base de Dados das Perguntas Mais Frequentes. Se tiver outras questões relativas ao nosso produto e não as conseguir encontrar no nosso webiste, pode-nos contactar através do e-mail: [email protected]. Para mais informações sobre produtos de Conceptronic, por favor visite o Web Site da Conceptronic: www.conceptronic.net 1. Introdução Este produto proporciona uma forma rápida e fácil de adicionar espaço de armazenamento extra ao seu PC ou computador portátil. Pode montar um disco rígido 2,5” SATA no CHD2UES para poder usufruir de espaço de armazenamento portátil. A caixa de disco rígido é perfeita para fazer transferência de dados, cópias de segurança ou para usar como disco rígido secundário no seu computador. Nota: O CHD2UES só pode ser usado com discos rígidos ATA de série de 2,5”. Os discos IDE de 2,5” não podem usados com esta caixa. 2. Conteúdo da Embalagem Devem existir os seguintes elementos na sua embalagem: 1 2 1 1 1 1 1 CHD2UES parafusos de montagem (não incluídos quando o CHD2UES já vem previamente montado) espuma para HDD (não incluídos quando o CHD2UES já vem previamente montado) saco de viagem para o CHD2UES cabo eSATA Cabo USB 1 cabo de alimentação USB Manual de Instalação Rápida 1 Cartão de Garantia 30 PORTUGUÊS 3. Instalação do hardware do CHD2UES 3.1 Montar o CHD2UES (quando ainda não está instalado nenhum disco rígido) Se tiver comprado o CHD2UES com um disco rígido pré-instalado, pode avançar este passo e continuar no passo 3.2 a. Faça deslizar com cuidado o suporte do disco rígido para fora da parte de trás da caixa. b. Tire o saco com os 2 parafusos de montagem e a espuma para o HDD da caixa. c. Ligue o disco rígido de 2,5” à ficha com cuidado. Certifique-se de que a ficha está correctamente ligada ao disco rígido. d. Cole a espuma incluída na parte de baixo do disco rígido antes de o colocar na caixa. e. Volte a deslizar o tabuleiro para dentro da caixa. f. Use os 2 parafusos incluídos para prender o tabuleiro dentro da caixa. 31 PORTUGUÊS 3.2 Ligações dos cabos a. Ligue o cabo USB ao CHD2UES e a uma porta USB do seu computador. O dispositivo liga-se automaticamente. O Windows 2000, XP e Vista reconhecem automaticamente o disco rígido. Não é necessário instalar nenhum controlador para trabalhar com o CHD2UES. 4. Criar e formatar uma partição no CHD2UES É possível que o disco rígido que está a usar ainda não tenha nenhuma partição/não esteja formatado. Neste caso, o CHD2UES não vai mostrar um disco rígido substituível com partições no seu sistema operativo. Para criar e/ou formatar a partição no seu CHD2UES, pode usar a função de formatação predefinida do Windows. Nota: 1. 2. Quando criar e/ou formatar o disco rígido, todos os dados existentes serão eliminados! Clique em “Start” (Iniciar), “Run” (Executar), execute o comando “diskmgmt.msc” e carregue em “OK”. Seleccione o seu disco rígido externo e clique com o botão direito do rato em cima dele. Se existir alguma partição que quiser eliminar, seleccione “Delete Partition” (Eliminar Partição). Para criar uma nova partição, seleccione “Create New Partition” (Criar Nova Partição). 2 32 PORTUGUÊS 3. 4. 5. 6. O “New Partition Wizard” (Assistente de Nova Partição) aparece. Faça clique em “Next” (Seguinte). Seleccione a opção “Primary Partition” (Partição Principal) e clique em “Next” (Seguinte). Defina o tamanho da nova partição. Por defeito, está definida com o máximo tamanho possível. Faça clique em “Next” (Seguinte). Atribua uma letra de unidade à nova partição. Por defeito, é atribuída a primeira letra de unidade disponível. Faça clique em “Next” (Seguinte). 7 7 7. Pode fazer diferentes configurações para formatar o disco rígido. Em “File System” (Sistema de Ficheiros), pode escolher entre NTFS ou FAT32. Também pode atribuir um nome de volume para a partição e seleccionar “Quick Format” (Formatação Rápida). Clique em “Next” (Seguinte) para continuar. Nota: 8. As partições maiores que 32 GB só podem ser formatadas com o sistema de ficheiros NTFS quando se usar o Gestor de Disco do Windows! Vai poder ver um resumo dos comandos seleccionados. Ao seleccionar “Finish” (Concluir), todos os comandos são executados e o seu disco rígido fica pronto a usar. O construído-em de disco rígido seu CHD2UES está agora pronto para uso. 33 DICHIARAZIONE DI CONFORMITÀ CE O fabricante Morada 2L International BV Databankweg 7 3821 AL Amersfoort, Países Baixos DECLARA QUE O PRODUTO Tipo 2,5” USB/eSATA HDD Produto CHD2UES Nome de marca Conceptronic Cumpre as seguintes directivas: 2004/108/EEC Directiva CEM: Compatibilidade Electromagnética 73/23/EEC Directiva de Baixa Tensão: Equipamento eléctrico desenhado para ser usado dentro de determinados limites de tensão Os seguintes standards foram consultados para avaliar a conformidade: EN55022/9.98 Classe B EN55024/9.98 EN 50081-1/1994 EN 61000-3-2/3/4/1995 EN 50082-1/1994 EN 60950/1995 O símbolo confirma que este produto está conforme os padrões e regulamentações acima referidos. Local e data de emissão: Amersfoort, 03/08/2007 (dd/mm/yyyy) Herman Looijen, Gestor de Marketing de Produto 34 MAGYAR Conceptronic Grab’n’GO CHD2UES Gyors installációs kalauz Köszönjük, hogy a Conceptronic 2,5-colos eSATA-s és USB-s merevlemez-dobozát választotta a SATA merevlemez-meghajtóhoz. A mellékelt Hardver Installációs Kalauz részletes magyarázatot nyújt a Conceptronic CHD2UES installálásához. Probléma esetén javasoljuk, hogy vegye igénybe a Support-site-en nyújtott segítséget (menjen a www.conceptronic.net-re és kattintson a ‘Support’-ra. Itt megtalálja a Gyakran Ismételt Kérdések adatbázist. Ha termékünkkel kapcsolatban további kérdése lenne, és weboldalunkon nem talál rá választ, forduljon hozzánk e-mailben: [email protected]. A Conceptronic termékekkel kapcsolatos további információért kérjük tekintse meg a Conceptronic weboldalát: www.conceptronic.net 1. Bevezetés Ezzel a termékkel gyorsan és egyszerűen adhat hozzá plusz tároló területet asztali számítógépéhez vagy Notebook-jához. Csatlakoztathat egy 2,5” SATA merevlemezt a CHD2UES -hoz, amely hordozható tárolást biztosít. A harddiskbox tökéletesen alkalmas adatátvitelre, backup-ok készítésére, illetve a számítógépen második merevlemezként is használható. Megjegyzés: A CHD2UES csak 2,5 colos, soros ATA merevlemezeknél használható. A 2,5 colos IDE lemezek ezzel a házzal nem használhatók. 2. A csomag tartalma A csomagnak az alábbiakat kell tartalmaznia: 1x 2x 1x 1x 1x 1x 1x CHD2UES (nem tartozék, ha a CHD2UES előre össze lett szerelve) szerelőcsavar a merevlemez-meghajtó habszivacsa (nem tartozék, ha a CHD2UES előre össze lett szerelve) útitáska a CHD2UES-hez eSATA-kábel USB-kábel 1x USB hálózati kábel gyorstelepítési útmutató 1x Jótállási jegy 35 MAGYAR 3. Hardvertelepítés a CHD2UES esetében 3.1 A CHD2UES összeszerelése (ha merevlemez nincs még telepítve) Ha a CHD2UES-t előre telepített merevlemezzel vásárolta meg, ugorja át ezt a lépést és menjen tovább a 3.2. lépéshez. a. Óvatosan csúsztassa ki a merevlemez tálcáját a tokozás hátoldalából. b. Távolítsa el a tokozásról a zacskót, amely két szerelőcsavart és a merevlemezmeghajtóhoz szükséges habszivacsot tartalmazza. c. Óvatosan csatlakoztassa a 2,5-colos merevlemezt a csatlakozóhoz. Ügyeljen arra, hogy a csatlakozó megfelelően legyen csatlakoztatva a merevlemezhez. d. Ragassza rá a mellékelt habszivacsot a merevlemez aljára, mielőtt a merevlemezt berakná a tokozásba. e. Csúsztassa vissza a tálcát a tokozásba. f. A tálcának a tokozásban való rögzítésére pedig használja az erre a célra mellékelt két csavart. 36 MAGYAR 3.2 Kábelcsatlakozások a. Csatlakoztassa az USB-kábelt a CHD2UES-hoz, majd számítógépének valamelyik szabad USB-portjához. Az eszköz automatikusan bekapcsol. A Windows 2000, XP és Vista automatikusan felismeri a merevlemezt. A CHD2UES működtetéséhez semmilyen meghajtót nem kell installálni. 4. Partíció létrehozása és formázása a CHD2UES Előfordulhat, hogy az Ön által használt merevlemez még nincs formázva illetve azon partíció létrehozva. Ez esetben a CHD2UES az operációs rendszerben nem mutat helyettesíthető merevlemezt. Ha a CHD2UES-n partíciót kíván előállítani és/vagy formázni, használja a Windows alapértelmezett formázó segédprogramját. Megjegyzés: A merevlemez előállításakor és/vagy formázásakor minden aktuális adat törlődik! 1. Kattintson a Start”-on, ezután a „Run”-on, hajtsa végre a „diskmgmt.msc” parancsot, majd nyomja le az „OK”-t. 2. Jelölje ki saját külső merevlemezét, majd kattintson azon az egér jobb oldali gombjával. Ha van rajta törölni kívánt partíció, válassza a „Delete Partition”.-t Új partíció előállításához jelölje ki a „Create New Partition”-t. 2 37 MAGYAR 3. 4. 5. 6. Ezután megjelenik a „New Partition Wizard”. Kattintson a „Next”-re. Jelölje ki a „Primary Partition” beállítást, majd kattintson a „“Next”-re. Állítsa be az új partíció méretét. Alapértelmezettként, az a maximális méretre van állítva. Kattintson a „Next”-re. Rendeljen hozzá meghajtó-betűjelet az új partícióhoz. Alapértelmezettként az első szabad meghajtó-betűjel fog hozzárendelődni. Kattintson a „Next”-re. 7 7 7. A merevlemez formázása érdekében különböző beállításokra kerülhet sor. A „File System”-nél választhatunk az NTFS vagy a FAT32 közül. Kötetnevet is hozzárendelhetünk a partícióhoz, sőt választhatjuk a „Quick Format-ot. Ha folytatni kívánjuk, kattintsunk a „Next”-re. Megjegyzés: 8. 32GB-nél nagyobb partíciók az NTFS fájlrendszerrel csak Windowslemezkezelés alkalmazásával formázhatók! Ezután a kijelölt parancsok összegzése jelenik meg. A „Finish” kijelölésével végrehajtásra kerül minden parancs, ezután pedig merevlemezünk már használható. Ezután a CHD2UES-be beépített merevlemez használatkész. 38 TÜRKÇE Conceptronic Grab’n’GO CHD2UES Hızlı Kurulum Kılavuzu SATA Sabit Disk için Conceptronic 2,5” eSATA & USB sabit disk kutusu Satın Aldığınız İçin Tebrikler. Ekteki Donanım Kurulum Kılavuzu Conceptronic CHD2UES kurulumunun adım adım nasıl yapılacağı konusunda bilgi verir. Problem ortaya çıktığında, destek sitemize gitmenizi (www.conceptronic.net adresine gidiniz ve ‘Support’ sayfasına tıklayınız) tavsiye ederiz. Burada Sıkça Sorulan Sorular Veritabanını bulacaksınız. Ürününüz ile ilgili başka sorularınız olduğunda ve bunların yanıtlarını web sitemizde bulamadığınız takdirde bize e-posta gönderin: [email protected] Conceptronic ürünleri ile ilgili daha fazla bilgi için lütfen Conceptronic Web Sitesini ziyaret edin: www.conceptronic.net 1. Giriş Bu ürün Masaüstü ya da Dizüstü bilgisayarınıza ilave depolama alanı eklemek için hızlı ve kolay bir yol sunmaktadır. CHD2UES’ye taşınabilir depolama imkanı sağlayan bir 2,5” SATA sabit disk monte edebilirsiniz. Sabit disk kutusu veri iletimi, yedekleme yapma ya da bilgisayarınızda ikinci bir sabit disk olarak kullanım için mükemmel bir çözümdür. Not: CHD2UES sadece 2,5” Seri ATA Sabit disklerle kullanılabilir. 2,5” IDE diskler bu kutu ile kullanılamaz. 2. Paket İçeriği Pakette aşağıdaki parçalar bulunmalıdır: 1x 2x 1x 1x 1x 1x 1x CHD2UES Montaj vidası (CHD2UES ön montajlı geldiğinde dahil değildir) Sabit Disk köpüğü (CHD2UES ön montajlı geldiğinde dahil değildir) CHD2UES için Seyahat Çantası eSATA Kablosu USB Kablo 1x USB Güç Kablosu Hızlı Kurulum Kılavuzu 1x Garanti Belgesi 39 TÜRKÇE 3. CHD2UES Donanım Kurulumu 3.1 CHD2UES'nin Monte Edilmesi (Sabit disk kurulumu henüz yapılmadığında) Ön montajlı sabit diske sahip CHD2UES satın aldıysanız bu adımı atlayıp adım 3.2’den devam edebilirsiniz a. Sabit disk tepsisini muhafazanın arkasından dışarıya yavaşça kaydırarak çıkarın. b. 2 montaj vidasına sahip çantayı ve sabit disk köpüğünü muhafazadan çıkarın. c. 2,5” sabit diski yavaşça konnektöre bağlayın. Konnektörün sabit diske doğru bir şekilde bağlı olduğundan emin olun. d. Sabit diski muhafazaya yerleştirmeden önce birlikte verilen köpüğü sabit diskin altına tutturun. e. Tepsiyi kaydırarak muhafazaya yerleştirin. f. Birlikte verilen 2 vidayı kullanarak tepsiyi muhafazaya sabitleyin. 40 TÜRKÇE 3.2 Kablo bağlantıları b. USB kabloyu CHD2UES’ye ve bilgisayarınızda boş bir USB porta bağlayın. Cihaz otomatik olarak çalışır. Windows 2000, XP ve Vista sabit diski otomatik olarak tanıyacaktır. CHD2UES’yi çalıştırmak için herhangi bir sürücü kurulumu gerekmez. 4. CHD2UES üzerinde disk bölümü oluşturulması ve biçimlendirilmesi Kullandığınız sabit disk henüz bölümlendirilmemiş/biçimlendirilmemiş olabilir. Bu durumda CHD2UES, işletim sisteminizde disk bölümlerine sahip değiştirilebilir bir sabit disk göstermez. CHD2UES üzerinde disk bölümü oluşturmak ve/veya biçimlendirmek (formatlamak) için varsayılan Windows biçimlendirme yardımcı programını kullanabilirsiniz. Not: Sabit disk oluşturulduğunda ve/veya biçimlendirildiğinde tüm mevcut veriler silinecektir! 1. “Start (Başlat)”, “Run (Çalıştır)”a tıklayın, “diskmgmt.msc” komutunu çalıştırın ve “OK (Tamam)”a basın. 2. Harici sabit diski seçin ve disk üzerinde sağ tıklayın. Silmek istediğiniz bir disk bölümü varsa “Delete Partition (Disk Bölümünü Sil)”i seçin. Yeni bir bölüm oluşturmak için “Create New Partition (Yeni Disk Bölümü Oluştur)”u seçin. 2 41 TÜRKÇE 3. 4. 5. 6. “New Partition Wizard (Yeni Disk Bölümü Sihirbazı)” ekrana gelecektir. “Next (İleri)”ye tıklayın. “Primary Partition (Birincil Disk Bölümü)”nü seçin ve “Next (İleri)”ye tıklayın. Yeni disk bölümünüzün büyüklüğünü belirleyin. Varsayılan olarak maksimum boyut seçilmiştir. “Next (İleri)”ye tıklayın. Yeni disk bölümünüz için bir sürücü harfi atayın. Varsayılan olarak ilk boş sürücü harfi atanır. “Next (İleri)”ye tıklayın. 7 7 7. Not: 8. Sabit diski biçimlendirmek (formatlamak) için farklı ayarlar yapabilirsiniz. “File System (Dosya Sistemi)”nde NTFS ya da FAT32 arasında seçim yapabilirsiniz. Bölüm için bir birim adı da atayabilir ve “Quick Format (Hızlı Biçimlendir)”i seçebilirsiniz. Devam etmek için “Next (İleri)”ye tıklayın. Windows Disk Yönetimi kullanırken 32 GB’den büyük disk bölümleri sadece NTFS dosya sistemi ile biçimlendirilebilir! Seçili komutların bir özetini göreceksiniz. “Finish (Son)”u seçtiğinizde tüm komutlar yürütülecek ve sabit diskiniz kullanıma hazır olacaktır. CHD2UES’nizde bulunan sabit disk artık kullanıma hazırdır. 42 DECLARATION OF CE CONFORMITY The manufacturer 2L International BV Address Databankweg 7 3821 AL Amersfoort, the Netherlands Hereby declares that the product Type 2,5” USB/eSATA HDD Product CHD2UES Brandname Conceptronic Complies with following directives: 2004/108/EEC EMC directive: Electromagnetic Compatibility 73/23/EEC Low Voltage Directive: Electrical equipment designed for use within certain voltage limits The following standards were consulted to assess conformity: EN55022/9.98 Class B EN55024/9.98 EN 50081-1/1994 EN 61000-3-2/3/4/1995 EN 50082-1/1994 EN 60950/1995 The symbol confirms that this product conforms to the above named standards and regulations. Place and date of issue: Amersfoort, 03/08/2007 (dd/mm/yyyy) Herman Looijen, Product Marketing Manager 43