1
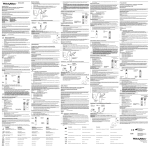
TS02B EXTERNAL 2.5’’ HDD ENCLOSURE Specifications: Model No. SST-TS02B Enclosure Material Aluminum. Color Black. Power Requirement 5Vdc. Drive Size Support 2.5” hard drive. Drive Interface Support SATA hard drive. Hard Disk Support Support up to 1TB Hard Disk and beyond * Enclosure Interface eSATA (Max. 3Gbits) USB2.0 (Max. 480Mbits) Operating System Support Windows 2000, XP, Vista, Mac OS and Linux. Net Weight 125 g Dimension 128mm(D) x 82mm(W) x17mm(H) Minimum System Requirements Windows 2000/XP, and Windows Vista Mac OS 9.x (Apple USB support 1.3.5 and greater) and Mac OS 10.1, 10.2, 10.3, and 10.4 MacȈG3 processor or greater Computer with eSATA or USB 2.0/1.1 interface. PCȈIntel Pentium 233MHz-compatible processor or greater Minimum 32MB RAM. *TS02 can theoretically support any hard drive capacity recognized by your PC, however, drive beyond 1 TB were unavailable for testing at the time of product release 1 EXTERNAL 2.5’’ HDD ENCLOSURE Entfernen Sie die beiden Schrauben der I/O Blende 1. Quite los dos tornillos de los paneles de E/S Retirez les 2 vis du panneau d’entrée/sortie Rimuovere le due viti dal pannello I/O Выньте два шурупа на панели ввода/вывода. I/O 䑜≄㜄㉐ ▄ᵐ㢌 ⇌㇠⪰ 㥐ᶤ䚝⏼␘. I/Oࡄࡀ࡞߆ࠄࡀࠫ2ᧄࠍᄖߒ߹ߔ Remove the two screws from the I/O panels. ौϟI/O䴶ᵓϞⱘܽ业㶎㍆ ㅔԧЁ᭛ ौϟI/O䴶ᵓϞⱘϸ乫㶎ϱ 2 EXTERNAL 2.5’’ HDD ENCLOSURE 2. Bringen Sie den beigefügten Schaumstoff wie gezeigt an Instale los paneles de mylar película que se incluyen como se muestra Collez l’ mylar film inclus comme montré Applicare le mylar film in dotazione come mostrato Прикрепите прилагаемые майларовая фильм, как показано на рисунке. Ἤ⫰㜄㉐㝴 ᵍ㢨 ┍⸽═ MYLAR 䙸⪸㡸 ⺴㵝䚝⏼␘. ࿑ߩࠃ߁ߦઃዻߩࡑࠗࡈࠖ࡞ࡓࠍ ขࠅઃߌ߹ߔ Attach the included mylar film as shown. ձ೪⼎ᇛ㌩㎷⠛䊐Ϟ ㅔԧЁ᭛ ձ⼎ᇚ㒱㓬⠛䌈Ϟ 3 EXTERNAL 2.5’’ HDD ENCLOSURE Verbinden Sie die 2,5'' Festplatte vorsichtig mit dem SATA Anschluss an der Platine 3. Conecte con cuidado su disco duro de 2,5” al conector SATA del PCB Branchez votre disque dur 2.5” délicatement au connecteur SATA situé sur le PCB Connettere con la dovuta cautela l’hard disk da 2,5” al connettore posto sul PCB Осторожно подключите ваш 2,5-дюймовый жесткий диск к SATA-разъему печатной платы. PCB㜄 㢼⏈ SATA 䀘≙䉤⪰ 2.5” 䚌☐☐⢰㢨⽀⪰ 㦤㐠㏘⤱᷀ 㜤ᷤ䚝⏼␘. 2.5”ࡂ࠼࠺ࠖࠬࠢ࠼ࠗࡉࠍPCBߩSATA ࠦࡀࠢ࠲ߦ⏕ታߦធ⛯ߒ߹ߔޕ Connect your 2.5” hard drive carefully to the SATA connector on the PCB. ᇛᙼⱘ2.5”⹀ᇣᖗഄᦦܹ3&%ᵓϞⱘ6$7$丁 ㅔԧЁ᭛ ᇚᙼⱘ2.5”⹀Ⲭᇣᖗഄᦦܹ3&%ᵓϞⱘ6$7$༈ 4 EXTERNAL 2.5’’ HDD ENCLOSURE Setzen Sie die 2,5'' Festplatte und die Platine in das TS02 Aluminium Gehäuse ein. Bitte stellen Sie sicher, dass sich die Platine in die Führungsnut einschiebt. 4. Inserte el disco duro y PCB en la caja de aluminio del TS02. Compruebe que el PCB se desliza en su lugar. Insérez le disque dur et le PCB dans le boîtier en aluminium du TS02. Veuillez bien vérifier que le PCB glisse correctement dans le rail du boîtier. Inserire l’hard disk ed il PCB nel box in alluminio TS02. Assicurarsi che il PCB scivoli nella specifica guida. Вставьте жесткий диск и печатную плату в алюминиевый корпус TS02. Убедитесь, что печатная плата попала в направляющие пазы. T02 㚀⨜⎸ 䀴㢨㏘㜄 䚌☐ ☐⢰㢨⽀㝴 PCB⪰ㇱ㢹䚝⏼␘. ᴴ㢨☐ 䝼㜄 PCBᴴ ⅸ⤠㫼 ㍌ 㢼⓸⦑ 䞉㢬䚝⏼␘. Insert the hare drive and PCB into TS02 aluminum case. Please make sure the PCB slide into the guiding groove. ࡂ࠼࠺ࠖࠬࠢ࠼ࠗࡉߣPCBࠍTS02 ࠕ࡞ࡒ࠾࠙ࡓࠤࠬߦࠇ߹ߔޕ PCBߪࠟࠗ࠼Ḵߦࠬࠗ࠼ᑼߦࠇߡߊߛߐޕ ᇛ⹀㟛3&%ᵓᦦܹ76ⲦЁ 䂟⺎䁡3&%ᵓℷ⺎ഄᦦܹᇢ䒠Ё ㅔԧЁ᭛ ᇚ⹀ⲬϢ3&%ᵓᦦܹ76ⲦЁ 䇋⹂䅸3&%ᵓℷ⹂ഄᦦܹᇐ䔼Ё 5 EXTERNAL 5. 2.5’’ HDD ENCLOSURE Setzen Sie die I/O Blende wieder ein und befestigen Sie diese mit den beiden Schrauben (siehe Schritt 1) Reinstale el panel de E/S y fíjelo con tornillos (paso 1) Remettez le panneau d’entrée/sortie et fixez-le avec les vis retirées lors de l’étape 1 Reinstallare il pannello I/O e serrarlo con le viti Установите на место панель ввода/вывода и закрепите шурупами (этап 1). I/O 䑜≄㡸 㣠 ㉘㾌䚌Ḕ ⇌㇠ ( STEP1)⦐ Ḕ㥉䚝⏼␘. I/Oࡄࡀ࡞ࠍᚯߒߢࠫࡀޔ࿕ቯߒ߹ߔ ࠬ࠹࠶ࡊ Reinstall the I/O panel and secure with screws (step1). ᇛI/O䴶ᵓ㺱ಲϺҹ㶎㍆䥪ℹ倳ϔ ㅔԧЁ᭛ ᇚI/O䴶ᵓ㺙ಲᑊҹ㶎ϱ䫕ℹ偸ϔ 6 G11209730




![アイタッチスリム・MaDoKa取扱説明書[PDFファイル/3.1MB]](http://vs1.manualzilla.com/store/data/006529538_3-875c8ca3ed6eaf2085d899d6ebefd3e0-150x150.png)