1
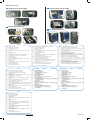
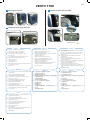
Q2845
VENTO 7700
A
C
Removing the side cover
Installing an optical disk drive (ODD)
1
3
2
2
1
B
Installing the power supply unit (PSU)
3
4
2
5
1
Continued at the back
English
A 1. Turn two rear panel thumbscrews counterclockwise.
2. Push the side cover to the direction of the rear panel.
3. Tilt the side cover and slide it out of the chassis.
2. Secure with screws.
3. Set the voltage selector according to the voltage in your area.
B 1. Slide the PSU into the slot until it snugly fits the metal rail.
C 1. Push the marked portion of the Magic Mask® to open.
Français
A 1. Retirez les deux vis du panneau arrière.
A 1. Drehen Sie die beiden Rändelschrauben an der Rückseite entgegen
2. Tirez le panneau latéral vers le panneau arrière.
3. Retirez le panneau latéral du châssis.
B 1. Glissez le bloc d’alimentation dans son slot jusqu’à ce qu’il soit bien
en place sur les rails métalliques.
3. Réglez le sélecteur de voltage selon votre région.
C 1. Appuyez sur la partie marquée Magic Mask pour ouvrir.
C 1. Drücken Sie zum Öffnen auf die Markierung der Magic Mask®.
3. Lift the drive bay lock.
4. Insert the ODD into the bay.
5. Align the ODD holes with the bay holes, then press down the drive bay
6. Connect cables.
2. Retirez le couvercle de protection de la baie du lecteur.
4. Insérez le lecteur optique dans la baie.
3. Soulevez le verrou de la baie du lecteur.
5. Alignez les pas de vis du lecteur optique avec ceux de la baie, puis
abaissez le verrou métallique pour sécuriser le lecteur.
6. Connectez les câbles.
Español
las agujas del reloj.
Metallschiene sitzt.
2. Sichern Sie es mit den Schrauben.
3. Stellen Sie den Spannungswahlschalter auf die in Ihrem Gebiet
anstehende Netzspannung.
2. Remove the drive bay cover.
A 1. Gire los dos tornillos de los paneles laterales en el sentido contrario a
dem Uhrzeigersinn.
2. Drücken Sie die Seitenabdeckung in Richtung Rückseite.
3. Kippen Sie die Seitenabdeckung an und ziehen Sie sie aus dem
Gehäuse heraus.
B 1. Schieben Sie das Netzteil in den Schacht, bis es richtig in der
2. Sécurisez-le à l’aide de vis.
®
lock to secure the drive in place.
Deutsch
2.
3.
4.
5.
Entfernen Sie die Laufwerksschachtabdeckung.
Heben Sie die Schachtverriegelung an.
Setzen Sie das optische Laufwerk in den Schacht ein.
Richten Sie die Löcher des Laufwerks mit denen am Schacht aus und
drücken Sie die Schachtverriegelung nach unten, um das Laufwerk zu
sichern.
6. Schießen Sie alle Kabel an.
繁體中文
簡體中文
A 1. 以逆時針方向旋轉,鬆開機殼後方的二顆手動螺絲。
A 1. 以逆時針方向旋轉,鬆開機箱後方的二顆手動螺絲。
2. 壓下機殼側板並往機殼後方推出。
2. 壓下機箱側板並往機箱後方推出。
2. Empuje la cubierta lateral en la dirección del panel trasero.
3. 將整個機殼側板取下來暫置於一旁。
3. 將整個機箱側板取下來暫置於一旁。
3. Incline la cubierta lateral y deslícela fuera del chasis.
B 1. 將電源供應器從機殼內部置入電源供應器插槽,並確認電源供應器剛剛好
2. Asegure la PSU con tornillos.
2. 鎖上四顆電源供應器螺絲。
2. 鎖上四顆電源螺絲。
3. Ajuste el selector de voltaje según el voltaje de su área.
3. 依所在地區的電壓值設定電壓選擇開關。
3. 依所在地區的電壓值設置電壓選擇開關。
2. Retire la cubierta del zócalo de la unidad.
C 1. 按一下Magic Mask面板的Push按鈕以開啟前面板。
C 1. 按一下Magic Mask面板的Push按鈕以開啟前面板。
2. 移除光碟機插槽擋板。
2. 去除光驅插槽擋板。
3. Levante el bloqueo del zócalo de la unidad.
3. 鬆開插槽固定扣。
3. 鬆開插槽固定扣。
4. Inserte la unidad óptica en su zócalo.
4. 將光碟機置入插槽內。
4. 將光驅置入插槽內。
5. Alinee los agujeros de la unidad óptica con los del zócalo. Empuje el bloqueo
5. 將光碟機螺絲孔對準機殼的螺絲孔,並將插槽側邊的固定扣往下扣上,以
5. 將光驅螺絲孔對準機箱的螺絲孔,並將插槽側邊的固定扣往下扣上,以鎖
6. 連接光驅電源線及信號線。
B 1. Deslice la PSU en su zócalo hasta que se ajuste al raíl metálico.
C 1. Empuje la porción marcada Magic Mask® para abrirla.
與插槽的金屬框架完全密合。
de la unidad hacia abajo para asegurar la unidad en su lugar.
6. Conecte los cables.
A 1. İki adet arka panel baş parmaklarını saatin ters yönünde çevirin.
2. Yan kapağı arka panel yönünde itin.
3. Yan kapağı eğin ve şasiden dışları kaydırın.
2. Vidaları kullanarak sabitleyin.
3. Voltaj selektörünü bölgenizdeki voltaja göre ayarlayın.
2. Sürücü yuvasının kapağını çıkarın.
3. Sürücü yuvasının kilidini kaldırın.
4. ODD’yi yuvaya takın.
5. ODD deliklerini yuvanın delikleri ile hizalayın, ardından sürücüyü yerine
6. Kabloları bağlayın.
B 1. PSU’yu metal raya tam oturuncaya kadar yuvaya kaydırın.
C 1. Açmak için Magic Mask®’ın işaretli kısmını itin.
sabitlemek için sürücü yuvasının kilidine bastırın.
全密合。
住設備。
鎖住裝置。
Türkçe
B 1. 將電源從機箱內部置入電源插槽,並確認電源剛剛好與插槽的金屬框架完
6. 連接光碟機電源線及訊號線。
VENTO 7700 (continued)
D
F
Installing a hard disk drive (HDD)
Installing a floppy disk drive (FDD)
2
1
2
1
3
E
4
3
Installing an expansion card
1
G
2
Reinstalling the side cover
3
2
1
3
2
4
English
D 1. Lift the drive bay lock.
2.
3.
4.
E 1.
Insert the HDD into the drive bay.
Press down the drive bay lock.
Connect cables.
On the rear panel, remove the metal cover opposite the slot you want
to use.
2. Press down the lock tab.
3. Install the card.
4. On the rear panel, push the slot cover lock tab to secure the card.
F 1. Remove the drive bay cover and knock-down metal cover.
2. Lift the drive bay lock.
3. Insert the FDD into the bay.
4. Align the FDD holes with the bay holes, then press down the drive bay
lock to secure the drive.
5. Connect cables.
G 1. Slide the top edge into the chassis, and align the side cover handle
with the curve on the bezel.
2. Slide the cover toward the front.
3. Turn the thumbscrews clockwise.
Français
D 1. Soulevez le verrou métallique de la baie pour disque dur.
2.
3.
4.
E 1.
2.
3.
4.
F 1.
2.
3.
4. Alignez les pas de vis du lecteur de disquettes avec ceux de la baie,
puis abaissez le verrou métallique pour sécuriser le lecteur.
5. Connectez les câbles.
G 1. Insérez le panneau sur les onglets et les rails du châssis.
2. Faites coulissez le panneau vers l’avant du châssis.
3. Replacez les vis sur le panneau arrière.
Español
D 1. Levante el bloqueo del zócalo de la unidad.
2.
3.
4.
E 1.
Inserte el disco duro en el zócalo de la unidad.
Empuje hacia abajo el bloqueo del zócalo de la unidad.
Conecte los cables.
En el panel trasero, retire la cubierta metálica opuesta al zócalo que
desee usar.
2. Empuje hacia abajo la ficha del bloqueo.
3. Instale la tarjeta.
4. En el panel trasero, empuje la ficha de la cubierta del zócalo para asegurar
la tarjeta.
F 1. Retire la cubierta del zócalo de la unidad y la cubierta metálica.
2. Levante el bloqueo del zócalo de la unidad.
3. Inserte el disquete en su zócalo.
4. Alinee los agujeros de la unidad de disquete con los agujeros del zócalo,
y empuje hacia abajo el bloqueo del zócalo de la unidad para asegurar
ésta.
5. Conecte los cables.
G 1. Deslice el borde superior en el chasis, y alinee el mango de la cubierta
lateral con la curva del bisel.
2. Deslice la cubierta en la dirección frontal.
3. Gire los tornillos en la dirección de las agujas del reloj.
Insérez le disque dur dais la baie.
Rabaissez le verrou métallique.
Connectez les câbles.
Sur le panneau arrière, retirez le cache métallique faisant face au slot
que vous souhaitez utiliser.
Abaissez l’onglet de verrouillage.
Installez la carte.
Sur le panneau arrière, abaissez l’onglet de verrouillage du cache
métallique pour sécuriser la carte.
Retirez le couvercle et le cache métallique de la baie.
Soulevez le verrou de la baie du lecteur.
Insérez le lecteur de disquettes dans la baie.
Deutsch
D 1. Heben Sie die Laufwerksschachtverriegelung an.
2.
3.
4.
E 1.
Schieben Sie die Festplatte in den Laufwerksschacht.
Drücken Sie die Laufwerksschachtverriegelung nach unten.
Schließen Sie alle Kabel an.
An der Rückseite entfernen Sie die Metallblende an dem Steckplatz,
den Sie benutzen möchten.
2. Drücken Sie den Sicherungshebel herunter.
3. Installieren Sie die Erweiterungskarte.
4. Sichern Sie die Karte mit dem Sicherungshebel an der Rückseite.
F 1. Entfernen Sie die Laufwerksschachtabdeckung und die Metallblende.
2. Heben Sie die Laufwerksschachtverriegelung an.
3. Schieben Sie das Diskettenlaufwerk in den Schacht.
4. R i c h t e n S i e d i e L ö c h e r d e s D i s k e t t e n l a u f w e r k s m i t
den Löchern am Schacht aus und drücken Sie die
Schachtverriegelung herunter, um das Laufwerk zu sichern.
5. Schließen Sie alle Kabel an.
G 1. Schieben Sie die obere Kante in das Gehäuse und richten Sie den
Griff der Abdeckung mit der Wölbung an dr Blende aus.
2. Schieben Sie die Abdeckung in Richtung Vorderseite.
3. Ziehen Sie die Rändelschrauben in Uhrzeigerrichtung wieder an.
簡體中文
繁體中文
D 1. 鬆開硬碟機插槽固定扣。
2.
3.
4.
E 1.
2.
3.
4.
F 1.
將硬碟機小心地插入插槽中。
壓下硬碟機插槽固定扣以固定住硬碟機。
連接電源線及訊號線。
移除您欲使用插槽的金屬檔板。
鬆開擴充卡���
卡榫�
。
將擴充卡上的金手指對準主機板上的插槽小心地插入。
壓下卡榫以固定住擴充卡。
移除軟碟機插槽前方的塑膠擋板。並用螺絲起子將插槽上的金屬擋板往內
壓,鬆開之後再將其取出來。
2. 鬆開插槽固定扣。
3. 將軟碟機小心地插入插槽中。
4. 注意軟碟機上的螺絲孔要對準機殼上的螺絲孔,然後壓下固定扣以固定住
軟碟機。
5. 連接電源線及訊號線。
G 1. 將機殼側板的卡榫對準側邊軌道小心地裝上機殼。
2. 將機殼側板往前面板方向推,使其完全固定在機殼上。
3. 鎖上二顆手動螺絲。
D 1. 鬆開硬盤插槽固定扣。
2. 將硬盤小心地插入插槽中。
3. 壓下硬盤插槽固定扣以固定住硬盤。
4. 連接電源線及信號線。
2. 鬆開擴展卡卡榫。
3. 將擴展卡上的金手指對準主板上的插槽小心地插入。
4. 壓下卡榫以固定住擴展卡。
E 1. 去除您欲使用插槽的金屬檔板。
F 1. 去除軟驅插槽前方的塑膠擋板。並用螺絲起子將插槽上的金屬擋板往內
壓,鬆開之後再將其取出來。
2. 鬆開插槽固定扣。
3. 將軟驅小心地插入插槽中。
4. 注意軟驅上的螺絲孔要對準機箱上的螺絲孔,然後壓下固定扣以固定住
軟驅。
5. 連接電源線及信號線。
2. 將機箱側板往前面板方向推,使其完全固定在機箱上。
3. 鎖上二顆手動螺絲。
G 1. 將機箱側板的卡榫對準側邊軌道小心地裝上機箱。
Türkçe
D 1. Sürücü yuvası kilidini kaldırın.
2.
3.
4.
E 1.
2.
3.
4.
F 1.
2.
3.
4.
5.
2.
3.
G 1.
HDD’yi sürücü yuvasına takın.
Sürücü yuvası kilidine basın.
Kabloları bağlayın.
Arka panelde, kullanmak istediğiniz yuvanın karşısındaki metal kapağı
çıkarın.
Kilitleme sekmesine basın.
Kartı takın.
Arka panelde kartı sabitlemek için yuva kapağının kilit sekmesini itin.
Sürücü yuvasının kapağını çıkarın ve metal kapağı aşağı kilitleyin.
Sürücü yuvasının kilidini kaldırın.
FDD’yi yuvaya takın.
FDD deliklerini yuva delikleri ile hizalayın, ardından sürücüyü sabitlemek
için sürücü yuvasının kilidine basın.
Kabloları bağlayın.
Üst kenarı şasiye kaydırın ve yan kapak tutamağını ön paneldeki yan
kapak tutamağı ile hizalayın.
Kapağı öne kaydırın.
Parmak vidalarını saat yönünde çevirin.
For more details, visit the ASUS website at www.asus.com.
15G067376000