1
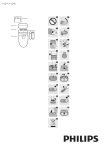
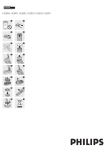
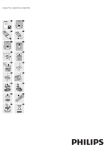
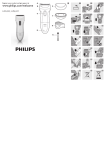
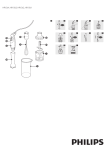
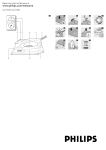
HQ30
1
2
3
4
5
6
7
8
9
10
11
12
13
14
English
Introduction
Congratulations on your purchase and welcome to
Philips! To fully benefit from the support that Philips offers,
register your product at www.philips.com/welcome.
Important
Read this user manual carefully before you use the
appliance and save it for future reference.
-
-
-
Warning
This appliance is not intended for use by persons
(including children) with reduced physical, sensory
or mental capabilities, or lack of experience and
knowledge, unless they have been given supervision
or instruction concerning use of the appliance by a
person responsible for their safety.
Children should be supervised to ensure that they
do not play with the appliance.
Caution
Keep the appliance dry.
Use and store the appliance at a temperature
between 15°C and 35°C.
Remove the batteries from the appliance if you are
not going to use it for some time.
Note: Philips Shaving Head Cleaning Spray may not be
available in all countries. Contact the Customer Care Centre
in your country about the availability of this accessory.
You can also clean the shaver in the following way:
Every week: shaving unit and hair chamber
1 Switch off the shaver.
2 Clean the top of the appliance first. Use the
cleaning brush supplied (Fig. 6).
3 Press the release button (1) and remove the
shaving unit (2) (Fig. 7).
4 Clean the inside of the shaving unit and the hair
chamber with the cleaning brush (Fig. 8).
5 Put the shaving unit back onto the shaver (Fig. 9).
Every two months: shaving heads
1 Switch off the shaver.
2 Press the release button (1) and remove the
the central spring towards each other (1). Then
lift the retaining frame out of the shaving unit
(2) (Fig. 10).
The appliance runs on two R6 AA 1.5-volt batteries.
Preferably use Philips alkaline batteries.
5 Clean the cutter with the short-bristled side of the
compartment (Fig. 2).
Note: Make sure the + and - indications on the batteries
match the indications in the battery compartment.
Note:The shaver does not work if the batteries have been
placed incorrectly.
-
How to avoid damage due to battery leakage
Do not expose the appliance to temperatures higher
than 35°C.
Remove the batteries if the appliance is not going to
be used for a month or more;
Do not leave empty batteries in the appliance.
Shaving time
Two new batteries offer a shaving time of 60 minutes.
Using the appliance
Shaving
Your skin may need 2 or 3 weeks to get accustomed to
the Philips shaving system.
Shaving on a dry face gives the best results.
1 Press the switch lock and push the on/off slide
upwards to switch on the shaver (Fig. 3).
Note:The switch lock prevents accidental switching on of the
appliance.
and clean them one by one (Fig. 11).
Do not mix up the cutters and the guards.
This is essential since each cutter has been ground with
its corresponding guard for optimal performance. If you
accidentally mix up the sets, it could take several weeks
before optimal shaving performance is restored.
cleaning brush (Fig. 12).
Brush carefully in the direction of the arrow.
6 Clean the guard with the brush (Fig. 13).
7 Slide the shaving heads back into the retaining
frame and put the retaining frame back into the
shaving unit.
8 Put the shaving unit back onto the shaver.
Extra thorough cleaning
For extra thorough cleaning, put the shaving heads in
a degreasing liquid (e.g. alcohol) every six months. To
remove the shaving heads, follow steps 1 to 4 described
above. After cleaning, lubricate the central point on the
inside of the guards with a drop of sewing machine oil to
prevent wear of the shaving heads.
Storage
1 Switch off the shaver.
2 Put the protection cap on the shaver after use to
prevent damage to the shaving heads (Fig. 5).
Replacement
Replace the shaving heads every 2 years for optimal
shaving results.
Replace damaged or worn shaving heads with HQ3
Philips Double Action shaving heads only.
1 Switch off the shaver.
2 Press the release button (1) and remove the
shaving unit (2) (Fig. 7).
3 To remove the retaining frame, push the sides of
the central spring towards each other (1). Then
lift the retaining frame out of the shaving unit
(2) (Fig. 10).
2 Move the shaving heads over your skin. Make both
4 Slide the shaving heads out of the retaining frame
3 Push the on/off slide downwards to switch off the
5 Put the retaining frame back into the shaving unit.
6 Put the shaving unit back onto the shaver.
straight and circular movements (Fig. 4).
shaver.
4 Put the protection cap on the shaver after use to
prevent damage to the shaving heads (Fig. 5).
Cleaning and maintenance
Never use scouring pads, abrasive cleaning agents or
aggressive liquids such as petrol or acetone to clean the
appliance.
Regular cleaning guarantees better shaving performance.
For easy and optimal cleaning, Philips Shaving Head
Cleaning Spray (type no. HQ110) is available. Ask your
Philips dealer for information.
4222.001.8944.6
Guarantee restrictions
The shaving heads (cutters and guards) are not covered
by the terms of the international guarantee because they
are subject to wear.
shaving unit (2) (Fig. 7).
4 Slide the shaving heads out of the retaining frame
1 Open the lid of the battery compartment (Fig. 1).
2 Put two batteries in the battery
Batteries contain substances that may pollute the
environment. Do not throw away batteries with the
normal household waste, but dispose of them at an
official collection point for batteries. Always remove
the batteries before you discard and hand in the
appliance at an official collection point.
Guarantee & service
If you need information or if you have a problem, please
visit the Philips website at www.philips.com or contact the
Philips Customer Care Centre in your country (you find
its phone number in the worldwide guarantee leaflet).
If there is no Customer Care Centre in your country,
go to your local Philips dealer or contact the Service
Department of Philips Domestic Appliances and Personal
Care BV.
3 To remove the retaining frame, push the sides of
Compliance with standards
This Philips appliance complies with all standards
regarding electromagnetic fields (EMF). If handled
properly and according to the instructions in this user
manual, the appliance is safe to use based on scientific
evidence available today.
Preparing for use
Inserting batteries
Make sure that your hands are dry when you insert the
batteries.
-
and replace them with new ones (Fig. 11).
Accessories
The following accessories are available:
- HQ3 Philips Double Action shaving heads.
- HQ110 Philips Shaving Head Cleaning Spray (not
available in China).
Environment
- Do not throw away the appliance with the normal
household waste at the end of its life, but hand it in
at an official collection point for recycling. By doing
this, you help to preserve the environment (Fig. 14).
2/4
繁體中文
簡介
恭喜您購買本產品並歡迎加入飛利浦!請於 www.
philips.com/welcome 註冊您的產品,來善用飛利浦
提供的支援。
重要事項
使用本產品前,請先仔細閱讀本使用手冊,並保留
說明以供日後參考。
-
-
警示
本產品不適合供下列人士 (包括小孩) 使用:身
體官能或心智能力退化者,或是經驗與使用知識
缺乏者。他們需要有負責其安全的人員在旁監
督,或指示產品的使用方法,方可使用。
請勿讓孩童將本產品當成玩具。
警告
請保持本產品乾燥。
請於 15°C 到 35°C 間使用並存放本產品。
如果您長時間不使用本產品,請取出本產品的
電池。
符合標準
本飛利浦產品符合電磁場 (electromagnetic fields,
EMF) 所有相關標準。若正確處理及依照本使用手冊
之說明進行操作,根據現有之科學文獻來看,使用
本產品並無安全顧慮。
使用前準備
裝入電池
本產品使用兩顆 R6 AA 1.5 伏特電池;建議使用飛
利浦鹼性電池。
裝入電池時請保持雙手乾燥。
1 打開電池盒的蓋子。 (圖 1)
2 將兩顆電池裝入電池盒內。 (圖 2)
注意: 請確認電池上的 +/- 正負極位置與電池盒內
的標示位置相符。
注意: 如果電池裝入的方向不正確,電鬍刀將無法
運作。
-
為避免電池漏電造成損壞:
請勿讓產品暴露於超過攝氏 35°C 的高溫。
如果將有一個月以上的時間不使用本產品,請
將電池取出;
請勿將電力耗盡的電池留置在此產品中。
刮鬍時間
兩顆新電池可以讓電鬍刀連續使用約 60 分鐘。
使用此電器
除毛
您的皮膚可能需要 2 到 3 週的時間才能完全適應飛
利浦電鬍刀系統。
乾刮可獲得最佳的刮鬍效果。
1 請按下開關鎖並將 On/Off 開關往上推,即可開
啟產品電源。 (圖 3)
注意: 開關鎖可預防意外開啟本產品電源。
2 將電鬍刀刀頭在皮膚上移動,請同時用直線及畫
圓的方式來移動。 (圖 4)
3 將 On/Off 開關往下推,即可關閉電鬍刀電源。
4 使用後請蓋上電鬍刀保護蓋,以避免電鬍刀刀頭
損壞。 (圖 5)
清潔與維護
絕對不可使用鋼絲絨、磨蝕性的清潔劑或侵蝕性的
液體 (例如汽油或丙酮) 清潔本產品。
定期清潔以維持較佳的刮鬍效果。
要輕鬆達到最佳的清潔效果,可使用 飛利浦電鬍刀
刀頭噴霧清潔劑 (型號:HQ110)。詳細資訊請洽詢
飛利浦經銷商。
注意: 飛利浦電鬍刀刀頭噴霧清潔劑 並非所有國家
都有供應。關於是否有這項配件供應,請與您所在
國家的顧客服務中心聯繫。
您也可以利用下列方法來清潔電鬍刀:
3 按下釋放鈕 (1) 並拆下電鬍刀組 (2)。 (圖 7)
4 用清潔刷清潔電鬍刀組的內部和鬍渣室。 (圖 8)
5 將電鬍刀組裝回電鬍刀上。 (圖 9)
每兩個月:電鬍刀刀頭
1 請先關閉電鬍刀電源。
2 按下釋放鈕 (1) 並拆下電鬍刀組 (2)。 (圖 7)
3 要拆下固定架,請將中央彈簧的兩側朝中間
推壓 (1)。然後提起固定架從電鬍刀組取出
(2)。 (圖 10)
4 將電鬍刀刀頭推出固定架,個別清潔。 (圖 11)
請勿弄亂刀片及刀網的順序。
這點非常重要,因為每一片刀片都與相對的刀網搭
配磨合以達到最佳的效果。如果不小心弄亂了刀片
和刀網,可能需數週的時間才能恢復最佳的刮鬍效
果。
5 請使用清潔刷的短毛側來清潔刀具。 (圖 12)
請朝箭頭方向小心刷動。
6 用清潔刷清潔刀網。 (圖 13)
7 將電鬍刀刀頭推回固定架,然後將固定框裝回電
鬍刀組。
8 將電鬍刀組裝回電鬍刀上。
強化徹底清潔
如需更徹底清洗,請每六個月一次將電鬍刀刀頭 浸
泡於去油脂液體 (如酒精) 進行清潔。電鬍刀刀頭的
拆除請依照前述步驟 1 至 4 進行。清潔後,請用一
滴縫紉機油潤滑刀網內側的中心點以避免電鬍刀頭
磨損。
收藏
1 請先關閉電鬍刀電源。
2 使用後請蓋上電鬍刀保護蓋,以避免電鬍刀刀頭
損壞。 (圖 5)
更換
每兩年更換刀頭,可達到完美的刮鬍效果 只能使用
HQ3 飛利浦 Double Action 電鬍刀刀頭,來更換損
壞或磨損的電鬍刀刀頭。
1 請先關閉電鬍刀電源。
2 按下釋放鈕 (1) 並拆下電鬍刀組 (2)。 (圖 7)
3 要拆下固定架,請將中央彈簧的兩側朝中間
推壓 (1)。然後提起固定架從電鬍刀組取出
(2)。 (圖 10)
4 將電鬍刀頭推出固定架外,然後更換新刀
頭。 (圖 11)
5 將固定架裝回電鬍刀組。
6 將電鬍刀組裝回電鬍刀上。
配件
備有下列配件可供另外選購:
- HQ3 飛利浦 Double Action 電鬍刀頭。
- HQ110 飛利浦電鬍刀刀頭清潔噴霧劑 (未於中
國發行)。
環境保護
- 電器壽命結束時請勿與一般家庭廢棄物一併丟
棄。請將該產品放置於政府指定的回收站,此舉
能為環保盡一份心力。 (圖 14)
- 電池內含可能會污染環境的物質,請勿與一般家
庭廢棄物一併丟棄,應送至政府指定的電池回收
點進行回收。若要丟棄本產品,也請將電池取
出,再將產品送至政府指定的回收點。
保固與服務
若您需要相關資訊或有任何問題,請造訪飛利浦網
站 www.philips.com,或連絡您當地的飛利浦客戶
服務中心 (您可以在全球保證書上找到連絡電話)。
如果您當地沒有客戶服務中心,請洽詢當地飛利浦
經銷商,或與飛利浦小家電及個人護理用品部門聯
繫。
保固限制
電鬍刀刀頭 (刀具和刀網) 由於其磨損性,因此不在
全球保固範圍內。
每週:清潔電鬍刀組及鬍渣室
1 請先關閉電鬍刀電源。
2 利用隨附的清潔刷清,先清潔本產品的上
方。 (圖 6)
4222.001.8944.6
3/4
简体中文
产品简介
感谢您的惠顾,欢迎光临飞利浦!为了您能充分享
受飞利浦提供的支持,请注册您的产品,网址为
www.philips.com/welcome。
注意事项
使用产品之前,请仔细阅读本用户手册,并妥善保
管以供日后参考。
-
-
使用准备
插入电池
产品使用两节 R6 AA 1.5 伏电池。最好使用飞利浦
碱性电池。
装入电池之前,双手要保持干燥。
1 打开电池仓盖。 (图 1)
2 将两节电池放入电池仓。 (图 2)
注: 确认电池的正负极指示 +,- 与电池仓的正负
指示一致。
注: 如果电池装错,则剃须刀就不会工作。
-
注: 飞利浦剃须刀头清洁喷雾剂不是所有国家/地
区都有销售。请向当地的客户服务中心了解是否有
售。
您也可以用下列方式清洁剃须刀:
每周:剃须刀头部件和胡茬储
警告
藏室
本产品不打算由肢体不健全、感 1 关闭剃须刀。
觉或精神上有障碍或缺乏相关经 2 使用产品随附的清洁刷首先清洁产品顶
部。 (图 6)
验和知识的人(包括儿童)使
3
按下释放钮
(1),取下剃须刀头部件 (2)。 (图 7)
用,除非有负责他们安全的人对
4 使用清洁刷清洁剃须刀头部件内侧和胡茬储藏
他们使用本产品进行监督或指
室。 (图 8)
导。
5 将剃须刀头部件重新安装到剃须刀上。 (图 9)
应照看好儿童,确保他们不玩耍
每两个月:剃须刀头
这些产品。
1
关闭剃须刀。
注意
2 按下释放钮 (1),取下剃须刀头部件 (2)。 (图 7)
保持产品干燥。
3 要取下固定架,请向中间捏中央弹簧的两侧
必须在 15 摄氏度至 35 摄氏度
(1)。然后向上提起固定架,将其从剃须刀头部
件中取出 (2)。 (图 10)
之间的温度下使用和存放本产
4 将剃须刀头滑出固定架,并一个一个地清
品。
洁。 (图 11)
如果在一段时期内不会使用本产
不要将刀片和网罩混合在一起。
品,请从产品中取出电池。
这一点很重要,因为每组刀片和网罩都已相互磨合
符合标准
得很好,以便获得最佳剃须效果。如果不小心将它
这款飞利浦产品符合关于电磁场 (EMF) 的所有相关
标准。据目前的科学证明,如果正确使用并按照本
用户手册中的说明进行操作,本产品是安全的。
-
为保证更好的剃须效果,剃须刀必须定期清洗。
为了更方便有效地清洁剃须刀,特推出飞利浦剃须
刀头清洁喷雾剂(型号 HQ110)。有关信息,请咨
询飞利浦家庭小电器客户服务部。
如何避免因电池泄漏而引起的损坏
切勿将产品暴露在温度高于 35°C 的环境中。
如果一个月或一个月以上不使用本产品,应将
电池取出;
切勿将耗尽的电池留在产品中。
剃须时间
两节新电池可提供的剃须时间最长为 60 分钟。
使用本产品
剃毛
您的皮肤可能需要 2 到 3 周才能适应飞利浦剃须系
统。
在干爽的面部剃须效果最佳。
1 按开关锁,然后向上推动开/关滑钮启动剃须
刀。 (图 3)
作。 (图 4)
3 向下推动开/关滑钮以关闭剃须刀电源。
4 使用之后用保护盖盖好剃须刀,以防剃须刀头受
损。 (图 5)
清洁和维护
不要使用钢丝绒、研磨性清洁剂或
腐蚀性液体(例如汽油或丙酮)来
清洁产品。
4222.001.8944.6
保修限制
由于剃须刀头(刀片和网罩)属于易磨损物品,因
此不在国际保修条款的涵盖范围之列。
2008/02/20
们弄混,剃须刀将需要数周时间才能恢复到最佳剃
须性能。
5 用清洁刷的短毛一侧清洁刀片。 (图 12)
按箭头方向仔细刷净。
6 用清洁刷清洁网罩。 (图 13)
7 滑动剃须刀头,将其重新安装到固定架上,然后
将固定架重新安装到剃须刀头部件上。
8 将剃须刀头部件重新安装到剃须刀上。
极其彻底的清洁
如需彻底清洁,则应每隔六个月将剃须刀头浸入脱
脂液(如酒精)清洗。按照上述步骤 1 至 4 取下剃
须刀头。清洗完成后,向网罩内的中心点滴入一滴
缝纫机油,以防剃须刀头磨损。
存放
1 关闭剃须刀。
2 使用之后用保护盖盖好剃须刀,以防剃须刀头受
损。 (图 5)
更换
为实现最佳剃须效果,建议每 2 年更换剃须刀头。
只能用 HQ3 飞利浦 Double Action 剃须刀头更换损
坏或磨损的剃须刀头。
1 关闭剃须刀。
2 按下释放钮 (1),取下剃须刀头部件 (2)。 (图 7)
3 要取下固定架,请向中间捏中央弹簧的两侧
(1)。然后向上提起固定架,将其从剃须刀头部
件中取出 (2)。 (图 10)
4 将剃须刀头从固定架上滑出,用新的剃须刀头更
换。 (图 11)
5 将固定架重新安装到剃须刀头部件上。
6 将剃须刀头部件重新安装到剃须刀上。
附件
注: 开关锁可防止无意中打开产品电源。
2 将剃须刀头在皮肤上移动。作直线和迂回动
保修与服务
如果您需要了解详细信息或有任何问题,请浏览飞
利浦网站,网址为 www.philips.com。您也可以与
您所在的国家/地区的飞利浦客户服务中心联系(您
可以从全球保修卡中找到电话号码)。如果您所在
的国家/地区没有飞利浦客户服务中心,请与当地
的飞利浦经销商或与飞利浦家庭小电器的维修中心
联系。
可选配以下附件:
- HQ3 飞利浦剃须刀头。
- HQ110 飞利浦剃须刀头清洁喷雾剂(不在中国
出售)
环保
-
弃置产品时,请不要将其与一般生活垃圾堆放在
一起;应将其交给官方指定的回收中心。这样做
有利于环保。 (图 14)
电池包含可能污染环境的物质。不要将电池和普
通生活垃圾一同丢弃,而应交给正式的电池收集
点处理。丢弃产品时,一定要将电池取出,并将
产品送到官方指定的回收站。
4/4