1
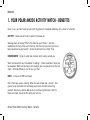
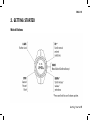
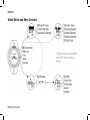
ENGLISH
ENGLISH
ENGLISH
Contents
1. YOUR POLAR AW200 ACTIVITY WATCH BENEFITS ...................................... 4
2. GETTING STARTED ............................ 5
Watch Buttons................................. 5
Watch Modes and Menu Structure .......... 6
What to Do First? .............................. 7
3. BEFORE ACTIVITY ............................. 8
Daily Use ................................... 8
Altitude Measurement ..................... 8
Altitude Calibration ........................ 8
Walking/Hiking Hilly or Flat Terrain...... 9
Barometer Calibration ....................10
Barometric Trend .........................10
Temperature ...............................11
4. DURING ACTIVITY ............................ 12
Start Action Recording (REC) ................ 12
Reading Data on Display ..................... 13
Polar Activity Zones.......................14
Reading Data on Display...continued ...16
File view...................................... 17
Altitude Trend Scale ......................... 18
Altitude Difference ........................... 19
5. AFTER ACTIVITY .............................. 20
Files of Saved Activity Data.................. 20
Viewing Saved Activity Data .............21
Delete a File ...............................23
Delete All Files ............................23
Reset Totals File ..........................23
6. SETTINGS..................................... 24
ENGLISH
Watch Settings ............................... 24
Daily Alarm On/Off........................24
Time of Day................................25
Date .......................................25
Sound On/Off..............................25
Units (metric/imperial) ...................26
ALTI AUTO On/Off .......................26
Intro On/Off................................27
User Settings ................................. 28
General Settings ............................. 29
Backlight...................................29
Button Lock ...............................29
7. CUSTOMER SERVICE INFORMATION ......... 30
Care and Maintenance....................... 30
Caring for your Activity Watch ..........30
Service .....................................31
Battery .....................................32
Precautions .................................. 34
Technical Capability .....................34
Minimizing Possible Health Risks During
Physical Outdoor Activities ..............35
Frequently Asked Questions ................. 36
Technical Specification ..................... 38
Limited Polar International Guarantee ...... 41
Polar Disclaimer ............................. 43
INDEX ......................................... 44
ENGLISH
1. YOUR POLAR AW200 ACTIVITY WATCH - BENEFITS
Once it's on, you don't want to take it off! A gateway to improved wellbeing with a touch of a button!
ACTIVITY - Allow yourself to be inspired in the open air.
Walking slowly or briskly? What's the effect on your fitness? - See live
feedback on Activity Zones and intensity. How much of your hiking time has
been beneficial to your health? - Check the Active Time vs Total Time
ENVIRONMENT - Enjoy it safely and discover what’s really around you.
Want to know which way the weather's heading? - Check barometric trend and
be prepared. Want to know how much elevation you have gained since the last
stop? - Altitude difference can tell you just that.
BODY - Just press START and move!
How intensively are you moving? When to have a break and a snack? - One
glance to see your work rate and keep you on track without exhausting
yourself. How many calories did you burn and how high did you hike? For
those and more, check the File after your activity.
4 Your Polar AW200 Activity Watch - Benefits
ENGLISH
2. GETTING STARTED
Watch Buttons
Getting Started 5
ENGLISH
Watch Modes and Menu Structure
6 Getting Started
ENGLISH
What to Do First?
1.
2.
3.
4.
5.
6.
Activate your Polar AW200 Activity Watch by
pressing the START button twice, until Basic
SETTINGS is displayed*.
Press START again and follow the instructions
on display:
Time: select either 12h or 24h. With 12 h,
select AM/PM. Enter correct time.
Date: DD = days, MM = month, YY = year
Units: KILOGRAMS (meters (M) / hectopascal
(hPa)/ Centigrades (°C)) or POUNDS (feet (FT) /
inches of mercury (inHg) / Fahrenheit (°F)
Settings OK? is displayed. To change any
settings, press the STOP button repeatedly
until you see the data you want to change.
Once correct, press the START button. The
display automatically switches to show the
time of day (TIME mode).
7.
To record as accurate data as possible during
activity, you need to key in some of your
personal details. Do this either straight away,
or when you start recording your activity.
To do so now, press the START button. Menu
WATCH SET is displayed. Press DOWN once
until Menu USER SET appears on display. Press
START, enter and confirm the required
information. Press and hold the STOP button
to return to TIME mode. For more detailed
description, see 'User Settings'.
Your activity watch is now ready for action!
*If you do not press any buttons for approx. five
minutes, the display automatically switches to
TIME mode. You will then need to set the correct
time, date and units separately. See 'Settings' for
details.
Getting Started 7
ENGLISH
3. BEFORE ACTIVITY
Daily Use
Altitude Calibration
Your Polar AW200 Activity Watch can be worn on
the wrist at all times. Not only does it tell you the
time of day and date, but the surrounding
temperature and air pressure trend (BARO), as
well, helping you keep track of any changes in the
weather.
To calibrate the altimeter, check your current
altitude on a topographic map of your area.
Alternatively, calibrate the barometer instead. For
this, see 'Barometer Calibration'.
1.
Altitude Measurement
Altitude measurement relies on a simple principle:
atmospheric pressure decreases as elevation
increases.
2.
For accurate altitude readings, the device needs to
be calibrated first.
3.
4.
8 Before Activity
Go to ALTIBARO mode. If the display shows
BARO mode, press START twice to Activate
ALTIMETER. If you are already in ALTI mode,
proceed to step 2.
Press START and UP to go to Altitude
CALIBRATION and press START. The value on
the display starts flashing.
Enter the correct altitude (M / FT).
Calibration OK is displayed for three seconds
before the display returns to ALTI mode.
ENGLISH
Walking/Hiking Hilly or Flat Terrain
If your aim is to roam around in a landscape where
altitude is likely to change a lot, we recommend
that you follow the altitude trend graph during
your hike. It is activated automatically as you start
recording your activity.
However, if you are planning to walk on flat rather
than hilly terrain, you may want to follow the
changes in the wheather instead in which case you
should deactivate automatic altitude
measurement, ALTI AUTO:
To activate barometric measurement, go to ALTI
mode and select Activate BAROMETER. Barometer
ACTIVATED is visible for a few seconds before the
display returns to BARO mode.
Once you start recording, the barometric trend
graph instead of the altitude trend graph will
appear on the display.
Start at TIME mode and select Menu WATCH SET >
Set ALTI AUTO On > OFF. Return to TIME mode by
pressing and holding the STOP button.
Before Activity 9
ENGLISH
Barometer Calibration
Barometric Trend
As barometric and altitude measurements are both
based on air pressure, calibrating the barometer
will automatically calibrate the altimeter. This is
practical in case you don't know the altitude but
have access to the internet or can call a local
weather station for current barometric information.
By using the barometer to predict possible weather
changes you can be better prepared and make
your outdoor activity more enjoyable and safer.
If the barometric trend is rising, the weather is
likely to get clearer but in cold climates, even
colder weather is likely to be on its way.
To calibrate barometer,
1.
2.
3.
4.
Go to ALTI/BARO mode. If the diplay shows
ALTI mode, press START twice to Activate
BAROMETER. If you are already in BARO mode,
proceed to step 2.
Press START and UP to go to Barometer
CALIBRATION and press START . The Sea level
PRESSURE value starts flashing on the display.
Enter the correct value (hPa / inHg).
Calibration OK is displayed for three seconds
before the display returns to BARO mode.
10 Before Activity
If the trend is dropping, the weather is likely to
get cloudier. The steeper or more rapid the drop,
the greater the chance of a storm. 1hPa/hour (or
0.03 inHg) drop in pressure can already signal
deteriorating weather. The graph is updated every
30 minutes and displays the changes in air
pressure over a rolling 24 hour period.
ENGLISH
Temperature
You can view the surrounding temperature in both,
BARO and ALTI modes.
In ALTI mode, press and hold the DOWN button to
switch the bottom row view between the time of
day and temperature.
Your body heat can affect the temperature reading
so it is advisable to either wear the activity watch
over your sleeve or take it off the wrist for
approximately 10 minutes to get the actual
temperature of the surrounding.
Before Activity 11
ENGLISH
4. DURING ACTIVITY
Start Action Recording (REC)
Starting from TIME mode, either
a) press and hold the START button or
b) press DOWN to go to ACTION mode and press
START.
Your Polar AW200 Activity Watch starts recording
total time of your walk/hike. To pause recording,
press STOP button once. Press it twice to stop
recording.
12 During Activity
If you have not keyed in the user settings, User
set MISSING is displayed. Follow the instructions
on how to enter them and then, once in ACTION
mode, press START to record your activity. If
incorrect or no user settings are entered, default
settings will be used.
For the first 30 seconds of recording, the device
will detect your movement. Therefore the zone
pointer (animation) will not be moving on the
display. Action data will start accumulating in
the file after one minute of activity.
ENGLISH
Reading Data on Display
During action recording, you can switch the view on the screen with the UP/DOWN buttons between the
following modes; TIME, ACTION or ALTI/BARO:
TIME mode:
Date / Polar logo (press and hold UP button to switch view)
Time of Day
ACTION mode 1st view:
The Zone Pointer moves within the activity zones and mirrors the speed of your walking or running
activity. If you move too slow, it stops. It is visible only during action recording.
Total Time is the cumulative time since you started recording your activity.
KCAL = Cumulative kilocalories burned since the beginning of recording.
ACTION mode 2nd view:
Bottom row: Press and hold DOWN button to see the work rate of the exercise
KCAL/H = Kilocalories burned per hour.
During Activity 13
ENGLISH
Polar Activity Zones
Based on walking and running speeds, Polar divides activity into five zones. The following chart displays
the zones and their effects on your health and fitness:
Slow walking
Long slow
walks maintain
overall health
and promote
recreation.
Walking
Brisk walking
Running
Fast running
Regular walking
in a comfortable
speed improves
health and
fitness in less fit
persons.
Brisk walking
allows health
benefits for all and
improves fitness in
most individuals.
Regular running is a
recommended
activity for advanced
fitness.
Running fast even
in short sessions
improves
performance and
increases race
speed.
Regular walking can improve fitness depending on your current fitness level. For example, if a less fit
person walks daily for 30 minutes or more at comfortable pace, fitness improves. For more experienced
walker brisk walking will improve fitness. A good recommendation is to walk briskly at least 30 minutes
3-5 times a week. This recommendation applies also to running.
14 During Activity
ENGLISH
In addition to walking and running speeds, ascents and descents will also affect intensity, energy
expenditure, and muscle fitness. For example, walking uphill slowly can burn as many calories as walking
briskly on a flat terrain. Walking or running technique, carrying a backpack and the quality of the surface
also have an effect on intensity. This is seen in the amount of expended calories.
Below typical calorie expenditures per hour (kcal/h) for a person weighing 75 kg. If you weigh less, fewer
calories are expended; if more, a greater amount of calories are expended.
Slow Walking
Walking
Brisk walking
Running
Fast running
300 kcal
400 kcal
500 kcal
700 kcal
800 kcal
For more information on the activity measurement, visit our Article Library; http://articles.polar.fi.
During Activity 15
ENGLISH
Reading Data on Display...continued
ALTI mode (= mountain symbol)
Altitude Trend graph shows altitude changes of passed track, or Altitude Difference (press and hold
the UP button to switch view)
Your current altitude
Time of day or Temperature (press and hold the DOWN button to switch view).
BARO mode (= cloud symbol)
Barometric Trend shows the changes in air pressure.
Current air pressure measured at sea level
Temperature or Time of day (press and hold DOWN button to switch view)
ALTI and BARO mode cannot be active simultaneously. This means that while the altitude trend is
displayed, no changes in air pressure are being recorded and vice versa.
16 During Activity
ENGLISH
File view
ASCENT = The total vertical elevation you have
During action recording or when recording is
paused, the display will automatically scroll
through the following cumulative values if you
press and hold the START button:
gained since you started recording.
ACTIVE TIME = The duration of truly active body
movement since you started recording. Compare
the active time with the total time and find out
how long you have been moving on an intensity
level that improves fitness. This time excludes the
time you have spent on stops and breaks during
your walk. If your activity watch does not detect
any motion for over an hour, the activity recording
will pause until you start it again manually.
DESCENT = The total vertical drop you have
completed since you started recording your action.
You can stop the automatic scrolling by pressing
either UP or DOWN at any time.
Your Polar AW200 Activity Watch is designed to
be worn on your wrist. Hanging it for example on
your backpack can cause inaccurate activity
measurements or no data recording at all.
ACT(IVE) STEPS = Instead of counting single steps,
Polar AW200 Activity Watch counts only the steps
that are based on continuous motion of the whole
body. The active steps improve fitness more
efficiently than the steps taken on a very low
intensity.
During Activity 17
ENGLISH
Altitude Trend Scale
Select the scale for the altitude graph to appear on the display. See our recommendation below:
Walking/Hiking
Scale
On Altitude Trend Scale, one
pixel equals
On Altitude Trend Scale, total
altitude axis equals
Level to
moderate
terrain
1
1 m / 3 ft
15 m / 45 ft
Moderate to
steep terrain
10
10 m /30 ft
150 m / 450 ft
To set the scale for altitude measurement, go to ALTI mode and select Altitude SCALE > 1 or 10.
The altitude trend is updated every 30 seconds during action recording and every 15 minutes at other
times.
18 During Activity
ENGLISH
Altitude Difference
For the altitude difference between two points
during a hike, when you are at the point you want
to start the measurement from,
1.
Go to ALTI mode and select Altitude
DIFFERENCE, press START and select
Difference RESET?
2.
To reset, press START . To cancel and to return
to previous menu, press STOP.
3.
At arrival to your destination point, in ALTI
mode, press and hold the UP button to see the
altitude difference since your last reset.
Please note that start of action recording resets
the altitude difference measurement
automatically.
During Activity 19
ENGLISH
5. AFTER ACTIVITY
Files of Saved Activity Data
As soon as you start recording your activity and start moving, the wrist unit begins to save data on your
activity. To view this information on file, start in TIME mode and select Menu FILES.
Your Polar AW200 Activity Watch can store up to nine files, the latest file being presented first. Once all
nine files have been used, a new file automatically replaces the oldest one.
File Info View
File order number/Total number of files on record
Weekday file was created
Date file was created i.e. when action recording took place.
Time file was created i.e. time when action recording was started.
20 After Activity
ENGLISH
Viewing Saved Activity Data
•
•
•
•
•
•
•
•
Activity ZONES. Press START to see vertical bars
indicating the time you spent in each zone
during your action recording:
To view the information available in each file, in
file info view, press START and then scroll the
data with UP/DOWN buttons:
Total time hh:mm:ss = Total duration of the
recorded time of action.
Active time hh:mm:ss = Time you were moving
actively.
Act. steps (Active steps) are related to the
Active Time feature. Active steps are
accumulated when action recording is switched
on and you are moving actively.
Calories xx kcal = Cumulative expended
energy measured during action recording.
Ascent = Cumulative vertical ascent (m or ft)
gained during action recording.
Descent = Cumulative vertical descent (m or ft)
reached during action recording.
Altitude MAX xx m / ft = The maximum
altitude (m or ft) reached during action
recording.
•
File x DELETE? = Once deleted, the file cannot
be retrieved.
After Activity 21
ENGLISH
To see cumulative totals, start in TIME mode,
press START and select Menu TOTALS. Scroll the
info with UP/DOWN buttons:
•
•
•
•
•
•
•
Active time dd.mm.yy = Total, cumulative active
time recorded since the date shown.
Act. steps dd.mm.yy = Total active steps during
action recordings since the date shown.
Calories dd.mm.yy = Total burned calories
during action recordings since the date shown.
Ascent dd.mm.yy = Total ascent during action
recordings since the date shown.
Descent dd.mm.yy = Total descent during action
recordings since the date shown.
Zones dd.mm.yy = Press START and you will
see the time spent in each zone since the date
shown.
Reset TOTALS? = Note that reset values cannot
be retrieved.
22 After Activity
ENGLISH
Delete a File
Delete All Files
You can delete an unwanted file, but note that
deleted files cannot be retrieved.
You can delete all files simultaneously. Please
note that deleted files cannot be retrieved.
To delete a file, start in TIME mode, then select
FILES.
Start from TIME mode and select Menu FILES.
Scroll to and select the file you want to delete.
File x DELETE? > Are you sure? is displayed.
To delete, press START. To return to the previous
view, press STOP.
Scroll to Delete ALL FILES? Are you sure? is
displayed.
To delete all files, press START. To return to the
previous view, press STOP.
Reset Totals File
Start in TIME mode and select Menu TOTALS >
Reset TOTALS? > Are you SURE?
To accept, press START. To return to the previous
menu, press STOP.
After Activity 23
ENGLISH
6. SETTINGS
Watch Settings
To access the watch settings Alarm, Time, Date,
Sound, Units, Alti Auto & Intro, start in TIME
mode, press START and select Menu WATCH SET.
Scroll UP and select the setting you want to
change.
To return to the previous menu at any stage of the
settings, press STOP. To return to TIME mode,
press and HOLD the STOP button.
Daily Alarm On/Off
Start in TIME mode and select
Menu Watch Set > Set ALARM hh:mm On/OFF >
Alarm SET .
To change the flashing value ( On/OFF, AM/PM,
HOURS, MIN), press UP/DOWN buttons. To accept
the flashing value, press START.
24 Settings
When the alarm is turned on, you should see an
alarm symbol on the display.
When the alarm goes off, Daily Alarm! appears in
the display. It sounds for one minute unless
turned off by pressing STOP.
To snooze 10 minutes, press any button on the
right side of the wrist unit.
Press STOP to cancel snoozing time.
Unless you deactivate the alarm feature in Menu
Watch Set, the alarm will go off daily at the set
time.
ENGLISH
Time of Day
Date
To set Time 1, start in TIME mode and select
Menu WATCH SET > Set TIME > Set TIME 1*.
To set the date, start in TIME mode and select
Menu WATCH SET > Set DATE.
Change the flashing value (12/24h, AM/PM,
HOURS, MIN) with UP/DOWN.
Change the flashing value (DD, MM, YY) with
UP/DOWN.
*To set Time 2, press UP to Set TIME 2, then
START and UP/DOWN to enter the time difference
measured from Time 1.
To accept the flashing value, press START.
Sound On/Off
To accept the flashing value, press START.
The sound settings (ON/OFF) do not affect the
alarms.
To change the view between Time 1 and Time 2,
in TIME mode press and hold DOWN.
Start in TIME mode and select Menu WATCH SET >
Set SOUND ON/OFF.
To select ON or OFF, press UP/DOWN.
Settings 25
ENGLISH
Units (metric/imperial)
ALTI AUTO On/Off
Selecting units determines the way following data
is displayed: weight, height, altitude, barometric
pressure, and temperature.
The ALTI AUTO feature, when activated, starts
recording the changes in altitude as soon as you
start recording your action. When you stop
recording, the feature starts tracking the changes
in air pressure.
Start in TIME mode and select
Menu WATCH SET > Set UNITS.
To switch the automatic altitude measurement ON
or OFF:
To select either option, use UP/DOWN.
Start in TIME mode and select
Menu WATCH SET > Set ALTI AUTO ON/OFF.
To select either ON or OFF, use UP/DOWN.
26 Settings
ENGLISH
Intro On/Off
When browsing the main modes (TIME,
ALTI/BARO or ACTION), each mode can show a
3-second introductory animation before returning
to the standard view.
To switch the animation ON or OFF, start in TIME
mode and select
Menu WATCH SET > Set INTRO OFF/ON .
To select either ON or OFF, use UP/DOWN.
Settings 27
ENGLISH
User Settings
To enter user settings, weight, height, date of
birth, and gender , start in TIME mode, press
START and select Menu USER SET.
> Weight KILOGRAMS/POUNDS > enter your weight.
> Height CM or FT/INCH > enter your height.
> Birthday DD.MM.YY or MM.DD.YY > enter your date
of birth.
> Set SEX. Select MALE or FEMALE.
> User set COMPLETED is visible for a few seconds
before the display returns to the previous menu.
To go back to a previous menu at any time, press
STOP.
To return to TIME mode at any time, press and
hold the STOP button.
28 Settings
To edit any of the user settings after selecting
Menu USER SET, scroll to the setting you wish to
change, select it and edit the flashing value.
ENGLISH
General Settings
Button Lock
Backlight
Button lock prevents the buttons from being
pressed accidentally.
To switch the backlight on at any time, press
LIGHT.
•
While the backlight is on in any mode, pressing
any of the buttons will keep the light on for
another six seconds.
•
Pressing and holding the UP or DOWN button
keeps the display illuminated until you release
the button.
•
During activity recording, if you press the LIGHT
button, the light comes on every time you press
any of the buttons during the same activity
recording session.
To switch the button lock ON or OFF, press and
hold the LIGHT button until the text Hold to
LOCK/UNLOCK changes into Buttons
LOCKED/UNLOCKED.
Stopping the recording and returning to TIME
mode switches the backlight off.
Settings 29
ENGLISH
7. CUSTOMER SERVICE INFORMATION
Care and Maintenance
Store your activity watch in a cool and dry place.
Caring for your Activity Watch
Do not expose the activity watch to direct sunlight
for extended periods, such as by leaving it in a
car.
Like any electronic device, your Polar AW200
Activity Watch should be treated with care. The
suggestions below will help you fulfill the
guarantee obligations and enjoy this product for
many years to come.
Keep your unit clean. Clean it with a mild soap
and water solution. Dry it carefully with a soft
towel. Never use alcohol or any abrasive material
such as steel wool or cleaning chemicals.
The operating temperature of your activity watch is
-10 °C to +60 °C / +14 °F to +140 °F and the
storage temperature is -20 °C to +70 °C / -4 °F to
+158 °F.
30 Customer Service Information
Keep the air pressure sensor channels (small holes
on the back cover of your activity watch) clean to
make sure that the altitude and temperature
measurements work. However, do not insert any
objects into the sensor channels.
ENGLISH
The activity watch is water resistant, so you can
wear it as a watch while doing underwater activity.
However, as it is not a diving instrument, neither
altitude nor barometric pressure can be measured
under water. Any activity data recorded under
water can also be inaccurate. To maintain water
resistance, do not press any buttons under water.
Do not store the activity watch in a damp
environment, in non-breathable material (i.e. a
plastic bag) or with conductive material such as a
wet towel.
Service
If your activity watch requires service during the
first two-year guarantee/warranty period, we
recommend the service to be carried out by
authorized Polar Service Centers only. The
warranty does not cover damage or consequential
damage caused by service not authorized by Polar
Electro.
Please see the separate Polar Customer Service
Card for details.
Register your Polar product at
http://register.polar.fi/ to ensure we can keep
improving our products and services to better meet
your needs.
Customer Service Information 31
ENGLISH
Battery
Avoid opening the sealed battery cover during the
guarantee period. We recommend that you have
the battery replaced by an authorized Polar
Service Center. They will test your activity watch
for water resistance after battery replacement, and
will make a full periodic check.
However, if you decide to change the battery
yourself anyway, please note the following:
•
•
•
•
The low battery indicator is displayed when
10-15% of the battery capacity is left.
Excessive use of the backlight and altimeter
drain the battery more rapidly.
In cold conditions, the low battery indicator may
appear, but will disappear when the temperature
rises.
The backlight and sound are automatically
turned off when the low battery indicator is
displayed. Any alarms set prior to the
appearance of the low battery indicator will
remain active.
32 Customer Service Information
Open the battery cover only when the battery
needs changing. We recommend that you change
the sealing ring of the battery cover every time you
change the battery. Additional sealing rings are
available at authorized Polar Service Centers only.
ENGLISH
To change the battery:
1.
2.
3.
4.
5.
6.
Open the battery cover with a coin by turning it from CLOSE to
OPEN.
Remove the battery cover and lift the battery (CR2032) out
carefully with a suitably sized screwdriver. Be careful not to
damage the metal sound element (a) or the grooves.
Insert a new battery with the positive (+) side outwards.
Replace the old sealing ring with a new one, fitting it snuggly in
the cover groove to ensure water resistance.
Put the cover back on and turn it clockwise to CLOSE.
Re-enter the basic settings. For further information, see the
chapter What to Do First.
It is recommended that the altimeter or barometer is calibrated after
battery replacement.
Keep the batteries away from children. If swallowed, contact a
doctor immediately. Batteries should be disposed of properly
according to local regulations.
Customer Service Information 33
ENGLISH
Precautions
Technical Capability
The Polar AW200 Activity Watch shows
environmental conditions such as altitude,
barometric pressure, and the surrounding
temperature.
It indicates the rate of activity intensity as energy
expenditure, and measures active steps during
walking and running types of actions. Such
activities include hiking, Nordic walking, and
trekking. No other use is intended or implied.
The Polar AW200 Activity Watch should not be
used for obtaining environmental measurements
that require professional or industrial precision.
Furthermore, the device should not be used to
obtain measurements when engaged in airborne or
underwater activities.
34 Customer Service Information
ENGLISH
Minimizing Possible Health Risks During
Physical Outdoor Activities
Physical activity always includes some risk. Before
starting regular outdoor activity, it is
recommended that you answer the following
questions concerning your health status. If you
answer yes to any of these questions, we
recommend that you consult a doctor before
starting any activity.
•
•
•
•
•
•
•
•
•
Have you been physically inactive for the past 5
years?
Do you have high blood pressure or high blood
cholesterol?
Are you taking any blood pressure or heart
medication?
Do you have a history of breathing problems?
Do you have symptoms of any disease?
Are you recovering from a serious illness or
medical treatment?
Do you use a pacemaker or another implanted
electronic device?
Do you smoke?
Are you pregnant?
It is important to be sensitive to your body’s
reactions during activity. If you feel unexpected
pain or excessive fatigue during activity, it is
recommended that you stop or continue at a
lighter intensity.
If you are allergic to any substance that comes
into contact with your skin, or if you suspect an
allergic reaction due to using the product, check
the listed materials under 'Technical
Specifications'.
Customer Service Information 35
ENGLISH
Frequently Asked Questions
What should I do if…
…there are no reactions to any buttons?
- You need to reset the wrist unit. Resetting only
clears the date and daily alarms, not the recorded
files. The altimeter and barometer calibration
values return to their default values (standard sea
level pressure 1013 hPa/29.90 inHg). To reset the
wrist unit, press the UP, DOWN, LIGHT and STOP
buttons down simultaneously. If you do not press
any buttons for approx. one minute after resetting
the wrist unit, the display goes to TIME mode.
36 Customer Service Information
...the animation on the display is not moving
although I am?
- First, make sure you are recording, see 'Start
Action Recording'. Then move effectively and fast
enough for a minimum of 30 seconds for the zone
pointer (animation) to move. Too slow or too
careful (e.g. tiptoeing) movement may also stop
the animation, as such movement is not
considered beneficial enough.
…the altitude reading changes even though I stay
at the same altitude?
- Altitude measurement is based on barometric
pressure. Changes in altitude or weather cause
changes in the pressure. For example, if you stay
at the same altitude but the weather and pressure
change, the altimeter interprets the pressure
change as a change in altitude.
ENGLISH
…the barometric pressure readings are
inaccurate?
- Your barometer may show faulty barometric
pressure if it is exposed to external interference
like strong wind or air conditioning. It is also
important that you stay at the same altitude when
using the barometer. If the readings are constantly
inaccurate, dirt may be blocking the air pressure
channels. In this case, send the activity watch to a
Polar Service Center.
…the display is blank?
- The activity watch is in battery saving mode
when it is dispatched from the factory. To activate
it, press the START button twice. See 'What to Do
First'.
…the low battery symbol is visible?
- Usually this means the battery has expired. For
further information, see 'Care and Maintenance'.
…the battery of the wrist unit must be replaced?
- We recommend having all service done by an
authorized Polar Service Center. This is especially
necessary to ensure that the guarantee remains
valid and is not affected by incorrect repair
procedures performed by an unauthorized agent.
Polar Service will test your wrist unit for water
resistance after battery replacement, and will
make a full check of the activity watch.
Customer Service Information 37
ENGLISH
Technical Specification
Time
Wrist Unit
Accuracy
Battery life
Battery type
Battery cap sealing
ring
Operation
temperature
Storage temperature
Wrist strap material
Wrist strap buckle,
case and case back
material
Average two years in normal use
CR 2032
O-ring 23.0 x 0.60
-10 °C to +60 °C / +14 °F to +140
°F
-20 °C to +70 °C / -4 °F to +158
°F
Thermoplastic Polyurethane and
glass fiber strengthened ABS
Stainless steel complying with the
EU Directive 94/27/EU and its
amendment 1999/C 205/05 on the
release of nickel from products
intended to come into direct and
prolonged contact with the skin.
38 Customer Service Information
better than ± 0.5 seconds / day at
25 °C / 77 °F temperature.
Altimeter
Measurement
Display range
Resolution
Ascent/Descent
resolution
Accuracy
The activity watch measures
altitude by using the standard
average altitude at defined air
pressures according to ISO 2533.
-550 m to +9000 m / -1800 ft to
+29500 ft
1 m / 5 ft
5 m / 20 ft
Temperature compensated
ENGLISH
Barometer
Display range
Resolution
Sea level pressure 800 hPa to 1100
hPa / 23.60 inHg to 32.50 inHg
1 hPa / 0.05 inHg
Thermometer
Display range
Resolution
-20 °C to +60 °C / -4 °F to 140 °F
1 °C / 1 °F
File
Amount of files saved maximum 9 files
Total time saved
maximum 99 h 59 min 59 s
KCAL/H
Resolution
50 kcal
Customer Service Information 39
ENGLISH
Water resistance of Polar products is tested according to International Standard ISO 2281. Products are
divided into three categories according to their water resistance. Check the back of your Polar product for
the water resistance category, and compare it to the chart below. Please note that these definitions do not
necessarily apply to products of other manufacturers.
Marking on
the case
back
Wash
splashes,
sweat,
raindrops
etc.
Bathing and
swimming
Skin diving
with snorkel
(no air tanks)
SCUBA diving
(with air
tanks)
Water
resistant
characteristics
Water
resistant
x
-
-
-
Splashes,
raindrops etc.
Water
resistant
50m
x
x
-
-
Minimum for
bathing and
swimming
x
x
x
-
For frequent
use in water
but not SCUBA
diving
Water
resistant
100m
40 Customer Service Information
ENGLISH
Limited Polar International Guarantee
•
This limited Polar international guarantee is
issued by Polar Electro Inc. for the consumers
who have purchased this product in the USA or
Canada. This limited Polar international
guarantee is issued by Polar Electro Oy for the
consumers who have purchased this product in
other countries.
•
Polar Electro Inc. / Polar Electro Oy guarantees
to the original consumer/ purchaser of this
product that the product will be free from
defects in material or workmanship for two years
from the date of purchase.
•
Please keep the receipt or stamped Polar
Customer Service Card, which is your proof of
purchase!
•
The guarantee does not cover the battery,
damage due to misuse, abuse, accidents or
non-compliance with the precautions; improper
maintenance, commercial use, cracked or
broken cases.
•
The guarantee does not cover any damage/s,
losses, costs or expenses, direct, indirect or
incidental, consequential or special, arising out
of, or related to the product. During the
guarantee period the product will be either
repaired or replaced at an authorized service
center free of charge.
•
This guarantee does not affect the consumer’s
statutory rights under applicable national or
state laws in force, or the consumer’s rights
against the dealer arising from their sales/
purchase contract.
Customer Service Information 41
ENGLISH
This product is compliant with Directive
93/42/EEC. The relevant Declaration of Conformity
is available at
www.support.polar.fi/declaration_of_conformity.
Polar products are electronic devices and are in
the scope of Directive 2002/96/EC of the
European Parliament and of the Council on waste
electrical and electronic equipment (WEEE).
These products should thus be disposed of
separately in EU countries. Polar encourages you
to minimize possible effects of waste on the
environment and human health, also outside the
European Union, by following local waste disposal
regulations and, where possible, utilize separate
collection of electronic devices. Copyright © 2006
42 Customer Service Information
Copyright © 2006 Polar Electro Oy, FIN-90440
KEMPELE, Finland.
Polar Electro Oy, FIN-90440 KEMPELE, Finland.
Polar Electro Oy is a ISO 9001:2000 certified
company. All rights reserved. No part of this
manual may be used or reproduced in any form or
by any means without prior written permission of
Polar Electro Oy. The names and logos marked
with a ™ symbol in this user manual or in the
package of this product are trademarks of Polar
Electro Oy. The names and logos marked with a ®
symbol in this user manual or in the package of
this product are registered trademarks of Polar
Electro Oy.
ENGLISH
Polar Disclaimer
The material in this manual is for informational
purposes only. The products it describes are
subject to change without prior notice, due to the
manufacturer’s continuous development program.
Polar Electro Inc./Polar Electro Oy makes no
representations or warranties with respect to this
manual or with respect to the products described
herein.
Polar Electro Inc./Polar Electro Oy shall not be
liable for any damages, losses, costs or expenses,
direct, indirect or incidental, consequential or
special, arising out of, or related to the use of this
material of the products described herein.
This product is protected by one or several of the
following patents: EP 0984719, US 6361502, EP
1405594, US 6418394, EP 1124483, FI
111801. Other patents pending.
Manufactured by:
Polar Electro Oy
Professorintie 5
FIN-90440 KEMPELE
Tel +358 8 5202 100
Fax +358 8 5202 300
www.polar.fi
Customer Service Information 43
ENGLISH
INDEX
ACTION Mode . . . . . . . . . . . . . . . . . . . . 6, 13
Active Steps . . . . . . . . . . . . . . . . . . . . . . . 17
Active Time . . . . . . . . . . . . . . . . . . . . . . . . 17
ALTI AUTO . . . . . . . . . . . . . . . . . . . . . . . 9, 26
ALTI Mode . . . . . . . . . . . . . . . . . . . . . . . 6, 16
Altitude Difference . . . . . . . . . . . . . . . . . . 19
Altitude Measurement . . . . . . . . . . . . . . . . 8
Altitude Trend . . . . . . . . . . . . . . . . . . . . . . 18
Ascent . . . . . . . . . . . . . . . . . . . . . . . . . . . . 21
Barometer Calibration . . . . . . . . . . . . . . . 10
Barometric Trend . . . . . . . . . . . . . . . . . . . 10
BARO Mode . . . . . . . . . . . . . . . . . . . . . . 6, 16
Descent . . . . . . . . . . . . . . . . . . . . . . . . . . . 21
File . . . . . . . . . . . . . . . . . . . . . . . . . . . . . . . 20
File View . . . . . . . . . . . . . . . . . . . . . . . . 6, 17
Intro . . . . . . . . . . . . . . . . . . . . . . . . . . . . . . 27
Polar Activity Zones . . . . . . . . . . . . . . . . . 21
Recording (REC) . . . . . . . . . . . . . . . . . . . . 12
TIME Mode . . . . . . . . . . . . . . . . . . . . . . . . . . 6
WATCH SET . . . . . . . . . . . . . . . . . . . . . . . . 24
Zone Pointer . . . . . . . . . . . . . . . . . . . . . . . 12
44 Index