1
MP3-CD Soundmachine
Register your product and get support at
www.philips.com/welcome
User Manual
Manuel d'utilisation
Manual de usuario
Benutzerhandbuch
AZ1833
1
1
8
2
9
3
4
5
0
6
7
!
4
@
AUX IN
AC MAINS~
#
$
%
6 x R14 • UM-2 • C-CELLS
2
8
DISC
3
USB
4
5
6
7
DISC
X
DISC
9
DISC
DISC
WMA
USB mass
storage device
USB cable
English
Controls / Power Suppy
Congratulations on your purchase and welcome to Philips!
To fully benefit from the support that Philips
offers, register your product at
www.philips.com/welcome.
Supplied accessories
– AC power cord
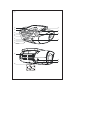
Back panel (See 1)
@ Telescopic antenna – improves FM
reception
# AUX IN jack – connects to external audio
source
$ AC~ MAINS – inlet for power cord
% Battery door – open to insert 6 x 1.5V
R-14/ UM2/ C-cells
– Line in cable
Power Supply
Whenever convenient, use the power supply
cord if you want to conserve battery life.
Make sure you remove the plug from the set
and wall outlet before inserting batteries.
Top and front panels (See 1)
1 Source selector: CD/USB/AUX, FM,
MW, OFF
– selects CD/MP3-CD, USB, AUX or radio
– switches off the set
2 2; – starts or pauses disc/USB playback
∞§
– For disc/ USB play:
– skips to the beginning of a current/
previous/ later track
– fast searches backwards and forwards
within a track
9 – stops disc/USB playback;
– erases a program
PROG – programs tracks and reviews the
program
Batteries
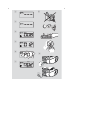
Main set (See 1)
•
Insert 6 batteries, type R-14, UM2 or Ccells (not included, preferably alkaline) with
the correct polarity.
•
Incorrect use of batteries can cause electrolyte leakage and will corrode the compartment or cause the batteries to burst:
•
Do not mix battery types: e.g. alkaline with
carbon zinc. Only use batteries of the same
type for the set.
•
When inserting new batteries, do not try to
mix old batteries with the new ones.
•
Remove the batteries if the set is not to be
used for a long time.
3 Display – shows disc/USB play functions
4 ALBUM +/– For MP3-CD/ WMA/USB play: select
albums
Batteries contain chemical substances, so
they should be disposed of properly.
5 USB – enters USB mode
6 CD – enters disc mode
7 MODE – selects different play modes:
e.g. REPEAT or SHUFFLE (random order)
Using AC power
1
Check if the power/mains voltage, as shown
on the type plate located on the
bottom of the set, corresponds to your
local power supply. If it does not, consult your
dealer or service center.
2
Connect the power cord to the
AC~ MAINS inlet and the wall socket.The
set is now ready for use.
8 OPEN•CLOSE – opens/ closes the CD
door
9 TUNING – tunes to radio stations
0 VOLUME – adjusts volume level
! USB DIRECT – connects an external USB
mass storage device
Power Supply
Basic Function / Radio
3
To switch the set off completely, withdraw the
power cord from the wall socket.
Basic functions
4
Install the unit near the AC outlet and where
the AC power plug can be easily reached.
•
Disconnect the power cord from the wall
socket to protect your set during heavy thunderstorms. Children could seriously injure
themselves as the free end of the cable may
still be live if only the connector is removed
from the MAINS socket at the back of the
unit.
Switching on/off the set and selecting
function
To switch on, adjust the source selector to
CD/USB/AUX, FM or MW as desired.
1
2
Adjusting volume
Adjust the volume with the VOLUME
control.
The type plate is located on the
bottom of the set.
–
Helpful hints:
To avoid unnecessary energy consumption,
always adjust the source selector to OFF
after using the set.
Radio reception
1
Push the source selector to FM or MW.
2
Turn TUNING to tune in a radio station.
3
To switch off the radio, adjust the source
selector to OFF.
Helpful hints:
CAUTION
Use of controls or adjustments
or performance of procedures
other than herein may result in
unsafe operation.
For users in the U.K., please follow
the boxed instructions ‘Important
notes for users in the U.K.’ .
This set complies with the radio
interference requirements of the
European Community.
To switch off, adjust the source selector to
OFF.
To improve reception
•
For FM, extend, incline and turn the
telescopic antenna. Reduce its length if the
signal is too strong.
•
For MW, uses a built-in antenna. Direct this
antenna by turning the whole set.
MP3-CD / CD Player
About MP3
The music compression technology MP3
(MPEG1 Audio Layer 3) significantly reduce
the digital data of an audio CD while
maintaining CD quality sound.
•
Creating a MP3 CD: burn the music files
from your computer hard disc on a CDR or
CDRW using your CD burner.
3
Open the disc door.
4
Insert a disc with the printed side facing up
and press the disc door gently to close.
➜ Display:The total number of tracks
appears.
5
Playing a disc
This player plays Audio Discs including CD-R/
CD-RW, MP3 CD and WMA. Do not try to
play a CD-ROM, CD-I, CDV,VCD, DVD or
computer CD.
IMPORTANT!
• CDs encoded with copyright protection
technologies by some record companies may
be unplayable by this product.
• DRM-protected WMA disc is not supported.
1
Adjust the source selector to
CD/USB/AUX.
➜ Display shows - - - with “DISC”(see 2), or
- - - with “USB” (see 3)
Press 2; to start playback.
➜ Display: 2 and the current track number.
For MP3-CD/ WMA only:
➜ The current track number “XXX“ and
album number “ALBXXX“ will be
displayed interchangeably (See 4 5).
6
Helpful hints:
– Make sure that the file names of the MP3 files
end with .mp3 or .wma.
– Number of albums: maximum 256
– Number of tracks: maximum 511
– The length of file names affects the number of
tracks for playback. With shorter file names,
more files can be burned on a disc.
Press CD to enter CD mode if USB is displayed.
➜ Display will show --- with “DISC”(See 2).
Getting MP3 files: you can either download
legal music files from the internet to your
computer hard disc, or create such files by
converting audio CD files in your computer
through appropriate encoder software.
(128kbps bit rate or higher is recommended
for MP3 files.)
•
2
To pause playback press 2;.
➜ Display: 2 and the current track number
flash.
7
Press 2; again to resume playback.
8
To stop playback, press 9.
–
–
–
Helpful hints:
The disc playback will also stop when:
you open the disc compartment door;
you select FM, MW or OFF position;
the disc has reached the end of the playback.
Selecting a different track
• Press ∞ or § once or repeatedly until the
desired track number appears in the display.
For MP3-CD/WMA: First press
ALBUM+/- once or more to find your
album.
• In the pause/stop position, press 2; to start
playback.
MP3-CD / CD Player
To erase a program
You can erase a program by:
– pressing 9 (twice during playback or once
in the stop position);
– selecting FM, MW or OFF position;
– opening the disc door.
➜ Display: PROG disappears.
Finding a passage within a
track
1
2
During playback, press and hold down
∞ or §.
➜ The disc is played at high speed and low
volume.
When you recognize the passage you want,
release ∞ or §.
➜ Normal playback resumes.
Selecting different play
modes (See 7)
You can select and change the various play
modes before or during playback, and
combine REP or REP ALL play modes with
PROG.
Programming tracks
You may store up to 20 tracks in the desired
sequence. If you like, store any track more
than once.
1
In the stop position, press PROG to activate
programming.
➜ Display shows P01 indicating the start of
the program and PROG flashes. (See 6)
Press ∞ or § to select your desired track
number.
REP – plays the current track continuously.
REP ALL – plays the entire disc/program
continuously.
SHUF – plays all tracks in random order
(not available with PROG).
1
To select play modes, press MODE once or
more.
For MP3-CD/WMA: First press
ALBUM+/- once or more to find your album.
2
Press 2; to start playback if in the stop
position.
3
Press PROG to store the desired track.
➜ Display shows P02, indicating the next
program location available.
3
4
Repeat steps 2 to 3 to select and store all
desired tracks.
To select normal playback, press MODE
repeatedly until the various modes are no
longer displayed.
– You can also press 9 to cancel your play
modes.
5
Press 2; to play the program.
2
To review your program
In the stop position, press and hold PROG 3
seconds.
➜ The display shows all the stored tracks in
sequence.
Helpful hints:
– Display shows P01 if no track is
programmed.
– If you try to store more than 20 tracks, no
track can be stored and the display will show
--- with “PROG” .
USB Connection
• Non-supported file formats are skipped.
This means that e.g.: Word documents .doc
or MP3 files with extension. dlf are ignored
and will not be played.
• AAC, WAV, PCM. NTFS audio files
• DRM protected WMA files
• WMA files in Lossless format
Using USB connectivity
•
AZ1833 is fitted with a USB port in the front
panel, offering a plug and play feature which
allows you to play, from your AZ1833, digital
music and spoken contents stored on a USB
mass storage device.
•
Using a USB mass storage device, you can
also enjoy all the features offered by AZ1833
which are explained and instructed in the
sections of disc operation.
Compatible USB mass storage devices
With the AZ1833, you can use
– USB flash memory (USB 2.0 or USB 1.1)
– USB flash player (USB 2.0 or USB 1.1)
• USB device which requires driver
installation under Windows XP is not
supported.
Note:
In some USB flash players (or memory
devices), the stored contents are recorded
using copyright protection technology. Such
protected contents will be unplayable on any
other devices (such as AZ1833 device).
Supported formats:
– USB or memory file format FAT12, FAT16,
FAT32 (sector size: 512 - 4096 bytes)
– MP3 bit rate (data rate): 32-320 kbps and
variable bit rate
– WMA v9 or earlier
– Directory nesting up to a maximum of 8
levels
– Number of albums: maximum 500
– Number of tracks: maximum 999
– ID3 tag v2.0 or later
– File name in Uicode UTF8 (maximum
length: 30 bytes
The system will not play or support
the following:
• Empty albums: an empty album is an album
that does not contain MP3/WMA files, and
will not be shown in the display.
1
Playing a USB mass storage device
Make sure that your AZ1833 is being
powered by AC mains or specified batteries.
2
Adjust the source selector to
CD/USB/AUX.
➜ Display shows - - - with “DISC”(see 2),
or - - - with “USB” (see 3)
3
Press USB to enter USB mode if USB is
NOT displayed.
➜ Display will show “USB” (see 3).
As shown in figure 9 , plug a compatible
USB mass storage device to AZ1833’s USB
port marked
. If needed, use a suitable
USB cable to connect between the device
and AZ1833’s USB port.
➜ The device will automatically power on.
• If the device is not powered on, turn on the
power manually, then re-connnect it.
➜ AZ1833’s display shows USB and the total
number of playable audio files (Max.
displayed track number is 999) stored on
the device.
4
5
Press 2; on your AZ1833 to start play.
➜ AZ1833’s display will show USB and share
the display information illustrated in the
disc operation.
Helpful hints:
– Make sure that file names of MP3 files end
with .mp3. and the file names of WMA files end
with .wma.
– For DRM protected WMA files, use Windows
Media Player 10 (or later) for conversion. Visit
www.microsoft.com for details about Windows
Media Player and WM DRM (Windows Media
Digital Rights Management).
– For USB device playing, if the display shows
"OL", it means that the USB device is electrically
overloading AZ1833.You need to change a USB
device.
INFORMATION REGARDING USB DIRECT:
1. Compatibility of the USB connection on this product:
a) This product supports most USB Mass storage devices (MSD) that these devices are compliant to the USB MSD standards.
i) Most common Mass storage class devices are flash drives, memory sticks, jump drives and
etc.
ii) If you see a "Disc Drive" showing up on your computer after you have plugged the mass
storage device into your computer, most likely it is MSD compliant and it will work with this
product.
b) If your Mass storage device requires a battery/power source, please make sure you have a
fresh battery in it or charge the USB device first and then plug it into this product again.
2. Supported Music type:
a) This device only supports unprotected music with file extension: .mp3 .wma
b) Music bought from on-line music stores are not supported because they are secured by
Digital Rights Management protection (DRM).
c) File name extensions that ended with the following are not supported: .wav; .m4a; .m4p; .mp4;
.aac and etc.
3. No Direct connection can be made from a Computer USB port to this product even you have
either or both mp3 or wma file in your computer.
Safety & Maintenance (See 8)
Safety information
•
Place the set on a hard, flat and stable surface
so that the system does not tilt.
•
Do not expose the set, batteries, CDs to
humidity, rain, sand or excessive heat caused
by heating equipment or direct sunlight.
•
Where the MAINS plug or an appliance coupler is used as the disconnect device, the disconnect device shall remain readily operable.
•
The apparatus shall not be exposed to
dripping or splashing.
•
Adequate ventilation with a minimum gap of
15 cm between the ventilation holes and surrounding surfaces is necessary to prevent
heat build-up.
•
The ventilation should not be impeded by
covering the ventilation openings with items,
such as newspapers, table-cloths, curtains, etc..
•
No objects filled with liquids, such as vases,
shall be placed on the apparatus.
•
No naked flame sources, such as lighted candles, should be placed on the apparatus.
•
The mechanical parts of the set contain
self-lubricating bearings and must not be oiled
or lubricated.
•
To clean the set, use a dry cloth. Do not use
any cleaning agents containing alcohol,
ammonia, benzene or abrasives as these may
harm the housing.
CD player and CD handling
•
If the CD player cannot read CDs correctly,
use a cleaning CD to clean the lens before
taking the set to repair.
•
The lens of the CD player should never be
touched!
•
Sudden changes in the surrounding
temperature can cause condensation on the
lens of your CD player. Playing a CD is then
not possible. Do not attempt to clean the
lens but leave the set in a warm environment
until the moisture evaporates.
•
Always close the CD door to avoid dust on
the lens.
•
To clean the CD, wipe in a straight line from
the center towards the edge using a soft,
lint-free cloth. Do not use cleaning agents as
they may damage the disc.
•
Never write on a CD or attach any stickers
to it.
Troubleshooting
If a fault occurs, first check the points listed below before taking the set for repair.
If you are unable to remedy a problem by following these hints, consult your dealer or service centre.
WARNING: Do not open the set as there is a risk of electric shock. Under no circumstances should you try to repair the set yourself, as this will invalidate the guarantee.
No sound/ power
–
•
–
•
–
•
–
•
Volume not adjusted
Adjust the VOLUME
Power cord not securely connected
Connect the AC power cord properly
Batteries dead/ incorrectly inserted
Insert (fresh) batteries correctly
Disc contains non-audio files
Insert a suitable disc or press ∞ or § once or
more skip to an audio track, instead of the data
files.
Display does not function properly/No
reaction to operation of any of the
controls
– Electrostatic discharge
• Switch off and unplug the set. Reconnect after a
few seconds.
no indication
–
•
–
•
–
•
–
•
–
•
It is set in the USB mode.
Press CD to select CD mode.
No disc inserted
Insert a suitable disc
Disc badly scratched or dirty
Replace/clean CD (See Maintenance)
CD-R(W) is blank or the disc is not finalized.
Use a finalized CD-R(W)
Laser lens steam up
Wait until lens has cleared.
Note:
Make sure the CD is not encoded with
Copyright protection technologies, as some
do not conform to the Compact
Disc standard.
The disc skips tracks
– Disc damaged or dirty
• Replace or clean disc
– Shuffle or program is active
• Quit shuffle/program
Sound skips during MP3 playback
– MP3 file made at compression level exceeding
320kbps
• Use a lower compression level to record CD
tracks into MP3 format
– Disc damaged or dirty
• Replace or clean disc.
Note:
DRM-protected WMA disc is not supported.
The USB device doesn’t play on my
AZ1833
– It is not set in the USB mode.
• Press USB to select USB mode.
– The device is not securely connected to AZ1833’s
USB port.
• Re-connect the device, and make sure that the
device is powered on.
– The device is not supported by AZ1833, or the audio
file format stored on the device is not supported by
AZ1833.
• Use a compatible device/ playable audio file
format.
Disposal of your old product
Your product is designed and manufactured with
high quality materials and components, which
can be recycled and reused.
When this crossed-out wheeled bin symbol is
attached to a product it means the product is covered by
the European Directive 2002/96/EC
Please inform yourself about the local separate collection
system for electrical and electronic products.
Please act according to your local rules and do not dispose of your old products with your normal household
waste.The correct disposal of your old product will help
prevent potential negative consequences for the environment and human health.
English
Meet Philips at the Internet
http://www.philips.com
Français
Español
Deutsch
W
CLASS 1
LASER PRODUCT
AZ1833
Printed in China
JW-0732