1
Contents
2
2 Important 4
3 Your product 7
TV overview 7
4 Use your product 9
Switch your TV on/off or to standby
Switch channels
Adjust TV volume
Watch connected devices
Use teletext
9
9
10
10
11
5 Use more of your product 12
Change language settings 12
Access the home menu 12
Access the options menu 13
Access the setup menu 13
Change picture and sound settings 14
Use advanced teletext features 18
Create and use lists of favourite channels20
Reorder/rearrange and rename channels 20
Hide and unhide channels 21
Use the Electronic Programme Guide 22
Use timers 23
Use child and rating locks 24
Use subtitles 25
Use the TV clock 26
View photos, play music and watch video
from a USB storage device 27
Listen to digital radio channels 29
Update the TV software 29
Change TV preferences 30
Start a TV demo 31
Reset the TV to factory settings 31
Automatically install channels 32
Manually install channels 33
Manually update the channel list 34
Test digital reception 35
Change startup message settings 36
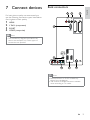
7 Connect devices 37
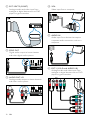
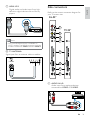
Back connectors 37
Side connectors 39
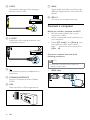
Connect a computer 40
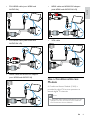
Use a Conditional Access Module 41
Assign a channel decoder 42
Use Philips EasyLink 42
Use a Kensington lock 44
8 Product information 45
Supported display resolutions 45
Multimedia 45
Tuner/Reception/Transmission 45
Remote control 45
Power 45
Supported TV mounts 46
EPG information 46
9 Troubleshooting 47
General TV issues 47
TV channel issues 47
Picture issues 47
Sound issues 48
HDMI connection issues 48
USB connection issues 49
Computer connection issues 49
Contact us 49
10 Index 50
EN
1
English
1 Notice
6 Install channels 32
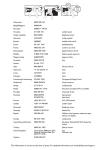
Model
Serial
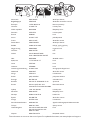
www.philips.com/support
Österreich
0810 000205
€0.07 pro Minute
België/Belgique
078250145
€0.06 Per minuut/Par minute
България
+3592 489 99 96
Местен разговор
Hrvatska
01 6403 776
Lokalni poziv
Česká republika
800142840
Bezplatný hovor
Danmark
3525 8759
Lokalt opkald
Estonia
6008600
local
Suomi
09 2311 3415
paikallispuhelu
France
0821 611655
€0.09 Par minute
Deutschland
01803 386 852
€0.09 pro Minute
Ελλάδα
0 0800 3122 1280
Κλήση χωρίς χρέωση
Magyarország
0680018189
Ingyenes hívás
Hrvatska
0800 222778
free
Ireland
North 0800 055 6882
South 1800-PHILIPS 7445477
free
Italia
840320086
€0.08 Al minuto
Қазақстан
+7 727 250 66 17
local
Latvia
52737691
local
Lithuania
67228896
local
Luxemburg/Luxembourg
40 6661 5644
Ortsgespräch/Appel local
Nederland
0900 8407
€0.10 Per minuut
Norge
2270 8111
Lokalsamtale
Polska
(022) 3491504
połączenie lokalne
Portugal
800 780 903
Chamada local
România
031-810 71 25/0800-89 49 10
Apel local
Россия
Moscow (495) 961-1111
Outside Moscow 8-800-200-0880
Местный звонок
Србија
+381 114 440 841
Lokalni poziv
Slovensko
0800 004537
Bezplatný hovor
Slovenija
00386 12 80 95 00
lokalni klic
España
902 888 784
€0.10 Por minuto
Sverige
08 5792 9100
Lokalsamtal
Suisse/Schweiz/Svizzera
0844 800 544
Appel local/Ortsgespräch/Chiamata locale
Türkiye
0800 261 3302
Şehiriçi arama
United Kingdom
General No: 0870 900 9070
General National Rate No:
0870 911 0036
local
Україна
8-800-500-69-70
Місцевий виклик
This information is correct at the time of press. For updated information, see www.philips.com/support.
1 Notice
2009 © Koninklijke Philips Electronics N.V. All
rights reserved.
Specifications are subject to change without
notice. Trademarks are the property of
Koninklijke Philips Electronics N.V or their
respective owners. Philips reserves the right
to change products at any time without being
obliged to adjust earlier supplies accordingly.
The material in this manual is believed
adequate for the intended use of the system.
If the product, or its individual modules or
procedures, are used for purposes other than
those specified herein, confirmation of their
validity and suitability must be obtained. Philips
warrants that the material itself does not
infringe any United States patents. No further
warranty is expressed or implied.
Warranty
• Risk of injury, damage to TV or void of
warranty! Never attempt to repair the TV
yourself.
• Use the TV and accessories only as
intended by the manufacturer.
• The caution sign printed on the back of
the TV indicates risk of electric shock.
Never remove the TV cover. Always
contact Philips Customer Support for
service or repairs.
•
Any operation expressly prohibited in
this manual, or any adjustments and
assembly procedures not recommended
or authorised in this manual shall void the
warranty.
2
EN
Pixel characteristics
This LCD product has a high number of
colour pixels. Although it has effective
pixels of 99.999% or more, black dots or
bright points of light (red, green or blue)
may appear constantly on the screen.
This is a structural property of the display
(within common industry standards) and
is not a malfunction.
Open source software
This television contains open source
software. Philips hereby offers to deliver
or make available, upon request, for
a charge no more than the cost of
physically performing source distribution,
a complete machine-readable copy of
the corresponding source code on a
medium customarily used for software
interchange. This offer is valid for a period
of 3 years after the date of purchase of
this product. To obtain the source code,
write to:
Development Manager
Technology & Development
Philips Consumer Lifestyle
620A Lorong 1, Toa Payoh
TP1, Level 3
Singapore 319762
Compliance with EMF
Koninklijke Philips Electronics N.V.
manufactures and sells many products
targeted at consumers which, like
any electronic apparatus, in general
have the ability to emit and receive
electromagnetic signals.
One of Philips’ leading Business Principles
is to take all necessary health and safety
measures for our products, to comply
with all applicable legal requirements and
to stay well within the EMF standards
applicable at the time of producing the
products.
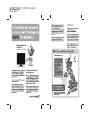
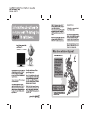
1
2
3
Remove fuse cover and fuse.
The replacement fuse must comply with
BS 1362 and have the ASTA approval
mark. If the fuse is lost, contact your
dealer in order to verify the correct type.
Refit the fuse cover.
In order to maintain conformity to the EMC
directive, the mains plug on this product must
not be detached from the mains cord cable.
Copyright
English
Philips is committed to develop, produce
and market products that cause no
adverse health effects. Philips confirms
that if its products are handled properly
for their intended use, they are safe
to use according to scientific evidence
available today.
Philips plays an active role in the
development of international EMF
and safety standards, enabling Philips
to anticipate further developments in
standardisation for early integration in its
products.
Mains fuse (UK only)
This TV is fitted with an approved
moulded plug. Should it become
necessary to replace the mains fuse, this
must be replaced with a fuse of the same
value as indicated on the plug (example
10A).
VESA, FDMI and the VESA Mounting Compliant
logo are trademarks of the Video Electronics
Standards Association.
Windows Media is either a registered
trademark or trademark of Microsoft
Corporation in the United States and/or other
countries.
® Kensington and Micro Saver are registered
US trademarks of ACCO World Corporation
with issued registrations and pending
applications in other countries throughout the
world.
All other registered and unregistered
trademarks are the property of their respective
owners.
Manufactured under licence from BBE Sound,
Inc. Licensed by BBE, Inc under one or more
of the following US patents: 5510752,5736897.
BBE and BBE symbol are registered trademarks
of BBE Sound Inc.
EN
3
2 Important
Read and understand all instructions before you
use your TV. If damage is caused by failure to
follow instructions, the warranty does not apply.
Safety
Risk of electric shock or fire!
• Never expose the TV to rain or water.
Never place liquid containers, such as
vases, near the TV. If liquids are spilt on
or into the TV, disconnect the TV from
the power outlet immediately. Contact
Philips Consumer Care to have the TV
checked before use.
• Never place the TV, remote control or
batteries near naked flames or other heat
sources, including direct sunlight.
To prevent the spread of fire, keep
candles or other flames away from the
TV, remote control and batteries at all
times.
•
Never insert objects into the ventilation
slots or other openings on the TV.
• When the TV is swivelled ensure that
no strain is exerted on the power cord.
Strain on the power cord can loosen
connections and cause arcing.
Risk of short circuit or fire!
• Never expose the remote control or
batteries to rain, water or excessive heat.
• Avoid force coming onto power plugs.
Loose power plugs can cause arcing or
fire.
Risk of injury or damage to the TV!
• Two people are required to lift and carry
a TV that weighs more than 25 kg.
4
EN
•
When stand mounting the TV, use only
the supplied stand. Secure the stand to
the TV tightly. Place the TV on a flat, level
surface that can support the combined
weight of the TV and the stand.
• When wall mounting the TV, use only a
wall mount that can support the weight of
the TV. Secure the wall mount to a wall
that can support the combined weight of
the TV and wall mount. Koninklijke Philips
Electronics N.V. bears no responsibility
for improper wall mounting that result in
accident, injury or damage.
Risk of injury to children!
Follow these precautions to prevent the
TV from toppling over and causing injury to
children:
• Never place the TV on a surface covered
by a cloth or other material that can be
pulled away.
• Ensure that no part of the TV hangs over
the edge of the surface.
• Never place the TV on tall furniture (such
as a bookcase) without anchoring both
the furniture and TV to the wall or a
suitable support.
• Educate children about the dangers of
climbing on furniture to reach the TV.
Risk of overheating!
Never install the TV in a confined space.
Always leave a space of at least 4 inches or
10 cm around the TV for ventilation. Ensure
curtains or other objects never cover the
ventilation slots on the TV.
Risk of damage to the TV!
Before you connect the TV to the power
outlet, ensure that the power voltage matches
the value printed on the back of the TV.
Never connect the TV to the power outlet if
the voltage is different.
Risk of injury, fire or power cord damage!
• Never place the TV or any objects on the
power cord.
• To easily disconnect the TV power cord
from the power outlet, ensure that you
have full access to the power cord at all
times.
When you disconnect the power cord,
always pull the plug, never the cable.
• Disconnect the TV from the power outlet
and aerial before lightning storms. During
lightning storms, never touch any part of
the TV, power cord or aerial cable.
Risk of hearing damage!
Avoid using earphones or headphones at high
volumes or for prolonged periods of time.
Low temperatures
If the TV is transported in temperatures
below 5°C, unpack the TV and wait until the
TV temperature matches room temperature
before connecting the TV to the power outlet.
Screen care
•
•
•
•
•
Avoid stationary images as much as
possible. Stationary images are images
that remain on-screen for extended
periods of time. Examples include:
on-screen menus, black bars and time
displays. If you must use stationary
images, reduce screen contrast and
brightness to avoid screen damage.
Unplug the TV before cleaning.
Clean the TV and frame with a soft,
damp cloth. Never use substances such as
alcohol, chemicals or household cleaners
on the TV.
Risk of damage to the TV screen! Never
touch, push, rub or strike the screen with
any object.
To avoid deformations and colour fading,
wipe off water drops as soon as possible.
Disposal of your old product and
batteries
English
•
Your product is designed and manufactured
with high quality materials and components,
which can be recycled and reused.
When this crossed-out wheeled bin symbol
is attached to a product it means that the
product is covered by the European Directive
2002/96/EC. Please inform yourself about the
local separate collection system for electrical
and electronic products.
Please act according to your local rules and
do not dispose of your old products with your
normal household waste.
Correct disposal of your old product helps to
prevent potential negative consequences for
the environment and human health.
Your product contains batteries covered by
the European Directive 2006/66/EC, which
cannot be disposed with normal household
waste.
Please inform yourself about the local rules
on separate collection of batteries because
correct disposal helps to prevent negative
consequences for the environmental and
human health.
EN
5
ECO-Green
• High energy efficiency
• Low standby power
• Designed to facilitate recycling
Philips continuously focuses on lowering
the environmental impact of its innovative
consumer products. We aim our efforts
towards environmental improvements
during manufacturing, reduction of harmful
substances, energy-efficient use, end-of-life
instructions and product recycling.
Thanks to our environmental effort, this TV
has been awarded the European Ecolabel –the
flower– www.ecolabel.eu
You can find detailed information on standby
energy consumption, warranty policy, spare
parts and recycling of this TV on the Philips
website for your country at www.philips.com.
This TV has features that contribute to
energy-efficient use. This TV was awarded
the European Ecolabel for its environmental
qualities.
Energy efficiency features
• Ambient light sensor
To save energy, the built-in Ambient
light sensor lowers the brightness of the
TV screen when the surrounding light
darkens.
• Energy saving
The energy saving setting of the TV
combines several TV settings that result
in saving energy. See the smart settings in
the setup menu.
6
EN
Low standby power consumption
The class-leading and highly advanced
power circuitry brings down the power
consumption of the TV to an extremely
low level, without losing out on the
constant standby functionality.
Power management
The advanced power management of this TV
ensures the most efficient use of its energy.
You can check how your personal TV settings,
the level of brightness in current onscreen
pictures and the surrounding light conditions
determine the relative power consumption.
•
Press DEMO, then select [Active Control]
and press OK. Your current TV setting is
highlighted. You can change to another setting
to check the corresponding values.
Congratulations on your purchase, and
welcome to Philips! To fully benefit from the
support that Philips offers; register your product
at www.philips.com/welcome.
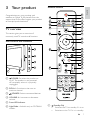
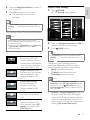
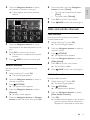
Remote control
1
28
2
27
TV overview
25
3
4
5
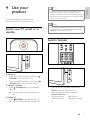
This section gives you an overview of
commonly used TV controls and functions.
24
7
26
6
8
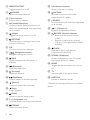
Side controls and indicators
9
4
10
11
12
13
14
15
16
17
23
3
2
1
6
a
22
18
5
POWER: Switches the product on
or off. The product is not powered
off completely unless it is physically
unplugged.
b P/CH +/-: Switches to the next or
previous channel.
c
English
3 Your product
19
20
21
SOURCE: Selects connected devices.
d VOLUME +/-: Increases or decreases
volume.
e Front LED indicator
f LightGuide : Available only on PFL7864H
models.
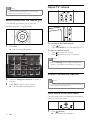
a
•
•
(Standby-On)
Switches the TV to standby if it is on.
Switches on the TV if it is in standby.
EN
7
b MHEG/TELETEXT
Toggles teletext on or off.
c
SOURCE
Selects connected devices.
d Colour buttons
Selects tasks or options.
e AD (Audio Descriptor)
UK only: Enables audio commentary for
the visually handicapped. Not supported
on all models.
f
(Home)
Toggles the home menu on or off.
g
OPTIONS
Accesses options relating to the current
activity or selection.
h OK
Confirms an entry or selection.
s 0-9 (Numeric buttons)
Selects a channel or setting.
t
PICTURE
Launches the picture menu.Not
supported on all models.
u
SOUND
Launches the sound menu.Not supported
on all models.
v
+/- (Volume +/-)
Increases or decreases volume.
w
x
BACKP/P (Previous channel)
Returns to the previous menu
screen.
• Returns to the previous channel.
(UK only: Not supported on MHEG
channels).
•
GUIDE
Accesses or exits the Electronic
Programme Guide (EPG).
i
(Navigation buttons)
Navigates through the menus.
j
INFO
Displays programme information, if
available.
k
(Backward)
*Searches backward.
z DEMO
Toggles the demonstration menu on or
off.
l
(Forward)
*Searches forward.
{ TV
Switches back to the aerial source.
m
(Play/Pause)
*Starts, pauses or resumes playback.
| SUBTITLE
Enables or disables subtitles.
n
(Record)
*Starts or stops video recording.
o
(Stop)
*Stops playback.
p
(Mute)
Mutes or restores audio output.
q P +/- (Programme +/-)
Switches to the next or previous channel.
r
FORMAT
Selects a picture format.
8
EN
y SCENEA (Wallpaper)
Displays wallpaper on your TV screen.
Not supported on all models.
*Controls the connected EasyLink-compliant
device.
Tip
•• Though your TV consumes very little power
when in standby, energy continues to be
consumed. When not in use for an extended
period of time, disconnect the TV power cable
from the power outlet.
This section helps you perform basic operations
(see ‘Use more of your product’ on page 12).
Switch your TV on/off or to
standby
English
4 Use your
product
Note
•• If you cannot locate your remote control and
want to switch on the TV from standby, press
P/CH +/- on the side of the TV.
Switch channels
To switch on
• If the front LED indicator is off, press
POWER at the side of the TV.
• If the front LED indicator is red, press
(Standby-On) on the remote control.
To switch to standby
• Press (Standby-On) on the remote
control.
»» The front LED indicator switches to
red.
To switch off
• Press POWER at the side of the TV.
»» The front LED indicator switches off.
•
•
•
Press P +/- on the remote control or
P/CH +/- on the side of the TV.
Enter a channel number using the
Numeric buttons.
Use the channel grid (see ‘Switch
channels with the channel grid’ on page
10).
EN
9
Adjust TV volume
Note
•• When you use a favourite list, you can only
select those channels in the list.
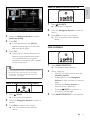
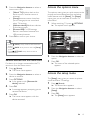
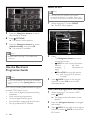
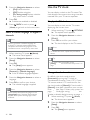
Switch channels with the channel grid
The channel grid allows you to view all
available channels in a grid format.
1
To increase or decrease volume
• Press
+/-.
• Press VOLUME +/- on the side of the TV.
To mute or unmute sound
• Press to mute the sound.
• Press again to restore the sound.
Press OK.
»» The channel grid appears.
1 2 3 4 5
6 7 RTL 8 8 9 10
11 12 13 14 15
166 177 1 8 1 9 20
2
3
Ned 1
N d2
Ned
SBSS 6
RTL 7
B 1
BBC
BBC 2
Comedy
ed
edy
CNN
NN
N
Ned 3
RTL 4
RTL 5
Net 5
Nickelo
elo
KetNet
KetN
Net
et
Discover
ve
ver
National
onal
on
a
Euro
ros
osp
sp
sp
Animal
ma
mal
HBO
BO
Note
•• Use the [Sound] menu to adjust headphone
volume (see ‘Adjust sound settings’ on page
17).
Watch connected devices
Press the Navigation buttons to select a
channel.
Press OK to confirm your choice.
»» The selected channel appears.
Note
•• For easy access, add new devices to the home
menu before selecting them.
Add a device to the home menu
Connect and switch on devices before adding
them to the home menu.
1
10
EN
Press (Home).
»» The home menu appears.
English
Select a device via the source list
Add
your devices
Watch TV
Browse USB
Setup
1
2
2
3
4
Press the Navigation buttons to select
[Add new device].
Press OK.
»» A message appears with [Start]
selected, prompting you to start the
add new device guide.
Press OK.
»» Follow the on-screen instructions to
select the type of device and where
it is connected. When the guide is
complete, a new device icon is added
to the home menu.
Tip
•• To avoid screen clutter, remove devices from
the home menu when they are no longer
connected (see ‘Remove devices from the
home menu’ on page 13).
3
2
3
Press (Home).
»» The home menu appears.
Press the Navigation buttons to select a
device.
Press OK to confirm your choice.
»» The TV switches to the selected
device.
Use teletext
1
2
Select a device via the home menu
1
Press
SOURCE.
»» The source list appears.
3
Press MHEG/TELETEXT.
»» The teletext screen appears.
Select a page by:
• Entering the page number with the
Numeric buttons.
• Pressing P +/- or the Navigation
buttons to view the next or previous
page.
• Pressing the Colour buttons to
select a colour coded item.
• Pressing
BACK to return to a
previously viewed page.
Press MHEG/TELETEXT to exit teletext.
Press the Navigation buttons to select a
device.
Press OK to confirm your choice.
»» The TV switches to the selected
device.
EN
11
5 Use more of
your product
•
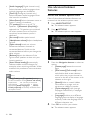
Change language settings
•
Note
•
•
•• Skip this step if your language settings are
correct.
1
2
3
4
5
•
When watching TV, press (Home).
»» The home menu appears.
Press the Navigation buttons to select
[Setup].
»» The [Setup] menu appears.
Press the Navigation buttons to select
[Installation] > [Languages] > [Menu
language].
»» A list of languages appears.
Press the Navigation buttons to select a
menu language.
Press OK to confirm your choice.
»» The selected language is applied to the
menu.
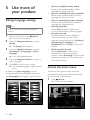
In addition to [Menu language], you can
configure the following language settings via
the [Languages] menu (digital channels only):
12
•
Languages
Menu language
Chann
a el installatiion
P i ry
Pri
Prima
ry audio
di
Dansk
D
sk
Prreference
P
enc s
ence
Seco
condary
co
ar audio
ary
udi
dio
Deutsch
Decod
Decoder
e err
Prima
mary
ryy subtitl
btit es
bt
EÏÏËÓÈÎο
Clock
lock
Secondary
Secon
dary subti
subtitles
tles
ess
English
Facto
cto
t ry rreset
Prima
m ryy tteletext
Español
Españ
ol
Secondary
Secon
aryy te
t l text
telet
Franç
nçais
nç
ais
Hearing im
mpaire
i d
Hrvatski
Hrvat
s
EN
CeŠ
C
Štiina
[Primary audio]/[Secondary audio]
Select primary and secondary audio
languages for digital channels.
[Primary subtitles]/[Secondary subtitles]
Select primary and secondary subtitle
languages for digital channels.
[Primary teletext]/[Secondary teletext]
Select primary and secondary teletext
languages for digital channels.
[Hearing impaired]
Select [On] to display subtitles with
primary and secondary audio languages.
[Visually impaired]
If available, select to hear additional
audio commentary for the visually
impaired through the options: [Speakers],
[Headphones] or [Speakers +
headphones]. Select [Off] to disable the
feature.
[Preferred audio format]
Select [Advanced] for best sound
reproduction from home theatre
systems. Select [Standard] for best sound
reproduction from the TV speakers and
basic sound systems.
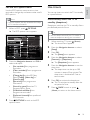
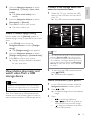
Access the home menu
The home menu gives you easy access to
connected devices, picture and sound settings
as well as other useful features.
1
Press (Home).
»» The home menu appears.
Add
your devices
Watch TV
Setup
Browse USB
3
Press the Navigation buttons to select a
home menu item:
• [Watch TV]Switches back to the
aerial source if another source is
selected.
• [Setup]Accesses menus that allow
you to change picture, sound and
other TV settings.
• [Add new device]Adds new devices
to the home menu.
• [Browse USB]If a USB storage
device is connected, accesses the
USB content browser.
Access the options menu
The options menu gives you quick access to the
picture and sound experience bar and other
useful features such as [Status]. The [Status]
menu gives you an overview of current TV
information.
1
Visually
Visu
ally impaire
impaired
d
Volume
Volu
o me - Vis
Visuall
uallyy impa
uall
im
mpa
pair
a ed
Press OK to confirm your choice.
Ma
M
Mark
ark as
a favo
avo
a
vouri
vo
uri e
urite
urit
Tip
•• Press
menu.
When watching TV, press OPTIONS.
»» The options menu appears.
Comm
Com
ommon
omm
m o
on
n inte
erffac
er
face
ace
c
ce
Status
(Home) at any time to exit the home
Cloc
oc
ck
•• Press
BACK at any time to exit the [Setup]
menu.
•• Press OPTIONS at any time to exit an
options menu.
Remove devices from the home menu
If a device is no longer connected to the TV,
remove it from the home menu.
1
2
3
4
5
Press (Home).
»» The home menu appears.
Press the Navigation buttons to select a
device to remove.
Press OPTIONS.
»» A list appears, with [Remove this
device] selected.
Press OK.
»» A message appears, prompting you to
remove the device.
Press OK.
»» The home menu appears, with the
device removed.
2
3
Press the Navigation buttons to select an
option.
Press OK.
»» The menu of the selected option
appears.
Access the setup menu
The [Setup] menu gives you access to picture,
sound and other TV settings.
1
2
3
Press (Home).
»» The home menu appears.
Press the Navigation buttons to select
[Setup].
Press OK.
»» The [Setup] menu appears.
EN
13
English
2
Change picture and sound
settings
6
Change picture and sound settings to suit your
preferences. You can apply pre-defined settings
or change settings manually.
Note
•• The flexibility to change settings is limited if
the TV location is set to [Shop] mode. Set the
TV location to [Home] mode to access all TV
settings (see ‘Change TV preferences’ on page
30).
7
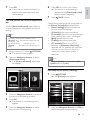
Use smart settings
Use smart settings to apply pre-defined
picture and sound settings.
1
2
3
4
5
8
When watching TV, press (Home).
»» The home menu appears.
Press the Navigation buttons to select
[Setup].
Press OK to confirm your choice.
»» The smart setting is applied.
Press
BACK to exit or press
(Home) to go back to the home menu.
Note
•• [Smart settings] is also accessible via the
[Picture and sound] experience bar (see ‘Use
the picture and sound experience bar’ on page
15).
Press OK.
»» The [Setup] menu appears.
Press the Navigation buttons to select
[Smart settings].
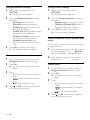
Use settings assistant
Press OK.
»» A list of smart settings appears.
Use the settings assistant to guide you through
the best picture and sound settings.
Personal
Vivid
Vivid
Natural
Cine
nema
ma
Game
Standard
Stan
da
1
2
3
4
5
6
14
Press the Navigation buttons to select:
• [Personal]Sets the TV to your
personal preferences set in the
[Picture] and [Sound] menus in
[Setup].
• [Vivid]Rich and dynamic settings,
ideal for daylight use.
• [Natural]A natural picture setting.
• [Cinema]Ideal settings for watching
movies.
• [Game]Ideal settings for gaming.
• [Standard]The most energy
conscious settings. Factory standard
settings.
EN
When watching TV, press (Home).
»» The home menu appears.
Press the Navigation buttons to select
[Setup].
Press OK.
»» The [Setup] menu appears.
Press the Navigation buttons to select
[Picture] > [Settings assistant].
Press OK.
»» A message appears prompting you to
start the settings assistant.
Press the Navigation buttons to select
[Start].
Press OK.
»» Follow the on-screen instructions to
choose your preferred picture and
sound settings.
Use the picture and sound experience
bar
Use the [Picture and sound] experience bar
to access frequently used picture and sound
settings.
Note
•• All picture settings are available via the
[Picture]menu (see ‘Manually adjust picture
settings’ on page 15).
•• All sound settings are available via the
[Sound]menu (see ‘Adjust sound settings’ on
page 17).
1
2
When watching TV, press OPTIONS.
»» The options menu appears.
Press the Navigation buttons to select
[Picture and sound].
»» The [Picture and sound] experience
bar appears.
6
7
Press OK to confirm your choice.
»» The picture or sound setting is
applied and the [Picture and sound]
experience bar reappears.
Press
English
7
BACK to exit.
The following settings can be configured via
the [Picture and sound] experience bar.
• [Smart settings]Applies pre-defined
picture and sound settings.
• [Colour]Adjusts colour saturation.
• [Contrast]Adjusts the intensity of bright
areas, keeping dark areas unchanged.
• [Bass]Adjusts the bass level.
• [Treble]Adjusts the treble level.
• [TV speakers]Turns on or off TV
speakers. If [Automatic (EasyLink)] is
selected, the TV speakers are switched
off when content from an EasyLinkcompliant home theater system is
detected.
Note
•• [Bass] and [Treble] are not available if [TV
speakers] are set to [Off].
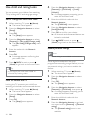
Manually adjust picture settings
1
Smart settings
3
4
5
Press the Navigation buttons to select a
picture or sound setting to adjust.
Smart settings
Settings assistant
Picture
Contr
ontr
t ast
S
Sound
Brightness
Brigh
Br
tness
nes
Featu
eatures
res
Colourr
Installation
Hue
Software update
Sharpness
ne
Noise reduuction
ct
Press OK.
»» The picture or sound setting menu
appears.
Press the Navigation buttons to adjust
the picture or sound setting.
Press PICTURE.
»» The [Picture] menu appears.
Tint
2
Press the Navigation buttons and OK to
select and adjust a picture setting.
EN
15
3
Press
Tip
•• The [Picture] menu is also accessible via the
[Setup]menu (see ‘Access the setup menu’ on
page 13).
The following picture settings can be
configured. Depending on the format of the
picture source, some picture settings are not
available.
• [Settings assistant]Use settings assistant
to guide you through the best picture and
sound settings.
• [Contrast]Adjusts the intensity of bright
areas, keeping dark areas unchanged.
• [Brightness]Adjusts the intensity and
details of dark areas.
• [Colour]Adjusts colour saturation.
• [Hue]Compensates colour variations in
NTSC encoded transmissions.
• [Sharpness]Adjusts the level of sharpness
in image details.
• [Noise reduction]Filters and reduces
noise in an image.
• [Tint]Adjusts the colour balance in an
image.
Note
•
•
•
•
Tip
•• If [Auto format mode] is disabled, select
[Picture format] > [Auto format] to enable
the option.
•
•• [Colour] and [Contrast] settings are also
accessible via the [Picture and sound]
experience bar (see ‘Use the picture and
sound experience bar’ on page 15).
> [Custom], then press OK to enable the
option.
•
16
[Custom tint]Make a customised tint
setting.
[Pixel Plus HD]/[Pixel Precise HD]Gives
access to advanced picture settings:
• [Dynamic contrast]Automatically
enhances contrast in an image.
• [Dynamic backlight]Adjusts the
brightness of the TV backlight to
match lighting conditions.
• [MPEG artefact reduction]Smoothes
out transitions on digital pictures.
You can switch this feature on or off.
EN
[Picture shift]Adjusts the position of the
picture.
Note
•• Before you adjust [Custom tint], select [Tint]
•
[Colour enhancement]Makes
colours more vivid and improves the
resolution of details in bright colours.
You can switch this feature on or off.
[PC mode]Enables picture settings
adjustment when a PC is connected to
the TV via HDMI. If enabled, you can
select [Picture format] > [Unscaled]
which provides maximum detail for
display of PC content.
[Light sensor]Dynamically adjusts picture
settings to match lighting conditions.
[Picture format]Changes the picture
format.
[Auto format mode]Sets the picture
format to automatically fill or
automatically zoom into the screen.
•
BACK to exit.
Change picture format
1
Press
FORMAT.
»» A list of picture formats appears.
Auto for
format
mat
Sup
Supe
perr zo
oom
o
Movie expand 16:9
Wide screen
Wid
screen
Unscaled
U
l d
3
Press the Navigation buttons to select a
picture format.
Press OK to confirm your choice.
»» The selected picture format is
activated.
Adjust sound settings
1
Tip
•• Picture formats are also accessible via the
[Setup]menu (see ‘Access the setup menu’ on
page 13).
The following picture formats can be selected.
Press SOUND.
»» The [Sound] menu appears.
Smart sett
settings
ings
Bass
Pictu
t re
Trebl
Tr
r e
Sound
Volu
lumee
lum
lu
Feat
Features
Featu
ea res
es
Volum
umee - Visual
Visu
isual
sually
sual
ly impair
impair
pa
Insta
nstallat
llation
on
A
Audio
language
lang
uage
Softw
ftw
t are update
updat
Duall I/II
/II
II
Mono Stere
Mono/
tereeo
Note
English
2
-8
Bass
TV speaker
ers
•• Depending on the picture source, some
picture formats are not available and will not
be seen on-screen.
•• Before you adjust [Unscaled], select [Picture]
> [PC mode] > [On], then press OK to
enable the option.
2
3
Press the Navigation buttons and OK to
select and adjust a sound setting.
Press
BACK to exit.
Tip
[Auto format] Enlarges
the picture to fill the
screen (subtitles remain
visible). Recommended for
minimal screen distortion
(but not for HD or PC).
[Super zoom] Removes
the black bars on the sides
of 4:3 broadcasts. Not
recommended for HD
or PC.
[Movie expand 16:9]
Scales the classic 4:3
format to 16:9. Not
recommended for HD
or PC.
[Wide screen] Stretches
the classic 4:3 format to
16:9
[Unscaled] Provides
maximum detail for PC.
Only available when [PC
mode] is enabled in the
[Picture] menu.
•• The [Sound] menu is also accessible via the
[Setup]menu (see ‘Access the setup menu’ on
page 13).
The following sound settings can be
configured. Depending on the broadcast,
some sound settings may not be available.
• [Bass]Adjusts the bass level.
• [Treble]Adjusts the treble level.
• [Volume]Adjusts the volume.
Note
•• Before you adjust [Volume - Visually
impaired], enable [Visually impaired]. When
watching TV, press OPTIONS and select
[Visually impaired]. Select a preferred option
and press OK.
•
[Volume - Visually impaired]Sets the mix
of visually impaired audio with regular
audio. When available, visually impaired
audio includes audio descriptions of onscreen action. You can also enable this by
pressing AD (Audio Descriptor).
EN
17
•
•
•
•
•
•
•
•
•
[Audio language](Digital channels only)
Selects between audio languages when
multiple languages are broadcast.
[Dual I-II](Analogue channels only)
Selects between audio languages when
dual sound is broadcast.
[Mono/Stereo]Selects between mono or
stereo if stereo is broadcast.
[TV speakers]Turns on or off TV
speakers. If [Automatic (EasyLink)] is
selected, the TV speakers are switched
off when content from an EasyLinkcompliant home theater system is
detected.
[Surround]Enables spatial sound.
[Headphones volume]Adjusts headphone
volume.
[Delta volume]Levels out volume
differences between channels or
connected devices. Switch to the
connected device before you change the
delta volume.
[Balance]Adjusts the balance of the
right and left speakers to best suit your
listening position.
[Auto volume leveling]Automatically
reduces sudden volume changes, for
example, when switching channels. When
enabled, this produces a more consistent
audio volume.
Use advanced teletext
features
Access the teletext options menu
Most of the advanced teletext features are
accessed via the teletext options menu.
1
2
Duall scr
D
screen
een
Reve
v al
Cycl
cle
e subp
subpages
ges
es
Lang
nguage
uage
3
•• [Bass], [Treble] and [TV speakers] settings
are also accessible via the [Picture and sound]
experience bar (see ‘Use the picture and
sound experience bar’ on page 15). When
supported, [Audio language] and [Volume Visually impaired] are directly accessible from
the options menu.
4
EN
Press OPTIONS.
»» The teletext options menu appears.
Freeze page
Note
18
Press MHEG/TELETEXT.
»» The teletext screen appears.
Press the Navigation buttons to select an
option:
• [Freeze page]Freezes the current
page.
• [Dual screen]/[Full screen]Enables
and disables dual screen teletext,
which splits the current channel or
source to the left of the screen, with
teletext on the right.
• [Reveal]Hides or reveals hidden
information on a page, such as
solutions to riddles or puzzles.
• [Cycle subpages]Cycles through
subpages automatically if subpages
are available.
• [Language]Switches to a different
language group to display a language
correctly when that language uses a
different character set.
Press OK to confirm your choice.
»» The teletext screen appears.
•• Press
OPTIONS at any time to exit the
options menu.
2
3
Press OK to highlight the first word or
number.
Press the Navigation buttons to skip to
the word or number to search.
Select teletext subpages
4
5
A teletext page can hold several subpages.
Subpages are displayed on a bar next to the
main page number.
Enlarge teletext pages
Note
•• Enable cycling of subpages before selecting
subpages (see ‘Access the teletext options
menu’ on page 18).
1
2
3
Press MHEG/TELETEXT.
»» The teletext screen appears.
Select a teletext page.
Table Of Pages (T.O.P.) teletext broadcasts
allow you to jump from one subject to
another without using page numbers. T.O.P.
teletext is not broadcast on all TV channels.
1
2
3
4
Press MHEG/TELETEXT.
»» The teletext screen appears.
2
3
Press MHEG/TELETEXT.
»» The teletext screen appears.
Press
FORMAT.
»» The teletext screen is enlarged.
Press:
•
to scroll up and down the
enlarged screen.
•
FORMAT to return to normal
screen size.
Teletext 2.5 offers more colours and better
graphics than normal teletext. If Teletext 2.5
is broadcast by a channel, it is switched on by
default.
1
Press the Navigation buttons to select a
subject.
3
Press OK to confirm your choice.
»» The teletext page appears.
4
Press MHEG/TELETEXT.
»» The teletext screen appears.
Press until no word or number is
highlighted to exit the search.
Use Teletext 2.5
2
Search a teletext page by subject or word.
1
1
Press INFO.
»» The T.O.P. overview appears.
Search teletext
Press OK to begin the search.
For more comfortable reading, you can
enlarge the teletext page.
Press or to select a subpage.
»» The subpage appears.
Select T.O.P. teletext broadcasts
English
Tip
5
When watching TV, press OPTIONS.
»» The options menu appears.
Press the Navigation buttons to select
[Setup].
Press OK.
»» The [Setup] menu appears.
Press the Navigation buttons to select
[Installation] > [Preferences] > [Teletext
2.5] > [On] or [Off].
»» Teletext 2.5 is enabled or disabled.
Press
BACK to exit or press
(Home) to go back to the home menu.
EN
19
Create and use lists of
favourite channels
Add or remove channels from a
favourite list
You can create lists of your preferred TV
channels so that you can find those channels
easily.
Tip
•• Select [All] channels before adding a channel
to a favourite list.
1
Note
•• Digital radio stations can also be added to
favourite lists, if supported.
View only channels in a favourite list, or
view all channels if a favourite list is currently
selected.
1
2
When watching TV, press OK.
»» The channel grid appears.
2
Press OPTIONS.
»» The options menu appears.
3
3 4 5
RTL 8
8 9 10
13 14 15
15
16 17 1 8 1 9 20
Ned 1
1
Ned 2
Select list
2
Ned 3
RTL 4
RTL 5
Net 5
Nickkelo
KettNeet
KetN
Discoover
National
n
Euro
roossp
Anim
ma
mal
HBO
BO
Mark as favourite
Reorder
Rename
Show hidden channels
Hide channel
3
4
5
6
20
Press the Navigation buttons to select
[Select list].
Press OK.
»» The [Select list] menu appears.
Press the Navigation buttons to select:
• [All]Displays all channels.
• [Favourites]Displays channels in a
selected favourite list.
• [Radio]Displays radio channels only.
• [Digital]Displays digital channels only.
• [Analogue]Displays analogue
channels only.
Press OK to confirm your choice.
»» The selected list is applied to the
channel grid.
EN
When watching TV, switch to the channel
you want to add or remove from a
favourite list.
Alternatively, press OK to enter the
channel grid and press the Navigation
buttons to select the channel to add or
remove.
Press OPTIONS.
»» The options menu appears.
Press the Navigation buttons to select
[Mark as favourite] or [Unmark as
favourite].
»» A star appears in the channel grid,
indicating that the channel is added to
the favourite list. The star disappears if
you chose to remove the channel from
the favourite list.
Reorder/rearrange and
rename channels
Reorder/rearrange channels
Reorder/rearrange channels in the grid to your
desired location.
1
2
3
When watching TV, press OK.
»» The channel grid appears.
Press OPTIONS.
»» The options menu appears.
Press the Navigation buttons to select
[Reorder], then press OK.
»» An on-screen message appears. To
continue, go to step 4.
•
To cancel and exit, press
OPTIONS and follow the on-screen
instructions.
Press the Navigation buttons to select
the channel to reorder in the grid.
»» A box appears around the selected
channel.
1 2 3 4 5
6 7 RTRTL 88 9 10
11 12 13 14 15
15
16 17 1 8 1 9 20
5
6
7
Ned 1
Ned 2
SBSS 6
RTL
TLL 7
B C1
BB
BBC
BBCC 2
Com
medyy
CN
NN
Ne 3
Ned
N
RTL 4
RTL 5
Net 5
Nickkelo
kelo
e
KetNeet
KetN
Discoover
Na onal
Nati
n
nal
Eur
uro
rosspp
ro
A mal
Anim
ma
HBO
BO
Press the Navigation buttons to move
the channel to the desired location in the
grid.
Press OK to confirm your choice.
»» The channel is moved to the selected
location.
Press
BACK to exit the channel grid.
Rename channels
Rename channels in the grid to suit your
needs.
1
2
3
4
5
6
7
8
Once complete, press the Navigation
buttons to select [Done].
• To clear the name entered, select
[Clear].
• To cancel, select [Cancel].
Press OK to confirm your choice.
Press
BACK to exit the channel grid.
Hide and unhide channels
Hide channels
Hide channels from the grid, to prevent
unauthorised access.
1
2
3
4
5
6
When watching TV, press OK.
»» The channel grid appears.
Press the Navigation buttons to select a
channel to hide.
Press OPTIONS.
»» The options menu appears.
Press the Navigation buttons to select
[Hide channel].
Press OK to confirm your choice.
»» The channel is hidden.
Press
BACK to exit the channel grid.
When watching TV, press OK.
»» The channel grid appears.
Unhide channels
Press the Navigation buttons to select a
channel to rename.
1
Display hidden channels.
Press OPTIONS.
»» The options menu appears.
2
Press the Navigation buttons to select
[Rename].
»» An entry screen appears.
3
Press the Navigation buttons or Numeric
buttons to edit the name, then press OK.
English
4
4
When watching TV, press OK.
»» The channel grid appears.
Press OPTIONS.
»» The options menu appears.
Press the Navigation buttons to select
[Show hidden channels].
Press OK.
»» Hidden channels appear in the channel
grid, but without channel information
displayed. It is displayed as a black box.
EN
21
Switch on EPG
1 2 3 4 5
6 7 RRTL 88 9 10
111 12 13 14 15
15
16 17 1 8 1 9 20
5
6
7
Ned 1
Ned 2
SBSS 6
RTL 7
B C1
BBC
BBCC 2
Com
medyy
CN
NN
Ned 3
RTL 4
RTL 5
Net 5
Nickkelo
KettNeet
KetN
Discoover
National
n
Euro
roossp
Anim
ma
mal
HBO
BO
Note
•• The first time you use EPG, you may be
prompted to perform an update. Follow the
on-screen instructions to perform the update.
1
Press the Navigation buttons to select
the channel to unhide.
Ned 1
Ned 2
Press OPTIONS.
»» The options menu appears.
•• Repeat steps 5 through 7 to unhide other
channels.
2
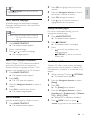
Use the Electronic
Programme Guide
Note
•• EPG is not available in all countries. If available,
3
you will receive either [Now]/[Next] or 8 days
EPG.
EPG is an on-screen guide available for digital
channels. EPG allows you to:
• View a list of digital programmes being
broadcast
• View upcoming programmes
• Group programmes by genre
• Set reminders when programmes start
• Set up preferred EPG channels
EN
NO
N
OW
OW
20:00 Flying Lotus
200:10
20:10
220:1
20:
10
1 The
The Man
Maan
RTL 4
20:15 TTrea
Treasure
su Ch
sure
Chest
est
st
20:15 Funky Fee
eett
ee
222:3
22
:30
30 PPoint Blank
NEXT
21:30 ZZ-Team
21
22:440 NCS
221:30
30 Cave
2
22:00
SBS 6
20:00 Cleopatra Jam
21:10 Unlucky
ckyy Luke
SBS 7
20:10 She-Wolf
2
21:25
Disaster Earth
Veronica
20:05
0
Under The Bridge
20:45 1200 Da
Days of
Press:
• The Navigation buttons to move
around the screen.
•
INFO to view more information
about a programme (see ‘View
channel/programme information’ on
page 22).
•
OPTIONS to view the options
menu (see ‘Use the EPG options
menu’ on page 23).
Press
BACK to exit to the original
channel, or press OK to exit to the
selected channel.
View channel/programme information
1
2
3
22
20:10 Click Chic
Ned 3
RTL 5
Press the Navigation buttons to select
[Unhide channel], then press OK.
»» The channel is unhidden.
Note
When watching TV, press GUIDE.
»» The EPG menu appears.
When watching TV or when in EPG,
press INFO.
»» The programme information screen
appears.
Press the Navigation buttons to navigate
the screens.
Press INFO to exit back to the original
channel or press
BACK to exit to the
EPG menu.
Use timers
Use the EPG options menu to set or clear
reminders, change day and access other useful
EPG options.
You can set timers to switch the TV to standby
at a specified time.
Note
•• The EPG options are only accessible for 8 days
of TV channel information.
1
When in EPG, press OPTIONS.
»» The EPG options menu appears.
NO
N
OW
Ned 1
20:10 Click Chic
Ned
Ned
d2
20 00 Flyi
20:00
Fl
Flying
ing
ng LLo
otuss
21 Z-Team
21:30
Ned
N
d3
20 10 Th
20:10
Thee Ma
Maan
Man
n
22:
2:40 NCS
S
RTL
RT
TL 4
220:15
0:15 TTreasure
reasure Chest
hest
est
21:3
RTL
RT
TL 5
220:15
0:15 Fun
Fu
Funkkky Fee
Feett
2
22:0
SB
SBS
BS 6
20:00
220:0
0:0000 Cl
C
Cleopatr
leopatrra Jan
n
Set reminder
Clear remind
Clear
remind
der
der
Chan
Change
Chan
hange
ge day
da
More
re inf
info
nfo
o
Search
h by
by ge
ge
enre
en
nre
e
2
3
NEXT
22:30 Point Blank
21:10 Unluckyy Luke
SBS 7
20
20:1
20:10
0:10
100 She
SheShe-Wol
Wollf
Scheduled
d re
e
eminders
minders
mind
2
21:25
Disaster Earth
Preferred
hanne
annels
20:05 U
Under Th
he Bridge
h
Veronicad ch
20:45 120
200 Days off
Press the Navigation buttons and OK to
select and adjust:
• [Set reminder]Sets programme
reminders.
• [Clear reminder]Clears programme
reminders.
• [Change day]Sets the EPG day.
Select [Today], [Next day] or
[Previous day].
• [More info]View programme
information.
• [Search by genre]Searches TV
programmes by genre.
• [Scheduled reminders]Lists
programme reminders.
• [Preferred channels]Sets preferred
EPG channels.
Automatically switch the TV to
standby (sleeptimer)
Sleeptimer switches the TV to standby after a
pre-defined period of time.
Tip
•• You can always switch off your TV earlier or
reset the sleeptimer during the countdown.
1
2
3
4
5
6
7
When watching TV, press (Home).
»» The home menu appears.
Press the Navigation buttons to select
[Setup]
Press OK.
»» The [Setup] menu appears.
Press the Navigation buttons to select
[Features] > [Sleeptimer].
»» The [Sleeptimer] menu appears.
Press the Navigation buttons to set the
sleep time.
»» The sleep timer can be up to 180
minutes, in steps of five minutes. The
sleep timer is switched off if set to
zero minutes.
Press OK to activate the sleeptimer.
»» The TV switches to standby after the
set period of time.
Press
BACK to exit or press
(Home) to return to the home menu.
Press OPTIONS to exit to the EPG
options menu.
EN
23
English
Use the EPG options menu
Use child and rating locks
4
You can prevent your children from watching
TV by locking the TV and using age ratings.
Set or change the child lock code
1
2
3
4
5
6
7
When watching TV, press (Home).
»» The home menu appears.
Press the Navigation buttons to select
[Setup].
Press OK.
»» The [Setup] menu appears.
Press the Navigation buttons to select
[Features] > [Set code]/[Change code].
»» The [Set code]/[Change code] menu
appears.
Enter the code with the Numeric
buttons.
Press OK.
»» A message appears confirming that
your code is set.
Press
BACK to exit or press
(Home) to go back to the home menu.
Tip
•• If you forget your code, enter ‘8888’ to
override any existing codes.
Lock or unlock the TV
Locking the TV prevents your child from
accessing all channels and connected devices.
1
2
3
24
When watching TV, press (Home).
»» The home menu appears.
Press the Navigation buttons to select
[Setup].
Press OK.
»» The [Setup] menu appears.
EN
5
6
7
8
Press the Navigation buttons to select
[Features] > [Child lock] > [Lock]/
[Unlock].
»» A message appears prompting you to
enter the child lock code.
Enter the child lock code with the
Numeric buttons.
»» The [Child lock] menu appears.
Press the Navigation buttons to select
[Lock]/[Unlock].
Press OK to confirm your choice.
»» All channels and connected devices are
locked or unlocked.
Press
BACK to exit or press
(Home) to go back to the home menu.
Enable parental ratings
Note
•• Parental rating is not available in all countries.
Some digital broadcasters rate their
programmes according to age. Before you can
set parental ratings, you have to enable the
feature.
1
2
3
4
5
6
When watching TV, press (Home).
»» The home menu appears.
Press the Navigation buttons to select
[Setup].
Press OK.
»» The [Setup] menu appears.
Press the Navigation buttons to select
[Features] > [Child lock], then press .
»» A message appears prompting you to
enter the child lock code.
Enter the child lock code with the
Numeric buttons.
Press the Navigation buttons to go back
one menu level to [Features] > [Parental
rating].
»» The [Parental rating] menu is now
available.
You can set your TV to display only
programmes with age ratings higher than your
child’s age.
Note
•• Before you can set parental ratings, you have
to enable the feature (see ‘Enable parental
ratings’ on page 24).
1
2
3
4
5
6
7
When watching TV, press (Home).
»» The home menu appears.
Press the Navigation buttons to select
[Setup].
Press OK.
»» The [Setup] menu appears.
Press the Navigation buttons to select
[Features] > [Parental rating].
»» A message appears prompting you to
enter the child lock code.
Enable or disable subtitles on
analogue TV channels
1
2
3
4
5
Enter the three-digit page number of the
subtitle page with the Numeric buttons.
Press MHEG/TELETEXT to switch off
teletext.
Press SUBTITLE.
»» The [Subtitles] menu appears.
the [Setup] menu.
6
Press the Navigation buttons to select
an age rating, then press OK to apply the
setting.
»» All programmes beyond the selected
age rating are blocked.
8
You can enable subtitles for each TV channel.
Subtitles are broadcast via teletext or DVBT digital broadcasts. With digital broadcasts,
you have the additional option of selecting a
preferred subtitle language.
Press MHEG/TELETEXT.
•• The [Subtitles] menu is also accessible through
7
Use subtitles
Switch to an analogue TV channel.
Note
Enter the child lock code with the
Numeric buttons.
Press
BACK to exit or press
(Home) to go back to the home menu.
English
Set parental ratings
Press the Navigation buttons to select:
• [On]Enables subtitles.
• [Off]Disables subtitles.
• [On during mute]Displays subtitles
only when audio is muted.
Press OK to confirm your choice.
»» Subtitles are enabled or disabled.
Press
BACK to exit or press
(Home) to go back to the home menu.
Note
•• Repeat this procedure to enable subtitles on
each analogue channel.
•• If EasyLink is enabled, subtitles are not
displayed when [On during mute] is selected
(see ‘Enable or disable EasyLink’ on page 44).
Enable or disable subtitles on digital
TV channels
1
Press SUBTITLE.
»» The [Subtitles] menu appears.
Note
•• The [Subtitles] menu is also accessible via the
[Setup]menu (see ‘Access the setup menu’ on
page 13).
EN
25
2
3
4
Press the Navigation buttons to select:
• [On]Enables subtitles.
• [Off]Disables subtitles.
• [On during mute]Displays subtitles
only when audio is muted.
Use the TV clock
You can display a clock on the TV screen. The
clock displays the current time using time data
received from your TV service operator.
Press OK.
»» Subtitles are enabled or disabled.
Display the TV clock
Press
BACK to exit or press
(Home) to go back to the home menu.
You can display a clock on the TV screen,
displaying the current time.
Select a subtitle language on digital TV
channels
Note
•• When you select a subtitle language on
1
2
3
a digital TV channel as described below,
the preferred subtitle language set in the
installation menu is temporarily overruled.
1
2
3
4
5
6
When watching TV, press (Home).
»» The home menu appears.
Press the Navigation buttons to select
[Setup].
Press OK.
»» The [Setup] menu appears.
Press the Navigation buttons to select
[Features] > [Subtitle language].
»» A list of subtitle languages appears.
Press the Navigation buttons to select a
language.
Press OK to confirm your choice.
»» The subtitle language is applied.
Note
•• Select preferred subtitle languages in the
[Languages]menu. Subtitles automatically
appear in the preferred languages when
enabled.
Press OK to confirm your choice.
»» The clock displays on the TV screen.
•• To disable the clock, repeat the procedure
above.
Tip
•• The clock is also accessible via the
[Setup]menu (see ‘Access the setup menu’ on
page 13).
Change the clock mode
By default, the clock mode is set to
[Automatic], syncing the TV clock to
Coordinated Universal Time (UTC). If your
TV cannot receive UTC transmissions, set
the clock mode to [Manual]. If clock mode is
[Manual], time data is based on your current
time zone (see ‘Step 1 Select your system’ on
page 33) and daylight saving conditions (see
‘Enable or disable daylight saving’ on page 27).
1
3
EN
Press the Navigation buttons to select
[Clock].
Note
2
26
When watching TV, press OPTIONS.
»» The options menu appears.
When watching TV, press (Home).
»» The home menu appears.
Press the Navigation buttons to select
[Setup].
Press OK.
»» The [Setup] menu appears.
5
6
Press the Navigation buttons to select
[Installation] > [Clock] > [Auto clock
mode].
»» The [Auto clock mode] menu
appears.
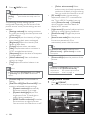
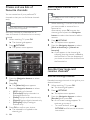
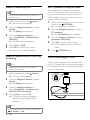
Connect a USB storage device and
enter the content browser
1
Press the Navigation buttons to select
[Automatic] or [Manual].
Press OK to confirm your choice.
»» The clock mode is set.
Enable or disable daylight saving
While the TV is on, connect the USB
device to the USB port on the side of
your TV.
»» The USB content browser appears.
Music
Coltraane
Coltr
Red Eyes
Photos
Photo
Miles
Mi
iles
Drivi
ving along
o the A..
Video
deoss
deo
Can
n
Croco
C
Cr
oco
odile Tears
Logan
If clock mode is set to [Manual], enable or
disable daylight saving if required for your time
zone.
1
2
3
In the [Clock] menu, press the
Navigation buttons to select [Daylight
saving].
»» The [Daylight saving] menu appears.
Press the Navigation buttons to select
[Daylight saving time] or [Standard time].
Press OK to confirm your choice.
»» Daylight saving is enabled or disabled
for your time zone.
View photos, play music and
watch video from a USB
storage device
Caution
•• Philips is not responsible if the USB storage
English
4
Baarrrel
Ba
elly Br
Breaking Eve..
Eve
Pharoaah
Ph
hS
San.
San
n...
Skint
Skint
Sk
ki t
Antip
ntip
ti op Con..
tip
S
Space
is the Place
Minim
imum
um Ma.
Ma..
Livin
ng for the City
A Tribe
be Called
Ca d
Note
•• The USB content browser is also accessible by
selecting [Browse USB] in the home menu.
•• If you connect multiple USB storage devices
via a USB hub, a message appears prompting
you to select a device. Press the Navigation
buttons to select the device, then press OK
to confirm.
2
To exit from the USB content browser,
press (HOME).
»» The home menu appears.
Watch a slideshow of your photos
1
device is not supported nor is it responsible
for damage or loss of data from the device.
2
Your TV is fitted with a USB connector that
enables you to view photos, listen to music or
watch movies stored on a USB storage device.
3
In the USB content browser, press the
Navigation buttons to select a photo.
Press
or OK.
»» A slideshow begins from the selected
image.
Press
•
to pause the slideshow.
•
/ , / or P +/- to go back or
move forward to the next image.
•
to stop the slideshow and return
to the USB browser.
EN
27
Change slideshow settings
1
2
3
When viewing a slideshow, press
OPTIONS.
»» The options menu appears.
Press the Navigation buttons to select
and adjust:
• [Rotate]Rotates a picture.
• [Repeat]Repeats the slideshow.
• [Shuffle on]Displays pictures in the
slideshow at random.
• [Shuffle off]Disables random display
of pictures in the slideshow.
• [Slideshow speed]Sets the amount
of time that a picture is shown.
• [Slideshow transition]Sets the
transition from one picture to the
next.
Press OK to confirm your choice.
»» The slideshow setting is applied.
Listen to music
1
2
3
4
In the USB content browser, press the
Navigation buttons to select a song.
Change music settings
1
2
3
Press the Navigation buttons to select
and adjust:
• [Repeat]Repeats a song or an album.
• [Shuffle on]/[Shuffle off]Enables or
disables random play of songs.
Press OK to confirm your choice.
»» The music setting is applied.
View a slideshow of your photos with
music
You can view a slide show of your photos with
background music.
1
2
After selecting a song to play (see ‘Listen
to music’ on page 28), press GUIDE.
»» The USB content browser appears.
Start a photo slideshow (see ‘Watch a
slideshow of your photos’ on page 27).
Press OK.
»» The song starts to play in the music
player.
Watch video
Press:
• P +/- to skip to the next or previous
song.
•
/ to fast-forward or rewind a
song.
•
to play or pause a song.
2
1
3
Press or OK to stop play and exit to
the USB content browser.
4
28
When in the music player, press
OPTIONS.
»» The options menu appears.
EN
In the USB content browser, press the
Navigation buttons to select a video.
Press OK.
»» The video starts to play in the video
player.
Press:
• P +/- to skip to the next or previous
video.
•
/ to fast-forward or rewind a
video.
•
to play or pause a video.
Press or OK to stop play and exit to
the USB content browser.
1
2
3
When in the video player, press
OPTIONS.
»» The options menu appears.
Press the Navigation buttons to select
and adjust:
• [Small screen]Plays video in a small
screen.
• [Full screen]Plays video across the
whole screen.
• [Repeat]Repeats a video.
• [Shuffle on]/[Shuffle off]Enables or
disables random play of videos.
Press OK to confirm the setting change.
Disconnect a USB storage device
Caution
•• Follow this procedure to avoid damage to your
USB storage device.
1
2
Press (HOME) to exit the USB content
browser.
Wait five seconds before disconnecting
the USB storage device.
Listen to digital radio
channels
If digital broadcasting is available, digital radio
channels are installed automatically during
installation.
1
2
3
4
5
6
7
Press OK.
»» A list of available digital radio channels
appears in the channel grid.
Press the Navigation buttons to select a
radio channel.
Press OK.
»» The selected digital radio channel plays
through the TV speakers.
Update the TV software
Philips continuously tries to improve its
products and we recommend that you update
the TV software when updates are available.
Check www.philips.com/support for availability.
Check the current software version
1
2
3
4
5
When watching TV, press (Home).
»» The home menu appears.
Press the Navigation buttons to select
[Setup].
Press OK.
»» The [Setup] menu appears.
Press the Navigation buttons to select
[Software update] > [Current software
info].
Press OK.
»» The version of the current software is
displayed.
When watching TV, press OK.
»» The channel grid appears.
Press OPTIONS.
»» The options menu appears.
Press the Navigation buttons to select
[Select list].
»» The [Select list] menu appears.
Press the Navigation buttons to select
[Radio].
EN
29
English
Change video settings
Update software (from website)
Before performing this procedure be sure to:
• Set aside some time to complete the
entire update.
• Have available a USB storage device with
at least 256MB of storage space.
• Have access to a computer with a USB
port and internet access.
1
2
3
4
5
When watching TV, press (Home).
»» The home menu appears.
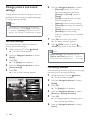
Change TV preferences
1
2
3
4
Press the Navigation buttons to select
[Setup].
Press OK.
»» The [Setup] menu appears.
Press the Navigation buttons to select
[Software update] > [Update now].
Press OK.
»» The update assistant starts. Follow the
on-screen instructions to complete the
update.
When watching TV, press (Home).
»» The home menu appears.
Press the Navigation buttons to select
[Setup].
Press OK.
»» The [Setup] menu appears.
Press the Navigation buttons to select
[Installation] > [Preferences].
»» The [Preferences] menu appears.
Languages
Langu
ages
Location
Home
Chann
a el installattion
Volum
V
ol e bar
b
Shop
p
Preferences
Chan
annel
an
ell iinforma
formation
ormation
n
Decod
Decoder
e err
EasyL
yLink
ink
nkk
Clock
lock
EasyLink
EasyL
ink Remot
Remotee Con
ontrol
trol
Facto
cto
t ry rreset
Pixell Plus
lus
us link
us
Light
ightGuide
ide
de brig
b i htnes
br
htn
tn s
Teletext 2.55
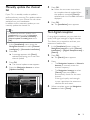
Update software (digital broadcasts)
(Only available in some countries) If available,
your TV can receive software updates via
digital broadcasts.
If an update is available, a message appears
prompting you to update the software. We
strongly recommend that you update the
software when prompted.
Follow the instructions below to update the
software at a later stage.
1
2
3
4
5
30
When watching TV, press (Home).
»» The home menu appears.
Press the Navigation buttons to select
[Setup].
Press OK.
»» The [Setup] menu appears.
Press the Navigation buttons to select
[Software update] > [Local updates].
Press OK.
»» The TV searches for available software
updates via digital broadcasts.
EN
5
Press the Navigation buttons to select
and change:
• [Location]Optimises TV settings for
your location - home or shop.
• [Volume bar]Displays the volume
bar when adjusting the volume.
• [Channel information]Displays
information about the TV channel
every time you switch channels.
• [EasyLink]Enables one-touch play
and one-touch standby between
EasyLink-compliant devices.
• [EasyLink Remote Control]When
EasyLink is enabled, allows remote
control key forwarding.
• [Pixel Plus link]When EasyLink is
enabled, automatically applies the
best Pixel Plus setting if there is
more than one (for example, if both
your TV and DVD player support
Pixel Plus).
•
6
[LightGuide brightness]Sets the
brightness of the front LED indicator
or LightGuide.
[Teletext 2.5]Enables or disables
Teletext 2.5.
English
•
Press OK.
»» The TV preference is applied.
Start a TV demo
(Not supported on MHEG channels)
1
2
3
4
When watching TV, press DEMO.
»» The demo menu appears.
Press the Navigation buttons to select a
demo.
Press OK to start the demo.
Press DEMO or
demo.
BACK to exit the
Reset the TV to factory
settings
Resetting your TV to factory settings restores
default picture and sound settings. Channel
installation settings remain the same.
1
2
3
4
When watching TV, press (Home).
»» The home menu appears.
Press the Navigation buttons to select
[Setup].
»» The [Setup] menu appears.
Press the Navigation buttons to select
[Installation] > [Factory reset].
Press OK.
»» TV settings are reset back to the
factory default.
EN
31
6 Install channels
Select Update channels
els
to update your currentt
channel list. Select Reeinstall channels to search
arch
and store all channels
again.
The first time you set up your TV, you are
prompted to select a menu language and to
install TV and digital radio channels (if available).
This chapter provides instructions on how to
re-install and fine tune channels.
Re-install channels
Update channels
Automatically install channels
This section describes how to search and store
channels automatically.
Install channels
Your TV searches and stores all available
digital and analogue TV channels as well as all
available digital radio channels.
1
2
In the [Channel installation] menu,
press the Navigation buttons to select
[Automatic installation].
Press OK.
»» A message appears prompting you to
start channel installation.
Languages
Languages
Automatic installation
Channel installation
message
d t messa
eell update
Ch
Chann
encess
ence
Prreference
P
p
update
annel upda
cchannel
andbyy channel
and
an
Stan
Caution
•• Leave [Settings] unchanged unless your
DVB-C provider supplies values for [Network
frequency], [Network ID] or [Symbol rate].
•• Setting [Frequency scan] to [Full scan] can
extend installation time significantly.
Note
•• If you have access to DVB-T and DVB-C, and
want to view channels from both networks,
you must perform channel installation twice
— once for DVB-T and once for DVB-C.
Select [Antenna] to install DVB-T channels and
select [Cable] to install DVB-C channels.
•• To switch between DVB-T and DVB-C
channels (see ‘Access DVB-C and DVB-T
channel networks’ on page 33).
5
Update your current channel list or Re-install all channels.
Decoder
Clock
Digital: Reception test
Manual Insta...
Analogue: M
Cancel
Start
ry rreset
ctory
Facto
3
4
32
Press the Navigation buttons to select
[Start].
Press OK.
»» The channel update screen appears,
with [Re-install channels] selected.
EN
6
Press OK.
»» Follow the onscreen instructions to
complete channel installation. When
channel installation is complete,
[Done] is selected and a list of installed
channels appears.
Press OK to confirm your choice.
»» The TV exits to the [Channel
installation] menu.
Tip
•• When digital TV channels are found, the list of
installed channels may display empty channel
numbers. You can rename, reorder or uninstall
stored channels as described below.
This option appears only if your country
supports DVB-C (Digital Video BroadcastingCable). If you have installed both DVB-C and
DVB-T channels, you have to switch to the
respective network to watch channels on that
network.
Manually install channels
This section describes how to search and store
analogue TV channels manually.
Step 1 Select your system
Note
•• Skip this step if your system settings are
correct.
1
2
1
2
3
4
5
When watching TV, press (Home).
»» The home menu appears.
Press the Navigation buttons to select
[Setup].
»» The [Setup] menu appears.
Press the Navigation buttons to select
[Installation] > [Channel installation] >
[Antenna or Cable DVB] > [Antenna] or
[Cable].
• Select [Antenna] to access DVBT (Digital Video BroadcastingTerrestrial) channels.
• Select [Cable] to access DVB-C
(Digital Video Broadcasting-Cable)
channels.
3
4
5
6
When watching TV, press (Home).
»» The home menu appears.
Press the Navigation buttons to select
[Setup].
»» The [Setup] menu appears.
Press the Navigation buttons to select
[Installation] > [Channel installation]
> [Analogue: Manual installation] >
[System].
Press OK.
»» A list of regional systems appears.
Press the Navigation buttons to select
your country or region.
Press OK to confirm your choice.
»» The selected country or region is
applied.
Press OK to confirm your choice.
Press
BACK to exit.
»» The TV switches to the selected
network.
EN
33
English
Access DVB-C and DVB-T channel
networks
Step 2 Search and store new TV
channels
1
2
In the [Analogue: Manual installation]
menu, press the Navigation buttons to
select [Find channel].
Press OK.
»» The [Find channel] menu appears.
Fine-tune analogue channels
You can fine tune analog channels manually
when reception is poor.
1
2
3
4
5
Done
3
4
5
6
7
34
538.00
MHz
Search next
Press:
• The Navigation buttons or Numeric
buttons to manually enter the
channel frequency.
• The Navigation buttons to select
[Search next], then press OK to
automatically search for the next
channel.
When the correct channel frequency is
selected, press the Navigation buttons to
select [Done].
Press OK.
»» The [Analogue: Manual installation]
menu appears.
Press the Navigation buttons to select
[Store current channel] to store the new
channel under the current channel; or
[Store as new channel] to store the new
channel under a new channel number.
Press OK to confirm your choice.
»» The channel is stored.
EN
6
7
8
9
When watching TV, select the channel to
fine-tune.
Press (Home).
»» The home menu appears.
Press the Navigation buttons to select
[Setup].
Press OK.
»» The [Setup] menu appears.
Press the Navigation buttons to select
[Installation] > [Channel installation] >
[Analogue: Manual installation] > [Fine
tune].
Press OK.
»» The [Fine tune] menu appears.
Press the Navigation buttons or Numeric
buttons to manually enter the channel
frequency.
When the correct channel frequency is
selected, press the Navigation buttons to
select [Done], then press OK.
»» The [Analogue: Manual installation]
menu appears.
Press the Navigation buttons to select
[Store current channel] to store the new
channel under the current channel.
10Press OK to confirm your choice.
If your TV is in standby mode, an update is
performed every morning. This update matches
channels stored in your channel list with those
available from your broadcaster.
In addition to this automatic update, you can
manually update the channel list.
Tip
•• To disable the automatic update, in the
[Installation] menu, press the Navigation
buttons to select [Channel installation] >
[Channel update in standby], then select
[Off].
1
2
3
4
In the [Installation] menu, press the
Navigation buttons to select [Channel
installation] > [Automatic installation].
Press OK.
»» A message appears with [Start]
selected, prompting you to start the
channel update.
Press OK.
»» The channel update screen appears.
5
6
Press OK.
»» The [Installation] menu appears.
Test digital reception
If using digital broadcasts, you can check the
quality and signal strength of digital channels.
This allows you to reposition and test your
antenna or satellite dish.
1
2
3
Press the Navigation buttons to select
[Update channels].
Select Update channels
els
to update your currentt
channel list. Select Reeinstall channels to search
arch
and store all channelss
again.
Press OK.
»» Follow the on-screen instructions
to complete channel update. When
the update is complete, [Done] is
selected and a list of added channels is
displayed.
Re-install channels
Update channels
4
In the [Installation] menu, press the
Navigation buttons to select [Channel
installation] > [Digital: Reception test] >
[Search].
Press OK.
»» The [Search] menu appears.
Press:
• The Navigation buttons or Numeric
buttons to manually enter the
channel frequency.
• The Navigation buttons to select
[Search], then press OK to
automatically search for the next
channel.
If the signal quality and strength
is poor, reposition the antenna or
satellite dish and retest.
When complete, press the Navigation
buttons to select [Done].
EN
35
English
Manually update the channel
list
5
Press OK.
»» The [Installation] menu appears.
Note
•• If you have further problems with the
reception of your digital broadcast, contact a
specialised installer.
Change startup message
settings
Enable or disable messages that appear at
the startup to indicate whether a channel or
installation update is needed.
1
2
3
36
In the [Installation] menu, press the
Navigation buttons to select [Channel
installation] > [Channel update
message].
Press OK.
Press the Navigation buttons to select
[On] or [Off].
»» Startup messages are enabled or
disabled.
EN
Back connectors
For best picture quality, we recommend you
use the following connection types, listed below
from highest to basic quality:
1
2
3
4
3
2
AUDIO
OUT
SPDIF
OUT
English
7 Connect devices
1
EXT 2
EXT 1
(RGB/CVBS)
(RGB/CVBS)
HDMI
Y Pb Pr (component)
SCART
4
VIDEO (composite)
VGA
Note
•• The connectivity diagrams provided in this
section are examples only. Other types of
connections are possible.
AUDIO IN:
LEFT / RIGHT
HDMI 1 / DVI
HDMI 2 / DVI
HDMI 3 / DVI
VGA
5
EXT 3
HDMI 3
HDMI 2
HDMI 1
TV ANTENNA
6
7
8
Note
•• Back connectors on 19-22” models vary
slightly from the diagram.
•• The number of HDMI connectors available
varies according to TV model.
EN
37
a EXT 1/EXT 2 (SCART)
Analogue audio and video input from
analogue or digital devices such as DVD
players or game consoles.
d VGA
Video input from a computer.
VGA
VGA
e AUDIO IN
Audio input from devices that require
a separate audio connection, such as a
computer.
b SPDIF OUT
Digital audio output to home theatres
and other digital audio systems.
c AUDIO OUT L/R
Analogue audio output to home theatres
and other audio systems.
AUDIO
OUT
38
EN
AUDIO
IN
AUDIO IN:
LEFT / RIGHT
HDMI 1 / DVI
HDMI 2 / DVI
HDMI 3 / DVI
VGA
f EXT 3 (Y Pb Pr and AUDIO L/R)
Analogue audio and video input from
analogue or digital devices such as DVD
players or game consoles.
EXT 3
Side connectors
English
g HDMI 1/2/3
Digital audio and video input from highdefinition digital devices such as Blu-ray
players.
Refer to the correct connector diagram for
your TV screen size:
26-52”
1
Note
2
3
4
19-22”
•• Only one HDMI connector is available on
19/22” models. The HDMI connector on these
models is labelled as HDMI instead of HDMI 1.
h TV ANTENNA
Signal input from an antenna, cable or satellite.
TV ANTENNA
5
6
7
8
a AUDIO IN L/R
Audio input from analogue devices
connected to VIDEO or S-VIDEO.
EN
39
b VIDEO
Composite video input from analogue
devices such as VCRs.
g HDMI
Digital audio and video input from highdefinition digital devices such as Blu-ray
players.
h SERV. U
For use by service personnel only.
Connect a computer
c S-VIDEO
Video input from analogue devices such
as satellite receivers.
Before you connect a computer to the TV:
• Set the screen refresh rate on your
computer to 60Hz.
• Select a supported screen resolution on
your computer.
• Enable [PC mode] in the [Picture]menu
(see ‘Manually adjust picture settings’ on
page 15), and set the picture format to
[Unscaled].
Connect a computer with one of the
following connectors:
Note
•• Connections via DVI or VGA require an
additional audio cable.
d
Stereo audio output to headphones or
earphones.
e COMMON INTERFACE
Slot for a Conditional Access Module
(CAM).
f USB
Data input from USB storage devices.
40
EN
•
HDMI cable
DVI-HDMI cable (rear HDMI and
AUDIO IN)
HDMI cable and HDMI-DVI adaptor
(side HDMI and AUDIO IN L/R)
•
English
•
AUDIO IN:
LEFT / RIGHT
HDMI 1 / DVI
HDMI 2 / DVI
HDMI 3 / DVI
VGA
DVI
DVI
•
VGA cable
•
DVI-HDMI cable (side HDMI and
AUDIO IN L/R)
AUDIO IN:
LEFT / RIGHT
HDMI 1 / DVI
HDMI 2 / DVI
HDMI 3 / DVI
VGA
VGA
DVI
VGA
•
HDMI cable and HDMI-DVI adaptor
(rear HDMI and AUDIO IN)
Use a Conditional Access
Module
AUDIO IN:
LEFT / RIGHT
HDMI 1 / DVI
HDMI 2 / DVI
HDMI 3 / DVI
VGA
A Conditional Access Module (CAM) is
provided by digital TV service operators to
decode digital TV channels.
Note
DVI
•• If required, refer to documentation from your
operator on how to insert a smart card into
the Conditional Access Module.
EN
41
Insert and activate a CAM
Caution
•• Be sure to follow the instructions described
below. Wrong insertion of a CAM may
damage both the CAM and your TV.
1
2
Switch off the TV.
Following the directions printed on the
CAM, gently insert the CAM into the
COMMON INTERFACE at the side of
the TV.
Assign a channel decoder
Before using a SCART digital channel decoder,
select the channel to decode and assign the
decoder to EXT 1 or EXT 2.
1
2
3
4
5
6
3
4
Push the CAM in as far as it will go.
Turn on the TV and wait for the CAM
to be activated. This may take several
minutes. Do not remove the CAM from
the slot when in use — removing the
CAM will deactivate digital services.
Access CAM services
1
2
3
4
5
42
After inserting and activating the CAM,
press OPTIONS.
»» The options menu appears.
Press the Navigation buttons to select
[Common interface].
Press OK.
»» A list of CAM applications appears.
Press the Navigation buttons to select a
CAM application.
Press OK to confirm your choice.
»» The selected CAM application is
enabled.
EN
While watching TV, press (Home).
»» The home menu appears.
Press the Navigation buttons to select
[Setup].
Press OK.
»» The [Setup] menu appears.
Press the Navigation buttons to select
[Installation] > [Decoder] > [Channel].
Press the Navigation buttons to select
[Status], then the location of the decoder
(eg. EXT 1 or EXT 2).
Press OK to confirm your choice.
»» The decoder is assigned.
Use Philips EasyLink
Your TV supports Philips EasyLink, which
uses the HDMI CEC (Consumer Electronics
Control) protocol. EasyLink-compliant devices
that are connected through HDMI connectors
can be controlled by a single remote control.
Note
•• Philips does not guarantee 100%
interoperability with all HDMI CEC devices.
Note
•• The EasyLink-compliant device must be
switched on and selected as the source.
EasyLink buttons
One-touch play
When you connect your TV to devices that
support one-touch play, you can control your
TV and the devices with one remote control.
One-touch standby
When you connect your TV to devices that
support standby, you can use your TV remote
control to put your TV and all connected
HDMI devices in standby mode.
System audio control
When you connect your TV to HDMI
CEC compliant devices, your TV can
switch automatically to play audio from the
connected device.
To use one-touch audio, you must map the
audio input from the connected device to
your TV.
You can use the remote control from the
connected device to adjust the volume.
Remote control (RC) key forwarding
RC key forwarding allows you to control
EasyLink-compliant devices using your TV
remote control.
You can control EasyLink-compliant devices
with the following buttons on the remote
control of your TV.
Button
(Play/
Pause)
(Stop)
(Record)
(Previous)
(Next)
0-9
(Numeric
buttons)
English
EasyLink features
EasyLink function
Starts, pauses or resumes
playback on your EasyLink
device.
Stops playback on your EasyLink
device.
Starts or stops video recording
on your EasyLink device.
Searches backward on your
EasyLink device.
Searches forward on your
EasyLink device.
When EasyLink is enabled,
selects a title, chapter or track.
Navigates through the menus of
(Navigation your EasyLink devices.
buttons)
OK
Activates a selection or
accesses the menu of your
EasyLink device.
Displays the menus of your
OPTIONS EasyLink device. Note that
when (Home) is pressed, the
TV menu is displayed.
TV
Switches back to the antenna
source from EasyLink mode.
(Standby- When EasyLink is enabled,
On)
switches the TV and all EasyLink
devices to standby. Note that
you must press and hold
(Standby-On) for at least 3
seconds for this to occur.
EN
43
Enable or disable EasyLink
Note
•• Do not enable Philips EasyLink if you do not
intend to use it.
1
2
3
4
5
When watching TV, press (Home).
»» The home menu appears.
Press the Navigation buttons to select
[Setup].
»» The [Setup] menu appears.
Press the Navigation buttons to
select [Installation] > [Preferences] >
[EasyLink].
»» The EasyLink menu appears.
Select [On] or [Off].
Press OK to confirm your choice.
»» EasyLink is enabled or disabled.
Enable or disable remote control key
forwarding
Note
•• Enable EasyLink before enabling remote
control key forwarding.
1
2
3
4
When watching TV, press (Home).
»» The home menu appears.
Press the Navigation buttons to select
[Setup].
»» The [Setup] menu appears.
Press the Navigation buttons to
select [Installation] > [Preferences] >
[EasyLink Remote Control].
Select [On], then press OK.
»» RC key forwarding is enabled or
disabled on the selected HDMI
connector.
Note
•• If you cannot exit from a device’s menu, press
OPTIONS then OK.
44
EN
Set TV speakers to EasyLink mode
When enabled, this feature automatically
turns off TV speakers when content from an
EasyLink-compliant home theatre system is
played. Audio is played only from the home
theatre system’s speakers.
1
2
3
4
5
When watching content from an EasyLink
device, press OPTIONS.
»» The options menu appears.
Press the Navigation buttons to select
[TV speakers].
»» The [TV speakers] menu appears.
Press the Navigation buttons to select
[Automatic (EasyLink)].
Press OK to confirm your choice.
»» The TV speakers are set to EasyLink
mode.
Press
OPTIONS to exit.
Use a Kensington lock
There is a Kensington security slot at the back
of the TV. Prevent theft by looping a Kensington
lock between the slot and a permanent object,
such as a heavy table.
Product information is subject to change
without notice. For detailed product
information, go to www.philips.com/support.
Multimedia
•
•
Supported display resolutions
Computer formats
• Resolution - refresh rate:
• 640 x 480 - 60Hz
• 800 x 600 - 60Hz
• 1024 x 768 - 60Hz
• 1280 x 1024 - 60 Hz (supported on
full HD TVs only)
• 1360 x 768 - 60Hz
• 1600 x 1200 - 60Hz (supported on
full HD TVs only)
• 1920 x 1080 - 60Hz
Video formats
• Resolution - refresh rate:
• 480i - 60Hz
• 480p - 60Hz
• 576i - 50Hz
• 576p - 50Hz
• 720p - 50Hz, 60Hz
• 1080i - 50Hz, 60Hz
• 1080p - 24Hz, 25Hz, 30Hz, 50Hz,
60Hz
English
8 Product
information
Supported storage device: USB (FAT
or DOS-formatted; Mass Storage Class
compliant only)
Supported multimedia file formats:
• Images: JPEG
• Audio: MP3, LPCM
• Video: MPEG1, MPEG2, H.264/
MPEG-4 AVC
Note
•• Multimedia file names must not exceed 128
characters.
Tuner/Reception/
Transmission
•
•
•
•
Antenna input: 75ohm coaxial (IEC75)
TV system: DVB COFDM 2K/8K
Video playback: NTSC, SECAM, PAL
DVB-T (Digital Video BroadcastingTerrestrial) and DVB-C (Digital Video
Broadcasting-Cable). See listed countries
on the back of the TV
Remote control
•
•
Type: PF03E09B/PF02E09B/PF02E09W
Batteries: 2 x AAA (LR03 type)
Power
•
•
•
Mains power: AC 220-240; 50Hz
Standby power: < 0.15W
Ambient temperature: 5 to 35 degrees
Celsius
EN
45
Supported TV mounts
EPG information
To mount the TV, purchase a Philips TV mount
or a VESA-compatible TV mount. To prevent
damage to cables and connectors, be sure to
leave a clearance of at least 2.2 inches or 5.5cm
from the back of the TV.
8 days EPG is only available in some countries
Warning
•• Follow all instructions provided with the TV
mount. Koninklijke Philips Electronics N.V.
bears no responsibility for improper TV
mounting that results in accident, injury or
damage.
TV screen size
Recommended VESA mount
19 inches/ 48cm
22 inches/ 56cm
26 inches/ 69cm
32 inches/ 81cm
37 inches/ 94cm
42 inches/ 107cm
47 inches/ 119cm
52 inches/ 132cm
VESA MIS-D 75, 4
VESA MIS-D 100, 4
VESA MIS-E 200, 100, 4
VESA MIS-F 200, 200, 6
VESA MIS-F 200, 200, 6
VESA MIS-F 400, 400, 6
VESA MIS-F 400, 400, 8
VESA MIS-F 400, 400, 8
46
EN
Country
8 days EPG
UK
France
Finland
Sweden
Denmark
Norway
Spain
Germany
Italy
Greece
Netherlands
Czech Republic
Belgium
Austria
Switzerland
Estonia
Lithuania
Croatia
Hungary
Ireland
Luxemburg
Poland
Portugal
Russia
Slovakia
Slovenia
Romania
Serbia
Latvia
Ukraine
Bulgaria
Kazakhstan
Yes
No
Yes
Yes
Yes
Yes
Yes
Yes
Yes
No
Yes
Yes
No
Yes
Yes
Yes
Yes
No
No
No
No
No
No
No
No
No
No
No
No
No
No
No
This section describes commonly encountered
issues and accompanying solutions.
General TV issues
The TV does not switch on:
•• Disconnect the power cable from the
power outlet. Wait for one minute then
reconnect it.
•• Check that the power cable is securely
connected.
The TV does not respond to remote control
or side controls when switched on
•• When the TV is switched on, the front
LED indicator flashes for about 20 to 25
seconds. This is normal behaviour. During
this time, the TV will not respond to the
remote control or side controls. When
a picture appears on-screen, the TV
responds only to the following remote
control buttons for the first few seconds:
+/- (VOLUME +/-), P +/- (Program
+/-), (MUTE) and (Standby-On). All
buttons can be used when the front LED
indicator stops flashing.
The remote control is not working properly:
•• Check that the remote control batteries
are correctly inserted according to the
+/- orientation.
•• Replace the remote control batteries if
they are flat or weak.
•• Clean the remote control and TV sensor
lens.
The standby light on the TV blinks red:
•• Disconnect the power cable from the
power outlet. Wait until the TV cools
down before reconnecting the power
cable. If the blinking reoccurs, contact
Philips Consumer Care.
You forgot the code to unlock the child lock
feature
•• Enter ‘8888’.
The TV menu is in the wrong language.
•• Change the TV menu to your preferred
language (see ‘Change language settings’
on page 12).
When turning the TV on/off/to standby, you
hear a creaking sound from the TV chassis:
•• No action is required. The creaking sound
is normal expansion and contraction of
the TV as it cools down and warms up.
This does not impact performance.
When the TV is in standby mode, a startup
splash screen is displayed, then returns to
standby mode.
•• This is normal behavior. The startup
screen is displayed when the TV is
disconnected from the mains and
reconnected.
TV channel issues
Previously installed channels do not appear in
the channel list:
•• Check that the correct channel list is
selected.
No digital channels were found during the
installation:
•• Check that the TV supports DVB-T, DVBT Lite or DVB-C in your country. See the
listed countries on the back of the TV.
Picture issues
The TV is on, but there is no picture:
•• Check that the antenna is properly
connected to the TV.
•• Check that the correct device is selected
as the TV source.
There is sound but no picture:
•• Check that the picture settings are
correctly set.
EN
47
English
9 Troubleshooting
There is poor TV reception from an antenna
connection:
•• Check that the antenna is properly
connected to the TV.
•• Loudspeakers, unearthed audio devices,
neon lights, high buildings and other large
objects can influence reception quality.
If possible, try to improve the reception
quality by changing the antenna direction
or moving devices away from the TV.
•• If reception on only one channel is poor,
fine tune this channel.
There is poor picture quality from connected
devices:
•• Check that the devices are connected
properly.
•• Check that the picture settings are
correctly set.
The TV did not save your picture settings:
• Check that the TV location is set to the
home setting. This mode offers you the
flexibility to change and save settings.
The picture does not fit the screen; it is too
big or too small:
•• Try using a different picture format.
The picture position is incorrect:
•• Picture signals from some devices may
not fit the screen correctly. Check the
signal output of the device.
The picture from broadcasts is scrambled:
•• You may need to use a Conditional
Access Module to access content. Check
with your operator.
An “e-sticker” banner displaying information
appears on the TV display:
•• The TV is in [Shop] mode. Remove the
e-sticker by setting the TV to [Home]
mode. In the [Home] menu, select
[Setup] > [Installation] > [Preferences]
> [Location] menu. It is necessary to
switch the TV to standby to ensure that
the TV exits [Shop] mode completely.
48
EN
Sound issues
There is a picture but sound quality is poor:
Note
•• If no audio signal is detected, the TV
automatically switches the audio output off
— this does not indicate malfunction.
••
Check that all cables are properly
connected.
•• Check that the volume is not set to 0.
•• Check that the sound is not muted.
•• Check that the TV speakers setting is on
in the sound menu.
•• Check that the TV audio output is
connected to the audio input on the
HDMI CEC enabled/EasyLink-compliant
HTS device. Sound should be heard from
the HTS speakers.
There is a picture but the sound quality is
poor:
•• Check that the sound settings are
correctly set.
There is a picture but sound comes from one
speaker only:
•• Verify that sound balance is set to the
centre.
HDMI connection issues
There are problems with HDMI devices:
•• Note that HDCP support can delay the
time taken for a TV to display content
from a HDMI device.
•• If the TV does not recognize the HDMI
device and no picture is displayed, try
switching the source from one device to
another and back again.
•• If there are intermittent sound
disruptions, check that output settings
from the HDMI device are correct.
•• If a HDMI-to-DVI adaptor or HDMI to
DVI cable is used, check that an additional
audio cable is connected to AUDIO L/R
or AUDIO IN (mini-jack only).
Contact us
English
You cannot use EasyLink features:
•• Check that your HDMI devices are
HDMI-CEC compatible. EasyLink features
only work with devices that are HDMICEC compatible.
If a HDMI CDC/EasyLink-compliant audio
device is connected to the TV and the TV does
not display any mute or volume icon when the
volume is muted, increased or decreased.
•• This behavior is normal when a HDMI
CEC/EasyLink-compliant device is
connected.
If you cannot resolve your problem, refer to
the FAQs for this TV at www.philips.com/
support.
If the problem remains unresolved, contact
Philips Consumer Care in your country as
listed in this user manual.
Warning
•• Do not attempt to repair the TV yourself. This
USB connection issues
USB device content is not displayed:
•• Check that the USB storage device is
set to ‘Mass Storage Class’ compliant,
as described in the storage device’s
documentation.
•• Check that the USB storage device is
compatible with the TV.
•• Check that the audio and picture file
formats are supported by the TV.
Audio and picture files do not play or display
smoothly
•• The transfer performance of the USB
storage device may limit the data transfer
rate to the TV, causing poor playback.
may cause severe injury, irreparable damage to
your TV or void your warranty.
Note
•• Make a note of your TV model and serial
number before you contact Philips. These
numbers are printed on the back of the TV
and on the packaging.
Computer connection issues
The computer display on the TV is not stable:
•• Check that a supported resolution and
refresh rate is selected on the computer.
•• Set the TV picture format to unscaled.
EN
49
10Index
A
analogue channel
fine-tune
audio balance
audio language17
auto volume leveling
B
bass
batteries
bracket
Brightness
C
34
17
17
17
45, 47
46
15
cables
quality
37
CAM, see also Conditional Access Module41
channel decoder
42
channel grid
access and change channels
10
channels
channel grid
hide channels
21
rename channels
21
reorder/rearrange channels
20
favourite list
20
install
automatic
32
manual
33
test reception
35
tune
34
child lock
TV lock
24
clock
26
colour
15
Common Interface
41, 39
composite cable
37
computer format
technical specifications
45
Conditional Access Module
41, 39
connections
50
EN
component
composite
HDMI
overview
quality
SCART
S-video
technical specifications
troubleshooting
USB
connectors
overview
USB
USB
contrast
D
demo
devices
add to home menu
connect
remove from home menu
watch
digital channel
subtitle language
test reception
digital radio
digital services
CAM
teletext
display
resolution
Dual I-II
DVB-C and DVB-T
access
37
39
39
37
37
37
39
45
49
27
37
37
39
15
31
10
37
13
10
26
35
29
41
19, 18
45
17
33
E
EasyLink
buttons
disable
enable
features
RC key forwarding
TV speakers
environmental care
43
44
44
43
44
44
5
factory settings
favourite list
create
troubleshooting
31
20
47
H
HDMI cable
connectors
troubleshooting
headphone volume
Home menu
access
remove devices
hue
39, 37
48
17
12
13
15
I
install channels
automatic
manual
K
Kensington lock
32
33
44
L
language
troubleshooting
light sensor
location
lock
Kensington
45
27
29
45
28
N
Noise reduction
15
P
PC mode
15
Personal Indentification Number or PIN
code
47
photos
slideshow
27
supported formats
45
picture and sound experience bar
15
picture format
picture format change
16
troubleshooting
47
Pixel Plus
15
power
45, 47
R
47
15
30
44
M
menu
home menu
language
setup menu
teletext
troubleshooting
Mono/Stereo
multimedia
listen to music
watch videos
Multimedia
supported formats
USB
music
digital radio
supported formats
USB
12
12
13
18
47
17
28
28
RC key forwarding
reception
remote control
key forwarding
overview
technical specifications
troubleshooting
44
47
44
,7
45
47
S
safety
SCART
settings
picture
sound
settings
settings assistant
setup menu
sharpness
4
37
15
17
15
14
13
15
EN
51
English
F
shop mode
sleep timer
smart settings
software
update
version
sound settings
SPDIF
standby
troubleshooting
subtitles
language
surround sound
S-Video
T
29
29
17
37
47
26
17
39
Table of Pages
19
technical specifcations
45
Teletext
dual screen
18
enlarge pages
19
features
18
menu
18
search
19
subpages
19
table of pages
19
teletext 2.5
19
use
11
timer
sleeptimer
23
tint
15
transmission
troubleshooting
47
treble
17
troubleshooting
47
tuner
45
TV
access DVB-C and DVB-T networks
33
adjust volume
10
connectors
39, 37
menu
12
screen care
5
software
29
speakers
17
standby
9
switch channels
9
52
switch off
switch on
troubleshooting
tuner technical specifications
wall mount
30
23
14
V
VGA
videos
supported formats
watch
visually impaired
volume
adjust
headphones
visually impaired
9
9
47
45
4, 46
37
45
28
17
10
17
17