1
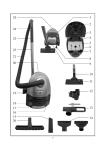
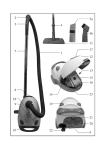
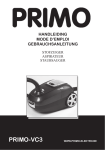
12
1
13
2
3
20
14
21
22
15
4
16
5
17
23
24
25
27
6
18
26a
7
8
9
26b
10
11
19
3
Important safety instructions
● Before the appliance is used, the main
body as well as any attachments should
be checked thoroughly for any defects. If
the appliance, for instance, has been
dropped onto a hard surface, it must no
longer be used: even invisible damage
may have adverse effects on the
operational safety of the appliance.
● The power cord should be regularly
examined for any signs of damage. In the
event of such damage being found, the
appliance must no longer be used.
● Always remove the plug from the wall
socket
- after use,
- in case of any malfunction, and
- before cleaning the appliance.
● When removing the plug from the wall
socket, never pull on the power cord;
always grip the plug itself.
● Never use the vacuum cleaner to pick up
- sharp or pointed objects such as glass
splinters,
- hot ashes, cigarette stubs or chemical
matter,
- stone dust, plaster, cement or any
similar fine dust particles,
- foam, water or other liquids.
● This appliance is not intended for use by
any person (including children) with
reduced physical, sensory or mental
capabilities, or lacking experience and
knowledge, unless they have been given
supervision or instruction concerning the
use of the appliance by a person
responsible for their safety.
● Children should be supervised to ensure
that they do not play with the appliance.
● Do not operate the vacuum cleaner
- if no dust bag has been inserted or if the
dust bag is damaged,
- if the ‘dust bag full’ indicator shows that
the bag has reached its capacity.
● The vacuum cleaner must not be used on
persons or animals. A considerable risk
exists especially where ears and eyes are
concerned. Keep the nozzle away from
Cylinder Cleaner
Dear Customer
Before using the appliance, the user should
read the following instructions carefully.
Connection to the mains supply
Make sure that the supply voltage
corresponds with the voltage marked on the
rating label of the appliance. This product
complies with all binding CE labelling
directives.
Familiarisation
1. Hose
2. Carrying handle
3. Filter compartment release
4. ‘Dust bag full’ indicator
5. Suction power regulator
6. Hepa-filter compartment
7. Main power switch
8. Hepa-filter compartment release
9. Attachment point for tube retaining
bracket
10. Accessory compartment
11. Power cord with plug
12. Hose grip
13. Secondary air-flow opening slide (tube)
14. Tube
15. Tube adjustment button
16. Tube retaining bracket
17. Multi-purpose tool
18. Hose connection
19. Power cord retract mechanism
20. Filter compartment cover
21. Motor protection filter
22. Dust bag
23. Filter compartment for dust bag and
motor protection filter
24. Filter holder
25. Rating label (on underside)
26. Dual-purpose tool
a. Crevice tool
b. Upholstery brush
27. Parquet brush
8
the head at all times.
● No responsibility will be accepted if
damage results from improper use, or if
these instructions are not complied with.
● This appliance is only intended for
domestic use and not for commercial
applications.
● In order to comply with safety
regulations and to avoid hazards, repairs
of electrical appliances must be carried
out by qualified personnel, including the
replacement of the power cord. If repairs
are needed, please send the appliance to
one of our customer service departments.
The address can be found in the
appendix to this manual.
-
-
Before using for the first time
- Remove the appliance from its
packaging.
- Remove any exterior and interior
packaging materials and make sure that
the dust bag, the motor protection filter
and the Hepa-filter are correctly inserted.
●
-
Thermal safety cut-out
This vacuum cleaner is equipped with an
integral thermal safety cut-out, which
automatically switches the appliance off in
case of overheating (e.g. due to blockage in
the tube or filter). Should this occur, remove
the plug from the wall socket and let the
appliance cool down for a minimum of one
hour. The vacuum cleaner may then be used
again after the blockage has been removed.
●
-
the red mark) and insert the plug into a
suitable wall socket.
The vacuum cleaner is equipped with a
very powerful motor. In order to prevent
a fuse within your home electrical
installation from being triggered when it
is switched on, always set the power
regulator to its lowest setting before the
appliance is activated.
The electronic suction power regulator
allows the suction power to be infinitely
adjusted to your needs.
In addition, the suction power can be
decreased further by opening the
secondary air-flow opening slide in the
hose grip.
Always start with a low setting when
cleaning soft objects such as curtains.
Always ensure that the power cord is not
routed around or runs over corners or
edges, and that it cannot be jammed in a
door.
During operation, the hose may be used
to pull the unit along behind you.
However, when carrying the unit, always
use the carrying handle.
To prevent the power cord from being
pulled with excessive force, always
change to the next suitable wall socket
when cleaning larger areas.
Switch off the appliance after use and
remove the plug from the wall socket.
To retract the power cord automatically
into its storage, press the foot switch of
the retraction mechanism.
Accessories
The dual-purpose tool is located in the
accessories compartment.
Operation
- Put the vacuum cleaner in its horizontal
operating position.
- Insert the hose into the hose connection.
- Connect the tube to the hose grip.
- Attach any of the nozzles or tools
provided to the end of the tube. If the full
tube length is not required (e.g. when
using the crevice tool), the nozzle may be
attached directly to the hose grip.
- Pull out the power cord from its storage
to the necessary length (but not beyond
Multi-purpose tool
The multi-purpose tool is especially suitable
for cleaning large areas. It can be adjusted
for use on tile floors or carpeted floors by
means of the lever on the attachment top.
Crevice tool
The crevice tool is designed to clean difficult9
by pressing it down lightly until it is heard
clicking into place. The cover can only be
closed with a dust bag inserted.
to-reach areas such as grooves, niches,
corners and crevices.
Upholstery brush
Fold out the brush element of the crevice
tool in the direction indicated by the arrow
until it locks into place.
The brush tool is suitable for cleaning
uneven areas such as upholstered surfaces,
picture frames, rows of books etc.
Changing the motor protection filter
The motor protection filter is located at the
rear of the filter compartment. Should the
filter be visibly dirty, replacement is
recommended at the same time as the dust
bag is changed.
- Lift out the motor protection filter from
the compartment.
- Remove the old filter from its holding
bracket.
- Insert a new motor protection filter into
the bracket.
- Push the filter holder back into the
compartment.
Parquet-brush
The parquet brush is used for high-grade
hard floors such as laminate floors, parquet
or ceramic tiles.
Changing the dust bag or filters
● Before any filter is changed, always
switch the appliance off and remove the
plug from the wall socket.
The vacuum cleaner uses replaceable filters.
When replacing the motor protection filter,
it may be necessary to cut the filter to size
with a pair of scissors.
The indicator shows when the dust bag
needs changing: as soon as the indicator
shows permanent red, the appliance must be
switched off and the dust bag replaced.
A noticeable decrease in vacuuming power
also indicates that the dust bag has reached
its capacity.
Changing the Hepa-filter
This filter is located in the Hepa-Filter
compartment. Should the filter be visibly
dirty, replacement is recommended at the
same time as the dust bag is changed.
- Press the release button for the Hepafilter and remove the compartment lid.
- Remove the old Hepa-filter.
- Fit a new Hepa-filter.
- Replace the compartment lid and push it
into position until it locks into place.
Cleaning and care
● Before cleaning the appliance, ensure it is
Changing the dust bag
- Remove the hose by pressing the two
buttons at its end.
- Push the filter compartment release
inwards to open the compartment.
- Lift out the filter holder with the dust bag
attached.
- Release the full bag by pulling up the
catch on the filter holder.
- When inserting the new bag, make sure
that its cardboard frame is first fitted
under the rear lugs before it is locked
under the release catch.
- Insert the filter holder with the new bag
into the filter compartment.
- Close the cover of the filter compartment
switched off and disconnected from the
power supply.
● To avoid the risk of electric shock, do not
clean the appliance with water and do
not immerse it in water.
● Do not use abrasives, harsh cleaning
solutions or thinners for cleaning.
- The housing of the unit and the
accessories may be cleaned with a dry or
slightly damp lint-free cloth.
Replacement filters
Replacement filter sets may be obtained
through the SEVERIN Service, quoting
article no. SB 9023.
10
Suitable replacement filters type Swirl Y293
are also available at most dealers’.
Swirl® and Y293® are registered trademarks of a
company of the Melitta Group.
Hepa replacement filters may be obtained
through the SEVERIN Service, quoting
article no. SB 9052.
Disposal
Do not dispose of old or defective
appliances in domestic garbage;
this should only be done through
public collection points.
Guarantee
This product is guaranteed against defects in
materials and workmanship for a period of
two years from the date of purchase. Under
this guarantee the manufacturer undertakes
to repair or replace any parts found to be
defective, providing the product is returned
to one of our authorised service centres. This
guarantee is only valid if the appliance has
been used in accordance with the
instructions, and provided that it has not
been modified, repaired or interfered with
by any unauthorised person, or damaged
through misuse.
This guarantee naturally does not cover
wear and tear, nor breakables such as glass
and ceramic items, bulbs etc. If the product
fails to operate and needs to be returned,
pack it carefully, enclosing your name and
address and the reason for return. If within
the guarantee period, please also provide the
guarantee card and proof of purchase.
11