1
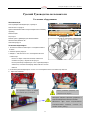
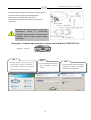
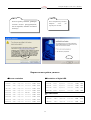
Colorful Graphics Card User’s Manual Colorful Graphics Card NVIDIA Series User’s Manual Colorful Technology Website: http://www.colorful.cn Colorful Graphics Card User’s Manual Copyright This VGA manual belongs to Colorful Technology LTD. It won’t be permitted to copy, change, or translate without prior permission. Disclaimer All trademarks used in this manual are the sole property of their respective owners. WARRANTY VOID CONDITIONS The product is guaranteed for 24 months from the date of original purchase from Colorful graphics card. This limited warranty does not cover any failure(s) or defect(s) caused by misuse, accident, abnormal or unusually heavy use, improper packaging or handling, neglect, abuse, alteration, improper installation, unauthorized repair or modification, improper testing or causes external to the product such as, but not limited to, excessive heat or humidity, power failures, power surges or acts of God. This limited warranty will be void if evidence is seen of screw holes created by Distributor, burned-out chips, more than four wires are broken on the PCB, or evidence of repair work performed by a party other than colorful. This limited warranty does not cover expendable components, any software supplied by colorful, any experimental or developmental products, compatibility issues with other hardware and software products introduced after the time of purchase, or products or accessories not manufactured by colorful WARNING!! DO NOT touch the cooling system since it may produce a certain heat while processing tasks. CAUTION!! DO NOT force the cooler against the fragile GPU to avoid damage to the GPU. Colorful Graphics Card User’s Manual Table of Contents Chapter 1 Hardware Installation................................................................................................................................ 1 1.1 Packing Contents ......................................................................................................................................... 1 1.2 How to install graphics card ........................................................................................................................ 1 Chapter 2 Driver Installation ..................................................................................................................................... 5 2.1 Driver installation in Windows XP.............................................................................................................. 5 2.2 Driver installation in Windows Vista........................................................................................................... 7 Chapter 3 NVIDIA Control Panel in Vista ................................................................................................................ 8 3.1 NVIDIA Control Panel Introduction............................................................................................................ 8 3.1.1 How to open the NVIDIA Control Panel.......................................................................................... 8 3.2 NVIDIA Control Panel Interface ................................................................................................................. 9 3.2.1 Using the Main Task Area: ............................................................................................................... 9 3.2.2 Using the Select a Task Pane: ........................................................................................................... 9 3.2.3 Using the Tool Bar:......................................................................................................................... 10 3.2.4 Using the Menu Bar:....................................................................................................................... 11 3.3 3D Settings ................................................................................................................................................ 12 3.3.1 Adjust Image Settings with Preview ............................................................................................... 12 3.3.2 Manage 3D Setting ......................................................................................................................... 13 3.3.3 Global Setting ................................................................................................................................. 13 3.3.4 Program Setting .............................................................................................................................. 14 3.4 Display....................................................................................................................................................... 15 3.4.1 Change Resolution.......................................................................................................................... 15 3.4.2 Adjust Desktop Color Settings........................................................................................................ 16 3.4.3 Rotate Display ................................................................................................................................ 17 3.4.4 Set Up Multiple Display ................................................................................................................. 17 3.5 Video and Television.................................................................................................................................. 18 3.5.1 Adjust Video Color Setting ............................................................................................................. 18 3.5.2 TV and HDTV Settings................................................................................................................... 19 Chapter 4 How to Build an HDMI Home Theater................................................................................................... 20 4.1 About the HDMI ........................................................................................................................................ 20 4.2 About the DisplayPort................................................................................................................................ 20 4.3 How to Install HDMI................................................................................................................................. 21 FAQs........................................................................................................................................................................ 24 한국어 사용자 안내 ............................................................................................................................................. 26 시스템 권장 사항 ......................................................................................................................................... 26 하드웨어설치 ................................................................................................................................................. 26 WINDOWS Vista/XP/2000 드라이버의 빠른 설치 ................................................................................. 27 기존 NVIDIA GeForce 그래픽 카드에서의 업그레이드 ....................................................................... 28 모니터사양 ..................................................................................................................................................... 29 Deutsch Benutzer-guider ......................................................................................................................................... 30 Hardware Installation....................................................................................................................................... 30 Treiber Installation WINDOWS Vista/XP/2000.............................................................................................. 31 Display Model ................................................................................................................................................. 32 Colorful Graphics Card User’s Manual Русский Руководство пользователя...................................................................................................................... 33 Установка оборудования ............................................................................................................................... 33 Быстрая установка программного обеспечения Windows 2000/XP/Vista ............................................... 34 Варианты настройки дисплея ....................................................................................................................... 35 Technical Support .................................................................................................................................................... 37 Colorful Graphics Card User’s Manual Chapter 1 Hardware Installation Before you begin… Thanks for purchasing Colorful graphics card. Please check the packing contents first before the installation. If there was any broken or parts missing, please contact your franchiser. 1.1 Packing Contents z z z z 1* Colorful graphics card 1* Windows 2000/XP/Vista driver CD 1* User’s manual DVI to VGA adapter, HDMI to DVI adapter, DVI to HDMI adapter, Additional power cable, S-VIDEO cable, TV-OUT cable, SPDIF connecting cable, HDMI cable (All the cables or adapters are Optional, and it depends on the output port of the graphics card) 1.2 How to install graphics card Follow the steps below to install the graphics card. 1. Turn off the power and remove all the cables which is connecting to the computer case 2. Open the computer case 3. Locate the PCI Express slot or AGP slot on the motherboard AGP slot Note: Insert the wrong slot may damage the graphics card 4. PCI Express slot Full seated the graphic card, and secure the card with a bracket screw. 1 Colorful Graphics Card User’s Manual 5. Additional power cable (Optional) Note: If the additional power cable is not connected, the computer will not boot, or the system will warn. 6. Pay attention on other parts of the motherboard when installing the card. Don’t open the plastic nips of After the installation, please note DIMM slots before installing the whether the nip of the PCIE slot is graphics card well connected. 7. Close the computer case, and re-connect all the cables that were removed before. Then connect the monitor 2 Colorful Graphics Card User’s Manual 8. HDMI (High-Definition Multimedia Interface) port (Optional) The High-Definition Multimedia Interface (HDMI) is a compact audio/video connector interface for transmitting uncompressed digital streams. It represents a digital alternative to consumer analog standards. HDMI connects digital audio/video sources such as set-top boxes, Blu-ray Disc players, personal computers, video game consoles, and AV receivers to compatible digital audio devices, video monitors, and digital televisions (DTV). 9. DisplayPort (Optional) DisplayPort is a digital display interface standard (approved May 2006, current version 1.1 approved on April 2, 2007) put forth by the Video Electronics Standards Association (VESA). It defines a new license-free, royalty-free, digital audio/video interconnect, intended to be used primarily between a computer and its display monitor, or a computer and a home-theater system. It supports a maximum of 10.8 Gbit/s data rate and WQXGA (2560×1600) resolution over a 3 meter cable. Both HDMI and DisplayPort need connect the SPDIF cable for audio output 3 Colorful Graphics Card User’s Manual 10. VVC and UVC (Optional) VVC (VRAM Voltage-Control) and UVC (VPU Voltage-Control) switches are Colorful particular high-light for enhancing overclocking capability; you can find them usually on the high-end graphics card. VPU VoltageControl VRAM VoltageControl The VVC and UVC are used for adjusting the memory voltage and core voltage. When slide to the right-side, the voltage will be added, and the overclocking ability will be improved. Caution: The system might come to unstable when overclocking, so basic users please keep the default clock and voltage. 11. Dual BIOS (Optional) The overcloking button is on the bracket of the graphics card. It is very convenient, users needn’t use a lot of softwares to test or adjust the clock when they play a game that without good performance, but just need press the button. Turbo- The VPU and memory work at high clock. Normal- The VPU and memory work at low clock 4 Colorful Graphics Card User’s Manual Chapter 2 Driver Installation Before installing the graphics card driver……. Please Note: 1. Make sure you have installed the chipset driver of the motherboard 2. Make sure the DirectX(Direct9.0 or later) has been installed. Microsoft DirectX is a collection of application programming interfaces (APIs) for handling tasks related to multimedia, especially game programming and video, on Microsoft platforms. 3. We suggest you downloading the latest DirectX on Microsoft website: http://www.microsoft.com 2.1 Driver installation in Windows XP Step 1: Insert the Colorful Smart Install CD into the CD drive, and it has an auto-start feature. The program will detect the graphics card model automatically. Click “Install Drivers” to install. Step 2: Select “I accept the terms in the license agreement” and click “Next”. Step 3: 5 Colorful Graphics Card User’s Manual Click “Change” if you want to extract the NVIDIA driver file to other path. Click “Next” to continue. Step 4: Click “Next” to continue. Step 5: This dialog box is because some NVIDIA graphics drivers didn’t pass the WHQL, it has no effect on using. Select “Continue Anyway”. Select “STOP installation” to exit the installation 6 Colorful Graphics Card User’s Manual Step 6: Select “Yes, I want to restart my computer now” and Click “Finish” to restart the computer. Select “No, I my computer computer will but the driver working. will restart later”, the not restart, will not be 2.2 Driver installation in Windows Vista The installation steps in Windows Vista is the same with Windows XP, please refer to the driver installation in Windows XP. Only the Step 4 is different. In Windows Vista, the dialog box is: Please select “Install this driver software anyway” to continue the installation. If select the “Don’t install this driver software”, the installation will be exit. Attention: 1. The driver is updated frequently in order to improve the graphics card compatibility, we try our best to keep the latest drivers in the drivers CD, but if you want update the driver, please visit COLORFUL website (http://www.colorful.cn/) or NVIDIA website (http://www.nvidia.com). 2. The driver CD content is limited, if it is not fit for your Operating System (such as Linux, Solaris, FreeBSD etc.), please visit NVDIA website (http://www.nvidia.com) to download the correct driver. 7 Colorful Graphics Card User’s Manual Chapter 3 NVIDIA Control Panel in Vista NVIDIA Control Panel is designed for Microsoft® Windows XP and Windows Vista. You can use NVIDIA Control Panel to control your NVIDIA hardware and access other NVIDIA software installed on your system. The operation in Windows XP and Windows Vista is almost the same, we use Windows Vista for the reference. 3.1 NVIDIA Control Panel Introduction 3.1.1 How to open the NVIDIA Control Panel You get two different ways to open the NVIDIA control Panel The first way: After the driver installation, right click the desktop, select the “NVIDIA Control Panel” from the context menu. The second way: Left Click the start menu, select the “Control Panel”, and choose “Classic View”. Then you can find the “NVIDIA Control Panel”, and double click it. 8 Colorful Graphics Card User’s Manual 3.2 NVIDIA Control Panel Interface The NVIDIA Control Panel provides an easy-to-use interface for managing your system. When you start the program for the first time, the NVIDIA Control Panel opens to the first page listed in the navigation tree. On subsequent visits, the control panel reopens to the last page visited. The NVIDIA Control Panel user interface consists of these main areas, Menu Bar Tool Bar Control Panel Main Task Area Select a Task Pane 3.2.1 Using the Main Task Area: The main task area, in the right pane, displays the application task pages. This area of the screen is where you will focus most of your attention as you use the NVIDIA Control Panel to accomplish your goals. You can access specific pages using the navigation tree in the Select a Task pane. 3.2.2 Using the Select a Task Pane: The navigation tree in the Select a Task pane shows all the primary NVIDIA Control pages that are installed on your system. The pages are grouped according to the same categories that existed in the previous version of the NVIDIA Control Panel. 9 Colorful Graphics Card User’s Manual 3.2.3 Using the Tool Bar: The Toolbar provides quick back and forth navigation between pages, and also lets you choose a view setting. Using the Navigation Buttons The back and forward buttons let you navigate sequentially among pages that you have visited. You can also navigate directly to a previously visited page by clicking the list arrow next to the back button. The drop‐down menu lists all the previously visited pages in the queue. Click the page that you want. Working with Views The currently selected view determines what options are available. There are three available views: • Standard • Advanced 10 Colorful Graphics Card User’s Manual • Custom Most commands are available for both Standard and Advanced views. However, some options are available only if the Advanced view is selected before opening the application category page. Also, task page options may different depending on the selected view. If the command you’re looking for is not displayed, return to the home page, select a different view, and return to the task page. To change the view: • From the View menu, select Standard, Advanced, or Custom. Note: For the Custom command to be available, you must define a custom view as described in the following section. Defining Custom Views You can customize NVIDIA Control Panel to display only the application category pages you want to see and use. To specify which the pages to display: 1 Select View > Define Custom View... or for quicker access, use the toolbar if you have it enabled. 2 On the Create Custom View page, for each application category that appears, select (check) the check boxes for the pages that you want to view and click OK. 3 To leave the Custom View mode, select either Standard or Advanced from the View menu or for quicker access, use the toolbar if you have it enabled. 4 To switch back to your custom view, select Custom. 3.2.4 Using the Menu Bar: The Menu bar contains standard Windows menus and menus specific to the NVIDIA Control Panel, such as the View and Profiles menus. Menus that are available on the menu bar may vary, depending on the NVIDIA Control Panel category (such as, Display, Mobile, 3D Settings, or other category) you are using. 11 Colorful Graphics Card User’s Manual 3.3 3D Settings Task in the 3D setting allow you to do the following: Change the image and rendering settings of your 3D applications and games that utilize Direct3D and OpenGL technology. Assign specific 3D settings to a game so that these settings automatically load when a game is launched. For systems and NVIDIA GPU-based graphics cards that are capable of using NVIDIA Scalable Link Interface (SLI) technology, you can enable this feature for significant improvements in rendering performance of applications that are based on Direct3D and OpenGL technology. 3.3.1 Adjust Image Settings with Preview Use this page to change the image and rendering settings for your 3D applications that utilize Direct3D and OpenGL This region display is a real-time animation with the current 3D settings. When you change any of the settings on this page, they are immediately applied reflected in the animation. 3D application will adjust automatically Stop and resume the animation Please refer to the Manage 3D Settings Performance: Offers the highest frame rate possible resulting in the best performance for your applications but at some expense to the image quality. Balanced: Offers an optimal blend of image and performance. Quality: Result in the best image quality but at some expense to application performance. 12 Colorful Graphics Card User’s Manual 3.3.2 Manage 3D Setting The Manage 3D Settings page allows you to change 3D global settings and also create settings for specific games or programs. The program settings are used automatically each time you launch the program. 3.3.3 Global Setting From the Global Settings tab, you can select from a list of pre-installed global settings (for workstation products) or create your own custom settings to use when running 3D applications. Mode allows you to control how NVIDIA antialiasing is applied in your 3D applications 13 Colorful Graphics Card User’s Manual 3.3.4 Program Setting From the Program Setting tab, you can create a set of 3D settings to use when running a particular game or application. Contains installed games and applications to which you have assigned unique 3D settings. Each line item has the game icon and the name of the game. Add launches the Open dialog box where you can browse to locate the game for which you want to establish unique settings. Deletes the game-settings association Restores the settings for the selected program to the default settings. Allows you to control how NVIDIA antialiasing is applied in your 3D applications 14 Colorful Graphics Card User’s Manual 3.4 Display The Display features enable you to further manipulate and configure your display settings to optimize to use of your displays. 3.4.1 Change Resolution You can change the color setting, reduce flickering, or adjust the amount of information appearing on the display. Use this slider to set the screen resolution for the selected display. As you increase the screen resolution value, you display more information on your screen, but the information decreases in size. The current setting is displayed below the slider. Use this list to set the refresh rates for the currently selected display. A higher refresh frequency reduces flicker on your screen. Use this slider to set your color quality for the selected display. Increasing color quality lets you view more photo-realistic images and is recommended for most desktop publishing and graphics illustration applications. Note: If you need to set your color quality to 256 colors to run a game or other software program that requires it, right-click the program icon or name on your desktop or Start menu, then click Properties. Click the Compatibility tab and then select the Run in 256 colors check box. Your display will revert to your default color setting when you close the program. 15 Colorful Graphics Card User’s Manual 3.4.2 Adjust Desktop Color Settings Use this page to set the contrast, sharpness, and color depth (Digital Vibrance) of the images on your desktop. There are 3 images to preview after changing. Brightness: Use this slider to adjust the brightness of your desktop. Digital Vibrance: To compensate for poor lighting conditions when viewing your desktop, use the Digital Vibrance slider to increase the crispness/richness/intensity of the desktop colors. Contrast: Contrast refers to the difference between the lightest and darkest parts of the desktop. Use the slider to adjust this difference. Image Sharpening: Image sharpening increases image clarity or contrast, usually at the edges of images. You can increase the contrast of images that appear slightly out of focus. NOTE: The image sharpening control is not available for GeForce 8 series GPUs. Gamma: Gamma refers to the brightness of mid-tones on your desktop without affecting shadows and highlights. Use the Gamma slider to adjust the Gamma on your desktop. 16 Colorful Graphics Card User’s Manual 3.4.3 Rotate Display The NVIDIA Rotate features enable you to change the orientation of your desktop to portrait, landscape, and inverted modes. This is useful if you have rotated your physical display and need to rotate the desktop to match the orientation of your display. 3.4.4 Set Up Multiple Display NVIDIA nView technology allows you to specify how you would lick to use your multiple displays. Clone is great for presentations and Dualview is perfect for a large desktop. In Clone mode, your desktop is duplicated on each display In Dualview mode, you have extra desktop space on the additional display, which you can configure independently, move your desktop items to, distribute applications to, etc. Click the display pair list and select the pair of displays in the order that you want to use them. For example, for display pair A + B, you can choose the "A + B" option or the "B + A" option. 17 Colorful Graphics Card User’s Manual 3.5 Video and Television Video and television features are similar to those for analog and digital displays and include features specific to television and HDTV technology for optimal viewing. 3.5.1 Adjust Video Color Setting Use the controls on this page to find tune the color settings for video content on your display. Standard The Standard tab includes sliders which control Brightness, Contrast, Hue, Saturation, Gamma. Selecting this check box causes the settings to override application-specific settings for VMR7. If unchecked, then application-specific settings will take precedence and your settings will not take effect. RGB Gamma When is selected, it allows you move the Red, Green, and Blue sliders to further control those colors in your video image. When is selected, it allows you move the Red, Green, and Blue sliders at the same time. Enhancements 18 Colorful Graphics Card User’s Manual Allows you to enhance the color contrast of the edges of images within your video from 0% to 60% Allows you to further tune your video color in your video from 0% to 80%. Note: All the settings above is only for the primary display. It is no reaction to other displays. 3.5.2 TV and HDTV Settings You can change the signal format to use for your standard television (TV) or high definition television (HDTV) as well as change the country-specific signal, or the HDTV display format (if you are using an HDTV). When you TV is connected, the television will appear here Select the connector that you TV use. If you are not sure, please select the “Auto Detect” If you are using a standard television and have chosen Composite or S-Video as your connector, the Signal list contains signal formats based on your country location. In the Select Television/HDTV Signal Format page, set the Connector list to your television's connector, such as Composite or S-Video. 19 Colorful Graphics Card User’s Manual Chapter 4 How to Build an HDMI Home Theater Note: 1. Chapter 4 is optional for the graphics card which support for HMDI 2. DisplayPort system has the same installation steps with HMDI system, so we don’t introduce it specially. 4.1 About the HDMI The High-Definition Multimedia Interface (HDMI) is a compact audio/video connector interface for transmitting uncompressed digital streams.HDMI devices are manufactured to adhere to various versions of the specification, where each version is given a number such as 1.0, 1.2, or 1.3a. Each subsequent version of the specification uses the same kind of cable but increases the bandwidth and/or capabilities of what can be transmitted over the cable.For example the previous maximum pixel clock rate of HDMI interface was 165 MHz which was sufficient for supporting 1080p at 60 Hz and WUXGA (1920x1200) at 60 Hz. HDMI 1.3 increased that to 340 MHz which allows for higher resolution, such as WQXGA (2560x1600), across a single digital link. Pin Definitions Pin 1 TMDS Data2+ Pin 2 TMDS Data2 Shield Pin 3 TMDS Data2– Pin 4 TMDS Data1+ Pin 5 TMDS Data1 Shield Pin 6 TMDS Data1– Pin 7 TMDS Data0+ Pin 8 TMDS Data0 Shield Pin 9 TMDS Data0– Pin 10 TMDS Clock+ Pin 11 TMDS Clock Shield Pin 12 TMDS Clock– Pin 13 CEC Pin 14 Reserved (N.C. on device) Pin 15 SCL Pin 16 SDA Pin 17 DDC/CEC Ground Pin 18 +5 V Power (max 50 mA) Pin 19 Hot Plug Detect 4.2 About the DisplayPort DisplayPort is a digital display interface standard (approved May 2006, current version 1.1 approved on April 2, 2007) put forth by the Video Electronics Standards Association (VESA). It defines a new license-free, royalty-free, digital audio/video interconnect, intended to be used primarily between a computer and its display monitor, or a computer and a home-theater system. It supports a maximum of 10.8 Gbit/s data rate and WQXGA (2560×1600) resolution over a 3 meter cable. The DisplayPort connector supports 1 to 4 data pairs in a Main Link that also carries audio and clock signals, each with a transfer rate of 1.62 or 2.7 Gbit/s. The video signal path supports 6 to 16 20 Colorful Graphics Card User’s Manual bits per color channel. A bi-directional auxiliary channel (at a constant 1 Mbit/s) carries management and device control data for the Main Link using VESA EDID and VESA MCCS standards. The video signal is not compatible with DVI or HDMI, but a DisplayPort connector can pass these signals through. While DVI and HDMI require separate clock signals, DisplayPort embeds the clock in the data signal. The data transmission protocol in DisplayPort is based on micro packets and is extensible for future feature additions, whereas DVI/HDMI transmission protocol is a Serial Data Stream at 10x pixel clock rate. Finally, unlike the separate DVI/HDMI and LVDS standards, DisplayPort supports both external (box-to-box) and internal (laptop LCD panel) display connections. Pin Definitions Pin 1 ML_Lane 0(p) Pin 2 GND Ground Pin 3 ML_Lane 0(n) Pin 4 ML_Lane 1(p) Pin 5 GND Ground Pin 6 ML_Lane 1(n) Pin 7 ML_Lane 2(p) Pin 8 GND Ground Pin 9 ML_Lane 2(n) Pin 10 ML_Lane 3(p) Pin 11 GND Ground Pin 12 ML_Lane 3(n) Pin 13 GND Ground Pin 14 GND Ground Pin 15 AUX_CH(p) Pin 16 GND Ground Pin 17 AUX_CH(n) Pin 18 Hot Plug Pin 19 DP_PWR Pin 20 DP_PWR 4.3 How to Install HDMI 1. Connect the HDMI cable to the HDMI connector of the television 2. Please use a connection cable to connect the SPDIF_IN pinheads on the graphics card to the SPDIF_OUT pinheads on the motherboard. The pinheads on different motherboards have different names; please refer the motherboard manual for more details. DO NOT CONNECT THE VCC PINHEAD ON THE MOTHERBOARD, OTHERWISE THE GRAPHICS OR THE MOTHERBOARD WILL BE DAMAGED 21 Colorful Graphics Card User’s Manual GND Data A sign of triangle The SPDIF_IN pinheads introduction of Colorful graphics card 3. Choose HDMI when start up 22 Colorful Graphics Card User’s Manual 4. At last, please set to HDMI mode in the NVIDIA Control Panel in the Operating System. Select the displays that you use. Select the “Component- high definition televisions”, the HD format (mode) list displays various HDTV display formats with equivalent screen resolutions such as 480p (720x480 progressive), 480i (720x480 interlaced), and so on. Choose a format that gives you the display result you want. Typically, progressive formats provide a more stable picture with fewer flickers. Refer to your HDTV owner's manual for a list of supported display formats. 23 Colorful Graphics Card User’s Manual FAQs This part contains a list of symptom that may indicate a problem with your software or hardware and some troubleshooting way you can take to solve the problem. If you still have problems after trying our suggestions or if you’re having a problem that is not described below, please contact us. Q: The graphics card has no VGA port, how could I use a CRT monitor? A: Some of the graphics card only has DVI port output; you can use the DVI to VGA adapter to connect the CRT monitor. Q: What shall I do if I lose my driver CD? A: You can visit our website (http://www.colorful.cn) to download the driver. Q: Is it necessary to update the graphics BIOS when the card runs OK? A: If there is no special use, Colorful doesn't provide graphics card BIOS. We don't advice users use the abnormal BIOS operation, because the wrong BIOS may damage your hardware, moreover, the card may out of warranty. Q: What are the names of different parts in a graphic card? A: A graphics cards made up by GPU chip, PCB, memory modules, Electronic component, bus interface and display output. Q: Why the fan on the graphics card runs so loudly? How to solve it? A: When the card runs under the high heat and lots of dust environment for a long time, the fan may make noise. You can clean the dust on the fan. If it is still the same, please contact the franchisers. Q: Why I can't use the Windows Media Player to play the movies? A: Please download the latest version of Windows Media Player. Q: How to upkeep the graphics card? A: 1. Keep the ambient dry and avoid the dust. 2. Clean the dust on the fan usually, and keep the PCB and electronic component clean. Q: Why my monitor appears wrong color when power on. A: 1. Graphics card and monitor is not well connected 2. Monitor broken 3. Graphics card broken 4. Monitor has been magnetized Q: The computer is hanging up, is my graphics broken? A: There are many reasons make the computer hang up, if you exclude others, please try to examine whether the motherboard and the graphics card were well connected, whether the connect fingers had been oxidated or whether installed the right driver. 24 Colorful Graphics Card User’s Manual Q: Why the monitor appears some abnormal dots? A: This is usually because the graphics card and motherboard are not well connected. Please clean the connect fingers or return. Q: What is function of the external power supply? A: Some high power cards, such as NVIDIA GeForce 7800 series, GeForce 7900 series, GeForce 8800 series, GeForce 9800 series and GTX200 series etc., have extra power supply, to make up for the lack of power that motherboard supply. 25 Colorful Graphics Card User’s Manual 한국어 사용자 안내 COLORFUL VGA 제품을 구매해 주시는 고객 여러분들께 감사에 말씀을 드리며, 본 매뉴얼은 그래픽카드(VGA)의 원활한 설치와 사용을 위해 제작되었음을 알려드립니다. 1. 본 설명서 내용의 일부 또는 전부를 복제하여 사용 하실 수 없습니다. 2. 본 설명서 및 제품은 제품의 기능 향상을 위해 사전 예고 없이 변경될 수 있습니다. 시스템 권장 사항 PCI – Express VGA 를 위한 시스템 요구사항 ● 인텔 펜티엄 4, 인텔 셀러론, AMD 애슬론 64, AMD 샘프론 프로세서 또는 상위제품 ● PCI Express x16 슬롯 적용 메인보드 ● Windows XP /VISTA 또는 Windows 2000 ● 128MB 또는 그 이상의 시스템 메모리 ● 드라이버 소프트웨어 설치를 위한 CD-ROM 드라이브 Windows Vista AGP VGA 를 위한 시스템 요구사항 ● 인텔 펜티엄 4, 인텔 셀러론, AMD 애슬론 64, AMD 샘프론 프로세서 ● AGP 슬롯 적용 메인보드 ● Windows 98SE, Windows XP 또는 Windows 2000 ● 128MB 또는 그 이상의 시스템 메모리 ● 드라이버 소프트웨어 설치를 위한 CD-ROM 드라이브 하드웨어설치 제품내용 본사의 그래픽카드를 받으신 후, 아래 내용을 확인하시고, 문제가 있으면, 신속히 구매한 곳에 연락 하시길 바랍니다. AGP SLOT 그래픽카드 및 부품. 드라이버 CD & 제품 사용 설명서 그래픽카드 설치 방법 1. 전원을 끄고 플러그를 제거하고, 케이스를 분리합니다. 2. 컴퓨터 메인보드상의 AGP 또는 PCI Express SLOT 을 찾고, 만약 SLOT 에 보호 덮개가 있으면 덮개를 엽니다. 또는 메인보드상에 기존의 그래픽카드가 있으면, 그 카드를 제거하며, 제거 시 먼저 고정된 금속판의 나사를 풀고, SLOT 에서 뺍니다. 3. 새로운 그래픽카드를 AGP 또는 PCI Express SLOT 에 삽입하여 밀어줍니다. 26 PCI Express SLOT Colorful Graphics Card User’s Manual 4. 그래픽 카드 설치 시 주의사항 그래픽카드 설치 후, 연결이 잘 그래픽카드를 설치하기 전에는 DIMM SLOT 의 되었는지 확인합니다. 플라스틱 집게를 열지 마십시오. 고급 그래픽카드의 경우 외부 전원을 필요로 합니다. (주의:외부 전원이 잘 연결되지 않으면 컴퓨터가 작동 하지 않습니다.) 5. 컴퓨터 케이스를 덮고, 다시 플러그를 연결 합니다. 다음 화면의 신호플러그를 그래픽카드의 DB-15 핀 단자에 꽂습니다. TV-OUT 기능이 있으면 AV 출력단자나 S-Video 출련단자를 TV 에 연결 합니다. (주의: TV-OUT 기능을 활성화 시키려면, TV 선과 그래픽카드를 연결한 다음 TV 의 전원을 켜고, 컴퓨터를 재부팅 합니다.) 경고:TV 케이블은 컴퓨터를 켜기 전에 반드시 그래픽카드와 TV 사이에 연결이 되어 있어야 합니다. 컴퓨터를 켠 후 그래픽카드와 TV 를 입력할 경우 그래픽카드에 심각한 영향을 줄 수 있습니다. 이럴 경우에는 무상 서비스 기간 내에도 사용자 과실로 인한 유상 서비스로 조치가 됩니다. 각별한 주의를 요망합니다. WINDOWS Vista/XP/2000 드라이버의 빠른 설치 드라이버 CD 를 CD-ROM 에 넣습니다. 1 단계: 드라이버 CD 를 CD-ROM 에 삽입하고, 자동 설치 프로그램이 화면에 나타나면 <Install Drivers>를 선택 2 단계: 대화창에서 시스템이 드라이버 설치 준비를 완료했음을 알려주면, <다음>을 선택. 27 Colorful Graphics Card User’s Manual 3 단계: 시스템에 설치 진행중이면, 대화창에서 설치 현황을 보여줍니다. 4 단계: 시스템 설치 시 다음 진행을 위한 정보창이 뜨면 <Continue Anyway>를 선택 5 단계: 설치 완료 후, 컴퓨터의 재부팅을 위해 <YES>를 누른 다음 <마침>을 선택. 기존 NVIDIA GeForce 그래픽 카드에서의 업그레이드 1) 컴퓨터의 전원을 켭니다. 2) “표준 그래픽 디스플레이 어댑터”로 그래픽 카드의 드라이버를 바꿉니다. 3) 컴퓨터 전원을 끄고, 모든 디스플레이 출력 장치의 전원을 끕니다. 4) 컴퓨터 케이스의 커버를 엽니다. 5) 확장 슬롯에서 현재의 그래픽 카드를 제거합니다. 6) 새로운 NVIDIA 그래픽 카드를 확장 슬롯에 설치하고 그래픽 카드가 흔들리지 않도록 나사를 이용하여 단단히 고정합니다. 28 Colorful Graphics Card User’s Manual 7) 컴퓨터 케이스의 커버를 닫습니다. 8) 모든 디스플레이 출력장치(TV 나 모니터)의 전원을 끕니다. 9) 각각의 출력장치에 맞는 단자에 케이블을 연결합니다. 10) 디스플레이 출력장치의 전원을 켭니다 11) 컴퓨터 본체의 전원을 켭니다. 모니터사양 Screen resolution Resolution of digital LED Resolution Color 128M 640×480 256bit High-color Full-color 64MB 128M 64MB 128M 800×600 256bit High-color Full-color 64MB 128M Full-color 64MB 128M 1024×768 256bit High-color Full-color 64MB 128M High-color Full-color 64MB 128M 1280×1024 256bit High-color Full-color 64MB 128M 256bit High-color Full-color 64MB 128M 256bit High-color Full-color 64MB 128M TV Resolution 1920×1080 1920×1200 256bit High-color Full-color 64MB 128M 1920×1440 256bit High-color Full-color 64MB 128M 2048×1536 256bit High-color Full-color 64MB 128M Resolution Color Memory 640×480 256bit High-color Full-color 64MB 800×600 256bit High-color Full-color 1024×768 256bit High-color 1280×1024 256bit 1600×1200 Memory Resolution Color 640×480 256bit High-color Full-color 64MB 128M 800×600 256bit High-color Full-color 64MB 128M Memory 어떻게 나의 모니터를 비교적 높은 해상도와 재생빈도율을 가질 수 있게 하는가? 이것은 모든 모니터의 규격이 다르기 때문입니다. 일반적으로 높은 bandwidth 와 H/V-frequency 는 화면의 선명도와 재생빈도율을 높게 조절할 수 있습니다. 29 Colorful Graphics Card User’s Manual Deutsch Benutzer-guider Hardware Installation Inhalt Bitte prüfen und identifizieren Sie die gelieferten Komponenten 1-3, Wenn Probleme auftreten, wenden Sie sich an den Verkäufer. AGP Slot Colorful Grafikkarte und Zubehör. Windows 98/Me、Windows 2000、 Windows XP 、Window Vista Treiber CD. PCI Express Slot Bedienungsanleitung des Produktes. Grafikkarte Installation 1.Entfernen Sie die Netzanschluss und sämtliche Kabel. Öffnen Sie das Computergehäuse. 2.Suchen Sie nach eine AGP Slot oder eine PCI Express Slot auf Ihrer Mainboard. Entfernen Sie gegebenenfalls die Schutzschicht. Wenn auf der Mainboard bereits eine Grafikkarte eingesetzt ist, entfernen Sie diese zuerst, indem Sie die Schrauben an der Metallplatte lösen und die Karte herausziehen. 3.Setzen Sie die neue Grafikkarte vorsichtig in die AGP oder PCI Express Slot ein und achten Sie darauf, dass die Grafikkarte bis nach ganz unten gedrückt ist. 4. Zu beachten während der Grafikkarte Installation: Nachdem die Karte eingesetzt ist, muss Bevor die Karte eingesetzt wird, können der Schalter fest geschlossen werden. die Plastikschalter an DIMM Slot nicht geöffnet werden Manche Hochauflösungsgrafikkarten besitzen eine externe Stromversorgung. Wenn sie nicht angeschlossen ist, kann der PC nicht gestartet werden. 30 Colorful Graphics Card User’s Manual 5 Computergehäuse wieder schließen. Alle getrennte Kabel erneut an den PC anschließen. Dann das Monitorkabel an den Steckplatz DB-15 der Grafikkarte anschließen. Wenn die Grafikkarte über TV-Out verfügt, können Sie AV-Out und S-Video-Out direkt mit dem Fernsehen verbinden. ( Wenn Sie TV-out Funktion aktivieren möchten, verbinden Sie TV mit Graphikkarte und schalten Sie den Strom des Fernsehers an. Ein Neustart des PC ist nötig. ) Warnung: Entfernen Sie und verbinden Sie KEINE Kabel an Ihren PC,während die Verbindung zwischen dem Fernseher und dem PC aktiv ist. Dies kann dazu führen, dass die Grafikkarte durchbrennt. Treiber Installation WINDOWS Vista/XP/2000 Treiber CD ins Laufwerk Schritt 1 Treiber CD ins Laufwerk,Das Installationsprogramm startet automatisch.【Install Drivers】 wählen. Schritt 2 Schritt 3 Ein Fenster gibt Ihnen an, dass das Während die Installation läuft, zeigt System bereit ist für die Installation. Ihnen ein Fenster den Fortschritt. 31 Colorful Graphics Card User’s Manual Schritt 5 Schritt 4 Nach der Installation wird ein Falls während der Installation folgendes Fenster Sie fragen, ob Sie einen Neustart wünschen. 【Yes】 wählen, Fenster auftaucht,klick【Continue Anyway】. dann【Finish】wählen. Display Model Screen resolution Resolution of digital LED Resolution Color 128M 640×480 256bit High-color Full-color 64MB 128M 64MB 128M 800×600 256bit High-color Full-color 64MB 128M Full-color 64MB 128M 1024×768 256bit High-color Full-color 64MB 128M High-color Full-color 64MB 128M 1280×1024 256bit High-color Full-color 64MB 128M 256bit High-color Full-color 64MB 128M 1920×1080 256bit High-color Full-color 64MB 128M 1920×1200 256bit High-color Full-color 64MB 128M 1920×1440 256bit High-color Full-color 64MB 128M 640×480 256bit High-color Full-color 64MB 128M 2048×1536 256bit High-color Full-color 64MB 128M 800×600 256bit High-color Full-color 64MB 128M Resolution Color Memory 640×480 256bit High-color Full-color 64MB 800×600 256bit High-color Full-color 1024×768 256bit High-color 1280×1024 256bit 1600×1200 Memory TV Resolution Resolution Color Memory Warum kann mein Monitor keine hohe Bildschrimauflösung und Bildschrimfrenquenz haben? Dies liegt daran, dass jeder Bildschirm ein anderes Format hat. Erkündigen Sie sich beim Bildschirm Produzent, welches Format Ihr Bildschirm hat. 32 Colorful Graphics Card User’s Manual Русский Руководство пользователя Установка оборудования Комплектация После приобретения видеокарты, проверьте комплектность продукта. При возникновении любых вопросов обратитесь к Вашему AGP slot продавцу. Комплектация Видеокарта PCI Express slot Компакт-диск с драйвером для Windows 98/Me. Windows 2000,Windows XP Описание продукта Установка видеокарты 1. Отключите питание компьютера и отсоедините кабель питания 2. Снимите крышку корпуса. 3. Найдите AGP или PCI-E слот на материнской плате компьютера Если слот закрыт защитной пленкой, снимите ее. Снимите заглушку с задней части корпуса. Если в разъеме для видеокарты стоит старая видеокарты снимите ее, изначально вывернув защитный винт если он имеется. 4. Установите разъем видеокарты точно в слот на материнской плате и нажмите до щелчка. 5. Обратите внимание Не открывайте защелки на DIMM После установки, убедитесь, что слоте памяти перед установкой. защелка плотно закрыта Некоторые мощные карточки нуждаются в подключении дополнительного питании (Внимание: При плохо подключенном дополнительном питании, система не сможет начать работу.) 33 Colorful Graphics Card User’s Manual 6.Закройте крышку корпуса. Подключите сигнальный шнур монитора используя DB-15 разъем видеокарты. При возможности подключения ТВ сигнала, подсоедините АВ разъем или S-Video порт к Вашему телевизору. Внимание: Все подключения к компьютеру производить только в отключенном состоянии. Подключение во включенном состоянии может вызвать гибель Вашей видеокарты. Быстрая установка программного обеспечения Windows 2000/XP/Vista Вставьте СД-диск Шаг 1 Вставив СД-диск в дисковод, на дисплее монитора Вы увидите приглашение к установкеИнсталляционной программы, пожалуйста нажмите Install Drivers Шаг 2 В следующем диалоговом окне нажмите кнопку <Next> 34 Шаг 3 В следующем окне вы сможете наблюдать процесс установки необходимых драйверов Colorful Graphics Card User’s Manual Шаг 4 Шаг 5 После завершения установки, Если во время установки драйверов система выдаст предупреждение, как на картинке, нажмите «Continue Anuway». выберите «Yes» для перезапуска системы Варианты настройки дисплея Screen resolution Resolution of digital LED Resolution Color 640×480 256bit High-color Full-color 64MB 800×600 256bit High-color Full-color 64MB Resolution Color 128M 640×480 256bit High-color Full-color 64MB 128M 128M 800×600 256bit High-color Full-color 64MB 128M 128M 128M Memory Memory 1024×768 256bit High-color Full-color 64MB 128M 1024×768 256bit High-color Full-color 64MB 1280×1024 256bit High-color Full-color 64MB 128M 1280×1024 256bit High-color Full-color 64MB 1600×1200 256bit High-color Full-color 64MB 128M 1920×1080 256bit High-color Full-color 64MB 128M 1920×1200 256bit High-color Full-color 64MB 128M Resolution Color 1920×1440 256bit High-color Full-color 64MB 128M 640×480 256bit High-color Full-color 64MB 128M 2048×1536 256bit High-color Full-color 64MB 128M 800×600 256bit High-color Full-color 64MB 128M TV Resolution 35 Memory Colorful Graphics Card User’s Manual Почему мой компьютер не может работать на большем разрешении и с частотой обновления экрана? Это происходит из-за различий возможностях между мониторами, их конфигураций. Вообщем, при более высокой полосе пропускания и частоте, больший по диагонали экран может приспособиться к более высокому разрешению и частоте обновления экрана. Пожалуйста, консультируйтесь с изготовителем Вашего дисплея для правильного выбора режима работы. 36 Colorful Graphics Card User’s Manual Technical Support If you can’t settle the questions, please contact with our engineer, and send the following information to us. (Note: please give a description about your computer system and your display equipments.) 1. Product Name: 2. Serial Number: 3. Purchase Date: 4. Customer Name: 5. Purchase Place: 6. Operation System: 7. Driver Version: 8. Contact Address: Abnormal Occurrence:………………………………………………………… ……………………………………………………………………………………… ……………………………………………………………………………………… ……………………………………………………………………………………… ……………………………………………………………………………………… ……………………………………………………………………………………… ……………………………………………………………………………………… ……………………………………………………………………………………… --Colorful Technology & Development Co., Ltd-http://www.colorful.cn 37