1
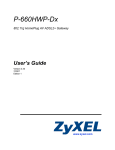
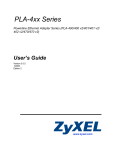
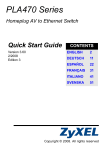
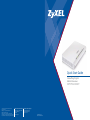
Quick Start Guide
HomePlug Digital
Media Streamer
dma1100p
Copyright © 2008 ZyXEL Communications Corp.
All rights reserved.
ZyXEL logo is a registered trademark of
ZyXEL Communications Corp.
All other brands, product names or trademarks
mentioned are the property of their respective owners.
All specifications are subject to change without notice.
ZyXEL Communications UK Ltd
11 The Courtyard, Eastern Road,
Bracknell, Berkshire,
RG12 2XB,
United Kingdom
Technical & Customer Support
Email: [email protected]
Telephone: 0845 122 0301
www.zyxel.co.uk
Issue Number: 001
Publication Date: 06/08
PACKAGE CONTENTS
OVERVIEW
The HomePlug Digital Media Streamer provides:
ZyXEL DMA1100P HomePlug Digital Media Streamer
• Playback of both standard and high definition movies, music and photos stored on PC and storage
device to your TV.
Remote Control + 2 AAA batteries
• Support for DRM protected downloadable content from major online providers.
• Playback of music or the latest PodCasts on your computer direct to your TV or Hi-Fi.
• USB storage device playback compatibility.
UK Power Cord
• Automated detection and organisation of your media files creating an easily accessible library.
Crossover LAN Cable
• 200Mbps HomePlug creating a home network without the cables, giving you fast, reliable and high
quality playback*.
Straight LAN Cable
Note: *Additional HomePlug is required to create a complete network.
SCART Cable
The following diagram shows the DMA1100P HomePlug Digital Media
Streamer set-up
ZyXEL DMA1100P Installation CD
Basic Set-up
Warranty Card
Plug Socket
SYSTEM REQUIREMENTS
•
•
•
•
•
CPU: Celeron 1.0 GHz or Pentium III 1 GHz or above
Memory: 256Mb or more
Network: Ethernet LAN
If running high definition you will require a HDMI cable (not included)
HomePlug AV compatible Adapter for networking to other HomePlug AV devices
The DMA1100P HomePlug Digital Media Streamer supports the following file
formats. See the User Guide on DMA1100P CD for more details.
Audio - Dolby Digital, DVD-Audio, MPEG1 and MPEG2 Layers I, II and III MP3), MPEG2
BC mutli-channel Layers I, II and III, MPEG2 and MPEG4, AAC-2, WMA9
Video - MPEG1, MPEG2 MP@ML, MPEG4 simple and advanced simple profile,
MPEG4, AVI file and WMV version 9
Photo - TIFF, PNG, GIF, BMP, JPEG and JPEG2000
SCART Cable
Power
Cord
TV
HomePlug Digital
Media Streamer
DMA1100P
Main Circuit
Plug Socket
PLA401
Ethernet Cable
Power Cord
WINDOWS Vista User
WINDOWS XP User
Refer to the Microsoft Vista Media Server appendix in
the User Guide (on the included Installation CD) for
further instructions on how to set-up the DMA1100P.
Install the software from the Installation CD
to install the DMA1100P.
Desktop PC
Ethernet Cable
P660HWP
Network Storage
NSA220
Microsoft Windows
98SE
DMA1100P
1
ME
2000
XP
XP/64
Vista
MAC LINUX
UK Technical & Customer Support
Email: [email protected]
Telephone: 0845 122 0301
2
STEP 1
Insert CD to install Digital Media software on
your computer, follow the on screen
instructions and please make sure that:
b. Connect the audio cables left (red)
and right (white) into the colour
corresponding sockets at the back
of the DMA1100P.
• Security software on your computer or laptop is turned OFF during
the installation e.g. Firewall and AntiVirus; please remember to switch
it back on following successful installation.
c. Connect the SCART connector into an available SCART socket on the
rear of your TV.
• All other applications are CLOSED DOWN e.g. Email, Web Browser,
Word Processor.
High definition installation - using a HDMI cable*
• You have a spare Ethernet port on your computer or laptop.
STEP 2
Plug in one end of the HDMI cable into the
HDMI socket on the DMA1100P and the
other end into an available HDMI socket on
the HDTV.
Connecting your DMA1100P
HomePlug Digital Media Streamer
*The HDMI cable is not included
1
Turn off your TV before connecting your DMA1100P
DMA1100P Connections
i
It is not recommended that you connect both a SCART cable and an HDMI cable into the
same HDTV - please use one or the other.
3
Connect your computer or laptop
a. There are several ways to connect to your network:
2
Connecting to your TV
Standard installation – for SCART Users
a. Unpack the SCART Cable and
connect the Composite Video
connector (yellow) into the yellow
Composite Video socket at the
back of the DMA1100P.
1. Using a HomePlug compatible
router or adapter
2. Using a router
directly connected
3. Using a computer or
laptop directly for media
content
The DMA1100P when powered on will
automatically network using HomePlug
AV via the electricity mains power
socket. You must use a compatible
HomePlug AV adapter or router
(connected to your Computer or
Storage device) to provide a HomePlug
connection to stream content. No
additional configuration is required.
Plug the supplied grey
straight LAN cable into
the LAN socket on the
DMA1100P and the other
end to the LAN/Ethernet
port on your router.
Plug the supplied red
crossover LAN cable to the
LAN socket on the
DMA1100P and the other
end to the LAN/ Ethernet
port on your computer or
laptop*.
* It is not recommended for Apple products.
i
3
For different type of TV or Hi-Fi connectivity, please refer to your TV or Hi-Fi manual
i
You will need to connect your computer (that has the digital media software installed) to
the DMA1100P via one of the methods listed above.
4
b. You can directly share media files via the USB 2.0 port. You can
connect a USB memory stick or hard drive at any time.
i
8
The DMA1100P HomePlug Digital Media Streamer should be
automatically detected and you will see a pop-up window, containing
the IP address of the DMA1100P.
The USB port is not recommended for Apple products, as this may damage the device.
4
Connect the power cord to the
DMA1100P (see right) then connect the
plug into your mains socket.
9
i
i
For networking via HomePlug AV, to achieve best results it is highly recommended you plug
the DMA1100P mains lead direct to the power socket in the wall, not via an extension lead.
The HomePlug AV connection may be sensitive to interference from additional electrical
equipment via the same socket.
5
6
Look at your computer or laptop screen.
Within the pop-up window, click
where instructed.
You may need to wait two or three minutes before the window pops up. If the window
does not appear, check the DMA1100P is turned on, cables are firmly connected and
restart the DMA1100P via on/off button.
If the pop-up window still fails to appear, then refer to Section 9 in the DMA1100P user
manual (located on the DMA1100P installation CD) to configure the DMA1100P and
computer software manually.
Ensure your DMA1100P and computer or laptop are correctly connected
to the HomePlug or LAN network and your media software is installed
correctly (see step 3).
10 Select Allow Connection and click OK.
Look at the DMA1100P LEDs (lights). On the front of the device, the
status light (1) will become green.
11 Click Yes to allow the DMA1100P to
stream your media files.
1
7
5
2
3
4
5
The Play light (2) will only come on when you stream media content.
The LAN light (3) will come on if you have connected to any network
devices e.g. computer or router. The USB light (4) will only come on
when a USB device is connected. The HomePlug light (5) will also come
on if you are successfully connected to another HomePlug Adapter in
your home.
12 Install your remote control batteries.
i
Always remember to point your DMA1100P remote control at the DMA1100P and not
at the TV.
6
13 Look at your TV
a. The DMA1100P
automatically locates your
computer and allocates a
number (typically, this will
be 1) in the bottom right
hand corner of the TV
screen (shown right).
If you are directly
connecting a USB memory
device, the media files are
located in the main menu USB.
b. The DMA1100P catalogues
your files according to the
media file type, e.g. Video,
Music and Photo.
c. Use the remote control to
navigate through the
menus and click OK on the
remote control once you
have selected your media
for streaming (see right).
STEP 3
Using your Remote Control
1) POWER switches between standby and on
1
2
2) HOME returns you to the main menu
3) Use the 0-9, CLEAR and INPUT keys to input numbers, (e.g.
for individual screens or times
3
4) PAGE up/down scroll up or down a list to the previous or
next page
4
5
14
13
15
5) AUDIO switches audio output between left, right and stereo
speakers
6) A-B lets you select, start and stop times to repeat an interval.
7) REPEAT keeps playing the file
16
6
17
8) INFO displays details about playing the file
9) SERVER opens a menu where you select the media server
you are using
7
8
9
10
18
19
11
12
21
20
10) ROTATE turns a photo 90º clockwise
11) SHUFFLE plays your playlist (favourites) files in a random
order
12) OPTION opens the menu where you configure the
DMA1100P’s settings
13) MUTE turns off the sound
Congratulations!!
Your DMA1100P HomePlug Digital Media Streamer is now set-up with your
computer or laptop to stream content direct to your TV and with additional
HomePlug AV devices you are now able to stream your media all around your
home.
14) VOLUME up/down adjusts the volume
15) Use the OK, Back and arrow buttons to go through the
menus and play your files
16) TOOL opens the Tool menu for additional options (see the
User Guide for more information)
17) These buttons perform the previous, play, next, reverse,
stop, fast forward, skip, pause and slow motion functions
during file playback.
18) Short cut keys PHOTO opens a menu of picture files to view
19) VIDEO opens a menu of video files to play
For instructions on how to operate your DMA1100P with popular online content
providers such as BBC iPlayer, Channel 4 On Demand, LoveFilm and eMusic go to
www.zyxel.co.uk/stream
7
20) MUSIC opens a menu of music files to play
21) USB opens a menu of files on your USB device
8
Notes
9
Notes
10