1
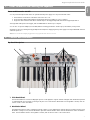
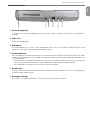
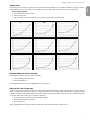
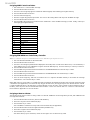
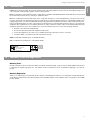
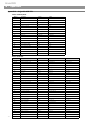
Oxygen Series
Oxygen 8 v2, Oxygen 49, Oxygen 61
User Guide
English
Oxygen Keyboard Line User Guide
Congratulations on purchasing an Oxygen keyboard from M-Audio. The Oxygen keyboards offer diverse controls and all the
programming features and functions you will need to develop your MIDI studio.
The Oxygen keyboards come with 25, 49, or 61 full-size, velocity-sensitive keys and eight fully assignable knobs, with 6 fully assignable
Transport buttons. The 49- and 61-note models also include 9 fully assignable buttons and 9 assignable sliders for performance and
programming. One simple USB connection serves as both a MIDI interface and bus-power source. Class-compliancy with Windows
XP and Mac OS X means that you can get down to business without even installing any drivers.
You can also expand on the functions of the Oxygen range by downloading the Enigma software editor and librarian. For more
information, see the Enigma Software Editor (replace with section’s number) of this manual or visit www.m-audio.com to register and
download the free software.
2 › What’s in the Box
Your Oxygen keyboard package contains the following:
< 25-, 49-, or 61-note keyboard
< CD-ROM containing Driver Software and User Manual in PDF format
< Printed Quick Start Guide
< CD-ROM containing bundled software
< 5-foot USB 1.1 Type B cable
3 › Features
Top Panel
The top panel has the following functional components:
< 25-, 49-, and 61-note key bed: full-sized velocity-sensitive keys with synth action
< 8 fully assignable MIDI controller knobs
< 9 assignable sliders (49 and 61 only)
< 9 assignable buttons (49 and 61 only)
< 6 Transport buttons
< Assignable Pitch Bend and Modulation wheels
< Octave and Transpose up, down buttons
< 10 non-volatile memories
< 7 top-panel Function buttons (only 5 on 25-note model)
< 3-segment LED screen
< Advanced programming functions on the keybed
Back Panel
The back panel has the following functional components:
< USB 1.1 upstream (Type B) port
< Sustain pedal input
< MIDI Out port
< On/Off switch
< Power input for optional power supply
3
English
1 › Introduction
General
The product has the following general features:
< USB bus powered
< Compatible with Enigma librarian and parameter editor for storing and organizing setups
< MIDI Data from controllers
• MIDI control number
• RPN/NRPN
• Program, Bank LSB, Bank MSB
• Pitch Bend
• GM/GM2/XG SysEx Messages
< MIDI Data from buttons:
• Note on
• Note on/off toggle
• MIDI CC on/off toggle
• RPN/NRPN
• Program, Bank LSB, Bank MSB presets
• MIDI Machine Control functions
• GM/GM2/XG SysEx Messages
• Program increment/decrement
• MIDI CC value increment/decrement
< All controls fully programmable to MIDI controller number
< All controls fully programmable to MIDI channel
< Controller Mute function mutes controller output to avoid parameter jumps
< Memory Dump via SysEx
4 › Minimum System Requirements
IMPORTANT: The Oxygen keyboard controllers are supported under Windows XP; they are not supported under Windows 98, 98SE or
Windows ME or 2000. You must be running Service Pack 1 (SP1) or later. Visit the Windows update web pages (http://windowsupdate.
microsoft.com/) to make certain you have the most current updates and fixes supplied by Microsoft.
On the Macintosh, the Oxygen controllers are supported under Mac OS X version 10.3.8 or version 10.4 or later. Earlier versions of
Mac operating systems are not supported.
Windows*
< Pentium 3 – 800 MHz or higher
(CPU may be higher for laptops)
< 256 MB RAM
< DirectX 9.0b or higher
< Windows XP (SP1) or higher
(Windows 98, Me, NT, or 2000 not supported)
Mac OS*
< Macintosh G3 800/G4 733 MHz or higher
(CPU may be higher for laptops)
< OS X 10.2.8 with 256 MB RAM,
< OS X 10.3.4 or greater with 512 MB RAM
*M-Audio suggests you also check the minimum system requirements for your software, as they may be greater than the above.
Windows XP and Mac OS X Class-Compliancy
If you are using Windows XP or Mac OS X, you may simply connect your keyboard using the USB lead (supplied) and turn the power
switch to “on.” Because the Oxygen keyboards are class- compliant, your unit will work without any further installation.
4
Oxygen Keyboard Line User Guide
English
5 › Driver Installation and Powering the Keyboard
Power and Connection via USB
You can power the keyboard via USB or an optional external power supply. Use only one method at a time.
1. Check that the on/off switch on the back of the unit is set to “off”
2. Plug in the USB cable provided with the Oxygen keyboard to a free USB port on your computer
3. Plug in the other end of the USB cable to the USB input on the Oxygen keyboard and turn the Oxygen keyboard on.
The single USB cable powers the Oxygen, and sends MIDI data to and from your computer.
You can also use a power adapter (not included) with the following specification: 12V DC output, 250-300mA, center positive.
Verify that you are not powering the Oxygen keyboard via USB, then simply plug in the power supply to the input labelled DC 12V and
switch the power on.
Note: Do not leave the adapter plugged in for long periods if the unit is not in use.
6 › Controls and Connectors
Top Panel Descriptions
1. Pitch Bend Wheel:
The Pitch Bend wheel is used for modifying the pitch of sounds played on a given channel. Rolling the Pitch Bend wheel upward
or downward will cause a raising or lowering of the pitch of a sound. The Pitch Bend wheel is an assignable controller, and can
also be used to control other effects.
2. Modulation Wheel:
The Modulation wheel is used to change the intensity of effects, such as Vibrato (pitch change), Tremolo (change in volume), and
Modulation (change in tone). Roll the Modulation upward to add modulation effect and roll downward to reduce modulation
effect. The Modulation wheel is an assignable controller, and can also be used to control other effects.
5
3. Octave +/- and Transpose Buttons:
The Octave buttons allow you to shift the octave of the keyboard up or down to extend the range of the key bed.
The left button is for the Octave down function, and the right button is for the Octave up function. The top to bottom range
available via the Octave up and down function is 11 octaves.
1.
Press Octave + one time for each up octave shift on the keyboard
2. Press Octave – one time for each down octave shift on the keyboard
Transpose is a secondary function of the Octave buttons. The Transpose function allows a pitch transposition up or down 12
steps. To activate the Transpose function, press both Octave up and down buttons simultaneously and then use the up and down
buttons to adjust transposition by one semitone.
1.
Press Octave + and Octave – together.
2. Press Octave + one time for each semi tone you want to transpose up.
3. Press Octave – one time for each semi tone you want to transpose down.
4. LED Screen:
The LED is a standard 3-segment LED display. The display provides feedback while you are programming various MIDI
functions.
5. Function Buttons:
There are 7 function buttons on the 49 and 61-Note and 5 on 25-Note. The Function buttons are used for on the fly programming.
The Advanced button is used to access the advanced programming functions on the keybed.
6. 9 Assignable MIDI Sliders (49- and 61- Note Only):
The Oxygen 49 and 61 have 9 assignable sliders that are fully programmable. Additionally, each fader can be assigned to an
individual MIDI channel.
7. 9 Assignable MIDI Buttons (49- and 61- Note Only):
The Oxygen 49 and 61 have 9 assignable buttons that are fully programmable. Additionally, each button can be assigned to an
individual MIDI channel.
8. 8 Assignable MIDI Knobs:
The Oxygen keyboards have 8 assignable knobs that are fully programmable. Additionally, each knob can be assigned to an
individual MIDI channel.
9. 6 Assignable Transport Buttons:
The Oxygen keyboards have 6 fully assignable Transport buttons that send MIDI controller data on any MIDI channel. Each
Transport button is fully programmable. Additionally, each button can be assigned to an individual MIDI channel.
10. Velocity-sensitive Keyboard:
The product’s key bed is velocity sensitive.
6
Oxygen Keyboard Line User Guide
English
Back Panel Descriptions
1. DC Power Supply Port:
For connection of a 12V DC 250-300mA power supply. (The power supply is an optional accessory and is not included in the
package.)
2. USB 1.1 Port:
USB 1.1 upstream (Type B) port
3. MIDI Output:
The external MIDI Out port is used to connect external MIDI devices such as sound modules, hardware sequencers, and
synthesizers. The port will accept a standard 5 pin DIN-type connector.
4. Sustain Pedal Input:
The Sustain Pedal input accepts a 1⁄4” TR jack plug. It is located on the rear or back panel as shown in the illustration. The sustain
pedal controls the hold length of any note played on the keyboard. However, the pedal is fully programmable and can be used
to control other effects.
• The polarity of the sustain pedal is determined when you power up your Oxygen controller. The state at power up is assumed
to be off. If the pedal is not pressed at power up, the pedal will be on when pressed, and off when released.
• The sustain pedal is an optional accessory and is not included in the package.
5. On/Off Switch:
The power switch on the rear of the product will function in a simple on or off mode. When the unit is on, it is powered by either
the external supply or USB bus power.
6. Kensington Lock Hole:
This connector is compatible with Kensington® security cables to protect your device from theft.
7
7 › Introduction to MIDI Programming Functions
Introduction
Before you begin exploring the MIDI section of the manual, please refer to the beginning of this guide and read the installation
information. It is necessary to install the Oxygen and ensure it is working properly before you begin to work with the MIDI functions.
Testing Your Oxygen keyboard with Your Computer Software
We recommend that you verify that your software application is properly communicating with the Oxygen keyboard. Most software
applications have a MIDI Input indicator. To confirm data is received, press any key on the keyboard.
If you encounter any issues or if the software receives no data, please verify that you have selected the keyboard’s driver as the MIDI
Input for your software. In addition, please read the troubleshooting section at the back of this manual and consult the manual that
came with your software for proper configuration within the software application.
Edit Mode
This manual will frequently refer to the “Edit mode.” Edit mode defines the state of the Oxygen after pressing the Advanced Function
button which is labeled “Advanced.”
In Edit mode, use the Oxygen keys for selecting programming functions. These functions are listed above each key on the key bed.
When entering numerical values in Edit mode, the LED display shows the value entered. This value will update as you enter numerical
data.
Use the Enter key each time the numerical data entry keys are used to enter a value. This will save that value. To exit Edit mode, simply
press the Edit button again, the LED will no longer be lit and you will have restored the keyboard.
8
Oxygen Keyboard Line User Guide
English
8 › Function Buttons Defined
Advanced
The Advanced Functions feature will put the keyboard into Edit mode, and the keys on the key bed will then call up the assigned
programming function written on the panel above them.
When the Advanced Function button is pressed, and the keyboard enters edit mode, the LED screen will show three dots along the
bottom of the display.
Mute
The Mute function mutes all MIDI output from the rotary dials, or faders on your Oxygen controller. This allows for adjustment
of controller parameters without altering software settings– useful for preventing parameter jumps in your software. To activate
Controller Mute, press the Mute button. The LED display will read “OFF” each time a controller is moved, in order to make it clear that
the controller is not sending any MIDI data.
The Mute function does not affect the buttons, the sustain pedal, or the keys. Pressing any of these controllers on your Oxygen
keyboard will cancel Mute mode automatically. To exit the Controller Mute mode, press the Controller Mute button again (the LED
screen will read “On”).
Snap Shot
The Snap Shot function sends out the current settings for each knob and fader on their current MIDI channel. This feature lets you
record the settings of the controllers into your sequencer, or update your software’s parameters to match the settings on your
Oxygen.
Snap Shot can be used in conjunction with the Mute function to create interesting effects. For example, Mute can be used to adjust
the position of the controllers on your Oxygen without affecting the software parameters, Then, Snap Shot can be used to immediately
shift all parameters to the new levels you have changed while muted, all at once.
Select
The Select button is used to select the function of the 2 data buttons. Each time the Select button is pressed, a different dot will light
along the bottom of the LED display to indicate which of the functions the Data buttons are currently assigned to.
The functions that can be assigned to the data buttons are Global Channel, Program and Preset Select (Preset is available from these
buttons on the 25-note Oxygen 8 v2 only. On the 49- and 61-note versions, there are separate dedicated buttons for Preset). On
initial power up, the data buttons will alter the selected preset on the 25-note version. On the 49- and 61-note versions, by default
the data buttons will alter the Global Channel. The settings for the Data buttons will be remembered even when you power down
your Oxygen.
If the Data buttons are assigned to ‘Prog’ then the buttons have the effect of sending a Program change. This is a useful setting if you
want to change quickly between patches on a synthesizer and audition the sound. Program Changes are always sent on the Global
MIDI Channel.
If the Data buttons are assigned to ‘Preset’ then the buttons are used to change between various presets of your Oxygen. This means
that each time a Data button is pressed, a new preset will be recalled.
If the Data buttons are assigned to ‘Glob.’ the buttons will change the Global MIDI Channel that the Oxygen controller is transmitting
on.
Data -/+ Buttons
The left Data button is ‘-‘ and will decrement the assigned function’s value. The right Data button is ‘+’ and will increment the assigned
function’s value.
Preset -/+ and Dual Press Memory Recall (49- and 61-note)
Note: the 25-note version does not have Preset – and + buttons. Simply press Preset - (down) or Preset + (up) to toggle through the
preset memories. Alternately, you can press both Preset - and Preset + which will put the keyboard into Advanced Function mode,
and then enter the memory number on the key bed to load one of the 10 presets from preset memory.
9
9 › Keybed Functions Defined
Control Assign
The Control Assign function assigns a MIDI controller message (MIDI CC) to a selected controller.
To assign a MIDI CC to a selected controller:
1. Press the Advanced Function button.
2. Press the Control Assign key.
3. Enter the MIDI CC value with the numeric keys.
4. Press the Enter key.
The controller that is affected by the Control Assign function is always the last used controller. By default, controller 1 is selected.
However, it is possible to alter the selected controller during edit mode by moving a different controller. As you enter a new MIDI cc
assignment using the data entry keys, the LED will update to give feedback on the number that has been entered.
Please see appendix A for a list of MIDI cc’s that are assignable. Note that we have expanded on the standard MIDI CC list. This is
to include other useful MIDI messages such as NRPN messages, GM/GM2 Sys Ex and even some CC’s that define how the controller
should operate. This simplifies programming such messages which are often complicated to program on other devices.
Global Channel
The Global Channel function changes the MIDI channel assigned to the keyboard. Your Oxygen controller will transmit on any of the
standard 16 MIDI channels. The Global MIDI Channel will affect the channel on which program changes, bank changes, and any
controllers set to respond to the global channel will transmit.
To set the Global Channel:
1.
Press the Advanced Function button
2. Press the Global Channel key.
3
Enter the MIDI channel number on the key bed.
4
Press the Enter key.
When engaging the Global Channel function, the LED screen will display the “c” symbol, and the last selected channel.
Note that it is also possible to set the Data keys to control the Global Channel. To do this:
1. Press the Select Function button until the dot above Glob Chan is lit.
2. Use the - and + Data buttons to decrement/increment the Global Channel.
Channel Assign
The Channel Assign function assigns a channel to an individual MIDI controller.
1. Press the Advanced button and then the Channel Assign key.
2. Enter the MIDI channel number using the data entry keys.
3. Then press the Enter key.
When assigned to channel 00, the controller will transmit on the Global Channel.
When engaging the Channel Assign function, the LED screen will display the “c” symbol, and the last selected channel.
Note: When a controller is assigned to send SysEx messages, the individual control channel number defines a Device ID and not a
transmit channel. Please see Appendix A to find out which of the extra MIDI CC numbers determine that the control should send a
SysEx message.
10
Oxygen Keyboard Line User Guide
The Control Select function selects a MIDI controller for parameter editing. Use the Control Select function to select a MIDI controller
before assigning a MIDI CC number to that controller.
To select a MIDI controller for editing, move the knob or fader that you want to edit. The last used controller is always the controller
that is currently selected for editing.
The second method to select a MIDI controller for editing:
1. Press the Advanced Function button
2. Press the Control Select button
3. Enter the controller’s ID number using the data entry keys.
4. Press the Enter key to confirm.
Note: If you move a controller after pressing Control Select, the LED will display the ID number of the selected controller to edit. The
ID number of each controller is shown on the printing by each control.
Program
The Program function is used to send a Program Change on the Global Channel. To send a Program Change:
1. Press the Advanced Function button.
2. Press the Program key.
3. Enter the Program Change to send using the data entry keys.
4. Press the Enter key to confirm.
Note that it is also possible to set the data keys to control Program Change. To do this:
1. Press the Select Function button until the dot above Prog is lit.
2. Use the - and + Data buttons to step through Program Changes. The Program Change number shown in the LED display will
be sent.
Bank LSB
The Bank LSB function can be used to access additional banks of sounds on your sound module or sound card by sending a bank
change LSB message. Note, this is only possible if your receiving device has additional banks of sounds.
1. Press the Advanced button.
2. Press the Bank LSB key.
3. Enter the bank number using the keypad.
4. Press the Enter key.
Please check your receiving device’s documentation to ensure that it will respond to these messages.
The Bank MSB message is always sent on the Global Channel.
Bank MSB
The Bank MSB function can be used to access additional banks of sounds on your sound module or sound card by sending a bank
change MSB message. Note: this is only possible if your receiving device has additional banks of sounds.
1. Press the Advanced button.
2. Press the Bank MSB key.
3. Enter the bank number using the keypad.
4. Press the Enter key.
Please check your receiving device’s documentation to ensure that it will respond to these messages.
The Bank MSB message is always sent on the Global Channel.
Data 1
The Data 1 function key only applies to the unit’s programmable buttons and pedal. The function of Data 1 depends on the MIDI CC
that is currently assigned to the controller that is to be edited. Please refer to Appendix A where each assignable MIDI CC is listed,
along with the Data 1, 2 and 3 functions.
When editing Data 1 values, the range of values that can be selected is 0-127.
11
English
Control Select
Data 2
The Data 2 function is located on the key bed. The function of Data 2 depends on the MIDI CC that is currently assigned to the controller
that is to be edited. Please refer to Appendix A where each assignable MIDI CC is listed, along with the Data 1, 2 and 3 functions.
When editing Data 2 values, the range of values that can be selected is 0-127.
It is possible to limit the range of the rotary dials and faders on your Oxygen keyboard. To assign minimum value to a knob
or fader:
1. Press the Advanced Function button
2. Select an assignable controller for editing
3. Press the Data 2 button
4. Type the minimum value for the controller and press Enter.
To assign minimum value to a button:
1. Press the Advanced Function button.
2. Select an assignable button for editing.
3. Press the Data 2 button.
4. Type the minimum value for the controller and press Enter.
The maximum value is assigned in the same way by using the Data 3 function key.
Data 3
The Data 3 function is located on the key bed. The function of Data 3 depends on the MIDI CC that is currently assigned to the controller
that is to be edited. Please refer to appendix A where each assignable MIDI CC is listed, along with the Data 1, 2 and 3 functions.
When editing Data 3 values, the range of values that can be selected is 0-127.
To assign maximum value to a knob or fader:
1. Press the Advanced Function button.
2. Select an assignable controller for editing.
3. Press the Data 3 button.
4. Type the maximum value for the controller and press Enter.
It is possible to limit the range of the rotary dials and faders on your Oxygen keyboard. To assign maximum value to a
button:
1. Press the Advanced Function button.
2. Select an assignable button for editing.
3. Press the Data 3 button.
4. Type the maximum value for the controller and press Enter.
The minimum value is assigned in the same way by using the Data 2 function key.
MIDI OUT FROM USB
This mode is controlled as follows:
1. Press the Advanced Function button.
2. Press the MIDI Out key.
3. The display will show either “Int” or “USB.”
On initial power up, the data from the keyboard and its controls is sent directly out of the MIDI Out port. This mode is shown in the
display as “Int” (Internal).
When set to USB, the data generated by the keyboard will no longer be sent from the external MIDI Out port. Instead, the data
received via the USB connection to the host computer will be transmitted directly to the external MIDI Out port. This mode is analogous
to the MIDI Output port on a dedicated USB-MIDI interface.
12
Oxygen Keyboard Line User Guide
The Velocity Curve Select button selects the velocity curve that the keyboard will use to regulate each MIDI note. Oxygen controllers
offer 12 different velocity curve settings, 9 curves, and 3 fixed curves. The 3 fixed curves give velocities of 64, 100 and 127.
On the Oxygen keyboard:
1. Press the Advanced Function button.
2. Press the Velocity key.
3. Type the number of the desired velocity curve using the key pad, and press the Enter key.
Drawbar Mode (49- and 61-note only)
The Drawbar function reverses the polarity of the faders.
1. Press the Advanced Function button.
2. Press the Drawbar key.
To exit the Drawbar function, press the Drawbar button a second time.
Device ID (49- and 61-note only)
The Device ID function will allow the assigning of a Device ID to differentiate between multiple keyboards when sending a memory
dump. On initial power up, the Device ID for your Oxygen keyboard is 127, meaning the device will respond to any SysEx received
regardless of the Device ID setting. If a Device ID is set at a number other than 127, the device will not respond to SysEx messages that
do not have a device ID of either 127, or the same as the device.
1. Press Advanced Function button and then the Device ID key.
2. Enter new device number on keypad.
3. Press the Enter key.
When engaging the Device ID function, the last saved device id number will display on the LED screen.
13
English
Velocity Curve
Memory Dump
The Memory Dump function sends out a Sys Ex memory dump from your Oxygen keyboard. The memory dump will send out Sys Ex
data for the 10 preset memories on the Oxygen line to allow for storing the memories in external software.
1. Press the Advanced Function button.
2. Press the Memory Dump key.
A stored Memory Dump can be played back to the Oxygen, and it will automatically read the preset settings from the file.
The Memory Dump is standard memory data. This means it is possible to store a memory dump by putting your sequencer into
record mode and simply sending the Memory Dump to your sequencer.
Store
The Store function saves a preset memory. After making changes to the MIDI controllers, save the changes to one of the 10 preset
memories by selecting that memory and pressing the Store button.
To save a preset:
1. Press the Advanced Function button
2. Press the Store key, the last selected memory number will display
3. Type in the number of the memory to store settings, and press Enter to save the changes.
All Store operations will delete the previous memory contents and replace with new ones. Please note that the factory presets are
stored in the product’s ROM and can therefore be restored at any time.
The factory settings are recalled by holding down the - and + Data buttons on power up.
Enter Key
The Enter key puts changes into effect when programming the keyboard. Press the Enter key after you have made a parameter
change with one of the function keys on the key bed. After the Enter key is pressed, Advanced Function mode will exit and the three
dots in the LED display will turn off.
Cancel Key
The Cancel function allows you to exit Edit mode while you are editing some data, without altering the previous data setting for the
parameter you are editing. So if you make a mistake during editing and don’t want to alter the previous setting, just press the Cancel
key.
14
Oxygen Keyboard Line User Guide
English
10 › Advanced Programming Functions
Introduction to Programming Options
MIDI CC (continuous controller) numbers are part of the General MIDI specification and are typically used to control the real-time
changing of parameters in musical equipment. For a complete list of standard MIDI controller numbers from 0 to 131, please see
Appendix A.
As mentioned in Section 6, many of the controls on the Oxygen range are fully programmable. This means that you can assign them
to send all sorts of different MIDI messages. This is achieved by selecting the controller for programming and assigning a 3-digit
number. Appendix A lists the numbers that can be assigned to different types of controllers on the Oxygen. It also defines the type of
MIDI message that will be sent out if you assign each number to a controller. As you can see from Appendix A, there is a wide variety
of MIDI messages that can be assigned to controllers. The uses of these messages will be explained in more detail in this section.
The assignable buttons and pedals have slightly different options from the faders or rotary dials.
The two charts show the transmit messages that can be programmed for each of the knobs, faders, and assignable buttons or
pedal.
Please pay extra attention to the differences between programming the faders or knobs and programming the buttons or pedal.
Faders and Rotary Dials:
MIDI CC
Description
Data 2
Data 3
0-119
Standard MIDI CC's
Min
Max
120-127
Channel Mode Messages
Min
Max
128
Pitch Bend Sensitivity
129
Channel Fine Tune
130
Channel Coarse Tune
131
Channel Pressure
132
RPN coarse
RPN LSB
RPN MSB
133
RPN Fine
RPN LSB
RPN MSB
134
NRPN Coarse
NRPN LSB
NRPN MSB
135
NRPN Fine
NRPN LSB
NRPN MSB
136
Master Volume GM*
137
Master Pan GM*
138
Master Coarse Tune GM*
139
Master Fine Tune GM*
140
Chorus Mod rate GM2*
141
Chorus Mod Depth GM2*
142
Feedback GM2*
143
Send to Reverb GM2*
144
Pitch Bend
-
-
255
Controller Off***
-
-
15
Buttons and Pedal:
MIDI CC
Description
Data 1
Data 2
Data 3
0-119
Standard MIDI CC's
-
Toggle Value 2
Toggle Value 1
120-127
Channel Mode Messages
-
Toggle Value 2
Toggle Value 1
128
Pitch Bend Range
-
Sensitivity Value
-
129
Channel Fine Tune
-
Tuning Amount
-
130
Channel Coarse Tune
-
Tuning Amount
-
131
Channel Pressure
-
Pressure Amount
-
132
RPN Coarse
Value
RPN LSB
RPN MSB
133
RPN Fine
Value
RPN LSB
RPN MSB
134
NRPN Coarse
Value
NRPN LSB
NRPN MSB
135
NRPN Fine
Value
NRPN LSB
NRPN MSB
136
Master Volume GM*
-
Volume LSB
Volume MSB
137
Master Pan GM*
-
Pan LSB
Pan MSB
138
Master Coarse Tune GM*
-
Tuning LSB
Tuning MSB
139
Master Fine Tune GM*
-
Tuning LSB
Tuning MSB
140
Chorus Mod rate GM2*
-
Mod Rate
-
141
Chorus Mod Depth GM2*
-
Mod Depth
-
142
Feedback GM2*
-
Feedback Level
-
143
Send to Reverb GM2*
-
Reverb Send Level
-
144
Pitch Bend
-
Pitch Shift LSB
Pitch Shift MSB
145
Program/Bank Preset
Program
Bank LSB
Bank MSB
146
MIDI CC (On/Off)
MIDI CC
Button Press Value
Button Release Value
147
Note (On/Off)
Note
Velocity Off
Velocity On
148
Note (On/Off Toggle)
Note
Velocity Off
Velocity On
149
MMC Command**
-
Command Select.
-
150
Reverb Type GM2 *
-
Type
-
151
Reverb Time GM2 *
-
Time
-
152
Chorus Type GM2*
-
Type
-
153
MIDI CC decrement
MIDI CC
Min
Max
154
MIDI CC increment
MIDI CC
Min
Max
155
Program decrement
-
Min
Max
156
Program increment
-
Min
Max
255
Controller Off***
-
-
-
* General MIDI SysEx messages
** General MIDI 2 SysEx messages
***
****
MMC SysEx messages
Press “0,” and then press the Enter key. Next press the Data - button.
[This table above is in need of the asterisks fixing. What is listed below the table is wrong. Tim Chandler should fix this]
16
Oxygen Keyboard Line User Guide
When a standard MIDI CC number is programmed to the assignable buttons or the sustain pedal, the controller will toggle between
an on and off value. That means when you press the controller, an on value is sent. When you next press the controller, the off value
is sent.
The on and off values are set using the Data 3 and Data 2 parameters respectively. Please try the example below; this will cause a
button to hard pan your sound from left to right each time the button is pressed:
1. Press the Advanced Function button, followed by the Ctrl Assign key.
2 . Type 10 using the numerical data entry keys.
3. Press the Enter key to confirm.
4. Press the Advanced Function button, followed by the Data 2 key.
5. Type in 00 using the numerical data entry keys.
6. Press the Enter key to confirm.
7. Press the Data 3 key.
8. Type in 127 using the numerical data entry keys.
9. Press the Enter key to confirm.
Here, 00 is assigned as the off value, and 127 is assigned as the on value. With your button programmed in this way, as you play
your keyboard, depressing the button will switch the sound between the left and right speakers.
If you want the button to send the same value every time, enter the same value for both the Data 2 and Data 3 parameters.
Setting Trigger Values for the Buttons or Pedal
The above method will toggle the button value each time it is pressed. It is possible to set the button to send one value when pressed,
and another value when released. This is known as a trigger, since each time you press the button the same value is sent. Such
operation is useful when triggering samples in your software.
A trigger button has an on value when pressed, and an off value when released. The sustain pedal is generally set up as a trigger to
ensure it will always turn off when released. The on value is set using the Data 3 parameter, and the off value is set using the data
2 parameter. Data 1 is used to define the MIDI CC that the controller should send as the trigger. In order to set the button/pedal to
operate as a trigger, it is necessary to assign MIDI CC 146 to the controller.
The following example works like a ‘mute’ for your keyboard. When you press the button, you will not hear any sound from the
keyboard until the button is released. To set this up, it is necessary to set up a trigger for the volume (MIDI CC 007), with a ON value
of 0 and an OFF value of 127:
1. Press the Advanced Function button, followed by the Ctrl assign key.
2. Type “146” using the numerical data entry keys and ENTER to confirm.
3. Press the Advanced Function button, followed by the DATA 1 key.
4. Type “007” using the numerical data entry keys and ENTER to confirm.
5. Press the Advanced Function button, followed by the DATA 2 key.
6. Type “127” using the numerical data entry keys and ENTER to confirm.
7. Press the Advanced Function button, followed by the DATA 3 key.
8. Type “000” using the numerical data entry keys and ENTER to confirm.
17
English
Setting Toggle Values for the Buttons or Pedal
Assigning MMC Control to a Button
1. Select the button to control the MMC message.
2. Press the Advanced Function button.
3. Press the Control Assign key. Type the number 149 with the keypad, and confirm by pressing the Enter key.
4. Press the Advanced Function button.
5. Press the Channel Assign key.
6. Enter 127 using the key pad, then press Enter. This ensures all receiving devices will respond to the MMC message.
7. Press the Advanced Function button.
8. Press the DATA 2 key and enter a number from the chart below to select the MMC message you want. Finally, confirm your
selecting by pressing the Enter key.
Number
MMC Command
01
STOP
02
PLAY
03
DEFERRED PLAY
04
FAST FORWARD
05
REWIND
06
RECORD STROBE
07
RECORD EXIT
08
RECORD PAUSE
09
PAUSE
10
EJECT
11
CHASE
12
COMMAND ERROR RESET
13
MMC RESET
Assigning RPN/NRPN to a Fader/Rotary Controller
Note: For a detailed description of RPN/NRPN data see the “MIDI Messages Explained” section.
1. Select the desired knob/fader as described earlier.
2. Press the Advanced Function button.
3. Press the Control Assign key. While the three display dots are visible, enter controller 132 for RPN Coarse, or 133 for RPN Fine, or
134 for NRPN Coarse or 135 for NRPN Fine using the numerical data entry keys. Press the Enter key to confirm your selection.
4. Press the Advanced Function button.
5. Press the DATA 3 key, and enter the desired number for the RPN/NRPN MSB. Press the Enter key to confirm.
6. Press the Advanced Function button.
7. Press the DATA 2 key, and enter the desired number for the RPN/NRPN LSB. Press the Enter key to confirm.
8. Press the Advanced Function button.
9. Press the Chan Assign Key, and enter a number from 1-16 to represent the MIDI channel you would like this message
transmitted on. Press the Enter key to confirm.
Many data sheets for synths make use of NRPN messages and will give the MSB and LSB values that should be entered for Data
3 and Data 2 (See Appendix E). Some manuals may only give the hex values, but Oxygen requires the decimal value be entered.
Convert hexadecimal values to decimal values using the Windows or Mac calculator; select Scientific mode (Programmer mode on
the Mac), select Hex, then enter the hexadecimal value needed to convert. Press the Dec button to convert it to a decimal value.
Please reference Appendix C for more information.
Assigning a Note to a Button
The following shows the procedure for setting a button to transmit a MIDI Note On message when pressed, and a MIDI Note Off
message when released.
1 Press the Advanced Function button, then the CTRL ASGN key.
2 Enter “147” using the numerical data entry keys.
3 Press the Enter key to confirm.
This is the MIDI CC number that corresponds to Note On/Off mode (see Appendix A).
4 Press the Advanced Function button again followed by the Data 3 key.
5 Enter “100” using the numerical data entry keys.
6 Press the Enter key to confirm.
This means when you press the button, a Note On message is sent out with a velocity of 100.
18
Oxygen Keyboard Line User Guide
7 Press the Advanced Function button again followed by the Data 2 key.
8 Enter “0” using the numerical data entry keys.
English
9 Press the Enter key to confirm.
This means when you release the button, a Note Off message will be sent out.
10 Press the Advanced Function button followed by the Data 1 key.
11 Enter “64” using the numerical data entry keys.
12 Press the Enter key to confirm.
This means you are sending out MIDI note 64 or E4 each time you press the button.
The MIDI note numbers are given in Appendix D.
Setting Buttons as Program, Bank Triggers.
You can program a button on your Oxygen controller to send a Program, Bank LSB and Bank MSB message whenever it is pressed.
This is useful for selecting patches on a sound module, or synthesizer on the fly.
To set up a button in this way:
1. Press the Advanced Function button. Press the Ctrl Assign key.
2. Enter “145” using the numerical data entry keys.
3. Use the Data 1 parameter to enter the desired program change that should be sent by the button/pedal.
4. Use the Data 2 parameter to enter the desired Bank LSB value that should be sent by the button/pedal.
5. Use the Data 3 parameter to enter the desired Bank MSB that should be sent by the button/pedal.
Programming a Button to Increment/Decrement a MIDI CC value
It is also possible to set a button to increment/decrement the value of a MIDI CC by 1 each time it is pressed. This is useful if you are
controlling parameters on your software that have a step-through operation with a small range.
To set a button to decrement from a maximum value to a minimum value, assign the button to MIDI CC 153. To set a button to
increment from a minimum value to a maximum value, assign the button to MIDI CC 154. The maximum and minimum values are
set using the Data 3 and Data 2 parameters respectively.
Please note that each button will only increment or decrement its own parameter value and this value is independent of any other
button. It is not possible to assign one button to increment and another to decrement the same parameter value.
Programming a Button to Increment/Decrement a Program Change
It is also possible to set a button to send an incremented/decremented Program Change each time it is pressed. This allows you to
set 2 assignable buttons up to step through programs on your software if desired. It is also possible to limit the range of the programs
that you want to step through.
To set a button to decrement a Program Change between a maximum and minimum value, assign the button to MIDI CC 155. To set
a button to increment a Program Change between a minimum and maximum value, assign the button to MIDI CC 156. The maximum
and minimum values are set using the Data 3 and Data 2 parameters respectively.
Please note that each button will only increment or decrement its own parameter value and this value is independent of any other
button. It is not possible to assign one button to increment and another to decrement the same parameter value.
About SysEx Messages and Device ID
When transmitting SysEx messages, the individual control channel number does not define a transmit channel, but a Device ID. When
the Chan key is pressed, the “c” is NOT displayed in the LCD screen.
Device IDs range between 00–127. In most cases, the Device ID should be set at 127. This means that all devices will receive the SysEx
message.
The Device ID for a SysEx message assigned to a controller cannot be changed using the Dev ID key. This key is used for varying the
global Device ID of the Oxygen controller..
For more information, please reference the “SysEx Messages” and “Device ID” sections.
19
Non-Volatile Memory
Your Oxygen controller features non-volatile memory, which allows for automatic saving of presets after powering down and
restarting. The current controller and channel assignments are stored whether you have stored the setup to a memory location or
not. The Program, Bank LSB and Bank MSB data, Global Channel setting, MIDI Out from USB setting and last used memory preset
are also stored.
Memory Dump
Press the Advanced Function button, then the Mem Dump key to send out SysEx data packets that represent the 20 memories set up
in the Oxygen controller. This can be used for storing or backing up the contents of the memory presets externally.
It is possible to record the complete Memory Dump to a standard sequencer. Recall the Memory Dump by playing the MIDI track
containing the recorded Memory Dump, making sure that the Oxygen’s drivers are selected as the output for that particular track.
A Memory Dump or a Memory Send does not affect the current controller assignments to the keyboard. Recall a preset to access the
new memory settings after a Memory Dump has been sent to the keyboard.
Press the Edit button, then the Mem Dump key to send out a number of SysEx data packets that represent the 20 memories set up in
the Oxygen. This can be used for storing or backing up the contents of the memory presets externally.
Assigning the Device ID (not available on 25-note model)
The Device ID is a way of differentiating between multiple keyboards. Press the Advanced Function button, then the Dev ID key to
assign a Device ID to your Oxygen controller. The default Device ID is 127 when a Memory Dump is performed. It is recommended
to keep the Device ID setting as 127.
If a Device ID is assigned to any number other than 127, the Memory Dump performed will be specific to the Oxygen, with the same
device ID. If the Device ID of the Oxygen differs from the one recorded with the Memory Dump, the data will be ignored.
When the Dev ID key is pressed, the LCD display represents the assigned Device ID. It is possible to enter a new Device ID using the
numerical data entry keys. Press the Enter key to confirm.
For more information on SysEx messages and device ID, please reference the “MIDI Messages Explained” section of this manual.
Returning to the Factory Default Setting
You can reset the Oxygen controller back to the factory default settings on power-up by holding down the Data - and + buttons.
Note: Restoring the factory presets will erase all set-ups you have stored to memory.
11 › MIDI Messages Defined
Program and Bank Changes
The original GM MIDI specification allowed for only 128 voices, numbered from 0-127. It is possible to access a different voice by
sending a Program Change.
In order to expand on the GM set of voices, Bank Changes were devised. Each bank contains 128 patches that can be accessed
using a Program Change. 16,384 available banks can be accessed by sending a 14-bit Bank Change message. The first 7 bits of this
message are sent in a single byte known as the Bank LSB. The last 7 bits are specified by another byte known as the Bank MSB. The
BANK LSB is more commonly used. This allows for 128 Bank Changes, and often there is no need to send a Bank MSB.
Almost all MIDI devices respond to the Program Change, but some that do not conform to the GM set of voices use the Program
Change message for other purposes. Many VST instruments have adopted this approach, allowing the use of a Program Change to
change the instrument patch. (The FM7 by Native Instruments is an example of this.)
Bank Changes are used more rarely. Bank Changes are useful in manufacturers’ extensions to the MIDI specification, such as
Roland's GS specification and Yamaha's XG specification. Both of these require the specification of a Bank Change in order to access
the extra voices and effects that these specifications provide.
Sending Program, Bank LSB and Bank MSB data is done by pressing the Edit button followed by the Program, Bank LSB or Bank MSB
key, and then entering the Program or Bank Change desired.
20
Oxygen Keyboard Line User Guide
Non-registered parameter numbers (NRPNs) are device-specific messages that enable the control of synths via MIDI. The MIDI
specification defines parameter numbers to allow manufacturers to specify their own controllers. The more common of these have
been registered by the MIDI Manufacturer's Association and are part of the MIDI specification (hence the term Registered Parameter
Numbers – RPNs). (See Appendix F for additional information.)
MIDI controllers 98 and 99 represent the NRPN LSB and MSB respectively, while 100 and 101 represent the RPN LSB and MSB. This can
be seen in the MIDI controllers list in Appendix E. To transmit an NRPN/RPN, these two controller messages are sent along with their
user-specified values. An additional controller message and value needs to be sent to specify the (coarse or fine) value adjustment.
This is specified by controller number 6 (Data Entry) for coarse adjustments or number 38 for fine adjustments.
Devices that receive NRPN messages will list NRPNs in the User Manual. It is essential to send the NRPN MSB and LSB messages
together. Both will be specified in the device's manual, but typically only in Hexadecimal format. If this is the case, you may refer to
Appendix C for help translating the value to decimal.
SysEx
System Exclusive (SysEx) messages were defined in the MIDI specification to allow control of individual devices via MIDI. The format
of SysEx messages allows virtually any function to be performed via MIDI if the receiving device can read and translate the message.
This allows devices to send audio sample memory data, memory dumps, controller settings, and much more. It also allows the
controllers of one device to be controlled by another.
It is not possible to program your own specified SysEx message into the Oxygen controller. However, several useful SysEx messages are
pre-programmed into the keyboard. They can be accessed by assigning the appropriate MIDI CC to a controller (see Appendix A).
A SysEx message is not transmitted on any specified channel. All SysEx messages contain a Device ID, which is used to single out
devices to respond to the SysEx message. All other devices are ignored. If you are using a SysEx message on the Oxygen, the Global
Channel is ignored. When you press the Channel Assign key, you will enter a Device ID instead. This is indicated by the fact that the
LED displays a 3-digit number, not a 2-digit number proceeded by a “c.”
Device IDs run from 00 to 127. 127 is the default device number setting on the Oxygen controller. This setting transmits the SysEx
message to all devices.
It is not possible to program the controllers of the Oxygen with your own SysEx messages, there are software applications that can
receive a MIDI input signal and transmit a different, user-specified message. You can program your SysEx messages into the translator
software, and then translate the incoming data from the keyboard to your SysEx, depending on the controller you are using.
12 › Troubleshooting
My M-Audio keyboard suddenly stopped working after having performed fine since installation.
• Switch off the unit and leave it alone for 10 seconds. Restart your computer and try again. If the problem persists, you may
have to re-install drivers for the unit.
My drivers are listed in the Device Manager and are said to be working, but the keyboard is not recognized in any software.
• Win2000 and XP have a limitation to how many MIDI device drivers you can have installed at any one time. However, the
operating system will not give you any indication that you are using the maximum number of drivers—the drivers will install
as if there is not a problem.
• To fix this problem, go to http://www.m-audio.com and locate the above question. You will find a link to an .exe file that will
solve this problem for you.
I have plugged in a sustain pedal to my M-Audio keyboard, but it works the wrong way.
• The polarity of the sustain pedal is calculated by the keyboard when it is powered up. On power up, the sustain pedal is
assumed to be in the OFF position. So, if you want the sustain pedal to be off when it is un-pressed, make sure the pedal is
un-pressed when you power up.
When I press a key, there is a delay before I hear any sound.
• This delay is known as latency. Latency with MIDI signals is due to the softsynth you are using. MIDI data is simply control data.
The MIDI is read by the softsynth. The softsynth then completes a large number of complex calculations, in order to produce
the sound you hear. All this takes time. If you already have an adequate sound card, try re-installing the latest drivers for the
sound card, or try reducing the buffer sizes of the audio drivers.
• If you feel that you may need a new or upgraded sound card please visit www.m-audio.com.
21
English
RPN/NRPNs
13 › Contact M-Audio
If you have any questions, comments or suggestions about this or any M-Audio product, we invite you to contact us by using the
following information:
M-Audio Germany
Kuhallmand 34, D-74613 Ohringen, Germany
M-Audio USA
5795 Martin Rd., Irwindale, CA 91706
Technical Support
tel (pro products): . . . .
tel (consumer products):
fax (shipping): . . . . . .
Sales
e-mail: . . . . . . . . . .
tel: . . . . . . . . . . . .
fax: . . . . . . . . . . . .
web: . . . . . . . . . . .
. . . . . . . . . . . . . . . (626) 633-9055
. . . . . . . . . . . . . . . .(626) 633-9066
. . . . . . . . . . . . . . . .(626) 633-9032
.
.
.
.
.
.
.
.
.
.
.
.
.
.
.
.
.
.
.
.
.
.
.
.
.
.
.
.
.
.
.
.
.
.
.
.
. . . . [email protected]
. . . . . . .(626) 633-9050
. . . . . . .(626) 633-9070
. http://www.m-audio.com
M-Audio U.K.
Floor 6, Gresham House, 53 Clarenden Road, Watford
WD17 1LA, United Kingdom
Technical Support
e-mail: . . . . . . .
tel:(Mac support): .
tel: (PC support): . .
Sales
tel: . . . . . . . . .
fax: . . . . . . . . .
web: . . . . . . . .
. . . . . . . . . . . . . . [email protected]
. . . . . . . . . . . . . . . . +44 (0)1765 650072
. . . . . . . . . . . . . . . . .+44 (0)1309 671301
. . . . . . . . . . . . . . . . +44 (0)1923 204010
. . . . . . . . . . . . . . . . +44 (0)1923 204039
. . . . . . . . . . . . . http://www.maudio.co.uk
M-Audio France
Floor 6, Gresham House, 53 Clarenden Road, Watford
WD17 1LA, United Kingdom
Technical Support
e-mail (PC support): .
e-mail (Mac support):
tel (PC support): . . .
tel (Mac support): . .
fax: . . . . . . . . . .
Sales
tel: . . . . . . . . . .
e-mail: . . . . . . . .
fax: . . . . . . . . . .
web: . . . . . . . . .
.
.
.
.
.
.
.
.
.
.
.
.
.
.
.
.
.
.
.
.
.
.
.
.
.
. . . . [email protected]
. . . . . . [email protected]
. 0820 000 731 (0,12 Euros par minute)
. 0820 391 191 (0,12 Euros par minute)
. . . . . . . . . . . . . 01 72 72 90 52
.
.
.
.
.
.
.
.
.
.
.
.
.
.
.
.
.
.
.
.
.
.
.
.
.
.
.
.
. . . . 0810 001 105 (Numero Azur)
. . . . [email protected]
. . . . . . . . . . . 01 72 72 90 52
http://www.m-audio-france.com/
M-Audio Japan
アビッドテクノロジー株式会社 ¦ エムオーディオ事業部
〒 460-0002 愛知県名古屋市中区丸の内 2-18-10
2-18-10 Marunouchi
Naka-Ku, Nagoya 460-0002
Japan
カスタマーサポート(技術的なお問い合わせ)
e-mail : . . . . . . . . . . . . . . . . . . [email protected]
e-mail (Macintosh 環境専用): . . . . . . [email protected]
tel : . . . . . . . . . 052-218-0859(10:00 12:00 / 13:00 17:00)
セールスに関するお問い合わせ
(技術的なお問い合わせはご遠慮下さい)
e-mail: . . . . . . . . . . . . . . . . . . . . . . . [email protected]
tel: . . . . . . . . . . 052-218-3375 (9:30 12:00 / 13:00 18:00)
fax: . . . . . . . . . . . . . . . . . . . . . . . . . . . 052-218-0875
プレス/ メディアに関するお問い合わせ
(技術的なお問い合わせはご遠慮下さい)
e-mail: . . . . . . . . . . . . . . . . . . . . . [email protected]
tel: . . . . . . . . . . 052-218-3375 (9:30 12:00 / 13:00 18:00)
fax: . . . . . . . . . . . . . . . . . . . . . . . . . . . 052-218-0875
web: . . . . . . . . . . . . . . . . . . . . http://www.m-audio.co.jp
22
Technical Support
e-mail: . . . . . . .
tel . . . . . . . . . .
fax: . . . . . . . . .
Sales
e-mail: . . . . . . .
tel: . . . . . . . . .
fax: . . . . . . . . .
web: . . . . . . . .
. . . . . . . . . . . . . . . [email protected]
. . . . . . . . . . . . . . .+49 (0)7941 - 9870030
. . . . . . . . . . . . . . . +49 (0)7941 98 70070
.
.
.
.
.
.
.
.
.
.
.
.
.
.
.
.
.
.
.
.
.
.
.
.
.
.
.
.
.
.
.
.
.
.
.
.
.
.
.
.
.
.
.
.
.
.
.
.
.
.
.
.
. . . . [email protected]
. . . +49 (0)7941 98 7000
. . +49 (0)7941 98 70070
. http://www.m-audio.de
M-Audio Canda
1400 St-Jean Baptiste Ave. #150, Quebec City,
Quebec G2E 5B7, Canada
Technical Support
phone (PC support): . .
phone (MAC support): .
fax . . . . . . . . . . .
Sales
e-mail: . . . . . . . . .
phone: . . . . . . . . .
fax: . . . . . . . . . . .
web: . . . . . . . . . .
. . . . . . . . . . . . . . . . . (418) 872-0444
. . . . . . . . . . . . . . . . . (418) 872-0444
. . . . . . . . . . . . . . . . : (418) 872-0034
.
.
.
.
.
.
.
.
.
.
.
.
.
.
.
.
.
.
.
.
.
.
.
.
.
.
.
.
.
.
.
.
.
.
.
.
.
.
.
.
[email protected]
. . . . . . .(866) 872-0444
. . . . . . . (514) 396-7102
. . http://www.m-audio.ca
M-Audio Latin America
5795 Martin Rd.
Irwindale, CA 91706 USA
Technical Support
e-mail: . . . . . . .
phone: . . . . . . .
Sales
e-mail: . . . . . . .
phone: . . . . . . .
fax: . . . . . . . . .
web: . . . . . . . .
. . . . . . . . . . . . . . [email protected]
. . . . . . . . . . . . . . . . . (52 871) 747 90 25
.
.
.
.
.
.
.
.
.
.
.
.
.
.
.
.
.
.
.
.
.
.
.
.
.
.
.
.
.
.
.
.
.
.
.
.
.
.
.
.
.
.
.
.
.
.
.
.
. . [email protected]
. . . . . . . (949) 766-7589
. . . . . . . (949) 766-7590
. http://www.m-audio.com
Oxygen Keyboard Line User Guide
Caution: Electro Static Discharge, Electrical Fast Transient and Conducted RF interference may cause the unit malfunctioning. In such
case, unplug the unit and plug it in again to restore normal operation.
Note: Your M-Audio product has been tested to comply with FCC Standards FOR HOME OR OFFICE USE. Modifications not authorized
by the manufacturer may void users authority to operate this device.
Note: This equipment has been tested and found to comply with the limits for a Class B digital device, pursuant to Part 15 of the
FCC Rules. These limits are designed to provide reasonable protection against harmful interference in a residential installation. This
equipment generates, uses and can radiate radio frequency energy and, if not installed and used in accordance with the instructions,
may cause harmful interference to radio communications. However, there is no guarantee that interference will not occur in a particular
installation. If this equipment does cause harmful interference to radio or television reception, which can be determined by turning the
equipment off and on, the user is encouraged to try to correct the interference by one or more of the following measures:
< Re-orient or relocate the receiving antenna.
< Increase the separation between the equipment and receiver.
< Connect the equipment to an outlet on a circuit different from that to which the receiver is connected.
< Consult the dealer or an experienced radio/ TV technician for help.
ASIO is a trademark of Steinberg Soft– und Hardware GmbH.
VST is a trademark of Steinberg Soft– und Hardware GmbH
Oxygen Keyboard Line
Tested to comply with
FCC standards
FOR HOME OR STUDIO USE
15 › Warranty Terms and Registration
Warranty Terms
M-Audio warrants products to be free from defects in materials and workmanship, under normal use and provided that the product
is owned by the original, registered user. Visit www.m-audio.com/warranty for terms and limitations applying to your specific
product.
Warranty Registration
Thank you for registering your new M-Audio product. Doing so immediately both entitles you to full warranty coverage and helps MAudio develop and manufacture the finest quality products available. Register online at www.m-audio.com/register to receive FREE
product updates.
23
English
14 › Technical Info
16 › Appendixes
Appendix A: Assignable MIDI CC’s
Faders and Rotary Dials:
MIDI CC
Description
Data 2
Data 3
0-119
Standard MIDI CCs
min
max
120-127
Channel Mode Messages
min
max
128
Pitch Bend Sensitivity
tft
max
129
Channel Fine Tune
min
max
130
Channel Coarse Tune
min
max
131
Channel Pressure
min
max
132
RPN Coarse
RPN LSB
RPN MSB
133
RPN Fine
RPN LSB
RPN MSB
134
NRPN Coarse
NRPN LSB
NRPN MSB
135
NRPN Fine
NRPN LSB
NRPN MSB
136
Master Volume GM*
min
max
137
Master Pan GM*
min
max
138
Master Coarse Tune GM*
min
max
139
Master Fine Tune GM*
min
max
140
Chorus Mod rate GM2*
min
max
141
Chorus Mod Depth GM2*
min
max
142
Feedback GM2*
min
max
143
Send to Reverb GM2*
min
max
144
Pitch Bend
-
-
255
Controller Off***
-
-
Buttons and Pedal:
24
MIDI CC
Description
Data 1
Data 2
Data 3
0-119
Standard MIDI CCs
-
Toggle Value 2
Toggle Value 1
120-127
Channel Mode Messages
-
Toggle Value 2
Toggle Value 1
128
Pitch Bend Range
-
Sensitivity Value
-
129
Channel Fine Tune
-
Tuning Amount
-
130
Channel Coarse Tune
-
Tuning Amount
-
131
Channel Pressure
-
Pressure Amount
-
132
RPN Coarse
Value
RPN LSB
RPN MSB
133
RPN Fine
Value
RPN LSB
RPN MSB
134
NRPN Coarse
Value
NRPN LSB
NRPN MSB
135
NRPN Fine
Value
NRPN LSB
NRPN MSB
136
Master Volume GM*
-
Volume LSB
Volume MSB
137
Master Pan GM*
-
Pan LSB
Pan MSB
138
Master Coarse Tune GM*
-
Tuning LSB
Tuning MSB
139
Master Fine Tune GM*
-
Tuning LSB
Tuning MSB
140
Chorus Mod rate GM2*
-
Mod Rate
-
141
Chorus Mod Depth GM2*
-
Mod Depth
-
142
Feedback GM2*
-
Feedback Level
-
143
Send to Reverb GM2*
-
Reverb Send level
-
144
Pitch Bend
-
Pitch Shift LSB
Pitch Shift MSB
145
Program/Bank Preset
Program
Bank LSB
Bank MSB
146
MIDI CC (on/off)
MIDI CC
Button Press Value
Button Release Value
147
Note (on/off)
Note
Velocity Off
Velocity On
148
Note (on/off toggle)
Note
Velocity Off
Velocity On
149
MMC Command**
-
Command Select.
-
150
Reverb Type GM2 *
-
Type
-
151
Reverb Time GM2 *
-
Time
-
152
Chorus Type GM2*
-
Type
-
153
MIDI CC Decrement
MIDICC
Minimum
Maximum
154
MIDI CC Increment
MIDICC
Minimum
Maximum
155
Program Decrement
-
Minimum
Maximum
156
Program Increment
-
Minimum
Maximum
255
Controller Off***
-
-
-
Oxygen Keyboard Line User Guide
Appendix B - Hexadecimal Conversion Chart
Hexadecimal value
Decimal Value
Hexadecimal value
Decimal Value
Hexadecimal value
Decimal Value
0
0
2B
43
56
86
1
1
2C
44
57
87
2
2
2D
45
58
88
3
3
2E
46
59
89
4
4
2F
47
5A
90
5
5
30
48
5B
91
6
6
31
49
5C
92
7
7
32
50
5D
93
8
8
33
51
5E
94
9
9
34
52
5F
95
0A
10
35
53
60
96
0B
11
36
54
61
97
0C
12
37
55
62
98
0D
13
38
56
63
99
0E
14
39
57
64
100
0F
15
3A
58
65
101
10
16
3B
59
66
102
11
17
3C
60
67
103
12
18
3D
61
68
104
13
19
3E
62
69
105
14
20
3F
63
6A
106
15
21
40
64
6B
107
16
22
41
65
6C
108
17
23
42
66
6D
109
18
24
43
67
6E
110
19
25
44
68
6F
111
1A
26
45
69
70
112
1B
27
46
70
71
113
1C
28
47
71
72
114
1D
29
48
72
73
115
1E
30
49
73
74
116
1F
31
4A
74
75
117
20
32
4B
75
76
118
21
33
4C
76
77
119
22
34
4D
77
78
120
23
35
4E
78
79
121
24
36
4F
79
7A
122
25
37
50
80
7B
123
26
38
51
81
7C
124
27
39
52
82
7D
125
28
40
53
83
7E
126
29
41
54
84
7F
127
2A
42
55
85
English
Hexadecimal to Decimal Conversion Chart
25
Appendix C - Useful MIDI Data
Piano
Bass
Reed
Synth Effects
0 Acoustic Grand Piano
32 Acoustic Bass
64 Soprano Sax
96 SFX Rain
1 Bright Acoustic Piano
33 Fingered Bass
65 Alto Sax
97 SFX Soundtrack
2 Electric grand Piano
34 Electric Picked Bass
66 Tenor Sax
98 SFX Crystal
3 Honky Tonk Piano
35 Fretless Bass
67 Baritone Sax
99 SFX Atmosphere
4 Electric Piano 1
36 Slap Bass 1
68 Oboe
100 SFX Brightness
5 Electric Piano 2
37 Slap Bass 2
69 English Horn
101 SFX Goblins
6 Harpsichord
38 Syn Bass 1
70 Bassoon
102 SFX Echoes
7 Clavinet
39 Syn Bass 2
71 Clarinet
103 SFX Sci-Fi
Chromatic Percussion
Strings/Orchestra
Pipe
Ethnic
8 Celesta
40 Violin
72 Piccolo
104 Sitar
9 Glockenspiel
41 Viola
73 Flute
105 Banjo
10 Music Box
42 Cello
74 Recorder
106 Shamisen
11 Vibraphone
43 Contrabass
75 Pan Flute
107 Koto
12 Marimba
44 Tremolo Strings
76 Bottle Blow
108 Kalimba
13 Xylophone
45 Pizzicato Strings
77 Shakuhachi
109 Bag Pipe
14 Tubular bells
46 Orchestral Harp
78 Whistle
110 Fiddle
15 Dulcimer
47 Timpani
79 Ocarina
111 Shanai
Organ
Ensemble
Synth Lead
Percussive
16 Drawbar Organ
48 String Ensemble 1
80 Syn Square Wave
112 Tinkle Bell
17 Percussive Organ
49 String Ensemble 2
81 Syn Sawtooth Wave
113 Agogo
18 Rock Organ
50 Syn Strings 1
82 Syn Calliope
114 Steel Drums
19 Church Organ
51 Syn Strings 2
83 Syn Chiff
115 Woodblock
20 Reed Organ
52 Choir Aahs
84 Syn Charang
116 Taiko Drum
21 Accordion
53 Voice Oohs
85 Syn Voice
117 Melodic Tom
22 Harmonica
54 Syn Choir
86 Syn Sawtooth Wave
118 Syn Drum
23 Tango Accordion
55 Orchestral Hit
87 Syn Brass & Lead
119 Reverse Cymbal
Guitar
Brass
Synth Pad
Sound Effects
24 Nylon Acoustic
56 Trumpet
88 New Age Syn Pad
120 Guitar Fret Noise
25 Steel Acoustic
57 Trombone
89 Warm Syn Pad
121 Breath Noise
26 Jazz Electric
58 Tuba
90 Polysynth Syn Pad
122 Seashore
27 Clean Electric
59 Muted Trumpet
91 Choir Syn Pad
123 Bird Tweet
28 Muted Electric
60 French Horn
92 Bowed Syn Pad
124 Telephone Ring
29 Overdrive
61 Brass Section
93 Metal Syn Pad
125 Helicopter
30 Distorted
61 Syn Brass 1
94 Halo Syn Pad
126 Applause
31 Harmonics
62 Syn Brass 2
95 Sweep Syn Pad
127 Gun Shot
MIDI Note Numbers
Octave (n)
Note Numbers
Cn
26
F#n
Gn
An
A#n
-1
0
C#n
1
Dn
2
D#n
3
En
4
Fn
5
6
7
G#n
8
9
10
Bn
11
0
12
13
14
15
16
17
18
19
20
21
22
23
1
24
25
26
27
28
29
30
31
32
33
34
35
2
36
37
38
39
40
41
42
43
44
45
46
47
3
48
49
50
51
52
53
54
55
56
57
58
59
4
60
61
62
63
64
65
66
67
68
69
70
71
83
5
72
73
74
75
76
77
78
79
80
81
82
6
84
85
86
87
88
89
90
91
92
93
94
95
7
96
97
98
99
100
101
102
103
104
105
106
107
8
108
109
110
111
112
113
114
115
116
117
118
119
9
120
121
122
123
124
125
126
127
Oxygen Keyboard Line User Guide
Appendix D
00 Bank Select
46 Controller 46
92 Tremelo Depth
01 Modulation
47 Controller 47
93 Chorus Depth
02 Breath Control
48 Gen Purpose 1 LSB
94 Celeste (De-tune)
03 Controller 3
49 Gen Purpose 2 LSB
95 Phaser Depth
04 Foot Control
50 Gen Purpose 3 LSB
96 Data Increment
05 Porta Time
51 Gen Purpose 4 LSB
97 Data Decrement
06 Data Entry
52 Controller 52
98 Non-Reg Param LSB
07 Channel Volume
53 Controller 53
99 Non-Reg Param MSB
08 Balance
54 Controller 54
100 Reg Param LSB
09 Controller 9
55 Controller 55
101 Reg Param MSB
10 Pan
56 Controller 56
102 Controller 102
11 Expression
57 Controller 57
103 Controller 103
12 Effects Controller 1
58 Controller 58
104 Controller 104
13 Effects Controller 2
59 Controller 59
105 Controller 105
14 Controller 14
60 Controller 60
106 Controller 106
15 Controller 15
61 Controller 61
107 Controller 107
16 Gen Purpose 1
62 Controller 62
108 Controller 108
17 Gen Purpose 2
63 Controller 63
109 Controller 109
18 Gen Purpose 3
64 Sustain Pedal
110 Controller 110
19 Gen Purpose 4
65 Portamento
111 Controller 111
20 Controller 20
66 Sostenuto
112 Controller 112
21 Controller 21
67 Soft Pedal
113 Controller 113
22 Controller 22
68 Legato Pedal
114 Controller 114
23 Controller 23
69 Hold 2
115 Controller 115
24 Controller 24
70 Sound Variation
116 Controller 116
25 Controller 25
71 Resonance
117 Controller 117
26 Controller 26
72 Release Time
118 Controller 118
27 Controller 27
73 Attack Time
119 Controller 119
28 Controller 28
74 Cut-off Frequency
Channel Mode Messages
29 Controller 29
75 Controller 75
120 All Sound off
30 Controller 30
76 Controller 76
121 Reset all Controllers
31 Controller 31
77 Controller 77
122 Local Control
32 Bank Select LSB
78 Controller 78
123 All Notes Off
33 Modulation LSB
79 Controller 79
124 Omni Off
34 Breath Control LSB
80 Gen Purpose 5
125 Omni On
35 Controller 35
81 Gen Purpose 6
126 Mono On (Poly Off)
36 Foot Control LSB
82 Gen Purpose 7
127 Poly On (Mono Off)
37 Porta Time LSB
83 Gen Purpose 8
Extra RPN Messages
38 Data Entry LSB
84 Portamento Control
128 Pitch Bend Sensitivity
39 Channel Volume LSB
85 Controller 85
129 Fine Tune
40 Balance LSB
86 Controller 86
130 Coarse Tune
41 Controller 41
87 Controller 87
131 Channel Pressure
42 Pan LSB
88 Controller 88
43 Expression LSB
89 Controller 89
44 Controller 44
90 Controller 90
45 Controller 45
91 Reverb Depth
English
Standard MIDI Controller numbers (MIDI CCs)
27
Appendix E - Roland GS and Yamaha XG NRPN Support to Roland JV/XP
NRPN
NRPN
Data
Data
MSB
LSB
MSB
LSB
CC99
CC98
CC06
CC38
01
08
00-7F
n/a (-64 - 0 - +63) Vibrato Rate (relative change)
01
09
00-7F
n/a (-64 - 0 - +63) Vibrato Depth (relative change)
01
0A
00-7F
n/a (-64 - 0 - +63) Vibrato Delay (relative change)
01
20
00-7F
n/a (-64 - 0 - +63) Filter Cutoff Freq. (relative change)
01
21
00-7F
n/a (-64 - 0 - +63) Filter Resonance (relative change)
01
63
00-7F
n/a (-64 - 0 - +63) EG (TVF&TVA) Attack Time (relative change)
01
64
00-7F
n/a (-64 - 0 - +63) EG (TVF&TVA) Decay Time (relative change)
01
66
00-7F
n/a (-64 - 0 - +63) EG (TVF&TVA) Release Time (relative change)
14
00-7F
00-7F
n/a (-64 - 0 - +63) Drum Filter Cutoff Freq. (relative change)*
15
00-7F
00-7F
n/a (-64 - 0 - +63) Drum Filter Resonance (relative change)*
16
00-7F
00-7F
n/a (-64 - 0 - +63) Drum EG Attack Rate (relative change)*
17
00-7F
00-7F
n/a (-64 - 0 - +63) Drum EG Decay Rate (relative change)*
18
00-7F
00-7F
n/a (-64 - 0 - +63) Drum Instrument Pitch Coarse (relative change)
19
00-7F
00-7F
n/a (-64 - 0 - +63) Drum Instrument Pitch Fine (relative change)*
1A
00-7F
00-7F
n/a (0 to Max) Drum Instrument Level (absolute change)
1C
00-7F
00-7F
n/a (Random, L>C>R) Drum Instrument Panpot (absolute change)
1D
00-7F
00-7F
n/a (0 to Max) Drum Instrument Reverb Send Level (absolute change)
1E
00-7F
00-7F
n/a (0 to Max) Drum Instrument Chorus Send Level (absolute change)
1F
00-7F
00-7F
n/a (0 to Max) Drum Instrument Variation Send Level (absolute change)**
*added by Yamaha XG;
**changed from Delay to Variation by Yamaha XG
Appendix F - General MIDI Reverb and Chorus Types
Reverb Types
0: Small Room
1: Medium Room
2: Large Room
3: Medium Hall
4: Large Hall
7: Plate
Chorus Types
0: Chorus 1
1: Chorus 2
2: Chorus 3
3: Chorus 4
4: FB Chorus
5: Flanger
051014_OxyLine_UG-EN01
28