1
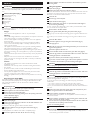
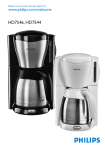
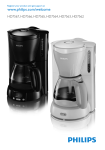
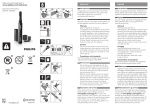
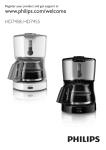
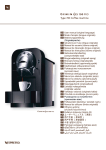
HD7466
1
D
E
C
F
A
B
G
2
3
4
5
6
7
8
9
English
Introduction
Congratulations on your purchase and welcome to Philips! To fully benefit
from the support that Philips offers, register your product at www.philips.
com.
General description (Fig. 1)
A Cord with mains plug
B On/off switch
C Coffeemaker
D Lid of coffeemaker
E Filter holder
F Lid of jug
G Jug
Important
Read these instructions for use carefully before using the appliance and save
them for future reference.
Danger
-- Never immerse the appliance in water or any other liquid.
Warning
-- Check if the voltage indicated on the appliance corresponds to the local
mains voltage before you connect the appliance.
-- Do not use the appliance if the plug, the mains cord or the appliance
itself is damaged.
-- If the mains cord is damaged, you must have it replaced by Philips, a
service centre authorized by Philips or similarly qualified persons in
order to avoid a hazard.
-- This appliance is not intended for use by persons (including children)
with reduced physical, sensory or mental capabilities, or lack of
experience and knowledge, unless they have been given supervision or
instruction concerning use of the appliance by a person responsible for
their safety.
-- Children should be supervised to ensure that they do not play with the
appliance.
-- Keep the mains cord out of the reach of children. Do not let the
mains cord hang over the edge of the table or worktop on which the
appliance stands.
--------
Caution
This appliance is intended to be used in household and similar
applications such as:
staff kitchen areas in shops, offices and other working environments;
farm houses;
by clients in hotels, motels and other residential type environments;
bed and breakfast type environments.
Do not place the appliance on a hot surface and prevent the mains
cord from coming into contact with hot surfaces.
Unplug the appliance before you clean it and if problems occur during
brewing.
Electromagnetic fields (EMF)
This Philips appliance complies with all standards regarding electromagnetic
fields (EMF). If handled properly and according to the instructions in this
user manual, the appliance is safe to use based on scientific evidence
available today.
Preparing for use
1 Clean the jug and filter holder (see chapter ‘Cleaning’).
2 Put the appliance on a flat and stable surface.
3 Put the plug in an earthed wall socket.
,, You can store excess cord by pushing it into the opening at the back
of the coffeemaker (Fig. 2).
Flushing the appliance
1 Open the lid (Fig. 3).
2 Fill the water tank with fresh, cold water to the MAX indication and
put the jug in place (Fig. 4).
Do not put a filter with ground coffee in the filter holder.
3 Switch the appliance on by pressing the on/off switch (Fig. 5).
The light goes on.
Let the appliance run until the water tank is completely empty.
4 Switch the appliance off when all the water is in the jug.
5 Let the appliance cool down for at least 3 minutes before you start
brewing coffee.
Using the appliance
1 Open the lid (Fig. 3).
2 Fill the water tank with fresh, cold water (Fig. 4).
The water level indicator shows the amount of water in the water tank. The
graduations correspond to large cups (125 ml). Make sure that the water
level does not exceed the MAX indication.
3 Close the lid.
4 Place the jug on the hotplate.
5 Open the filter holder (Fig. 6).
6 Take a paper filter (type 1x2 or no. 2) and fold the sealed edges to
prevent tearing and folding.
In some countries this coffeemaker comes with a permanent filter. In that
case you should not use paper filters.
7 Put the filter in the filter holder.
8 Put pre-ground coffee (filter-fine grind) in the filter (Fig. 7).
For large cups: use one heaped measuring spoon of ground coffee for each
cup.
For small cups: use one level measuring spoon of ground coffee for each
cup.
9 Close the filter holder.
10Switch the appliance on by pressing the on/off switch (Fig. 5).
Note:The light goes on.
11When all the water has passed through the filter, you can remove the
jug from the appliance.
12Switch the appliance off after use.
13Remove the filter holder and throw the paper filter away (Fig. 8).
14Clean the jug and the removable filter holder in hot water with some
washing-up liquid or in the dishwasher.
15If you have used the permanent filter, empty and rinse it.
16If you want to brew another jug of coffee, let the appliance cool down
for at least 3 minutes before you start brewing coffee again.
Cleaning
Always unplug the appliance before you start cleaning it.
Never immerse the appliance in water.
1 Clean the outside of the appliance with a moist cloth.
2 Clean the jug and the removable filter holder in hot water with some
washing-up liquid or in the dishwasher.
Descaling
Regular descaling will prolong the life of the appliance and will guarantee
optimal brewing results for a long time.
In case of normal use (two full jugs of coffee every day), descale the
coffeemaker:
- 2 or 3 times a year if your using soft water (less than 18 DH);
- 4 or 5 times a year if you are using hard water (more than 18 DH).
Turn to your local water board for information about the water hardness in
your area.
1 Fill the water tank with white vinegar (4% acetic acid). Do not put a
filter and ground coffee in the filter holder.
2 Let the appliance complete two brewing cycles.
See chapter ‘Using the appliance’. Let the appliance cool down before you
start the second run.
3 Let the appliance complete two more brewing cycles with fresh, cold
water to remove all vinegar residues.
,, You can also use an appropriate liquid descaler. In this case, follow the
instructions on the package of the descaler.
Do not use a descaling powder.
4 Clean the separate parts (see chapter ‘Cleaning’).
Accessories
-- You can order a new jug from your Philips dealer or a Philips service
centre under type number HD7980.
-- You can order a permanent filter from your Philips dealer or a Philips
service centre under reference number 9965 00013 387 (permanent
nylon coffee filter).
Environment
-- Do not throw the appliance away with the normal household waste
at the end of its life, but hand it in at an official collection point for
recycling. By doing this you help to preserve the environment (Fig. 9).
Guarantee & service
If you need service or information or if you have a problem, please visit the
Philips website at www.philips.com or contact the Philips Consumer
Care Centre in your country (you find its phone number in the worldwide
guarantee leaflet). If there is no Consumer Care Centre in your country, go
to your local Philips dealer.
Troubleshooting
Problem
Solution
The appliance
doesn’t work.
Make sure that the appliance is plugged in.
Make sure that the voltage indicated on the
appliance corresponds to the local mains voltage.
Make sure that the appliance is switched on.
In all other cases, contact the Philips Customer
Care Centre.
Water leaks out of
the appliance.
Make sure that the water tank has not been filled
beyond the MAX level.
In all other cases, contact the Philips Customer
Care Centre.
The appliance takes
a long time to brew
coffee.
Descale the appliance (see chapter ‘Descaling’).
The appliance
produces a lot of
noise and steam
during the brewing
process.
Make sure that the water tank has been filled with
COLD water.
Descale the appliance (see chapter ‘Descaling’).
Coffee grounds end
up in the jug.
Make sure that the coffee filter contains the right
amount of ground coffee. If there is too much
ground coffee in the filter, the filter holder may
overflow.
Make sure that the jug has been placed correctly
under the filter holder. If this isn’t the case, the filter
holder may overflow.
Make sure that the opening in the bottom of the
filter holder isn’t clogged.
Make sure that the right size of paper filter has
been used.
Make sure that the paper filter isn’t torn.
The coffee is too
weak.
Make sure that the right proportion of coffee to
water has been used.
Make sure that the paper filter hasn’t collapsed.
Make sure that the right size of paper filter has
been used.
The coffee doesn’t
taste good.
Don’t leave the jug with coffee on the hotplate
too long, especially not if it only contains a small
amount of coffee.
The coffee isn’t hot
enough.
Make sure that the jug has been properly placed
on the hotplate.
Make sure that the hotplate and the jug are clean
(see chapter ‘Cleaning’).
We advise you to brew more than three cups
of coffee to ensure that the coffee has the right
temperature.
Problem
Solution
We advise you to use thin-walled cups, because
they will absorb less heat from the coffee than
thick-walled cups.
We advise you to use hot milk or milk at room
temperature instead of cold milk from the fridge.
There is less coffee
in the jug than
expected.
Make sure that the jug has been properly placed
on the hotplate. If this isn’t the case, the drip stop
will prevent the coffee from flowing out of the
filter.
Bahasa Melayu
Pengenalan
Tahniah atas pembelian anda, dan selamat datang ke Philips! Untuk
mendapat manfaat sepenuhnya daripada sokongan yang ditawarkan oleh
Philips, daftarkan produk anda di www.philips.com.
Perihalan umum (Gamb. 1)
A Kord dengan plag sesalur kuasa
B Suis hidup/mati
C Alat Pembancuh kopi
D Tudung pembancuh kopi
E Pemegang penuras
F Tudung jag
G Jag
4 Matikan perkakas apabila semua airnya berada di dalam jag.
5 Biarkan perkakas menjadi sejuk selama 3 minit sebelum anda mula
membancuh kopi.
Menggunakan perkakas
1 Bukakan tudung (Gamb. 3).
2 Isikan tangki air dengan air sejuk yang baru (Gamb. 4).
Penunjuk paras air menunjukkan jumlah air di dalam tangki air. Senggatannya
sepadan dengan cawan besar (125ml). Pastikan paras air tidak melebihi
penunjuk MAX.
3 Tutupkan tudung.
4 Letakkan jag di atas plat panas.
5 Buka pemegang penuras (Gamb. 6).
6 Ambil turas kertas (jenis 1x2 atau no. 2) dan lipat pinggir berkedap
Penting
Baca arahan ini dengan teliti sebelum menggunakan perkakas dan simpan
arahan ini untuk rujukan pada masa depan.
supaya tidak terkoyak dan terlipat.
Di sesetengah negara pembancuh kopi ini disertakan dengan turas yang
kekal. Jika demikian, anda tidak seharusnya menggunakan turas kertas.
Bahaya
-- Jangan sekali-kali menenggelamkan perkakas di dalam air atau apa-apa
cecair lain.
7 Masukkan turas ke dalam pemegang turas.
-----
---
--------
Amaran:
Periksa sama ada voltan yang ditunjukkan pada perkakas sepadan
dengan voltan sesalur kuasa setempat sebelum anda menyambungkan
perkakas.
Jangan gunakan perkakas jika plag, kord sesalur kuasa atau perkakas itu
sendiri rosak.
Jika kord utama rosak, ia mesti digantikan oleh Philips, pusat servis
yang disahkan oleh Philips atau oleh pihak yang mempunyai kelayakan
seumpamanya, bagi mengelakkan bahaya.
Perkakas ini tidak dimaksudkan untuk digunakan oleh orang (termasuk
kanak-kanak) yang kurang upaya dari segi fizikal, deria atau mental, atau
kurang berpengalaman dan pengetahuan, kecuali mereka diawasi atau
diberi arahan berkenaan penggunaan perkakas ini oleh orang yang
bertanggungjawab atas keselamatan mereka.
Kanak-kanak hendaklah diselia untuk memastikan mereka tidak bermain
dengan perkakas ini.
Jauhkan kord sesalur kuasa dari capaian kanak-kanak. Jangan biarkan kord
sesalur kuasa tergantung melepasi pinggir meja atau permukaan tempat
kerja di mana perkakas berada.
Awas
Perkakas ini dimaksudkan untuk digunakan dalam rumah dan
penggunaan yang serupa seperti:
kawasan dapur kakitangan di kedai, pejabat dan persekitaran kerja;
kediaman di ladang;
oleh klien di hotel, motel dan persekitaran penginapan yang lain;
persekitaran jenis inap-sarapan.
Jangan letakkan pembancuh kopi di atas permukaan panas dan pastikan
kord sesalur kuasa utama tidak bersentuhan dengan permukaan panas.
Cabut plag perkakas sebelum membersihkannya dan jika masalah
berlaku semasa penjerangan.
Medan Elektro Magnet (EMF)
Perkakas Philips ini mematuhi semua piawai yang berhubung dengan medan
elektromagnet (EMF). Jika dikendalikan dengan betul dan mematuhi arahan
dalam manual pengguna ini, perkakas selamat untuk digunakan menurut
bukti saintifik yang boleh didapati pada masa ini.
Bersedia untuk menggunakannya
1 Bersihkan jag dan pemegang turas (lihat bab ‘Membersihkan’).
2 Letak perkakas di atas permukaan yang rata dan stabil.
3 Masukkan plag ke dalam soket dinding yang dibumikan.
,, Anda boleh menyimpan kord yang berlebihan dengan menolaknya ke
dalam bukaan di belakang pembancuh kopi (Gamb. 2).
Membilas perkakas
1 Bukakan tudung (Gamb. 3).
2 Isikan tangki air dengan air sejuk baru sehingga ke penunjuk MAX dan
letakkan jag di tempatnya (Gamb. 4).
Jangan masukkan turas dan serbuk kopi di dalam pemegang turas.
3 Hidupkan perkakas dengan menekan butang hidup/mati (Gamb. 5).
Lampu menyala.
Biarkan perkakas hidup sehingga tangki air benar-benar kering.
8 Masukkan kopi yang sudah dikisar (kisaran halus ditapis) ke dalam
turas (Gamb. 7).
Bagi cawan besar: gunakan satu sudu penyukat penuh serbuk kopi bagi
setiap cawan.
Bagi cawan kecil: gunakan satu sudu penyukat rata serbuk kopi bagi setiap
cawan.
9 Tutupkan pemegang turas.
10Hidupkan perkakas dengan menekan butang hidup/mati (Gamb. 5).
Nota: Lampu menyala.
11Apabila semua air sudah melalui penuras, anda boleh mengeluarkan jag
dari perkakas.
12Matikan perkakas setelah digunakan.
13Angkat pemegang turas dan buang turas kertas (Gamb. 8).
14Bersihkan jag dan pemegang turas boleh tanggal dalam air yang panas
dengan sedikit cecair mencuci atau di dalam mesin basuh pinggan
mangkuk.
15Jika anda telah menggunakan turas kekal, kosongkan dan bilasnya.
16Jika anda hendak membancuh satu jag kopi lagi, biarkan perkakas
menyejuk selama 3 minit sebelum anda mula membancuh kopi semula.
Pembersihan
Cabutkan plag perkakas setiap kali sebelum anda mula membersihkannya.
Jangan sekali-kali menenggelamkan perkakas ke dalam air.
1 Bersihkan bahagian luar perkakas dengan kain lembap.
2 Bersihkan jag dan pemegang turas boleh tanggal dalam air yang panas
dengan sedikit cecair mencuci atau di dalam mesin basuh pinggan
mangkuk.
Menanggalkan kerak
Penanggalan kerak secara kerap akan melanjutkan hayat perkakas dan akan
menjamin hasil pembancuhan yang unggul untuk masa yang lama.
Bagi penggunaan biasa (dua jag penuh kopi setiap hari), tanggalkan kerak
pada pembancuh kopi anda:
- 2 atau 3 kali setahun jika anda menggunakan air lembut (kurang dari
18DH).
- 4 atau 5 kali setahun jika anda menggunakan air keras (lebih dari 18DH).
Rujuk kepada lembaga air tempatan anda untuk maklumat kekerasan air di
tempat anda.
1 Isikan tangki air dengan cuka putih (4% asid asetik). Jangan masukkan
turas atau serbuk kopi ke dalam pemegang turas.
2 Biarkan perkakas melengkapkan dua kitaran menjerang.
Lihat bab ‘Menggunakan perkakas’. Biarkan perkakas menjadi sejuk sebelum
anda memulakan semula pusingan kedua.
3 Biarkan lagi sehingga perkakas melengkapkan dua kitaran tambahan
menjerang dengan air sejuk yang baru untuk menanggalkan apa-apa
sisa cuka dan kerak.
,, Anda juga boleh menggunakan penanggal kerak cecair yang
bersesuaian. Jika demikian, ikuti arahan yang diberikan bersama-sama
penanggal kerak.
Jangan gunakan serbuk penanggal kerak.
Masalah
Penyelesaian
4 Bersihkan bahagian-bahagian yang boleh ditanggalkan (lihat bab
Kopi tidak cukup
panas.
Pastikan jag telah diletakkan dengan betul di atas
plat panas.
‘Pembersihan’).
Pastikan plat panas dan jag bersih (lihat bab
‘Membersihkan’).
Aksesori
-- Anda boleh memesan jag baru dari penjual Philips anda atau pusat
servis Philips di bawah nombor jenis HD7980.
-- Anda boleh memesan turas kekal dari penjual Philips anda atau pusat
servis Philips di bawah nombor rujukan 9965 00013 387 (turas kopi
nilon kekal).
Anda disyorkan menjerang lebih daripada tiga
cawan kopi untuk memastikan suhu kopi yang
mencukupi.
Anda disyorkan menggunakan cawan tipis, kerana
ia kurang meresap haba dari kopi berbanding
dengan cawan tebal.
Alam sekitar
-- Jangan buang perkakas bersama sampah rumah yang biasa pada
akhir hayatnya, tetapi serahkannya ke pusat pungutan rasmi kitaran
semula. Dengan berbuat demikian, anda membantu memelihara alam
sekitar (Gamb. 9).
Jaminan dan servis
Jika anda memerlukan perkhidmatan atau maklumat atau jika anda
menghadapi masalah, sila lawati laman web Philips di www.philips.
com atau hubungi Pusat Layanan Pelanggan Philips di negara anda (anda
boleh mendapatkan nombor telefonnya pada risalah jaminan sedunia).
Jika Pusat Layanan Pelanggan tidak terdapat di negara anda, hubungi wakil
penjual Philips tempatan anda.
Menyelesaikan masalah
Masalah
Penyelesaian
Perkakas tidak
berfungsi.
Pastikan perkakas diplagkan.
Pastikan voltan yang tertulis pada alat ini sepadan
dengan voltan pada sesalur utama.
Pastikan perkakas dihidupkan.
Dalam semua keadaan lain, hubungi Pusat Layanan
Pengguna Phillips.
Air keluar dari
perkakas.
Pastikan tangki air tidak diisi melepasi paras MAX.
Dalam semua keadaan lain, hubungi Pusat Layanan
Pengguna Phillips.
Perkakas mengambil
Tanggalkan kerak perkakas (lihat bab “Penanggalan
masa yang lama untuk Kerak’).
menjerang kopi.
Perkakas
mengeluarkan bunyi
dan wap yang banyak
semasa proses
menjerang.
Pastikan air tangki air telah diisi dengan air SEJUK.
Tanggalkan kerak perkakas (lihat bab “Penanggalan
Kerak’).
Serbuk kopi tertinggal Pastikan bahawa turas kopi mengandungi jumlah
di dalam jag.
serbuk kopi yang mencukupi. Jika terlalu banyak
serbuk kopi di dalam turas, pemegang turas
mungkin melimpah keluar.
Pastikan jag telah diletakkan dengan betul di
bawah pemegang turas. Jika tidak, pemegang
turasnya mungkin melimpah keluar.
Pastikan bukaan di bawah pemegang turas tidak
tersumbat.
Pastikan saiz turas kertas yang betul telah
digunakan.
Pastikan turas kertas tidak koyak.
Kopi terlalu cair.
Pastikan kadar kopi dengan air yang betul
digunakan.
Pastikan turas kertas tidak teralih dari tempatnya.
Pastikan saiz turas kertas yang betul telah
digunakan.
Kopi tidak sedap.
Jangan biarkan jag dengan kopi di atas plat
panas terlalu lama, terutamanya jika ia hanya
mengandungi kopi yang sedikit.
Anda disyorkan menggunakan susu panas atau
susu pada suhu bilik dan bukan susu sejuk dari
peti sejuk.
Kopi di dalam jag
adalah kurang
daripada yang
dijangkakan.
Periksa jika jag telah diletakkan dengan betul
di atas plat panas. Jika tidak, titisannya akan
menghalang kopi daripada mengalir keluar dari
turas.
한국어
제품 소개
필립스 제품을 구입해 주셔서 감사합니다! 필립스가 드리는
지원 혜택을 받으실 수 있도록 www.philips.com에서 제품을
등록하십시오.
A
B
C
D
E
F
G
각 부의 명칭 (그림 1)
전원 코드
전원 스위치
커피메이커
커피메이커 뚜껑
필터 홀더
용기 뚜껑
용기
중요사항
본 제품을 사용하기 전에 이 설명서를 주의 깊게 읽고, 나중에
참조할 수 있도록 잘 보관하십시오.
위험
-- 제품을 절대로 물 또는 기타 액체에 담그지 마십시오.
-----
---
--------
경고
제품에 전원을 연결하기 전에, 제품에 표시된 전압과 사용
지역의 전압이 일치하는지 확인하십시오.
만약 플러그나 전원 코드 또는 제품이 손상되었을 경우에는
제품을 사용하지 마십시오.
전원 코드가 손상된 경우, 안전을 위해 필립스 공인 서비스 센터
또는 필립스 서비스 지정점에 의뢰하여 교체하십시오.
신체적인 감각 및 정신적인 능력이 떨어지거나 경험과
지식이 풍부하지 않은 사용자(어린이 포함)는 혼자 제품을
사용하지 말고 제품 사용과 관련하여 안전에 책임질 수 있도록
지시사항을 충분히 숙지한 사람의 지도와 도움을 받으십시오.
어린이가 제품을 가지고 놀지 못하도록 지도해 주십시오.
전원 코드는 어린이의 손이 닿지 않는 곳에 보관하십시오.
제품이 올려져 있는 식탁이나 조리대의 가장자리로 전원 코드가
흘러내리지 않도록 하십시오.
주의
본 제품은 가정 및 다음과 같은 유사 환경에서 사용하도록
설계되었습니다.
매장, 사무실 및 기타 작업 환경 내 직원용 탕비실
농장 내 주거 시설
호텔 및 기타 숙박 시설
민박 시설
제품을 뜨거운 곳에 놓지 마시고 전원 코드가 뜨거운 표면과
접촉하지 않도록 주의하십시오.
제품을 청소하기 전에 그리고 커피를 끓이는 도중에 문제가
발생한 경우 제품의 전원 코드를 먼저 뽑으십시오.
전자기장(EMF)
이 필립스 제품은 EMF(전자기장)와 관련된 모든 기준을
준수합니다. 이 사용 설명서의 지침에 따라 적절하게 취급할 경우
이 제품은 안전하게 사용할 수 있으며 이는 현재까지의 과학적
증거에 근거하고 있습니다.
사용 전 준비
1 커피 용기와 필터 홀더를 세척하십시오(‘청소’란 참조).
2 제품은 평평하고 안정적인 곳에 놓으십시오.
3 전원 플러그를 벽면 콘센트에 꽂으십시오.
,, 사용하지 않는 전원 코드는 커피메이커 뒷면에 있는 코드
보관함에 밀어 넣으십시오 (그림 2).
최초 사용 전 세척
1 뚜껑을 여십시오 (그림 3).
2 물탱크에 신선하고 차가운 물을 최대량 표시인 MAX 눈금까지
채운 다음 용기를 제자리에 놓으십시오 (그림 4).
원두 커피 가루를 넣은 필터를 필터 홀더에 넣지 마십시오.
3 전원 스위치를 눌러 제품을 켜십시오 (그림 5).
표시등이 켜집니다.
물탱크가 완전히 비워질 때까지 제품을 작동시키십시오.
4 물이 모두 용기로 내려가면 제품의 전원을 끄십시오.
5 최소 3분 동안 제품을 식힌 다음 커피를 끓이십시오.
제품 사용
1 뚜껑을 여십시오 (그림 3).
2 물 탱크에 신선하고 차가운 물을 채우십시오 (그림 4).
수위 표시기에 물탱크에 든 물의 양이 표시됩니다. 수위 눈금은
대형 컵(125 ml) 기준입니다. 수위가 MAX 눈금을 초과하지 않는지
확인하십시오.
3 뚜껑을 닫으십시오.
4 용기를 열판 위에 올려놓으십시오.
5 필터 거치대를 여십시오 (그림 6).
6 종이 필터(1x2 또는 no.2 규격제품)를 준비하십시오. 종이
필터가 찢어지거나 접히지 않도록 봉해진 가장자리를 접어서
사용하십시오.
일부 국가에서는 이 커피메이커에 영구 필터가 장착되어 있습니다.
이러한 경우에는 종이 필터를 사용하지 마십시오.
7 필터를 필터 홀더에 넣으십시오.
8 미리 갈아 놓은 원두 커피(필터용 분쇄)를 필터에
넣으십시오.  (그림 7)
큰 컵을 사용하는 경우: 커피 1잔당 계량 스푼으로 듬뿍 담은 한
스푼이 적당합니다.
작은 컵을 사용하는 경우: 커피 1잔당 계량 스푼으로 깎아 담은 한
스푼이 적당합니다.
9 필터 홀더를 닫으십시오.
10전원 스위치를 눌러 제품을 켜십시오 (그림 5).
참고: 표시등이 켜집니다.
11커피가 필터를 통해 다 내려오면, 용기를 본체에서 꺼낼 수
있습니다.
12제품을 사용하신 후에는 반드시 제품의 전원을 끄십시오.
13필터 홀더를 분리해서 종이 필터를 버리십시오 (그림 8).
14소량의 세제를 푼 뜨거운 물 또는 식기 세척기를 이용해 용기와
분리형 필터 거치대를 세척하십시오.
15영구 필터를 사용하는 경우 내용물을 비운 다음 헹구십시오.
16커피를 만든 다음 또 추출하려면 커피를 끓이기 전에 최소 3분
동안 제품을 식히십시오.
청소
제품을 청소하기 전에는 항상 전원 코드를 뽑으십시오.
본체는 절대로 물에 담그지 마십시오.
1 제품의 외관은 젖은 헝겊으로 닦으십시오.
2 소량의 세제를 푼 뜨거운 물 또는 식기 세척기를 이용해 용기와
분리형 필터 거치대를 세척하십시오.
스케일 제거
정기적인 스케일 제거는 제품의 수명을 연장해주며, 장기간 최상의
커피 추출 결과를 보장해줍니다.
일반적으로 사용하는 경우(하루에 커피 용기 가득 2번씩), 다음
주기로 커피메이커의 스케일을 제거하십시오.
- 경도 18DH 이하의 연수를 사용하는 경우, 1년에 2 ~ 3회
- 경도 18DH 이상의 경수를 사용하는 경우, 1년에 4 ~ 5회
사용 지역의 물의 경도는 관할 수도사업소에 문의하십시오.
1 물 탱크에 화이트 식초(아세트산 4%)를 부으십시오. 필터
홀더에 필터와 원두 커피 가루를 넣지 마십시오.
2 커피 추출 과정을 2회 반복하십시오.
’제품 사용’란을 참조하십시오. 방금 커피를 끓인 경우 다시
끓이기 전에 제품을 식히십시오.
3 깨끗한 찬 물로 커피 추출 과정을 2회 더 수행하여 식초
찌꺼기를 완전히 헹구어 내십시오.
,, 액상 스케일 제거제를 사용하셔도 됩니다. 이런 경우, 스케일
제거제의 포장 박스에 명시되어 있는 사용 지침을 따르십시오.
분말형 스케일 제거제는 사용하지 마십시오.
4 다른 부속품을 청소하십시오(‘청소’란 참조).
액세서리
-- 새 용기를 주문하려면 필립스 대리점 또는 필립스 서비스
센터에 유형 번호 HD7980으로 문의하십시오.
-- 영구 필터는 필립스 대리점 또는 필립스 서비스센터에서 참조
번호 9965 00013 387(영구 나일론 커피 필터)로 구매하실 수
있습니다.
환경
-- 수명이 다 된 제품은 일반 가정용 쓰레기와 함께 버리지 마시고
지정된 재활용 수거 장소에 버리십시오. 이런 방법으로 환경
보호에 동참하실 수 있습니다 (그림 9).
문제점
품질 보증 및 서비스
보다 자세한 정보가 필요하시거나, 사용상의 문제가 있을 경우에는
필립스전자 홈페이지(www.philips.co.kr)를 방문하시거나 필립스
고객 상담실로 문의하십시오. 전국 서비스센터 안내는 제품
보증서를 참조하십시오. *(주)필립스전자: (02)709-1200 *고객
상담실: (080)600-6600(수신자부담)
용기에 있는 커피의 용기를 열판에 올바르게 놓았는지
양이 생각보다
확인하십시오. 올바르게 놓여있지 않은
적습니다.
경우 누수 방지 기능으로 인해 커피가
필터에서 내려오지 않습니다.
문제 해결
문제점
해결책
제품이 작동하지
않습니다.
전원 플러그가 전원에 연결되어 있는지
확인하십시오.
제품에 표시된 전압과 사용 지역의 전압이
일치하는지 확인하십시오.
제품이 켜져 있는지 확인하십시오.
나머지 경우는 필립스 고객 상담실로
문의하십시오.
제품에서 물이
샙니다.
물탱크에 물이 최고 수위 표시인 MAX 이상
채워졌는지 확인하십시오.
나머지 경우는 필립스 고객 상담실로
문의하십시오.
커피를 추출하는 데 제품의 스케일을 제거하십시오(‘스케일
시간이 너무 오래
제거’란 참조).
걸립니다.
커피를 추출하는
물탱크에 찬물을 채웠는지 확인하십시오.
동안 소음과
수증기가 너무 많이
배출됩니다.
제품의 스케일을 제거하십시오(‘스케일
제거’란 참조).
용기에 원두
커피 가루가
흘러내렸습니다.
커피 필터에 적정량의 원두 커피 가루를
넣었는지 확인하십시오. 필터에 원두 커피
가루가 너무 많으면 필터 홀더가 넘칠 수
있습니다.
용기를 필터 홀더 아래에 제대로 놓았는지
확인하십시오. 올바르게 놓여있지 않은
경우 필터 홀더가 넘칠 수 있습니다.
필터 홀더 바닥의 입구가 막혀있지 않은지
확인하십시오.
올바른 크기의 종이 필터를 사용했는지
확인하십시오.
종이 필터가 찢어지지 않았는지
확인하십시오.
커피가 너무
연합니다.
커피 대 물의 비율이 적절한지
확인하십시오.
종이 필터가 찌그러지지 않았는지
확인하십시오.
올바른 크기의 종이 필터를 사용했는지
확인하십시오.
커피 맛이 좋지
않습니다.
특히 커피가 소량인 경우 커피가 담긴
용기를 열판 위에 너무 오래 두지 마십시오.
커피가
미지근합니다.
용기를 열판 위에 올바르게 놓았는지
확인하십시오.
열판과 용기가 깨끗한지 확인하십시오(‘
청소’란 참조).
적절한 커피 온도를 유지하려면 커피를 4잔
이상 추출하는 것이 좋습니다.
얇은 컵을 사용하는 것이 좋습니다. 얇은
컵이 두꺼운 컵보다 커피의 열을 덜
흡수합니다.
해결책
냉장고에서 꺼낸 찬 우유보다 뜨거운 우유
또는 실내 온도에 있는 우유를 사용하는
것이 좋습니다.
繁體中文
簡介
恭喜您購買本產品並歡迎加入飛利浦!請於 www.philips.com 註冊
您的產品,以善用飛利浦提供的支援。
A
B
C
D
E
F
G
一般說明 (圖 1)
電源線及插頭
電源開關
咖啡機
咖啡機上蓋
濾杯座
咖啡壺蓋
壺
重要事項
在使用本產品前,請先仔細閱讀說明並保留說明書,以供日後參
考。
危險
-- 切勿讓產品浸入水或其他液體中。
-------
--------
警示
在您連接電源之前,請檢查本地的電源電壓是否與產品所標示的
電壓相符。
當插頭、電線或產品本身受損時,請勿使用產品。
如果電線損壞,必須交由飛利浦、飛利浦授權之服務中心,或是
具備相同資格的技師更換,以免發生危險。
基於安全考慮,在缺乏監督及適當指示之下,本產品不適用於孩
童及任何身體、知覺、或心理功能障礙者,或缺乏使用經驗及知
識者。
請勿讓孩童使用本產品或當成玩具。
請勿讓兒童接觸電源線。請勿讓電源線懸掛在產品放置的餐桌或
流理台邊緣。
警告
本產品為居家用途設計,而類似的應用包含:
店家的員工廚房、辦公室與其他工作場所;
農舍;
供住宿的飯店、汽車旅館與其他居住場所;
擺設床位與供應早餐的空間。
請勿將產品置放在高溫表面,並避免電源線與高溫表面接觸。
清洗前先將產品的插頭拔掉,或沖咖啡期間如有問題,也請將插
頭拔掉。
電磁波 (EMF)
本飛利浦產品符合電磁場 (Electromagnetic field,EMF) 所有相關標
準。若正確處理及依照本使用手冊之說明進行操作,根據現有之科
學文獻來看,使用本產品並無安全顧慮。
使用前準備
1 清潔咖啡壺及濾紙座 (請參閱「清潔」單元)。
6 取一張濾紙 (1x2 或 no. 2 型) 並折疊濾紙的密封邊緣以避免綻開
或翻折。
在某些國家,本咖啡機會隨附永久濾網。若是如此則請勿使用濾
紙。
7 將濾紙放入濾網座中。
8 將預先研磨好的咖啡粉 (濾紙級之細研磨) 放到濾紙中。 (圖 7)
大杯量:每杯咖啡請使用一滿匙的研磨咖啡。
小杯量:每杯咖啡請使用一平匙的研磨咖啡。
9 蓋上濾網座。
10按下 On/Off 開關來切換產品。 (圖 5)
注意: 指示燈會亮起。
11當所有的水通過濾紙滴漏完畢後,即可將咖啡壺取出。
12使用完畢後關閉產品的電源。
13拆下濾網座,將濾紙丟棄。 (圖 8)
14以熱水加些許洗潔精清潔咖啡壺及可拆式濾網,或置入洗碗機中
清洗。
15如果你使用的是永久濾網,請加以清空及沖洗。
16如果要再煮一壺咖啡,請先讓咖啡機冷卻至少 3 分鐘後再使用。
清潔
在您進行清潔前,請務必先拔離電源插頭。
切勿將本產品浸泡於水中。
1 用濕布擦拭產品的外部表面。
2 以熱水加些許洗潔精清潔咖啡壺及可拆式濾網,或置入洗碗機中
清洗。
除垢
定期去除水垢可以延長產品的使用壽命,且可以長時間確保咖啡烹
煮的效果。
正常使用下 (每天兩滿壺的咖啡) 去除產品水垢:
- 如果使用軟水 (低於18DH) 則每年 2 至 3 次;
- 如果使用硬水 (高於18DH) 則每年 4 至 5 次。
關於您當地水質硬度的資訊,請向您當地的水公司詢問。
1 在水箱內加入白醋 (4% 酸醋)。切勿在濾網座放置濾紙和研磨咖
啡。
2 讓產品完成兩次烹煮程序。
參閱「使用產品」單元。開始第二次烹煮前先讓產品冷卻。
3 使用乾淨的冷水讓產品多進行兩次烹煮程序,以去除任何殘留的
醋味及水垢。
,, 您也可以使用適當的水垢清除劑。如果使用水垢清除劑,請遵循
清潔劑包裝的指示。
切勿使用水垢清除粉末。
2 將產品置於穩固的平面上。
4 清洗可拆卸的零件 (請參閱「清潔」單元)。
3 將插頭插入接地插座中。
配件
-- 您可以從飛利浦經銷商或是飛利浦服務中心訂購新的咖啡壺,請
用類型編號 HD7980。
-- 您可以從飛利浦經銷商或飛利浦服務中心訂購永久濾網,參考編
號為 9965 00013 387 (永久尼龍咖啡濾網)。
,, 您可以將多餘的電源線壓入咖啡機後方的開孔收藏。 (圖 2)
沖洗產品
1 打開蓋子。 (圖 3)
2 在水箱加入乾淨的冷水至「MAX」標誌的位置,然後放好咖啡
壺。 (圖 4)
切勿將裝有研磨咖啡的濾紙放入濾網座中。
3 按下 On/Off 開關來切換產品。 (圖 5)
指示燈會亮起。
操作產品直到水箱完全沒水為止。
4 當所有的水都進入咖啡壺中,即可關掉產品。
5 在您再次開始煮咖啡前,請先讓產品斷電至少三分鐘。
使用此產品
1 打開蓋子。 (圖 3)
2 在水箱裝入乾淨的冷水。 (圖 4)
水位指標會標示目前水箱的水量。每一刻度約為一大杯水 (125ml)。
請確認水量不超過「MAX (最高)」標示。
環境保護
-- 本產品使用壽命結束時,請勿與一般家庭廢棄物丟棄。請將該產
品放置於政府指定的回收站,此舉能為環保盡一份心力。 (圖 9)
保固與服務
如需相關服務或資訊,或是有任何問題,請瀏覽飛利浦網站,網址
為 www.philips.com,或聯絡當地的飛利浦客戶服務中心 (電話號碼
可參閱全球保證書)。若您當地沒有客戶服務中心,請洽詢當地的飛
利浦經銷商。
故障排除
問題
解決方法
產品不能運作。
請確認插頭已經插上。
請確認本產品的電壓與當地電壓相符。
3 蓋上蓋子。
請確認已開啟本產品電源開關。
4 將咖啡壺放在加熱盤上。
除此外,請聯絡飛利浦顧客服務中心。
5 打開濾網座。 (圖 6)
問題
解決方法
水從產品漏出。
請確認水箱水位沒有超過 MAX (最高) 刻
度。
除此外,請聯絡飛利浦顧客服務中心。
產品花費過長的時間
烹煮咖啡。
去除產品的水垢 (請參閱「去除水垢」單
元)。
產品在烹煮程序期間
製造過多噪音及蒸
氣。
請確認水箱裝入冷水,不是熱水。
去除產品的水垢 (請參閱「去除水垢」單
元)。
研磨咖啡是否跑進咖
啡壺中。
請確認濾紙內裝入適量研磨咖啡,若是過
量則可能溢出。
請確認咖啡壺放置位置正確,位於濾紙座
下方,否則濾紙座可能會滿溢。
請確認濾紙座下方開口沒有堵塞。
請確認所用的濾紙尺寸正確無誤。
請確認濾紙未撕裂。
咖啡太淡。
請確認咖啡對水的比例正確。
請確認濾紙沒有散開。
請確認所用的濾紙尺寸正確無誤。
咖啡不好喝。
勿將咖啡壺放置在熱盤上過久,尤其只有
少量的咖啡時更勿放置過久。
咖啡不夠熱。
請確認已正確將咖啡壺置於保溫盤之上。
請確認保溫盤和咖啡壺均已清洗乾淨 (請
參閱「清潔」單元)。
我們建議您至少烹煮三杯咖啡,以確保咖
啡夠熱。
建議您使用杯壁較薄的杯子,因為較厚的
杯子會從咖啡吸收較多熱度。
建議您使用熱的或是室溫的牛奶,不用冰
箱的冰牛奶。
咖啡壺中的咖啡比預
期的少。
請確認咖啡壺是否正確放在保溫盤上。放
置錯誤時,特殊底盤防漏功能會阻止咖啡
流出濾紙。
简体中文
产品简介
感谢您的惠顾,欢迎光临飞利浦!为了您能充分享受飞利浦提供的
支持,请注册您的产品,网址为 www.philips.com。
A
B
C
D
E
F
G
7 将过滤网放在过滤网架内。
8 将研磨过的咖啡粉(适合过滤的粒度)放入过滤网。 (图 7)
大杯:每杯需一满勺份量的咖啡粉。
小杯:每杯需一平勺份量的咖啡粉。
9 关闭过滤网架。
一般说明 (图 1)
10按开/关按钮打开产品电源。 (图 5)
A.带电源插头的电线
B.开/关切换钮
C.咖啡壶
D.咖啡壶盖
E.过滤网架
F.玻璃壶盖
G.玻璃壶
注意: 指示灯亮起。
注意事项
15如果您使用的是永久性过滤器,请将其倒空,并用水冲洗。
使用本产品前,请仔细阅读本使用说明书,并妥善保管以备日后参
考。
危险
-- 切勿将本产品浸入水中或任何其它液体中。
警告
-- 在将产品连接电源之前,请先检查产品所标电压与当地的供电电
压是否相符。
-- 如果插头、电源线或产品本身受损,请勿使用本产品。
-- 如果电源线损坏,为避免危险,必须由飞利浦或其授权的服务中
心,或类似的专职人员来更换。
-- 本产品不应由肢体不健全、感觉或精神上有障碍或缺乏相关经验
和知识的人(包括儿童)使用,除非有负责他们安全的人对他们
使用本产品进行监督或指导。
-- 应照看好儿童,确保他们不玩耍该产品。
-- 不要让儿童接触到电源线。切勿将电源线悬挂在放置本产品的桌
子或工作台的边上。
注意
-- 本产品仅限于家用。
-- 切勿将本产品放在热的表面上,并防止电源线与热的表面接触。
-- 在清洁前或在煮咖啡期间出现问题时,拔下产品的电源插头。
电磁场 (EMF)
本飞利浦产品符合关于电磁场 (EMF) 的所有相关标准。据目前的科
学证明,如果正确使用并按照本用户手册中的说明进行操作,本产
品是安全的。
使用准备
1 清洁玻璃壶和过滤网架(见“清洁”一章)。
2 将产品放在一个水平,稳固的表面上。
3 将插头插入有接地的电源插座。
,, 可将多余的电源线推入咖啡壶背后的收藏格中。 (图 2)
11当所有的水都流过过滤网后,可将玻璃壶从热盘上取走。
12使用后,请关闭产品电源。
13卸下过滤网架并将过滤纸丢弃。 (图 8)
14在含有洗涤剂的热水或洗碗机内清洗玻璃壶及可拆卸过滤网架。
16如果您要冲煮第二壶咖啡,请让产品至少冷却 3 分钟,然后再冲
煮咖啡。
清洁
清洗产品前,务必要先将插头拔掉。
切勿将产品浸入水中。
1 用湿布清洁产品外部。
2 在含有洗涤剂的热水或洗碗机内清洗玻璃壶及可拆卸过滤网架。
除水垢
定期去除水垢既可延长产品的使用寿命,又可保证长时间得到最佳
煮咖啡效果。
在正常使用情况下(每天两满壶咖啡),可按以下方法除去咖啡壶
的水垢:
- 如果使用软水(小于 18 DH),每年除垢 2 至 3 次;
- 如果使用硬水(大于 18 DH),每年除垢 4 至 5 次。
可向所在地区的自来水管理部门查询当地的水质硬度。
1 往水箱注入白醋(醋酸度为 4%)。切勿将过滤网和咖啡粉放入
过滤网架。
2 让产品完成两次烹煮过程。
见“使用产品”一章。请等到产品冷却后,再开始第二次运行。
3 注入清水,并使咖啡壶再完成两次冲煮过程,以便清除残留的白
醋。
,, 您也可以使用适当的除垢剂。在这种情况下,应按照除垢剂包装
上的说明进行操作。
切勿使用除垢粉。
4 清洗可拆卸部件(见“清洁”一章)。
附件
2 将清水注入水箱至最高水位 (MAX),然后将玻璃壶放入到位。 (
,, 您可以从飞利浦经销商处或飞利浦服务中心定购型号为 HD7980
的新玻璃壶。
,, 您可以从飞利浦经销商处或飞利浦服务中心定购型号为 9965
00013 387(尼龙)的永久性过滤网。
图 4)
切勿将带有咖啡粉的过滤网放于过滤网架之上。
1 弃置产品时,请不要将其与一般生活垃圾堆放在一起;应将其交
冲洗产品
1 打开盖子。 (图 3)
3 按开/关按钮打开产品电源。 (图 5)
指示灯亮起。
在水箱中的水完全烧尽之前,请一直开启产品。
4 当所有水都流入玻璃壶后,关闭产品电源。
5 冲煮咖啡前,请让产品至少冷却 3 分钟。
使用本产品
1 打开盖子。 (图 3)
2 往水箱里注入清水。 (图 4)
水位标记指示了水箱中的水量。其刻度与大号玻璃壶(125 毫升)
相对应。确保水位不能超过最高水位 (MAX)
环境
给官方指定的回收中心。这样做有利于环保。 (图 9)
保修与服务
如果您需要服务或信息,或如果您有任何疑问,请访问飞利浦网
站:www.philips.com。也可与您所在地的飞利浦顾客服务中心联系
(可从全球保修卡中找到电话号码)。如果您的所在地没有飞利浦
客户服务中心,可与当地的飞利浦经销商联系。
故障种类和处理方法
问题
解决方法
产品不能启动。
确保产品电源插头已插上。
3 合上盖子。
确保产品上标示的电压与当地的电源电压
相符。
4 将玻璃壶放在热盘上。
确保已打开本产品电源。
5 打开过滤网架。 (图 6)
如果仍有问题,请与飞利浦客户服务中心
联系。
6 取一张过滤纸(1X2 型或 2 号),将密封边折起,以防撕破或折
叠。
在某些国家/地区,此咖啡壶随附永久性过滤网,因此您无需使用过
滤纸。
产品漏水。
确保水箱中的水未超过最大水位 (MAX)。
问题
解决方法
如果仍有问题,请与飞利浦客户服务中心
联系。
产品煮咖啡的时间过
长。
去除产品内的水垢(见“除水垢”一章)
。
产品在煮咖啡过程中
产生很大的噪音和蒸
汽。
确保水箱中注入的是冷水。
去除产品内的水垢(见“除水垢”一章)
。
玻璃壶内残留咖啡
粉。
确保咖啡过滤网内的咖啡粉量正确。如果
过滤网内的咖啡粉过多,则可能导致咖啡
从过滤网架溢出。
确保玻璃壶被正确放置在过滤网架下方。
如果放置不正确,则可能导致咖啡从过滤
网架溢出。
确保过滤网架底部的开口未被阻塞。
确保使用的过滤纸尺寸正确。
确保过滤纸未被撕破。
咖啡太稀。
确保咖啡与水的比例正确。
确保过滤纸未被折叠。
确保使用的过滤纸尺寸正确。
咖啡口感不好。
切勿长时间将装有咖啡的玻璃壶放置在热
盘上,尤其是装有少量咖啡时。
咖啡热度不够。
确保玻璃壶被正确放置在热板上。
确保热板和玻璃壶是洁净的(见“清洁”
一章)。
建议您冲煮 3 杯以上的咖啡以确保咖啡温
度适中。
建议您使用壁薄的杯子,因为与壁厚的杯
子相比,它们可从咖啡吸收更少的热量。
建议您使用热的或与室温相当的牛奶,切
勿使用刚从冰箱里取出的牛奶。
玻璃壶中的咖啡比预
期的少。
确保玻璃壶被正确地放置在热板上。否
则,防滴漏功能将阻止咖啡流入玻璃壶。