1
AZ130-ENG
2010.5.6
11:38
Page 1
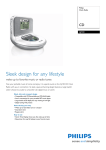
CD Clock Radio
Register your product and get support at
www.philips.com/welcome
User manual
AJ130
AZ130-ENG
1
2010.5.6
11:38
Page 2
1
2
6
7
3
4
5
8
%
9
^
0
&
*
!
@
#
(
)
$
AZ130-ENG
2010.5.6
11:38
Page 3
7
2
3
4
X
PROG
5
6
SLEEP
AZ130-ENG
2010.5.6
11:38
English
Page 4
Controls
Congratulations on your purchase, and welcome to Philips! To fully benefit from the
support that Philips offers, register your
product at www.philips.com/welcome.
Supplied accessory
– 1 X certified AC/DC 9V adapter
(Input: 100-240V ~ 50/60Hz 0.6A,
Output: 9V
1.5A)
– 1 X AUX cable
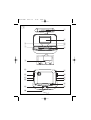
Controls (see 1)
1 REPEAT ALARM – pushes to switch off
alarm for a 5-minute period
2 LCD Display – shows the clock/ alarm time
or CD/radio information
3 9 – stops CD playback
– erases a CD program
4 SOURCE
– selects CD, radio or AUX source of sound
5 POWER
– switches the set on or to standby
– stops the active buzzer, radio or CD alarm
for 24 hours
– switches off the sleep timer
6 ); – starts/ pauses CD playback
7 HOUR/MIN/TUNING ∞/ §
– adjusts clock / alarm time
– skips CD tracks/ searches for a particular passage
– tunes to radio stations
8 Reset
– press if the set / display does not react to
operation of any button
9/% AL 1/ AL 2
– sets and activates alarm of ALARM 1 /ALARM 2
– stops the active buzzer, radio or CD alarm
for 24 hours
– switches off ALARM 1/ ALARM 2
0 REPEAT – repeats a track/CD program/
entire CD
SHUFFFLE – plays all tracks in random order
PRE 3, 4 – selects a preset radion station
! BRIGHTNESS – changes the brightness of
the display illumination
@ SLEEP
– switches off radio, CD for timer mode
#
$
^
&
*
(
)
Power supply
– adjusts timer options for radio/CD playback
– views the remaining sleep time.
Battery door – opens to insert 2 x 1.5V
AAA batteries
AUX – 3.5mm audio input jack
VOLUME 3, 4 – adjusts sound level
DISPLAY – displays CD tracks or radio
information
PROGRAM/SET TIME
– sets clock/alarm time
– programs CD tracks
– programs preset radio stations
DC 9V– socket for AC/DC 9V adapter
Pigtail – FM antenna to improve FM
reception
Power supply
1
Mains Adapter.
Connect the mains adapter to the set's DC
9V socket and to the power socket.
Helpful hints:
To avoid damage to the set, use only the
adapter supplied!
The type plate is located on the bottom
of the set.
Clock memory backup
1
2
When a power failure occurs, the complete
clock radio will be switched off. When the
power supply returns, the time display shows
0:00 and you will need to reset the correct
time on the clock.
To retain the clock time and the set alarm time(s) in
the event of an AC power failure or disconnection,
insert 2 x 1.5 volt batteries, typed AAA (not supplied) into the battery compartment.This will act as
a clock memory backup.
When powered by the battery, the time will not be
illuminated on the clock display, and operation of the
alarms, radio and CD are also impossible.As soon
as the AC power supply returns, the display will indicate the correct time.
Insert the battery into the battery
compartment for clock memory backup.
Connect the power plug to the wall outlet.
AZ130-ENG
2010.5.6
11:38
Page 5
Clock
•
Replace the battery once a year, or as often
as necessary.
Digital tuner
3
Press and hold TUNING ∞ or § until the
frequency in the display starts running.
➜ The radio automatically tunes to a station
of sufficient reception.
4
Repeat step 3 if necessary until you find the
desired station.
•
To tune to a weak station, press TUNING
∞ or § briefly and repeatedly until you have
found optimal reception.
To view radio information, press DISPLAY.
➜ The current waveband and frequency will
be displayed for several seconds (See 2),
then it will switch back to clock display.
Batteries contain chemical substances, so
they should be disposed of properly.
Basic operation
1
2
1
Switching on the system and selecting
function
Press POWER.
➜ The system will switch to the last selected
source.
To select desired source, press SOURCE once
or more.
5
Switching the system to standby
Press POWER.
To improve reception:
FM: Extend and adjust the pigtail for optimum
reception.
Standby power consumption
(clock mode) . . . . . . . . . . . . . . . . . . . .. . . . <2W
1
Programming radio stations
You can store up to a total of 10 radio stations in the memory (10 FM), manually or
automatically (Auto store).
Illumination brightness
Press BRIGHTNESS once or more.
➜ The brightness of the display can be adjusted:
High ➟ Low ➟ High
Manual programming
1
Tune to your desired station (see Tuning to
radio stations).
2
Press PROGRAM/SET TIME to activate
programming.
➜ Display: PROG flashes.
3
Press PRE 3, 4 once or more to allocate a
number from 1 to 10.
4
Press PROGRAM/SET TIME to confirm.
5
Repeat steps 1-4 to store other stations.
–
Helpful hints:
You can erase a preset station by storing
another frequency in its place.
Setting the clock
1
2
3
The clock uses 24-hour time format.
In standby mode, press PROGRAM/SET TIME
➜ The time digits flash.
Hold down or press HOUR/MIN repeatedly
to adjust the hours and minutes.
Press PROGRAM/SET TIME to confirm
the setting.
Digital tuner
1
2
Tuning to radio station
Press POWER to switch on from standby.
➜ The system will switch to the last selected
source.
If TUNER is not selected, press SOURCE
once or more to select it.
➜ The radio station frequency, waveband will
be displayed briefly, then clock is displayed.
is also displayed. (See 2 )
This set complies with the radio
interference requirements of the
European Community.
AZ130-ENG
2010.5.6
11:38
Page 6
CD Player
Autostore
Autostore automatically starts programming
radio stations from preset 1. Any previous
presets e.g. manually programmed will be
erased.
1
Press and hold PROGRAM/SET TIME until
the frequency in the display starts running.
➜ Available stations are programmed (FM).
After all stations are stored, the first autostore preset station will then automatically
play.
To listen to a preset or autostore
station
•
•
1
2
Press the PRE3, 4 buttons once or more
until the desired preset station is displayed.
CD playback
•
•
1
2
3
4
5
6
7
8
9
This CD clock radio can play only audio discs
including CD-R (CD-recordable) and CD-RW
(CD-rewritable).
Do not try to play a MP3, CD-ROM,
CDI,VCD, DVD or computer CD.
Press POWER to switch on from standby.
➜ The system will switch to the last selected
source.
If CD is not selected, press SOURCE once
or more to select it.
➜
is displayed.
Lift the CD door to open.
Insert a CD with printed side facing up, and
close the CD door.
➜ ---- is displayed briefly, then total CD track
number.
Press ); to start playback.
To view CD track information, press
DISPLAY.
➜ The current track number is displayed for
several seconds (See 3), then it will
switch back to clock display.
To adjust the sound, turn VOLUME 3, 4.
To interrupt, press );.To resume playback,
press ); again.
To stop playback, press 9.
1
2
3
4
5
Selecting a different track
Press ∞ /§ once or repeatedly until the
desired track number appears on the display.
In the stop position, press ); to start playback.
➜ The selected track number appears briefly
on the display when you press ∞ /§ to
skip tracks, then it switches back to clock
display.
Finding a passage within a track
During playback, press and hold down ∞ /§.
➜ The CD is played at high speed and low
volume.
Release ∞ /§ when you recognize the passage you want.
➜ Normal CD playback resumes.
Programming tracks
You may store up to 20 tracks in the desired
sequence for playback. If you like, store any
track more than once.
In the stop position, press PROGRAM/SET
TIME to enter programming mode.
➜ PROG and P01 are displayed, flashing,
indicating the start of programming
(See 4).
Press ∞ /§ to select desired track.
Press PROGRAM/SET TIME to store the
track.
P02 is displayed, flashing, indicating the
➜P
second program sequence is available.
Repeat steps 2 to 3 to select and store all
desired tracks.
➜ If you attempt to store more than 20
tracks, no tracks can be stored.
Press ); to play the program.
➜ PROG is displayed.
To review a program,
In the stop position, press and hold
PROGRAM/SET TIME until all the stored
tracks are displayed.
AZ130-ENG
2010.5.6
11:38
Page 7
CD Player
Alarm
To erase a program, select any of the
following.
– Pressing 9 (twice during playback or once
in the stop position);
– Pressing POWER to standby;
– Selecting TUNER or AUX.
Selecting different play modes:
REPEAT and SHUFFLE
You can select and change the various play
modes before or during playback, and
combine REPEAT modes with program.
SHUF – plays all tracks in random order.
Using the alarm
AJ130 allows you to simultaneously set two
different alarms (ALARM 1 and ALARM 2 )
which can go off in the CD, radio or buzzer
mode.The clock time needs to be set
correctly before using alarm.
1
•
•
•
REP – plays the current track continuously.
REP ALL – plays the entire disc/program
continuously.
1
2
3
To select play modes, press SHUFFLE or
REPEPEAT once or more.
➜ The selected play mode will be displayed.
Press ); to start playback if in the stop
postion.
To return to normal playback, press SHUFFLE or REPEPEAT repeatedly until the
various modes are no longer displayed.
– You can also press 9 once to cancel your
play modes.
Note:
– Selection of shuffle mode is not available in
the program mode.
2
3
•
Setting alarm time and mode
In standby mode, press AL 1 or AL 2 once
or more to select alarm mode.
– radio mode
– CD mode
– buzzer mode. The gentle wake buzzer
alarm increases its beep tone frequency within
seconds
➜ The time digits flash.
Hold down or press HOUR/MIN repeatedly
to adjust the hours and mintues.
Press PROGRAM/SET TIME to confirm
the setting.
Repeat the steps above to set and activate
the other alarm if necessary.
➜ When alarm are/is set and activated. AL1
and/or AL2 are/is displayed (See 5).
•
At the set alarm time, the CD or radio or
buzzer will switch on automatically.
Notes:
– Insert a CD if you select CD source as
alarm mode, otherwise, buzzer will auto
turn on.
– When AJ130 is in AUX mode (connecting
an external device), only buzzer will turn on
at the set time regardless of the CD or
RADIO alarm mode you have selected.
– If you have an alarm set in the radio or CD
mode, make sure you have adjusted the
volume loud enough to wake you up.
AZ130-ENG
2010.5.6
11:38
Page 8
Alarm
Sleep/Auxiliary connection
Switching off the alarm
There are three ways of switching off the
alarm. Unless you choose to cancel the alarm
completely, the DAILY ALARM RESET option
will be automatically kept activated from the
time your alarm first goes off.
1
1
Daily alarm reset
If you want the alarm to be stopped
immediately but also wish to repeat the alarm
call at the same time for the following day:
During the alarm call, press once
corresponding AL 1 or AL 2, or press
POWER.
➜ The corresponding AL1 or AL2 is still displayed.
Sleep
The CD clock radio has a built-in sleep timer,
which enables the set to be automatically
switched off during radio or CD playback
after a set period of time.
1
2
3
Repeat alarm
This will repeat your alarm call at 5-minute
intervals.
During the alarm call, press
REPEAT ALARM.
➜ The corresponding AL1 or AL2 is still displayed, yet flashing.
Setting the sleep time
During CD or radio playback, press SLEEP
repeatedly until the desired timer option
appears.
➜ Selections are as follows (time in minute)
90=75=60=45=30=15=00=
90
The set will turn off automatically at the
selected time.
To cancel the timer function, either
press SLEEP once or more until “00”
appears (See 6), or press POWER to
switch to standby.
➜ “SLEEP” disappears when sleep function is
cancelled.
Note:
– The sleep function does not affect your
alarm time setting(s).
– To view the remaining sleep time, press
SLEEP.
Switching off the alarm completely
Press once or more corresponding AL 1 or
AL 2 until AL1 or AL2 disappears.
Connecting an external device
You can listen to the sound of the connected
external device through your AJ130’s
speakers.
1
2
3
Press POWER to switch on from standby.
➜ The system will switch to the last selected
source
If AUX is not selected, press SOURCE once
or more to select it.
➜ “ AUX” is displayed.
Use the supplied AUX cable to connect
AJ130’s AUX jack to an AUDIO OUT or
headphone jack on an external equipment
(such as CD player, or VCR).
AZ130-ENG
2010.5.6
11:38
Page 9
Safety and maintenance (See 7 )
Safety and general
maintenance
•
•
•
•
•
•
•
•
•
•
If you do not intend to use the CD clock
radio for a long time, withdraw the power
cord from the wall outlet.
Place the set on a hard and flat surface so
that the system does not tilt.
Install the unit near the AC outlet and where
the AC power plug can be easily reached.
The apparatus shall not be exposed to dripping or splashing.
Do not expose the set, batteries, CDs to
humidity, rain, sand or excessive heat caused
by heating equipment or direct sunlight.
No objects filled with liquids, such as vases,
shall be placed on the appartus.
No naked flame sources, such as lighted
candles, should be placed on the apparatus.
Do not cover the set. Adequate ventilation
with a minimum gap of 6 inches between the
ventilation holes and surrounding surfaces is
necessary to prevent heat build-up.
The mechanical parts of the set contain
self-lubricating bearings and must not be oiled
or lubricated.
To clean the set, use a soft dry cloth. Do not
use any cleaning agents containing alcohol,
ammonia, benzene or abrasives as these may
harm the housing.
CD player and CD handling
•
•
•
•
•
The lens of the CD player should never be
touched!
Sudden changes in the surrounding temperature can cause condensation to form and the
lens of your CD player to cloud over. Playing
a CD is then not possible. Do not attempt to
clean the lens but leave the set in a warm
environment until the moisture evaporates.
Always shut the CD door to keep the CD
compartment dust-free.To clean, dust the
compartment with a soft dry cloth.
To clean the CD, wipe in a straight line from
the center towards the edge using a soft,
lint-free cloth. Do not use cleaning agents as
they may damage the disc.
Never write on a CD or attach any stickers
to it.
AZ130-ENG
2010.5.6
11:38
Page 10
Troubleshooting
If a fault occurs, first check the points listed below before taking the set for repair.
If you are unable to remedy a problem by following these hints, consult your dealer or
service center.
WARNING: Do not open the set as there is a risk of electric shock. Under no circumstances should you try to repair the set yourself, as this will invalidate the warranty.
No sound.
The alarm does not function.
– Volume not adjusted.
• Adjust the VOLUME.
–
•
–
•
–
CD playback does not work.
–
•
–
•
–
•
–
•
CD badly scratched or dirty.
Replace/ clean CD.
Laser lens steamed up.
Wait until lens has adjusted to room temperature
Laser lens dirty.
Clean lens by playing a CD lens cleaning disc.
CD-R is non-finalized.
Use a finalized CD-R.
Occasional crackling sound during FM
broadcast.
– Weak signal.
• Extend the pigtail antenna fully.
Alarm time not set.
See section on Setting alarm time.
Alarm mode not selected.
See section on Setting alarm mode.
No CD is inserted as CD is selected as Alarm
mode.
• Insert a CD.
AZ130-ENG
2010.5.6
11:38
Page 11
Disposal of your old product
Your product is designed and manufactured with high quality materials and components, which can
be recycled and reused.
When this crossed-out wheeled bin symbol is attached to a product it means the
product is covered by the European Directive 2002/96/EC.
Please inform yourself about the local separate collection system for electrical and
electronic products.
Please act according to your local rules and do not dispose of your old products with your normal
household waste.The correct disposal of your old product will help prevent potential negative
consequences for the environment and human health.
Environmental information
All unnecessary packaging material has been omitted.The packaging can be easily separated into three materials: cardboard, polystyrene and plastic.
Your set consists of materials which can be recycled if disassembled by a
specialized company. Please observe the local regulations regarding the
disposal of packaging, dead batteries and old equipment.
CAUTION
- Visible and invisible laser radiation. If the cover is open, do not look at the
beam.
- High voltage! Do not open.You run the risk of getting an electric shock.
The machine does not contain any user-serviceable parts.
- Modification of the product could result in hazardous radiation of EMC or
other unsafe operation.
AZ130-ENG
2010.5.6
11:38
Page 12
Meet Philips at the Internet
http://www.philips.com
W
CLASS 1
LASER PRODUCT
© 2010 Koninklijke Philips Electronics N.V.
All rights reserved.
AJ130_IFU_12_V2.0