1
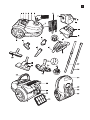
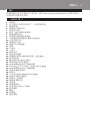
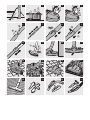
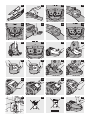
FC9160-FC9176
1
FC9176-FC9160
English 6
한국어 13
繁體中文 21
6
English
Introduction
Congratulations on your purchase and welcome to Philips! To fully benefit from the support that
Philips offers, register your product at www.philips.com/welcome.
General description (Fig. 1)
1 Cord rewind button
2 Suction power knob (in case of remote control: infrared receiver)
3 On/off button
4 Dustbag-full indicator
5 Hose connection opening
6 Hose with swivel connector
7 Dust cover release tab
8 Filter holder with motor protection filter
9 Reusable dustbag (specific countries only)
10 Removable strip
11 Dustbag holder
12 Disposable synthetic dustbag
13 Rear wheel
14 Small nozzle
15 Small brush
16 Crevice tool
17 Button coupling
18 Hose with handgrip (specific types only: with remote control)
19 Accessory holder
20 Hard floor nozzle (specific types only)
21 Combination nozzle (specific types only)
22 Rocker switch for carpet/hard floor settings
23 TriActive nozzle (specific types only)
24 Rocker switch for carpet/hard floor settings
25 Parking/storage ridge
26 Side brush
27 Tri-Scopic tube (specific types only)
28 Telescopic tube (specific types only)
29 Hinging top handle
30 Filter grille (open)
31 Parking slot
32 Mains plug
33 Ultra Clean Air HEPA 13 filter
34 Front handle
35 Swivel wheel
36 Storage slot
37 Type plate
Important
Read this user manual carefully before you use the appliance and save it for future reference.
Danger
-- Never suck up water or any other liquid. Never suck up flammable substances and do not suck
up ashes until they are cold.
English
7
Warning
-- Check if the voltage indicated on the appliance corresponds to the local mains voltage before
you connect the appliance.
-- Do not use the appliance if the plug, the mains cord or the appliance itself is damaged.
-- If the mains cord is damaged, you must have it replaced by Philips, a service centre authorised by
Philips or similarly qualified persons in order to avoid a hazard.
-- This appliance is not intended for use by persons (including children) with reduced physical,
sensory or mental capabilities, or lack of experience and knowledge, unless they have been given
supervision or instruction concerning use of the appliance by a person responsible for their safety.
-- Children should be supervised to ensure that they do not play with the appliance.
-- Do not point the hose, the tube or any other accessory at the eyes or ears nor put it in your
mouth when it is connected to the vacuum cleaner and the vacuum cleaner is switched on.
Caution
-- When you use the vacuum cleaner to vacuum ashes, fine sand, lime, cement dust and similar
substances, the pores of the dustbag become clogged. As a result, the dustbag-full indicator will
indicate that the dustbag is full. Replace the disposable dustbag or empty the reusable dustbag,
even if it is not full yet (see chapter ‘Replacing/emptying the dustbag’).
-- Never use the appliance without the motor protection filter. This could damage the motor and
shorten the life of the appliance.
-- Only use Philips s-bag ` synthetic dustbags or the reusable dustbag provided (some countries only).
-- The translucent display panel is made of recyclable polycarbonate (>PC/ABS<).
-- During vacuum cleaning, especially in rooms with low air humidity, your vacuum cleaner builds
up static electricity. As a result you can experience electric shocks when you touch the tube or
other steel parts of your vacuum cleaner. These shocks are not harmful to you and do not
damage the appliance. To reduce this inconvenience we advise you:
1 to discharge the appliance by frequently holding the tube against other metal objects in the
room (for example legs of a table or chair, radiator etc.); (Fig. 2)
2 to raise the air humidity level in the room by placing water in the room. For example, you can
hang containers filled with water from your radiators or place bowls filled with water on or
near your radiators (Fig. 3).
Electromagnetic fields (EMF)
This Philips appliance complies with all standards regarding electromagnetic fields (EMF). If handled
properly and according to the instructions in this user manual, the appliance is safe to use based on
scientific evidence available today.
Preparing for use
Hose
1To connect the hose, push it firmly into the appliance (‘click’) (Fig. 4).
2To disconnect the hose, push the buttons and pull the hose out of the appliance (Fig. 5).
Tri-Scopic tube (specific types only)
1To connect the tube to the handgrip, press the spring-loaded lock button on the handgrip (1)
and insert the handgrip into the tube. Fit the spring-loaded lock button into the opening in
the tube (‘click’) (2) (Fig. 6).
-- To disconnect the tube from the handgrip, press the spring-loaded lock button and pull the
handgrip out of the tube.
2Adjust the tube to the length you find most comfortable during vacuuming. Press one of the
two collars downwards and pull the tube part above the collar upwards or push it
downwards (Fig. 7).
8
English
Telescopic tube (specific types only)
1To connect the tube to the handgrip, insert the handgrip into the tube. Fit the spring-loaded
lock button into the opening in the tube (‘click’) (Fig. 8).
-- To disconnect the tube from the handgrip, press the easy-release button (1) and pull the
handgrip out of the tube (2) (Fig. 9).
2Adjust the tube to the length you find most comfortable during vacuuming (Fig. 10).
Nozzles and accessories
1To connect a nozzle or an accessory to the tube, press the spring-loaded lock button (1) on
the tube and insert the tube into the nozzle or accessory (2). Fit the spring-loaded lock
button into the opening in the nozzle or accessory (‘click’) (Fig. 11).
Note:You can also connect the nozzles and accessories directly to the handgrip in the same way.
2To disconnect the nozzle or an accessory from the tube, press the spring-loaded lock button
and pull the nozzle out of the tube.
TriActive nozzle (specific types only)
The TriActive nozzle is a multi-purpose nozzle for carpets and hard floors.
-- The side brushes catch more dust and dirt at the sides of the nozzle and allow you to clean
better along furniture and other obstacles (Fig. 12).
-- The opening at the front of the nozzle allows you to vacuum larger particles (Fig. 13).
1To clean hard floors, push the rocker switch on top of the nozzle with your foot (Fig. 14).
,, The brush strip for cleaning hard floors comes out of the housing. At the same time, the
wheel is lifted to prevent scratching and to increase manoeuvrability.
2To clean carpets, push the rocker switch again (Fig. 15).
,, The brush strip disappears into the nozzle housing and the wheel is lowered automatically.
Combination nozzle (specific types only)
The combination nozzle can be used on either carpets or hard floors.
1To clean hard floors, push the rocker switch on top of the nozzle with your foot (Fig. 16).
,, The brush strip for cleaning hard floors comes out of the nozzle housing.
2To clean carpets, push the rocker switch again (Fig. 17).
,, The brush strip disappears into the nozzle housing.
Hard floor nozzle (specific types only)
-- The hard-floor nozzle is designed for gentle cleaning of hard floors (Fig. 18).
Accessories
1You can connect the crevice tool (1), the small nozzle (2) or the small brush (3) directly to
the handgrip of the hose or to the tube. Use the same method as for the tube.  (Fig. 19)
-- Use the crevice tool to clean narrow corners or hard-to-reach places.
-- Use the small nozzle to clean small areas, e.g. the seats of chairs and sofas.
-- Use the small brush nozzle to clean computers, bookshelves etc.
Accessory holder
1Snap the accessory holder onto the handgrip (Fig. 20).
2Snap two accessories into the accessory holder:
-- Crevice tool and small nozzle (Fig. 21).
-- Crevice tool and small nozzle (Fig. 22).
Note:The small nozzle must be placed in the accessory holder as shown in the picture.
English
9
Infrared remote control (specific types only)
1Remove the battery compartment cover.
2Place the batteries in the battery compartment (Fig. 23).
Make sure the - and + poles point in the right direction.
3Reattach the battery compartment cover
Using the appliance
1Pull the cord out of the appliance and put the mains plug in the wall socket.
2Press the on/off button on top of the appliance with your foot to switch on the
appliance (Fig. 24).
Adjusting suction power
During vacuuming, you can adjust the suction power.
-- Use maximum suction power to vacuum very dirty carpets and hard floors.
-- Use minimum suction power to vacuum curtains, table carpets, etc.
Infrared remote control (specific types only)
With the infrared remote control, you can set the suction power to one of 5 different suction
power settings.
-- When you switch on the appliance, it always starts operating at the highest suction
power setting.
-- To reduce the suction power by one setting, press the - button.  (Fig. 25)
To increase the suction power by one setting, press the + button.
Suction power knob (specific types only)
-- During vacuum cleaning, you can adjust the suction power with the suction power knob on top
of the appliance (Fig. 26)
Pausing during use
1If you want to pause for a moment, insert the ridge on the nozzle into the parking slot to
park the tube in a convenient position (Fig. 27).
2If the appliance is equipped with an infrared remote control (specific types only), press the
standby button to switch off the vacuum cleaner temporarily, for instance when you have to
move some furniture.  (Fig. 28)
3To continue vacuum cleaning, press the standby button again. The appliance then starts
operating at the previously selected suction power setting again.
Storage
1Slide the tube parts into each other to reduce the tube to its shortest length.
2Switch off the appliance and remove the mains plug from the wall socket.
3Press the cord rewind button to rewind the mains cord (Fig. 29).
4 To store the appliance in upright position, insert the ridge on the nozzle into the storage
slot (Fig. 30).
5 Always put the TriActive nozzle in the carpet setting when you store it (brush strip retracted
into the nozzle). Also prevent the side brushes from becoming bent (Fig. 15).
10
English
Replacing/emptying the dustbag
Always unplug the appliance before you replace the disposable dustbag or empty the reusable
dustbag.
Note: In some cases, the dustbag-full indicator can indicate that the dustbag is full, even though it is not.
This may occur if the pores of the dustbag are clogged (e.g. when you have vacuumed ashes, fine sand,
lime, cement dust and similar substances) or if something is blocking the nozzle, tube and/or hose. If the
pores of the dustbag are clogged, you have to replace the dustbag, even if it is not full yet. If the dustbag
is not clogged but not full either, something is blocking the nozzle, tube and/or hose. In this case, do not
replace the dustbag but remove the obstruction.
Replacing the disposable dustbag
-- Replace the dustbag as soon as the dustbag-full indicator has changed colour permanently, i.e.
even when the nozzle is not placed on the floor (Fig. 31).
1Pull the cover upwards to open it (Fig. 32).
2Lift the dustbag holder out of the appliance (Fig. 33).
Make sure you hold the holder with the dustbag in horizontal position when you lift it out of the
appliance.
3Pull at the cardboard tag to remove the full dustbag from the holder (Fig. 34).
,, The dustbag is sealed automatically.
4 Slide the cardboard front of the new dustbag into the two grooves of the dustbag holder as
far as possible.  (Fig. 35)
5 Put the dustbag holder back into the vacuum cleaner.
Note: If you have not inserted a dustbag, you cannot close the cover.
Emptying the reusable dustbag (specific countries only)
In some countries, this vacuum cleaner also comes with a reusable dustbag that can be used and
emptied repeatedly. You can use the reusable dustbag instead of disposable dustbags.
1Remove the reusable dustbag from the appliance and the holder as described in section
‘Replacing the disposable dustbag’ above.
2Slide the clip off the dustbag sideways.
3Shake out the contents into a dustbin.
4 To close the dustbag, slide the clip back onto the bottom edge of the dustbag.
5 Reinsert the reusable dustbag into the holder and the appliance as described in
section ‘Replacing the disposable dustbag’ above.
Maintenance
Always unplug the appliance before you clean or replace the filters
Note: Only wipe the body of the appliance with a moist cloth.
Permanent motor protection filter
To guarantee optimal performance, clean the permanent motor protection filter every time you
replace or empty the dustbag.
1Remove the dustbag holder with the dustbag (Fig. 33).
English 11
2Press the filter holder release tab (1) and take the filter holder out of the appliance (2). Take
the motor protection filter out of the filter holder.  (Fig. 36)
3Shake the filter over a dustbin to clean it.
4 Put the clean filter back into the filter holder. Fit the two lugs of the filter holder behind the
ridge at the bottom to ensure that it fits properly at the top (1). Then press home the filter
holder (‘click’) (2) (Fig. 37).
5 Place the dustbag holder with the dustbag back into the appliance.
HEPA 13 filter
The HEPA 13 filter is able to remove 99.95% of all particles down to 0.0003mm in size from the
outlet air. This not only includes normal house dust, but also harmful microscopic vermin such as
dust mites and their excrements, which are well-known causes of respiratory allergies.
Note:To guarantee optimal dust retention and performance of the vacuum cleaner, always replace the
HEPA filter every 2 years with an original Philips filter of the correct type (see chapter ‘Ordering
accessories’).You can dispose of the old filter with the normal household waste.
Replacing the HEPA 13 filter
1Open the filter grille (Fig. 38).
2Take out the washable HEPA 13 filter (Fig. 39).
3Put the filter back into the appliance (Fig. 40).
4 Close the filter grille and push the bottom corners until they snap home (Fig. 41).
Note: For optimal results, replace the HEPA 13 filter every 2 years. If you want to minimise the impact on
the environment, you can wash the HEPA 13 filter.
Washing the HEPA 13 filter (FC917x series only)
To wash the HEPA 13 filter, follow the instructions below.
1Rinse the HEPA 13 filter under a hot slow-running tap (Fig. 42).
 Never clean the filter with a brush.
2Carefully shake the water from the surface of the filter. Let the filter dry completely for at
least 2 hours before you put it back into the vacuum cleaner.
Note: Cleaning does not restore the original colour of the filter, but does restore its filtration power.
Ordering accessories
If you have any difficulties obtaining dustbags, filters or other accessories for this appliance, please
contact the Philips Consumer Care Centre in your country or consult the worldwide guarantee
leaflet.
Ordering dustbags
-- Philips s-bag® classic long performance dustbags last 50% longer than standard dustbags,
thanks their non-clogging material. Available under type number FC8021.
-- Philips s-bag® anti-allergy dustbags reduce the exposure to allergens. Their HEPA 10 filtration
level gives you a clean and healthy home environment. Available under type number FC8022.
-- Philips s-bag® anti-odour dustbags have an odour-absorbing coating. This coating absorbs and
neutralises unpleasant smells caused by decomposing pet hair or food scraps. Available under
type number FC8023.
12
English
Ordering filters
-- Washable Ultra Clean Air HEPA 13 filters are available under type number FC8038.
Environment
-- The non-rechargeable batteries of the remote control contain substances that may pollute the
environment. Do not throw away batteries with the normal household waste, but dispose of
them at an official collection point for batteries. Always remove the batteries of the remote
control (specific types only) before you discard and hand in the appliance at an official collection
point.  (Fig. 43)
-- Do not throw away the appliance with the normal household waste at the end of its life, but
hand it in at an official collection point for recycling. By doing this, you help to preserve the
environment (Fig. 44).
Guarantee and service
If you need service or information or if you have a problem, please visit the Philips website at
www.philips.com or contact the Philips Consumer Care Centre in your country. You find its
phone number in the worldwide guarantee leaflet. If there is no Consumer Care Centre in your
country, go to your local Philips dealer.
Troubleshooting
This chapter summarises the most common problems you could encounter with the appliance. If
you are unable to solve the problem with the information below, contact the Consumer Care
Centre in your country.
1The suction power is insufficient.
A The dustbag may be full.
-- Empty the reusable dustbag (specific types only) or replace the paper dustbag.
B The filters may be dirty.
-- Clean or replace the filters.
C The suction power may be set to a low setting.
-- Set the suction power to a higher setting.
D The nozzle, tube or hose may be blocked up.
-- To remove the obstruction, disconnect the blocked-up item and connect it (as far as possible)
the other way around. Switch on the vacuum cleaner to force the air through the blocked-up
item in opposite direction (Fig. 45).
2The infrared remote control (specific types only) does not function.
A Perhaps the batteries do not make proper contact or have not been inserted in the proper way.
-- Remove the lid of the battery compartment and push the batteries back into place. Make sure
that the - and + poles point in the right direction (Fig. 23).
B The batteries may be empty.
-- Replace the batteries.
3When I use my vacuum cleaner I sometimes feel electric shocks.
A Your vacuum cleaner builds up static electricity. The lower the air humidity in the rooms, the
more static electricity the appliance builds up.
-- To reduce this inconvenience, we advise you to discharge the appliance by frequently holding
the tube against other metal objects in the room (for example legs of a table or chair, a radiator
etc.).
-- To reduce this inconvenience, we advise you to raise the air humidity level in the room by
placing water in the room. For example, you can hang containers filled with water from your
radiators or place bowls filled with water on or near your radiators.
한국어 13
소개
필립스 제품을 구입해 주셔서 감사합니다! 필립스가 드리는 지원 혜택을 받으실 수
있도록 www.philips.co.kr에서 제품을 등록하십시오.
각 부의 명칭 (그림 1)
1 코드 되감기 버튼
2 흡입력 조절기(리모콘의 경우: 적외선 수신기)
3 전원 버튼
4 먼지 봉투 교체 표시등
5 호스 연결 구멍
6 회전식 연결부가 있는 호스
7 먼지 덮개 분리 탭
8 모터 보호 필터가 있는 필터 거치대
9 재사용이 가능한 먼지 봉투(특정 국가만 해당)
10 탈착식 스트립
11 먼지 봉투 거치대
12 합성섬유로 만든 교체형 먼지 봉투
13 뒷바퀴
14 소형 노즐
15 소형 브러시
16 틈새 노즐
17 버튼 결합 기능
18 손잡이가 달린 호스(특정 모델만 해당: 리모콘 포함)
19 액세서리 거치대
20 딱딱한 바닥용 노즐(특정 모델만 해당)
21 콤비네이션 노즐(특정 모델만 해당)
22 카페트/일반 바닥재 설정을 위한 로커 스위치
23 TriActive 노즐(특정 모델만 해당)
24 카페트/일반 바닥재 설정을 위한 로커 스위치
25 임시보관/보관 걸이
26 측면 브러시
27 3단 연장관(특정 모델만 해당)
28 길이 조절이 가능한 연장관(특정 모델만 해당)
29 경첩식 상단 손잡이
30 필터 커버(열림)
31 임시보관용 홈
32 전원 플러그
33 Ultra Clean Air HEPA 13 필터
34 앞면 손잡이
35 회전식 바퀴
36 보관용 홈
37 명판
14
한국어
주의 사항
본 제품을 사용하기 전에 이 사용 설명서를 주의 깊게 읽고 나중에 참조할 수 있도록 잘
보관하십시오.
위험
-- 물, 다른 용액 또는 가연성 물질은 절대 흡입하지 마십시오. 타고 남은 재는 완전히
꺼져서 식기 전까지는 절대 흡입하지 마십시오.
경고
-- 제품에 전원을 연결하기 전에, 제품에 표시된 전압과 사용 지역의 전압이 일치하는지
확인하십시오.
-- 만약 플러그나 전원 코드 또는 제품이 손상되었을 경우에는 제품을 사용하지
마십시오.
-- 전원 코드가 손상된 경우, 안전을 위해 필립스 서비스 센터 또는 필립스 서비스
지정점에 의뢰하여 교체하십시오.
-- 신체적인 감각 및 정신적인 능력이 떨어지거나 경험과 지식이 풍부하지 않은 성인 및
어린이는 혼자 제품을 사용하지 말고, 제품 사용과 관련하여 안전에 책임 질 수
있도록 지시사항을 충분히 숙지한 사람의 도움을 받으십시오.
-- 어린이가 제품을 가지고 놀지 못하도록 지도해 주십시오.
-- 호스, 연장관 또는 기타 액세서리가 진공 청소기가 연결되어 있고 진공 청소기의
전원이 켜져 있을 때 이를 눈, 귀에 갖다 대거나 입에 넣지 마십시오.
주의
-- 진공 청소기를 사용하여 재, 미세한 모래, 석회, 시멘트 가루 및 유사한 물질을
흡입하면 먼지 봉투 구멍이 막히게 됩니다. 이로 인해 먼지 봉투 교체 표시등에 먼지
봉투가 가득 찬 것으로 표시됩니다. 이 경우, 먼지 봉투가 가득 차지 않았더라도
교체형 먼지 봉투를 교체하거나 재사용이 가능한 먼지 봉투인 경우 봉투를
비우십시오(‘먼지 봉투 교체/비우기’란 참조).
-- 모터 보호 필터 없이 제품을 사용하지 마십시오. 모터가 손상되고 제품의 수명이
단축될 수 있습니다.
-- 반드시 제품과 함께 제공되는 필립스 S-bag ` 합성섬유 먼지 봉투 또는 재사용
먼지 봉투를 사용하십시오(특정 국가만 해당).
-- 반투명 표시창은 재활용 가능한 폴리카보네이트(>PC/ABS<)로 만들어졌습니다.
-- 특히 습도가 낮은 실내에서 진공 청소기를 사용할 경우 진공 청소기에 정전기가
축적됩니다. 이로 인해 진공 청소기의 연장관이나 다른 철제 부분을 만질 때 경미한
감전이 발생할 수 있습니다. 이러한 감전은 인체에 해롭지 않으며 제품도 손상시키지
않습니다. 하지만 불편을 최소화하기 위해 진공 청소기 사용 시 다음 사항을
권장합니다.
1 실내에서 연장관을 금속 물체(예: 테이블, 의자 또는 라디에이터 등의 다리)와 수시로
접촉하도록 하여 제품을 방전시킵니다 (그림 2).
2 물을 채운 용기를 라디에이터에 걸쳐놓거나 라디에이터 위나 근처에 물을 채운
그릇을 놓는 방법으로 실내에 수분을 공급하여 습도를 높입니다 (그림 3).
EMF(전자기장)
이 필립스 제품은 EMF(전자기장)와 관련된 모든 기준을 준수합니다. 이 사용 설명서의
지침에 따라 적절하게 취급할 경우 이 제품은 안전하게 사용할 수 있으며 이는
현재까지의 과학적 증거에 근거하고 있습니다.
한국어 15
사용 전 준비
호스
1호스를 연결하려면 ‘찰칵’ 소리가 날 때까지 제품 안으로 밀어 넣으십시오 (
그림 4).
2호스를 분리하려면 버튼을 누르고 제품에서 호스를 잡아당겨 빼십시오 (그림 5).
3단 연장관(특정 모델만 해당)
1손잡이에 연장관을 연결하려면 손잡이에 있는 스프링식 잠금 버튼을 누르고(1)
손잡이를 연장관에 장착하십시오. 스프링식 잠금 버튼을 ‘찰칵’ 소리가 날 때까지
연장관 구멍에 맞추십시오(2) (그림 6).
-- 손잡이에서 연장관을 분리하려면 스프링식 잠금 버튼을 누르고 연장관에서 손잡이를
잡아당기십시오.
2청소하면서 사용하기 편한 길이로 연장관을 조절하십시오. 이음 고리 2개 중 하나를
아래쪽으로 누르고 이음 고리의 윗부분의 연장관을 위쪽으로 잡아 당기거나
아래쪽으로 밀어내십시오 (그림 7).
길이 조절이 가능한 연장관(특정 모델만 해당)
1손잡이에 연장관을 연결하려면 손잡이를 연장관에 장착하십시오. 스프링식 잠금
버튼이 ‘찰칵’ 소리가 날 때까지 연장관 구멍에 맞추십시오 (그림 8).
-- 손잡이에서 연장관을 분리하려면 간편 열림 버튼을 누르고(1) 연장관에서 손잡이를
잡아당기십시오(2) (그림 9).
2청소하는 동안 연장관을 사용하기 편한 길이로 조절하십시오 (그림 10).
노즐 및 액세서리
1노즐 또는 액세서리를 연장관에 연결하려면 연장관에 있는 스프링식 잠금 버튼을
누르고(1) 연장관을 노즐 또는 액세서리에 끼우십시오(2). 스프링식 잠금 버튼을
노즐 또는 액세서리에 있는 주입구에 맞춥니다(‘찰칵’ 소리가 남) (그림 11).
참고: 같은 방법으로 노즐 및 액세서리를 손잡이에 직접 연결할 수도 있습니다.
2노즐 또는 액세서리를 연장관에서 분리하려면 스프링식 잠금 버튼을 누르고 노즐을
연장관에서 잡아당기면 됩니다.
TriActive 노즐(특정 모델만 해당)
TriActive 노즐은 카페트 및 일반 바닥에서 사용할 수 있는 다용도 노즐입니다.
-- 노즐 옆 부분의 측면 브러시는 먼지와 더러움을 더 잘 잡아주며, 가구 및 기타
장애물의 가장자리를 따라 효과적으로 청소합니다 (그림 12).
-- 노즐 앞부분의 구멍은 더 큰 입자를 흡입할 수 있습니다 (그림 13).
1일반 바닥재를 청소하려면 노즐 상단의 로커 스위치를 발로 누르십시오 (그림 14).
,, 그러면 일반 바닥재용 브러시의 솔 부분이 외장 바깥으로 나옵니다. 동시에 바퀴도
올라가서 긁힘을 방지하고 더 잘 움직이게 됩니다.
2카페트를 세척하려면 로커 스위치를 다시 누르십시오 (그림 15).
,, 브러시의 솔 부분이 노즐 외장 안으로 들어가고 바퀴도 자동으로 내려옵니다.
콤비네이션 노즐(특정 모델만 해당)
콤비네이션 노즐은 카페트나 일반 바닥에서 사용할 수 있습니다.
1일반 바닥재를 청소하려면 노즐 상단의 로커 스위치를 발로 누르십시오 (그림 16).
,, 일반 바닥재용 브러시의 솔 부분이 노즐 외장 바깥으로 나옵니다.
2카페트를 세척하려면 로커 스위치를 다시 누르십시오 (그림 17).
,, 브러시의 솔 부분이 노즐 외장 안으로 들어갑니다.
16
한국어
딱딱한 바닥용 노즐(특정 모델만 해당)
-- 딱딱한 바닥용 노즐은 딱딱한 바닥을 부드럽게 청소하도록 설계되었습니다 (
그림 18).
액세서리
1호스 손잡이나 연장관에 틈새 노즐(1), 소형 노즐(2) 또는 소형 브러시(3)를 직접
연결할 수 있습니다. 연장관과 같은 방법을 사용하십시오.  (그림 19)
-- 틈새 노즐은 좁은 구석이나 닿기 힘든 장소를 청소할 때 사용하십시오.
-- 소형 노즐은 의자나 소파와 같이 좁은 공간을 청소할 때 사용하십시오.
-- 소형 브러시 노즐은 컴퓨터나 책장 등을 청소할 때 사용하십시오.
액세서리 거치대
1액세서리 거치대를 손잡이에 끼우십시오 (그림 20).
22개의 액세서리를 액세서리 거치대에 끼우십시오.
-- 틈새 노즐 및 소형 노즐 (그림 21)
-- 틈새 노즐 및 소형 노즐 (그림 22)
참고: 그림과 같이 소형 노즐을 반드시 액세서리 거치대에 보관하십시오.
적외선 리모콘(특정 모델만 해당)
1배터리함 덮개를 여십시오.
2배터리함에 배터리를 넣으십시오 (그림 23).
배터리의 극성(+/-)에 맞게 끼우십시오.
3배터리함 덮개를 닫으십시오.
제품 사용
1제품에서 코드를 꺼내고 벽면 콘센트에 전원 플러그를 꽂으십시오.
2제품 상단의 전원 버튼을 발로 눌러서 전원을 켜십시오 (그림 24).
흡입력 조절
청소 도중 흡입력을 조절할 수 있습니다.
-- 매우 더러운 카페트 및 딱딱한 바닥을 청소할 때는 흡입력을 최대로 하여
사용하십시오.
-- 커튼, 식탁보 등을 청소할 때는 흡입력을 최저로 하여 사용하십시오.
적외선 리모콘(특정 모델만 해당)
적외선 리모콘을 사용하여 흡입력을 5가지 설정으로 조절할 수 있습니다.
-- 제품의 전원을 켜면 항상 최고 흡입력으로 작동이 시작됩니다.
-- 흡입력을 한 단계 낮추려면 - 버튼을 누르십시오.  (그림 25)
흡입력을 한 단계 높이려면 + 버튼을 누르십시오.
흡입력 조절기(특정 모델만 해당)
-- 청소 중에도 제품 상단의 흡입력 조절기로 흡입력을 조절할 수 있습니다 (그림 26).
사용 중 잠시 중단
1청소를 잠시 중단하려면 노즐 걸이를 임시 보관용 홈에 끼워서 연장관을 편안하게
세워두십시오 (그림 27).
2제품에 적외선 리모콘(특정 모델만 해당)이 장착되어 있으면 가구를 옮겨야 하는
경우와 같이 일시적으로 진공 청소기 스위치를 꺼야 할 때 대기 버튼을
누르십시오.  (그림 28)
한국어 17
3진공 청소기를 계속 사용하려면 대기 버튼을 다시 누르십시오. 그러면 이전에 선택된
흡입력 설정에서 다시 작동이 시작됩니다.
보관
1연장관끼리 서로 밀어서 가장 짧게 조절하십시오.
2제품 전원을 끄고 벽면 콘센트에서 전원 플러그를 뽑으십시오.
3코드 되감기 버튼을 눌러 전원 코드를 되감으십시오 (그림 29).
4제품을 똑바로 세워서 보관하려면 노즐 걸이를 보관용 홈에 끼우십시오 (그림 30).
5청소기를 보관할 때는 항상 Tri-Active 노즐을 카페트 설정에 두십시오(브러시 솔
부분이 노즐 속으로 들어간 상태). 또한 측면 브러시가 휘어지지 않도록 하십시오 (
그림 15).
먼지 봉투 교체/비우기
교체형 먼지 봉투를 교체하거나 재사용이 가능한 먼지 봉투를 비우기 전에 항상 전원
플러그를 뽑으십시오.
참고: 먼지 봉투가 가득 차지 않았는데도 먼지 봉투 교체 표시등에 꽉 찼다는 표시가
나타나는 경우가 있습니다. 이러한 현상은 재, 미세 모래, 시멘트 먼지 및 유사 물질
등을 청소한 후 먼지 봉투 표면의 작은 구멍들이 막히거나 다른 물질이 노즐, 튜브, 호스
등에 막혔을 때 발생합니다. 먼지 봉투 표면의 구멍이 막히면 가득 차지 않았더라도 먼지
봉투를 교체하십시오. 먼지 봉투가 막히지도 않고 가득 차지도 않았다면 다른 물질이
노즐, 튜브, 호스 등을 막고 있을 수 있습니다. 이 경우에는 먼지 봉투를 교체하지 말고
막고 있는 물체를 제거해 주십시오.
교체형 먼지 봉투를 교체
-- 먼지 봉투 교체 표시등의 색깔이 바뀌면 즉시 먼지 봉투를 교체하십시오(예를 들어,
노즐을 바닥에 대고 있지 않은 경우도 해당) (그림 31).
1먼지 봉투를 열려면 덮개를 위로 올리십시오 (그림 32).
2제품에서 먼지 봉투 거치대를 들어내십시오 (그림 33).
제품에서 먼지 봉투를 들어올릴 때 먼지 봉투를 수평 위치로 하여 거치대를 잡아야
합니다.
3거치대에서 가득 찬 먼지 봉투를 분리하려면 딱딱한 판지의 손잡이를 당기십시오 (
그림 34).
,, 먼지 봉투가 자동으로 밀봉됩니다.
4새 먼지 봉투의 판지 앞면을 먼지 봉투 거치대의 2개 홈으로 최대한 밀어
넣으십시오.  (그림 35)
5먼지 봉투 거치대를 진공 청소기 안에 다시 넣으십시오.
참고: 먼지 봉투를 끼우지 않으면 덮개를 닫을 수 없습니다.
재사용이 가능한 먼지 봉투 비우기(특정 국가만 해당)
일부 국가에서는 반복해서 사용하고 비울 수 있는 재사용이 가능한 먼지 봉투가 이 진공
청소기와 함께 제공됩니다. 교체형 먼지 봉투 대신 재사용이 가능한 먼지 봉투를 사용할
수 있습니다.
1위 ‘교체형 먼지 봉투 교체’ 섹션에 설명되어 있는 것처럼, 제품에서 재사용이
가능한 먼지 봉투와 거치대를 분리하십시오.
2클립을 먼지 봉투를 옆으로 미십시오.
18
한국어
3내용물을 휴지통에 털어 버리십시오.
4클립을 다시 먼지 봉투 아래 가장자리로 밀어서 먼지 봉투를 닫으십시오.
5위 ‘교체형 먼지 봉투 교체’ 섹션에 설명되어 있는 것처럼, 재사용이 가능한 먼지
봉투를 거치대와 제품에 다시 끼우십시오.
유지관리
필터를 세척하거나 교체하기 전에는 항상 제품 코드를 뽑으십시오.
참고: 제품 본체만 젖은 천으로 닦으십시오.
영구 모터 보호 필터
최적의 성능을 보장하려면 먼지 봉투를 교체하거나 비울 때마다 영구 모터 보호 필터를
청소하십시오.
1먼지 봉투가 들어있는 먼지 봉투 거치대를 분리하십시오 (그림 33).
2필터 거치대 분리 탭을 누르고(1) 제품에서 필터 거치대를 꺼내십시오(2). 필터
거치대에서 모터 보호 필터를 꺼내십시오.  (그림 36)
3휴지통 위에서 필터를 털어내 필터를 청소하십시오.
4깨끗해진 필터를 다시 필터 거치대에 끼우십시오. 필터 거치대의 두 돌출부를 아래쪽
홈에 맞추어 윗부분이 잘 맞도록 하십시오(1). 그런 다음 필터 거치대를 ‘찰칵’
소리가 날 때까지 눌러 제자리에 끼우십시오(2) (그림 37).
5먼지 봉투가 들어있는 먼지 봉투 거치대를 제품에 다시 넣으십시오.
HEPA 13 필터
HEPA 13 필터는 배출 공기에서 나오는 0.0003mm 크기의 모든 미립자를 99.95%까지
제거할 수 있습니다. 여기에는 일반 가정 먼지뿐 아니라 호흡기 알레르기를 유발하는
먼지 진드기 및 진드기 배설물과 같은 해로운 미세 해충도 포함됩니다.
참고: 진공 청소기의 최상의 먼지 제거 성능을 위해 HEPA 필터는 반드시 2년마다 정품
필립스 필터로 교체하십시오(‘액세서리 주문’란 참조). 오래된 필터는 일반 가정용
쓰레기와 함께 버려도 됩니다.
HEPA 13 필터 교체
1필터 커버를 여십시오 (그림 38).
2물 세척이 가능한 HEPA 13 필터를 꺼내십시오 (그림 39).
3필터를 제품에 다시 넣으십시오 (그림 40).
4필터 커버를 닫고 하단 모서리를 밀어서 제자리에 끼우십시오 (그림 41).
참고: 최상의 결과를 위해, HEPA 13 필터를 2년마다 교체하십시오. HEPA 13 필터를
세척하면 환경에 미치는 영향을 최소화할 수 있습니다.
HEPA 13 필터 세척(FC917x 모델만 해당)
HEPA 13 필터를 세척하려면 다음 지침을 따르십시오.
1HEPA 13 필터를 천천히 흐르는 뜨거운 물에 헹구십시오 (그림 42).
 필터를 브러시로 씻지 마십시오.
2필터를 조심스럽게 흔들어 물기를 털어내십시오. 필터를 진공 청소기에 다시 넣기
전에 최소 2시간 동안 완전히 말리십시오.
참고: 필터 세척을 통해 원래 색깔이 돌아오지는 않지만 필터링 기능은 회복됩니다.
한국어 19
액세서리 주문
본 제품의 필터나 기타 액세서리를 구하기 어려운 경우에는 필립스 고객 상담실로
문의하거나 제품 보증서를 참조하십시오.
먼지 봉투 구매
-- 막힘을 방지하는 재질로 되어 있는 필립스 S-bag® 클래식 - 긴 수명 먼지 봉투는
표준 먼지 봉투보다 수명이 50% 더 깁니다. 모델 번호 FC8021로 구매하십시오.
-- 필립스 S-bag® 알레르기 방지 먼지 봉투는 알레르겐에 대한 노출을 줄여줍니다. 이
먼지 봉투의 HEPA 10 필터링 수준은 가장 청결한 집안 청소와 건강한 생활을
보장합니다. 모델 번호 FC8022로 구매하십시오.
-- 필립스 S-bag® 냄새 방지 먼지 봉투는 냄새를 흡수하도록 코팅 처리되어 있습니다.
이 코팅은 애완 동물의 털이나 음식 찌꺼기를 분해시킬 때 나는 불쾌한 냄새를
흡수하고 중화합니다. 모델 번호 FC8023으로 구매하십시오.
필터 구매
-- 물 세척이 불가능한 수퍼 클린 에어 HEPA 13 필터는 모델 번호 FC8038로
구매하십시오.
환경
-- 리모콘의 비충전식 배터리는 환경을 오염시키는 물질을 포함하고 있습니다.
배터리는 일반 가정용 쓰레기와 함께 버리지 마시고 지정된 배터리 분리 수거함에
버리십시오. 제품을 버리기 전에 항상 리모콘에서 배터리를 분리하여 지정된
수거함에 버려 주십시오(특정 모델만 해당).  (그림 43)
-- 수명이 다 된 제품은 일반 가정용 쓰레기와 함께 버리지 마시고 지정된 재활용 수거
장소에 버리십시오. 이런 방법으로 환경 보호에 동참하실 수 있습니다 (그림 44).
품질 보증 및 서비스
보다 자세한 정보가 필요하시거나, 사용상의 문제가 있을 경우에는 필립스전자 홈페이지
(www.philips.co.kr)를 방문하거나 필립스 고객 상담실로 문의하십시오. 전국
서비스센터 안내는 제품 보증서를 참조하십시오. *(주)필립스전자: (02)709-1200 *
고객 상담실: (080)600-6600(수신자부담)
문제 해결
이 란은 제품을 사용하면서 가장 일반적으로 경험하게 되는 문제와 그 해결 방법을
제시합니다. 발생한 문제를 아래 정보로 해결할 수 없는 경우에는 필립스 고객 상담실로
문의하십시오.
1흡입력이 약합니다.
A 먼지 봉투가 가득 차 있을 수 있습니다.
-- 재활용이 가능한 종이 먼지 봉투(특정 모델만 해당)를 비우거나 교체하십시오.
B 필터가 더러울 수 있습니다.
-- 필터를 세척하거나 교체하십시오.
C 흡입력이 낮게 설정되어 있을 수 있습니다.
-- 흡입력을 더 높은 설정으로 바꾸십시오.
D 노즐, 연장관 또는 호스가 막혔을 수 있습니다.
-- 이물질을 제거하려면 막힌 부분을 분리하여 반대 방향으로 가능한 멀리
연결하십시오. 진공 청소기의 전원을 켜서 막힌 부분에 공기가 반대 방향으로
통하도록 하십시오 (그림 45).
20
한국어
2적외선 리모콘(특정 모델만 해당)이 작동하지 않습니다.
A 배터리가 올바로 접촉되지 않았거나 올바르게 끼워져 있지 않습니다.
-- 배터리함의 뚜껑을 열고 배터리를 다시 끼우십시오. 배터리의 극성(-/+)에 맞게
끼워졌는지 확인하십시오 (그림 23).
B 배터리가 방전되었을 수 있습니다.
-- 배터리를 교체하십시오.
3진공 청소기로 청소할 때 가끔씩 정전기가 일어납니다.
A 진공 청소기는 정전기를 유발합니다. 실내 습도가 낮을수록 정전기가 더 많이
생깁니다.
-- 이러한 불편을 최소화하기 위해서는 실내에서 연장관을 금속 물체(예: 테이블, 의자
또는 라디에이터 등의 다리)와 수시로 접촉하도록 하여 제품을 방전시키는 것이
좋습니다.
-- 이러한 불편을 최소화하기 위해서는 물을 채운 용기를 라디에이터에 걸쳐놓거나
라디에이터 위나 근처에 물을 채운 그릇을 놓는 방법으로 실내에 수분을 공급하여
습도를 높이는 것이 좋습니다.
繁體中文 21
簡介
恭喜您購買本產品並歡迎加入飛利浦!請於 www.philips.com/welcome 註冊您的產品,
以善用飛利浦提供的支援。
一般說明 (圖 1)
1 收線鈕
2 吸力旋鈕 (在遙控的情況下:紅外線接收器)
3 開/關按鈕
4 集塵袋已滿指示燈
5 軟管接口開口
6 軟管,隨附旋轉式連接器
7 集塵蓋釋放拉片
8 具馬達防護濾網的濾網座
9 可重複使用的集塵袋 (僅限特定國家)
10 可拆式固定帶
11 集塵袋支托架
12 拋棄式合成集塵袋
13 後輪
14 小吸頭
15 小刷子
16 縫隙吸頭
17 按鈕結合機關
18 附握柄的軟管 (僅限特定型號:遙控機型)
19 配件置放架
20 硬地板吸頭 (限特定機型)
21 兩用吸頭 (限特定機型)
22 地毯/硬質地板設定之搖動開關
23 TriActive 全方位三效合一吸頭 (限特定機型)
24 地毯/硬質地板設定之搖動開關
25 安置/收藏突起部位
26 側刷毛
27 三段式吸塵管 (僅適用於特定機型)
28 伸縮管 (限特定機型)
29 鉸鏈式上部握柄
30 濾網罩 (開放式)
31 安置槽
32 電源線插頭
33 極淨空氣 HEPA 13 濾網
34 前端握柄
35 轉輪
36 收藏槽
37 機型標籤
22
繁體中文
重要事項
在使用本產品前,請先仔細閱讀本使用手冊,並保留說明以供日後參考。
危險
-- 請勿用來吸水或任何其它液體。請勿吸取易燃性物質,且請勿吸取未完全冷卻的灰
燼。
警示
-- 在您連接電源之前,請檢查本地的電源電壓是否與產品所標示的電壓相符。
-- 當插頭、電線或產品本身受損時,請勿使用產品。
-- 如果電線損壞,則必須交由飛利浦、飛利浦授權之服務中心,或是具備相同資格的技
師更換,以免發生危險。
-- 基於安全考慮,在缺乏監督及適當指示之下,本產品不適用於孩童及任何身體、知
覺、或心理功能障礙者,或缺乏使用經驗及知識者。
-- 請勿讓孩童使用本產品或當成玩具。
-- 若已連接至吸塵器且吸塵器電源為開啟時,請勿將軟管、吸塵管或其他配件指向眼睛
或耳朵,也請勿將其放入口中。
警告
-- 當您使用吸塵器來清除灰燼、細沙、石灰、水泥灰塵與類似物質時,集塵袋孔會逐漸
阻塞,使得集塵袋已滿指示燈顯示集塵袋已滿。即使集塵袋並未全滿,也請更換拋棄
式集塵袋或清空可重複使用的集塵袋 (請參閱「更換/清空集塵袋」單元)。
-- 請勿在未安裝馬達防護濾網的時候使用本產品,否則可能會損壞馬達並縮短產品壽
命。
-- 請務必使用隨附的飛利浦 s-bag ` 合成集塵袋或重複使用型集塵袋 (僅限部分國家)。
-- 半透明顯示面板採用可回收的聚碳酸酯材料 (>PC/ABS<) 製成。
-- 吸塵的時候,尤其是在空氣濕度低的房間中,吸塵器會產生靜電。因此您可能在接觸
吸塵管或吸塵器其他不鏽鋼零件時感到輕微觸電。此現象並不會對您及產品造成傷
害。若要避免此情形發生,建議您:
1 以吸塵管碰觸房間中的其他金屬物體 (如桌椅的腳、暖氣等),為吸塵器放電; (圖 2)
2 在房間中放水,增加房內濕度。舉例來說,您可以懸掛盛裝暖氣水的容器或在暖氣附
近放置水碗。 (圖 3)
電磁波 (EMF)
本飛利浦產品符合電磁波 (Electromagnetic fields,EMF) 所有相關標準。只要使用方式正
確並依照本使用手冊之說明進行操作,根據現有的科學研究資料,使用本產品並無安全顧
慮。
使用前準備
軟管
1若要連接軟管,將軟管用力推入產品固定 (要聽到「喀噠聲」)。 (圖 4)
2若要拆開軟管,請按下按鈕並將軟管從吸塵器拉出。 (圖 5)
三段式吸塵管 (僅適用於特定機型)
1若要將吸塵管連接至握把,請按下握把上的彈簧式鎖定鈕 (1),並將握把插入吸塵管
中。將彈簧式鎖定鈕卡進吸塵管上的開孔 (會聽見「喀噠」一聲) (2)。 (圖 6)
-- 若要從握把上移除吸塵管,按下彈簧鎖定鈕,然後將握把由吸塵管拉出即可。
2使用吸塵器時,請將吸塵管調整到最適合的長度。請將兩個軸環中其中一個向下按,
並將軸環上方的吸塵管向上拉或向下推。 (圖 7)
繁體中文 23
伸縮管 (限特定機型)
1若要將吸塵管連接至握把,請將握把插入吸塵管中。將彈簧式鎖定鈕卡進吸塵管上的
開孔 (會聽見「喀噠」一聲)。 (圖 8)
-- 若要從握把上移除吸塵管,按下輕鬆釋放按鈕 (1),然後將握把由吸塵管拉出 (2) 即
可。 (圖 9)
2將管子調整至吸塵時最舒適的使用長度。 (圖 10)
吸頭與配件
1若要為吸塵管連接吸頭或配件,請壓下吸塵管上的彈簧式鎖定鈕 (1) ,把吸塵管插入吸
頭或配件 (2)。將彈簧式鎖定鈕卡進吸頭或配件的開孔 (會聽見「喀噠」一聲)。 (圖 11)
注意: 您也可以用同樣的方式將吸頭和配件直接連接到握把上。
2若要將吸頭或配件從吸塵管取下,請壓下彈簧式鎖定鈕,將吸頭從吸塵管內抽出即
可。
TriActive 全方位三效合一吸頭 (限特定機型)
TriActive 全方位三效合一吸頭是地毯及硬質地板專用的多用途吸頭。
-- 兩側吸頭的側刷可吸除更多灰塵及髒污,將您的家具和其他不易移動的物品清理得更
乾淨。 (圖 12)
-- 吸頭前端的開口可吸除更大的碎屑。 (圖 13)
1若要清理硬質地板,請以腳推壓吸頭頂端的搖動開關。 (圖 14)
,, 清潔地板的毛刷條從殼體內推出。在此同時,輪子會抬起,可防止刮傷地板又可加強
移動性。
2清潔地毯時,請再次推壓搖動開關。 (圖 15)
,, 將毛刷條收進吸頭殼體內,輪子將會自動降下。
兩用吸頭 (限特定機型)
兩用吸頭可用於地毯或硬質地板。
1若要清理硬質地板,請以腳推壓吸頭頂端的搖動開關 (圖 16)
,, 毛刷條會從吸頭外殼內伸出,以清潔硬質地板。
2清潔地毯時,請再次推壓搖動開關。 (圖 17)
,, 將毛刷條收進吸頭外殼內。
硬地板吸頭 (限特定機型)
-- 硬地板吸頭的設計,能溫和的清潔硬地板。 (圖 18)
配件
1您可以直接將縫隙吸頭 (1)、小吸頭 (2) 或小刷子 (3) 連接到軟管或吸塵管的握把。相
同的方法適用於吸塵管。  (圖 19)
-- 縫隙吸頭可以用來清潔狹窄的角落,以及不容易到達的死角。
-- 小吸頭可以用來進行小面積的清潔,例如椅墊及沙發等。
-- 小清潔刷吸頭可以用來清潔電腦、書櫃等地方。
配件置放架
1將配件置放架扣在握把上。 (圖 20)
2將兩個配件扣在配件置放架上:
-- 縫隙吸頭與小吸頭。 (圖 21)
-- 縫隙吸頭與小吸頭。 (圖 22)
注意: 小吸頭必須依照圖中指示收納在配件置放架內。
24
繁體中文
紅外線遙控裝置 (僅限於特定機型)
1移除電池槽蓋。
2將電池置入電池槽內。 (圖 23)
請確定正 (+) 負 (-) 極放置無誤。
3重新蓋上電池槽蓋
使用此產品
1請將電線自產品中拉出,將插頭接上電源插座。
2用腳按下產品頂端的開/關 (on/off) 按鈕,以開啟產品電源。 (圖 24)
調整吸力
使用吸塵器期間,您可以調整吸力。
-- 使用最大吸力清潔非常骯髒的地毯與硬質地板。
-- 使用最小吸力清潔窗簾、桌墊等。
紅外線遙控裝置 (僅限於特定機型)
您可以利用紅外線遙控裝置,將吸力調整為 5 個不同吸力設定之一。
-- 每次在您開啟產品時,產品都會以最大的吸力設定開始運作。
-- 若要將吸力設為減弱一級的設定,請按下 - 按紐。  (圖 25)
若要將吸力設為增強一級的設定,請按下 + 按紐。
吸力旋鈕 (限特定機型)
-- 使用吸塵器清潔時,您可以利用產品上方的吸力旋鈕來調整吸力 (圖 26)
使用中暫停
1若您想要暫停片刻,請將吸頭上的突出物插入安置槽,以將吸塵管固定為便於使用的
位置。 (圖 27)
2如果產品具備紅外線遙控裝置 (僅限於特定機型),可按下待機按鈕暫時關閉吸塵器 (例
如正好要搬動某些傢俱時)。  (圖 28)
3若要繼續使用吸塵器,請再次按下待機 (Standby) 按鈕。本產品即會以上次所選取的
吸力設定再次開始運作。
收納
1吸塵管零件彼此套入,將吸塵管縮短為最短長度。
2使用完畢後,請將產品關閉,並將插頭從牆上插座拔下。
3按下收線鈕,將電源線收回。 (圖 29)
4若要將產品直立存放,請將吸頭上的突出物插入收藏槽。 (圖 30)
5收納時,請務必將 TriActive 全方位三效合一吸頭設定為地毯設定 (刷子收回至吸頭
中)。另請避免側邊刷毛彎曲變形。 (圖 15)
繁體中文 25
更換/清空集塵袋
更換拋棄式集塵袋或清空可重複使用的集塵袋之前,請務必將產品插頭拔掉。
注意: 有時,雖然集塵袋未滿,但集塵袋已滿指示燈卻會指出集塵袋已滿。這可能是因為
集塵袋的細孔阻塞 (例如,若您曾吸除灰燼、細沙、石灰、水泥粉塵等等類似物質),或有
異物堵塞吸頭、吸塵管及/或軟管。若集塵袋細孔阻塞,即使尚未全滿,您仍然必須更換集
塵袋。如果集塵袋並未阻塞,也未全滿,這表示有異物阻塞吸頭、吸塵管及/或軟管。這時
不必更換集塵袋,只須清除堵塞物即可。
更換拋棄式集塵袋
-- 如果集塵袋已滿指示燈的顏色長時間改變 (換言之,即使吸頭沒有貼緊地板的情況
下),請立即更換集塵袋。 (圖 31)
1請將蓋子往上拉,掀開蓋子。 (圖 32)
2將集塵袋支托架自產品中提起。 (圖 33)
請確定從吸塵器中取出集塵袋支托架時,支托架呈水平位置。
3拉著紙板拉片,將已滿的集塵袋從支托架中移除。 (圖 34)
,, 此集塵袋會自動封口。
4將新集塵袋的紙板前端儘可能卡進集塵袋支托架上的兩個狹槽中。  (圖 35)
5將集塵袋支托架裝回吸塵器。
注意: 若您沒有裝入集塵袋,就無法關上蓋子。
清空可重複使用的集塵袋 (僅限特定國家)
在某些國家,此款吸塵器配有可以重複使用的集塵袋,重複清空多次使用。您可安裝重複
使用的集塵袋代替拋棄式的集塵袋。
1請依「更換拋棄式集塵袋」一節中所述,從產品和支托架卸下可重複使用的集塵袋。
2將夾子朝集塵袋的側邊滑動。
3將集塵室中的內容物搖出倒入垃圾桶中。
4若要關閉集塵袋,請將夾子朝集塵袋下緣滑動。
5請依「更換拋棄式集塵袋」一節中所述,將可重複使用的集塵袋裝回支托架和產品。
保養
在清潔或更換濾網之前,請務必拔除電源插頭。
注意: 限使用濕布擦拭產品機體。
永久馬達防護濾網
為確保最佳效能,每次更換或清空集塵袋時,請清潔永久馬達防護濾網。
1將集塵袋支托架連同集塵袋一起一併拆除。 (圖 33)
2按下濾網座釋放拉片 (1),將濾網座從產品中取出 (2)。將馬達防護濾網從濾網座內取
出。  (圖 36)
3在垃圾桶上抖動濾網。
4將乾淨的濾網裝回濾網座中。將濾網座的兩個凸耳套在底部突起物的後方,以確保上
緣正確套入 (1),並將濾網座壓回原位 (會聽見「喀噠」一聲) (2)。 (圖 37)
5將集塵袋支托架連同集塵袋一起一併裝回本產品中。
26
繁體中文
HEPA 13 濾網
HEPA 13 濾網可移除空氣中 99.95% 小至 0.0003 公釐的空氣粒子。這不只包括一般住家
灰塵,還包括肉眼可見的害蟲,如塵蹣及其排泄物等常見的呼吸道過敏原。
注意: 為確保理想的灰塵防護及吸塵效能,請務必以飛利浦原廠同型號的濾網,每 2 年
更換一次 HEPA 濾網 (請參閱「訂購配件」)。您可將舊的濾網與一般家庭廢棄物一併丟
棄。
更換 HEPA 13 濾網
1打開濾網罩。 (圖 38)
2取出可水洗 HEPA 13 濾網。 (圖 39)
3將濾網裝回吸塵器。 (圖 40)
4關閉濾網罩,並將底部四個角往下壓,直到卡入定位為止。 (圖 41)
注意: 若要獲得最佳效果,請每 2 年更換一次 HEPA 13 濾網。如希望儘量減少對環境的
影響,您可以清洗 HEPA 13 濾網。
清洗 HEPA 13 濾網 (限 FC917x 系列)
若要清洗 HEPA 13 濾網,請遵照下列指示操作。
1在水龍頭下以熱水緩緩清洗 HEPA 13 濾網。 (圖 42)
 切勿使用刷子清洗濾網。
2小心甩乾濾網表面的水份。等待濾網至少風乾 2 小時,徹底乾燥之後,再將濾網裝回
吸塵器內。
注意: 清潔濾網並無法恢復濾網原本的顏色,但可以恢復過濾效能。
訂購配件
如果您在購買集塵袋、濾網或本產品其他配件上有任何困難,請連絡您所在國家/地區的飛
利浦客戶服務中心,或查詢全球保證書。
訂購集塵袋
-- 飛利浦 s-bag® 一般長效型集塵袋採用不阻塞材質,因此較標準型集塵袋的耐用程度多
出 50%。型號為 FC8021。
-- 飛利浦 s-bag® 抗過敏集塵袋能減少和過敏原的接觸。這款 HEPA 10 的過濾效果能提
供您乾淨和健康的居家環境。型號為 FC8022。
-- 飛利浦 s-bag® 防臭集塵袋的表層能吸收異味。這個表層能吸收並中和由寵物毛髮或廚
餘分解後所產生的異味。型號為 FC8023。
訂購濾網
-- 可水洗極淨空氣 HEPA 13 抗敏濾網型號為 FC8038。
繁體中文 27
環境保護
-- 遙控器的非充電式電池內含可能會污染環境的物質,電池不可與一般家庭廢棄物一併
丟棄,應送至政府指定的電池回收點進行回收。若要丟棄本產品,請務必將遙控器 (限
特定機型) 的電池取出,再將產品送至政府指定的回收點。  (圖 43)
-- 本產品壽命結束時請勿與一般家庭廢棄物一併丟棄。請將該產品放置於政府指定的回
收站,此舉能為環保盡一份心力。 (圖 44)
保固與服務
如需相關服務或資訊,或是有任何問題,請瀏覽飛利浦網站,網址為 www.philips.com,
或聯絡您所在國家/地區的飛利浦客戶服務中心,電話號碼可參閱全球保證書。若您的所在
國家/地區沒有客戶服務中心,請洽詢當地的飛利浦經銷商。
故障排除
本單元概述您使用本產品時最常遇到的問題。如果您無法利用以下資訊解決您遇到的問
題,請聯絡您所在國家/地區的客戶服務中心。
1吸力不足。
A 集塵袋可能已滿。
-- 清空可重複使用的集塵袋 (限特定機型) 或更換紙製集塵袋。
B 濾網可能已經髒污。
-- 請清潔或更換濾網。
C 吸力可能設為低吸力的設定。
-- 請將吸力設為高吸力的設定。
D 吸頭、吸塵管或軟管可能已經阻塞。
-- 若要去除阻塞物,請拆除阻塞的部分,並將它以相反的方向 (盡可能地) 連接。打開吸
塵器,使空氣以相反方向強制吹出阻塞的部分。 (圖 45)
2紅外線遙控裝置 (僅限於特定機型) 無法正常運轉。
A 也許是電池接觸不良或者是沒有正確裝入。
-- 移開電池槽的蓋子,將電池壓回。請確定正 (+) 負 (-) 極放置無誤。 (圖 23)
B 電池可能用完。
-- 更換電池。
3使用吸塵器時,偶爾有觸電的感覺。
A 您的吸塵器會產生靜電。房間濕度越低,越容易產生靜電。
-- 如果要減少此類不便,請時常以吸塵管碰觸房間中的其他金屬物體 (如桌椅腳、暖氣
等),為產品放電。
-- 如果要降低此類不便,建議您在房間中放水,增加房內濕度。舉例來說,您可以懸掛
裝滿暖氣水的容器或在暖氣附近放置水碗。
28
2
3
4
5
6
7
8
9
10
11
12
13
14
15
16
17
18
19
20
21
22
23
24
25
26
27
28
29
30
31
32
33
34
35
36
37
38
39
40
41
42
43
44
45
4222.003.3325.2