1
L
S
2
1
0
0
S
e
r
i
e
s
L S
2 1 0 0
S e r i e s
© 2001 SYMBOL TECHNOLOGIES, INC. All rights reserved.
Symbol reserves the right to make changes to any product to improve reliability,
function, or design.
Symbol does not assume any product liability arising out of, or in connection with, the
application or use of any product, circuit, or application described herein.
No license is granted, either expressly or by implication, estoppel, or otherwise under
any patent right or patent, covering or relating to any combination, system, apparatus,
machine, material, method, or process in which Symbol products might be used. An
implied license exists only for equipment, circuits, and subsystems contained in Symbol
products.
Symbol and the Symbol logo are registered trademarks of Symbol Technologies, Inc.
Other product names mentioned in this manual may be trademarks or registered
trademarks of their respective companies and are hereby acknowledged.
Symbol Technologies, Inc.
One Symbol Plaza
Holtsville, N.Y. 11742-1300
http://www.symbol.com
Patents
This product is covered by one or more of the following U.S. and foreign Patents:
U.S. Patent No. 4,496,831; 4,593,186; 4,603,262; 4,607,156; 4,652,750; 4,673,805;
4,736,095; 4,758,717; 4,760,248; 4,806,742; 4,816,660; 4,845,350; 4,896,026; 4,897,532;
4,923,281; 4,933,538; 4,992,717; 5,015,833; 5,017,765; 5,021,641; 5,029,183; 5,047,617;
5,103,461; 5,113,445; 5,130,520; 5,140,144; 5,142,550; 5,149,950; 5,157,687; 5,168,148;
5,168,149; 5,180,904; 5,216,232; 5,229,591; 5,230,088; 5,235,167; 5,243,655; 5,247,162;
5,250,791; 5,250,792; 5,260,553; 5,262,627; 5,262,628; 5,266,787; 5,278,398; 5,280,162;
5,280,163; 5,280,164; 5,280,498; 5,304,786; 5,304,788; 5,306,900; 5,321,246; 5,324,924;
5,337,361; 5,367,151; 5,373,148; 5,378,882; 5,396,053; 5,396,055; 5,399,846; 5,408,081;
5,410,139; 5,410,140; 5,412,198; 5,418,812; 5,420,411; 5,436,440; 5,444,231; 5,449,891;
5,449,893; 5,468,949; 5,471,042; 5,478,998; 5,479,000; 5,479,002; 5,479,441; 5,504,322;
5,519,577; 5,528,621; 5,532,469; 5,543,610; 5,545,889; 5,552,592; 5,557,093; 5,578,810;
5,581,070; 5,589,679; 5,589,680; 5,608,202; 5,612,531; 5,619,028; 5,627,359; 5,637,852;
5,664,229; 5,668,803; 5,675,139; 5,693,929; 5,698,835; 5,705,800; 5,714,746; 5,723,851;
5,734,152; 5,734,153; 5,742,043; 5,745,794; 5,754,587; 5,762,516; 5,763,863; 5,767,500;
5,789,728; 5,789,731; 5,808,287; 5,811,785; 5,811,787; 5,815,811; 5,821,519; 5,821,520;
5,823,812; 5,828,050; 5,850,078; 5,861,615; 5,874,720; 5,875,415; 5,900,617; 5,902,989;
5,907,146; 5,912,450; 5,914,478; 5,917,173; 5,920,059; 5,923,025; 5,929,420; 5,945,658;
5,945,659; 5,946,194; 5,959,285; 6,002,918; 6,021,947; 6,036,098; 6,047,892; 6,050,491;
6,053,413; 6,056,200; 6,065,678; 6,067,297; 6,068,190; 6,082,621; 6,084,528; 6,088,482;
6,092,725; 6,101,483; 6,102,293; 6,104,620; 6,114,712; 6,115,678; 6,119,944; 6,123,265;
6,131,814; 6,138,180; 6,142,379; 6,172,478; 6,176,428; 6,178,426; 6,186,400; 6,188,681;
6,209,788; 6,216,951; 6,220,514; 6,243,447; 6,244,513; 6,247,647; 6,250,551; 6,295,031;
D305,885; D341,584; D344,501; D359,483; D362,453; D363,700; D363,918; D370,478;
D383,124; D391,250; D405,077; D406,581; D414,171; D414,172; D418,500; D419,548;
D423,468; D424,035; D430,158; D430,159; D431,562; D436,104.
Invention No. 55,358; 62,539; 69,060; 69,187 (Taiwan); No. 1,601,796; 1,907,875;
1,955,269 (Japan); European Patent 367,299; 414,281; 367,300; 367,298; UK 2,072,832;
France 81/03938; Italy 1,138,713.
rev. 10/01
Q u i c k
R e f e r e n c e
Introduction
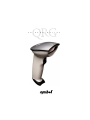
The LS 2100 Series scanners are lightweight laser scanners which
combine the best in basic scanning performance and value. The
2100 series is made up of three versions of the scanner, which differ
in their host interface capability. The three versions are as follows:
•
•
•
LS 2100: the undecoded version
LS 2104: the RS-232 and Synapse version
LS 2106: the Keyboard Wedge and Synapse version
This Quick Reference Guide provides basic instruction on the set up
and use of the scanner. Unless otherwise noted, the term LS 21xx
refers to all versions of the scanner.
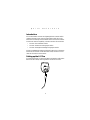
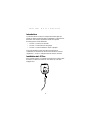
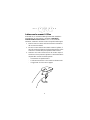
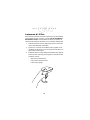
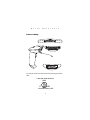
Setting up the LS 21xx
To set up the scanner, you must first attach the interface cable to the
bottom of the scanner, ensuring that the connection is secure.
1
L S
2 1 0 0
S e r i e s
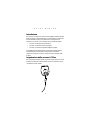
Scanning with the LS 21xx
Before you can use the scanner, it should have already been installed
and programmed. If not, consult the appropriate LS 21xx Product
Reference Guide for your specific scanner. If you need assistance,
contact your local supplier or Symbol Technologies.
1. Before you use the scanner, make sure all cable connections
are secure.
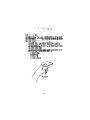
2. Aim the scanner away from you. Press the trigger; the scan
beam lights and an orange light illuminates at the rear of the
scanner.
3. Make sure the bar code is in the correct scanning range. Aim
and press the trigger. The scanner has read the symbol when:
-
You hear a beep.
The orange light turns green.
The red laser turns off.
2
Q u i c k
R e f e r e n c e
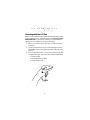
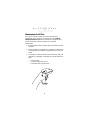
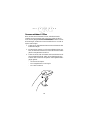
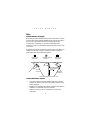
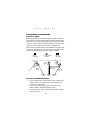
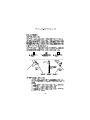
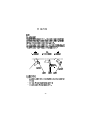
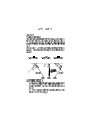
Aiming
Hold at an angle
Do not hold the scanner directly over the bar code. Laser light
reflecting directly back into the scanner from the bar code is known
as specular reflection. This strong light can “blind” the scanner and
make decoding difficult. The area where specular reflection occurs
is known as a “dead zone”.
You can tilt the scanner up to 55° forward or back and achieve a
successful decode. Simple practice quickly shows what tolerances to
work within.
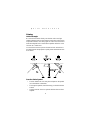
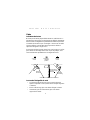
Scan the Entire Symbol
•
•
•
The scan beam must cross every bar and space on the symbol
(as in the left bar code below).
The larger the symbol, the farther away you should hold the
scanner.
Hold the scanner closer for symbols with bars that are close
together.
3
L S
2 1 0 0
S e r i e s
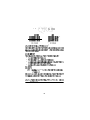
Right
Wrong
What Does The Beep Mean?
When you hear 1 beep (short high tone) it means data has been
decoded successfully. If any other beeps are heard, contact the
technical person in charge of scanning.
Troubleshooting
If the scanner does not work after you’ve followed these operating
instructions:
•
•
•
•
Check the system power.
Check for loose cable connections.
Be sure the scanning system is programmed to read the type of
bar code you are trying to scan.
Check to be sure the symbol is not defaced.
Cleaning
1RWH
LS 2100 series scanners require no user maintenance.
Wipe the scanner window periodically with a lens tissue or other
material suitable for cleaning optical material, such as eyeglasses.
&DXWLRQ
Do not pour, spray or spill any liquid on the scanner.
4
G u i d e
u t i l i s a t e u r
Introduction
La série des lecteurs LS 2100 se compose de lecteurs légers qui
offrent un rapport performances/prix imbattable. La série 2100 est
déclinée en trois versions de lecteurs offrant des capacités
d’interfaçage avec l’hôte différentes :
•
•
•
LS 2100 : la version non décodée
LS 2104 : la version RS-232 et Synapse
LS 2106 : la version émulation clavier et Synapse
Ce Guide utilisateur fournit des instructions de base sur
l’installation et l’utilisation du lecteur. Sauf indication contraire,
l’appellation « LS 21xx » désigne toutes les versions du lecteur.
Installation du LS 21xx
Pour installer le lecteur, vous devez tout d’abord raccorder le câble
d’interface au dessous du lecteur et vous assurer qu’il est bien
engagé à fond.
5
S é r i e
L S
2 1 0 0
Maniement du LS 21xx
Pour pouvoir utiliser le lecteur, il doit avoir été installé et
programmé. Si tel n’est pas le cas, reportez-vous au Guide de
référence produit LS 21xx de votre lecteur. En cas de problème,
prenez contact avec votre fournisseur local ou Symbol
Technologies.
1. Avant d’utiliser le lecteur, vérifiez que tous les câbles sont bien
branchés.
2. Pointez le lecteur, puis appuyez sur la gâchette. Le faisceau de
lecture apparaît et un témoin orange s’allume sur l’arrière du
lecteur.
3. Vérifiez que le code à barres est à la bonne distance, visez, puis
appuyez sur la gâchette. Le décodage du code est effectué lorsque :
-
Un bip retentit.
Le témoin orange vire au vert.
Le faisceau laser rouge est coupé.
6
G u i d e
u t i l i s a t e u r
Visée
Inclinaison du lecteur
Ne tenez pas le lecteur perpendiculairement au code à barres. Le
faisceau laser renvoyé par le code risque de se réfléchir directement
dans le lecteur et d’engendrer un phénomène de réflexion spéculaire.
L’intensité du faisceau risque « d’aveugler » le lecteur et de rendre
la lecture délicate. L’angle dans lequel se produit la réflexion
spéculaire est appelé l’« angle mort ».
Vous pouvez incliner le lecteur jusqu’à 55 º vers l’avant ou l’arrière
pour réaliser un décodage réussi. Avec un peu de pratique, vous
vous familiariserez rapidement avec les angles de lecture.
2. Réflexion
spéculaire
possible
1. Lecture
réussie
3. Lecture
réussie
55 °
55 °
La zone ombrée
représente l’angle
mort (±2”)
Faisceau
de lecture
Faisceau
de lecture
Code à barres Code à barres Code à barres
Lecture de l’intégralité du code
•
•
•
Le faisceau de lecture doit recouvrir toutes les barres et
espaces composant le code (comme dans l’exemple de gauche
ci-dessous).
Plus le code est large, plus vous devrez éloigner le lecteur.
Inversement, plus le code est dense, plus vous devrez
rapprocher le lecteur.
7
S é r i e
L S
Correct
2 1 0 0
Incorrect
Signification du bip
Lorsqu’un seul bip (signal sonore aigu et bref) retentit, cela signifie
que le décodage des données a été effectué. Si vous entendez d’autres
bips, contactez le technicien responsable de la lecture.
Dépannage
Si le lecteur ne fonctionne pas lorsque vous vous êtes conformé à ce
mode d’emploi :
•
•
•
•
Vérifiez que le système est sous tension.
Vérifiez les branchements.
Vérifiez que le système de lecture est programmé pour lire le
type de code à barres en question.
Vérifiez que le code est en bon état.
Nettoyage
5HPDUTXH
La série des lecteurs LS 2100 ne nécessite aucun
entretien spécial.
Il suffit de nettoyer régulièrement la fenêtre de lecture avec un
chiffon pour objectif ou un tissu convenant pour le nettoyage des
optiques, tels que les lunettes.
$WWHQWLRQ
Ne vaporisez ni versez de liquide sur le lecteur.
8
K u r z ü b e r s i c h t
Einführung
Die Scanner der Serie LS 2100 sind leichte Laserscanner, die Ihnen
optimales Basisscannen und hohen Gegenwert bieten. Die Serie LS
2100 setzt sich aus drei Versionen des Scanners zusammen, die sich
in ihrer Hostschnittstellenleistungsfähigkeit unterscheiden. Es
handelt sich um die folgenden drei Versionen:
•
•
•
LS 2100: die nicht decodierte Version
LS 2104: die RS-232- und Synapsenversion
LS 2106: die Tastaturweichen- und Synapsenversion
Diese Kurzübersicht enthält die grundlegenden Anleitungen zum
Durchführen des Set-ups und zur Benutzung des Scanners. Sofern
nicht abweichend angegeben bezieht sich die Bezeichnung LS21xx
auf alle Versionen des Scanners.
Einrichten des LS 21xx
Zum Einrichten des Scanners müssen Sie zunächst das Schnittstellenkabel an der Unterseite des Scanners anbringen und darauf
achten, daß es fest sitzt.
9
S e r i e
L S
2 1 0 0
Scannen mit dem LS 21xx
Bevor Sie den Scanner benutzen können, sollte dieser bereits
installiert und programmiert sein. Falls nicht, ziehen Sie den für
Ihren Scanner gültigen LS 21xx Produktleitfaden zu Rate. Falls Sie
Hilfe benötigen, wenden Sie sich an Ihren Händler vor Ort oder an
Symbol Technologies.
1. Achten Sie vor dem Benutzen des Scanners auf festen Sitz aller
Kabelverbindungen.
2. Richten Sie den Scanner von sich weg. Betätigen Sie den Auslöser; der Scanstrahl leuchtet auf, und an der Scannerrückseite
geht eine orangefarbene Leuchte an.
3. Achten Sie darauf, daß sich der Barcode innerhalb des korrekten Scanabstands befindet. Zielen Sie und betätigen Sie den
Auslöser. Der Scanner hat das Symbol unter folgenden Bedingungen gelesen:
-
Sie hören einen Piepton.
Das orangefarbene Licht wird grün.
Der Laser schaltet ab.
10
K u r z ü b e r s i c h t
Zielen
Positionierung
Halten Sie den Scanner nicht unmittelbar über den Barcode. Das
vom Barcode direkt in den Scanner zurückreflektierte Laserlicht
wird als Spiegelreflexion bezeichnet. Dieses starke Licht kann den
Scanner blenden und das Decodieren erschweren. Der Bereich, in
dem die Spiegelreflexion auftritt wird als „toter Bereich“
bezeichnet.
Sie können den Scanner um bis zu 55° nach vorn oder hinten neigen
und dennoch erfolgreich decodieren. Durch einfaches Üben lernen
Sie die zulässigen Arbeitstoleranzen kennen.
1. Erfolgreiches
Scannen
2. Mögliche
Spiegelreflexion
3. Erfolgreiches
Scannen
55 °
55 °
Schattierter Bereich
stellt toten Bereich
dar (±2°)
Scanstrahl
Scanstrahl
Barcode
Barcode
Barcode
Gesamtes Symbol scannen
•
•
•
Der Scanstrahl muß alle Striche und Zwischenräume des
Symbols (wie im Fall des linken Barcodes unten dargestellt)
erfassen.
Je größer das Symbol, desto größer sollte die Entfernung des
Scanners sein.
Bei Symbolen, bei denen die Striche enger beieinander liegen,
11
S e r i e
L S
2 1 0 0
sollten Sie den Scanner näher heranführen.
Richtig
Falsch
Was bedeutet der Piepton?
Wenn Sie einen Piepton (einen kurzen hohen Ton) hören, bedeutet
dies, daß die Daten erfolgreich decodiert wurden. Sollten Sie
irgendeinen anderen Ton hören, wenden Sie sich an den für das
Scannen zuständigen Techniker.
Fehlersuche
Falls der Scanner trotz Befolgens der Bedienungsanweisungen nicht
funktionieren sollte, gehen Sie wie folgt vor:
•
•
•
•
Prüfen Sie nach, ob das System mit Strom versorgt wird.
Achten Sie auf festen Sitz aller Kabelverbindungen.
Vergewissern Sie sich, daß das Scansystem für den Barcodetyp
programmiert ist, den Sie scannen möchten.
Überprüfen Sie, ob das Symbol noch in Ordnung ist.
Reinigen
+LQZHLV Die Scanner der Serie LS 2100 erfordern keine
Wartung seitens des Benutzers.
Wischen Sie das Scannerfenster regelmäßig mit einem Tuch oder mit
sonstigen für das Reinigen von optischen Komponenten wie Brillen
geeigneten Materialien ab.
9RUVLFKW
Achten Sie darauf, keine Flüssigkeiten auf den Scanner
zu gießen, spritzen oder zu verschütten.
12
G u i d a
R a p i d a
Introduzione
Gli scanner LS 2100 sono scanner a laser leggeri caratterizzati dal
miglior rapporto valore-prestazioni. La serie 2100 è composta da
tre versioni dello scanner, che differiscono nelle capacità di
interfaccia con l’host. Le tre versioni sono riportate di seguito.
•
•
•
LS 2100: la versione senza decodifica
LS 2104: la versione RS-232 e Synapse
LS 2106: la versione Keyboard Wedge e Synapse
La presente Guida rapida fornisce le istruzioni di base relative
all’impostazione e all’uso dello scanner. Salvo indicazione
contraria, il termine LS 21xx si riferisce a tutte le versioni dello
scanner.
Impostazione dello scanner LS 21xx
Per l’impostazione dello scanner, in primo luogo inserire il cavo di
interfaccia nella parte inferiore dello scanner e controllare che la
connessione sia ben fissata.
1
S e r i e
L S
2 1 0 0
Lettura con lo scanner LS 21xx
Prima dell’uso, lo scanner dovrebbe già essere stato installato e
programmato. In caso contrario, consultare il Manuale di
riferimento dello scanner LS 21xx in uso. In caso si desideri
assistenza, contattare il fornitore locale o la Symbol Technologies.
1. Prima di usare lo scanner, verificare che tutte le connessioni
dei cavi siano ben fissate.
2. Mirare lo scanner lontano da se stessi. Premere il grilletto, il
fascio di scansione si illumina e l’indicatore luminoso di colore
arancione si accende nella parte posteriore dello scanner.
3. Verificare che il codice a barre si trovi nel corretto campo di
scansione. Mirare e premere il grilletto. La lettura del simbolo
da parte dello scanner è avvenuta quando:
-
Viene emesso un segnale acustico.
L’indicatore luminoso di colore arancione diventa verde.
Il raggio laser di colore rosso si spegne.
2
G u i d a
R a p i d a
Mira
Posizionamento ad angolo
Non tenere lo scanner direttamente sopra al codice a barre. Il fascio
luminoso laser che si riflette direttamente nello scanner dal codice a
barre è noto come riflessione speculare. Questo forte fascio
luminoso può “schermare” lo scanner e rendere difficile la
decodifica. L’area in cui avviene la riflessione speculare è nota come
“area cieca”.
È possibile inclinare lo scanner fino a 55º in avanti o all’indietro ed
ottenere una decodifica valida. La semplice pratica mostrerà in
tempi rapidi entro quali tolleranze operare.
2. Possibile riflessione
speculare
1. Scansione con
esito positivo
3. Scansione con
esito positivo
55°
55°
L’area ombreggiata
rappresenta l’area
cieca (±2")
Fascio di
scansione
Fascio di
scansione
Codice a barre Codice a barre Codice a barre
Lettura dell’intero simbolo
•
•
•
Il fascio di scansione deve attraversare ogni barra e spazio
presenti sul simbolo (come nel codice a barre riportato nella
pagina seguente).
Maggiore è la larghezza del simbolo, maggiore deve essere la
distanza a cui è necessario tenere lo scanner.
Tenere lo scanner più vicino ai simboli le cui barre sono
ravvicinate.
3
S e r i e
L S
Corretto
2 1 0 0
Non corretto
Cosa indica il segnale acustico?
Quando viene emesso un segnale acustico (breve tono alto) significa
che i dati sono stati decodificati con esito positivo. Se vengono
emessi altri segnali acustici, contattare il tecnico responsabile della
scansione.
Risoluzione dei problemi
Se lo scanner non funziona dopo aver seguito queste istruzioni,
effettuare le operazioni riportate di seguito.
•
•
•
•
Controllare l’alimentazione del sistema.
Verificare la presenza di connessioni difettose dei cavi.
Assicurarsi che il sistema di scansione sia programmato per la
lettura del tipo di codice a barre che si desidera decodificare.
Controllare che il simbolo non sia cancellato.
Pulizia
1RWD
Gli scanner LS 2100 non richiedono alcuna
manutenzione ordinaria.
Pulire periodicamente la finestra di scansione con una salvietta per
lenti o altro materiale adatto alla pulizia di articoli ottici come gli
occhiali.
$WWHQ]LRQH
Non versare, vaporizzare o rovesciare liquidi sullo
scanner.
4
G u í a
R á p i d a
Introducción
La serie LS 2100 dispone de scanners láser ligeros que combinan un
rendimiento de lectura básica inmejorable con un precio óptimo. La
serie 2100 consta de tres versiones del scanner, que se diferencian
en la capacidad de la interfaz del ordenador central. Estas son las
tres versiones:
•
•
•
LS 2100: versión sin descodificador
LS 2104: versión RS-232 y Synapse
LS 2106: versión Synapse y emulación de teclado
Esta Guía de Referencia Rápida facilita instrucciones básicas sobre
la configuración y utilización del scanner. A menos que se indique
lo contrario, el término LS 21xx hace referencia a todas las
versiones del scanner.
Configuración del LS 21xx
Para configurar el scanner, primero debe conectar el cable de
interfaz a la parte inferior del scanner y comprobar que queda bien
fijado.
17
S e r i e
L S
2 1 0 0
Lectura con el LS 21xx
Para comenzar a utilizar el scanner, es preciso que ya esté instalado
y programado. En caso contrario, consulte la Guía de Referencia
del Producto LS 21xx correspondiente al scanner en cuestión. Si
necesita ayuda, diríjase al proveedor local o a Symbol Technologies.
1. Antes de utilizar el scanner, asegúrese de que las conexiones
de los cables estén bien aseguradas.
2. Apunte con el scanner hacia adelante. Pulse el gatillo, se encenderá el haz de lectura y una luz naranja se iluminará en la
parte posterior del scanner.
3. Asegúrese de que el código de barras esté dentro del rango de
lectura correcto. Apunte y pulse el gatillo. El scanner ha leído
el símbolo cuando:
-
usted oye una señal sonora.
la luz naranja se vuelve verde.
el láser rojo se apaga.
18
G u í a
R á p i d a
Para apuntar correctamente
Sujeción en ángulo
No sostenga el scanner directamente sobre el código de barras. La
luz del láser que se refleja directamente en el scanner desde el código
de barras se conoce como reflejo especular. Esta fuerte luz puede
“cegar” al scanner y dificultar la descodificación. El área en la que
se produce el reflejo especular se denomina “zona muerta”.
Puede inclinar el scanner hasta 55° hacia adelante o atrás para lograr
una correcta descodificación. Con algo de práctica se familiarizará
con el rango de tolerancia dentro del cual opera el aparato.
1. Lectura
satisfactoria
2. Posible reflexión
especular
3. Lectura
satisfactoria
55 °
55 °
El área sombreada
representa la zona
muerta (±2")
Haz de
lectura
Haz de
lectura
Código de
barras
Código de
barras
Código de
barras
Para leer la totalidad del símbolo
•
•
•
El haz de lectura debe cruzar todas las barras y espacios del
símbolo (como en el código de barras de la izquierda que
encontrará a continuación).
Cuanto más grande sea el símbolo, tanto mayor será la
distancia desde la que deberá apuntar y leerlo.
Aproxime más el scanner a los símbolos cuyas barras estén
muy juntas entre sí.
19
S e r i e
L S
2 1 0 0
Correcto
Incorrecto
¿Qué significa la señal sonora?
Cuando perciba una señal (breve tono alto) esto indica que los datos
han sido descodificados con éxito. Si escucha otras señales, consulte
al técnico responsable de la lectura.
Solución de problemas
Si el scanner no funciona una vez ejecutadas estas instrucciones para
su operación:
•
•
•
•
Verifique la alimentación del sistema.
Compruebe que las conexiones de los cables estén bien
aseguradas.
Asegúrese de que el sistema de lectura está programado para
leer el tipo de código de barras que intenta leer.
Compruebe que el símbolo no está deteriorado.
Limpieza
1RWD
Los scanners de la serie LS 2100 no precisan
mantenimiento por parte del usuario.
Limpie periódicamente la ventana del scanner con un paño para
lentes u otro material apropiado para la limpieza de material óptico,
como las gafas.
3UHFDXFLyQ No vierta, rocíe ni derrame ningún tipo de líquido sobre el scanner
20
.5
•
•
•
.5
.5 45
5[PCRUG
.5 -G[DQCTF9GFIG
5[PCRUG
.5ZZ
.5ZZ
21
. 5 .5ZZ
.5ZZ
5[ODQN6GEJPQNQIKGU
.'&
.'&
22
±2°)
23
. 5 •
•
•
•
.5
24
/6
•
/6
•
/6 56
•
/6
/6 [[
/6[[
25
/ 6 /6[[
/6 [[
6\PERO 7HFKQRORJLHV
26
55°
55°
f °
•
•
•
27
/ 6 •
•
•
•
/6
28
G
szGYXWWG
G
G
G
G
G
•
•
•
G
G
UG
G
G
G
G
G
G
G
G
U
G
SG
G
G
szGYXWWaG
szGYXW[aGyzTYZYG
szGYXW]aG
G
UG
G
G
G
G
G
G
G
G
G
G
G
G
G
U
G
G
G
G
G
G
G
G
G
szGYXG
G
G
G
SG
G
G
G
29
G
G
G
G
GszGYX G
G
G
UGYXWWG
G
G
U
G
G
G
s z G Y X W W G
szGYX
G
G
G
UG
G
sz YXG
G
G
XU
G
G
YU
G
G
U
ZU
G
T
T
T
G
SG
G
G
G
UG
Gz G{G
G
G
G
G
G
G
G
SG
SG
G
G G
G
G
G
G
G
G
G
G
G
G
G
G
G
G
G
G
UG
G
G
G
U
30
G
G
G
U
G
SG
U
G
G
G
G
U
G
G
G
UG
G
G
G
U
U
G
G
G
G
G
G
G
G
UG
G
G
G
G
G
G
UG G
G
U
UG
G
G
G
G
G
UG
U
XUG
G
G
G
G\\
G
G
G
G
G
G
G
G
G
G
G
G
G
YU
G
G
G
G
G
G
UG
G
G
G
G
G
G
•
G
G G
G G
G
G
G
G
G
O
•
•
G
G
G
OYP
G
ZU
G
G
G
G
G
G
G
G
P
G
U
O
G
G
P
GO
G
G
G
G
G
O
SG
G
G
G
G
G
31
P
G
G
G
U
G
G
G
PG
G
G
G
G
G
U
G
G
G
s z G Y X W W G
G
G
G
UG G
G
G
G
G
f
G
G
U
G
SG
O
G
P
G
a
G
G
G
G
G
G
•
•
•
G
G
G
G
G
G
aGG
G
G
U
U
G
G
G
G
G
G
G
G
G
G G
U
G
G
GszGYXWWG
U
G
G
U
G
aGG
G
G
G
G
G
G
G
•
G
G
G
U
G
G
G
G
32
G
G
G
G
G
G
SG
G
G
G
G
G
U
SGG
G
Q u i c k
R e f e r e n c e
Ergonomic Recommendations
Caution: In order to avoid or minimize the potential risk of ergonomic injury follow
the recommendations below. Consult with your local Health & Safety Manager to
ensure that you are meeting with your company’s safety programs to prevent employee
injury.
• Reduce or eliminate repetitive motion
• Maintain a natural position
• Reduce or eliminate excessive force
• Keep objects that are used frequently within easy reach
• Perform tasks at correct heights
• Reduce or eliminate vibration
• Reduce or eliminate direct pressure
• Provide adjustable workstations
• Provide adequate clearance
• Provide a suitable working environment
• Improve work procedures.
Regulatory Information
Radio Frequency Interference Requirements
This device has been tested and found to comply with the limits for a Class B digital
device pursuant to Part 15 of the Federal Communications Commissions Rules and
Regulation. These limits are designed to provide reasonable protection against harmful
interference when the equipment is operated in a commercial environment. This
equipment generates, uses, and can radiate radio frequency energy and, if not installed
and used in accordance with the instruction manual, may cause harmful interference to
radio communications.
However, there is no guarantee that interference will not occur in a particular
installation. If the equipment does cause harmful interference to radio or television
reception, which can be determined by turning the equipment off and on, the user is
encouraged to try to correct the interference by one or more of the following measures:
• Re-orient or relocate the receiving antenna.
• Increase the separation between the equipment and receiver.
• Connect the equipment into an outlet on a circuit different from that which the
receiver is connected.
• Consult the dealer or an experienced radio/TV technician for help.
Radio Frequency Interference Requirements - Canada
This Class B digital apparatus complies with Canadian ICES-003.
Cet appareil numérique de la classe B est conforme à la norme NMB-003 du Canada.
5
L S
2 1 0 0
S e r i e s
CE Marking and European Union Compliance
Products intended for sale within the European Union are marked with the
CE Mark which indicates compliance to applicable Directives and
European Normes (EN), as follows. Amendments to these Directives or
ENs are included:
Applicable Directives
• Electromagnetic Compatibility Directive 89/336/EEC
• Low Voltage Directive 73/23/EEC
Applicable Standards
• EN 55 022 - Limits and Methods of Measurement of Radio Interference Characteristics of Information technology Equipment
• EN 50 082-1 - Electromagnetic Compatibility - Generic Immunity Standard, Part
1: Residential, commercial, Light Industry
• IEC 801.2 - Electromagnetic Compatibility for Industrial Process Measurement
and Control Equipment Part 2: Electrostatic Discharge Requirements
• IEC 801.3 - Electromagnetic Compatibility for Industrial Process Measurement
and Control Equipment Part 3: Radiated Electromagnetic Field Requirements
• IEC 801.4 - Electromagnetic Compatibility for Industrial Process Measurement
and Control Equipment Part 4: Electrical Fast Transients Requirements
• EN 60 950 + Amd 1 + Amd 2 - Safety of Information Technology Equipment
Including Electrical Business Equipment
Laser Devices
Symbol products using lasers comply with US 21CFR1040.10, and IEC825-1:1993,
EN60825-1:1994+A11:1996. The laser classification is marked on one of the labels on
the product.
Class 1 Laser devices are not considered to be hazardous when used for their intended
purpose. The following statement is required to comply with US and international
regulations:
Caution: Use of controls, adjustments or performance of procedures other than those
specified herein may result in hazardous laser light exposure.
Class 2 laser scanners use a low power, visible light diode. As with any very bright light
source, such as the sun, the user should avoid staring directly into the light beam.
Momentary exposure to a Class 2 laser is not known to be harmful.
6
Q u i c k
R e f e r e n c e
Scanner Labeling
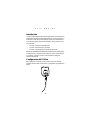
or
The scanner will also be marked with the following cerification
label:
Laser Bar Code Scanner
9B97
C
US
Listed Accessory ITE
7
L S
2 1 0 0
S e r i e s
In accordance with Clause 5, IEC 0825 and EN60825, the following information is
provided to the user:
ENGLISH
CLASS 1
CLASS 2
DANISH
KLASSE 1
KLASSE 2
DUTCH
KLASSE 1
KLASSE 2
FINNISH
LUOKKA 1
LUOKKA 2
FRENCH
CLASSE 1
CLASSE 2
GERMAN
KLASSE 1
KLASSE 2
HEBREW
CLASS 1 LASER PRODUCT
LASER LIGHT
DO NOT STARE INTO BEAM
CLASS 2 LASER PRODUCT
KLASSE 1 LASERPRODUKT
LASERLYF
SE IKKE IND I STRÅLEN
KLASSE 2 LASERPRODUKT
AL LASER DI CLASSE 2
ITALIAN
CLASSE 1
CLASSE 2
KLASSE-1 LASERPRODUKT
LASERLICHT
NIET IN STRAAL STAREN
KLASSE-2 LASERPRODUKT
NORWEGIAN
KLASSE 1
LASERPRODUKT, KLASSE 1
KLASSE 2
LASERLYS IKKE STIRR INN I LYSSTRÅLEN
LASERPRODUKT, KLASSE 2
PRODOTTO AL LASER DI CLASSE 1
LUCE LASER
NON FISSARE IL RAGGIOPRODOTTO
PORTUGUESE
CLASSE 1
PRODUTO LASER DA CLASSE 1
LUOKKA 1 LASERTUOTE
LASERVALO
ÄLÄ TUIJOTA SÄDETTÄ
LUOKKA 2 LASERTUOTE
CLASSE 2
SPANISH
CLASE 1
CLASE 2
PRODUIT LASER DE CLASSE 1
LUMIERE LASER
NE PAS REGARDER LE RAYON FIXEMENT
PRODUIT LASER DE CLASSE 2
SWEDISH
KLASS 1
KLASS 2
LASERPRODUKT DER KLASSE 1
LASERSTRAHLEN
NICHT DIREKT IN DEN LASERSTRAHL SCHAUEN
LASERPRODUKT DER KLASSE 2
8
LUZ DE LASER NÃO FIXAR O RAIO LUMINOSO
PRODUTO LASER DA CLASSE 2
PRODUCTO LASER DE LA CLASE 1
LUZ LASER
NO MIRE FIJAMENTE EL HAZ
PRODUCTO LASER DE LA CLASE 2
LASERPRODUKT KLASS 1
LASERLJUS STIRRA INTE MOT STRÅLEN
LASERPRODUKT KLASS 2
Q u i c k
R e f e r e n c e
Warranty
Symbol Technologies, Inc. (“Symbol”) manufactures its hardware products in accordance with
industry-standard practices. Symbol warrants that the HotShot LS2100 series (the “Product”) will be
free from defects in materials and workmanship for a period of sixty months (60 months) from date
of shipment and for the life of the product with regard to the Mylar Scan Element (consisting of a
Mylar Strip, mirror assembly and magnet) embedded in the Product.
This warranty is provided to the original owner only and is not transferable to any third party. It shall
not apply to any product (i) which has been repaired or altered unless done or approved by Symbol,
(ii) which has not been maintained in accordance with any operating or handling instructions supplied
by Symbol, (iii) which has been subjected to unusual physical or electrical stress, misuse, abuse, power
shortage, negligence or accident or (iv) which has been used other than in accordance with the product
operating and handling instructions. Preventive maintenance is the responsibility of customer and is
not covered under this warranty.
Wear items and accessories having a Symbol serial number, will carry a 90-day limited warranty. Nonserialized items will carry a 30-day limited warranty.
Warranty Coverage and Procedure
During the warranty period, Symbol will repair or replace defective products returned to Symbol’s
manufacturing plant in the US. For warranty service in North America, call the Symbol Support
Center at 1-800-653-5350. International customers should contact the local Symbol office or support
center. If warranty service is required, Symbol will issue a Return Material Authorization Number.
Products must be shipped in the original or comparable packaging, shipping and insurance charges
prepaid. Symbol will ship the repaired or replacement product freight and insurance prepaid in North
America. Shipments from the US or other locations will be made F.O.B. Symbol’s manufacturing
plant.
Symbol will use new or refurbished parts at its discretion and will own all parts removed from
repaired products. Customer will pay for the replacement product in case it does not return the
replaced product to Symbol within 3 days of receipt of the replacement product. The process for
return and customer’s charges will be in accordance with Symbol’s Exchange Policy in effect at the
time of the exchange.
Customer accepts full responsibility for its software and data including the appropriate backup
thereof.
Repair or replacement of a product during warranty will not extend the original warranty term.
Symbol’s Customer Service organization offers an array of service plans, such as on-site, depot, or
phone support, that can be implemented to meet customer’s special operational requirements and are
available at a substantial discount during warranty period.
General
Except for the warranties stated above, Symbol disclaims all warranties, express or implied, on
products furnished hereunder, including without limitation implied warranties of merchantability and
fitness for a particular purpose. The stated express warranties are in lieu of all obligations or liabilities
on part of Symbol for damages, including without limitation, special, indirect, or consequential
damages arising out of or in connection with the use or performance of the product.
Seller’s liability for damages to buyer or others resulting from the use of any product, shall in no way
exceed the purchase price of said product, except in instances of injury to persons or property.
Some states (or jurisdictions) do not allow the exclusion or limitation of incidental or consequential
damages, so the proceeding exclusion or limitation may not apply to you.
9
6HUYLFH,QIRUPDWLRQ
Before you use the unit, it must be configured to operate in your facility’s network and
run your applications.
If you have a problem running your unit or using your equipment, contact your
facility’s Technical or Systems Support. If there is a problem with the equipment, they
will contact the Symbol Support Center:
United States1
1-800-653-5350
1-631-738-2400
Canada
905-629-7226
United Kingdom
0800 328 2424
Asia/Pacific
337-6588
Australia
1-800-672-906
Austria/Österreich
1-505-5794
Denmark/Danmark
7020-1718
Finland/Suomi
9 5407 580
France
01-40-96-52-21
Germany/Deutchland
6074-49020
Italy/Italia
2-484441
Mexico/México
5-520-1835
Netherlands/Nederland
315-271700
Norway/Norge
66810600
South Africa
11-4405668
Spain/España
+913244000
Sweden/Sverige
84452900
Latin America
Sales Support
1-800-347-0178 Inside US
+1-561-483-1275 Outside US
Europe/Mid-East
Distributor Operations
Contact local distributor or call
+44 208 945 7360
1
Customer support is available 24 hours a day, 7 days a week.
For the latest version of this guide go to:http://www.symbol.com/manuals.
70-32817-02
Revision D — November 2001
Symbol Technologies, Inc. One Symbol Plaza Holtsville, NY 11742-1300