1
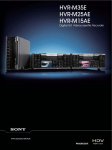
Working with Video in the Advanced Dub Room MC1319
Written/produced by FVNMA Technical Staff at the School of the Art Institute of Chicago, rev. 10/10/13
The new and improved Advanced Dub Room uses the Blackmagic Videohub and a computer-controlled
interface to enable transfers from various analog and digital formats to other analog and digital formats.
Perhaps most importantly, it allows you to quickly create HD or SD Apple ProRes 422 files directly from
a range of physical formats. Before getting into the details of how to make dubs and/or digital files in
MC1319, here’s a rundown of all of the decks and formats available in the room. The shorthand labels in
bold correspond to the labels you will find in the Videohub control panel.
Available Inputs/Sources
(Left rack)
(Right rack)
HDV/DV: Sony HVR-M15AU (HDV/DV/DVCAM)
BETAMAX: Sony SL-20 (Betamax)
BETA SP: Sony UVW-1400 (Betacam SP)
LASER: Pioneer CLD-980 (LaserDisc)
DVDREC: Pioneer DVR-310 (DVD)
UNIDVD: Pioneer DV-373 (PAL/NTSC DVD)
VHS: Panasonic AG-1980 (NTSC VHS/SVHS)
UNIVHS: Panasonic AG-W3 (PAL/NTSC/SECAMVHS)
HI8: Sony EVO-7800 (Hi8/Video8/8mm)
3/4: Sony VO-5850 (Umatic 3/4”)
ADDITIONAL INPUTS/SOURCES
HDV/DV: Input to FCP X or Premiere from Sony HVRM15AU via Firewire is also possible.
MAC: output from Mac Pro via Blackmagic
Decklink Card (using FCP X or Premiere)
Available Outputs/Destinations
(Left rack)
(Right rack)
HDV/DV: Sony HVR-M15AU (HDV/DV/DVCAM)
BETA SP: Sony UVW-1400 (Betacam SP)
DVDREC: Pioneer DVR-310 (DVD)
VHS: Panasonic AG-1980 (NTSC VHS)
ADDITIONAL OUTPUTS/DESTINATIONS
MAC: output to Mac Pro via Blackmagic
Decklink Card and Blackmagic Media Express
software
HDV/DV: Output from FCP X or Premiere to
Sony HVR-M15AU via Firewire is also possible.
Getting Started
HD MONITOR: Samsung HDTV monitor, intended to be
used for reference when making dubs/transfers.*
*Touch the lower right-hand corner of the TV frame (to the
left of the power button) to access volume controls
Turn on the Furman Power Conditioner via the red switch at the top right of the dub rack. The white square buttons on the Videohub should light up and the other power conditioners will turn on.
When all of the devices in the racks are on in addition to the computer, the room tends to get very warm, so
make sure that only the decks you plan to use are powered on.
Turn on the Mac Pro.
(1)
Making Traditional Dubs
To make a traditional dub from one physical format to
another (e.g. VHS to Mini-DV or Mini-DV to Beta SP) you’ll
use the Blackmagic Videohub utility software. Launch
Blackmagic Videohub from the Applications folder or the
Dock.
If you don’t see a window like the one shown below, go to the View menu and choose “Main Router Control.”
outputs/
destinations
inputs/sources
You will use this interface to route signals from the various decks in the dub rack to and from other decks. It
also routes signals to and from the computer. In the first column are a series of drop-down menus that allow
you to route any one of the available inputs/sources to an individual output. The six available outputs/destinations are in the second column (see page 1 for descriptions of all of the inputs and outputs).
You can send an input to multiple outputs simultaneously. In the example shown above, the VHS deck is being
routed to the Mac Pro, the HDV/DV deck, the DVD recorder and the Beta SP deck. The DVD recorder is being
routed to the monitor (see pages 3-5 for instructions on transfers to the Mac Pro and for notes on the various
decks).
The example above involves a single VHS source being sent to multiple destinations simultaneously. Actually
recording to tape or disc at all of those destinations is an unlikely scenario. For the purposes of instruction we’ll
assume that you are making a dub from a VHS tape to a DVD while also recording to a ProRes file on the Mac
Pro. To do so, load, cue and pause a VHS tape in the VHS deck and load a blank disc in the DVD recorder.
Make sure that the DVD recorder’s input is set to L1. The HD monitor will display the output from the DVD
recorder to confirm that it’s receiving the signal from the VHS deck. Open Blackmagic Media Express and proceed as instructed on page 3, then press record on the DVD recorder and continue as instructed on page 4.
(2)
Transferring to ProRes Files
Open System Preferences from the Apple menu or the Dock. Click on
the Blackmagic Design panel.
In the Settings tab of the Blackmagic Design panel, make sure that the
settings are as shown below. There’s no need to change the “default
video standard” since you’ll be choosing the format of your output file
using Blackmagic Media Express.
Click on the
Processing tab.
If you plan to up-res your material from SD to HD, you can choose a Letterbox or Anamorphic conversion via
the “Select input processing” drop-down menu.
In our tests transferring from VHS, the Letterbox option produced files in which a significant portion of the
image was cropped out, so we would recommend choosing the “SD Anamorphic 16:9 to HD” option shown
above.
Make sure you have routed your source to the MAC input
in the Videohub utility (see page 2), then open Blackmagic
Media Express from the Applications folder or the Dock.
Open Media Express
Preferences window
from the Media Express
menu or via Commandcomma.
We generally recommend using Apple ProRes
422 files, but you have the option to capture to
any of the codecs shown here:
All of the sources in the
dub rack output interlaced video signals. To
up-res to HD, you must
choose HD 1080i 59.94.
(3)
Transferring to ProRes Files (cont.)
Once you’ve set your File Format in Media Express Preferences and cued your source, you’re ready to capture
a file. Make sure the Log and Capture tab is selected.
By default Media Express will
name your file Untitled 01, Untitled 02 and so on. To change the
filename, click in the Description
field and type the new name. Then
(very important!) click the plus sign
button at the end of the Description
field to register the new filename.
After clicking the button the new
filename will appear in the Name
field.
Subsequent files will use the nomenclature you choose in this step.
For example, in the image here,
the new filename is VHS_01. Once
that file is captured the next file will
automatically be named VHS_02.
Press play on your source and click the Capture button. Media Express will appear as shown below. Note: if
you send your source (in this case VHS) to the HD MONITOR output via Videohub you can hear it through the
Samsung TV, but you will not hear your audio from the computer while it’s capturing a file, so make sure you’re
getting a signal via the audio level meters in Media Express.
Click the Capture button again to
stop capturing. Click Capture again
and a new file will be created.
To retrieve your files, simply navigate to the Movies folder--it is the
default location for files captured in
Media Express.
While it is possible to save your Media Express projects, it’s not necessary--the project files only contain metadata about the project/format settings. The important files are the media files captured to the Movies folder.
When you’re done capturing files, copy them to your own hard drive and delete them from the MC1319 Mac Pro.
You cannot store your files on the computer!
(4)
Notes on the Pioneer DVD Recorder
The input should be set to L1.
If it’s not, press the FUNCTION BUTTON on the front of the DVD recorder until you reach the channel (INPUT
SELECTOR) section.
Using the Function Wheel (to the RIGHT of the function button) scroll through the channel options until you
reach L1.
FUNCTION WHEEL
FUNCTION BUTTON
The REC MODE function enables you to choose an compression option appropriate for the length of your
source material.
Push the FUNCTION BUTTON until you reach REC MODE.
CHOICES: FINE, 1hr, 2hr, 4hr, 6hr, MN (allows you to manually choose your recording hours/minutes).
*The compression will increase and the visual quality will decrease with higher values of recording time.
When you’ve reached the end of your source material press STOP REC. Then elect HOME MENU with the
Pioneer DVD Recorder remote.
Scroll to FINALIZE and follow the onscreen prompts to finish the process.
Notes on the Panasonic SVHS/VHS Deck
INPUT should ALWAYS be set to A1. If it is not, change it via the
CHANNEL buttons.
*Make sure the Hi-Fi/LINEAR MIX switch on the front of the
console is switched to OFF.
(5)
Notes on the Sony Beta SP Deck
Make sure the VIDEO IN button slider is set to COMPONENT.
Adjust audio levels manually on the left side of the deck.
TO RECORD:
Press the REC button on front of the deck to preview your recording on the monitor.
Press the REC and PLAY buttons simultaneously to record material onto tape.
**When recording to BETA SP the monitor will display an image with various horizontal lines that
may vertically roll. THIS IS A MONITORING GLITCH AND WILL NOT AFFECT THE RECORDING
ON YOUR TAPE! **
To pause or jog use the SONY SVRM-100A remote control.
Notes on the Universal VHS Deck
This deck should be used for tapes in
formats other than NTSC (e.g. PAL).
The line input (below and to the right
of the power button) should be set to
LINE 1.
Because the AG-W3 can detect the format
of your tape, AUTO is the default mode,
but you can manually select the format by
pressing one of the other buttons.
The output selection on the RIGHT side of
the deck should generally should be set
to NTSC but you can change it to PAL or
SECAM if needed by pressing the corresponding buttons.
(6)
Outputting a File to a Tape or Disc
If you wish to output a video file from the MC1319 Mac Pro to any of the four available destinations (see page
1) you can do so using Blackmagic Media Express. However, please note that your file must be an SD file
(720x480 or 720x486) as HD formats (1280x780,1920x1080, etc) cannot be processed by the devices in the
dub racks.*
*While it is possible to output an SD file or a 1440x1080 HDV file to the
HDV/DV deck in MC1319, you will get much better results outputting
from FCPX or Adobe Premiere via Firewire at any of the computers
connected to Sony HDV/DV decks in the MC819 computer lab.
First, make sure that the Mac Pro is outputting audio through the Blackmagic Decklink card and not through
the Cinema Display. Open System Preferences from the Dock or the Apple menu and choose the Sound panel.
Click the Output
tab and select
Blackmagic Audio.
In this example, we’ll output a file from the Mac Pro to a VHS tape and monitor from the VHS. The Videohub
should be routed as shown below.
Open Blackmagic
Media Express. Select
Import > Media Files
from the File menu.
Your file will appear in
the “Scratch” media
alist.
Click on the green Playback tab. Cue your file using
the transport controls and/or timeline slider. Press
the record button(s) on your output device and then
press play in the Media Express via the play button
or the space bar. **NOTE: if you click away from the
Media Express screen, playback will stop--this is
one case in which multi-tasking is not possible.
timeline
slider
transport
controls
(7)